# Instant's help docs
This website contains our help docs. This document concatenates all help docs in one file so LLMs do not have to scrape the entire website. Searching the contents of this file should give you the answers you need.
## The basics
- Instant AI is our primary product. Instant AI completely automates email marketing for online retailers, from automated flows to email campaigns. If we refer to a product simply called _Instant_, we either mean Instant AI, or the overall suite, encompassing both Instant AI and it's add-ons.
- Instant Audiences is an add-on for ESPs like Instant AI and Klaviyo. It analyses a merchant's web traffic and tells your marketing systems who to email.
## Use Shopify Flows to score and tag shoppers for segmentation
By using Shopify Flows to automatically tag shoppers based on their behaviour, you can build a layer of custom intelligence that flows directly into Instant AI's segmentation, flow exclusions, and smart content rules.
Shopify Flows is a native automation tool built into Shopify. It lets you trigger actions — including adding or removing customer tags — based on events in your store: purchases, order count, spend thresholds, product categories bought, and more.
You don't need to tag customers manually. Flows does it in real time as shoppers meet your criteria.
Instant AI reads Shopify customer tags automatically, within 1 to 2 minutes of a tag being applied. Any tag you create in Shopify becomes immediately available as a filter in Instant AI.
[Learn more about Shopify Flows](https://help.shopify.com/en/manual/shopify-flow)
---
## Four ways to use tagging strategically
### 1. The gift recipient who becomes a buyer
Tag: `gifted-by-someone`
When a customer's first order has a shipping address that differs from their billing address, there's a good chance the purchase was a gift. Tag that shopper as `gifted-by-someone`.
Their first self-purchase is one of the highest-intent moments in your entire customer base. It means they loved the product enough to come back and buy it for themselves. That moment deserves its own campaign — not a generic welcome flow, not a standard promo.
The campaign writes itself: *"Treating yourself this time?"*
Set up a Shopify Flow to apply the tag when billing address does not match shipping address on a first order. Then build a segment in Instant AI that targets `gifted-by-someone` shoppers who have since made a second purchase under their own details.
---
### 2. The shopper who only buys on sale
Tag: `coupon-redeemer-only`
Some shoppers have never paid full price. They open your emails, they click your links — but they only convert when there's a discount involved.
The instinct is to keep sending them offers. That's a trap.
Tag this cohort with `coupon-redeemer-only` using a Shopify Flow that fires when every order a customer has placed includes a discount code. Then run a deliberate test: send them a campaign with no discount at all. Use social proof, product storytelling, and scarcity signals instead.
Some will convert. That's margin you were leaving on the table. The ones who don't convert tell you something equally useful — they were never real customers, just discount hunters. Suppress them from future sends and protect your sender reputation.
---
### 3. Your founding-era customers
Tag: `founder-era`
Your first few hundred customers are not like everyone else. They found you before the growth, before the press, before the ads. They took a chance on you.
Most brands eventually stop treating them differently. They get lumped into the same segments as customers who bought last week. That's a mistake.
Use a Shopify Flow to tag any customer whose first order was placed before a specific date — your first 500 customers, your pre-launch cohort, whoever those people are for your brand. Tag them `founder-era`.
Then build a completely separate campaign track for this segment. Founder notes. Behind-the-scenes content. First access to new products. Never a generic promo. The communication should feel like a letter to an old friend, not a broadcast to a list.
The economics are obvious: your most loyal, highest-LTV customers deserve your most personal messaging. The cost of doing this is almost zero.
---
### 4. Lead scoring
Tags: `score-hot`, `score-warm`, `score-cold`
Instead of treating all shoppers on your list as equals, assign each one a cumulative score based on their behaviour. Shopify Flows tallies the score and applies a bucket tag in real time.
A simple scoring model might look like this:
| Behaviour | Points |
|---|---|
| Made a purchase | +10 |
| Second purchase | +15 |
| Order value over $150 | +10 |
| Clicked an email | +5 |
| Referred someone | +20 |
| Only buys on sale | -10 |
| No purchase in 90 days | -10 |
Shopify Flows writes a tag like `score-hot`, `score-warm`, or `score-cold` as shoppers move between thresholds.
You decide what the thresholds mean for your business. A brand selling supplements might weight repurchase frequency heavily. A brand selling luxury goods might weight AOV and referrals. The model reflects what your business actually values.
In Instant AI, use the tags like this:
- **`score-hot`** — First access to new drops, no-discount campaigns, high-trust copy
- **`score-warm`** — Social proof campaigns, soft urgency, second-purchase nudges
- **`score-cold`** — Re-engagement campaign, and if they don't respond, suppress entirely to protect deliverability
---
## Where to use these tags in Instant AI
Once a tag exists in Shopify, it's available across three places in Instant AI.
### Campaign segments
Build a segment that filters on a specific Shopify tag and save it for reuse. Any campaign you send can then target or exclude that segment directly. Segments recalculate at send time, so you're always working with the current state of your list.
[How to create and save segments in Instant AI](https://help.instant.one/how-to-create-and-save-segments-in-instant-ai)
### Flow exclusions
Exclude tagged shoppers from specific flows entirely. A shopper tagged `score-hot` probably doesn't need a browse abandonment email. A shopper tagged `founder-era` shouldn't be getting your standard welcome sequence. Tags let you skip the right people from the right flows without touching your flow setup.
[How to exclude shoppers from flows using Shopify tags](https://help.instant.one/how-to-exclude-certain-shoppers-from-receiving-instant-ai-emails)
### Smart rules
Use tags as conditions inside your emails to show different content blocks to different shoppers — within the same campaign or flow. A single campaign can show a VIP early-access block to `founder-era` shoppers, a loyalty reward block to `score-hot` shoppers, and a standard offer to everyone else. One send, multiple experiences.
[How to manage rules in your emails](https://help.instant.one/how-to-manage-rules-in-your-emails)
---
## The underlying principle
Tags don't have to just describe who a shopper is. The most useful tags describe what they need next. Build your tagging strategy around that question and your segmentation will do work that no out-of-the-box filter can match.
Article URL: https://help.instant.one/shopify-flows
Keywords:
## Using Claude and ChatGPT with Instant's product documentation
Instant’s help docs are now LLM-friendly. We publish all of our documentation to [a single, LLM-optimised text file](/llms.txt).
To make Claude or ChatGPT an expert on Instant, tell it about our `llms.txt`. You can do this in your *custom instructions* for [Claude](https://support.claude.com/en/articles/10185728-understanding-claude-s-personalization-features#h_56148f4c09) or [ChatGPT](https://help.openai.com/en/articles/8096356-chatgpt-custom-instructions) to make it aware across all future conversations.
*e.g.,*
> I use Instant AI for email marketing. Instant's product documentation lives here in this single text file: https://help.instant.one/llms.txt — if I ask you about Instant, or email marketing, always refer to this documentation.
Article URL: https://help.instant.one/documentation-for-llms
Keywords:
## Can I lazy load Instant's pixel?
We do not recommend lazy loading Instant’s pixel.
By default, browsers try to load a webpage’s images, scripts, styles, and other assets as soon as the page starts loading. This can slow down page speed, especially when the page includes large images or heavy third-party scripts.
[Lazy loading](https://developer.mozilla.org/en-US/docs/Web/Performance/Guides/Lazy_loading) delays some assets until after the main page content has loaded. It is most commonly used for images, but some brands also use it for third-party scripts, such as analytics tools, live chat widgets, review widgets, advertising pixels, and personalisation tools.
Lazy loading can improve page speed, but it also creates a trade-off: delayed scripts may not always run in time.
For Instant’s pixel, this can cause problems.
For example, if a shopper leaves the page before the pixel has loaded, Instant may not receive the event. Some lazy-loading methods can also fail to load the pixel consistently, which can lead to more dropped events.
Dropped events mean fewer abandonment emails. Fewer abandonment emails mean less recovered revenue.
While lazy loading is a good approach for non-essential assets, Instant’s pixel is already highly optimised for page load performance. Because it directly supports revenue recovery, it should load with the initial page load rather than being lazy loaded.
Article URL: https://help.instant.one/lazy-loading
Keywords:
## How to use Rules in your campaigns
Rules let you show different content to different shoppers within a single campaign. Segmentation in campaigns matters, but you shouldn't have to build 3-4 versions of the same campaign just to vary the messaging slightly. Rules change that.
Instead of duplicating a campaign for each cohort, keep one campaign and add Rules wherever you want the content to change. You control which blocks appear based on filters like shopper location, purchase history, cart activity, or Shopify tags. In campaigns, Rules work by adding a new conditional block into the email, and the block only appears for shoppers who meet the condition.
---
### **What filters are available in Rules**
When you create a Rule, you set the condition using a filter. The available filters are:
- **Location** — Target shoppers based on their country.
- **Purchased** — Filter based on purchase history, including specific products, total spend, or date range.
- **Viewed** — Target shoppers who have viewed specific products or collections on your site.
- **Added to Cart** — Target shoppers who have added items to their cart.
- **Active on Site** — Target shoppers based on recent activity on your site.
- **Email** — Filter based on email address information on the profile.
- **Phone** — Filter based on phone number information on the profile.
- **Profile Attributes** — Filter based on custom attributes stored on a shopper's profile.
- **Email Activity** — Target shoppers who have opened or clicked an Instant email.
- **Shopify Tag** — Match shoppers based on their Shopify customer tags.
- **Subscription** — Filter based on a shopper's subscription status (e.g. email or SMS).
**Else conditions**
You can chain multiple conditions onto a single Rule using **else** logic. Conditions are evaluated in order: if the first condition is met, that block shows. If not, the next condition is evaluated, and so on. If no conditions are met, nothing shows in that spot.
---
### **Adding a Rule block to your campaign**
1. Go to **Campaigns** in your Instant AI dashboard and open the campaign you want to edit
2. In the panel on the left, select the **Rule** block,
4. Click **Select filter** in the left panel and choose your filter type
5. Configure the filter conditions and click **Apply**
6. Select a block type to show when the condition is met
7. To add additional else conditions, click **+ Add condition**
8. Click **Save Changes** when done
---
### **Deleting Rules**
There are three levels of deletion when editing a Rule block:
- To remove a single block from within a condition, click on the block you want to remove and click the trash icon at the top of the menu
- To remove a single condition from the chain, click the trash icon next to that condition
- To remove the Rule block entirely, click the trash icon in the top right of the Rules panel
---
### **Previewing Rules**
While editing, you can check how your Rules will look using Preview mode.
1. Toggle **Preview** on in the top right of the editor
2. The campaign switches to a compiled read-only view, a green banner appears at the top showing **Previewing [campaign name]** by default
3. Click the dropdown on the banner to switch to a specific Rule variation, the banner updates to **Previewing rule [rule name]** and the email updates to show that rule's content
4. Toggle Preview off to return to editing
---
**FAQ**
**Can I apply a Rule to an existing block in a campaign?**
No. In campaigns, Rules only work as new conditional blocks you add into the email. Applying a Rule to an existing block is only supported in flows, where blocks can be shared across multiple touchpoints.
**Do Rules work on every step of a multistep campaign?**
Yes. You can add Rule blocks on any step of a multistep campaign, so each touchpoint in the sequence can carry its own conditional content.
**What happens if a shopper doesn't match any condition?**
Nothing renders in that spot for that shopper. The rest of the campaign sends as normal.
**Can I use different filter types in the same Rule?**
Yes. Each condition in a Rule can use a different filter, so you can chain a Location condition, then a Shopify Tag condition, then an Added to Cart condition in the same block.
**Can I schedule a Rule to appear or disappear on a specific date?**
Date-based Rules are not currently supported in campaigns. Because campaigns are sent at a specific point in time, you control timing through the campaign's send schedule rather than through a Rule. Scheduled date Rules are available in flows.
---
For more on using Rules in flows, including how to apply a Rule to an existing block and schedule date-based Rules, see [How to manage Rules in your Emails](https://help.instant.one/how-to-manage-rules-in-your-emails/).
Article URL: https://help.instant.one/how-to-add-rules-to-campaigns
Keywords:
## Instant Release Notes | Q2 2026
## Change Your Fallback for Custom Fonts
Released 18 June 2026
### What's new?
- Edit the fallback font on an existing custom font without recreating it
- Click the edit button on the dropdown to manage the fallback
- When creating a new font, pick your fallback at the same time
[How to edit fallback fonts →](https://help.instant.one/fallback-fonts/)
---
## Pop-up Delay
Released 15 June 2026
### What's new?
- Choose Short, Medium, or Long to influence when your signup form first appears to shoppers
- Predictive opt-in and auto-optimised timing still run underneath, this adjusts the lean on first appearance rather than setting a fixed delay
- Find it under Configuration > Signup form > Edit, on the Email capture step
### Impact
Your signup form already uses predictive opt-in and auto-optimised timing to decide the best moment to show. Pop-up Delay lets you nudge that without overriding it: lean Long to let first-time visitors browse before being prompted, or lean Short to surface the form earlier and capture intent sooner.
---
## Default Segments
Released 10 June 2026
### What's new?
- You now get four default segments automatically: Recently Abandoned Cart, Inactive Customers, Recently Purchased, and Never Purchased
- They appear in your existing Segments list, ready to use right away
- Edit or delete any of them at any time, they're a starting point rather than a permanent fixture
- They work exactly like the segments you build yourself, so there's nothing new to learn
### Impact
Building your first segment from a blank slate can be the hardest part of getting started. These four cover the most common ways merchants group their shoppers, so you can see what segmentation can do and start sending to a useful audience straight away.
Keep the ones that fit how you sell, tweak them, or clear them out entirely. They're there to make the first step easier, not to lock you in.
---
## Recipient's Local Time
Released 9 June 2026
### What's new?
- Schedule a campaign to reach every recipient at the same local time, instead of one fixed time in your store's timezone
- Set it under Instant AI > Campaigns > Overview > Timezone, then click the pencil icon
- The setting applies to every email in the campaign
- We work out each recipient's timezone from their address and enriched profile data, so there's nothing to tag or import
- If we can't determine a recipient's timezone, or their local send time has already passed, they send in your store's timezone instead
[How to send campaigns in your recipient's local timezone →](https://help.instant.one/send-campaigns-in-your-recipients-local-timezone/)
## Easier breakdown of your subscription
Released 4 June 2026
### What's new?
- See how much of your subscription you've used each month, with your total usage shown at a glance
- Click in for a full breakdown of the flows and campaigns usage you have left for the month, when your next billing period starts, and how to get in touch to upgrade
- SMS usage is included, so you can monitor your spend
- On a trial? You'll see a temporary breakdown instead
---
## Brand Kit
Released 3 June 2026
### What's new?
- Brand Kit is the home for controlling the look and feel of everything in Instant, all in one place
- We automatically build it from your store, so it already reflects your fonts, heading styles and brand details, applied to your emails
- It picks up the granular detail: H1/H2/H3 styling, whether your CTAs are uppercase, whether your images have curved edges, and more
- To change anything, open your Brand Kit and click edit
- Find it under [nav path]
### Impact
Controlling how your emails look is one of the most common things brands ask us for. Small things like padding, bolding a line of text, or matching your heading styles to your site.
Brand Kit brings all of that into one place. You set your look and feel once and Instant applies it everywhere, instead of adjusting individual emails. And because we build it from your store automatically, your Brand Kit already matches your fonts, heading styles, CTA casing and image styling, so it's working for you from day one.
[How does the Brand Kit work? →](https://help.instant.one/how-does-the-brand-kit-work/)
---
## Brand Kit Fonts and Headings in the Text Editor
Released 3 June 2026
### What's new?
- Apply your brand kit H1, H2, H3, and body styles directly in the text editor with a single click
- Manually override to a custom font, including Google Fonts, whenever you need it
- Manage your headings and fonts in the brand kit: change a style there, or upload more fonts there, and they're ready to select in the text editor for every future campaign
### Impact
Keeping a campaign on-brand used to mean restyling each heading by hand. Now your brand kit's H1, H2, H3, and body styles are a click away in the text editor. Change a style in the brand kit and it flows through to every future campaign, so you set it once and write content without fiddling with formatting. Need a font we don't include by default? Upload it to the brand kit, or override to a Google Font directly in the text editor.
---
## Smart Rules in Campaigns
Released 19 May 2026
### What's new?
- Change parts of a campaign email based on who's receiving it, so you can send one campaign with content tailored to different shoppers instead of duplicating it for each segment
- Add a Smart Rule block anywhere in your campaign and set a filter for who should see it
- Filter by location, purchase history, email activity, Shopify tag, or a scheduled date range
- Chain conditions together with If / Else if logic, so different shoppers can see different content in the same slot
- Preview any rule's output with the Preview toggle before sending
- Works alongside your existing campaign segment, so you can target broadly and still tailor the content inside
### Impact
Most marketers solve this problem by duplicating the campaign for every segment. One for US, one for AU, one for first-time buyers, one for VIPs. That's a lot of campaigns to build, schedule, and report on for what is really one message with a few variations.
Smart Rules let you send one campaign with content that adapts to each shopper. A US-specific free shipping banner for US shoppers, an AU-specific offer for Australian shoppers, a VIP banner for repeat buyers, a first-time buyer offer for new shoppers, all in the same send.
One email, one analytics view, every shopper sees something written for them.
[How to use Smart Rules in Campaigns →](https://help.instant.one/how-to-use-smart-rules-in-campaigns)
---
## AI Subject Lines in Campaigns
Released 19 May 2026
### What's new?
- Every shopper now gets a unique subject line and preview text, written for them, on every campaign you send
- Instant reads your full campaign (including text, images, and messaging) and combines it with what we know about each shopper, whether they've bought before, browsed recently, or abandoned a cart, to generate a unique subject line and preview tailored to your campaign and where they are in the buying cycle
- Turn it on with a single toggle in any campaign
- View a live log of every subject line in `Campaigns` > `Activity` as emails go out
- Works on every step of a multistep campaign
### Impact
Personalised AI subject lines have always been one of the strongest parts of Instant AI in Flows. Now they work the same way in Campaigns.
For most brands, a campaign subject line is a guess. You write one line, send it to everyone, and hope it lands. Some brands A/B test, but that just means you pick the better of two guesses for one audience.
Now, every shopper gets a subject line written for them and the campaign they're about to receive. A first-time visitor gets a different angle to a repeat buyer, who gets a different angle to someone who just abandoned a cart. One campaign, thousands of subject lines, one toggle.
[How to use AI Subject Lines in Campaigns →](https://help.instant.one/how-to-use-ai-subject-lines-in-campaigns)
---
## Custom Event Mapping
Released 8th May 2026
### What's new?
- Replace Instant AI's default Shopify product data (price, image, name, description, compare at price) with values from your own product metafields
- Useful for stores that sell personalised or custom products, run member or wholesale pricing, use email-specific creative, or store rich product data in metafields
- Set the source for each field once, and Instant uses your custom data across every flow email automatically
- Supports both single-value and JSON metafields, with dot-notation paths to pull a specific value from structured data
- Choose what happens when a product is missing the metafield: fall back to the standard Shopify value, or suppress the field entirely
- Turn mappings on and off with a single toggle, no need to republish flows
- Find it under `Configuration` > `Email Settings` > `Event Mapping`
### Impact
For most stores, Shopify's standard product fields are exactly right and emails work out of the box. But a few merchants have richer product data sitting outside the standard fields.
Brands may run VIP member pricing that needs to show in emails instead of their regular compare at price. Or maybe a custom print company need cart abandonment emails to display the actual custom photo a shopper uploaded during checkout, not a generic product mockup. These brands solve the same problem the same way, by storing the data they care about in custom fields instead of Shopify's standard ones.
You can configure a mapping once, and everywhere we can, we'll replace that event with what you want to use instead.
[How to use Custom Event Mapping →](https://help.instant.one/how-to-use-custom-event-mapping)
---
## Unsubscribe Rates on Individual Campaigns
Released 8th May 2026
### What's new?
- You can now see the unsubscribe rate for each individual campaign in campaign analytics
- Previously, unsubscribe rates were only available as a combined total across all campaigns in the Deliverability Dashboard
- Open any campaign to see its unsubscribe rate alongside the other performance metrics
---
## SMS in Campaigns
Released 5th May 2026
What's new:
- Add an SMS step to any multi-step campaign, in any combination with email
- Apply one segment to your entire multi-step campaign and we'll automatically work out who can receive SMS, who can receive email, and who can get both
- Brand prefix and unsubscribe line are added automatically, with character limits enforced live in the editor
- SMS revenue, clicks, and engagement report alongside email in your campaign analytics
- Every SMS is kept to a single message, so it's a predictable cost, per SMS, every time
- Available for Australian phone numbers only. International numbers are skipped automatically.
### Impact
The best marketing managers know it's not about email vs SMS. It's both working together. Most brands launching a sale will have different messaging for SMS and email, but use them together to make an announcement.
You might send a high volume of emails leading up to a sale to build hype, then add an SMS announcement the moment the sale goes live. Or you might use SMS for an extra nudge right before a sale ends to make sure you've maximised conversions.
That pattern is known to convert, and an SMS strategy should always be interwoven with your email strategy. That's why every multi-step campaign in Instant supports both, in any combination, to help you drive the message home.
[How to send an SMS Campaign with Instant AI →](https://help.instant.one/how-to-send-an-sms-campaign-with-instant-ai)

---
## SMS Prefix now supports up to 12 characters (for Australia)
Released 1st May
### What's new?
- All SMS from Instant AI require a brand prefix
- This aligns with Australian requirements every SMS must have the business name
- You can select a short prefix or long prefix
- If selecting a short prefix, you'll be allowed up to 4 characters and can personalise the url link and your prefix name
- If selecting long prefix, you'll be allowed up to 10 characters, but no customisations of the url link
- Any changes you make to your SMS settings will apply to every SMS sent including flows and campaigns
---
## Improved breakdown of filters in past Campaigns
Released 1st May
### What's new?
- Campaigns with long and complex filters are now easier to navigate with an easier UI
- If you have a long list of filters, simply hover over the filter chip to see a breakdown
---
## Upload Custom Fonts
Released 28th April 2026
### What's new?
- You can now upload your own custom font file to use across your Instant AI emails
- Go to Settings > Email Settings > Custom Font, select Upload Font, and upload a WOFF2 file
- Add multiple weights (Regular, Bold, etc.) for the same font family
- Once uploaded, your custom font applies to all text in your emails — both headings and paragraphs
- Your Default Font is still required and acts as the fallback for email clients that don't support custom fonts
---
## Add a Google Font
Released 20 April 2026
### What's new?
- You can now pick one Google Font and apply it across every email Instant AI generates
- It applies to everything, including all text across Flows and campaigns Campaigns
- Set it under Settings > Email Settings > Style > Custom Font (Optional)
- Your existing Default Font remains as the fallback, so recipients in clients that don't support web fonts still see a clean, on-brand email
---
## CSV Export
Released 14 April 2026
### What's new?
- You can now export your Shoppers list as a CSV directly from the Shoppers page
- Go to Shoppers > Select Menu in the right corner > Export as CSV
- You can also export Flow Activity from any flow's Activity tab
- Go to Flows > Select Flow > Activity > Download button in right corner
- Both exports reflect whatever filters you have applied, so you can filter first and download exactly what you need
---
## Custom Attribution Windows
Released 13th April 2026
### What's new?
You can now customise the attribution window Instant uses to measure email and SMS revenue, directly from your settings.
- By default, Instant uses a 5-day open/click window for email and a 1-day click window for SMS, matching Klaviyo's standard settings
- Switch to Custom to set your own open and click windows independently for email and SMS
- Set either value to 0 to remove that interaction type entirely, for example, 0 open days and 1 click day gives you a 1-day click-only model
- Email and SMS are configured separately, reflecting how the two channels are measured differently across the industry
- Changes apply retroactively and immediately, your full dashboard and flow analytics update the moment you save, so you can compare what any period looks like under a different model
- Find it in Settings > Email Settings > Preferences > Attribution window
[Learn more about how attribution works →](https://help.instant.one/how-does-instant-ai-attribute-email-revenue)
[How to customise your attribution window →](https://help.instant.one/how-to-customise-your-attribution-window)
---
## More ways to conditionally show email content with Rules
Released 10th April 2026
### What's new?
- Instant AI now lets you manually create dynamic content within your emails
- Instead of one email for everyone, you can now tailor the design based on who's receiving it. Certain customers can get one image, others might get another.
- Use cases like, Show a sale banner only during your sale, then it auto-disappears, a different hero for repeat buyers, or exclusive content for subscription customers
- Rules are filters you apply to blocks inside your email, so we know which block we should use for which customer, without altering any flows
- There are two ways to use Rules: insert a new block that only appears when a condition is met, or replace an existing block with a different version for specific customers
- You can chain multiple conditions together — if the first isn't met, Instant tries the next, and so on
- Filter by location, purchase history, email activity, Shopify tag, or a scheduled date range
- Date-based Rules activate and expire automatically — set it once and your emails update themselves
- Replacing an existing block updates it everywhere it appears across all your emails at once
Read more about how to manage rules with our documentation [here](/how-to-manage-rules-in-your-emails)
---
## More design options for buttons and dividers
Released 10th April 2026
### What's new?
- There are now more design options when editing buttons and dividers
- This is useful when editing campaigns, and needing to override your brand defaults
- The new options show when editing colours, width, radius, outline, alignment & more
- These are once off *overrides* and won't apply to other blocks or impact your brand
Article URL: https://help.instant.one/instant-release-notes-q2-2026
Keywords:
## Understanding Your Campaign Deliverability
Deliverability shows how many emails reached your customers and what happened to the ones that didn’t. This breakdown helps you monitor list quality and sending performance for each campaign
Where to Find Deliverability Insights
-
Open your Campaigns page in Instant AI.
-
Click into the specific campaign you want to review.
-
Go to the Performance tab.
-
In the Interaction section, select Deliverability.
You’ll now see a detailed view of how many emails were submitted, delivered, blocked, bounced, or dropped.
What Each Status Means
Submitted
The total number of emails Instant AI attempted to send for that campaign. Everyone who met your campaign criteria is counted here.
Delivered
Emails that were successfully accepted by the recipient’s email server (e.g., Gmail, Outlook). Delivered means the message reached the recipients server and your reputation allowed it to be delivered.
Blocked
Emails that were rejected before delivery by the mailbox provider. Blocked emails may succeed in future sends if the issue is temporary. Reasons may include:
- Temporary server issues
- Reputation-based filtering
- The mailbox provider refusing the connection
Bounced
Emails that could not be delivered because the address is invalid or unreachable. Bounced contacts are automatically suppressed to protect your domain reputation. Examples include:
- Email address doesn’t exist
- Mailbox permanently unavailable
- Hard bounce from the server
Dropped or Skipped
Emails our sending partners did not retry because a recent attempt to that same address previously failed. This typically happens when:
- The email address recently bounced
- The mailbox is repeatedly full
- The address was temporarily marked as undeliverable
These contacts are not unsubscribed and remain in your list. They may receive future emails if the mailbox becomes deliverable again.
Article URL: https://help.instant.one/understanding-your-campaign-deliverability
Keywords:
## Why isn't my Instant dashboard displaying revenue from all of my Instant flows?
Discrepancies in your dashboard revenue could be linked to recent changes in your Instant flow setup.
If you're seeing discrepancies in the revenue displayed on your dashboard, it could be due to recent changes in your Instant Audiences flow setup.
To ensure all revenue is properly reflected in your Instant dashboard, please follow the steps below.
-
Ensure relevant flows include "Instant Audiences" in their flow name.
For your Audience flow to be included in dashboard reporting, the flow name must include the term "Instant Audiences". This keyword is used to filter and identify relevant flows for accurate reporting.
-
Double-check that relevant flow are Not Archived.
If you've recently archived a high-revenue flow while adjusting your setup, this could explain a sudden drop in reported revenue. As archived flows do not contribute to dashboard reporting, please ensure that the flows you want to track are not archived.
-
Verify that the Flow is Live or in Draft Status
Your dashboard will only track flows that are either Live or in Draft. To ensure your flow is tracked, confirm flows you'd like to track either Live or in Draft status.
Article URL: https://help.instant.one/archived-flows-vs-unarchived-flows
Keywords:
## How do I compare the performance of Instant's identity resolution with another provider?
When comparing identity providers, it may be useful to understand and see how many profiles additional profiles Instant was able to identify beyond another provider.
Conversely, it may be useful to understand how many profiles that another provider was able to identify, that Instant was not able to.
This documentation can also be applied to exploring how many additional profiles Instant was able to identify beyond what Klaviyo's default identification can provide.
If you are running both providers in Klaviyo, it is simple to determine how many additional identifications Instant could provide by using segments in Klaviyo.
💡 Tip: If Instant is identifying profiles but attributed revenue to Instant flows are low, Instant's identity resolution is working however there may be an issue with your flows that is prohibiting performance.
Please contact your customer success manager if this is the case, we will be more than happy to perform an audit of your Klaviyo flow setup setup and determine opportunities to optimise performance.
Please note that this analysis is only possible if you have another provider installed, and both Instant and another provider has been live for at least 30 days.
If this is not the case, this analysis will produce inaccurate and unreliable results.
Find how many profiles Instant could identify that another provider did not:
- Proceed to Audiences > Lists & Segments in Klaviyo. Click Create New > Create segment.
- You will be asked to create a segment using the segment builder. Add the following conditions. A screenshot of what this should look like is below.
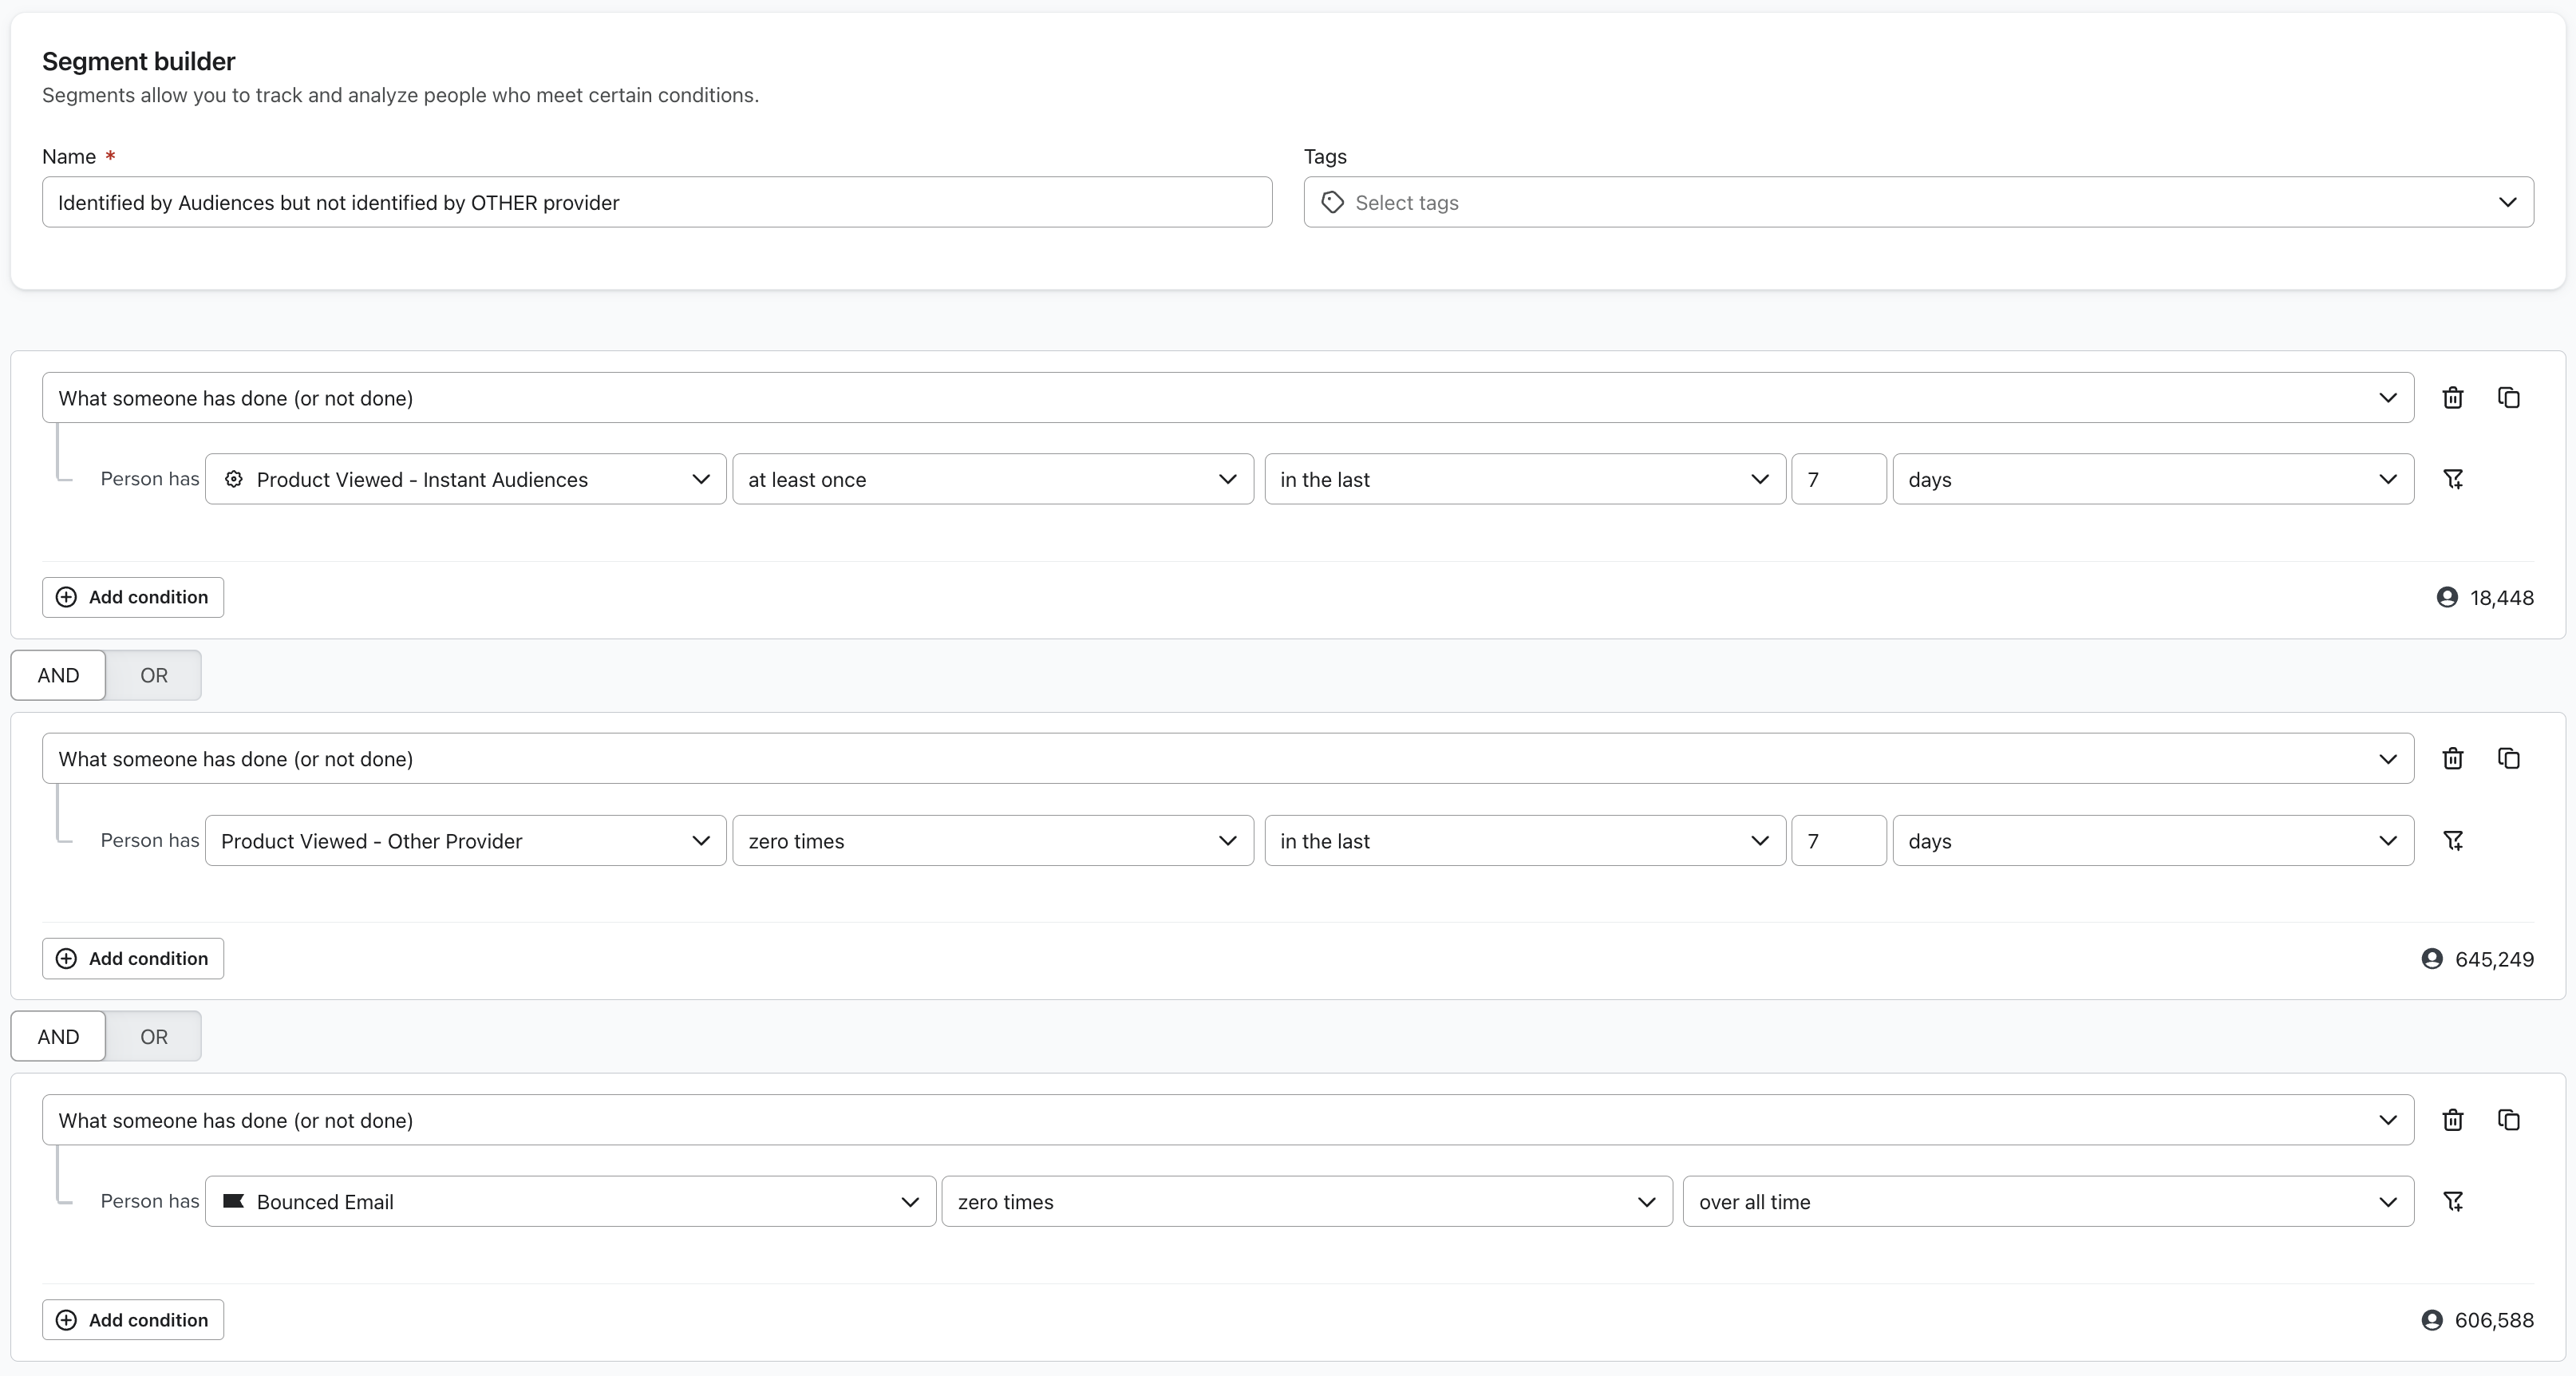
- "When someone has done (or not done) > Person has Product Viewed - Instant Audiences at least once in the last 7 days AND
- "When someone has done (or not done) > Person has Product Viewed - Other Provider zero times in the last 7 days AND
- "What someone has done (or not done) > Person has Bounced Email zero times over all time".
- This filter is important as it ensures that profiles invalid emails are filtered out.
- Please wait for the segment to create. It may take a while depending on the size of your email list.
Once this is complete, the segment will be populated with all the profiles that Instant identified, that the other provider did not.
Find how many profiles that another provider could identify that Instant did not:
- Proceed to Audiences > Lists & Segments in Klaviyo. Click Create New > Create segment.
- You will be asked to create a segment using the segment builder. Add the following conditions. A screenshot of what this should look like is below.

- "When someone has done (or not done) > Person has Product Viewed - Instant Audiences zero times in the last 7 days AND
- "When someone has done (or not done) > Person has Product Viewed - Other Provider at least once in the last 7 days AND
- "What someone has done (or not done) > Person has Bounced Email zero times over all time".
- This filter is important as it ensures that profiles invalid emails are filtered out.
- Please wait for the segment to create. It may take a while depending on the size of your email list.
Once this is complete, the segment will be populated with all the profiles that Instant did not to identify, that the other provider did.
Article URL: https://help.instant.one/compare-instant-against-provider
Keywords:
## How do I view all new profiles added by Audiences new profile export?
Every new profile added by Instant is tagged in Klaviyo with the tag "Instant Audiences Tags" with the value “Net New”.
Profiles marked "Net New" are net new shoppers added via Audiences new profile export.
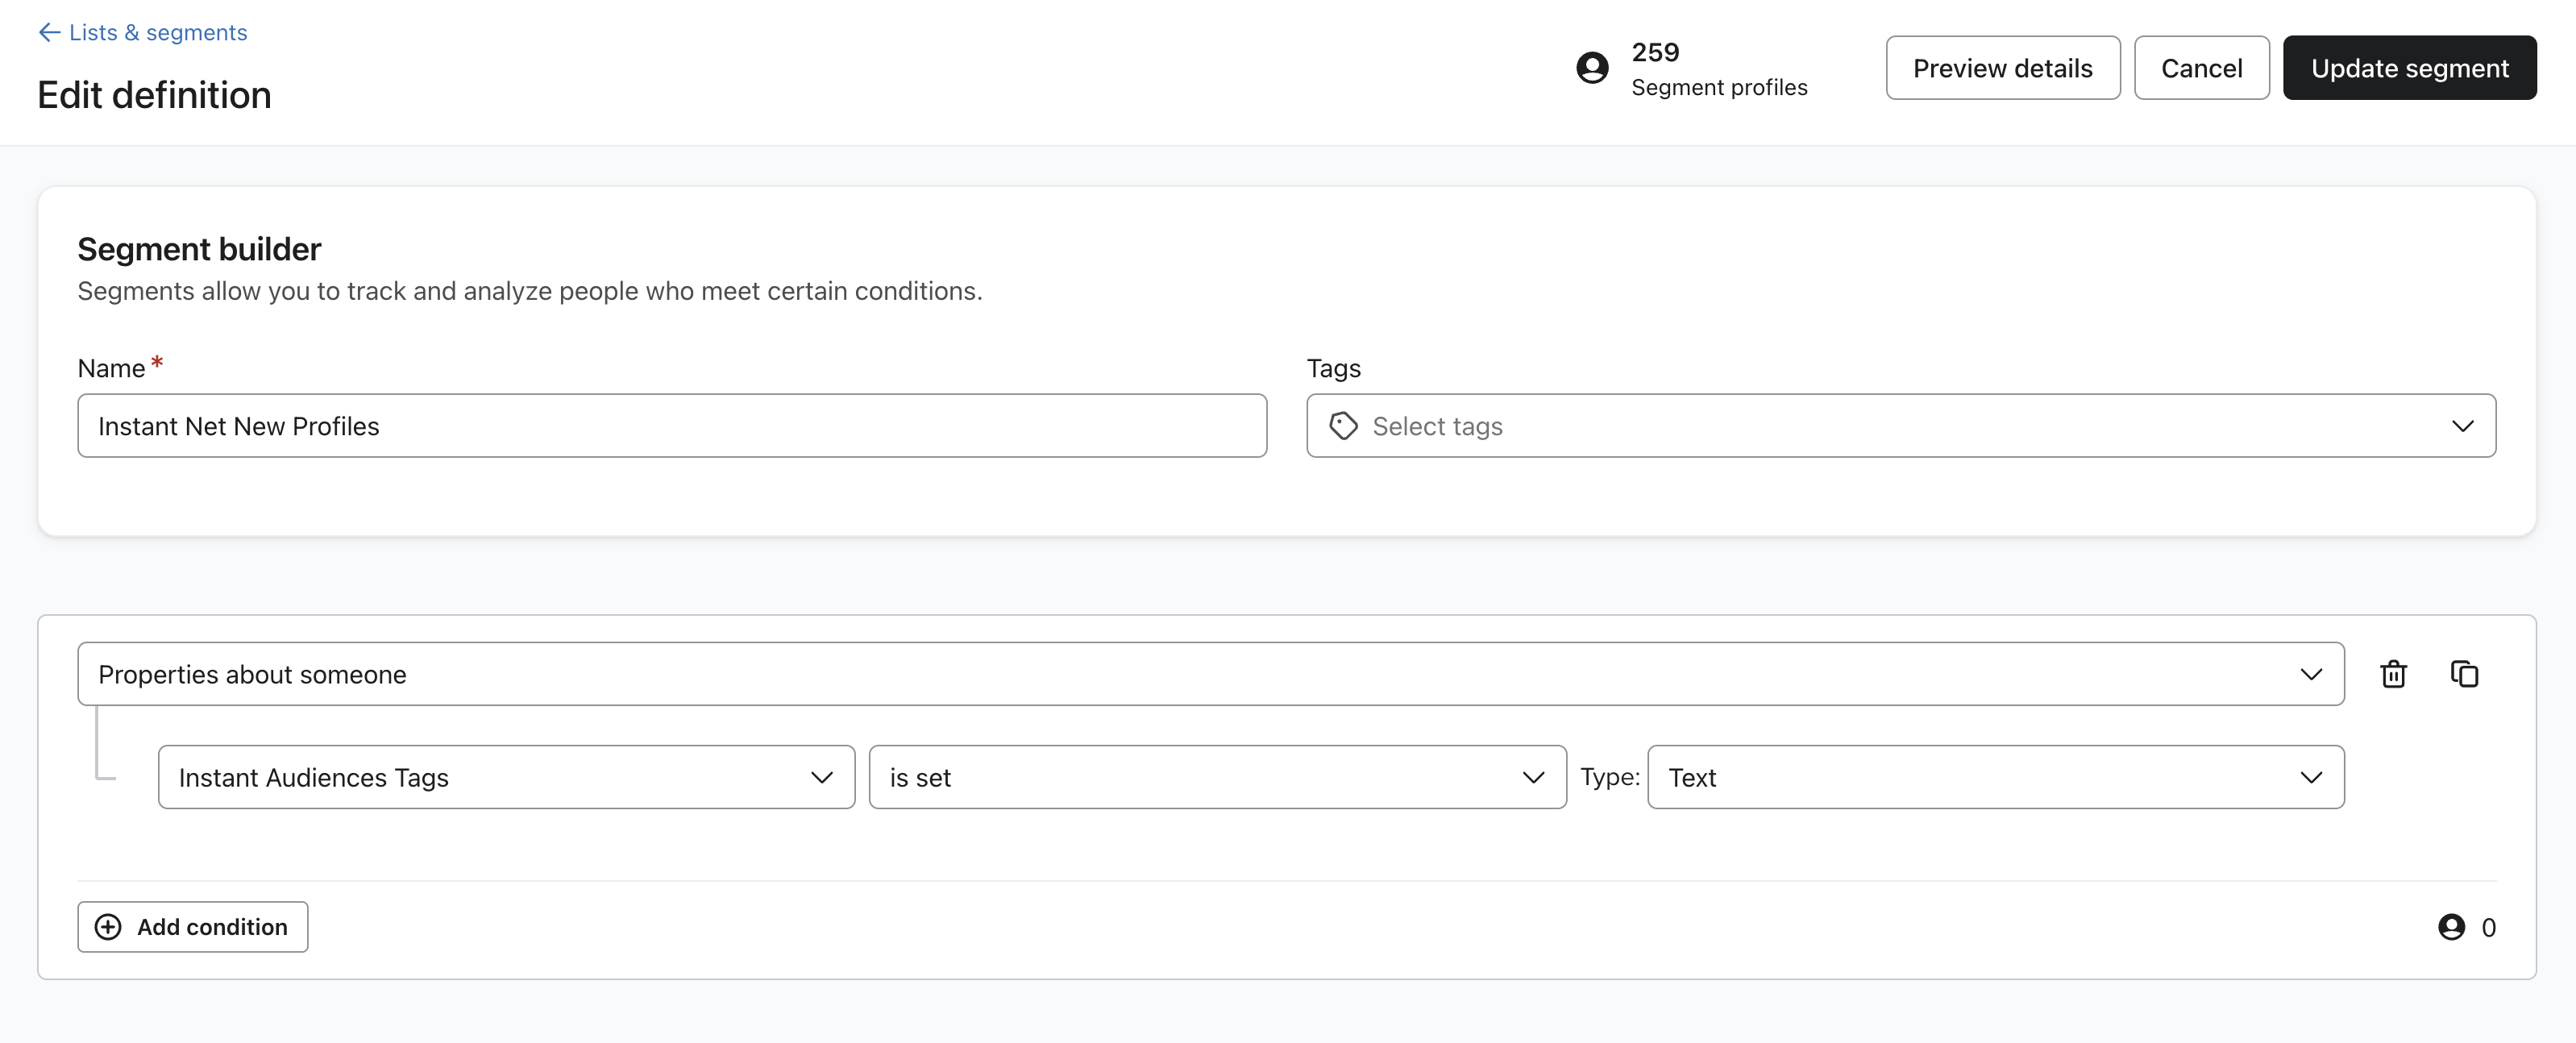
Create a Klaviyo segment filtering for profiles where "Instant Audiences Tags" "is set", Type: ‘Text’ to see profiles.
Ensure this segment contains the filter: "Properties about someone, Instant Audiences Tags contains Net New with type List". See screenshot below for more information.
 If you are unsure how to create a segment, please review the Klaviyo segment documentation, linked here.
If you used Audiences pre May 2024, please read below.
Please note that pre May 2024, Audiences used Klaviyo lists for new profiles.
As of May 2024, Audiences utilises Klaviyo Profile tags to track net new profiles. For additional documentation, please click here.
If you used Audiences before May 2024, you will need to an additional filter that looks for profiles in the net new list too.
Please see a screenshot below of what the segment definition should be.
Important: Please make sure that the filter is set to "OR", not "AND".

Article URL: https://help.instant.one/view-new-profiles-new-profile-export
Keywords:
## What is Instant Checkout?
Instant Checkout is an E-Commerce product that Increases Revenue for retailers by optimising the checkout experience. Instant is integrated into Big Commerce, Magento, Woo Commerce and Salesforce online stores.
For Shoppers, an Instant checkout is a one-step experience that is easy and secure. Instant saves payment and shipping information that can then be used to checkout across any Instant-enabled retailer.
Instants features help retailers tackle abandoned carts/ low conversions by improving the checkout experience and encouraging repeat customers.
*Please note that Instant Checkout is not compatible with Shopify
Article URL: https://help.instant.one/instant-checkout1
Keywords:
## Why is Instant sending through numerous Klaviyo metrics for a profile?
Instant may send multiple metrics for a single profile due to user interactions and behavior on the site.
This is expected behavior and is designed to ensure accurate tracking of a customer's journey.
This means that the volume of events reflects user activity, not website sessions. This may result in the number of events fired by Instant exceeding the number of site sessions, which is normal behaviour.
For example, if a customer refreshes the checkout numerous times, then multiple checkout started events will be fired for the same customer.
💡 For more in-depth information about what metrics Instant Audiences sends to Klaviyo, and when those metrics are fired, please refer to this article.
Why is the same Instant metric triggered numerous times for a single profile?
1. Checkout progression
-
- If a customer navigates through multiple stages of the checkout process or refreshes the checkout page, multiple events may be fired within a single session.
- For example:
- Refreshing the checkout page multiple times will trigger multiple Checkout Started events.
- Progressing through various stages of the checkout process will re-trigger Checkout Started events.
- For example, filling out personal information, or filling out address information.
-
-
- Each Checkout Started event will also trigger a Page Viewed event.
- Every time a Checkout Started event is fired, a Cart Viewed / Checkout Started event will also be fired.
2. Customer behavior during shopping sessions
-
- Customers navigating the site frequently or interacting with multiple pages will naturally generate a larger number of events, such as:
- Product Viewed events when they visit product pages.
- If a shopper visits the checkout numerous times, that shopper's Klaviyo profile will result in numerous Checkout Started and Cart Viewed / Checkout Started events.
- Page Viewed events alongside other actions like Item Added to Cart events.
3. Item Added to Cart events with multiple items
-
- When a customer adds multiple items to their cart, each item generates a separate Item Added to Cart event for each item.
Why does Instant send metrics like this?
Instant’s behavior is designed to align with the needs of platforms like Klaviyo, which use these events to drive flows and automate customer engagement.
Here’s why this approach works:
How do I prevent duplicate emails?
-
Ensure sufficient flow cooldowns, minimum of 7 days
- Ensure adequate cooldown periods for flows to prevent customers from being re-enrolled too frequently.
- For example, a 1-hour cooldown will cause duplicate emails if a customer refreshes the checkout multiple times throughout a given day. Increasing the cooldown prevents this issue.
-
Understand event frequency
- Recognize that the volume of events reflects user activity, not website sessions. For example:
- A customer viewing multiple products will generate multiple Product Viewed events.
- Refreshing the checkout results in repeated Page Viewed and Checkout Started events. Progressing through a checkout will result in further Checkout Started events to fire.
-
Review flows and triggers
- Ensure your Klaviyo flows are set up to handle events intelligently.
- Long enough flow cooldowns ensure that customers receive relevant emails without over-communication.
Article URL: https://help.instant.one/klaviyo-metrics-for-profiles
Keywords:
## How to best optimise your email designs for Mobile
Most of your subscribers will open your emails on a phone, so getting the mobile experience right matters. Instant gives you control over how multi-column content behaves on smaller screens through the Stack on mobile setting on Layout blocks.
What Stack on mobile does
Stack on mobile is a per-block setting on any Layout block. It controls how the columns inside that Layout render on mobile devices, without changing the desktop view.
- Off (default): Columns stay next to each other on mobile, matching the desktop layout.
- On: Columns automatically stack vertically on mobile, so each item takes the full width of the screen.
When to stack and when not to stack
We typically recommend turning Stack on mobile on for grids of product images. Stacked product images are larger, easier to tap, and better suited to the way people scroll on a phone.
We recommend turning Stack on mobile off when the composition of the Layout is part of the design and you want it to look the same on web and mobile. Common cases:
- Designed image grids where the arrangement carries the meaning
- Icon rows or feature strips where horizontal alignment matters
- Footer navigation links
How to toggle Stack on mobile
- Open the campaign or flow email you want to edit.
- Click the Layout block you want to adjust.
- In the left panel, find the Stack on mobile toggle.
- Switch it On to auto-stack on mobile, or leave it Off to keep columns side by side.
- Save your changes.
Examples of a Layout Block with no stacking (left) or with stacking (right)

FAQ
Does this setting apply to every block? No. Stack on mobile is a setting on Layout blocks only.
What is the default? Off. Columns stay next to each other on mobile unless you turn the toggle on.
Can I use different settings on different Layout blocks in the same email? Yes. The setting is per Layout block, so you can stack a product grid and keep a feature row side by side in the same email.
Will my desktop view change if I turn it on? No. Stack on mobile only affects how the Layout renders on mobile.
Article URL: https://help.instant.one/how-to-best-optimise-your-email-designs-for-mobile
Keywords:
## What is Instant's Engaged Filter for Campaigns?
Instant offers a default filter for "Engaged" that is available on all campaigns.
Customers who are marked as engaged have either opened or clicked on an email in the nominated time period. If you have a Klaviyo integration, Klaviyo opens and clicks are also included in this filter.
For example, if you used a filter such as "Engaged in the last 7 days" and had a Klaviyo integration, the result would be all customers who have opened or clicked on an email in the last 7 days from either Instant or Klaviyo
Article URL: https://help.instant.one/what-is-instants-engaged-filter-for-campaigns
Keywords:
## How does Instant AI manage email sender to and from addresses?
When you onboard with Instant AI, we require DNS integration with your domain. This ensures all emails are sent on your behalf, maintaining brand trust and deliverability.
We’ll integrate using either your main domain or a subdomain. Our preference is to use your main domain wherever possible, but if that’s already in use or would impact your existing setup, we’ll automatically choose the best available subdomain to avoid disruption.
Default “From” address
By default, we’ll use a noreply address for all emails:
-
If we can use your main domain, the default will look like noreply@yourdomain.com.
-
If we need to use a subdomain, we’ll automatically select the best available option, like noreply@send.yourdomain.com or noreply@mail.yourdomain.com, depending on availability.
This setup happens automatically and ensures emails are authenticated and sent properly.
Default “Reply-To” address
By default, the “Reply-To” address will match the “From” address (also using noreply). This means replies won’t be actively monitored unless you configure this setting.
If you want customers to be able to reply to your emails, you can easily set your own “Reply-To” address in your Brand settings under the Reply-To Address field. For example, you could enter help@yourdomain.com, and all replies will go directly there.
Sender name
The name that appears in your recipients’ inboxes comes from the Store Name you configure in Brand settings. For example, if you set your Store Name to Instant Store, that’s the name shoppers will see in their inbox, even though the email is sent from noreply@yourdomain.com. The noreply part only becomes visible if they inspect the sender details.
FAQ's
Can I change the “From” email address to something other than noreply?
Not directly. To ensure proper authentication and deliverability, Instant AI manages the “From” address automatically. We always use a verified noreply@ address linked to your domain or subdomain.
How does Instant AI choose the subdomain if my main domain isn’t available?
We automatically detect the best available option, such as send, mail, or a similar subdomain, to minimise disruption and maintain alignment with your existing DNS setup.
What happens if I don’t set a “Reply-To” address?
If you don’t configure a “Reply-To” address, we’ll default to the same noreply@ address as the sender. This means any replies will not be received or processed unless you explicitly change it.
Does the name in the inbox match my brand?
Yes. The display name in your recipient’s inbox is pulled from your Store Name in your Brand settings. This ensures your emails look consistent and branded, even though we manage the underlying sending infrastructure.
Article URL: https://help.instant.one/how-does-instant-ai-manage-email-sender-to-and-from-addresses
Keywords:
## How many email Touchpoints send with an Instant AI flow?
Instant AI automatically sets the best number of emails (or touchpoints) for each flow, based on proven performance data. This means you don’t need to manually automate or adjust the number of emails yourself. Everything is pre-optimised for conversions.
Default and Optional Touchpoints
Each flow has a recommended number of touchpoints built in. Some touchpoints are optional and can be removed or increased if needed, while others are critical to performance and can’t be changed.
If a touchpoint can be deleted, you’ll see a trash icon in the top-right corner of the step (like in Step 3 below). If you don’t see the delete icon, it’s a required touchpoint that can’t be removed.
You can also add new touchpoints up to a maximum of 5 emails per flow.
|
Flow
|
Minimum
|
Default
|
Maximum
|
|
Welcome
|
1
|
3
|
5
|
|
Abandoned Session
|
1
|
3
|
5
|
|
Abandoned Collection
|
2
|
3
|
5
|
|
Abandoned Browse
|
2
|
3
|
5
|
|
Abandoned Cart
|
3
|
3
|
5
|
|
Abandoned Checkout
|
3
|
3
|
5
|
|
Price Drop
|
3
|
3
|
5
|
|
Low in Stock
|
3
|
3
|
5
|
|
Back in Stock
|
3
|
3
|
5
|
|
Post Purchase
|
1
|
1
|
1
|
|
Request Review
|
1
|
1
|
1
|
|
Winback
|
1
|
3
|
5
|
Why can't some touchpoints be reduced?
Our highest-performing flows have been tested extensively. Three touchpoints are the proven sweet spot for conversions, so these flows can’t be reduced below that number. This helps maintain your performance and ensures Instant AI keeps driving optimal recovery results.
What time delays are used for each touchpoints?
All delays between our email touchpoints automatically calculated so you'll always use the highest performing options. These default to follow a 1hr + 24hr + 48hr pattern, with any additional touchpoints increasing another +48 hours for optional touchpoints. These delays may change due to personalised send time for each customer and are a general guide only.
If you'd like to customise the email sending intensity, try our email sending settings here
Article URL: https://help.instant.one/how-many-email-touchpoints-send-with-an-instant-ai-flow-
Keywords:
## Proving ROI with A/B Testing
How you can be confident with your Instant Audiences results through data-driven A/B Tests
In today’s competitive eCommerce landscape, every marketing dollar counts. At Instant, we want our brands to be confident of the true impact of Instant, providing indisputable proof for the ROI Instant brings. This is why Instant is introducing built-in A/B testing—so that any brand can see objectively how Instant drives your brand's revenue growth.
The A/B test is easy to set up, and only some brands are eligible to run this test. Please reach out to your Customer Success Manager to get started. Once it is set up, the A/B test results are 100% self-serve with results displayed inside of the Instant Dashboard. The information displayed in the "A/B Test" section of the dashboard is designed to help you evaluate how much additional revenue Instant generates, with statistics in there to guide you through the Instant A/B Test logic and process.
How the A/B Test Works:
- Enable A/B Testing – A customer success manager (CSM) can activate an A/B test for a merchant directly from the Instant dashboard.
- Split Audience Cohorts – Shoppers visiting the merchant’s store are randomly assigned to one of two groups - 50% of shoppers into each group:
- Group A (Instant Test): This group's user events are de-anonymised from Instant and sent to Klaviyo, powering Instant marketing flows in Klaviyo.
- Group B (Excluded): This group will not have their user events de-anonymised by Instant.
- Track Key Metrics – The platform automatically monitors conversion events, revenue generated, and shopper engagement for both groups.
- Analyze Revenue Impact – We strongly recommend the A/B test to run for be at least 4 to 6 weeks, and should not be shorter. This is because the larger the sample size is, the more accurate the results will be.
During the test, the Instant dashboard can present an objective side-by-side comparison of:
- Revenue generated in total, and by each cohort
- What each cohort's test results process looks like
- Revenue uplift between the two cohorts - bearing in mind this isn't reflective of the total revenue uplift you would see with Instant as only 50% of the eligible shoppers are going through the Instant experience.
- Make Data-Driven Decisions – brands can use these results to validate the effectiveness of Instant’s platform and optimize their marketing strategies.
Accessing your A/B Test
1. Navigate to the Instant Dashboard and log in.
2. After logging in, select A/B test in the left-hand panel
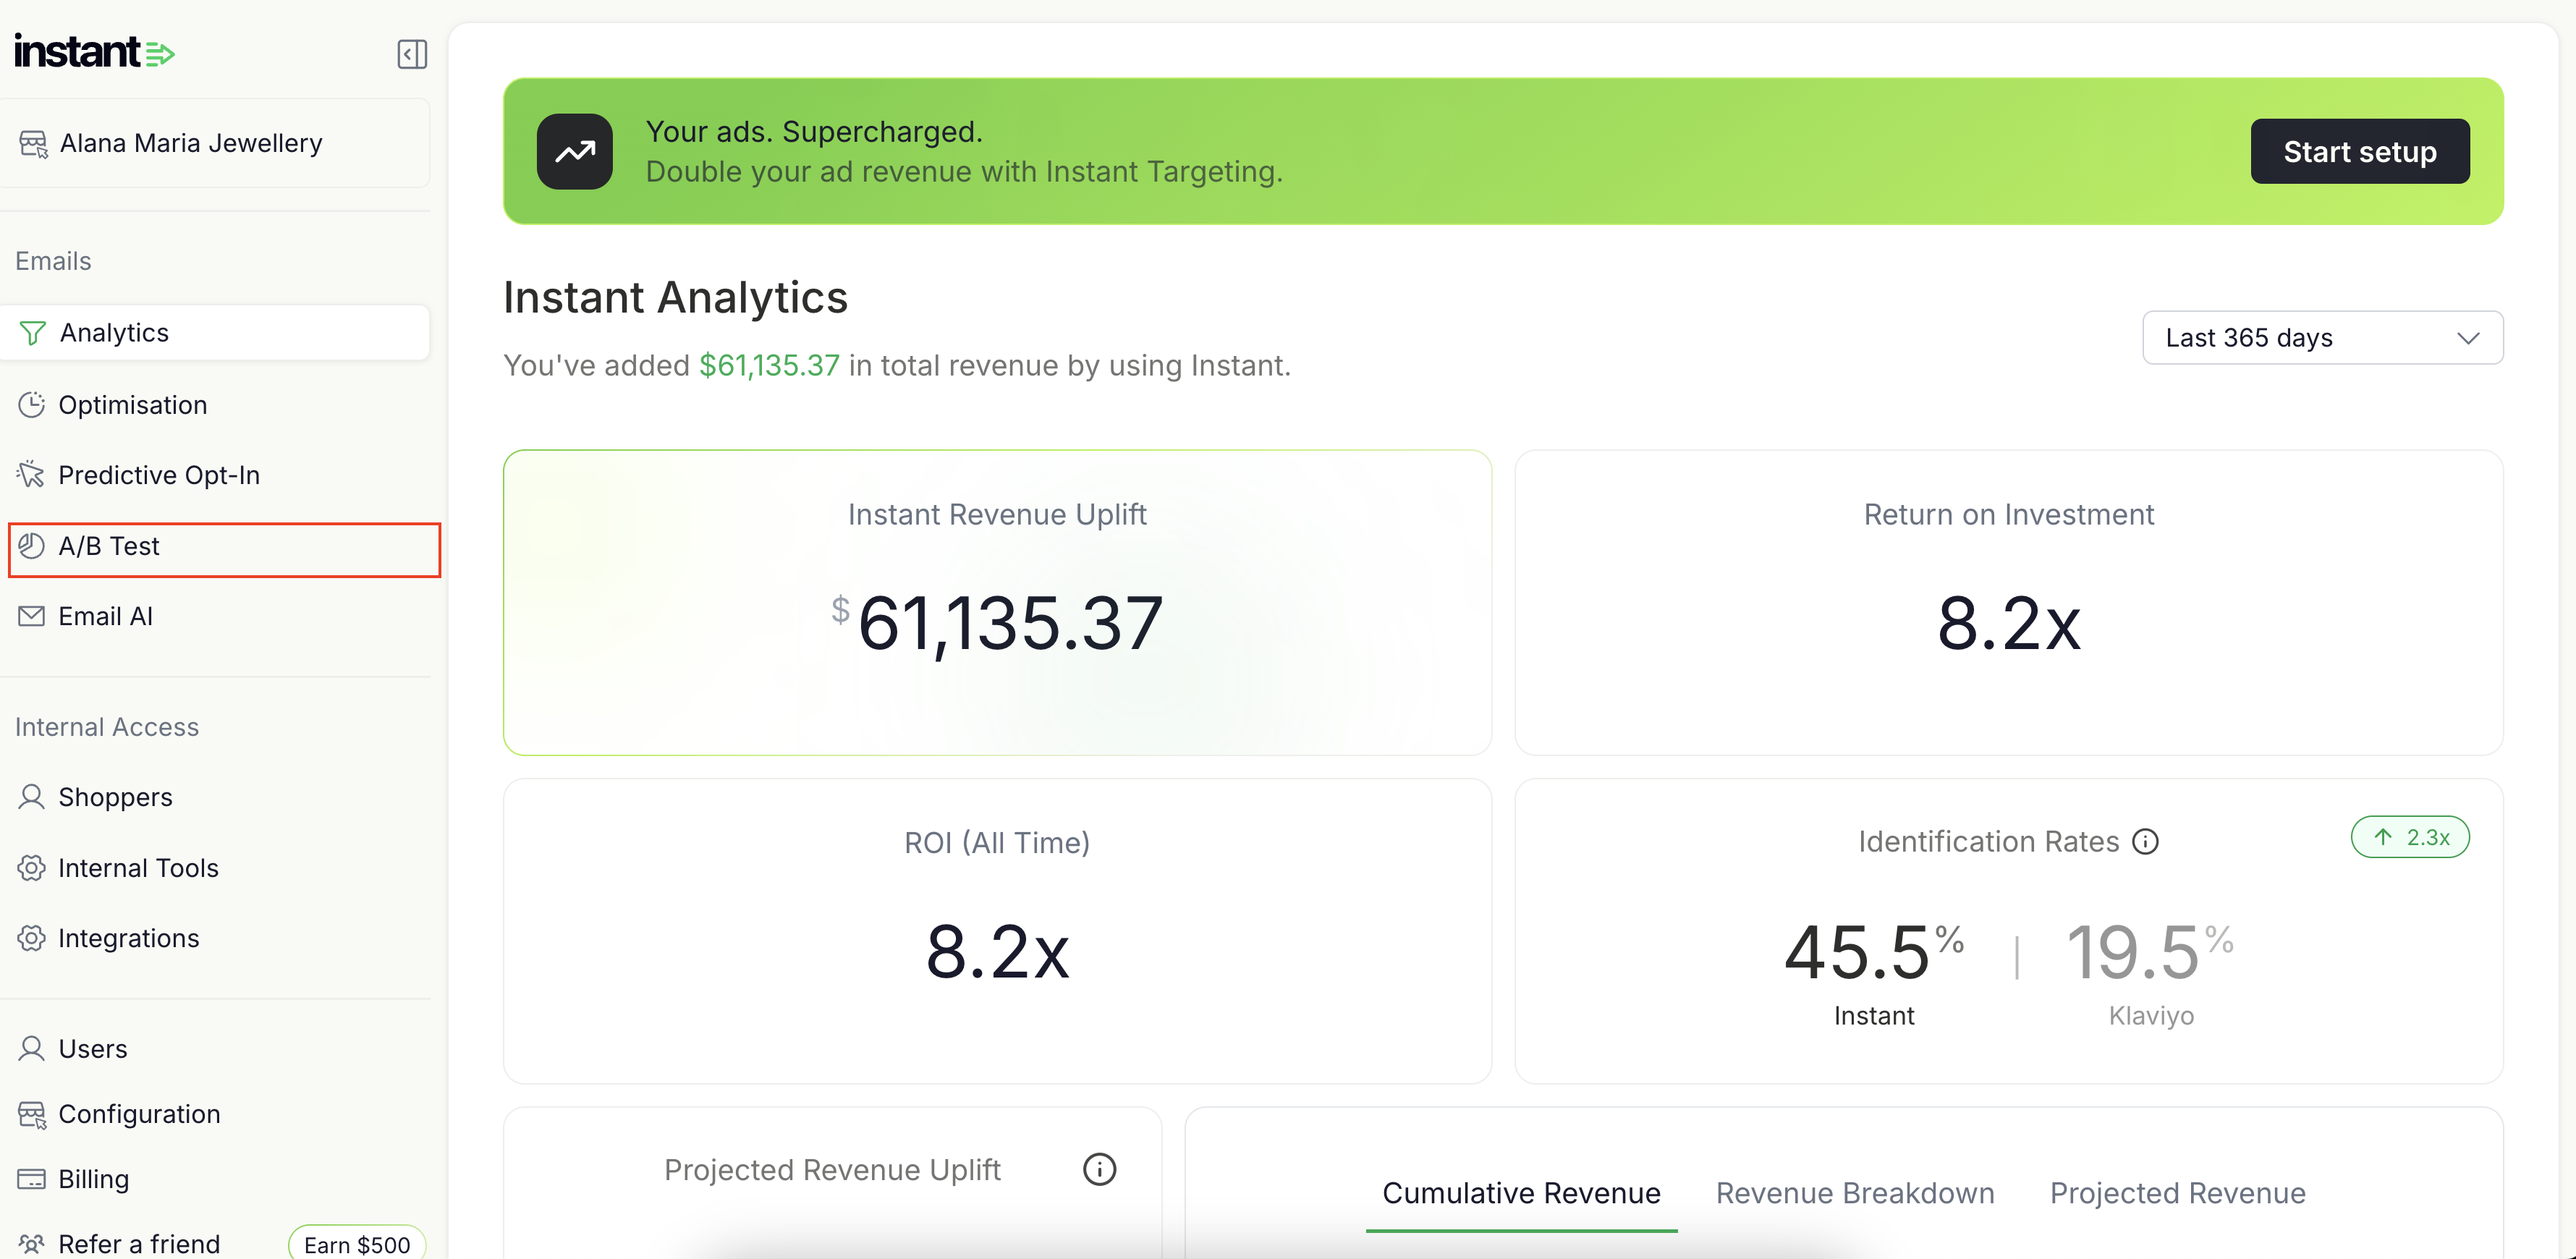
3. This will take you directly to your A/B test results
How to Understand your Instant A/B Test Dashboard and Data:
1. How we tested: consistent with how Instant Audiences usually functions, the A/B test only include Instant identified browsers arriving at your store. We exclude any browsers that Klaviyo or Shopify would have already identified.

For example, in this A/B test Instant has identified 3,548 shoppers that Klaviyo and Shopify were unable to identify.
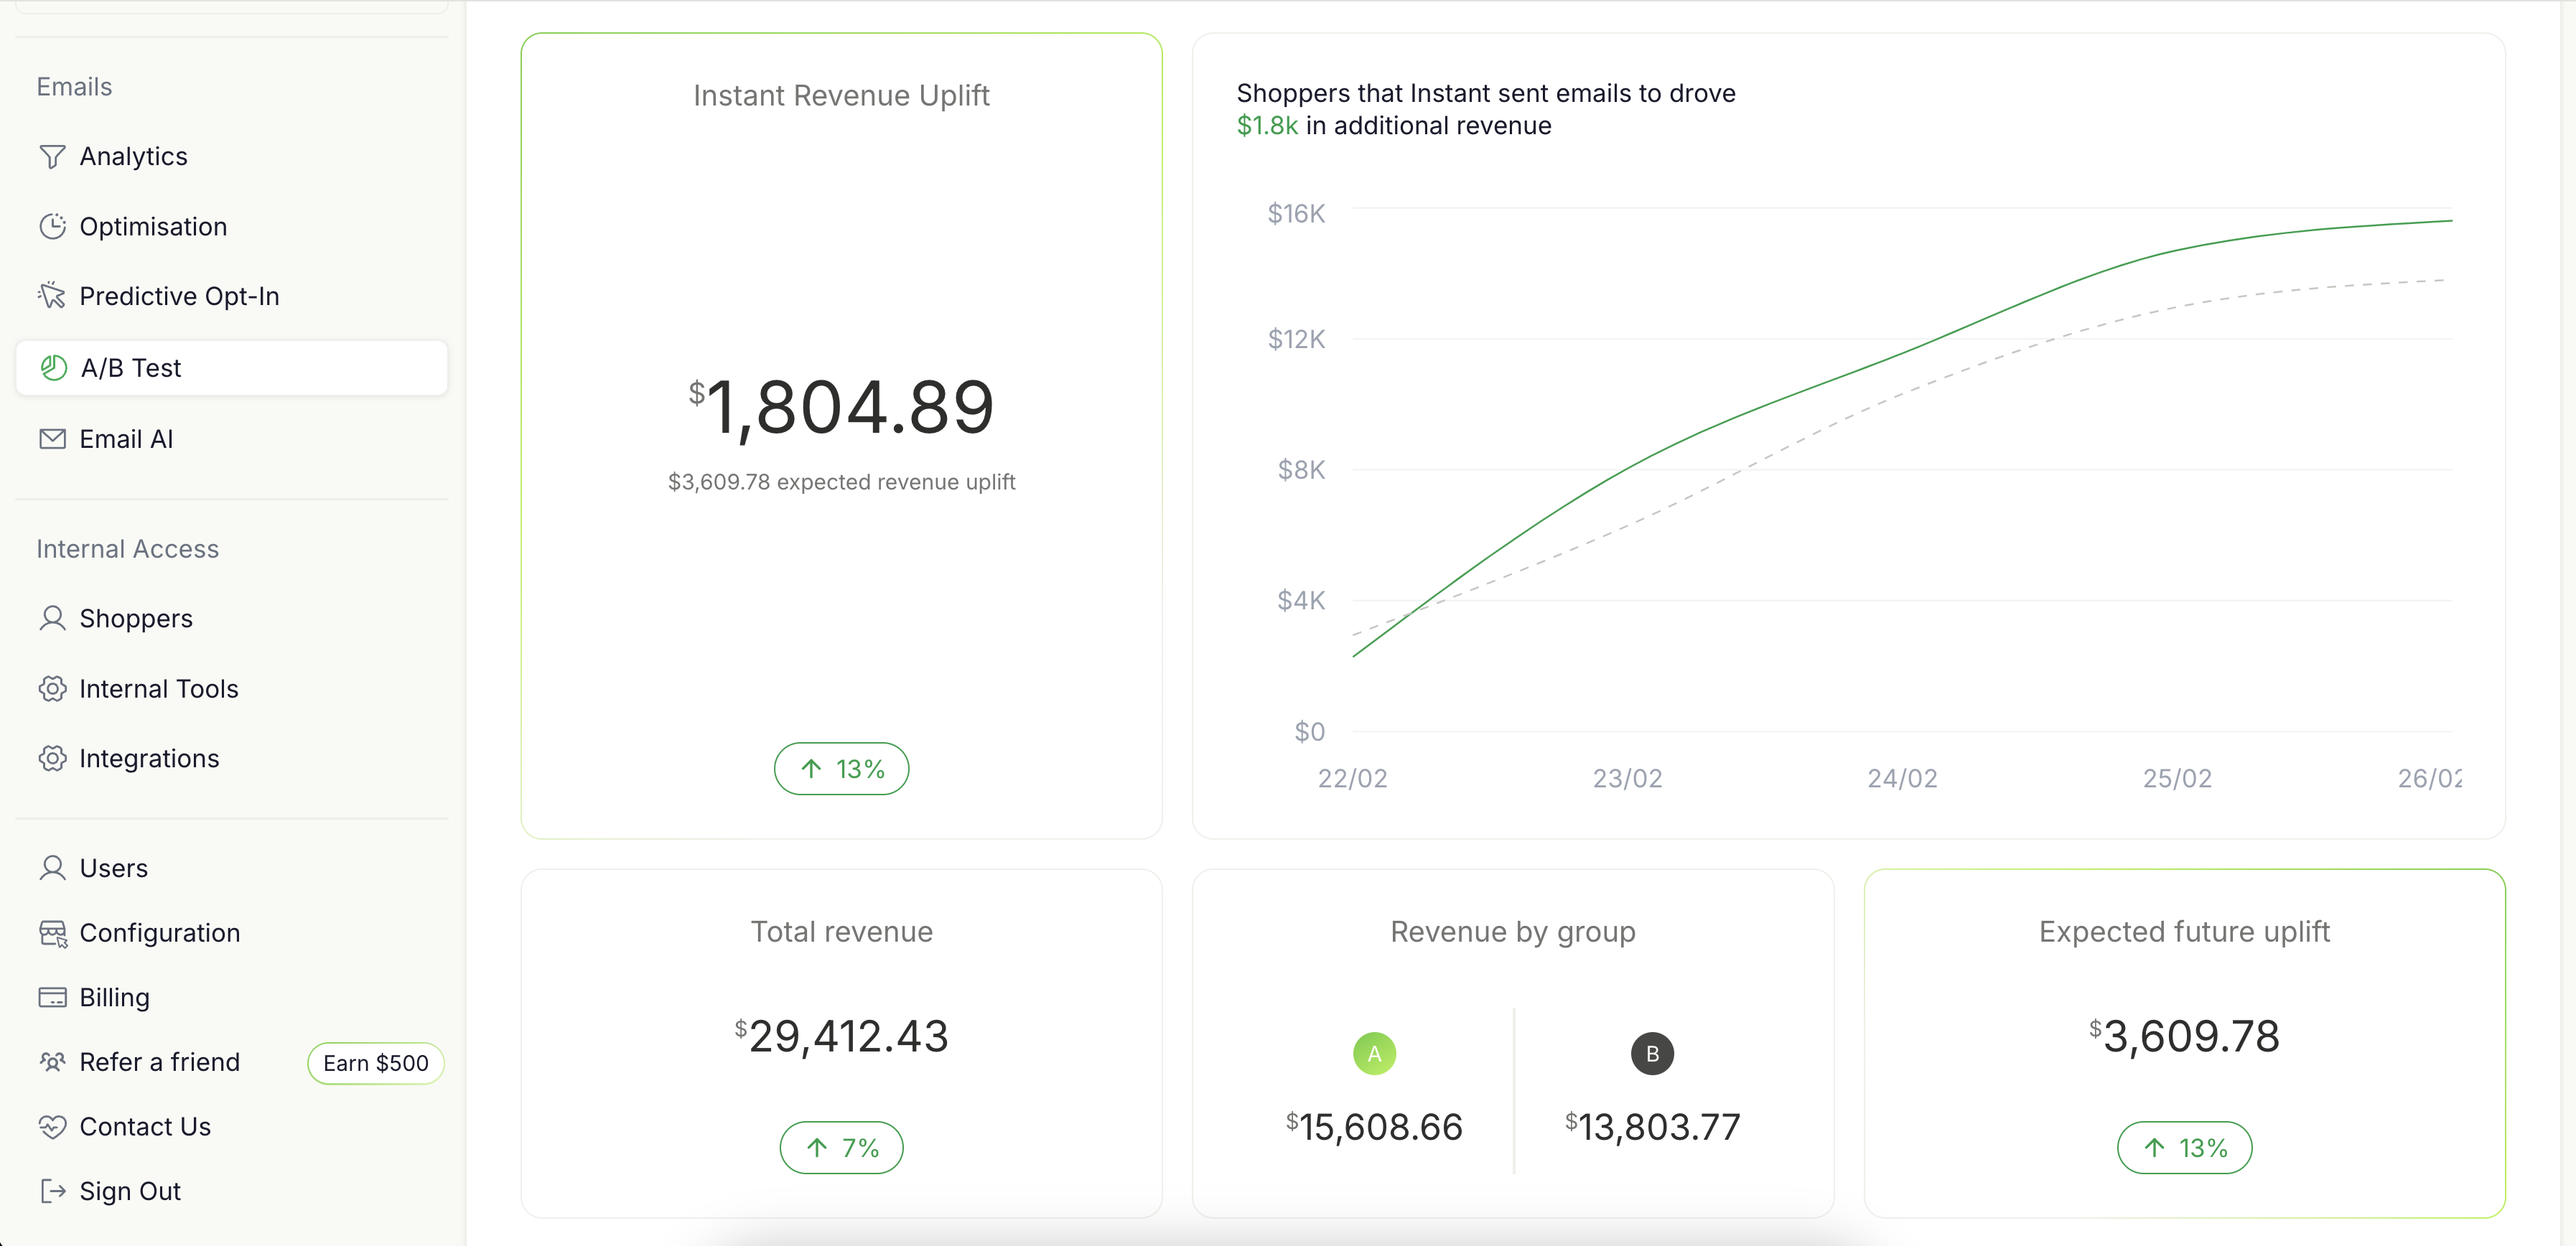
2. Results
This section of the report presents the primary test outcomes:
-
Instant Revenue Uplift: The additional revenue generated from shoppers who received Instant emails compared to those who did not.
-
Total Revenue: The combined revenue from both groups over the testing period. Noting that the is the revenue generated only from shoppers that were tracked by the A/B test.
-
Revenue by Group: A breakdown showing how much revenue was generated by Group A vs. Group B.
-
Expected Future Uplift: The estimated future revenue gain if Instant emails continue to be sent to all eligible shoppers.
Also included in this section is a time-series chart that helps you visualise and tracks revenue accumulation for both Group A and Group B throughout the testing period.
-
The green line: Represents revenue from shoppers in Group A.
-
The grey line: Represents revenue from shoppers in Group B.
-
The gap between the lines: Indicates the incremental revenue difference generated by Group A vs Group B.
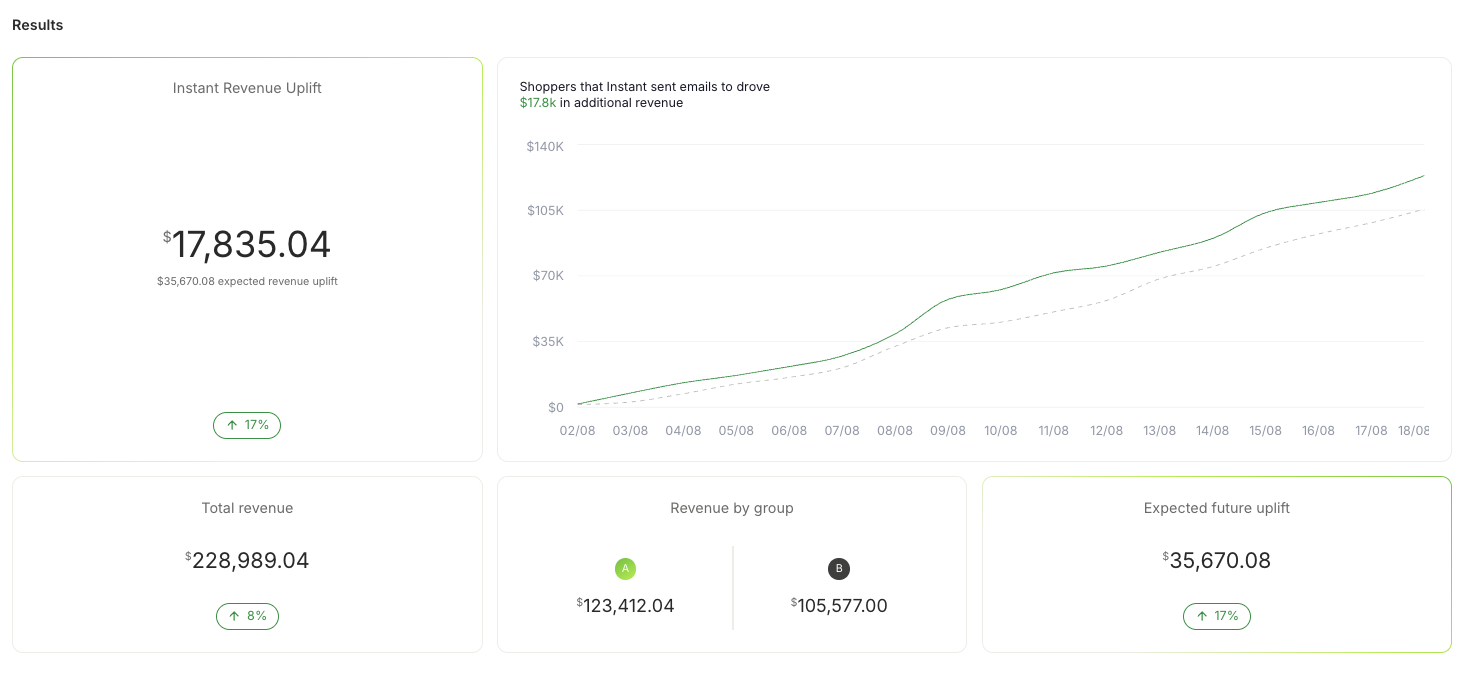
For example, in this test Instant’s emails generated an additional $17,835.04, an 17% revenue increase comparing Group A over Group B. If the merchant extends this strategy, they can expect an estimated future uplift of $35,670.08.
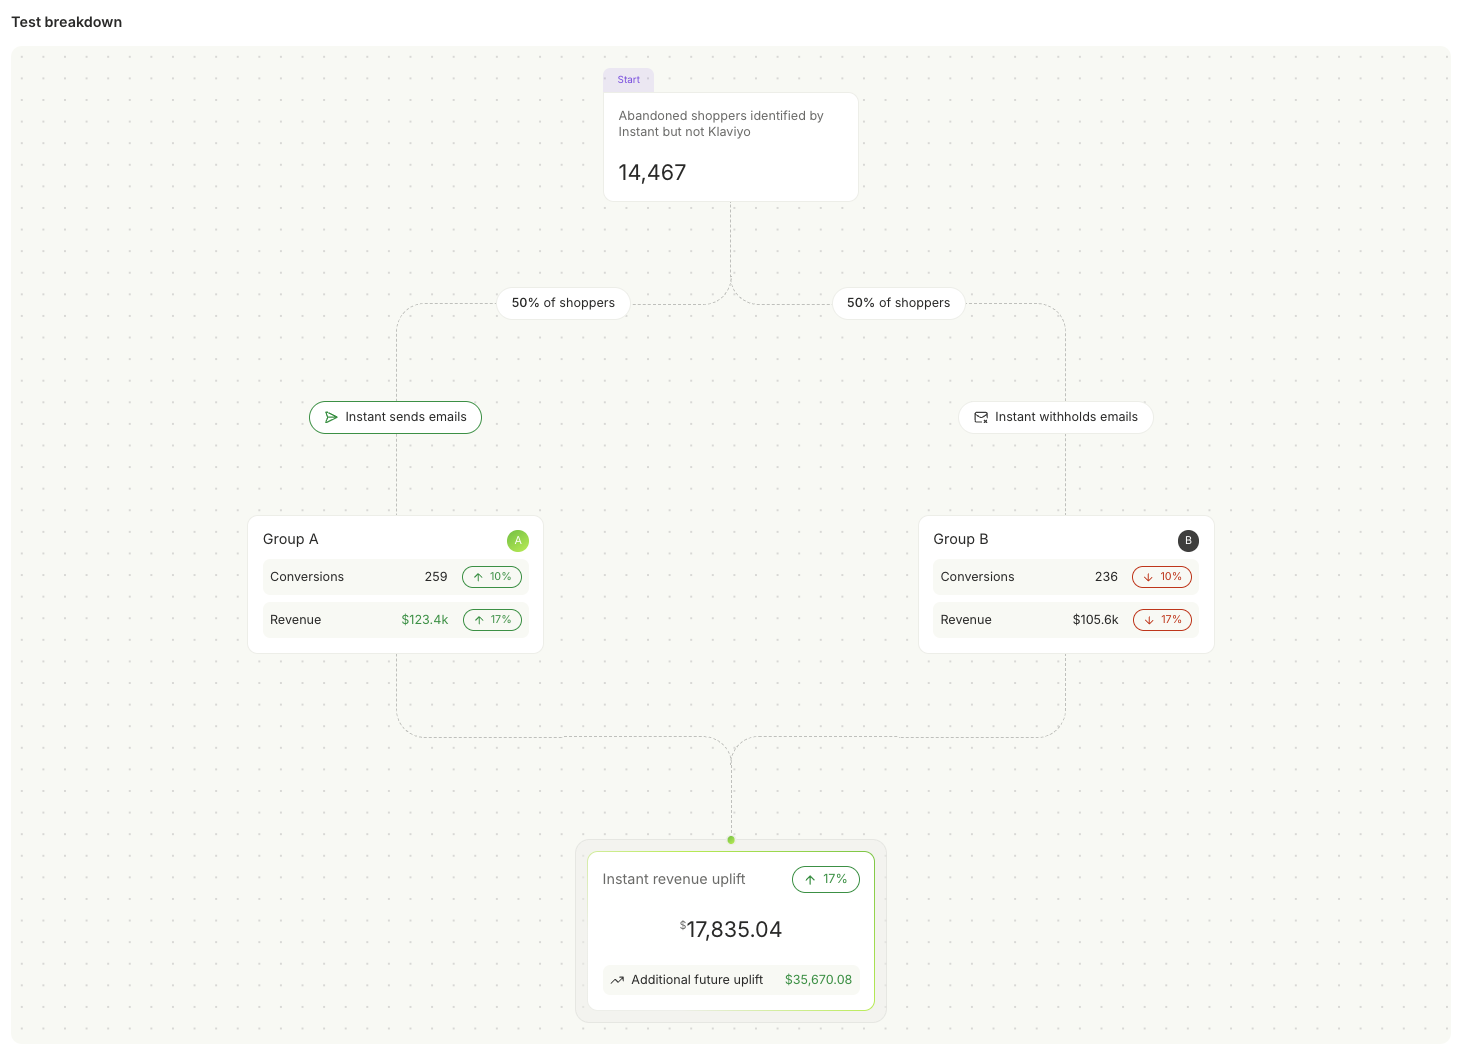
3. Test breakdown
The test breakdown diagram provides a visual representation of how the test was structured and the final results:
-
Total Shoppers Tested: The number of shoppers split into two groups.
-
Conversions Per Group: The number of shoppers who completed a purchase.
-
Revenue Per Group: The revenue generated from each cohort.
-
Percentage Uplift: The increase in conversions and revenue observed in the Test Group.
For example, in this test we analyzed 14,467 shoppers, split evenly between the two groups:
-
Group A (Received Emails): 259 conversions, generating $123.4K in revenue.
-
Group B (No Emails): 236 conversions, generating $105.6K in revenue.
-
Result: A clear 17% increase in conversions and revenue that Group A has demonstrated over Group B.
Key notes about your A/B Test:
- Traffic Separation: The traffic is split into two separate groups, allowing you to clearly compare the value of Instant identifications.
- No Impact on Existing Flows: The A/B test is run independently from your existing Klaviyo flows, so it will not interfere with your store’s regular revenue generation.
- No Email Triggered for 50% of Browsers: In the A/B test, 50% of the browsers that Instant identifies will not have their de-anonymised events sent to Klaviyof, allowing us to track their behavior separately.
Frequently Asked Questions:
1. How are the browsers assigned to Group A and Group B?
Browsers that Klaviyo identifies are excluded from the A/B test. For shoppers that are not identified by Klaviyo but are identified by Instant, 50% will be sent Instant events (Group B), and the other 50% will not (Group A). These are randomly selected.
2. How do we measure the impact of Instant?
We measure conversion and revenue for each group (A and B). The results show how much additional revenue could be generated by using Instant events.
3. What happens if a browser identified by Klaviyo makes a purchase?
If a browser is identified by Klaviyo, their purchases are tracked as part of the standard Klaviyo metrics and do not impact the A/B test and they are excluded from the A/B test.
4. Will My A/B Test Revenue Appear in My Analytics Page?
No, the A/B test revenue will not appear in your analytics page. Your analytics page shows how much revenue Klaviyo is reporting. The A/B test is comparing the overall revenue difference between the two randomly allocated cohorts (one we send events to Klaviyo, the other we don't).
Conclusion
This A/B testing feature provides definitive proof of Instant's value, eliminating skepticism and doubts related to your brand's ROI figures. Brands can now see exactly how much additional revenue they’re generating with Instant Audiences—helping them make data-driven decisions and supercharge their revenue!
Ready to prove your own revenue uplift? Contact your Instant Customer Success Manager today to enable A/B testing for your brand, or email help@instant.one
Article URL: https://help.instant.one/audience-test
Keywords:
## Integrate Instant with your Shopify Site
Instant integrates with Shopify natively. Following the guide below will allow us to begin tracking identification on your site.
Section 1: Shopify Customer Events Pixel Setup
Step 1
Select Settings in the sidebar of your Shopify Dashboard.
Step 2
Select Customer Events in the settings sidebar.
Step 3
Select Add custom pixel at the top right of the screen.
Step 4
Call your custom pixel ”Instant” and then select Add pixel.
Step 5
Configure the pixel to Not required under 'Permission' and Data collected does not qualify as data sale under 'Data sale'.
Step 6
This step requires adding Instant's pixel to your site, allowing us to identify anonymous shoppers who visit your website.
- If you're currently onboarding onto the product, your pixel can be found in the Connect Custom Store step. This state is what's shown in the video below.
- If you have already onboarded onto the product, proceed to the Instant dashboard and go to Configuration > Select Shopify . You will see a pixel underneath Step 1: Pixel Installation.
Copy the code to the clipboard by clicking Copy code.
Remove the code currently in the Shopify code box and paste from the clipboard with ctrl/cmd + v.
Step 7
Press the Save button and then press Connect to proceed.
Step 8
Navigate back to Customer Events and confirm that the pixel is Activated.
Section 2: Shopify API Setup
Step 9
Select Apps and sales channels in the settings sidebar.
Click on Develop apps in the top right.
Step 10
Select Create an app.
If you are prompted to Allow custom app development, please allow it.
Please note: if there are existing apps installed, the Create an app button will be on the top right of your screen.
Step 11
Call the app Instant and then select Create app.
Set the app developer to yourself.
Step 12
Click on Configure Admin API scopes.
Step 13
Using the "Filter access scopes" search bar, select the following access scopes.
- write_themes, read_themes
- write_script_tags, read_script_tags
- read_customers
- read_products
- read_orders
- read_customer_events
- write_discounts, read_discounts
- write_content, read_content
- write_inventory, read_inventory
- write_discounts_allocator_functions, read_discounts_allocator_functions
- write_online_store_pages, read_online_store_pages
- write_pixels, read_pixels
and then click Save.
If you're having trouble with this step, please use the "Filter access scopes" search to search for each scope.
The video below only shows the selection of the write_themes access scope. All of the scopes listed above must be selected.
Step 14
Click Install in the confirmation window that appears.
Step 15
Click on Reveal token once. Once the token is revealed, copy the token into your clipboard.
Paste the token into the field either on the onboarding page or configuration page.
Step 16
Click on Configuration, located on the right of Overview.
Click Configure for Storefront API Integration.
Step 17
Select the following Storefront API access scopes
- unauthenticated_write_checkouts, unauthenticated_read_checkouts
- unauthenticated_read_customers
- unauthenticated_read_product_listings
and then click Save.
Step 18
Locate your Shopify ID by checking the URL in your browser's address bar while viewing the Shopify Dashboard.
Enter it on either the onboarding page or configuration page.

Article URL: https://help.instant.one/integrate-instant-with-your-shopify-site
Keywords: how does instantai connect with shopify
## How do I install the Audiences pixel onto a legacy Shopify checkout
The legacy Shopify checkout, which provides access to checkout.liquid is being deprecated. How do I install the Audiences pixel onto a legacy Shopify checkout?
With the deprecation of Shopify's legacy checkout from August 14th 2024, Shopify is releasing checkout extensibility, which is replacing commonly used files such as checkout.liquid which is currently used for extending the Shopify checkout.
Instant Audiences is built on top of checkout extensibility, and therefore works out of the box with all Shopify customers that have upgraded from the legacy Shopify checkout.
If you are integrating Instant Audiences, we would highly recommend upgrading your Shopify checkout.
For customers that are still on the legacy Shopify checkout wanting to install the Audiences pixel, please proceed through the normal onboarding flow, but in addition, complete the steps below.
1. During onboarding, you would have added the Instant pixel to your theme in theme.liquid. This pixel is unique per site.
To retrieve your pixel, either copy + paste it from theme.liquid, or proceed to the Instant dashboard (link here), and proceed to Step 11 underneath Audiences > Setup > Ecommerce platform.
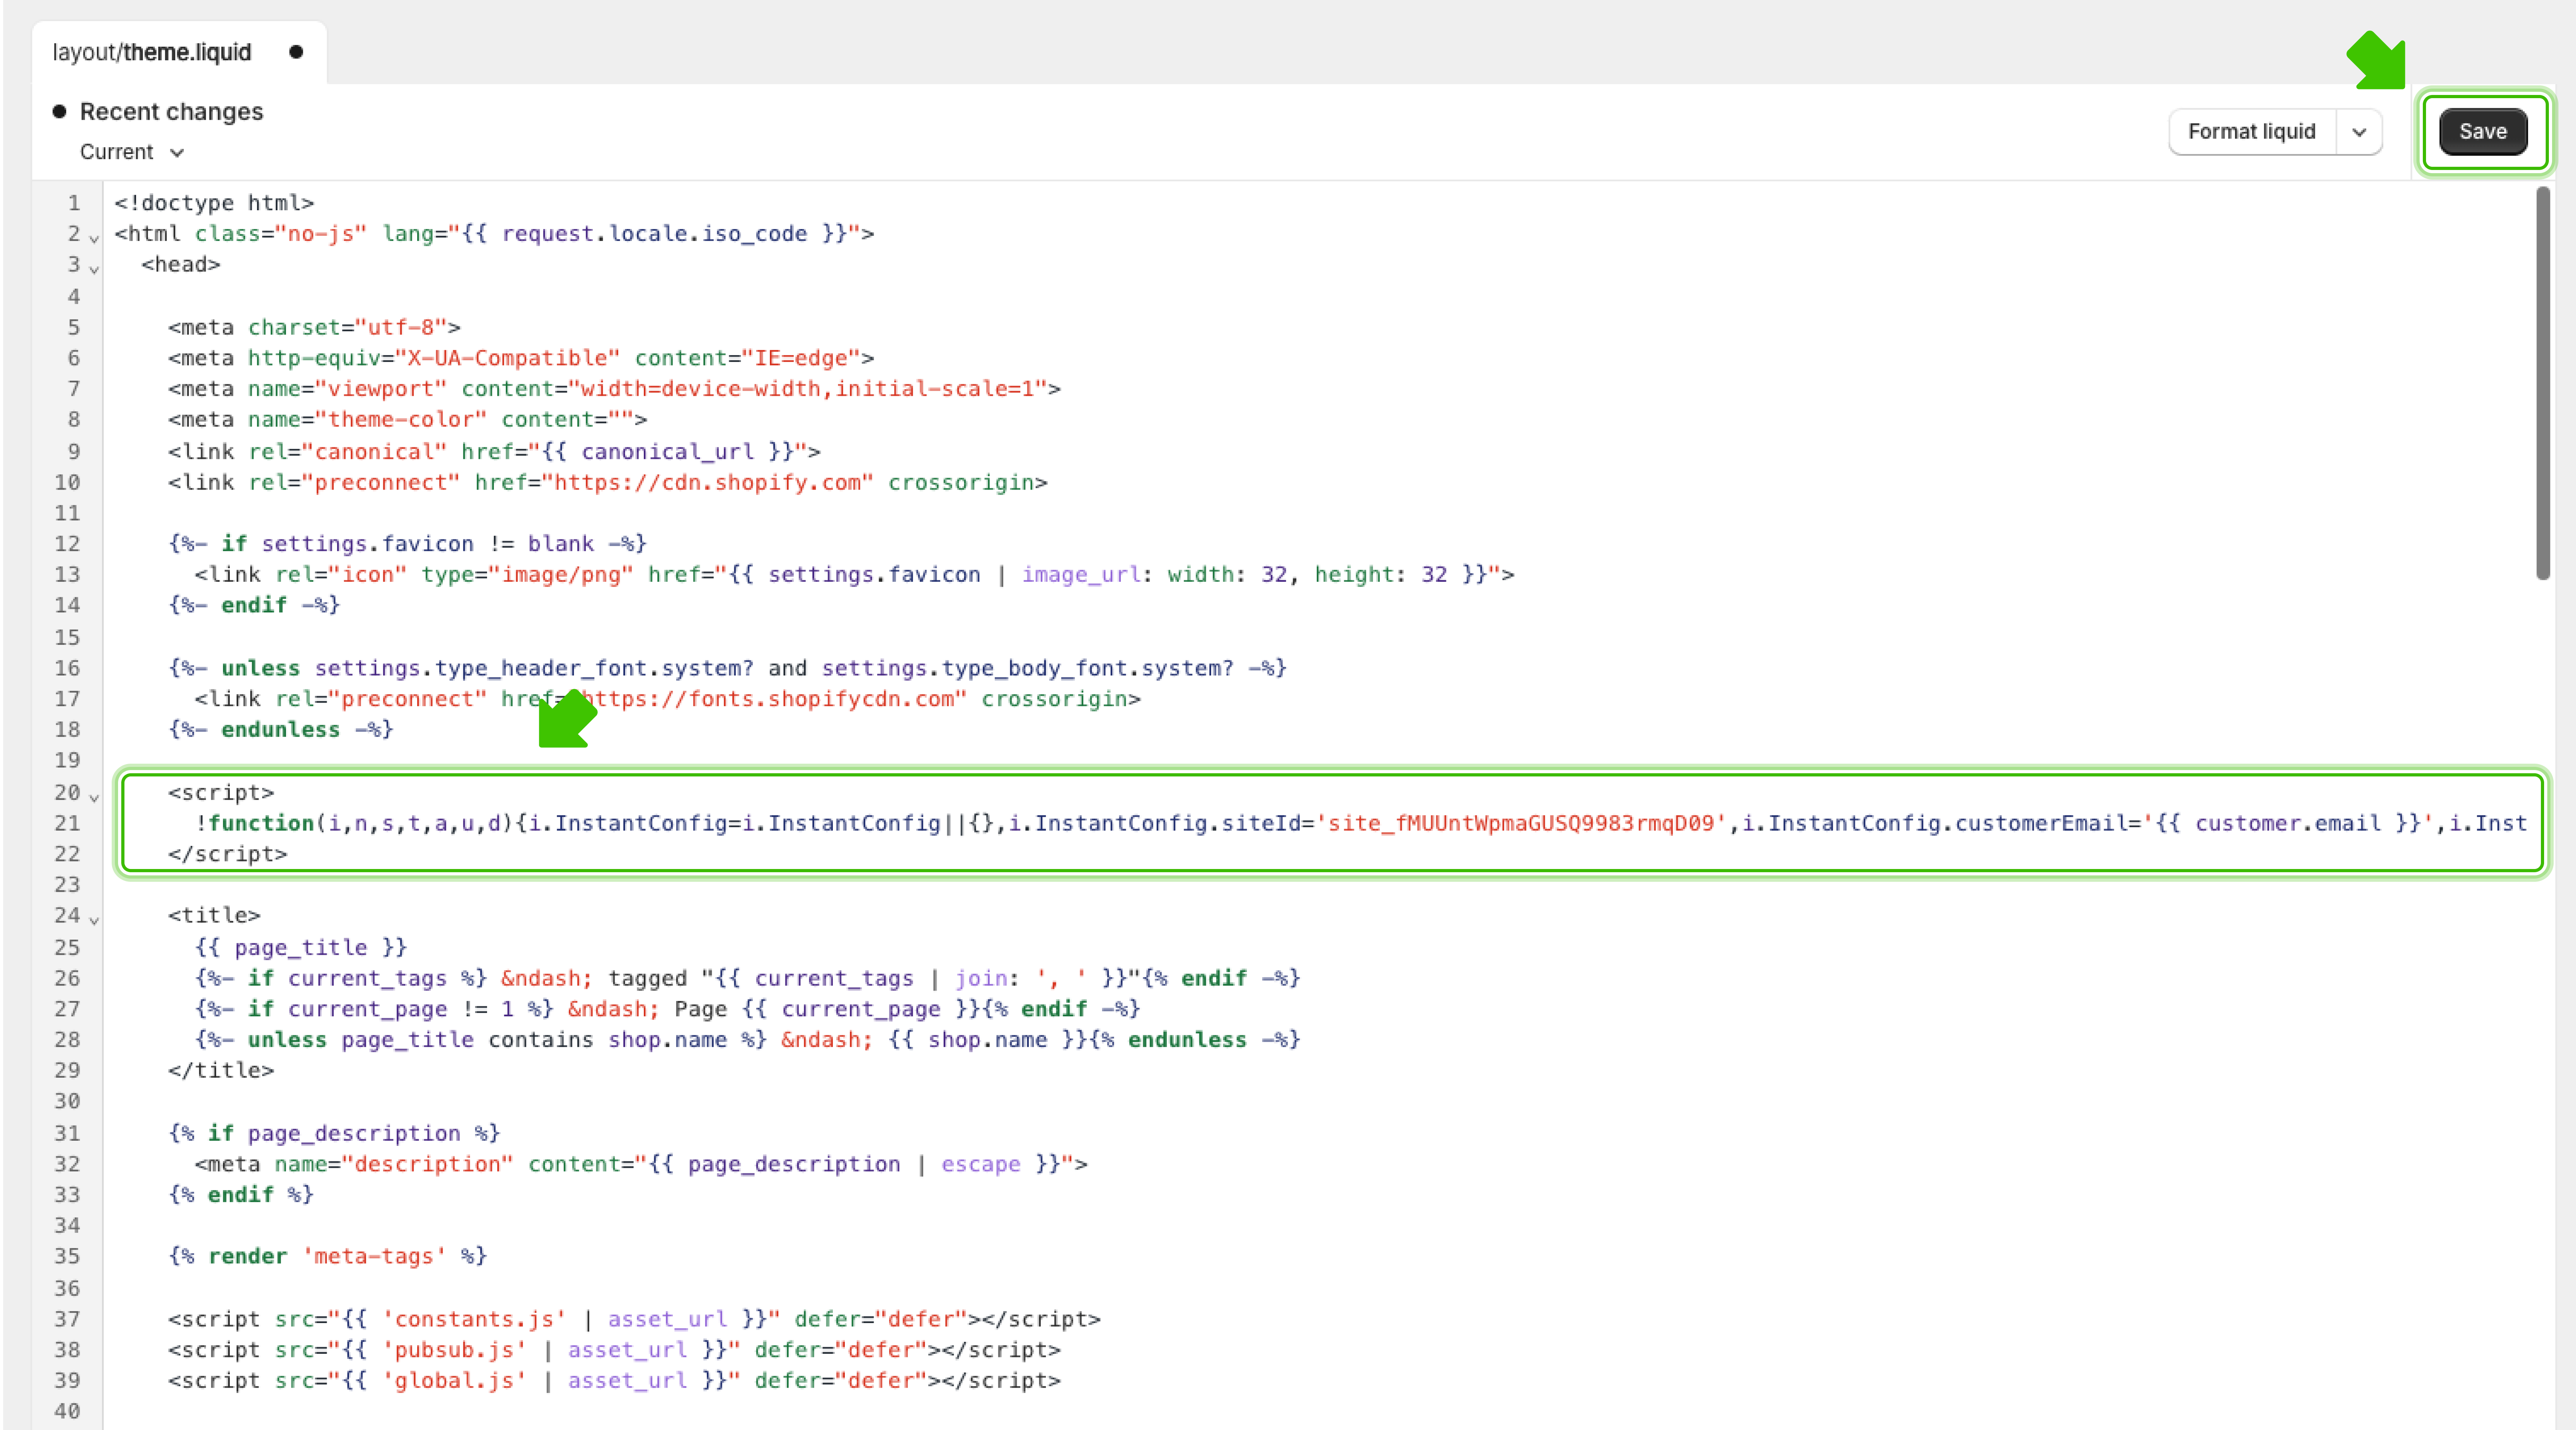
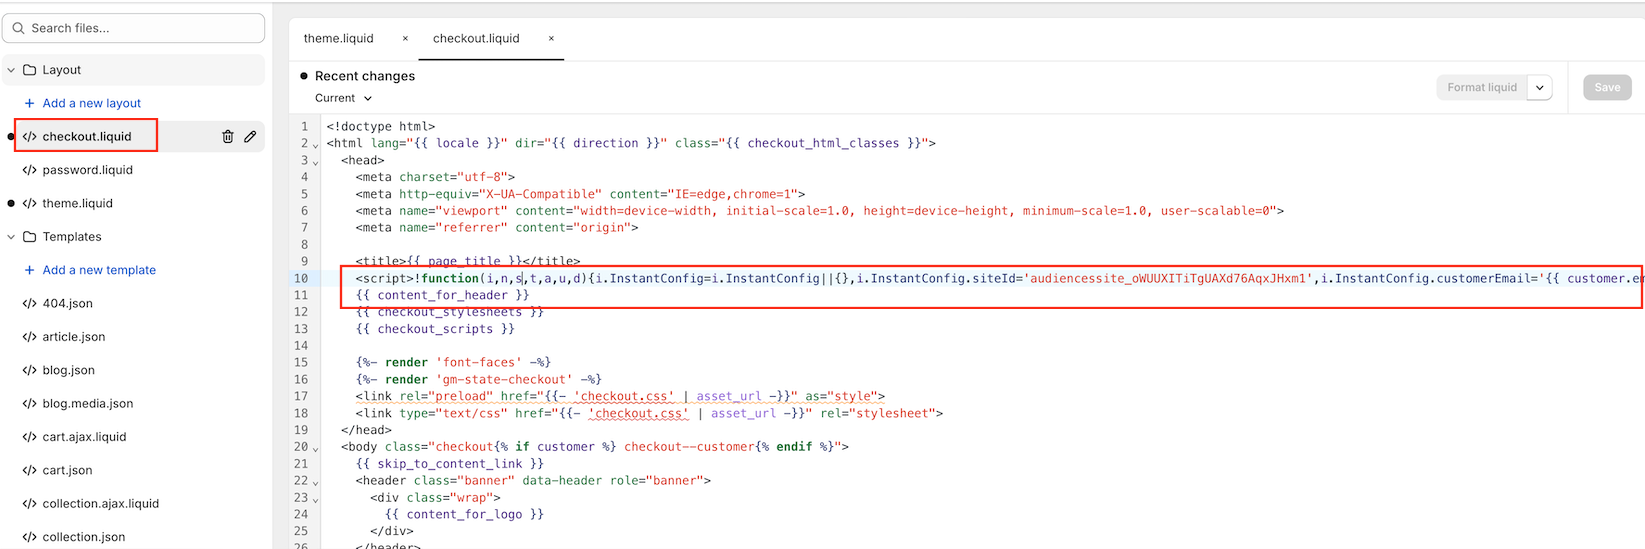
2. Please take this pixel, and also copy+paste the pixel above the {{ content_for_header }} tag in your checkout.liquid file. Please see a screenshot below of how this should look.
After you have pasted the pixel into checkout.liquid, click Save in the top right to complete configuration.
Article URL: https://help.instant.one/install-pixel-onto-legacy-shopify-checkout
Keywords:
## How does Instant's Meta integration (Instant Targeting) work?
Meta’s advertising platform relies on feedback from your website to determine who is most likely to respond to your ads. The more information Meta receives about how people interact with your site, both before and after they see your ads, the smarter its algorithms become at finding and targeting the right audience.
Instant’s integration with Meta ensures that these valuable customer insights are always being shared, helping Meta learn from both successful and unsuccessful conversions, and continuously improving the accuracy of your ad campaigns over time.
How it works
With Instant Targeting, your website is able to send Meta a much richer, more detailed view of your shoppers’ journeys.
This enhanced data helps train Meta’s AI, so its targeting engine gets incrementally better every day. Previously, the data that reached Meta was often sparse and anonymous, which limited Meta’s ability to refine its audience selection. Once you implement Instant Targeting, you begin providing information that lets Meta not only recognize who is interested in your brand, but also understand which types of customer actions are most valuable for future ad delivery.
This process of data enrichment has tangible benefits for your business. The targeting power of Meta’s platform increases dramatically, enabling it to connect your ads with shoppers who are genuinely more likely to convert. As a merchant, you don’t need to do any extra work — your campaigns start to deliver better outcomes because the underlying AI is making more informed decisions based on real, granular shopper behavior.
You’ll likely notice a stronger return on your ad spend because Meta is able to match your ads to users who have demonstrated genuine interest in your brand.
Benefits of effective targeting:
- Improved event-match quality (EMQ) - Higher EMQ means Meta is able to more precisely identify and match individual actions on your site with the right users on its platform
- Better ads targeting - Precise targeting allows merchants to reach audiences more likely to convert, reducing wasted impressions.
- Increased return-on-ad-spend (ROAS) - Effective targeting maximizes ad investments by generating higher conversions from the right audience.
- Reduced cost per acquisition (CPA) and cost-per-click (CPC) - Targeting lowers CPA and CPC by connecting ads with users who are genuinely interested, enhancing cost efficiency.
- Run more profitable ads - Overall, effective targeting enables merchants to generate more sales while keeping advertising costs low, boosting profitability.
Article URL: https://help.instant.one/how-does-instant-targeting-work
Keywords:
## What is First Party Tracking and how to Configure it
First-party tracking is a way to make Instant's tracking more reliable by sending events through **your own domain** instead of a shared third-party one.
This helps ensure that important shopper activity, like product views, sign-ups and checkout events, are less likely to be blocked by ad blockers or browser privacy tools.
---
#### How tracking normally works (without first-party tracking)
When a shopper interacts with your site:
1. The Instant Pixel detects the event
2. The event is sent to a shared Instant domain
3. Instant processes the event and triggers flows or reporting
Some browsers and ad blockers treat shared tracking domains as third-party traffic, which can result in events being blocked or dropped.
#### How first-party tracking works
With first-party tracking enabled:
1. The Instant Pixel detects the event
2. The event is sent to a subdomain on your site (e.g. track.yourstore.com)
3. That subdomain securely forwards the event to Instant
From the browser's perspective, tracking stays within your site — making it first-party by default.
#### How to enable first-party tracking
1. In your Instant AI dashboard, go to **Domain**
2. Select **First-party tracking**
3. Click **Enable**
4. Add the provided record to your domain settings
#### Why this matters
First-party tracking helps ensure fewer blocked events, higher shopper identification, higher overall event volume, and more reliable long-term tracking. This results in more accurate data and more consistent behaviour across browsers.
#### Is first-party tracking required?
First-party tracking is optional, but strongly recommended for all merchants. Instant will continue to work without it, however some events may never reach Instant and identification rates may be lower.
You'll benefit most if:
- You rely on sign-up and behavioural flows
- Your audience uses ad blockers or privacy-focused browsers
- You want future-proof tracking as privacy rules evolve
In practice, this applies to most merchants.
#### Is this safe and best practice?
Yes. This is considered modern best practice for web tracking. Platforms like Meta, Google and Shopify all use first-party tracking approaches because third-party tracking is becoming increasingly unreliable. First-party tracking does not collect additional data or bypass privacy rules.
#### What can you expect after enabling it?
Once enabled, you may see more shoppers entering your flows and higher total event counts. There's no ongoing maintenance or changes after initial set up.
Article URL: https://help.instant.one/what-is-first-party-tracking-and-how-to-configure-it
Keywords:
## Why does Instant AI need to connect to my DNS provider?
Instant AI connects to your DNS provider to verify your domain and send emails on your behalf. This connection ensures your emails are authenticated (through SPF, DKIM, and DMARC), which helps them reach your customers’ inboxes instead of being flagged as spam.
What this means for your existing setup
If you already use another email sending platform, or have existing DNS records connected elsewhere, nothing changes to your current DNS configuration.
Each platform uses its own unique records, and you can only have one active CNAME per subdomain (for example, send.yourbrand.com or mail.yourbrand.com). This means that if you are using an existing subdomain such as send.yourbrand.com then Instant AI won't be able to send from the same subdomain. Instead, we will automatically check the available domains and subdomains and recommend the best option available.
For example, if send.yourbrand.com is already in use, we will find the next closest alternative such as .mail or .shop and continue to find an alternative until one is available.
The records we provide are always new and non-conflicting since they must be unique. If you see any errors suggesting that there may be a conflict of records please contact our team. You should be able to you simply add the records we provide alongside your existing records and offer no replacements.
Why you need to connect your custom domain
Adding Instant AI’s DNS records gives you:
- Authenticated sending (SPF/DKIM/DMARC)
- Improved deliverability and trust with inbox providers
- Accurate tracking of opens, clicks, and unsubscribes tied to your verified domain
Once verified, your emails will show as being sent “from your brand,” not from a third-party sender which helps your deliverability and brand reputation long-term. Some platforms may default you to a domain from the sender (e.g. from Instant) however we know that the best results come from sending direct from your domain so we default to this option immediately to give you the best results possible.
FAQ's
Do I need to change my existing DNS records (like Klaviyo or Google Workspace)?
No. Instant AI only asks you to add new records for your selected subdomain. Your existing DNS setup (including Klaviyo, Google, or Shopify records) remains untouched. You should not be editing existing records and instead only adding new ones.
How does Instant AI test that everything is working?
Instant AI automatically checks that your DNS records are verified and secure before any email is sent. You’ll see a “Verifying” status until your provider confirms the connection — then we’ll activate sending. If anything fails, we’ll show a clear error message so you can fix it before going live.
Can I go live before my DNS records verify?
No. To protect your sender reputation, Instant AI blocks sending until all required records are verified. Once verified, emails will start sending automatically. Only once the new records are connected can you go live and start sending emails.
Why doesn’t Instant AI let me send without DNS, like some ESPs do?
Some platforms allow sending from a shared domain (for example, Klaviyo’s klaviyomail.com), which doesn’t require DNS setup. Instant AI doesn’t offer this because shared domains do not build reputation for your brand and don’t meet modern authentication requirements. Using your own authenticated subdomain provides better deliverability, protects your domain, and ensures full alignment with SPF, DKIM, and DMARC — all of which inbox providers now expect.
Are other brands sending emails from the same domain or subdomain as me?
No. Instant AI sends email from a customer-owned subdomain that is uniquely authenticated via your DNS (for example, send.yourbrand.com). Because DNS authentication requires domain ownership, it is not possible for another brand or another Instant AI customer to send from your subdomain.
Each sending subdomain is a 1:1 connection to a single email platform. If you use multiple email tools (such as Klaviyo, Attentive, or Instant AI), each must use its own subdomain. This ensures complete isolation of sending identity and reputation.
Instant AI uses industry-standard email delivery infrastructure, where authentication and sending reputation are enforced at the domain level, not shared across customers.
Article URL: https://help.instant.one/why-does-instant-ai-need-to-connect-to-my-dns-provider
Keywords:
## Using Instant Audiences with a Shopify Headless Store
Instant has native integrations into Shopify and BigCommerce. Shopify Headless stores require a custom integration, with five steps:
- Connecting to the Shopify API
- Installing Instant's Identification Pixel
- Tracking Customer Events
- Updating Event Properties
Please contact your customer success manager if you experience any issues. We are happy to guide you or your developers through this implementation if needed.
Step 1: Connecting to Shopify's API
The first step of the integration process requires connecting to Shopify's API.
- Proceed to the Instant dashboard and go to Pixel > Select Shopify. You will see the instructions for connecting to Shopify's API under "Step 1: Shopify API Setup".
- Follow these instructions and verify your integration.
Step 2: Installing Instant's Identification Pixel
The first step of the integration process requires adding Instant's pixel to your site. This allows Instant to identify anonymous shoppers who visit your website.
- Proceed to the Instant dashboard and go to Pixel > Select Shopify. You will see instructions to complete your pixel setup under Step 2: Storefront Pixel.
- Follow these instructions and verify your integration.
Step 3: Tracking Customer Events
The code snippets below are example track events.
They are intended as a reference — copying and pasting them directly may not work as-is.
After implementing these events in the correct places, make sure you're passing all the necessary data used in your email templates.
Step 3 walks you through this process.
Event triggers determine when Instant interaction events are sent and contain the payload data for Klaviyo.
- Throughout your website, where you would be sending events to Klaviyo, also send them to Instant Audiences by copy pasting the following snippet just below. See examples below.
window.InstantJS.track("EVENT_TYPE", [{
    provider: "KLAVIYO",
    event: EVENT_DATA
}]);
- Replace EVENT_TYPE with the type of event you wish to send.
- Replace EVENT_DATA with the data you'd like to send to Audiences. Audiences will then send this data through to your marketing integrations such as Klaviyo. Please note that the structure of this event data payload does not matter. Audiences will simply forward this payload through to Klaviyo.
Note that the available events are as follows:
- PAGE_VIEWED
- COLLECTION_VIEWED
- PRODUCT_VIEWED
- ITEM_ADDED_TO_CART
- CART_VIEWED
- CHECKOUT_STARTED
We recommend adding adding the following three events at a minimum:
- PRODUCT_VIEWED — this will trigger a Browse Abandonment flow
- ITEM_ADDED_TO_CART — this will trigger a Cart Abandonment flow
- CHECKOUT_STARTED — this will trigger a Checkout Abandonment flow
Example code snippets for these events are shown below.
Example: Checkout started events
To track when a customer starts the checkout flow, you'll need to execute the following JavaScript code as soon as someone visits the checkout page. The payload data serves as a placeholder to demonstrate the required data structure for Instant Audiences.
window.InstantJS.track("CHECKOUT_STARTED", [
  {
    provider: "KLAVIYO",
    event: {
      CheckoutURL: "",
      Items: [
        {
          ProductName: "",
          Quantity: "1",
          ItemPrice: "19.95",
          ImageURL:
            ""
        },
        {
          ProductName: "",
          Quantity: "1",
          ItemPrice: "221.95",
          ImageURL:
            ""
        },
      ],
    },
  },
]);
Example: Add to cart events
To track when a customer adds an item to their cart, you'll need to execute the following JavaScript code when the “Add to Cart” button is clicked.
One implementation method is to add an event listener to the "Add to Cart" button on relevant pages. When clicked, this will trigger the code shown below. The payload data serves as a placeholder to demonstrate the required data structure for Instant Audiences.
window.InstantJS.track("ITEM_ADDED_TO_CART", [
  {
    provider: "KLAVIYO",
    event: {
      CheckoutURL: "",
      Items: [
        {
          ProductName: "",
          Quantity: "1",
          ItemPrice: "19.95",
          ImageURL: "",
        },
        {
          ProductName: "",
          Quantity: "1",
          ItemPrice: "221.95",
          ImageURL: "",
        },
      ],
    },
  },
]);
Example: Product viewed events
To track product views, you'll need to execute the following JavaScript code whenever a customer lands on a product page.
One implementation method is to add the following code snippet to the source code of your product page template. This code will trigger when a customer visits the page. The payload data serves as a placeholder to demonstrate the required data structure for Instant Audiences.
window.InstantJS.track("PRODUCT_VIEWED", [
  {
    provider: "KLAVIYO",
    event: {
      ProductName: "",
      ItemPrice: "370.00",
      ImageURL: ""
    },
  },
]);
Step 4: Update Event Properties
In the code snippet above, the PRODUCT_VIEWED event has a structured event payload:
event: {
  ProductName: "",
  ItemPrice: "370.00",
  ImageURL: ""
}
The properties in this payload will need to match the properties used in your email templates. For example, if you use the property 'event.item_price' in your templates, you will need to change the 'ItemPrice' property to 'item_price'. Similarly, this must be done for any properties your email templates require that are not included in our payload.
Please ensure you are passing through all the necessary data required in your email templates.
If you make updates to your email templates without updating your integration, Klaviyo may receive incomplete data.
Once this is finalised, your integration with Instant Audiences is complete.
Please reach out to your customer success manager if you require any assistance.
Article URL: https://help.instant.one/using-instant-audiences-with-a-shopify-headless-store
Keywords:
## Why are my Klaviyo flow emails being skipped?
If flow emails have a large number of skips, this may indicate an underlying issue with flow filters, or incorrect properties being used in email templates.
To look into the the reason behind skips, please navigate to your Klaviyo dashboard and complete the steps below.
- Proceed to an abandonment flow and click an email template. On the Email details tab that appears, click on "View Details" under Performance.

- The email overview screen will appear. Proceed to the Recipient activity tab.
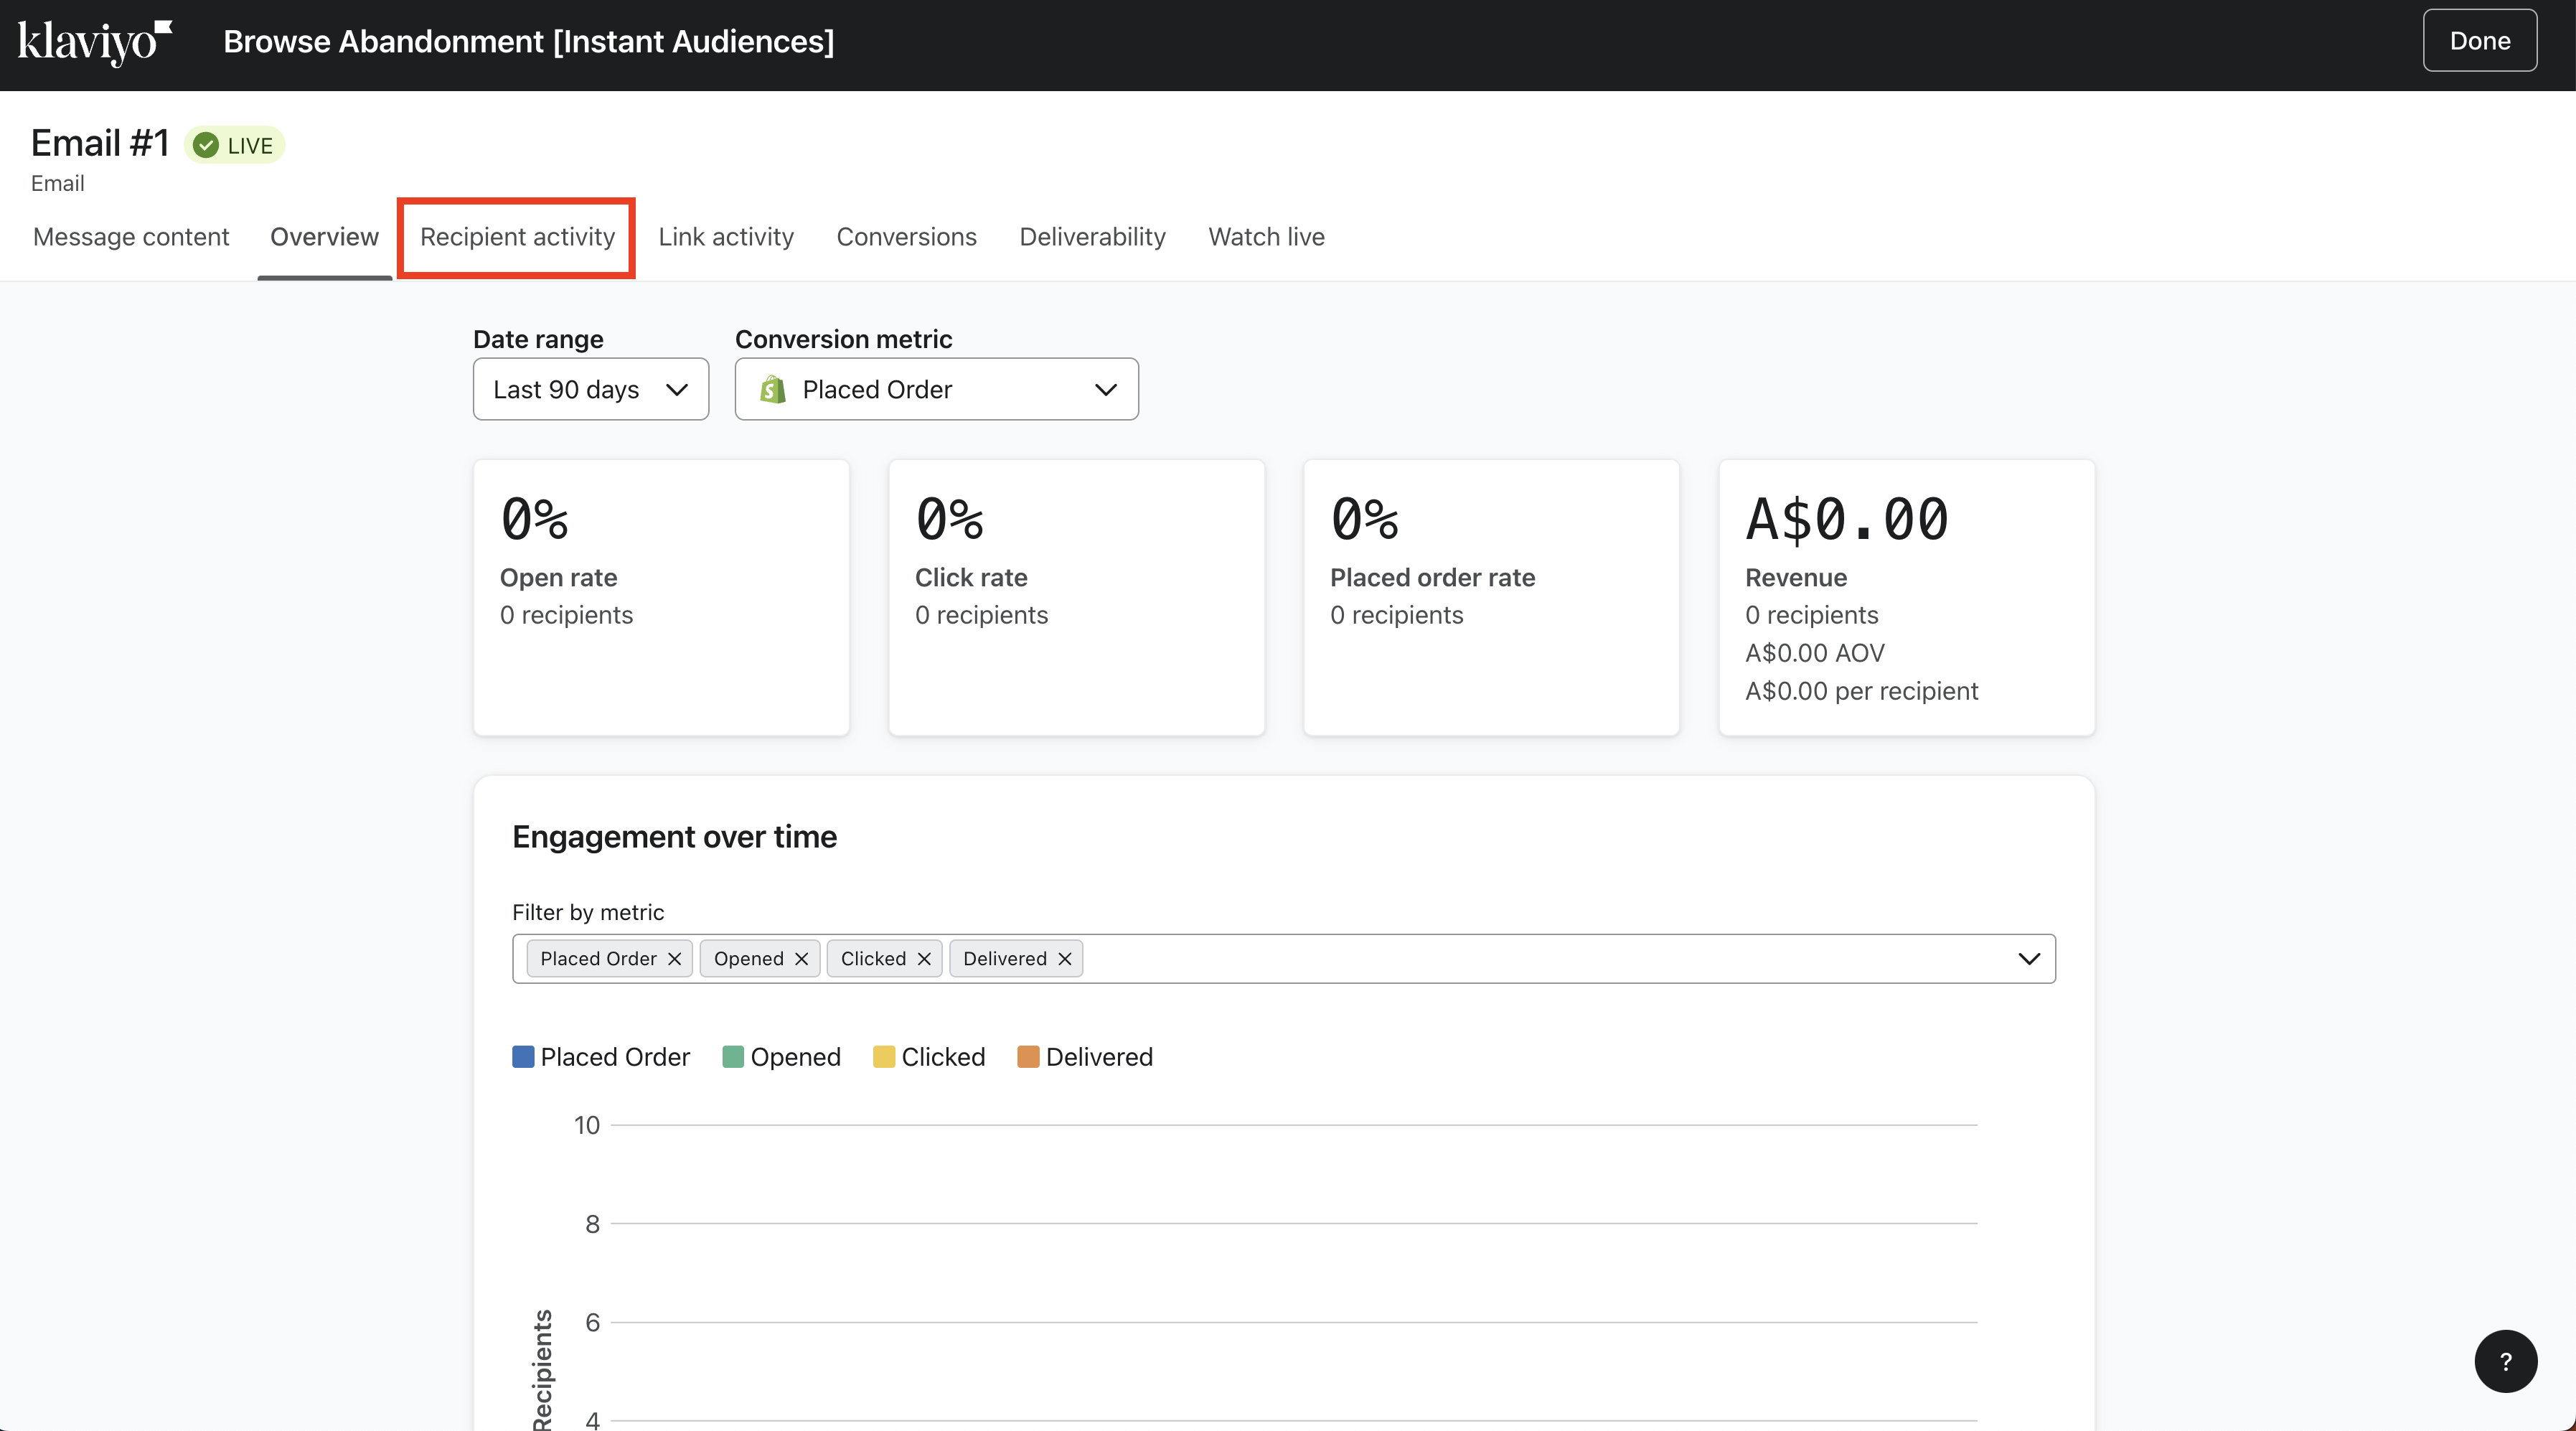
- On the sidebar, click on "Skipped".
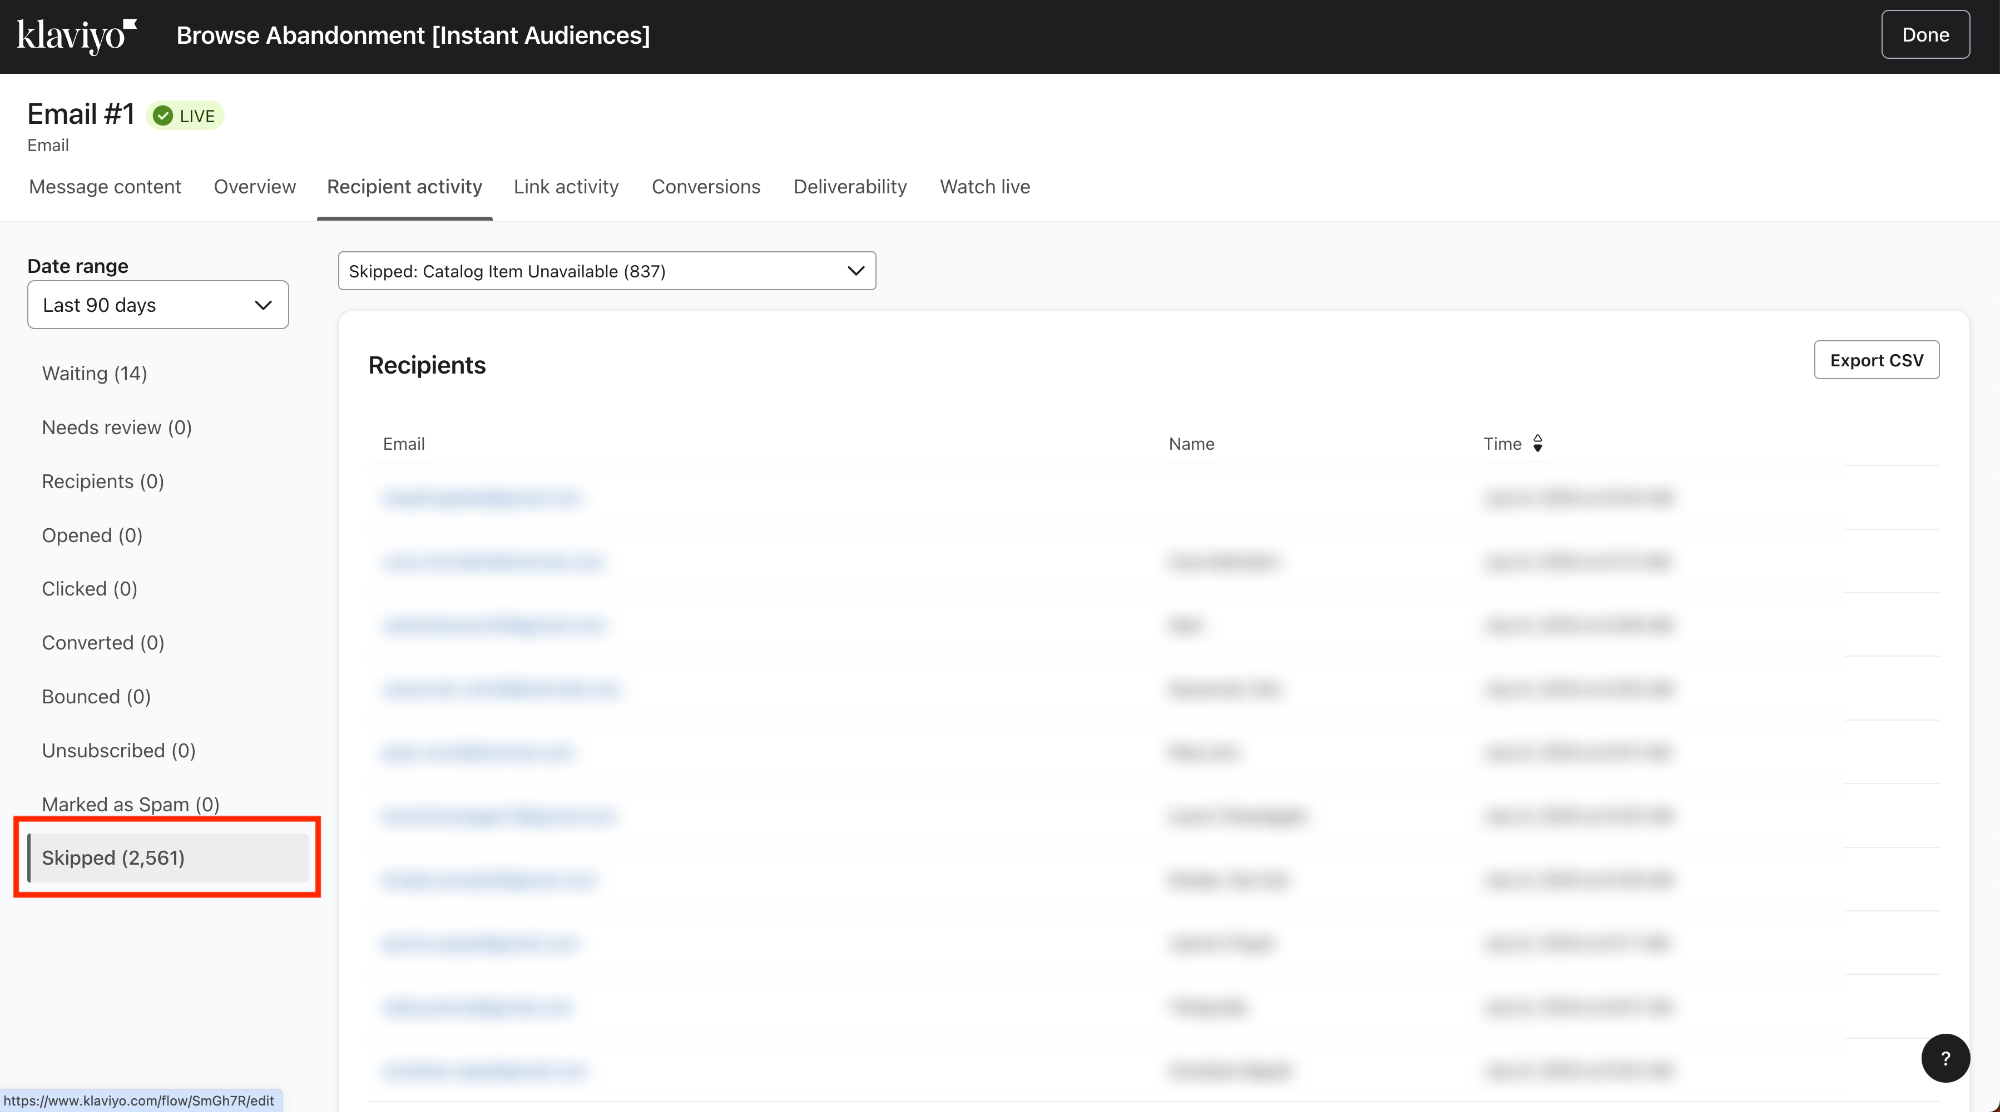
- Under the dropdown above the list of skipped emails, you will be able to see the reasons why flow emails are being skipped.
For more details on what each skip reason means, please see below.
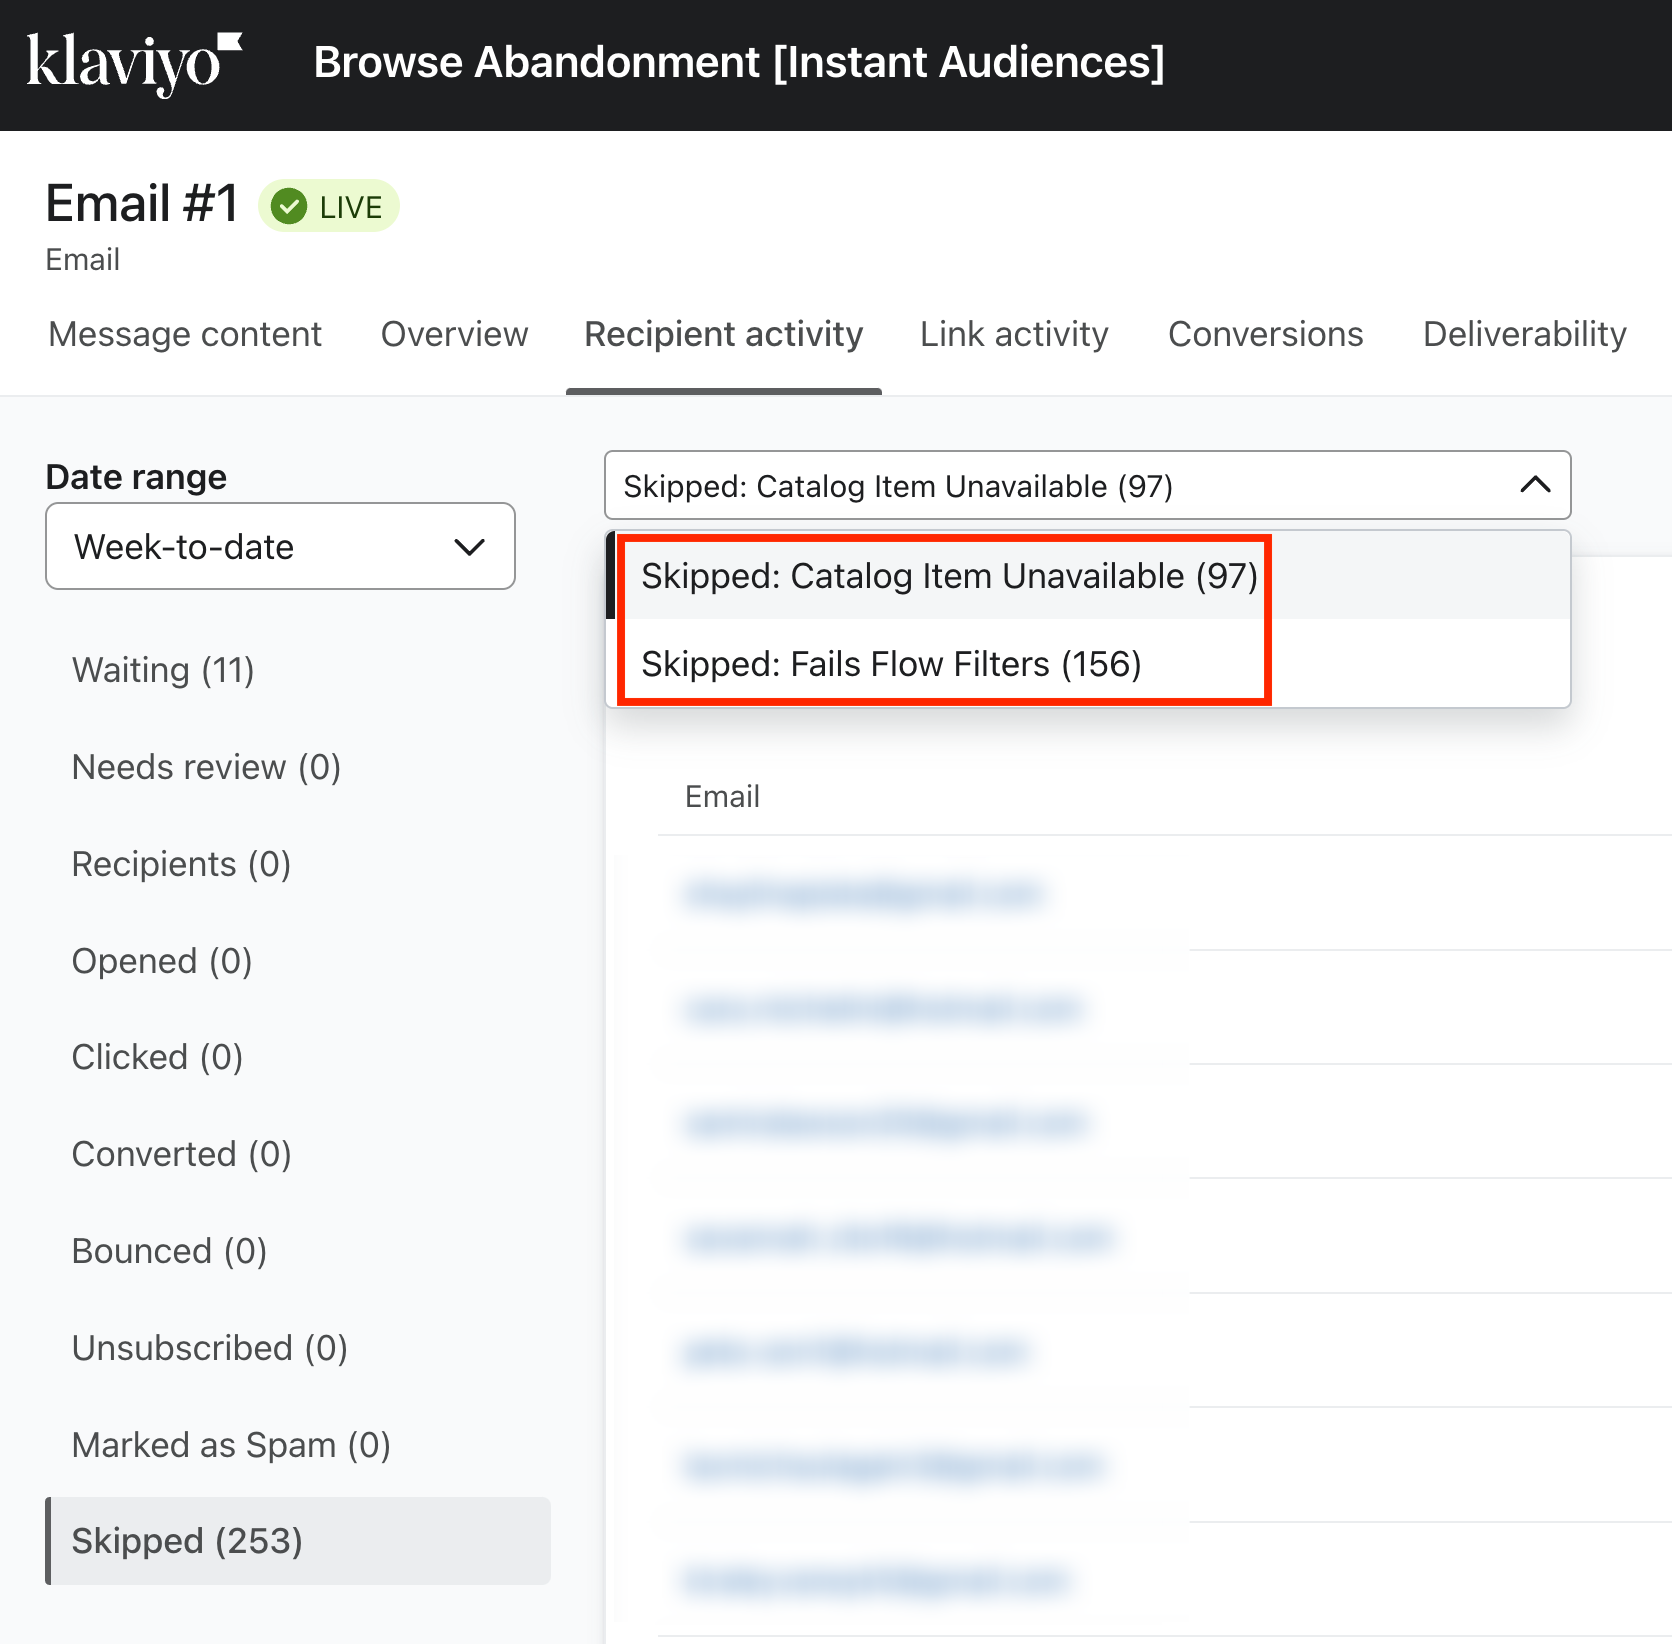
Catalog Item Unavailable
For more information on how to resolve the "Catalog Item Unavailable" error, please refer here.
Fails Flow Filters
For more information on how to resolve the "Fails Flow Filters" error, please refer here.
Article URL: https://help.instant.one/shopify-flow-emails-skipped
Keywords:
## Using Instant Audiences with a Neto Store
Instant has native integrations into Shopify and BigCommerce. Alternative platforms like Neto require a custom integration. This custom integration involves three steps:
- Installing Instant's Pixel
- Tracking Customer Events
- Updating Event Properties
Please contact your customer success manager if you experience any issues. We are happy to guide you or your developers through this implementation if needed.
Step 1: Installing Instant's Pixel
The first step of the integration process requires adding Instant's pixel to your site. This allows Instant to identify anonymous shoppers who visit your website.
- If you're currently onboarding onto the product, your pixel can be found in the Connect Custom Store step.
- If you have already onboarded onto the product, proceed to the Instant dashboard and go to Configuration > Select Custom. You will see a pixel underneath the Custom section.
- Add this pixel to the <head> tag of your website's HTML.
Step 2: Tracking Customer Events
The second step of the integration process requires forwarding customer events to Instant Audiences, similar to how you would already be forwarding these events to Klaviyo!
- Navigate to "Settings & tools" and then "All settings & tools".
- In the "Settings & tools page", select "Custom Scripts".
- The "Custom Scripts" page will show all current custom scripts installed. Select "New" to add a new custom script.
- Paste the code snippet below into the "Page Header" section. This will ensure it is added to every page.
- When complete, click the "Save" button!
<script>
  function getCartForInstantEvent(callback) {
    // Wait for k4n.checkout to be available
    if (window.k4n && window.k4n.checkout && Array.isArray(k4n.checkout.items)) {
      // Execute the callback with the cart items
      callback(k4n.checkout);
    } else {
      setTimeout(() => getCartForInstantEvent(callback), 1000);
    }
  }


  function getProductData() {
    if (window.k4n && window.k4n.product) {
      return {
        Title: decodeURIComponent(k4n.product.name),
        ItemId: parseInt(k4n.product.product_id),
        ProductID: parseInt(k4n.product.product_id),
        Categories: k4n.product.categories.map(decodeURIComponent),
        ImageUrl: decodeURIComponent(k4n.product.image),
        Url: decodeURIComponent(k4n.product.url),
        Metadata: {
          Price: parseFloat(k4n.product.price),
        },
      };
    }
    return null;
  }


  function getCartItem(item) {
     return {
       image: decodeURIComponent(item.image),
       name: decodeURIComponent(item.name),
       product_id: item.product_id,
       qty: item.qty,
       sku: item.sku,
       total: item.total,
       unit_price: item.unit_price,
       url: decodeURIComponent(item.url)
     }
  }


  // Track Product Viewed
  document.addEventListener("DOMContentLoaded", () => {
    const product = getProductData();
    if (product) {
      window.InstantJS.track("PRODUCT_VIEWED", [
        {
          provider: "KLAVIYO",
          event: product,
        },
      ]);
    }
  });


  // Track Add to Cart with dynamic selectors
  document.addEventListener("DOMContentLoaded", () => {
    const addToCartButtons = document.querySelectorAll("[name='add-to-cart'], [name='addToCart'], [class*='addtocart'], [class*='add-to-cart'], [class*='btn-add-to-cart']"); // Add other potential selectors here
    addToCartButtons.forEach(button => {
      button.addEventListener("click", () => {
        const product = getProductData();
        let cartItems;
        if(window.nCartCache) {
         cartItems = window.nCartCache
        }
        if (product) {
          window.InstantJS.track("ITEM_ADDED_TO_CART", [
            {
              provider: "KLAVIYO",
              event: {
                ...product,
               items: cartItems
              },
            },
          ]);
        }
      });
    });
  });


  // Track Cart Viewed
  document.addEventListener("DOMContentLoaded", () => {
    if (window.location.href.includes("cart") && !window.location.href.includes("payment")) {
      getCartForInstantEvent(function (checkout) {
        window.InstantJS.track("CART_VIEWED", [
          {
            provider: "KLAVIYO",
            event: {
             items: checkout.items.map((item) => {
              return getCartItem(item)
             }),
             total: checkout.total
            },
          },
        ]);
      });
    }
  });


  // Track Checkout Started
  document.addEventListener("DOMContentLoaded", () => {
    if (window.location.href.includes("cart") && window.location.href.includes("payment")) {
      getCartForInstantEvent(function (checkout) {
        window.InstantJS.track("CHECKOUT_STARTED", [
           {
            provider: "KLAVIYO",
            event: {
            items: checkout.items.map((item) => {
              return getCartItem(item)
            }),
            total: checkout.total
            },
          },
        ]);
      });
    }
  });
</script>
Step 3: Update Event Properties
In the code snippet above, the following events have a structured payload:
- PRODUCT_VIEWED
- ITEM_ADDED_TO_CART
- CART_VIEWED
- CHECKOUT_STARTED
For PRODUCT_VIEWED and ITEM_ADDED_TO_CART, this is:
event: {
  image: decodeURIComponent(item.image),
  name: decodeURIComponent(item.name),
  product_id: item.product_id,
  qty: item.qty,
  sku: item.sku,
  total: item.total,
  unit_price: item.unit_price,
  url: decodeURIComponent(item.url)
}
The properties in this payload will need to match the properties used in your email templates. For example, if you use the property 'event.item_name' in your templates, you will need to change the 'name' property to 'item_name'. Similarly, this must be done for any properties your email templates require that are not included in our payload.
Please ensure you are passing through all the necessary data required in your email templates.
If you make updates to your email templates without updating your integration, Klaviyo may receive incomplete data.
Once this is finalised, your integration with Instant Audiences is complete.
Please reach out to your customer success manager if you require any assistance.
Article URL: https://help.instant.one/using-instant-audiences-with-a-neto-store
Keywords:
## How are Success Indicators calculated?
Instant uses 3 main success indicators to measure the performance of Instant. We track these metrics on individual customer dashboards and and review them with our customers during success calls on a regular basis.
Please see below for more information on each Indicator and how we calculate it.
Increase in Checkout Completion
Your checkout completion rate is calculated from every customer who starts the checkout process versus completes the process and makes a purchase from your store.
We compare the checkout completion of your generic checkout versus your Instant checkout to understand the increase and present it to you as a percentage.
Obtaining Generic Checkout Data:
Your generic data is obtained using Google Analytics. We calculate the visits to the checkout(buyers who start the checkout process) versus visits to the order confirmation page(buyers who complete the checkout process).
Real Data (Calculated by Industry):
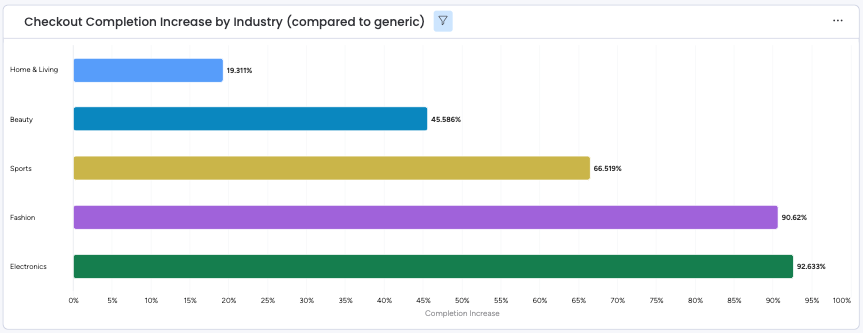
Decrease in First Time Checkout Time
Your checkout time is calculated from the average time it takes a first time customer who completes an Instant transaction versus the average time of a customer completing a transaction using the generic checkout.
We compare the average times and present the data to you in the form of a percentage increase.
Obtaining Generic Data:
Your Generic Data is obtained using Google Analytics. We look at the average time spent on your generic checkout page.
Repeat Customer Rate
To calculate your repeat customer rate we look at how many Instant transactions were completed by existing users versus first time customers and calculate this as a percentage. We generally see this number grow significantly month on month.
Article URL: https://help.instant.one/success-metrics
Keywords:
## How do I manually integrate Audiences Product Viewed and Add to Cart events for Shopify?
Please do not proceed with these steps unless you have been advised by the Instant team that it is required.
By default, the Instant pixel handles all event tracking end-to-end without any manual intervention.
As of September 2024, we have identified a number of merchants who experience issues with Shopify Customer events not sending through all events. Instant's native integration relies on Shopify Customer Events. These Customer Events bug(s) are unrelated to Instant, have been reported by other vendors e.g. here and are related to Shopify's recent updates.
This guide is only written for sites that have run into issues with Shopify's Customer Events tracking which prevents the native Instant integration from working.
For the below to work, please ensure you already have normal Klaviyo tracking enabled.
- Proceed to your Shopify dashboard and click on Sales channels > Online Store in your sidebar
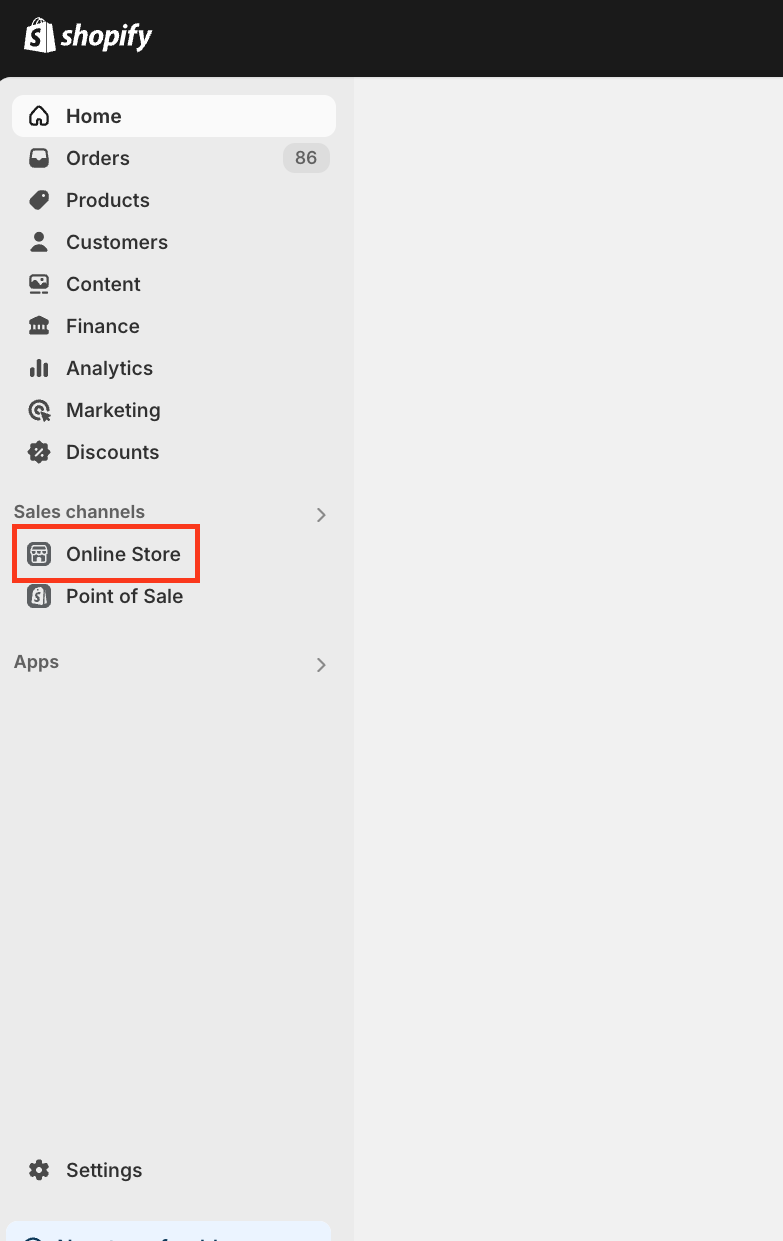
- Click on the three dots next to Customize, and click on Edit code.
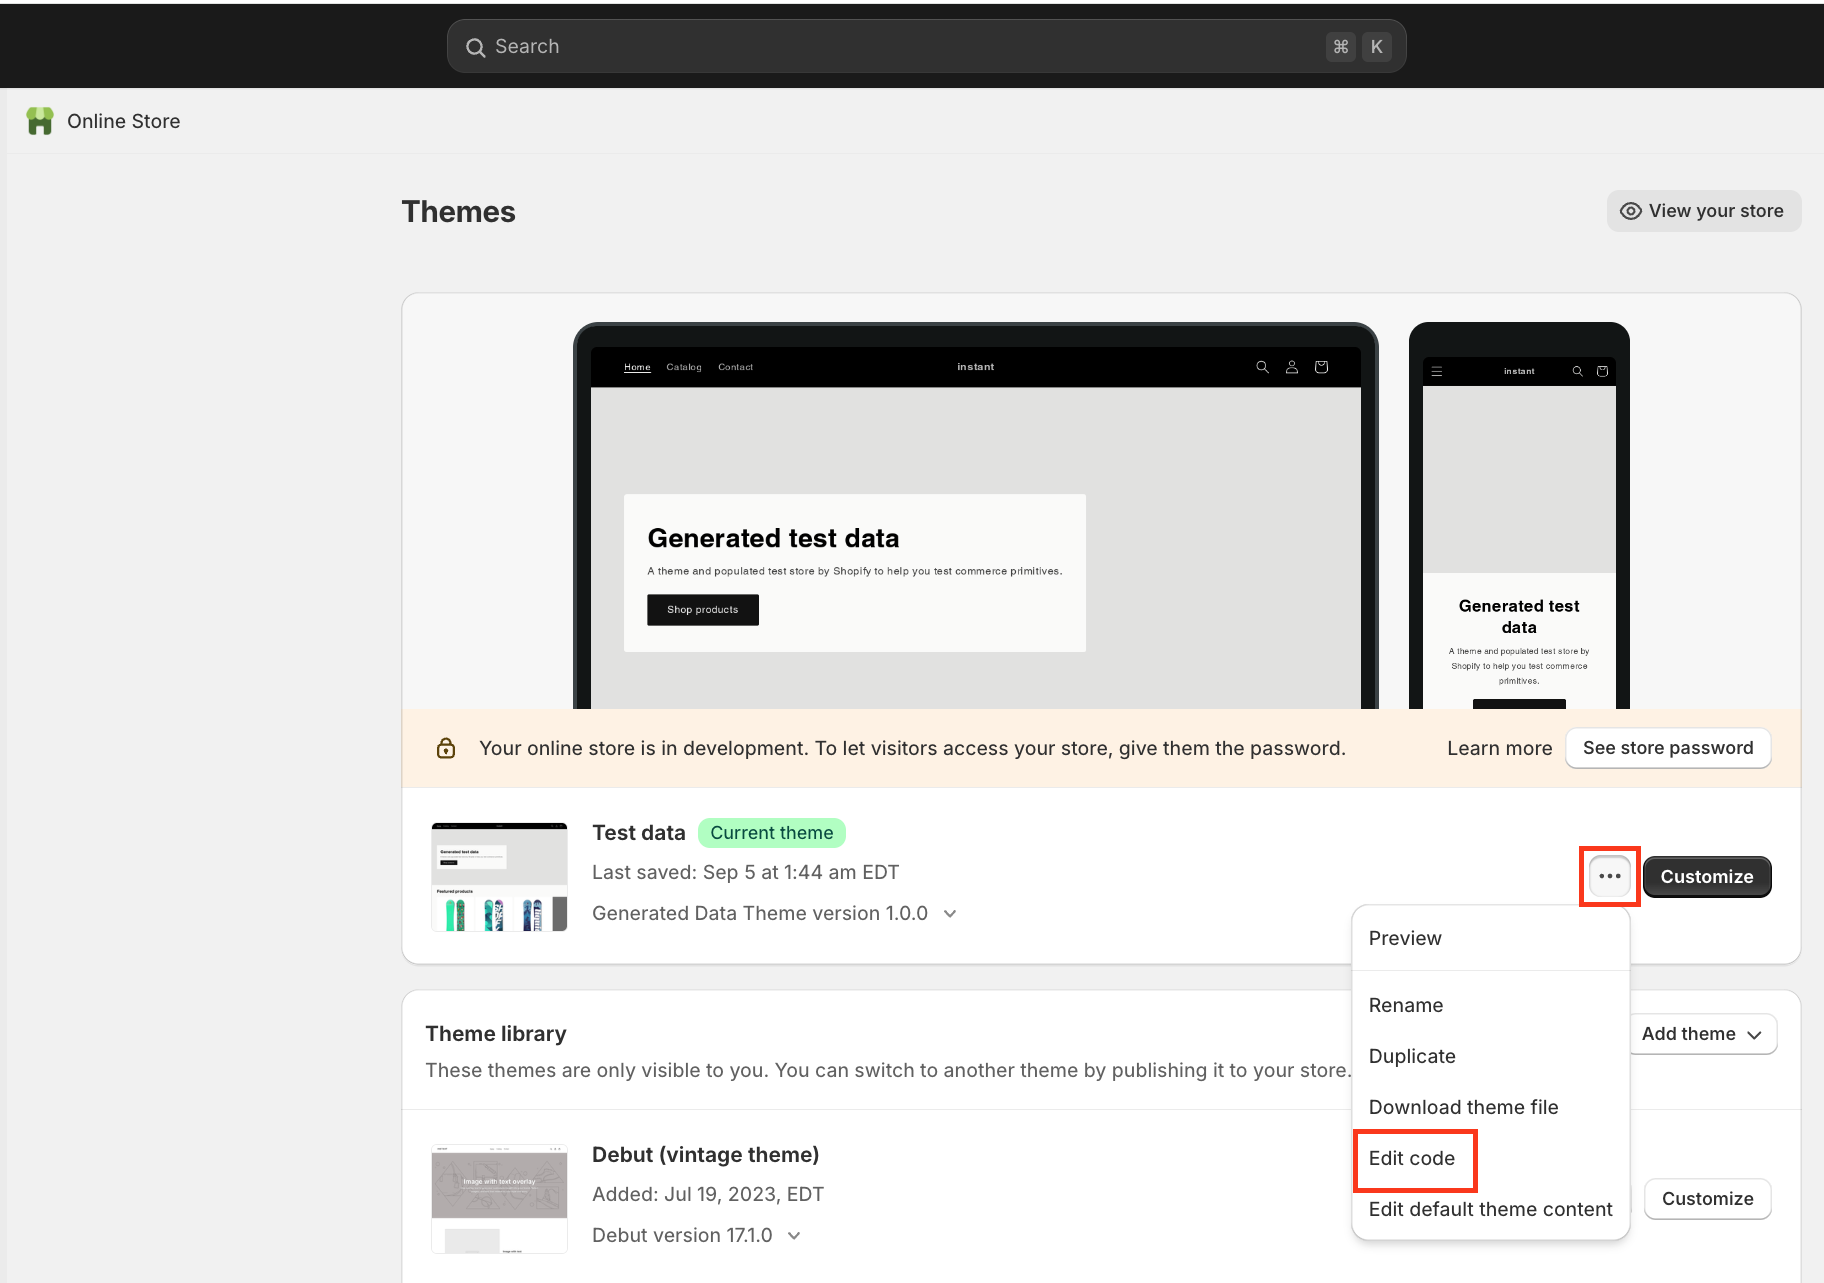
- Proceed into theme.liquid, which is located under layout.
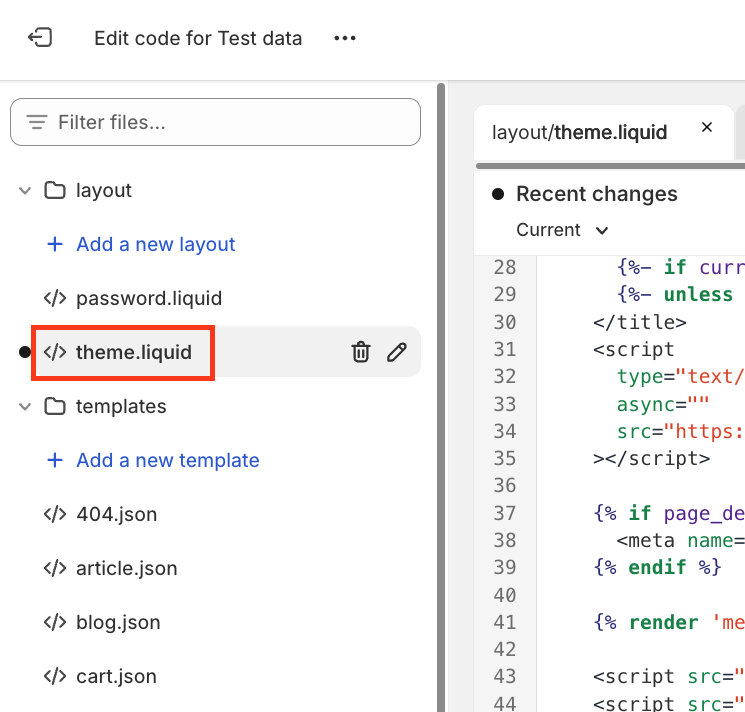
- Locate {{ content_for_header }} in the theme.liquid file.
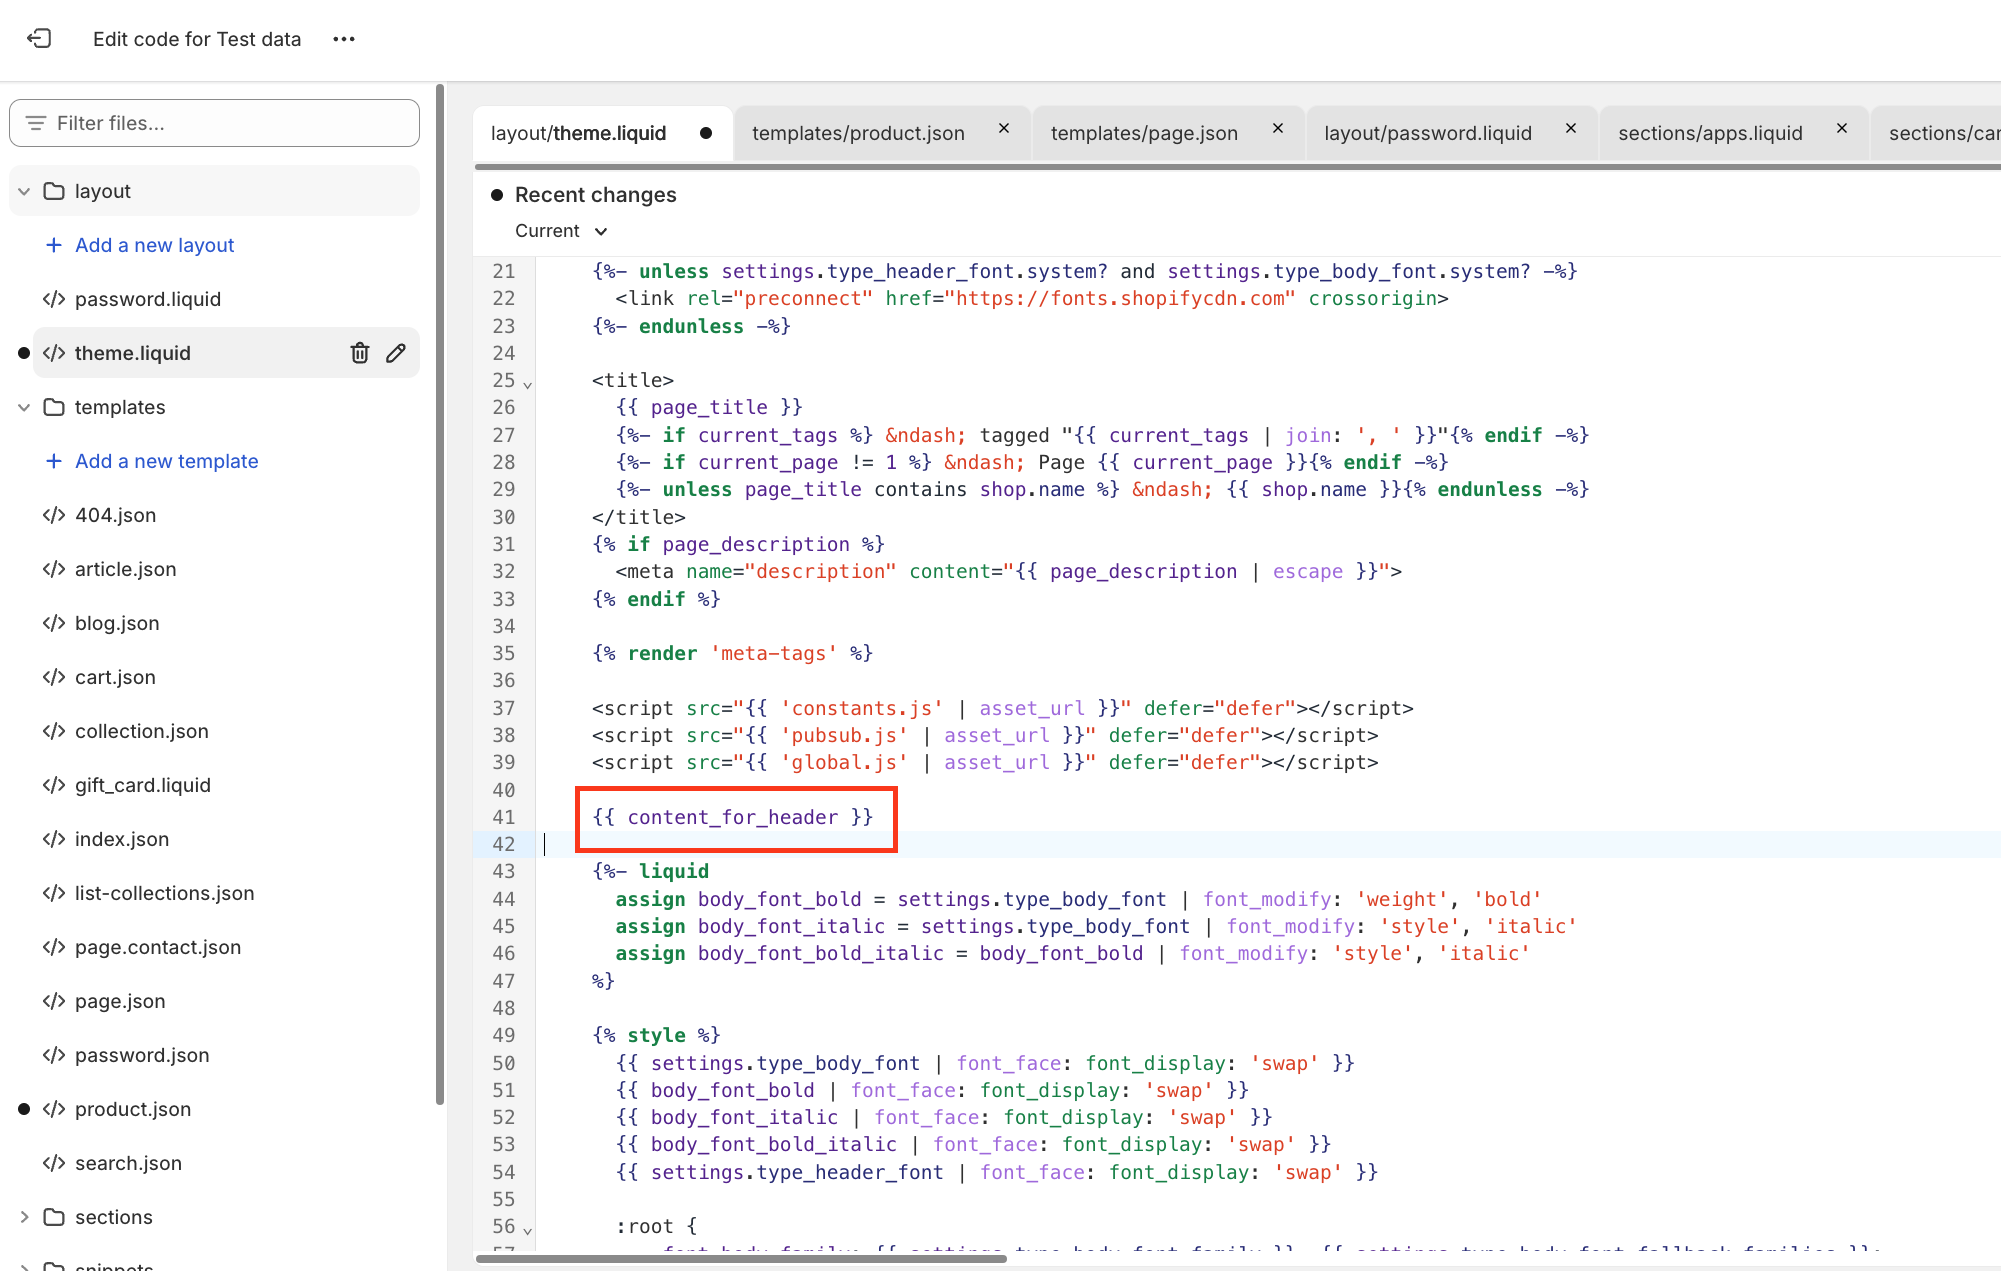
- Copy and paste the code below, and add it just above {% raw %}{{ content_for_header }}{% endraw %}.
<script>
var audiencesManualTrackingInitialized = false;
const audiencesManualTracking = setInterval(() => {
    if (
        typeof item === 'undefined' ||
        audiencesManualTrackingInitialized ||
        !window.InstantJS
    ) {
        return;
    }

    clearInterval(audiencesManualTracking);
    audiencesManualTrackingInitialized = true;

    window.InstantJS.track('PRODUCT_VIEWED', [
        {
            provider: 'KLAVIYO',
            event: item,
        },
    ]);
}, 500);

function audiencesAddedToCart() {
    fetch(`${window.location.origin}/cart.js`)
        .then((res) => res.clone().json())
        .then((data) => {
            var cart = {
                total_price: data.total_price / 100,
                $value: data.total_price / 100,
                total_discount: data.total_discount,
                original_total_price: data.original_total_price / 100,
                items: data.items,
            };

            if (item !== 'undefined') {
                cart = Object.assign(cart, item);
            }

            window.InstantJS.track('ITEM_ADDED_TO_CART', [
                {
                    event: cart,
                    provider: 'KLAVIYO',
                },
            ]);
        });
}

(function (ns, fetch) {
    ns.fetch = function () {
        const response = fetch.apply(this, arguments);
        response.then((res) => {
            if (
                `${window.location.origin}/cart/add.js`.includes(res.url) &&
                res.url !== ''
            ) {
                audiencesAddedToCart();
            }
        });
        return response;
    };
})(window, window.fetch);

(function (ns) {
    var originalXhrOpen = XMLHttpRequest.prototype.open;
    var originalXhrSend = XMLHttpRequest.prototype.send;

    XMLHttpRequest.prototype.open = function (method, url) {
        this._url = url;
        return originalXhrOpen.apply(this, arguments);
    };

    XMLHttpRequest.prototype.send = function () {
        this.addEventListener('load', function () {
            if (this._url && this._url.includes('cart/add.js')) {
                audiencesAddedToCart();
            }
        });
        return originalXhrSend.apply(this, arguments);
    };
})(window);
</script>
- Once the code is added, click on "Save" in the top right.
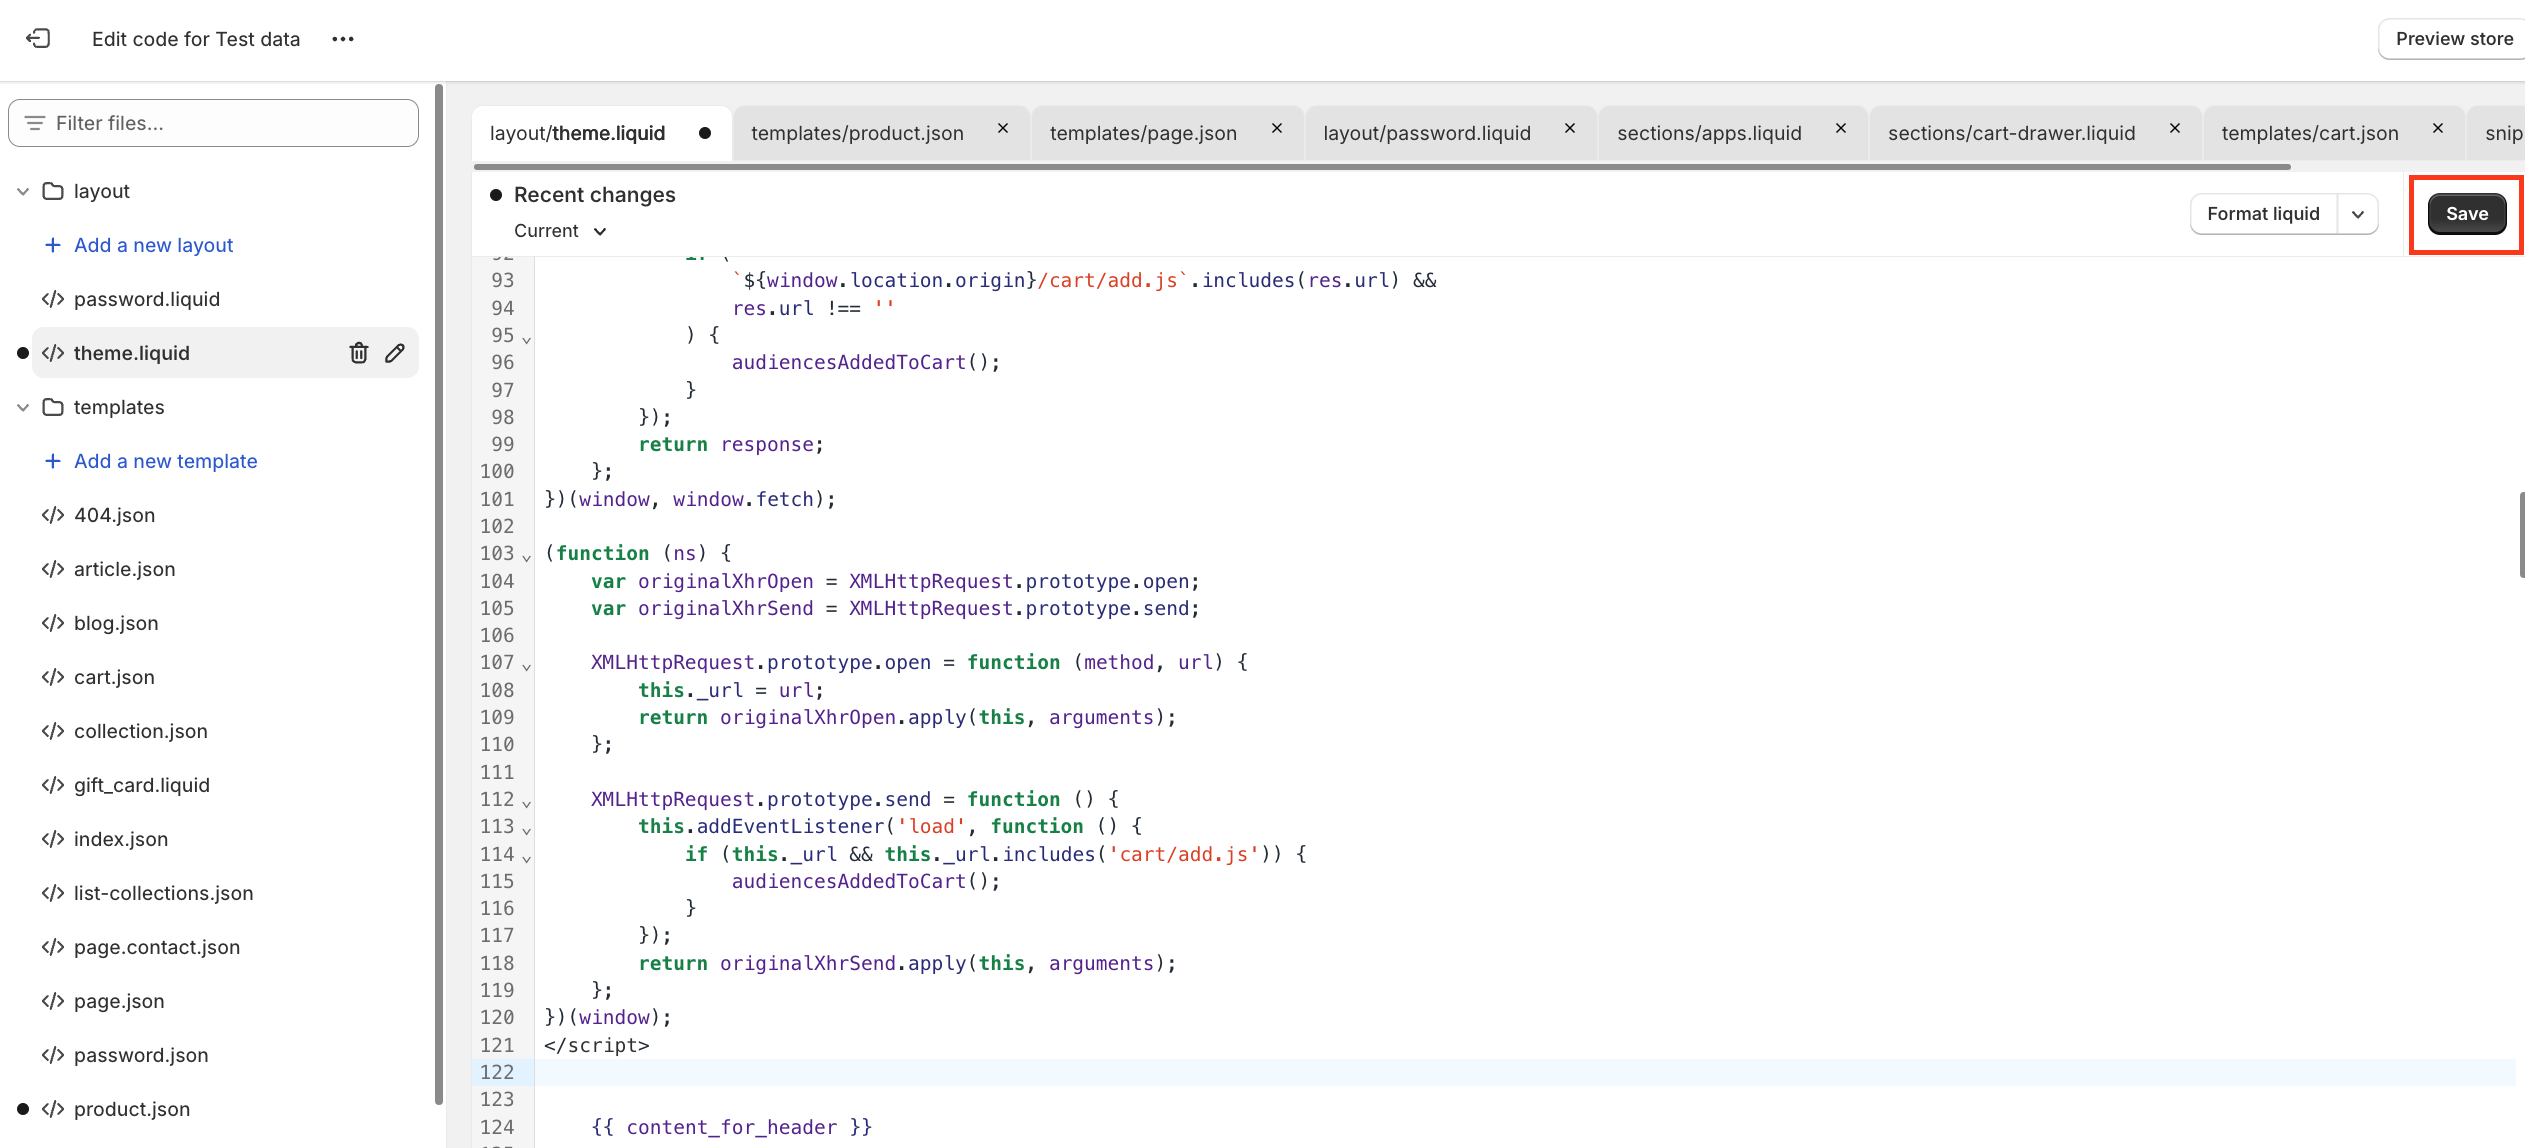
More information regarding the underlying issue with Customer Events:
On some merchants, a bug is present which prevents the iframe for Shopify Customer Events to load. The Shopify Customer Events functionality provides the Instant pixel with a full event stream to record when someone viewed a product, or adds an item to cart, for example.
This bug will cause the Instant pixel to not receive this event stream.
To identify whether this bug exists, simply open the javascript console, and click repeatedly in any given area on the page.
For every time you click, you will see this error appear in your console.
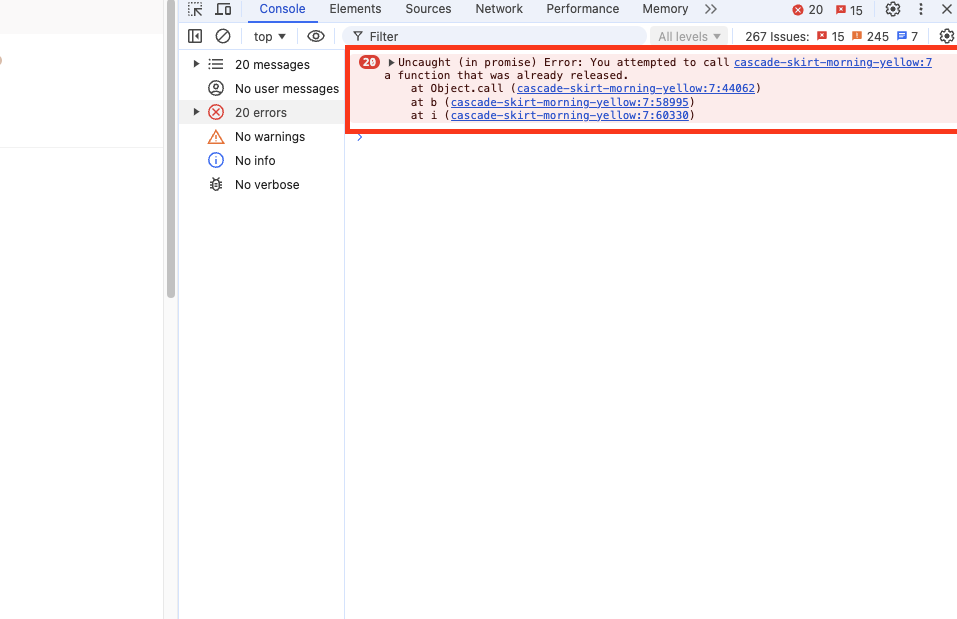
Article URL: https://help.instant.one/product-viewed-add-to-cart-for-shopify
Keywords:
## How to Read Meta’s “Reconciled Events”
Meta’s “reconciled events” represent the final, de-duplicated list of user actions that Meta has accepted, attributed, and used for reporting or ad optimisation.
Since many businesses have multiple systems sending event data (such as browser pixels, server-side integrations, or third-party tools like Instant), Meta initially receives a higher volume of “raw” events — sometimes several for the same customer action. To maintain accuracy, it groups these using deduplication IDs and selects the single, most valuable instance for reporting.
When viewing your Events Manager, you may first notice an inflated number of events. After Meta processes the raw data, the platform surfaces only “reconciled events”. Each represents one customer action, no matter how many duplicates were sent. The reconciled event count is what is used for performance reporting, attribution, and optimisation.
To verify that your Instant integration is working correctly, follow these steps:
-
In Meta Events Manager, look for your key events (like “Purchase” or “Add to Cart”) and view both the raw and reconciled event counts.
-
Shortly after activating Instant Targeting, you should see a jump in total received events. Within 24–48 hours, however, the reconciled count will stabilise and accurately reflect actual user activity.
-
You should also monitor the “event match quality” or “match rate” metrics provided alongside each event — these should improve as Instant sends richer customer data.
-
If reconciled event counts do not reflect real actions or you stop seeing improved match rates, check your deduplication and event setup, or reach out to support for assistance.
Consistently reviewing reconciled events, match quality, and outgoing data from Instant will help ensure your marketing data is both accurate and actionable for stronger ad performance.
Article URL: https://help.instant.one/how-to-read-metas-reconciled-events
Keywords:
## Why is my customer receiving duplicate emails from the same flow?
If a customer receives duplicate emails in a short period of time, it may indicate problems with cool-down periods.
Understanding Cool Down Periods
What is a cool-down period?
A cool-down period is a defined time during which a customer cannot enter another flow after receiving a message.
This practice helps prevent customers from receiving duplicate emails and multiple messages too quickly, leading to a more positive user experience.
Cool-down periods are typically set to 7 days as shown here:
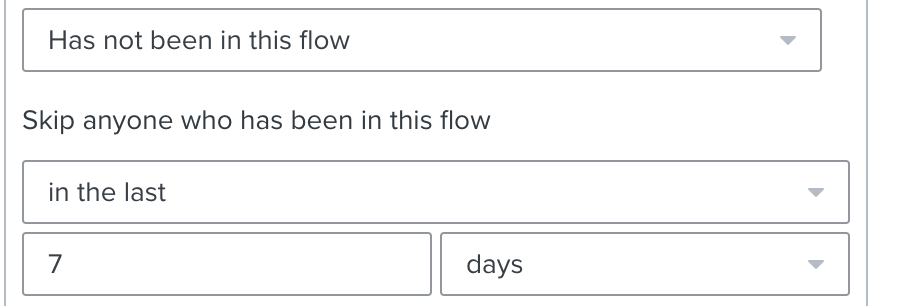
How cool-down periods work:
Consider the following scenario:
Monday morning - Emma visits an e-commerce website and views a dress, triggering a 'product viewed' event that enrolls her in the store's email flow.
Later that day - Emma returns to the website and triggers the 'product viewed' event again.
Without a cool-down period:
Emma receives duplicate emails from the 'Product Viewed' flow.
With a 7-day cool-down period:
Emma receives only one email from the store, preventing emails fatigue.
Enhancing the customer experience: A cool-down period helps prevent customers from feeling overwhelmed by receiving the same emails in a short period, ultimately enhancing the customer experience
Key Consideration When Setting Cool-Down Periods: Preventing flow overlap.
Two different flows may have an overlap in triggers. To make sure there is no overlap ensure they are properly spaced out.
Other Considerations:
- Customer Engagement: Align cool-down periods with times when customers are likely to engage with your content.
- Performance Review: Regularly assess and adjust cool-down periods based on customer interactions and feedback.
- Consider store volume: Consider the volume of your store. If you sell high-cost, low-value items, you may need longer cool-down periods. However, if your store has low-cost, high-volume products, shorter cool down periods. might be more beneficial.
How to Adjust the Cool-down Period:
1. Log into your account and click Flows in the left-hand panel.
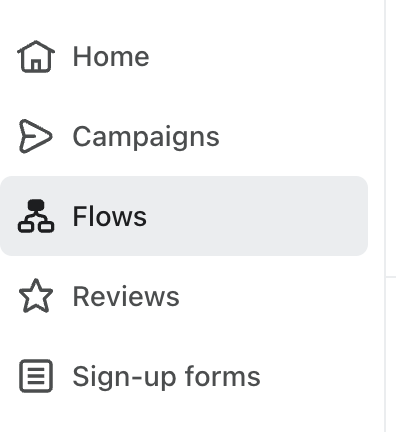
2. Select the specific flow you want to adjust.
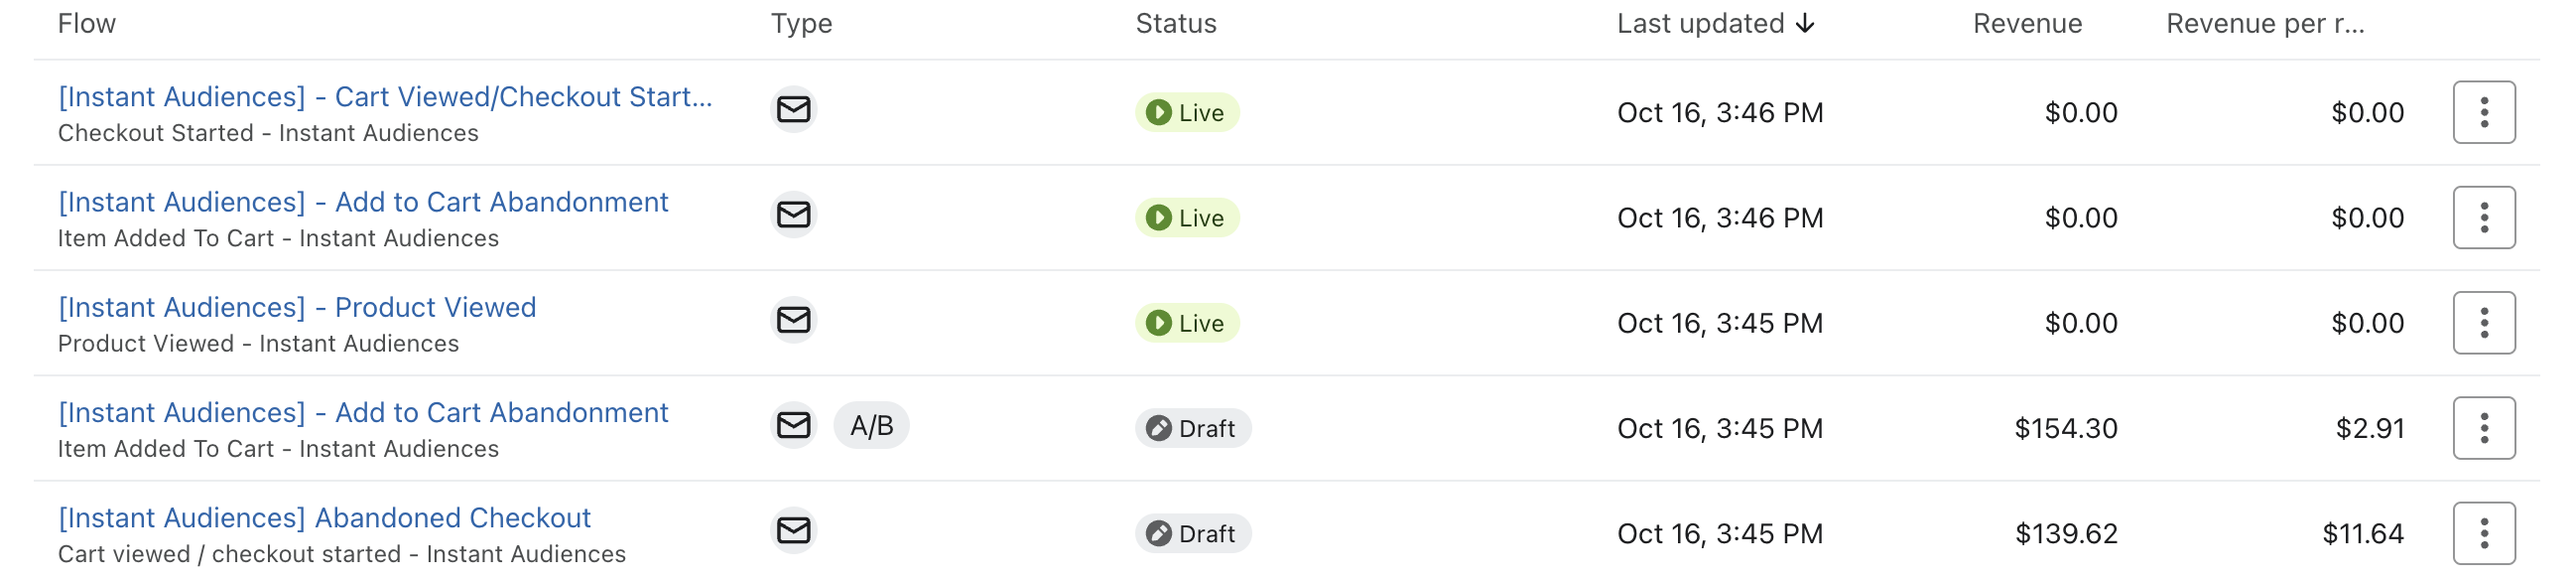
3. Click the flow trigger.
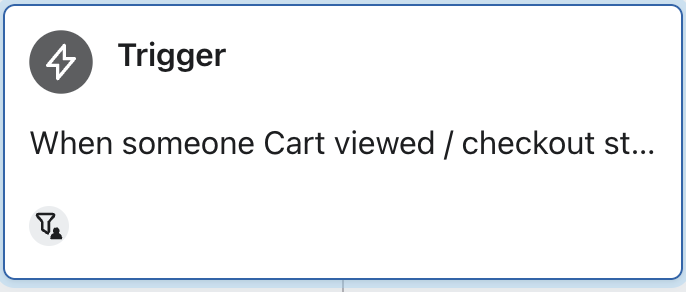
4. Click Edit on the right side to open the filters.
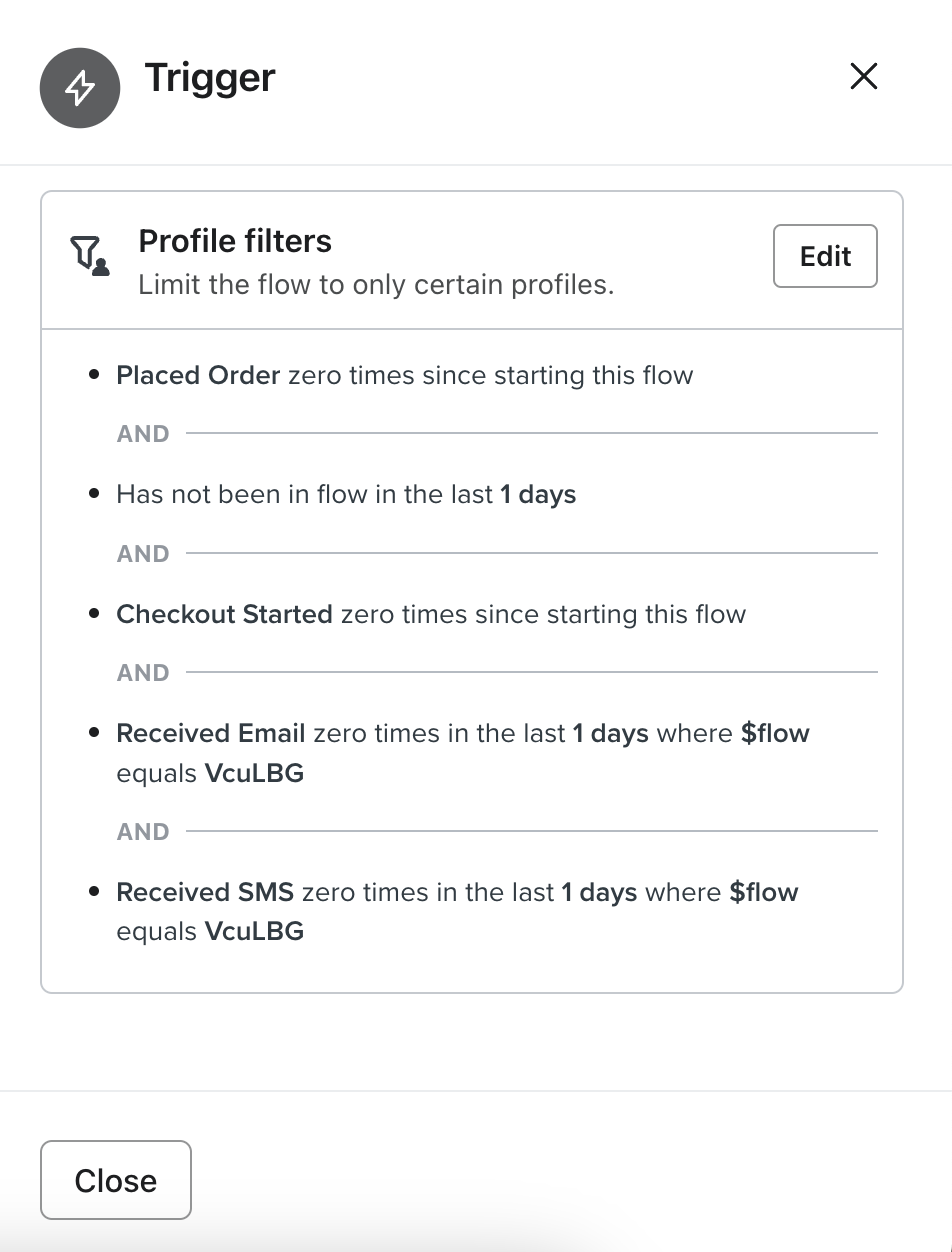
5. Click the +Add icon at the bottom to add your cool-down period.
6. A condition box will appear. Click 'Select Condition' then choose 'Has not been in this flow.'
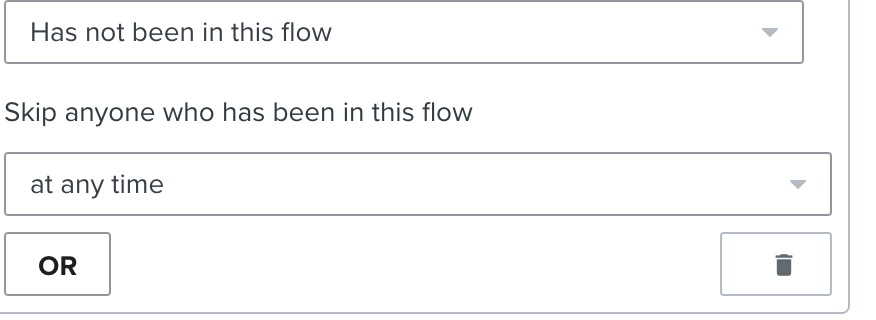
7. Under 'Skip anyone who has been in this flow' select 'In the last' from the dropdown.
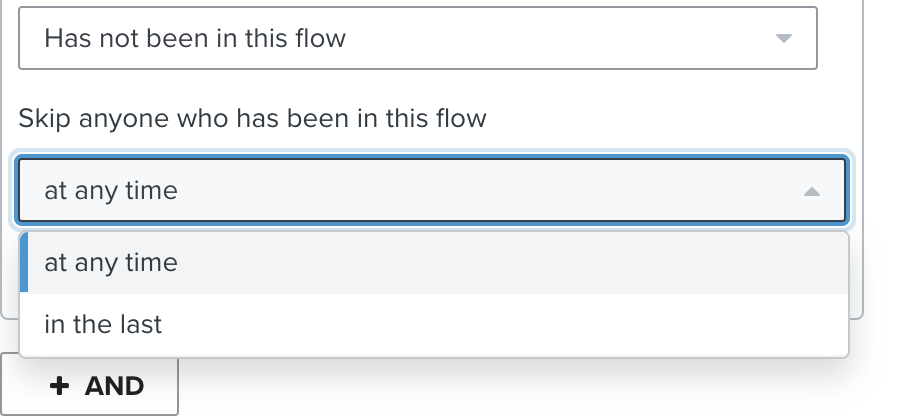
8. Adjust the days to your desired cool-down period (typically 7).
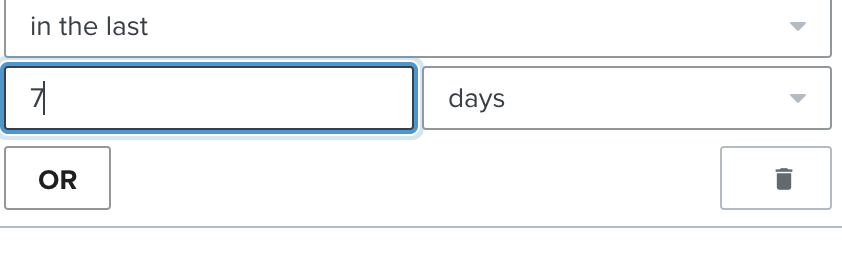
9. Click Save.
Article URL: https://help.instant.one/duplicate-emails-same-flow
Keywords:
## Instant IP Address
We strongly recommend whitelisting Instant's IP address (52.65.211.20) to ensure uninterrupted and efficient transactions.
By whitelisting, Instant will seamlessly integrate with your existing security infrastructure and eliminate potential disruptions.
To whitelist an IP Address:
-
Access Firewall Settings: Log in to your firewall or network security settings.
-
Find Whitelisting Options: Look for options related to whitelisting or trusted IP addresses.
-
Add Instant's IP Address: Enter the below values into the designated field for whitelisted IP addresses. Save the changes.
- 52.65.211.20
- 13.211.54.7
- 13.237.186.221
- 13.238.86.157
-
Test Operations: After whitelisting, conduct tests to confirm that Instant operates smoothly within your environment.
Article URL: https://help.instant.one/instant-ip-address
Keywords:
## Why is Instant AI still sending abandonment emails for out-of-stock products?
Instant AI checks product availability directly through your Shopify API integration before including any product in an abandonment email.
That means your Shopify inventory needs to accurately reflect what you do and don’t want to send.If a product appears sold out on your site but Shopify still marks it as available for sale, Instant AI will treat it as in stock.
Common Reasons why Shopify might still say “available”
-
“Continue selling when out of stock” is enabled
Shopify keeps the product available even when inventory reaches 0 if the product is flagged to allow selling while out of stock. To accurately use your stock levels, ensure that this is not enabled. Alternatively, if you wish to keep it enabled, we are still able to continue including this product in emails however we will assume it is always available and won't be skipping if it is out of stock.
-
Inventory tracking is turned off
If tracking is disabled, Shopify assumes the item is always in stock and won't send any stock information to Instant through the API. Ensure that inventory tracking is enabled for us to accurately read stock levels.
-
Multiple inventory locations
Shopify treats a product as available if any connected location has stock assigned to the Online Store channel. Check if you have multiple locations connected, and you may accidentally have more than one of them connected to your online store availability. Sometimes unused or test locations are still linked to your online store and will cause it to falsely show as available.
-
Hidden or unpublished variants
Shopify marks the whole product as available if any variant can still be sold — even one you’ve hidden on your site. Check to see if you have different variants available on your site that may mean the customer could purchase an alternative variant. If this is the case, it's still valid for Instant AI to send an email promoting the product if it has stock of variant.
-
Theme or app customisation
You might have a theme or app that hides the Add to Cart button when an item sells out (for example, a “Notify Me” or “Pre-order” app).
These only change how the site looks. Shopify will still consider the product available in the backend unless that has also been changed. Check your product inventory settings and make sure it also displays as unavailable in the backend and not just on your website.
-
Subscription or bundle products
If a product is purchasable as part of a subscription or bundle, Shopify still flags it as available, even if the one-time purchase is sold out. Check if you have any variants such as subscriptions or bundles available that include this product, but the subscription or bundle sku is still available.
-
Browse events resolve to an in-stock variant
When a shopper views a product, we receive events for the variants they interacted with on the product page. Most Shopify product pages will default to previewing a variant that is available, and will therefore send product viewed events that include an in-stock variant.
In practice, this means that many shoppers will view both in-stock and out-of-stock variants during a single session. We check whether any of the variants viewed are in stock. If at least one variant is available, the product will be treated as in stock and can be included in Browse Abandonment flows.
Article URL: https://help.instant.one/why-is-instant-ai-still-sending-abandonment-emails-for-out-of-stock-products
Keywords:
## Pixel troubleshooting
① Check if events are coming through to your Klaviyo account.
- Log into your Klaviyo account and navigate to Metrics (under the Analytics menu in your sidebar).
- Search for Page Viewed - Instant Audiences. This metric fires every time an identified shopper visits a page on your website, so these should come through regularly.
- Drill into the Page Viewed - Instant Audiences metric and select activity feed. This presents a list of recent activity for this metric.
If you have recent activity for the Page Viewed - Instant Audiences event, your pixel is likely working fine. To be thorough, you may wish to check the other Instant Audiences events.
If there is no recent activity for the Page Viewed - Instant Audiences event, your pixel may not be correctly installed, and you should continue onto the steps that follow.
② Check if the pixel is present in the code for your website
If our pixel is not installed in your website's code, we won't receive events. It's possible that via an update to your theme, or changes to your website configuration, you may have accidentally removed our pixel from your theme.
- Navigate to your website, and use your browser's Inspect Element tool (right click → Inspect).
- Search for cdn.instant.one in the source code from your browser's Inspect Element tool. This should return a <script> tag, inside your website's <head> tag, pointing to our Javascript file.
- Search for InstantConfig in the source code from your browser's Inspect Element tool. This should return another <script> tag, deeper in the page.
If both scripts are not present, your pixel is likely incorrectly installed.
Our team can further troubleshoot your pixel for you, please reach out if needed.
Article URL: https://help.instant.one/pixel-troubleshooting
Keywords:
## Understanding Event Match Quality (EMQ)
Event Match Quality (EMQ) is a score provided by Meta that measures how well the actions happening on your website (the “events” like purchases, sign-ups, or cart additions) can be matched to real people on Facebook and Instagram.
Essentially, a higher EMQ means Meta knows with greater confidence exactly who took each action on your site. This is incredibly important for ad targeting and attribution: if Meta can reliably identify the customers behind each conversion, your ads can be delivered more efficiently to lookalike audiences who are more likely to convert.
EMQ is determined by the quality and completeness of customer data sent along with each event. When your website only provides limited or anonymous data, EMQ remains low, reducing Meta’s confidence and limiting the effectiveness of your ads.
This is where Instant makes a difference.
By enriching event data with customer identifiers, Instant ensures that each event sent to Meta is packed with information that boosts Meta’s ability to accurately match web visitors to their profiles on its platforms.
When Instant is active, you’ll typically notice EMQ scores increase in your Meta Events Manager. This improvement results from the added data depth and reliability, allowing Meta to attribute conversions more precisely and target ads with greater efficiency.
Higher EMQ ultimately means your campaigns are reaching more relevant audiences, driving down wasted spend and increasing your campaign’s return on investment.
Article URL: https://help.instant.one/understanding-event-match-quality
Keywords:
## How do you send custom events to Instant Audiences?
Sending custom events to the Audiences pixel is easy to setup.
This guide will walk through how you can send custom events to Instant Audiences.
It is common that even while using Instant's native integrations into platforms like Shopify and BigCommerce, that modifications to a product page, such as dynamic DOM rendering (without refreshing the page) may result in the native integration not sending through event such as product viewed, or add to cart events.
You may also want to track additional add to cart events from upsell pop-ups, or other locations that are custom built and not picked up by our native integrations.
Please contact your customer success manager if you run into any issues - we are happy to guide you or your developers through this implementation.
Steps to send custom events to Audiences:
To send custom events to Audiences, please complete the following:
- Locate where you would like to send a custom event to Audiences.
- Copy and paste the below snippet of code to the location to where you'd like to send the custom event.
window.InstantJS.track("EVENT_TYPE", [{
    provider: "KLAVIYO",
    event: EVENT_DATA
}]);
- Replace EVENT_TYPE with the type of event you wish to send.
- Replace EVENT_DATA with the data you'd like to send to Audiences. Audiences will then send this data through to your marketing integrations such as Klaviyo.
Note that the available events are as follows:
- PAGE_VIEWED, COLLECTION_VIEWED, PRODUCT_VIEWED, ITEM_ADDED_TO_CART, CART_VIEWED, CHECKOUT_STARTED, CHECKOUT_ADDED_PAYMENT_INFO, CHECKOUT_ADDED_ADDRESS_INFO, PURCHASE_COMPLETED
Examples:
Example #1: Klaviyo Viewed Product: If you render your product page dynamically (which may interfere with Shopify customer event tracking), then you can send a product viewed event to Audiences directly. See below for an example.
window.InstantJS.track("PRODUCT_VIEWED", [{
    provider: "KLAVIYO",
    event: {
        ProductName: "Expandable Bag",
        ProductID: "12345",
        Categories: ["Bags"],
        URL: "https://example.com/product/expandable-bag",
        Brand: "YourBrand",
        Price: "$199.99",
        CompareAtPrice: "$249.99",
        ImageURL: "https://example.com/images/expandable-carry-on.jpg"
    }
}]);
Article URL: https://help.instant.one/send-custom-events
Keywords:
## How does the Back in Stock flow work?
Instant AI’s Back in Stock Flow triggers 1 hour after a product is added back into stock. The short delay helps avoid false triggers if stock levels fluctuate.
Who gets enrolled
-
Shoppers who viewed the product in the last 60 days.
-
We’ll automatically exclude shoppers who already purchased the product in that time (e.g. if someone bought it 45 days ago, then it went out of stock, they won’t be re-enrolled).
-
If a shopper adds the product to cart, they’ll also be excluded. That’s because once it’s in their cart, we prioritise abandoned cart emails over back in stock.
How the flow works
-
By default, Back in Stock runs as a 3-part email series, but you can customise this to add or remove touchpoints.
-
Emails only send if the shopper is not already in an active abandonment flow (e.g. Abandoned Checkout). Abandonment takes priority.
-
Coupons aren’t included by default, but you can enable them in coupon settings.
Shopify inventory requirements
-
Only works with standard Shopify inventory management. Third-party inventory apps are not supported.
-
If you have multiple locations, the product will count as “in stock” if at least one location can fulfil online orders.
-
If a product has “Continue selling when out of stock” turned on, we’ll never send a back in stock flow for it.
-
The product must be published and available on the Online Store for the flow to trigger. If stock is added to a draft or unpublished product, no emails will send.
FAQ's
How can I delay sending a back in stock email?
If you want to pause emails, make sure the product is not available to order online. In Shopify, you can keep the product published (so it still shows on your site) but remove its Online Store availability or mark it as unavailable for purchase. While it’s visible but not purchasable, Instant won’t trigger a back in stock email. As soon as it’s both published and purchasable with stock available, the flow will send.
What happens if a customer returns stock?
Any increase in stock counts — whether it’s from a return, manual adjustment, or receiving new stock. If the product is published and purchasable, this will trigger a back in stock flow to all shoppers who viewed it in the past 60 days (and haven’t purchased or added it to cart since). If the product is unpublished or unavailable online, no email will send.
Article URL: https://help.instant.one/how-does-the-back-in-stock-flow-work
Keywords:
## How do I setup my flows for sale periods?
Leverage your existing flows for major sales periods like Black Friday/Cyber Monday.
During the holiday period, your business may decide to run seasonal promotions to boost revenue and generate more activity for your brand. Because these promotions typically run for one day or over the weekend, we recommend adjusting your existing flow to avoid any flow disruption or duplicate emails.
By making small changes to your existing flows, you can ensure timely email delivery and accurate tracking of activity for your seasonal promotions.
Best Practices for Flow Adjustments:
Option #1: Edit the Existing Email or SMS
Modify the current content in your email to reflect the seasonal promotion.
Steps:
- Navigate to your existing flow.
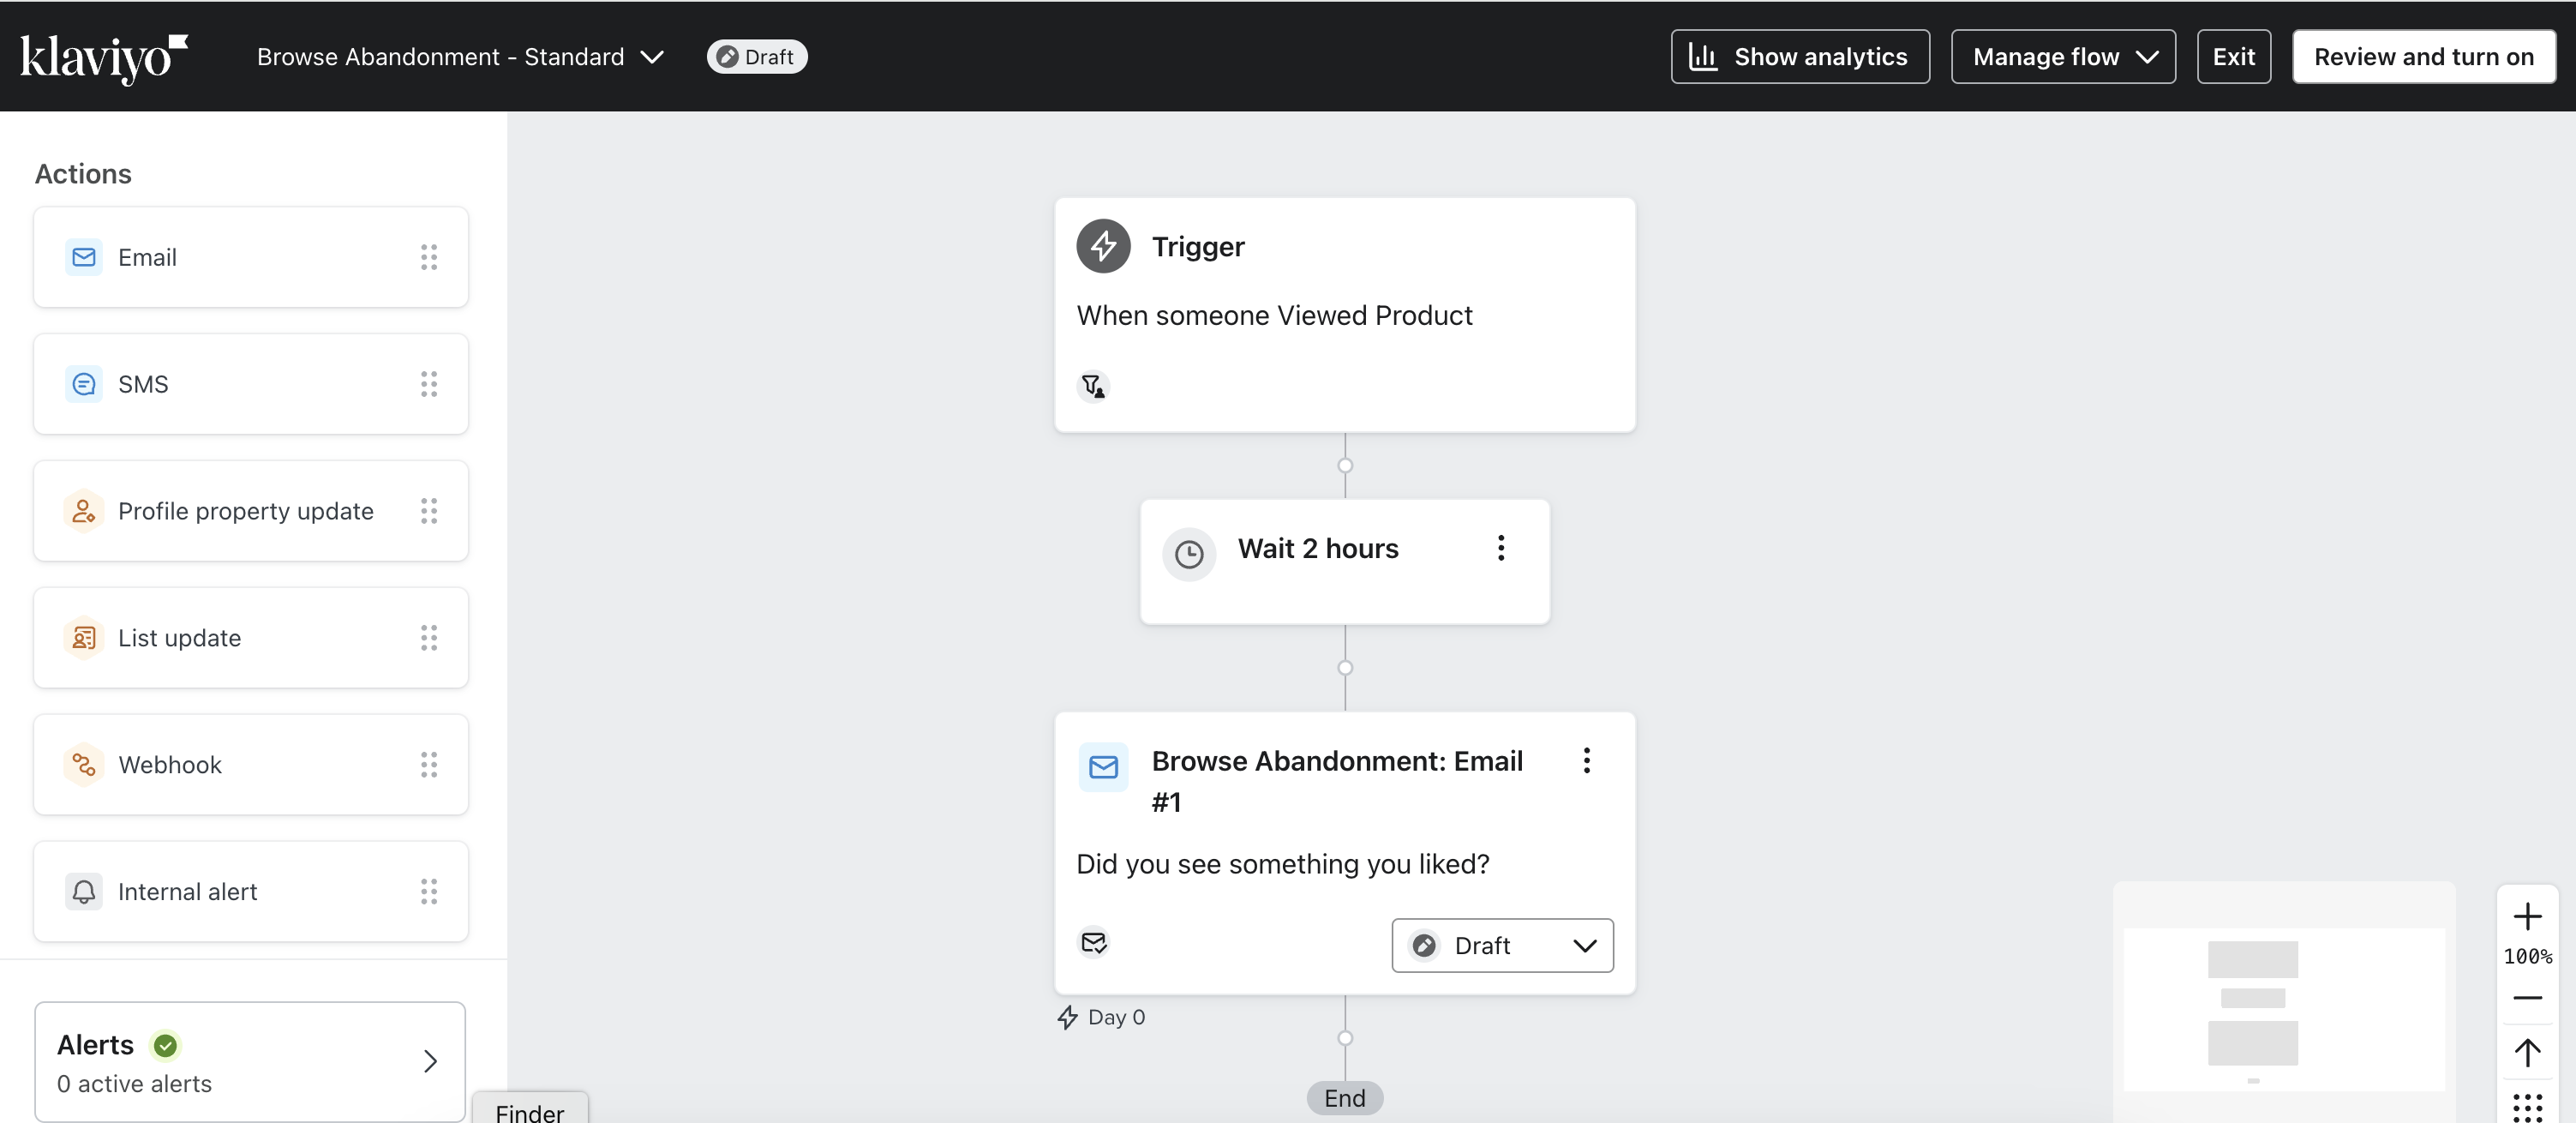
2. In the email box, click on the three dots in the top right corner of the email and select Edit.
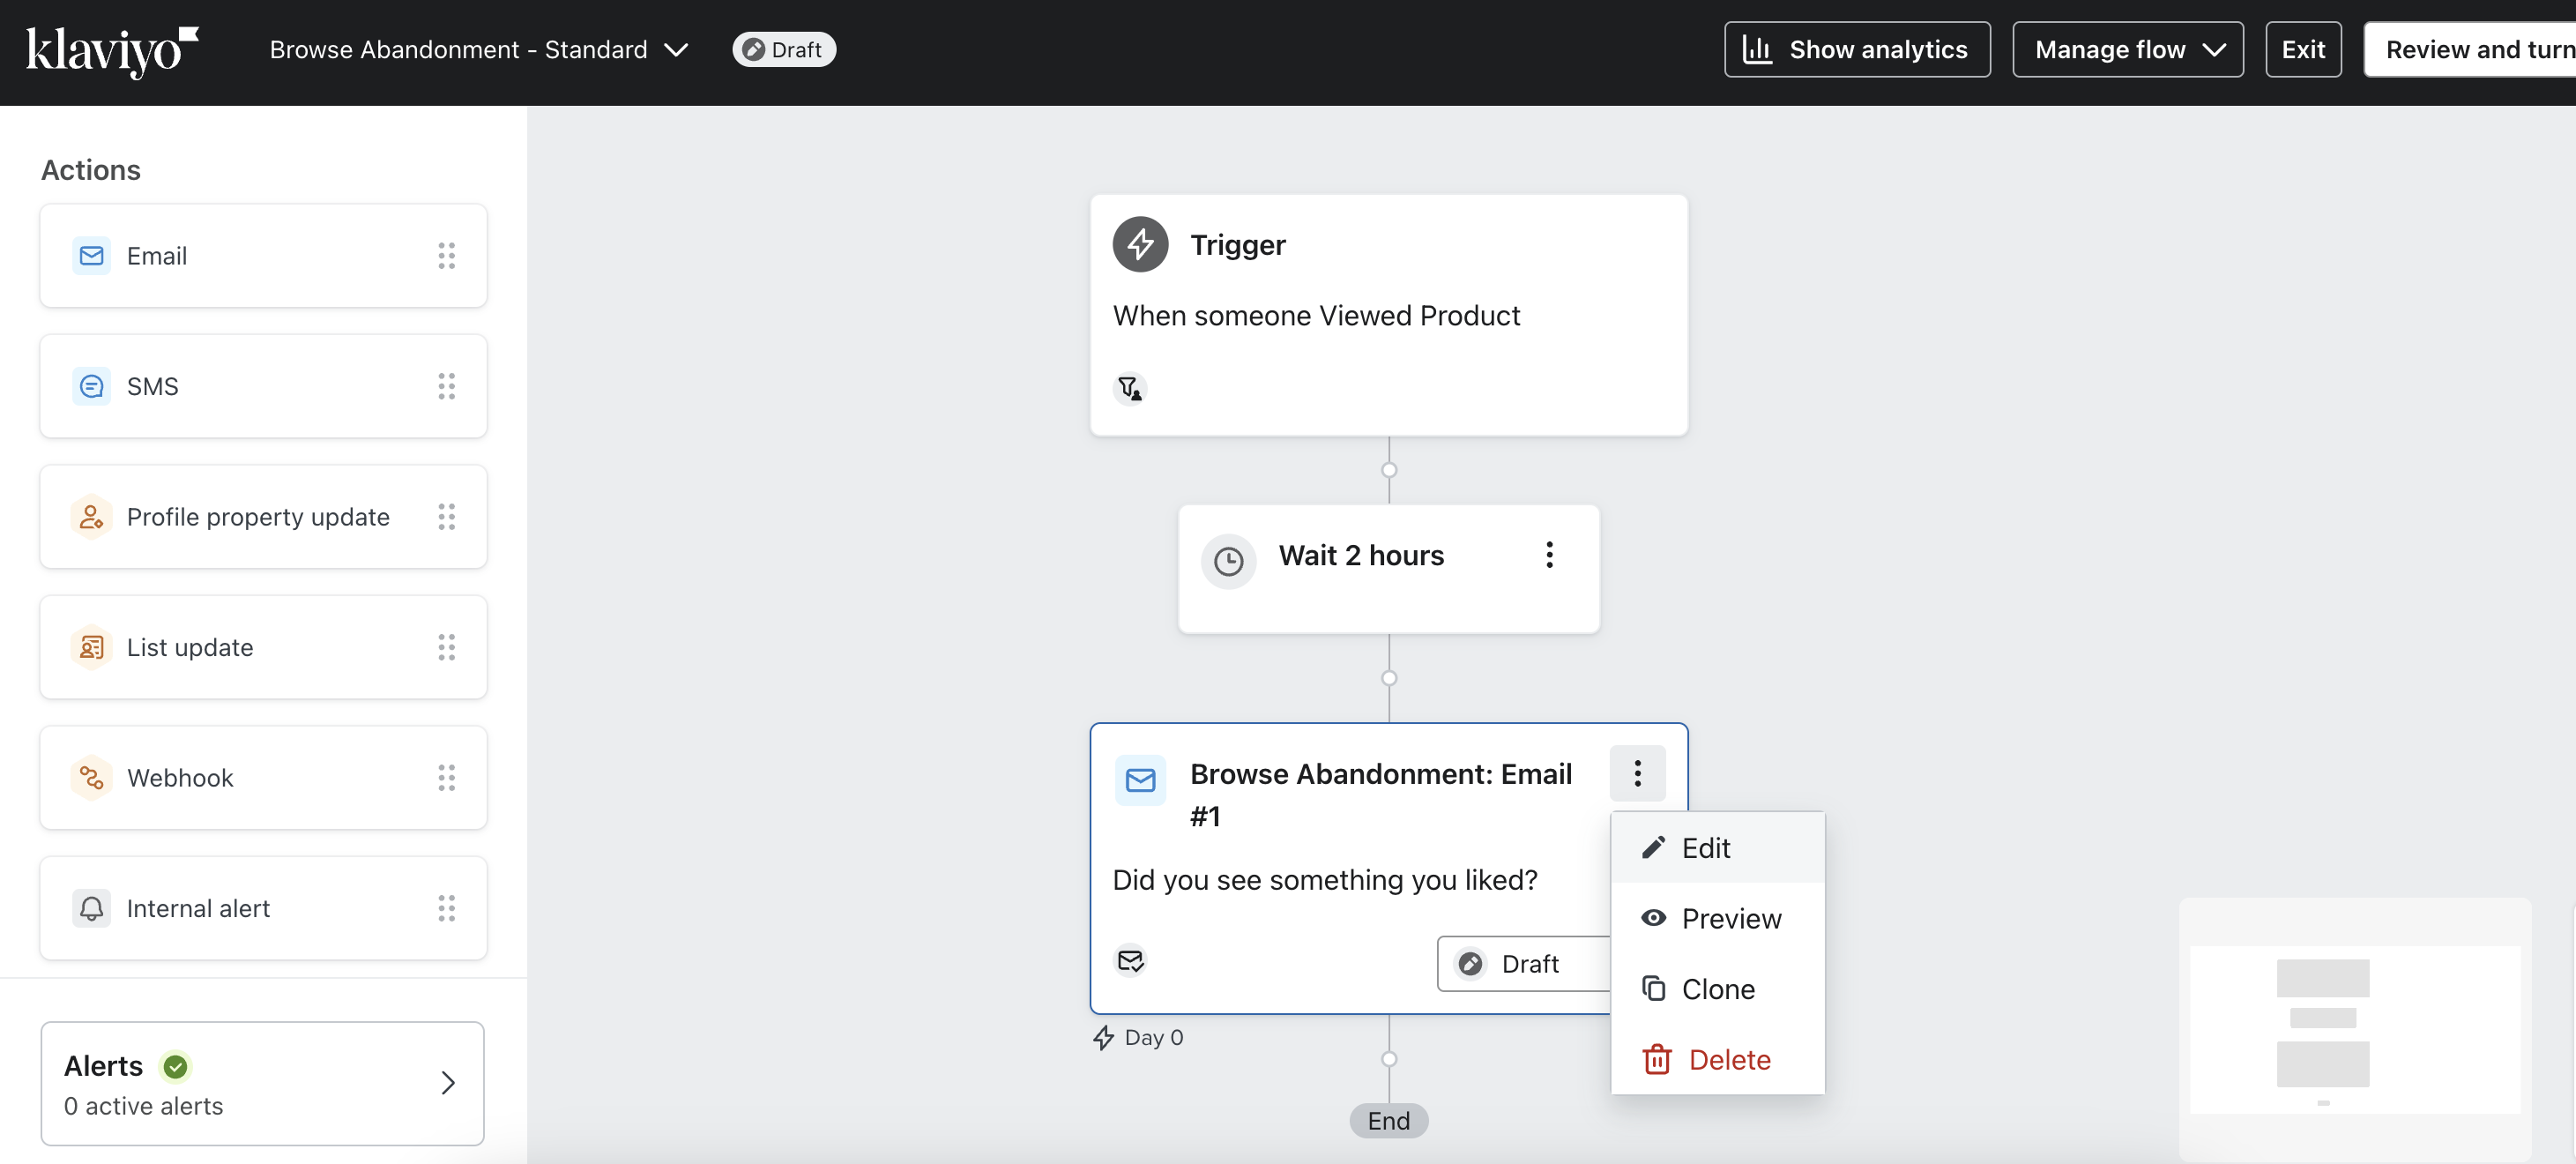
3. On the next page, click the subject line and update the content to reflect your promotion.
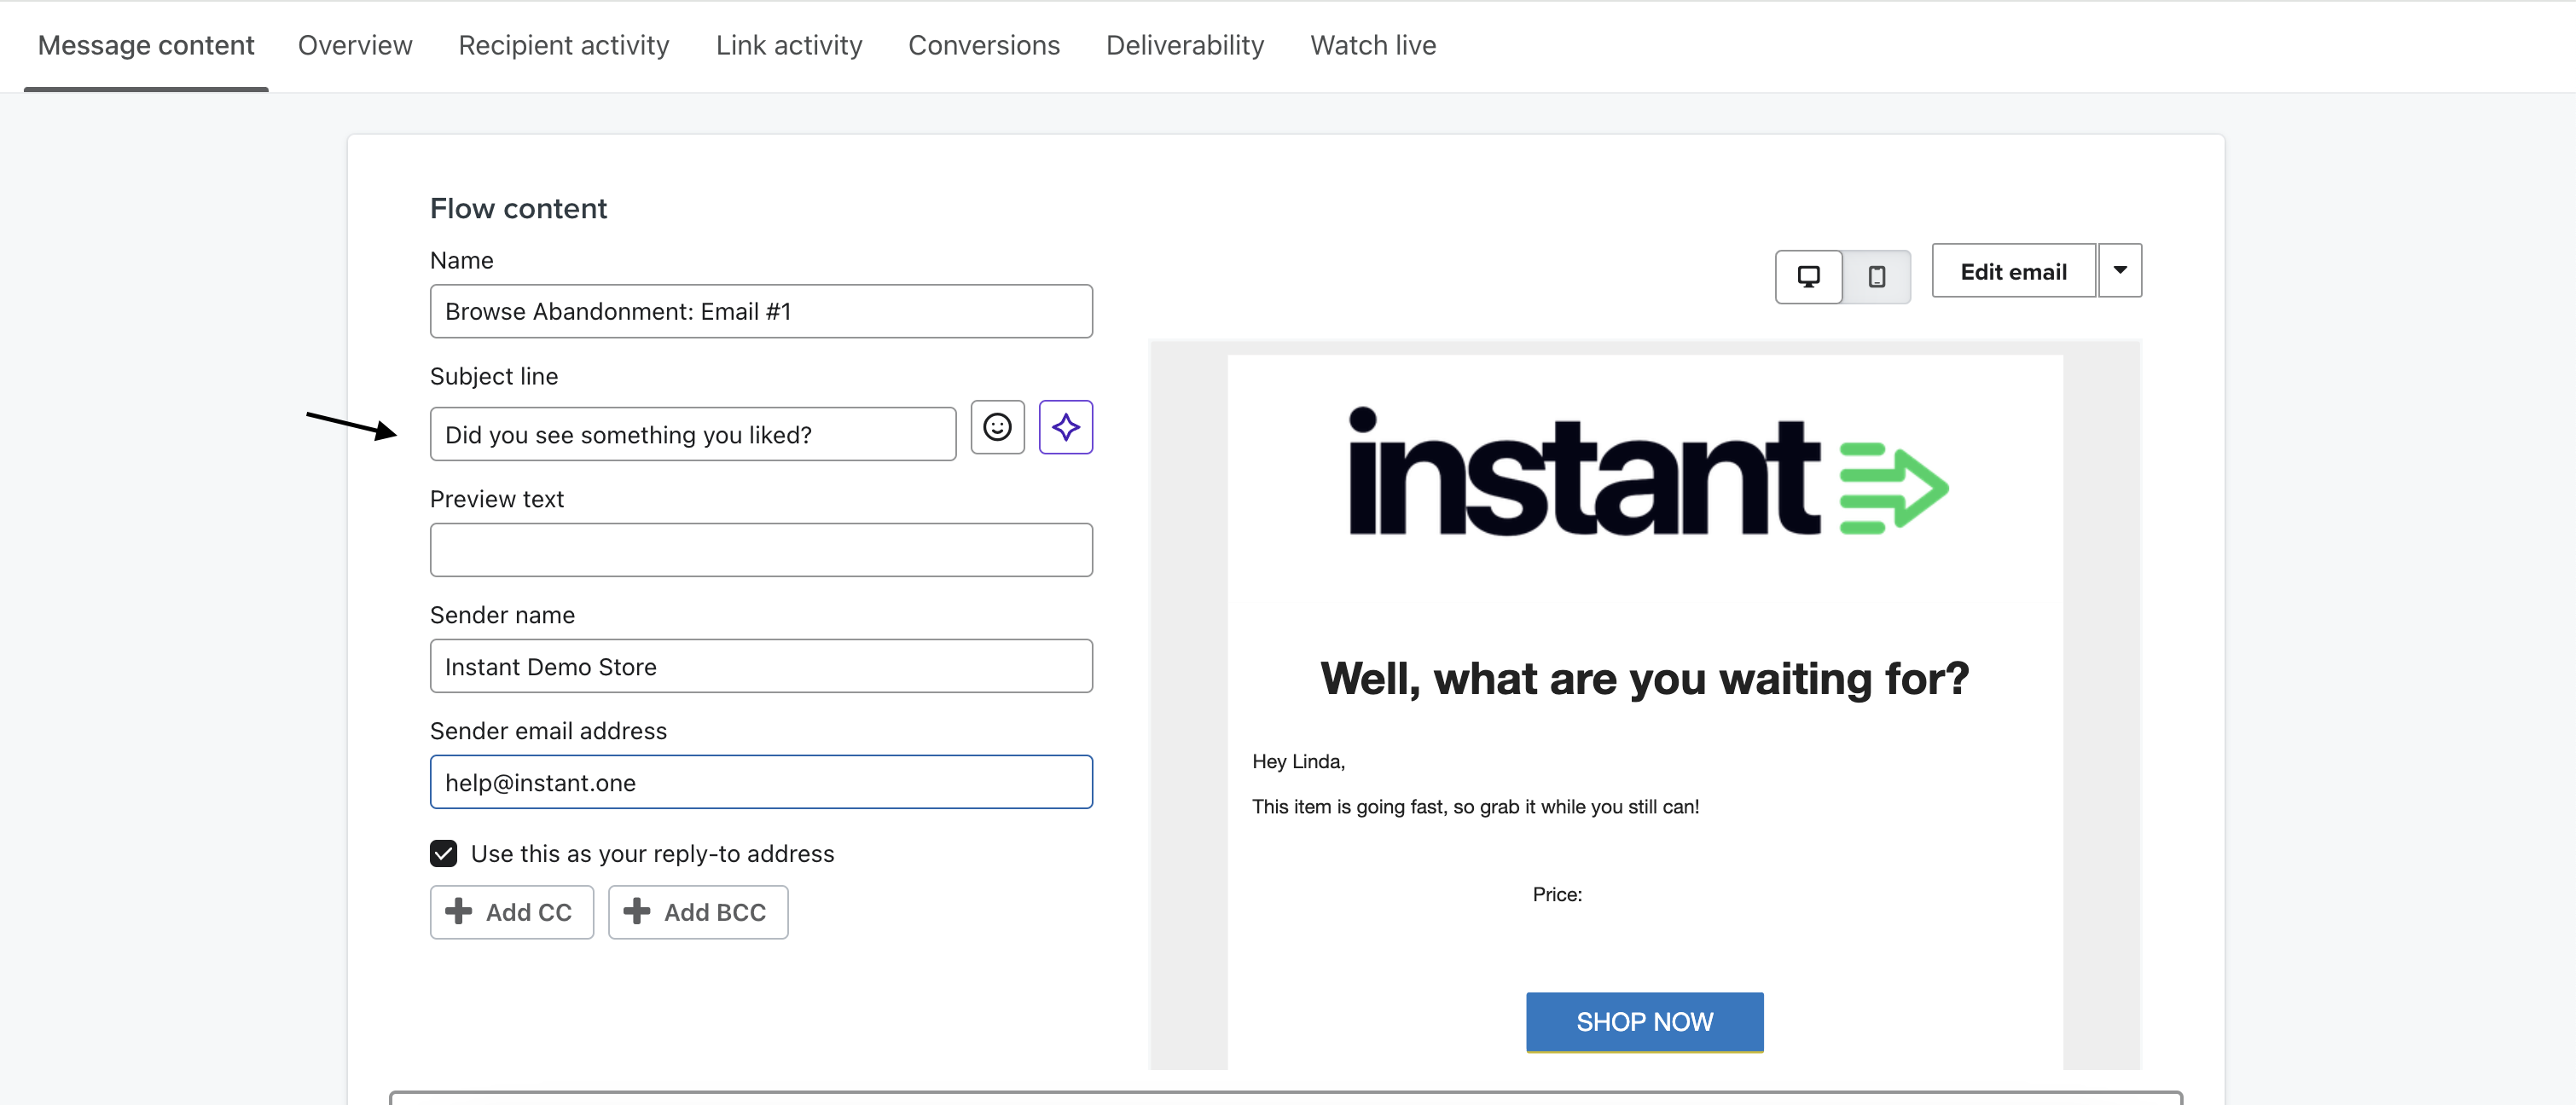
4. Once you've made the necessary changes, click Done in the top right-hand corner.
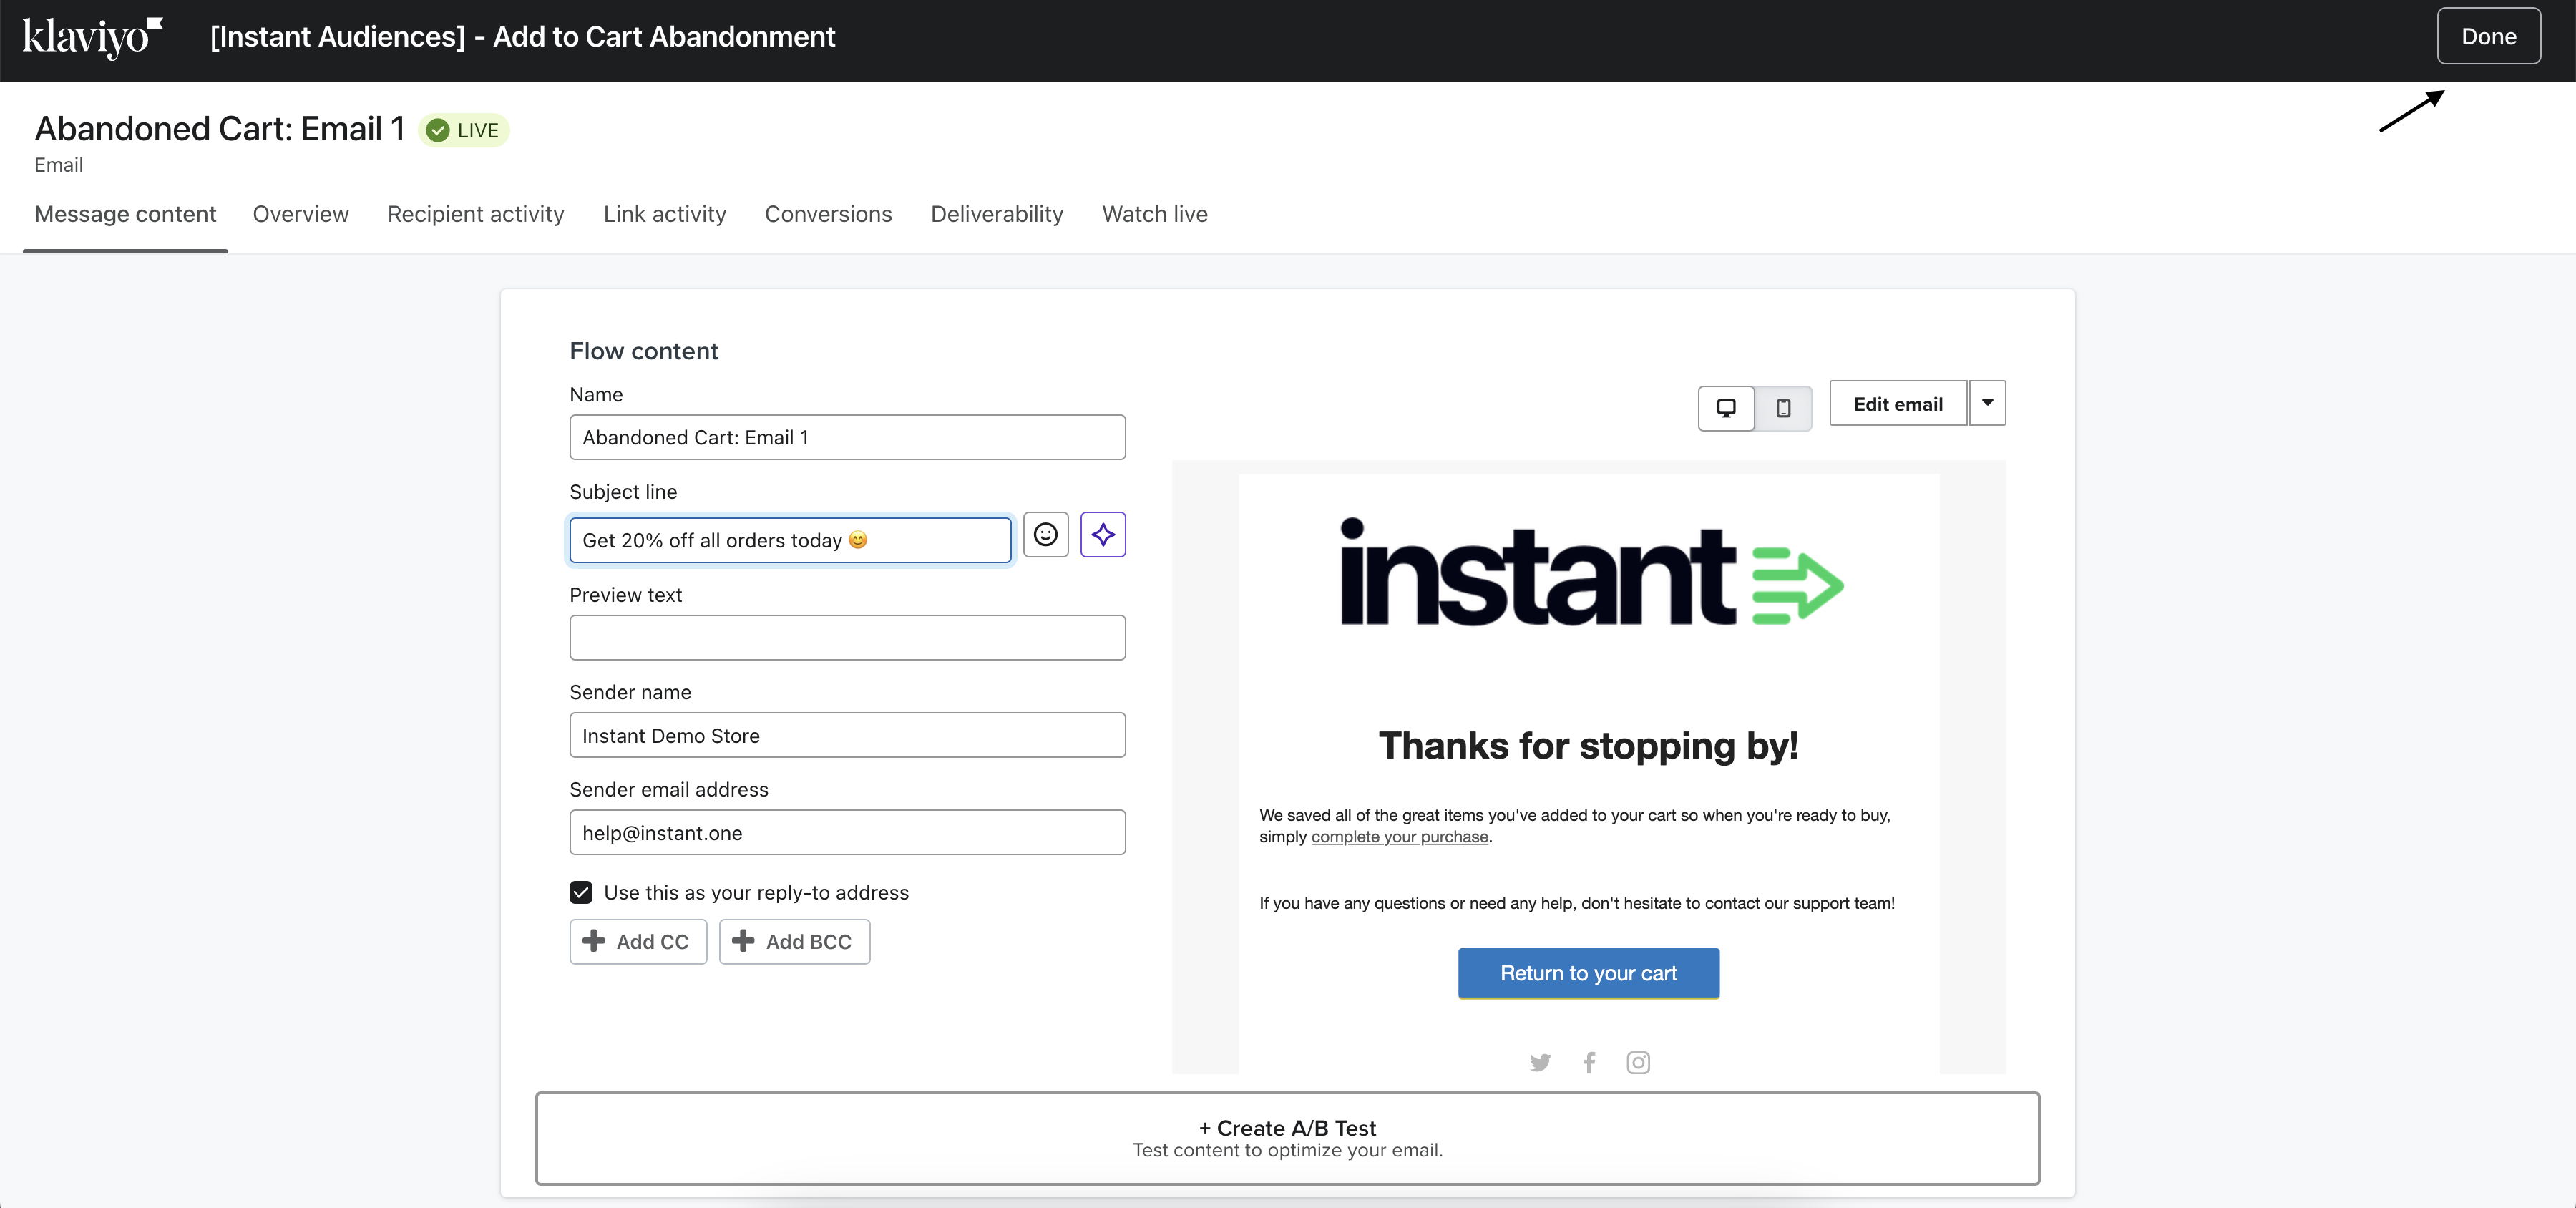
5.Your updated changes will now be reflected in the email.
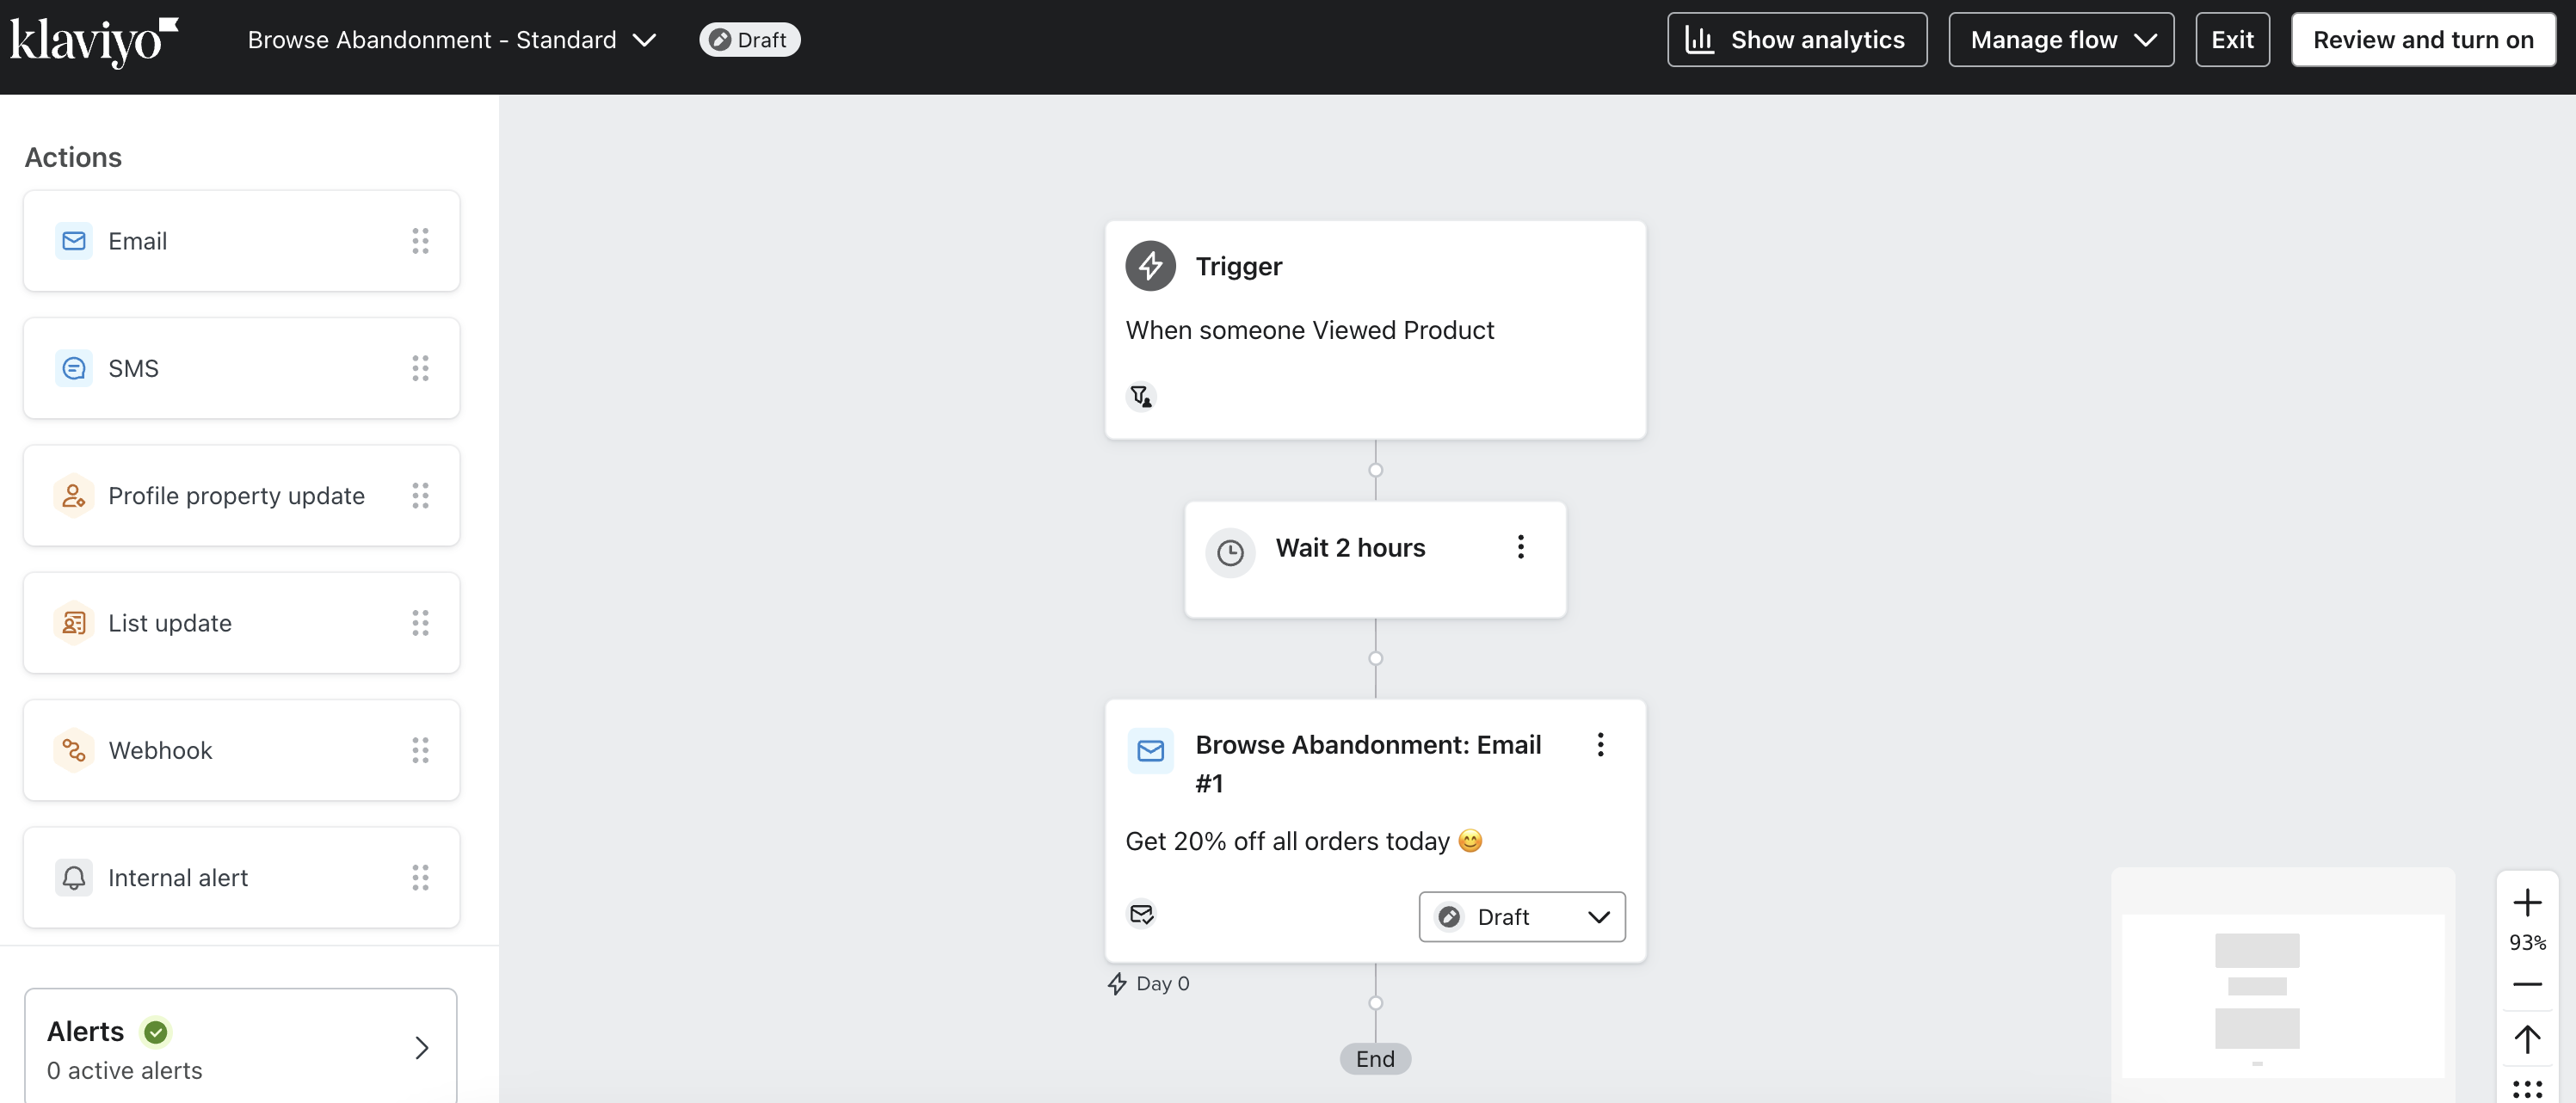
6. To test the changes, click on your email to open the panel on the right, and scroll down to the subject and sender section.
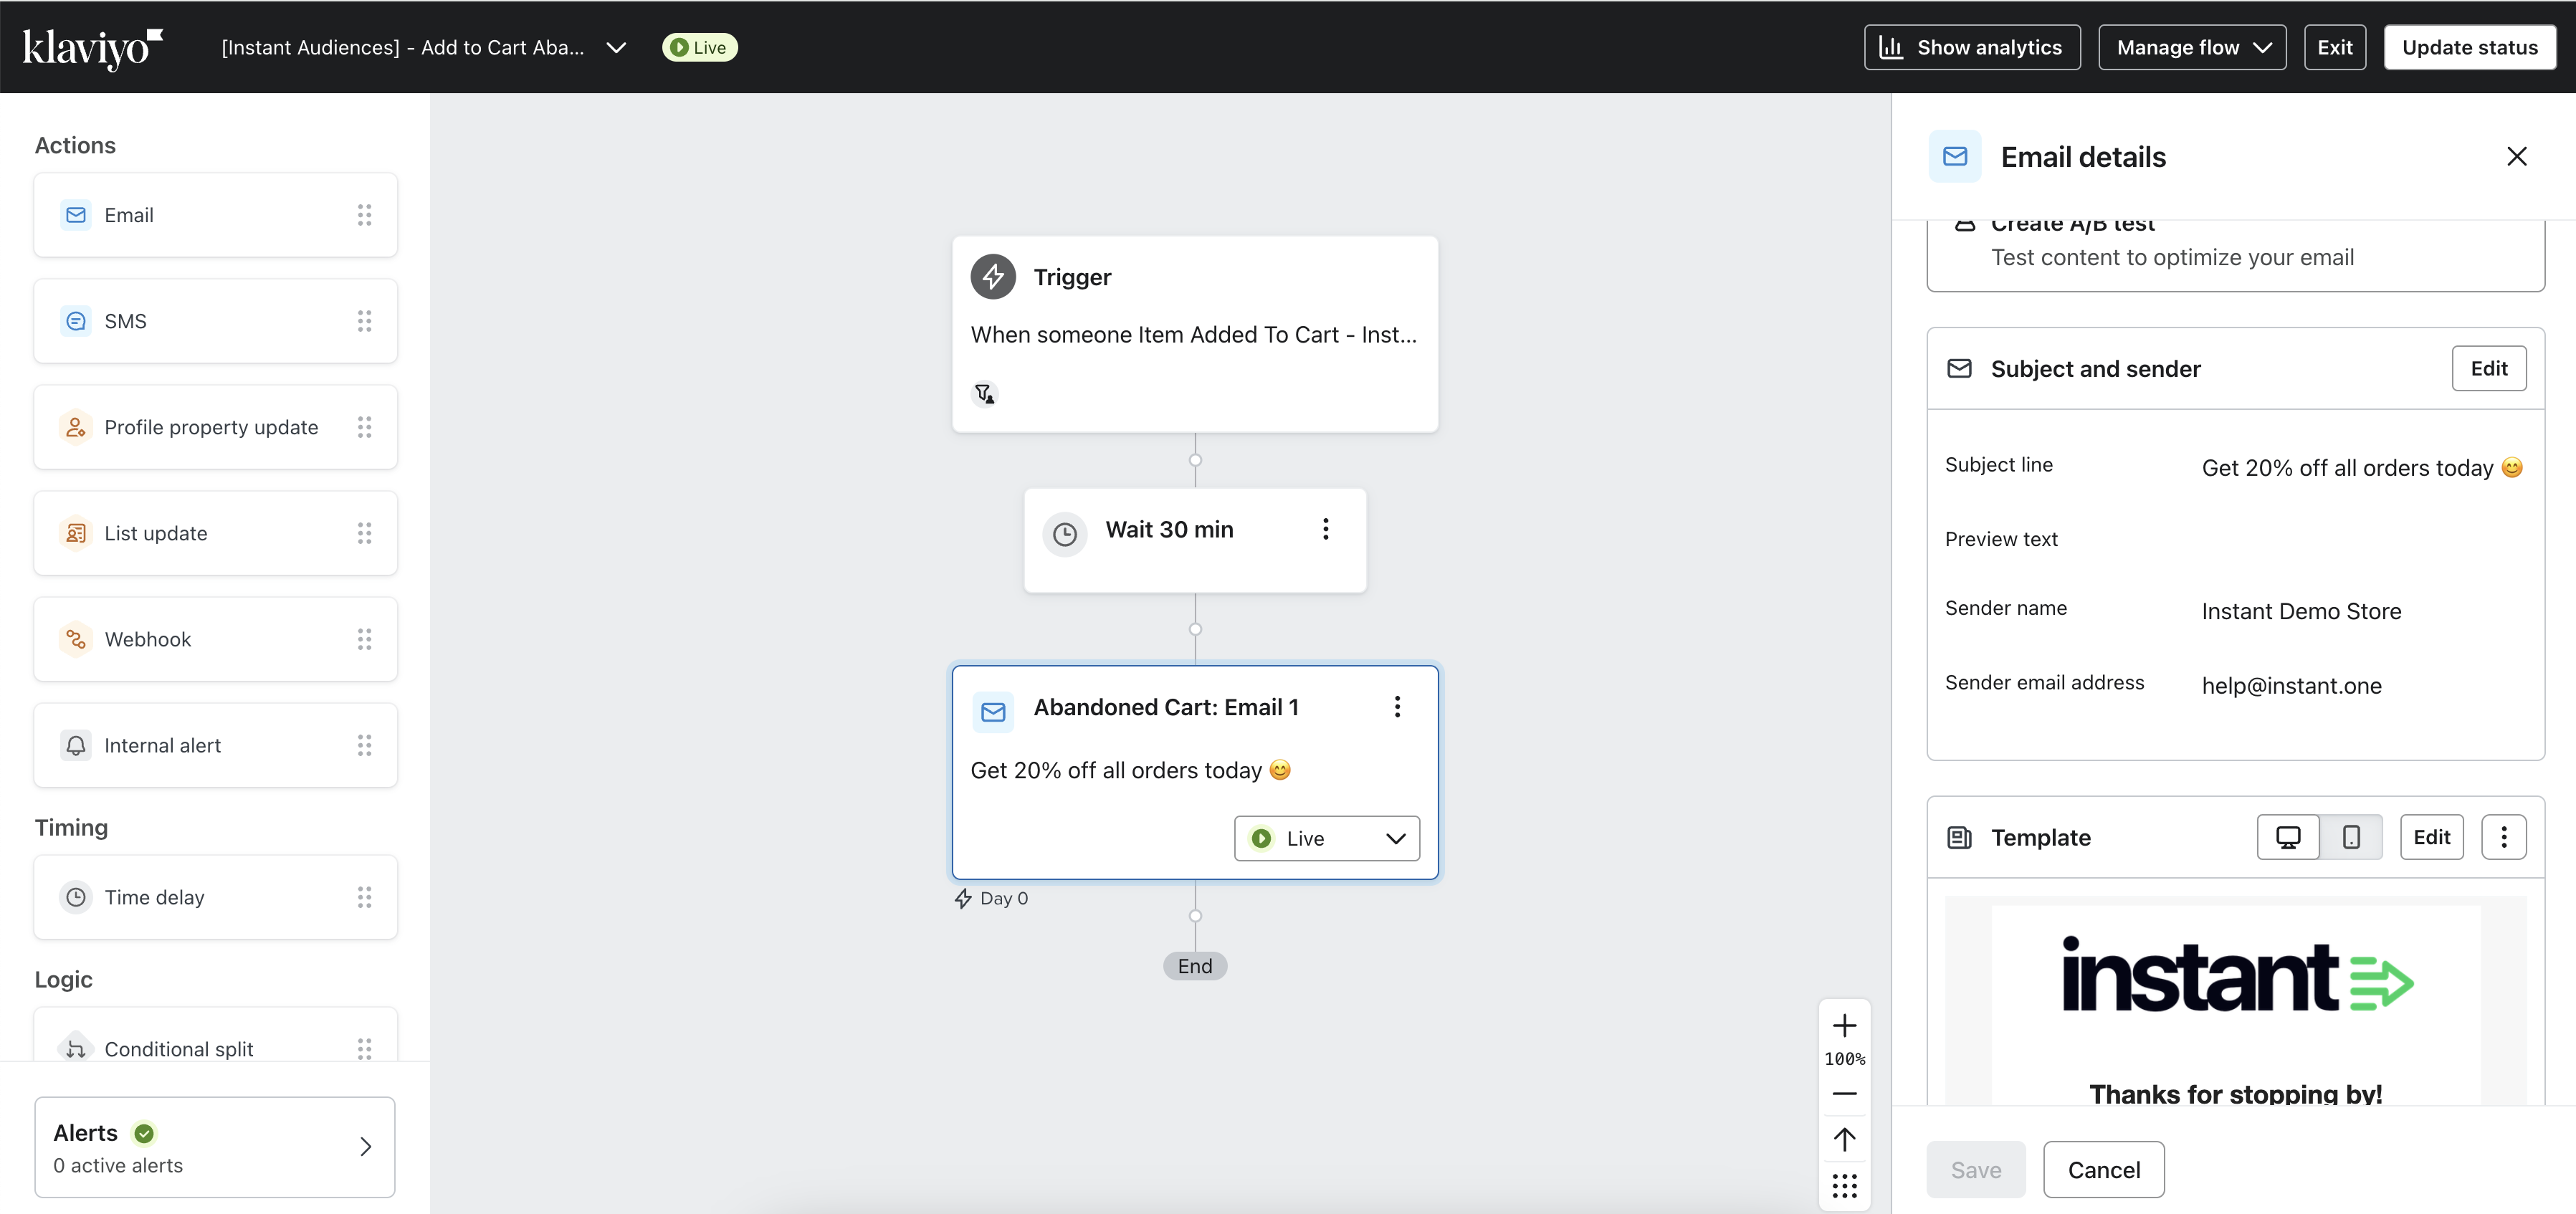
7. Click Edit.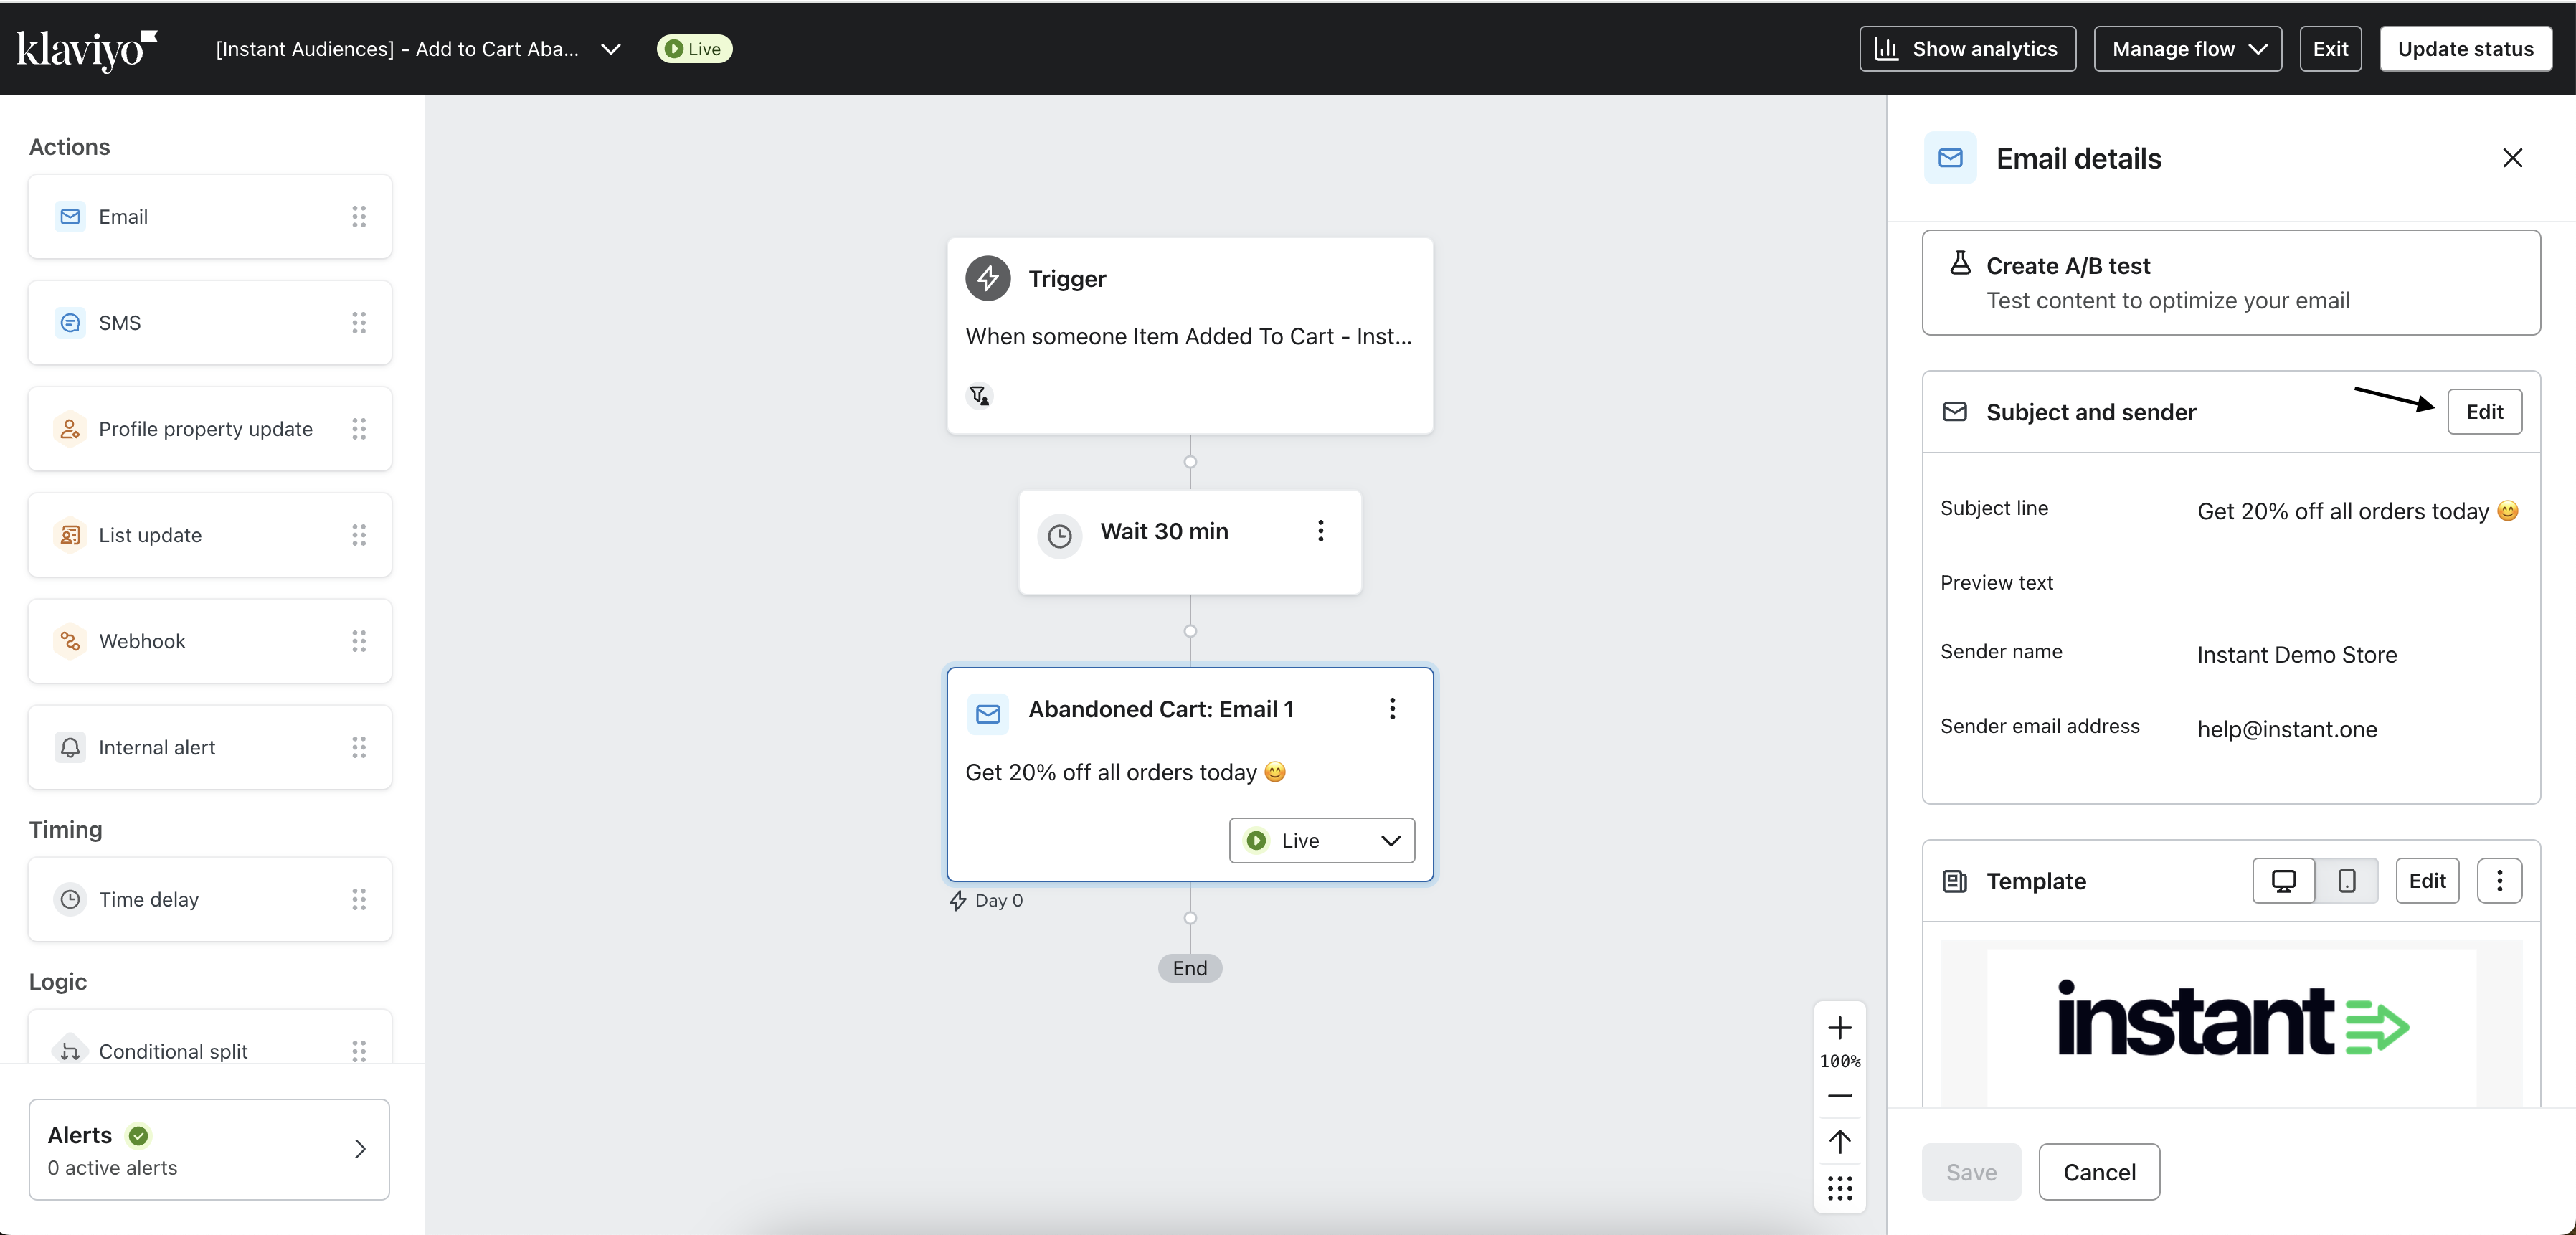
8. On the Manage Template page, click Preview & Test.
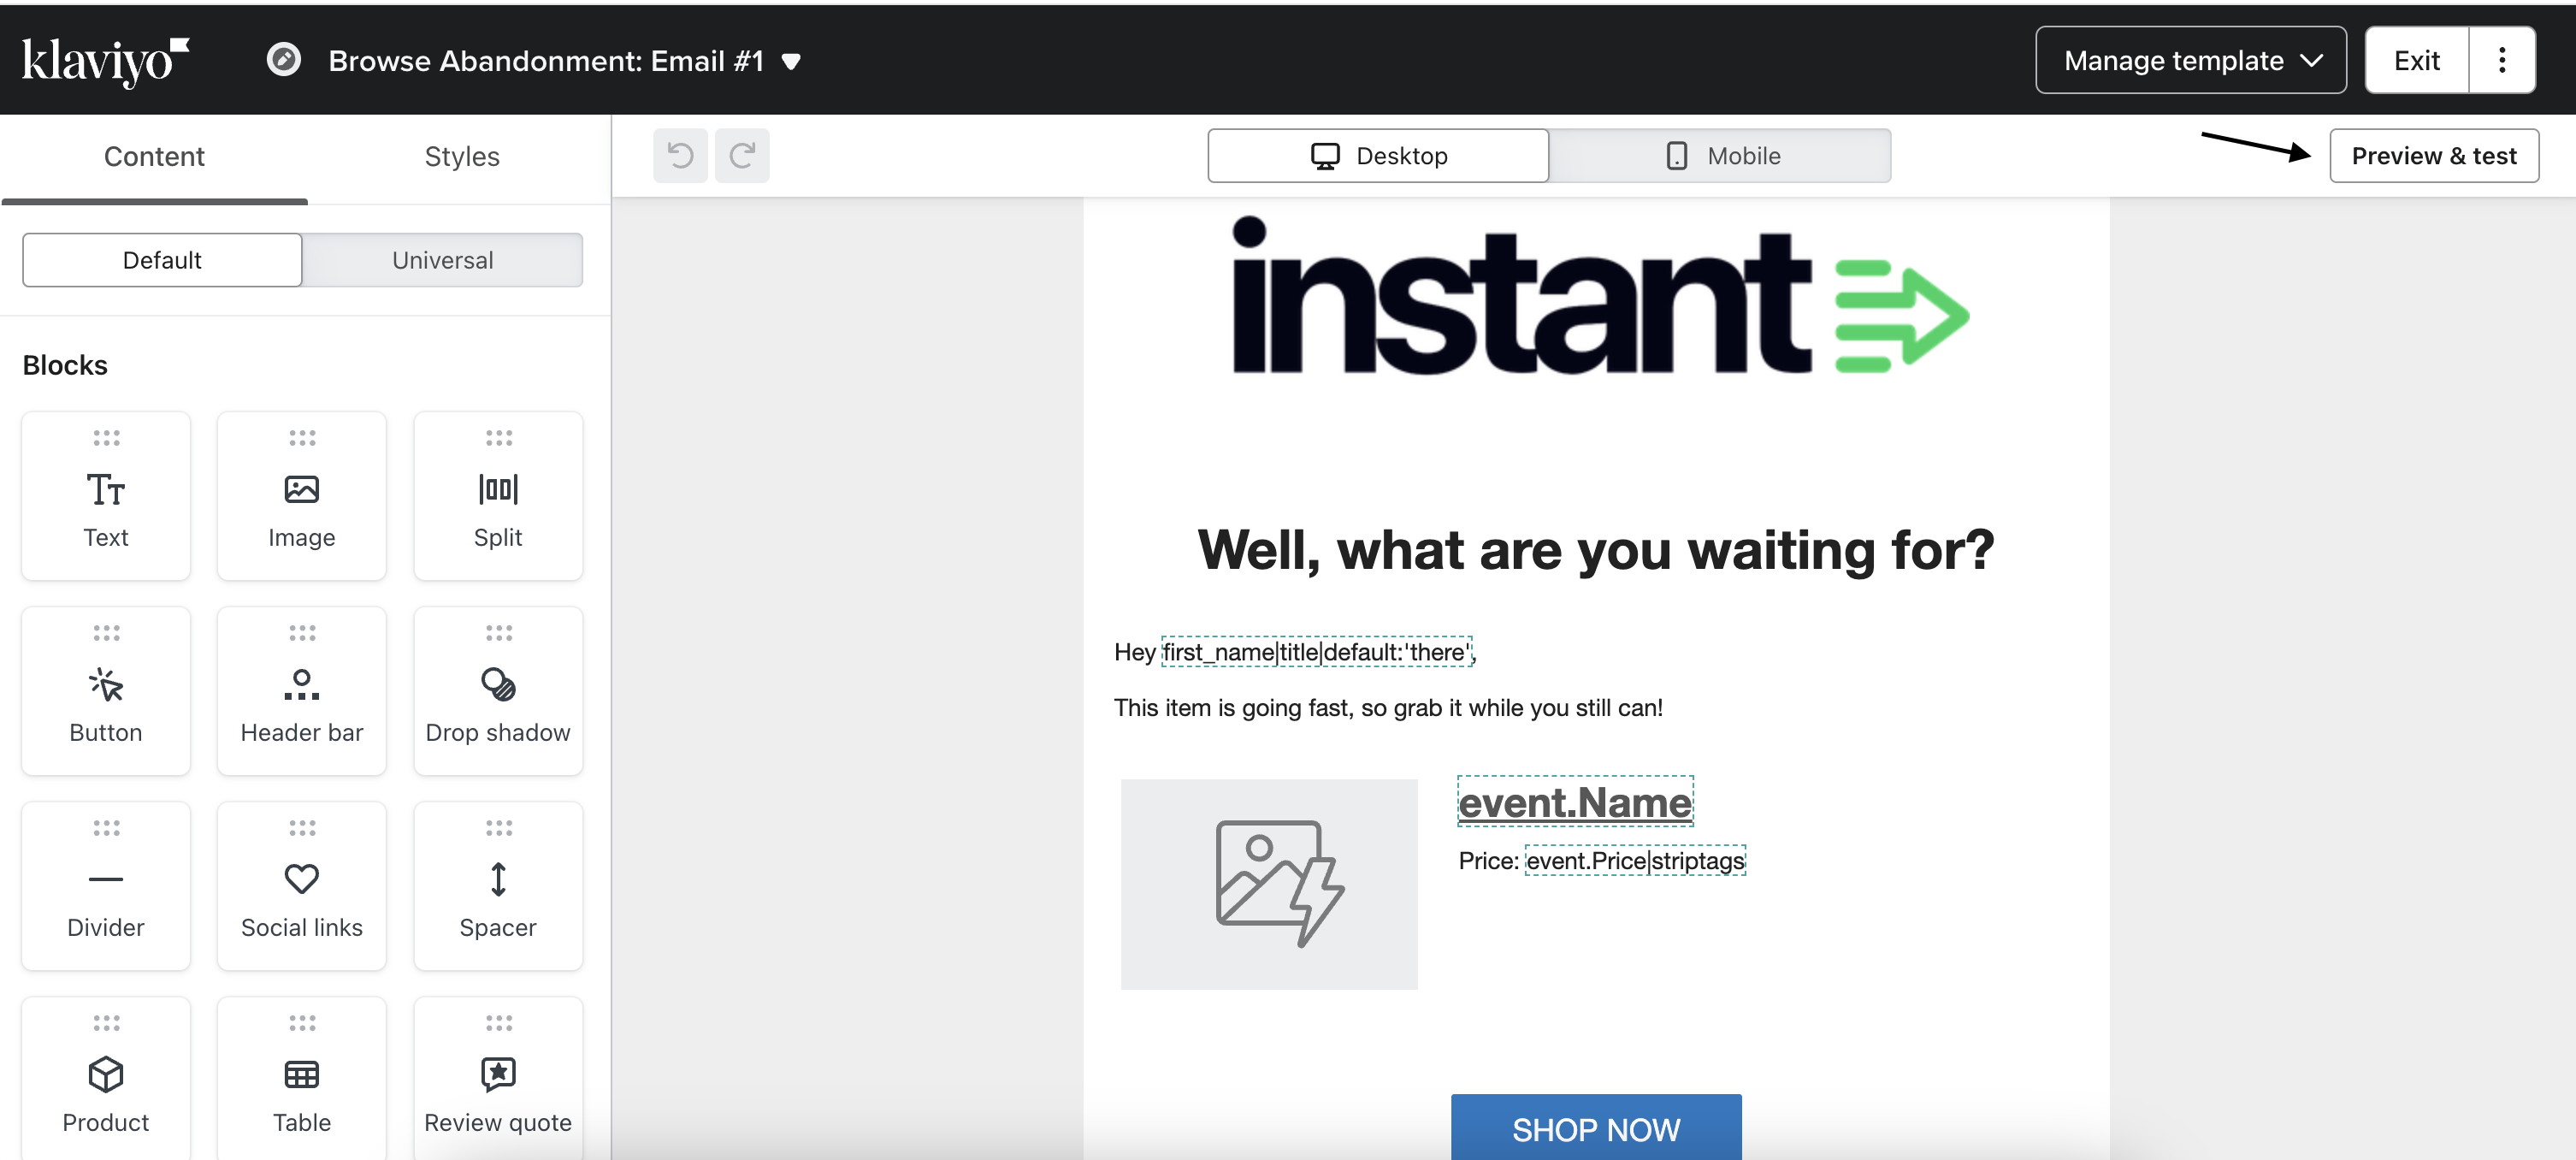
9. On the Preview Mode page, click Send test.
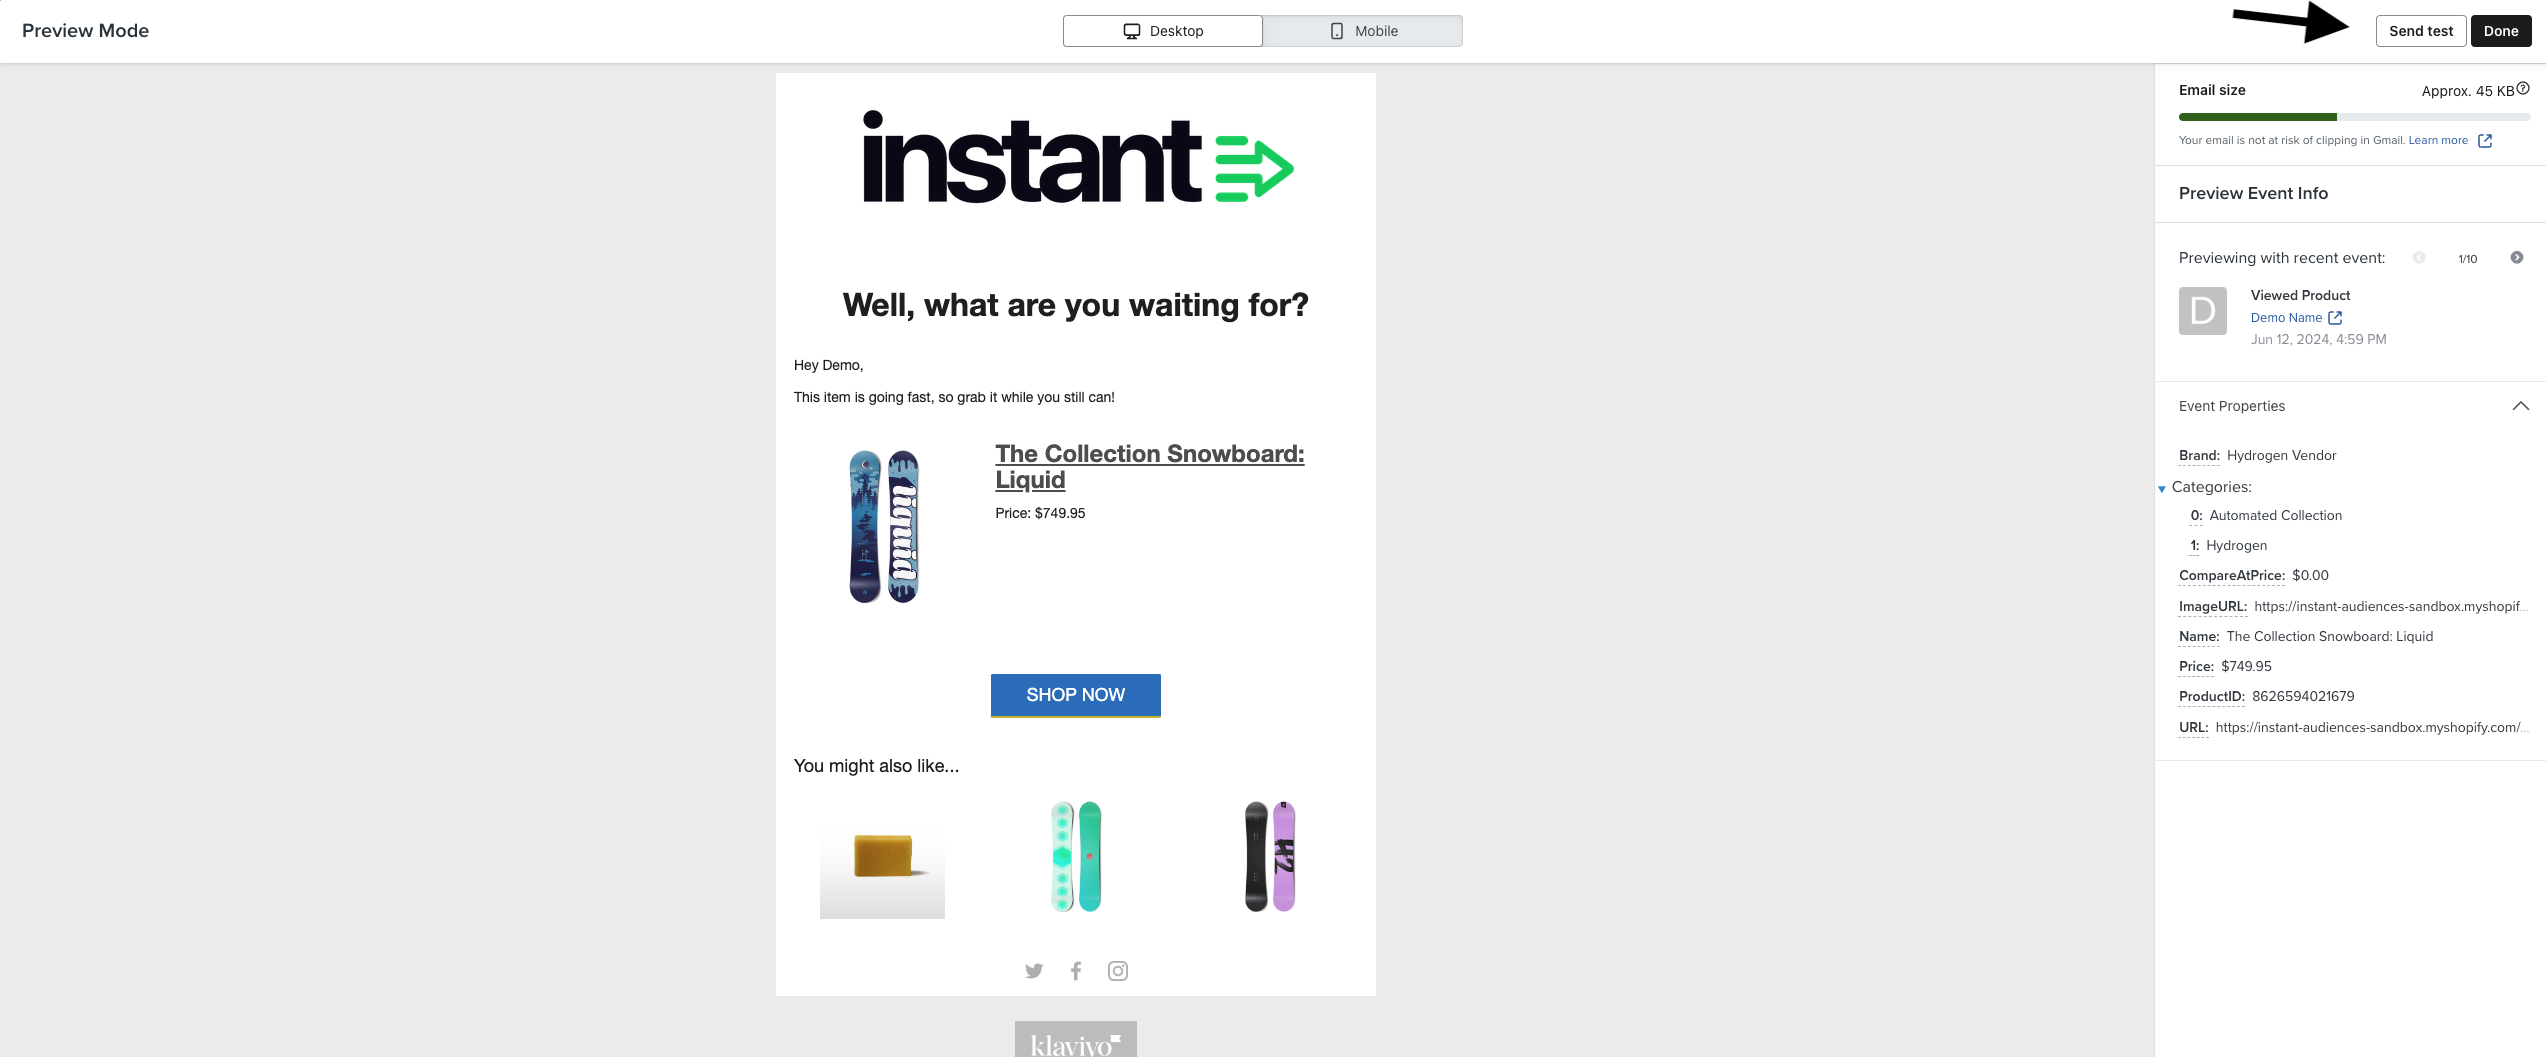
10. In the popup, enter your email address and click Send. The preview will be sent to your inbox.
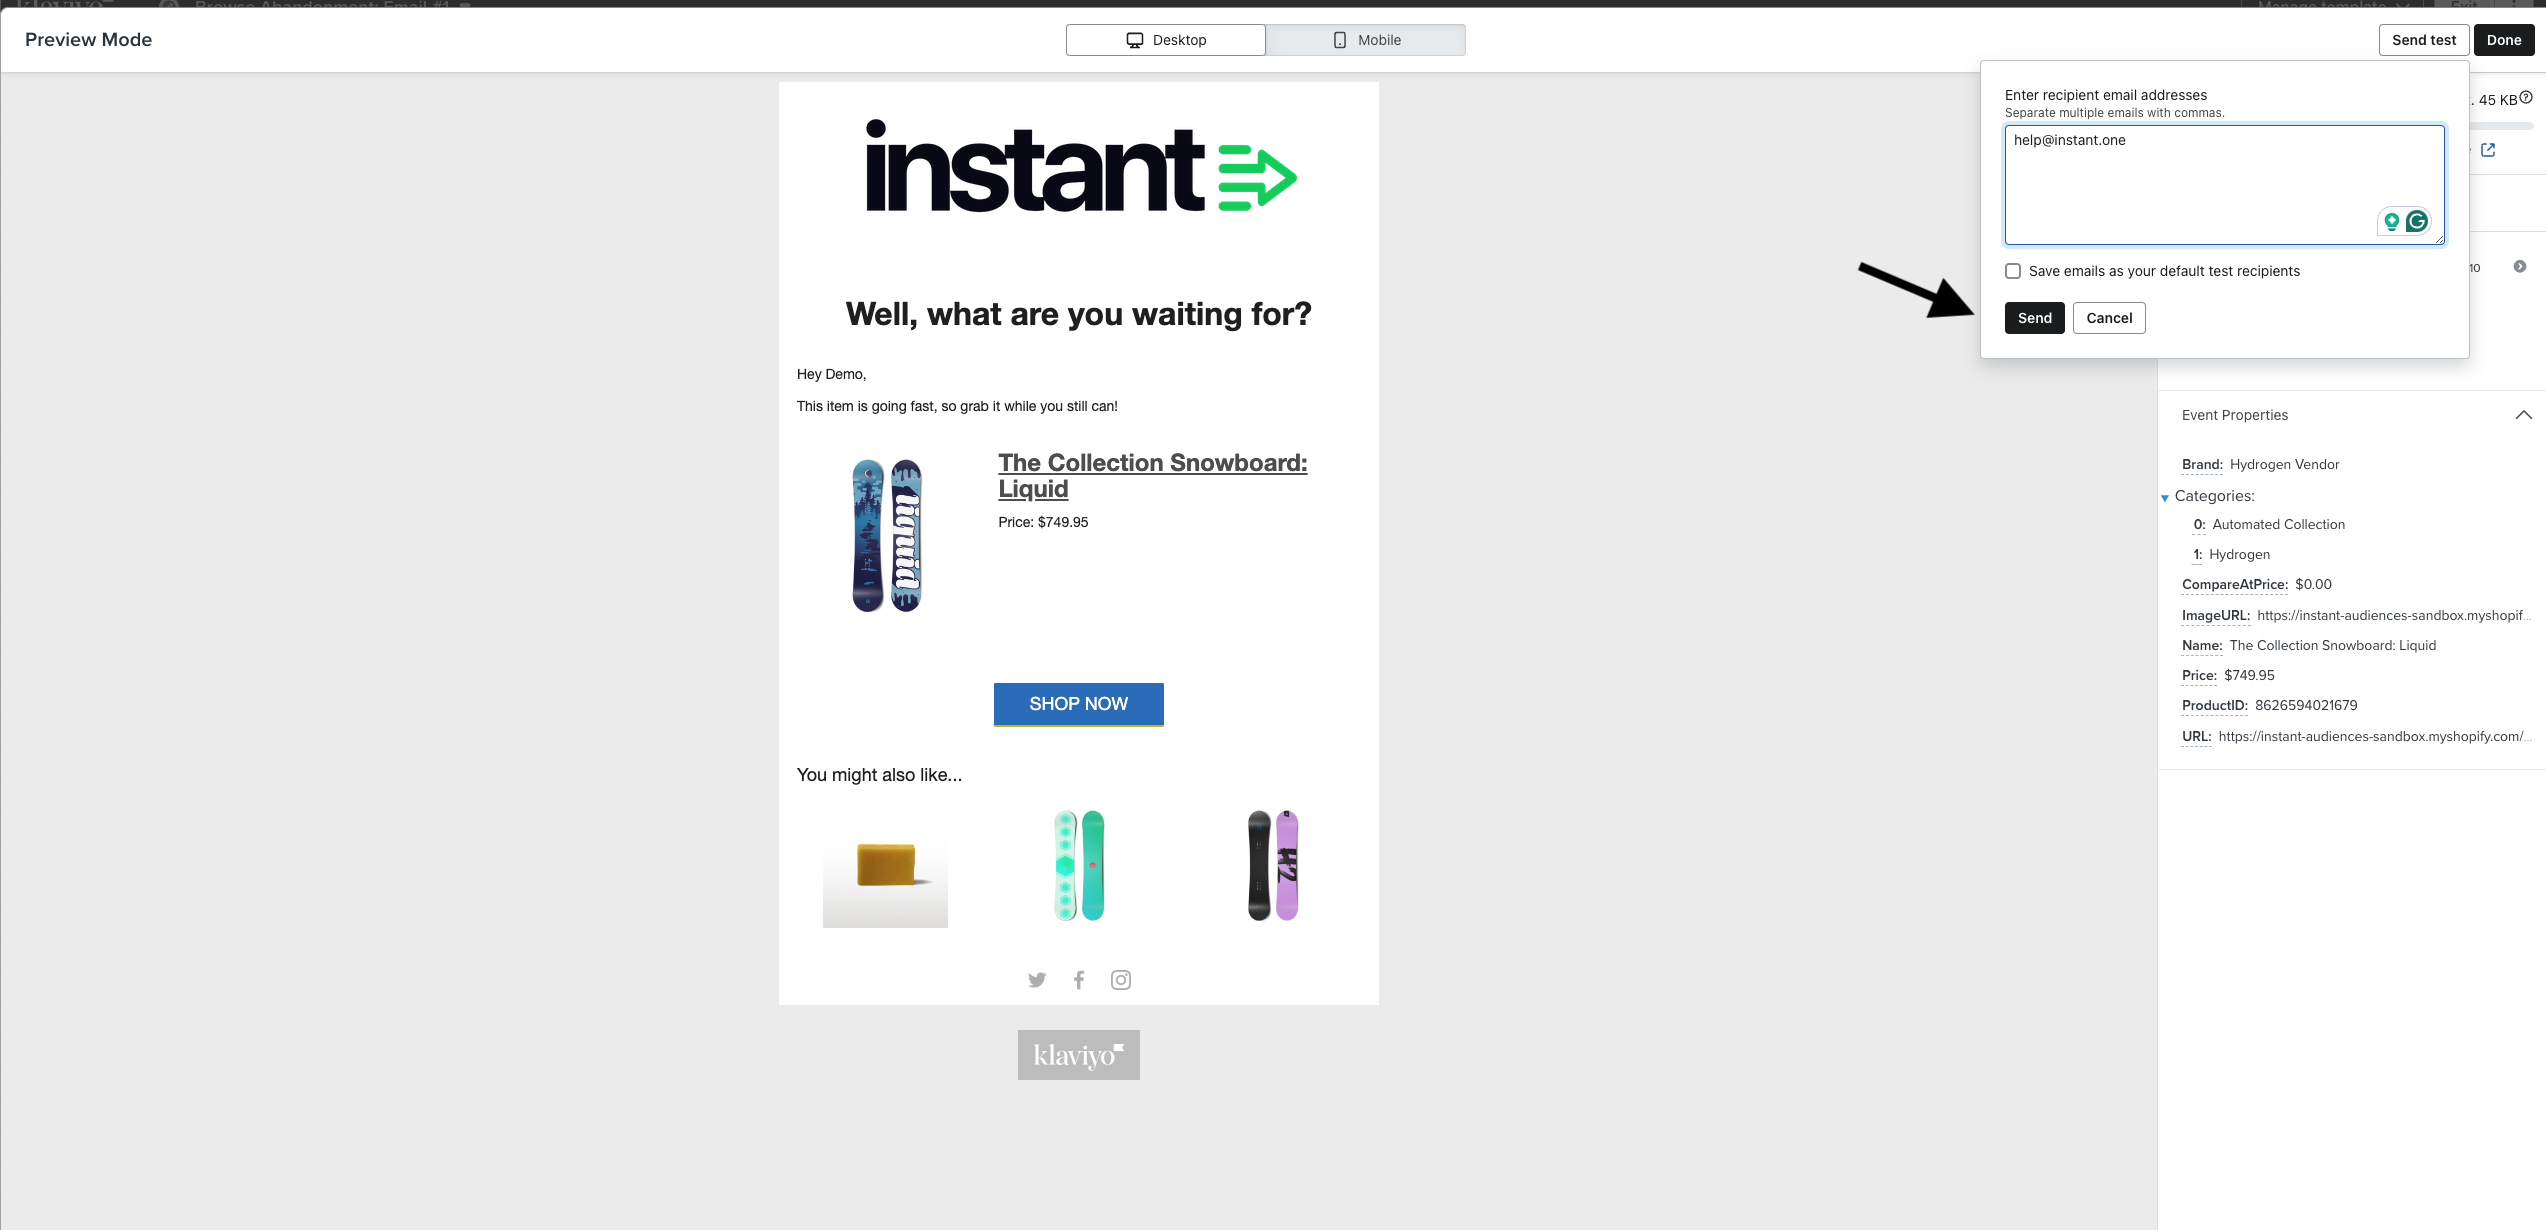
Option #2: Clone the Existing Email or SMS
Clone your existing email and modify the new copy to fit your needs.
Steps:
-
Navigate to your existing flow and click on the email under the trigger. Next, click the three dots in the top right corner and select Clone.

2. A cloned copy of the email will appear directly below the original email.
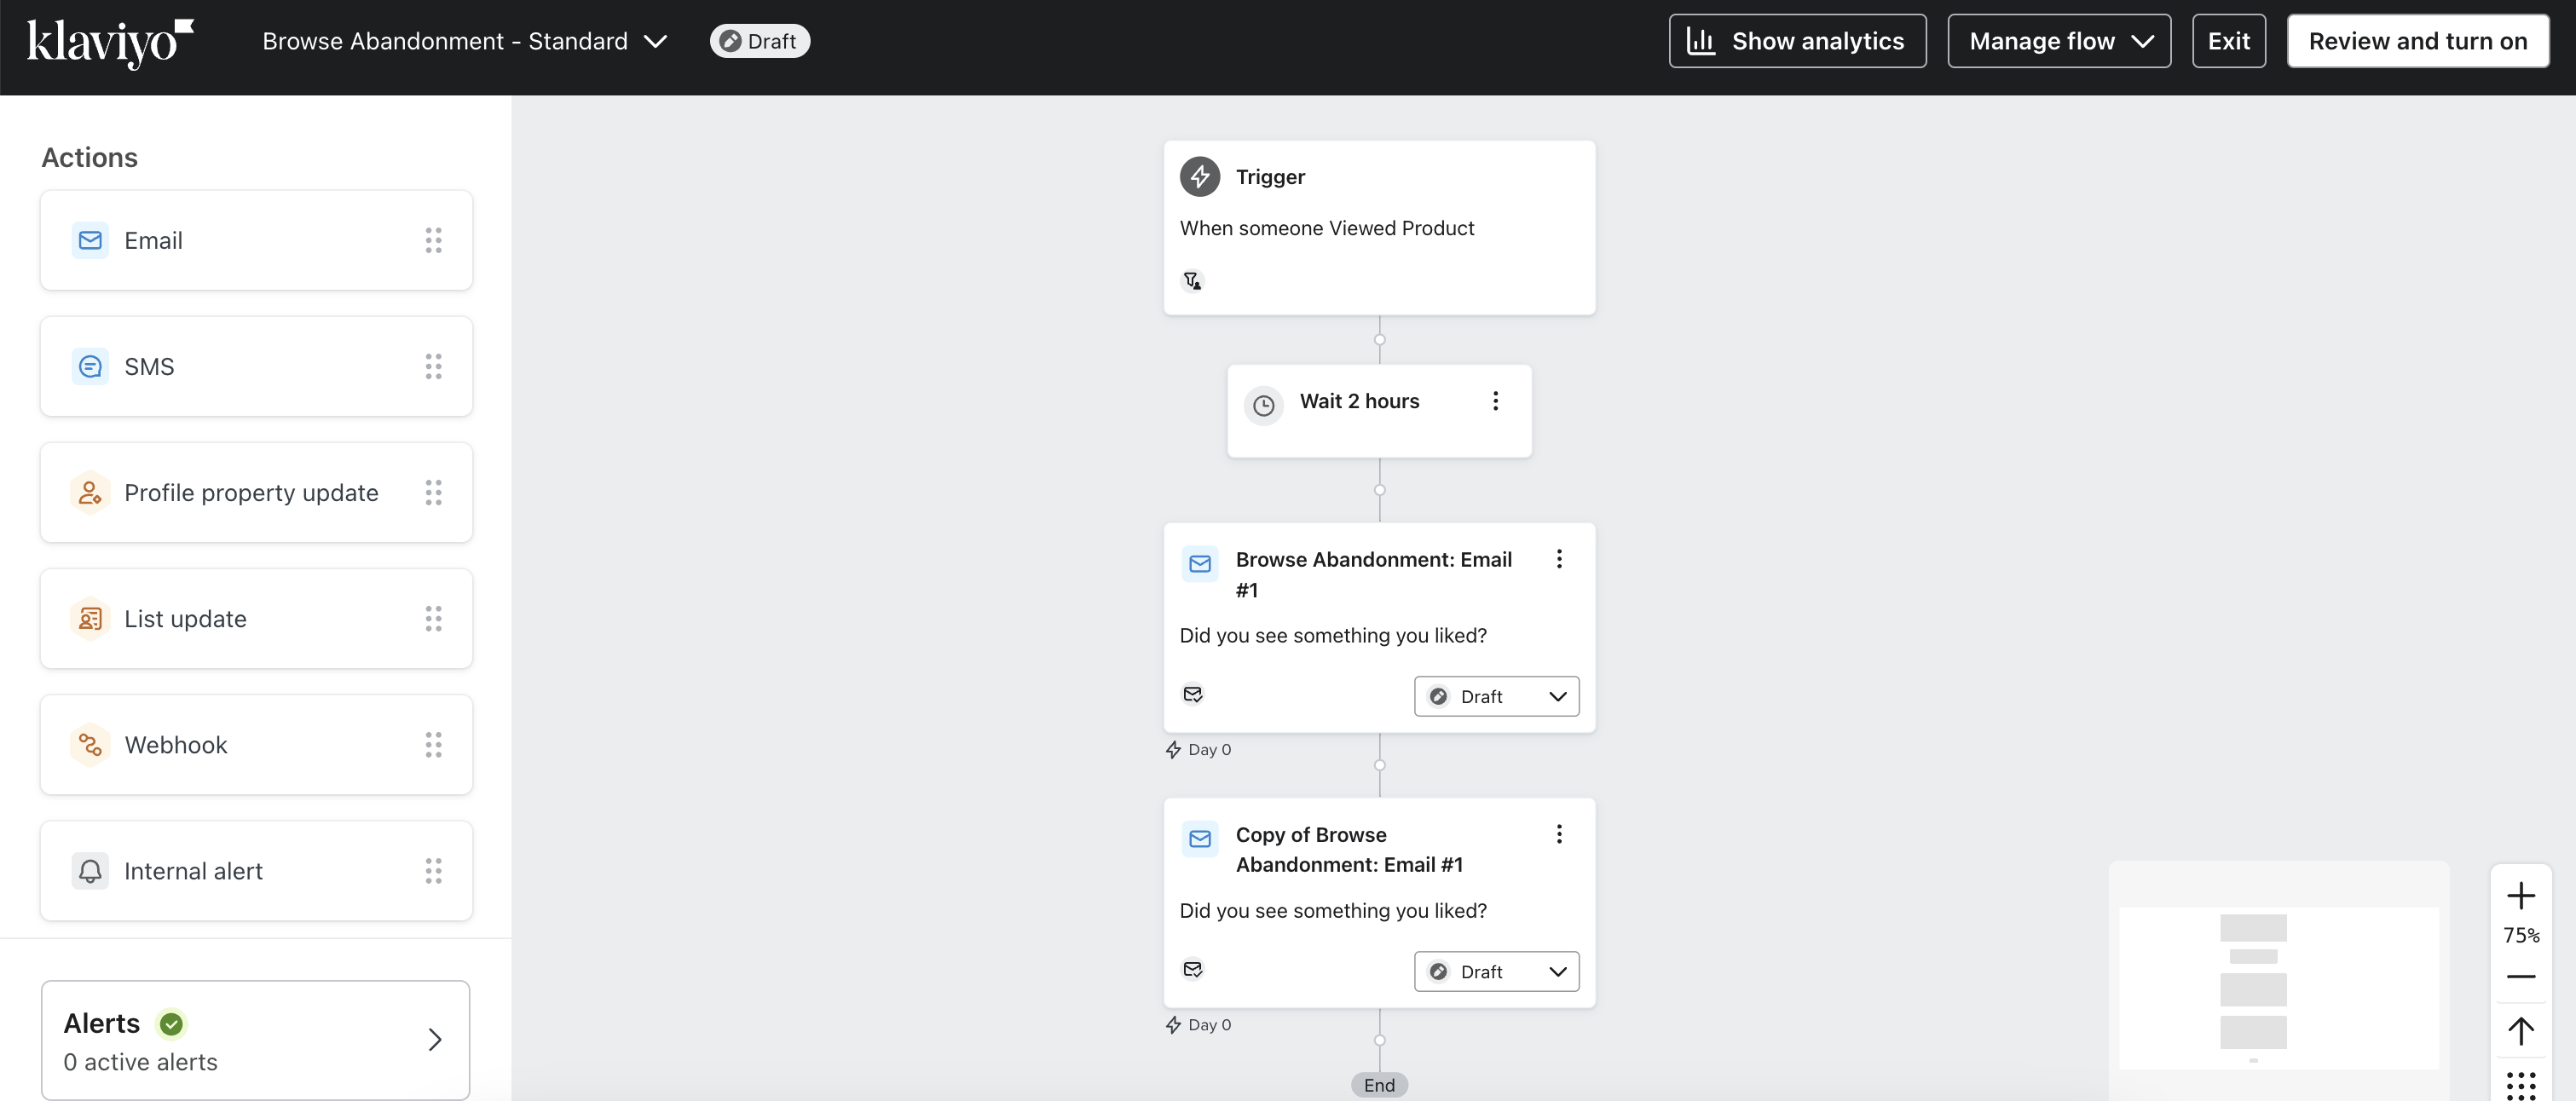
3. In the top right-hand corner of the clone, click the three dots and select Edit.
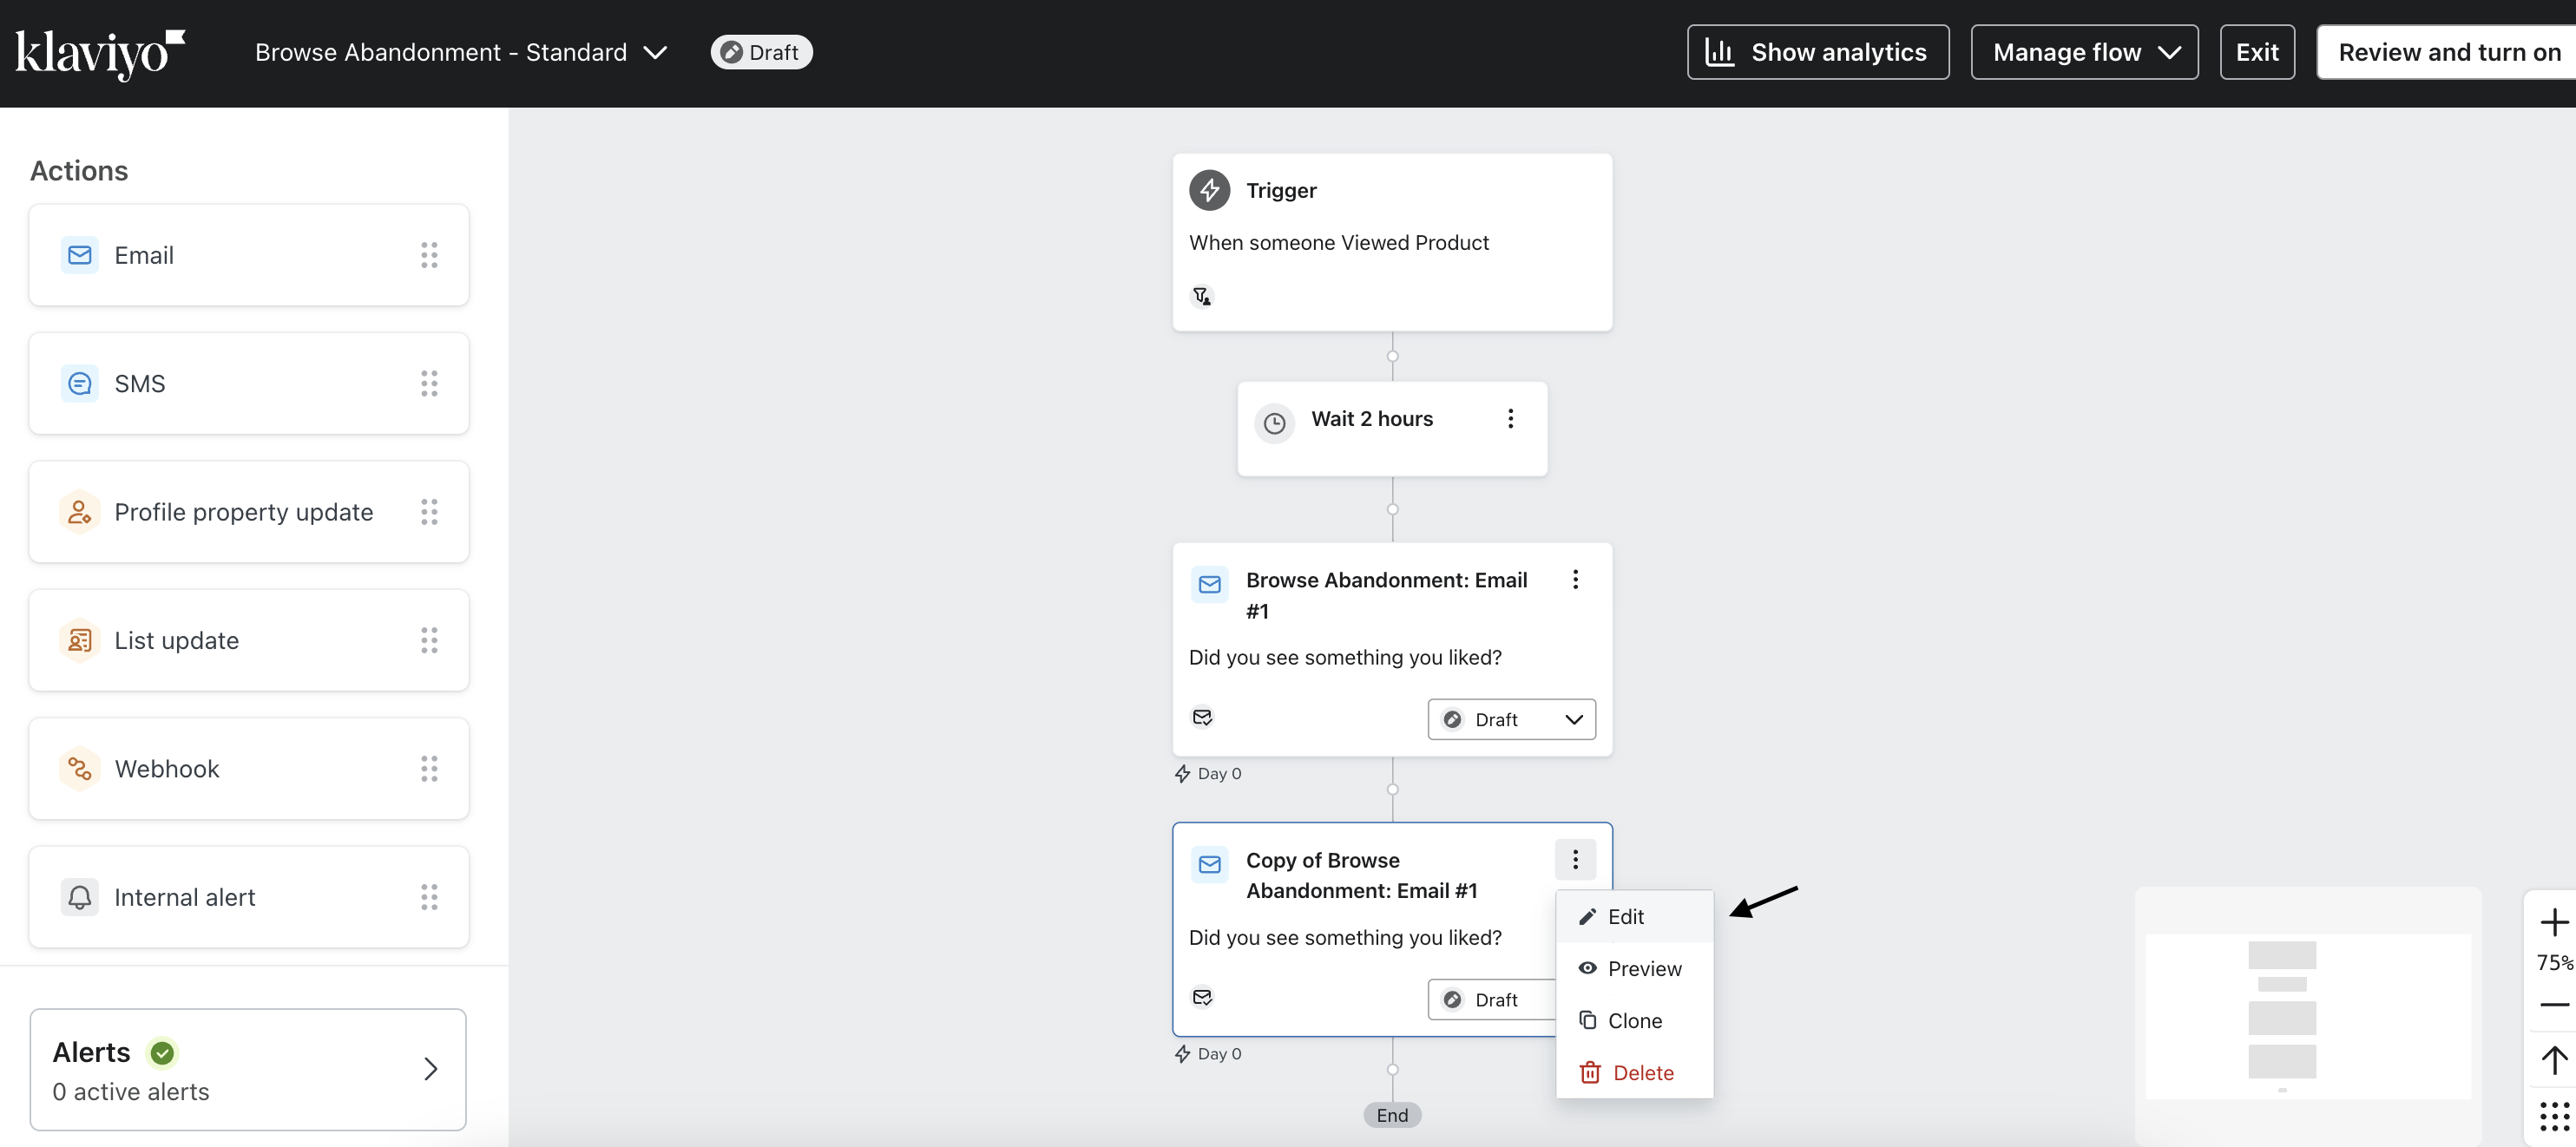
4. On the next page, click the subject line and update the content to reflect your promotion.
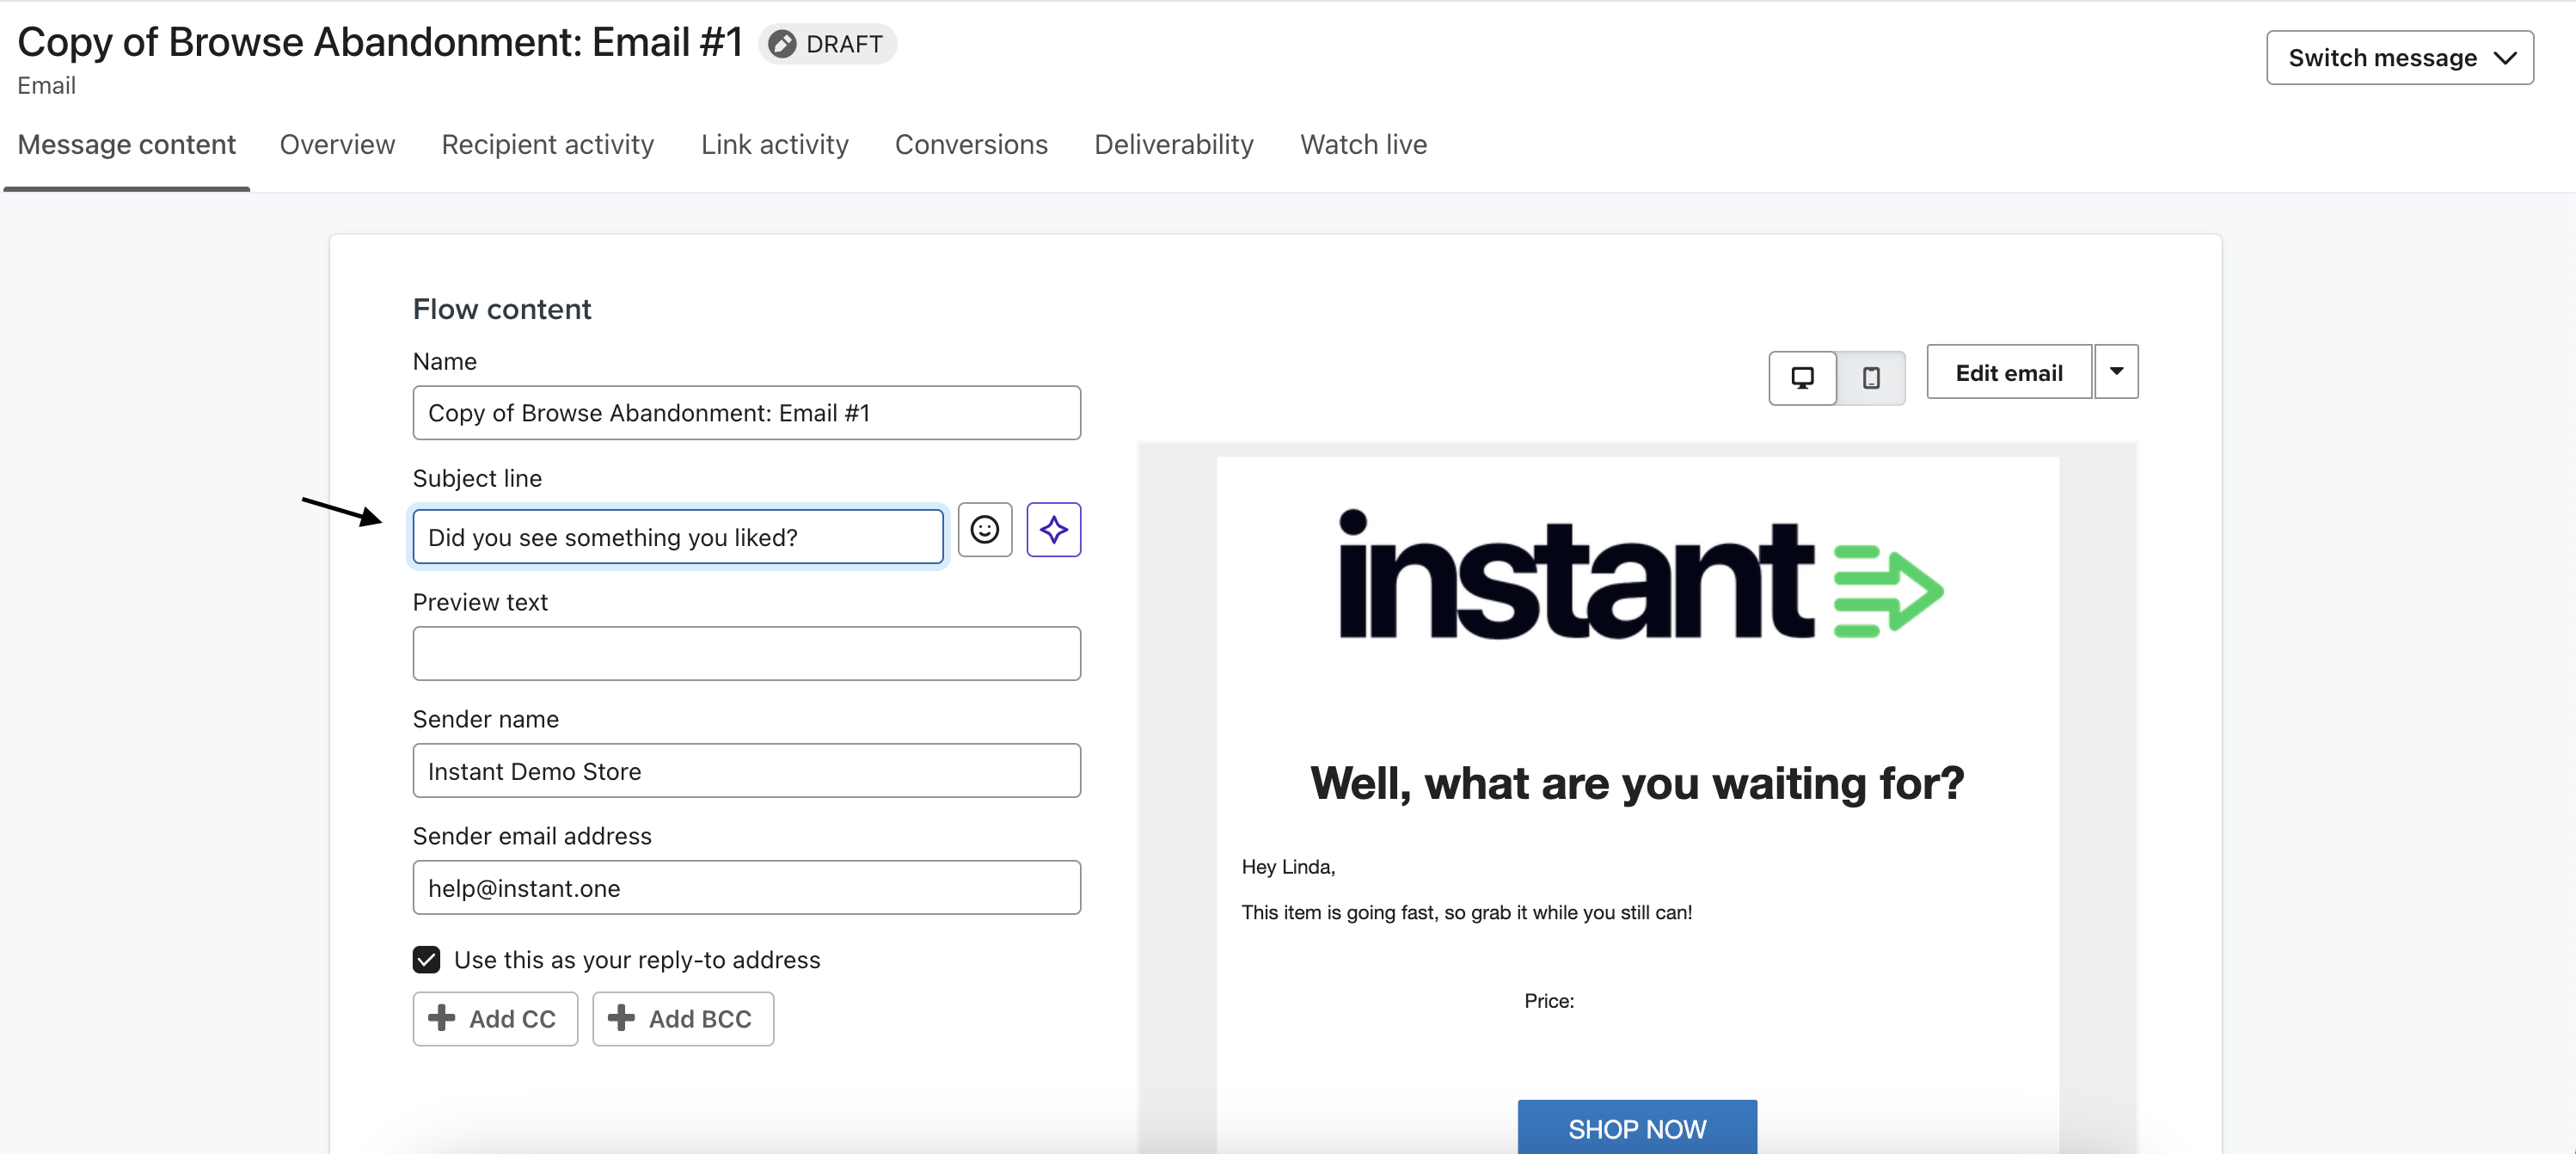
5. Once you've made the necessary changes, click Done in the top right-hand corner.
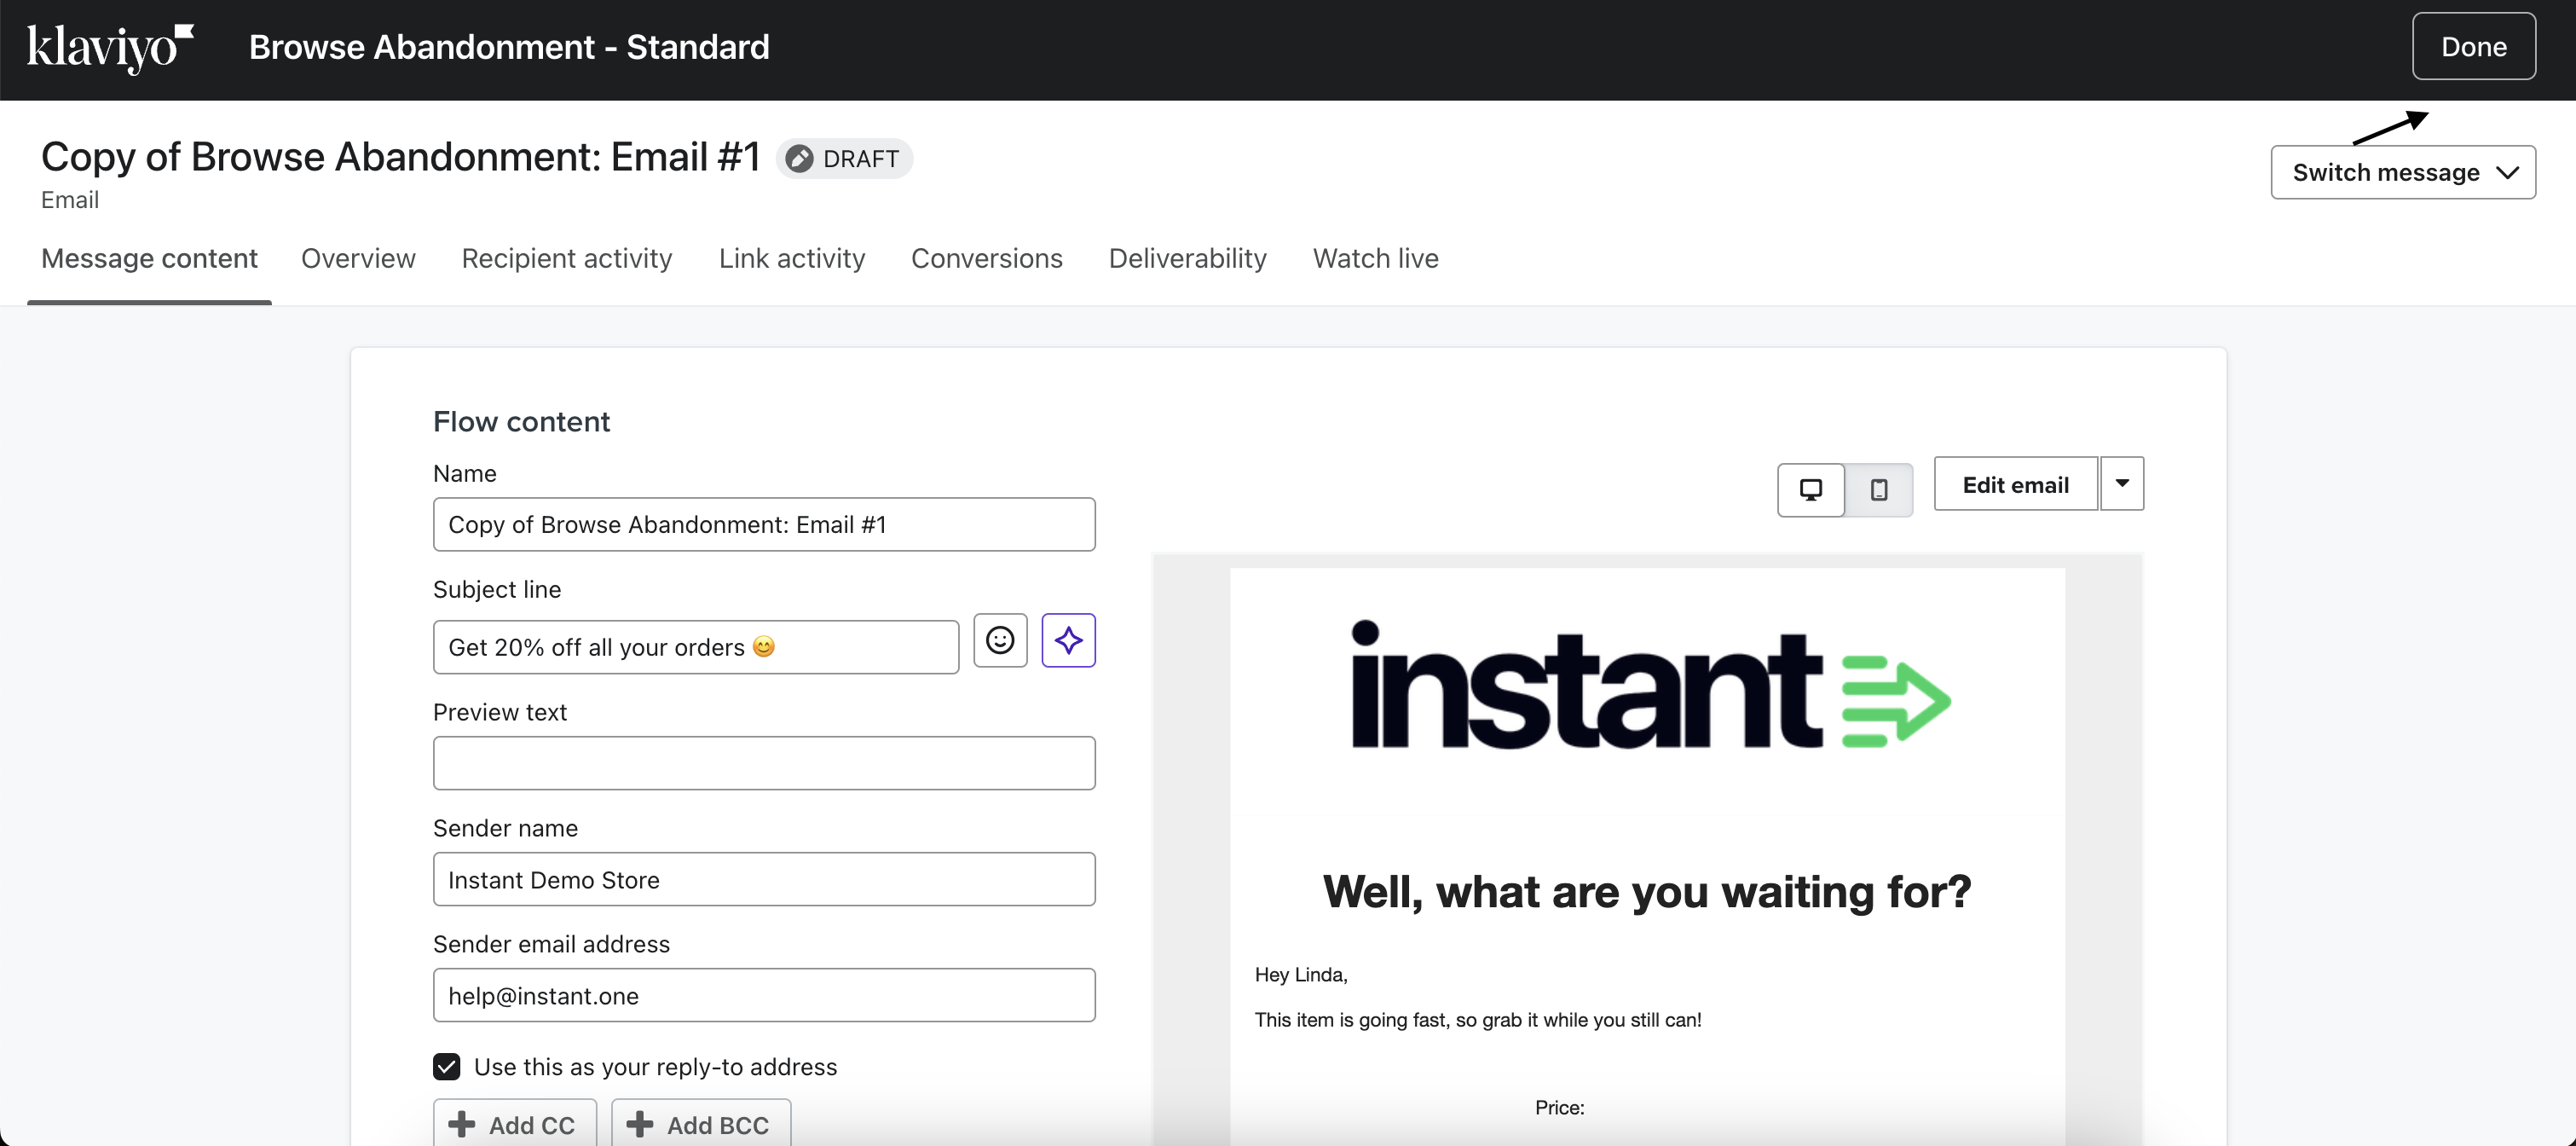
6. This will redirect you to the flow page. To test the changes, go to the left-hand pane and click Edit.
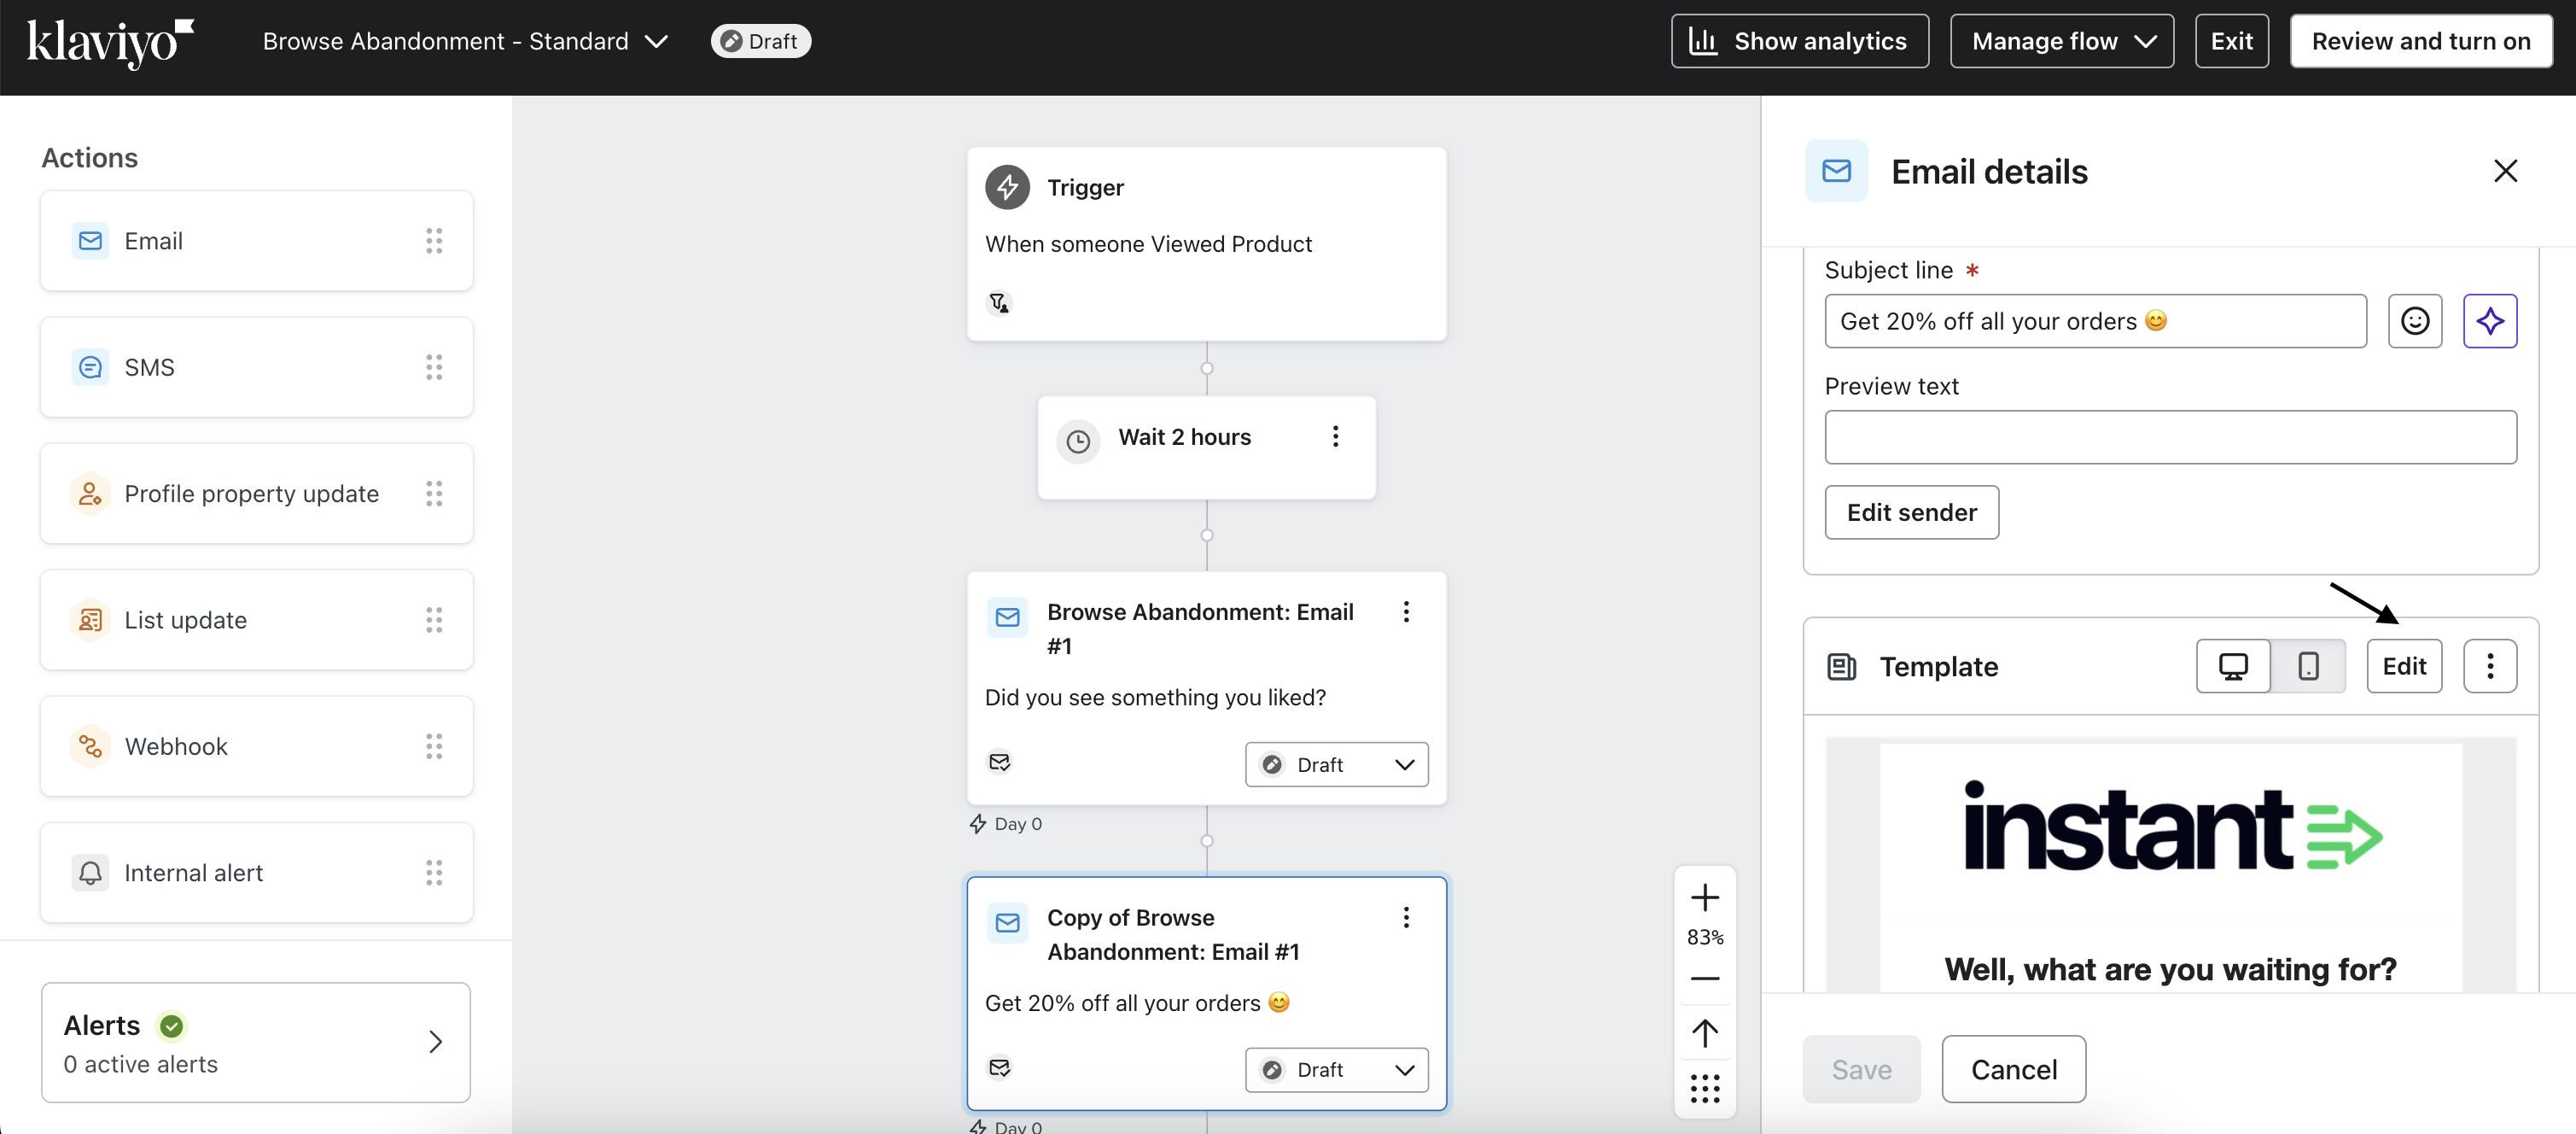
7. On the Manage template page, click Preview & test.
8. On the Preview & Test page, click Send Test.
9. In the popup, enter your email address and click Send. The preview will be sent to your inbox.
10. On the day of the sale, select the Live button in the original email and switch its status to Draft. Next, set the cloned email status to Live.
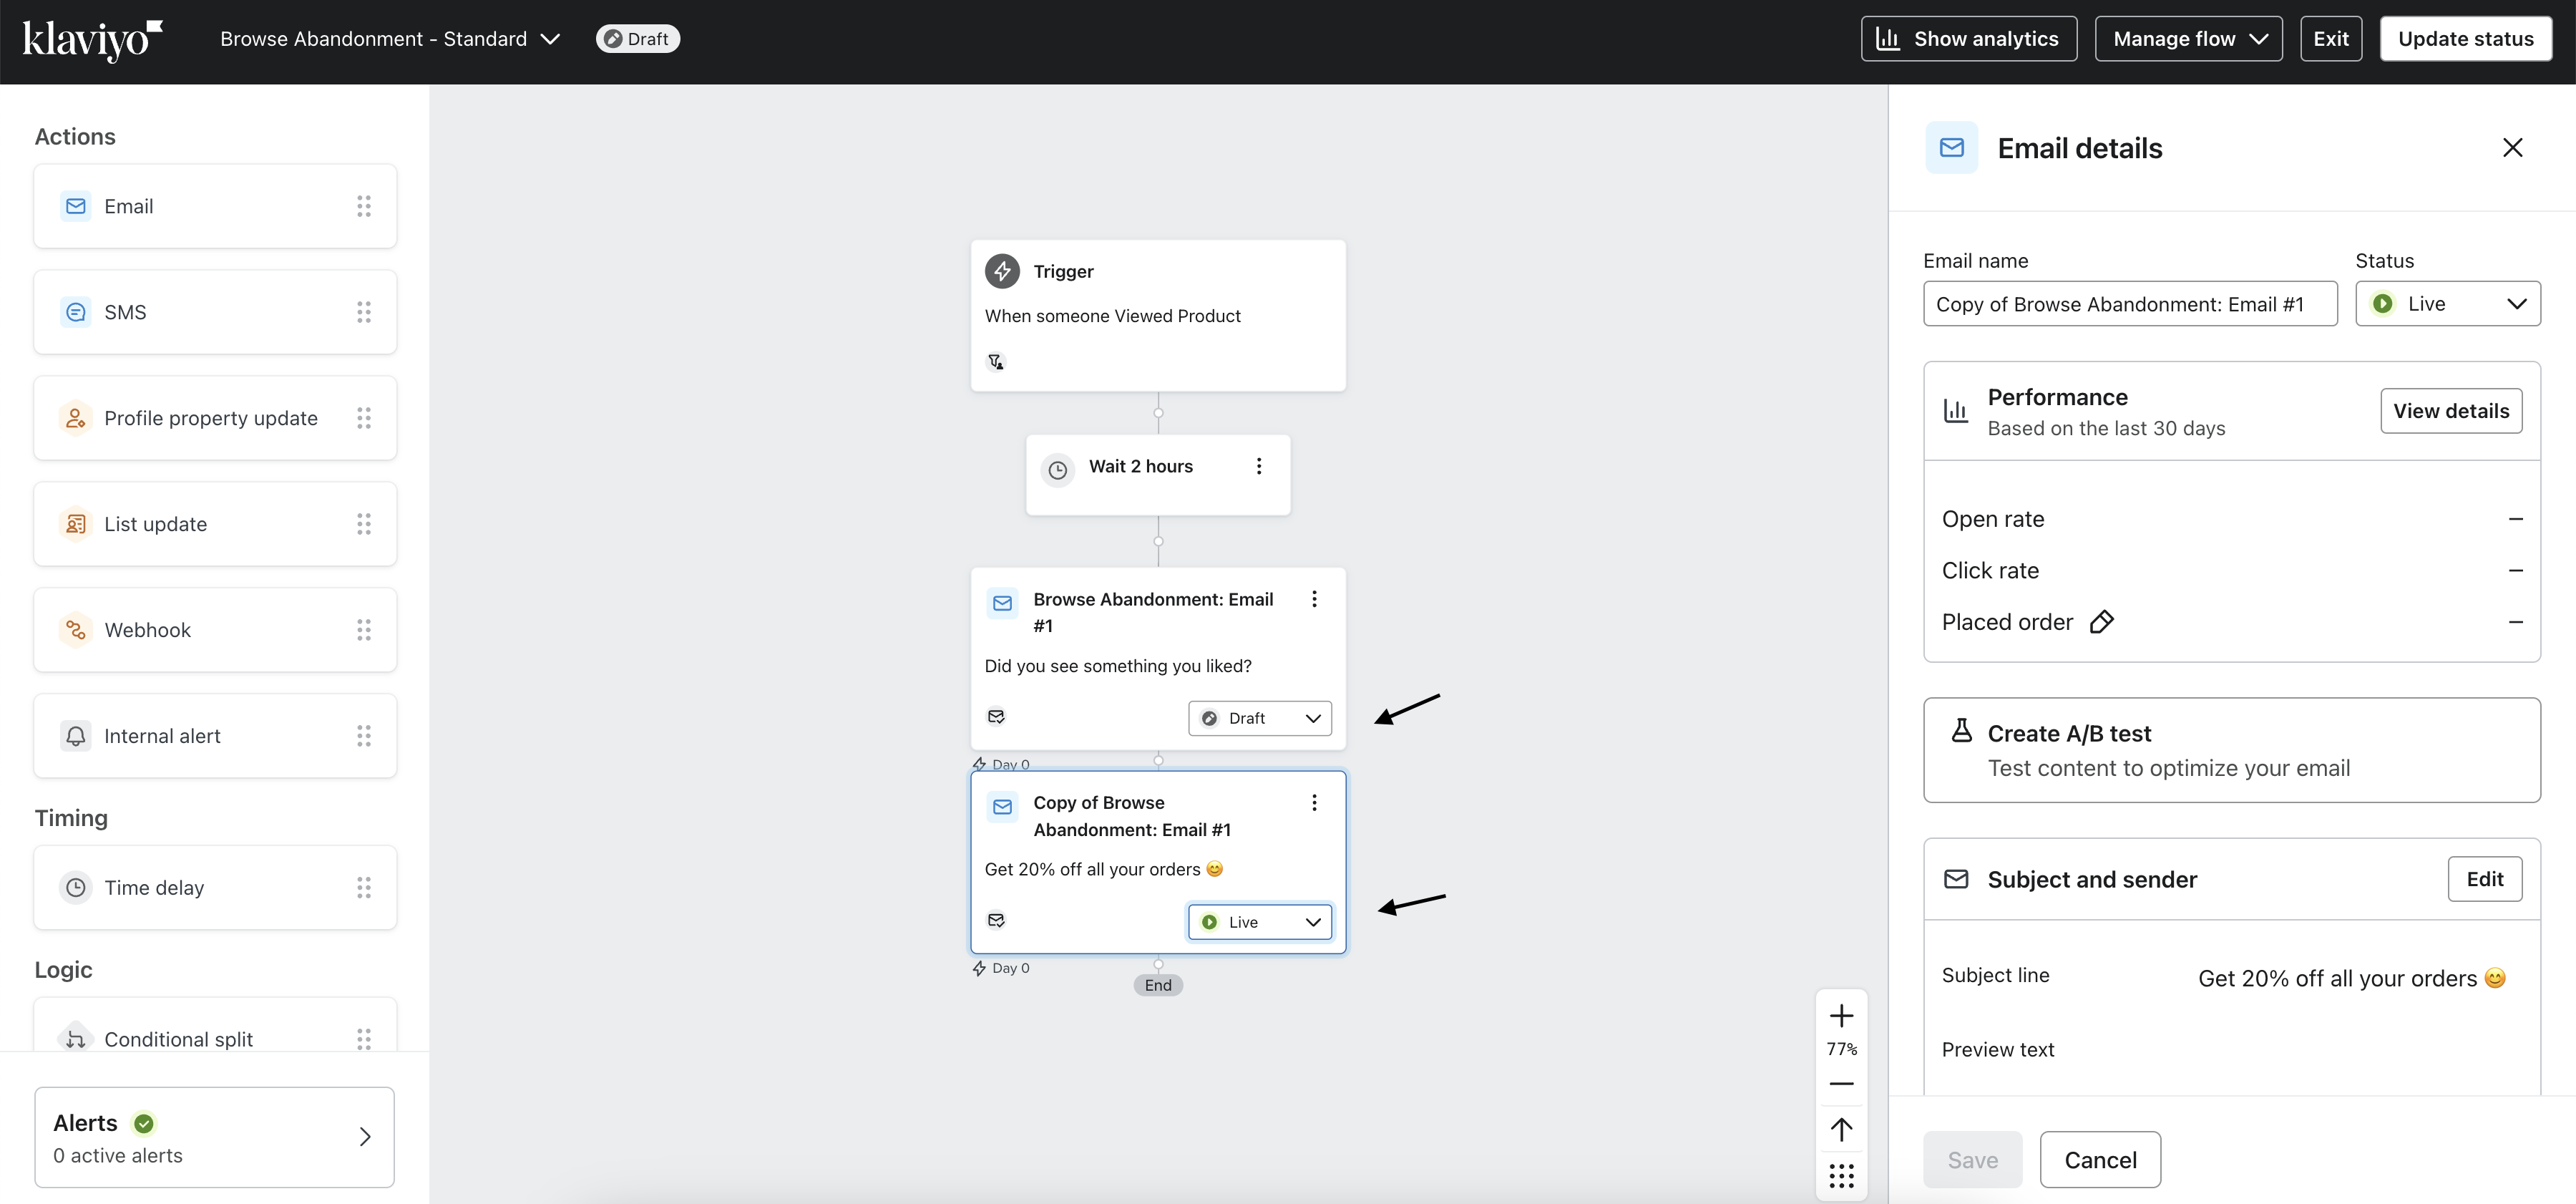
11. After the sale ends, return the flow to its original setup. Click the three dots in the top-right corner of the clone and select Delete.
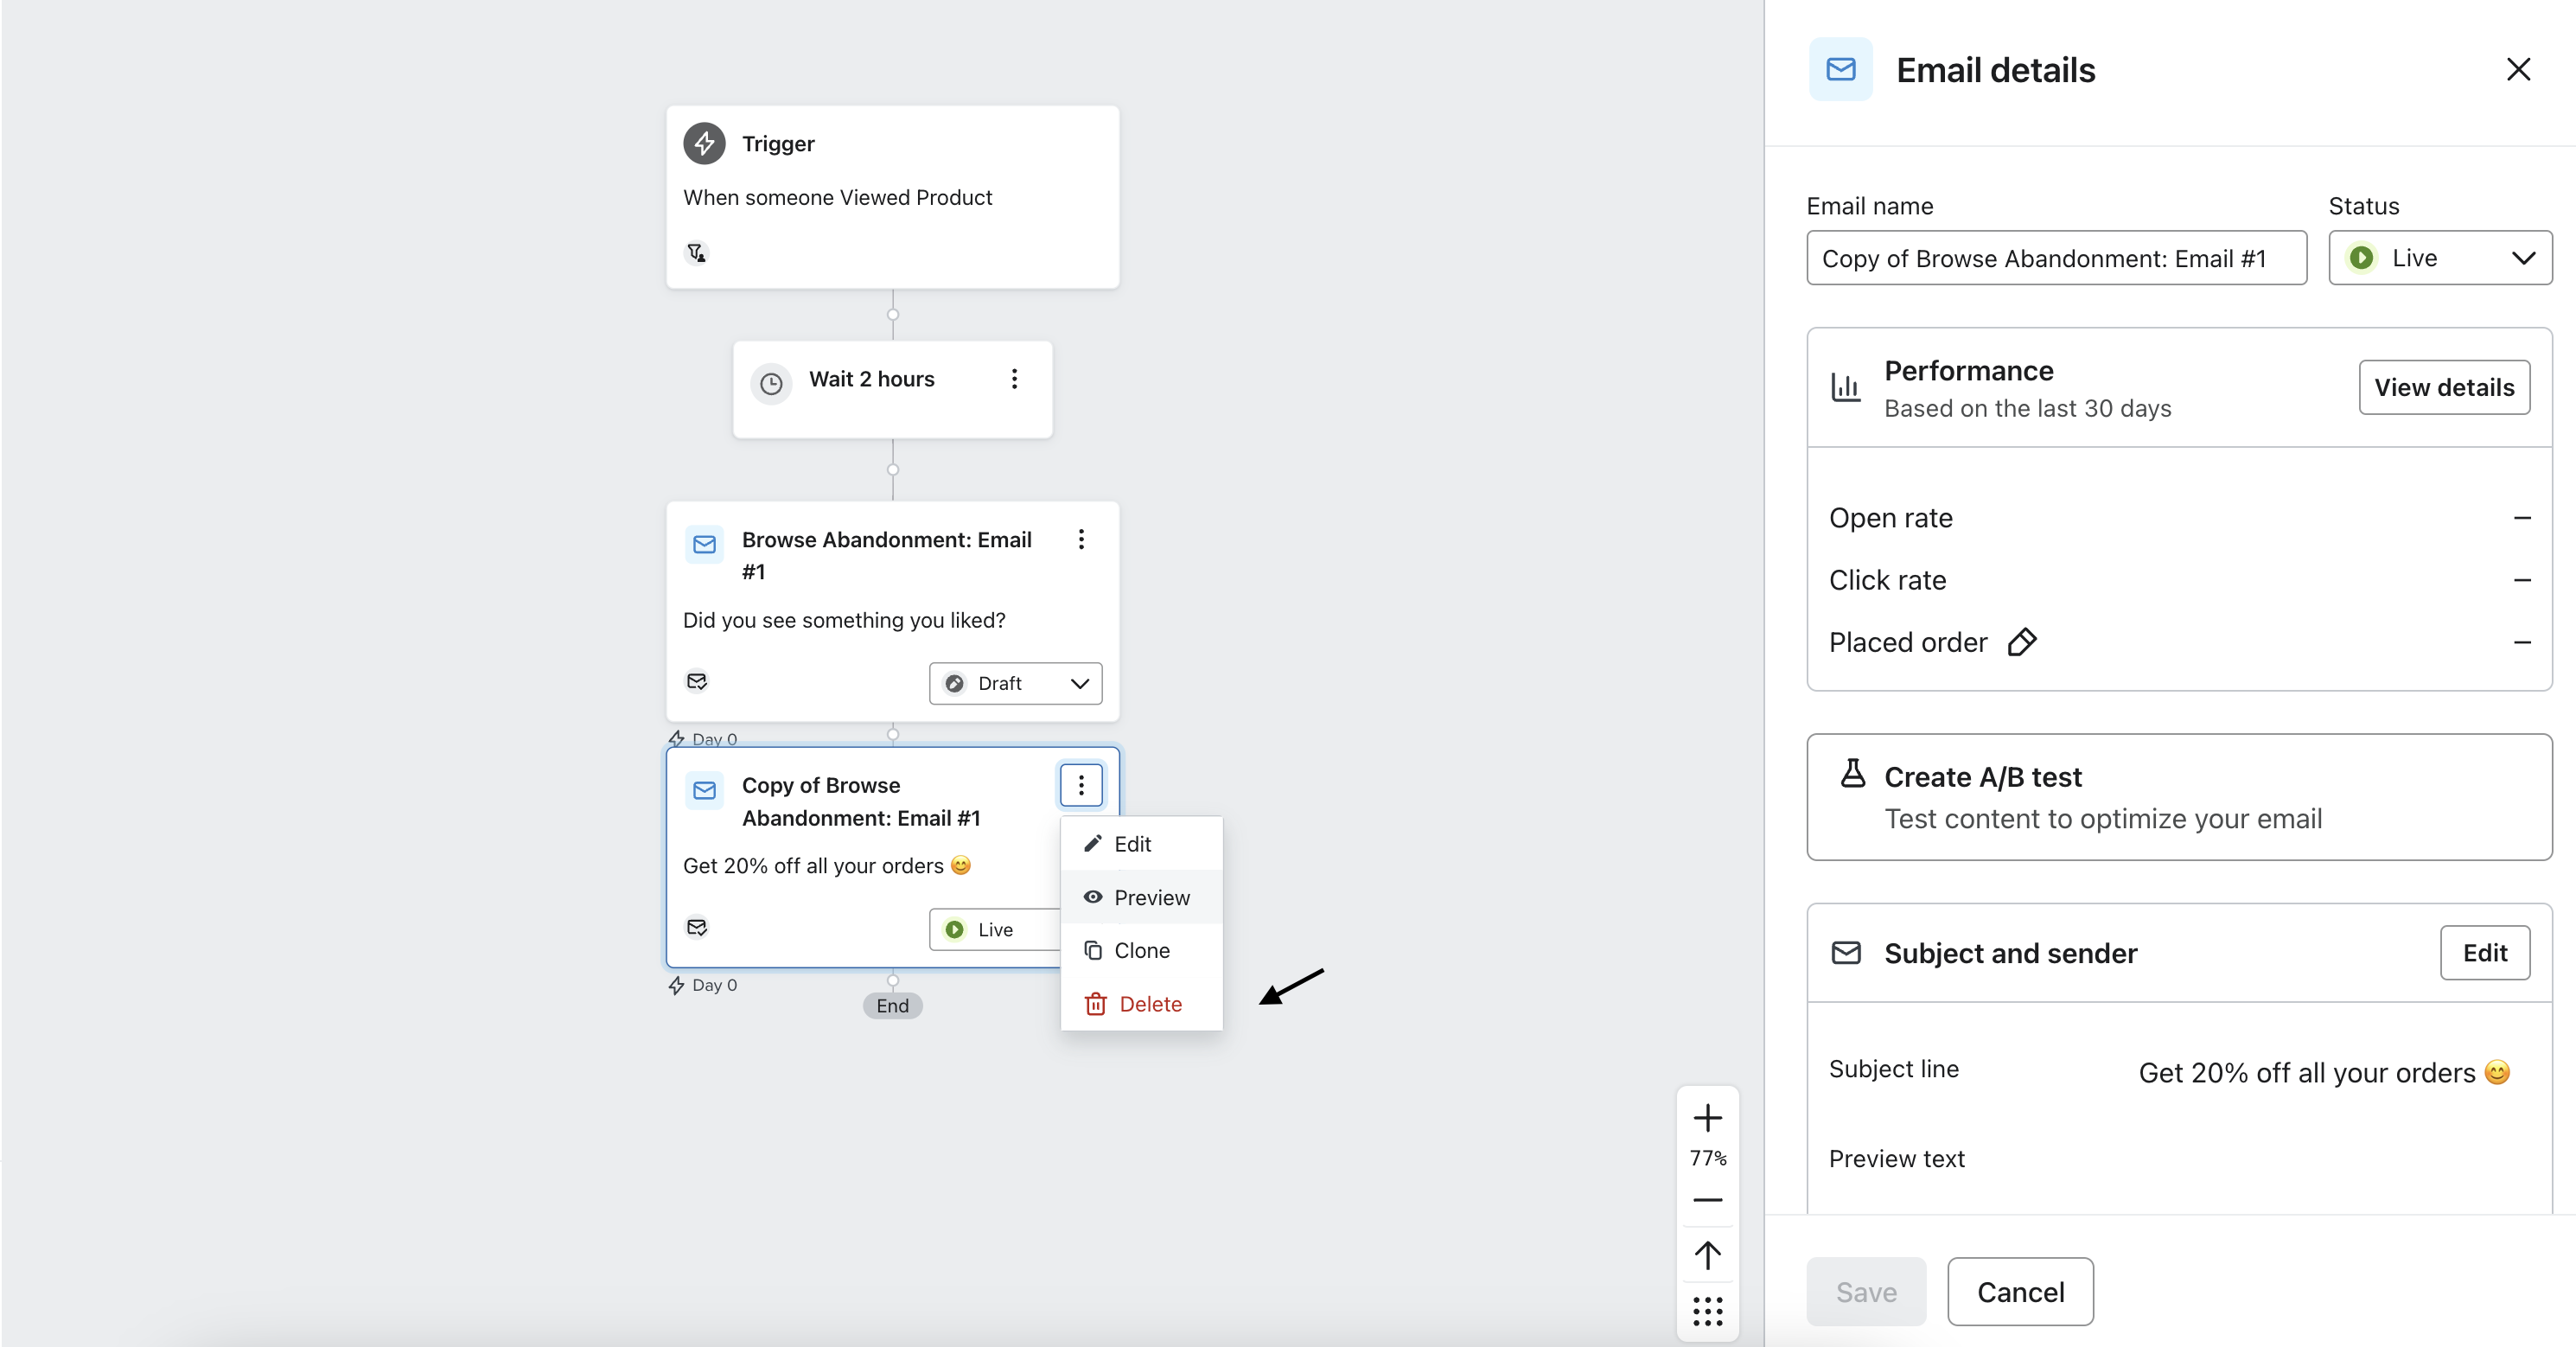
12. Update the subject in the original email and set the status to Live.
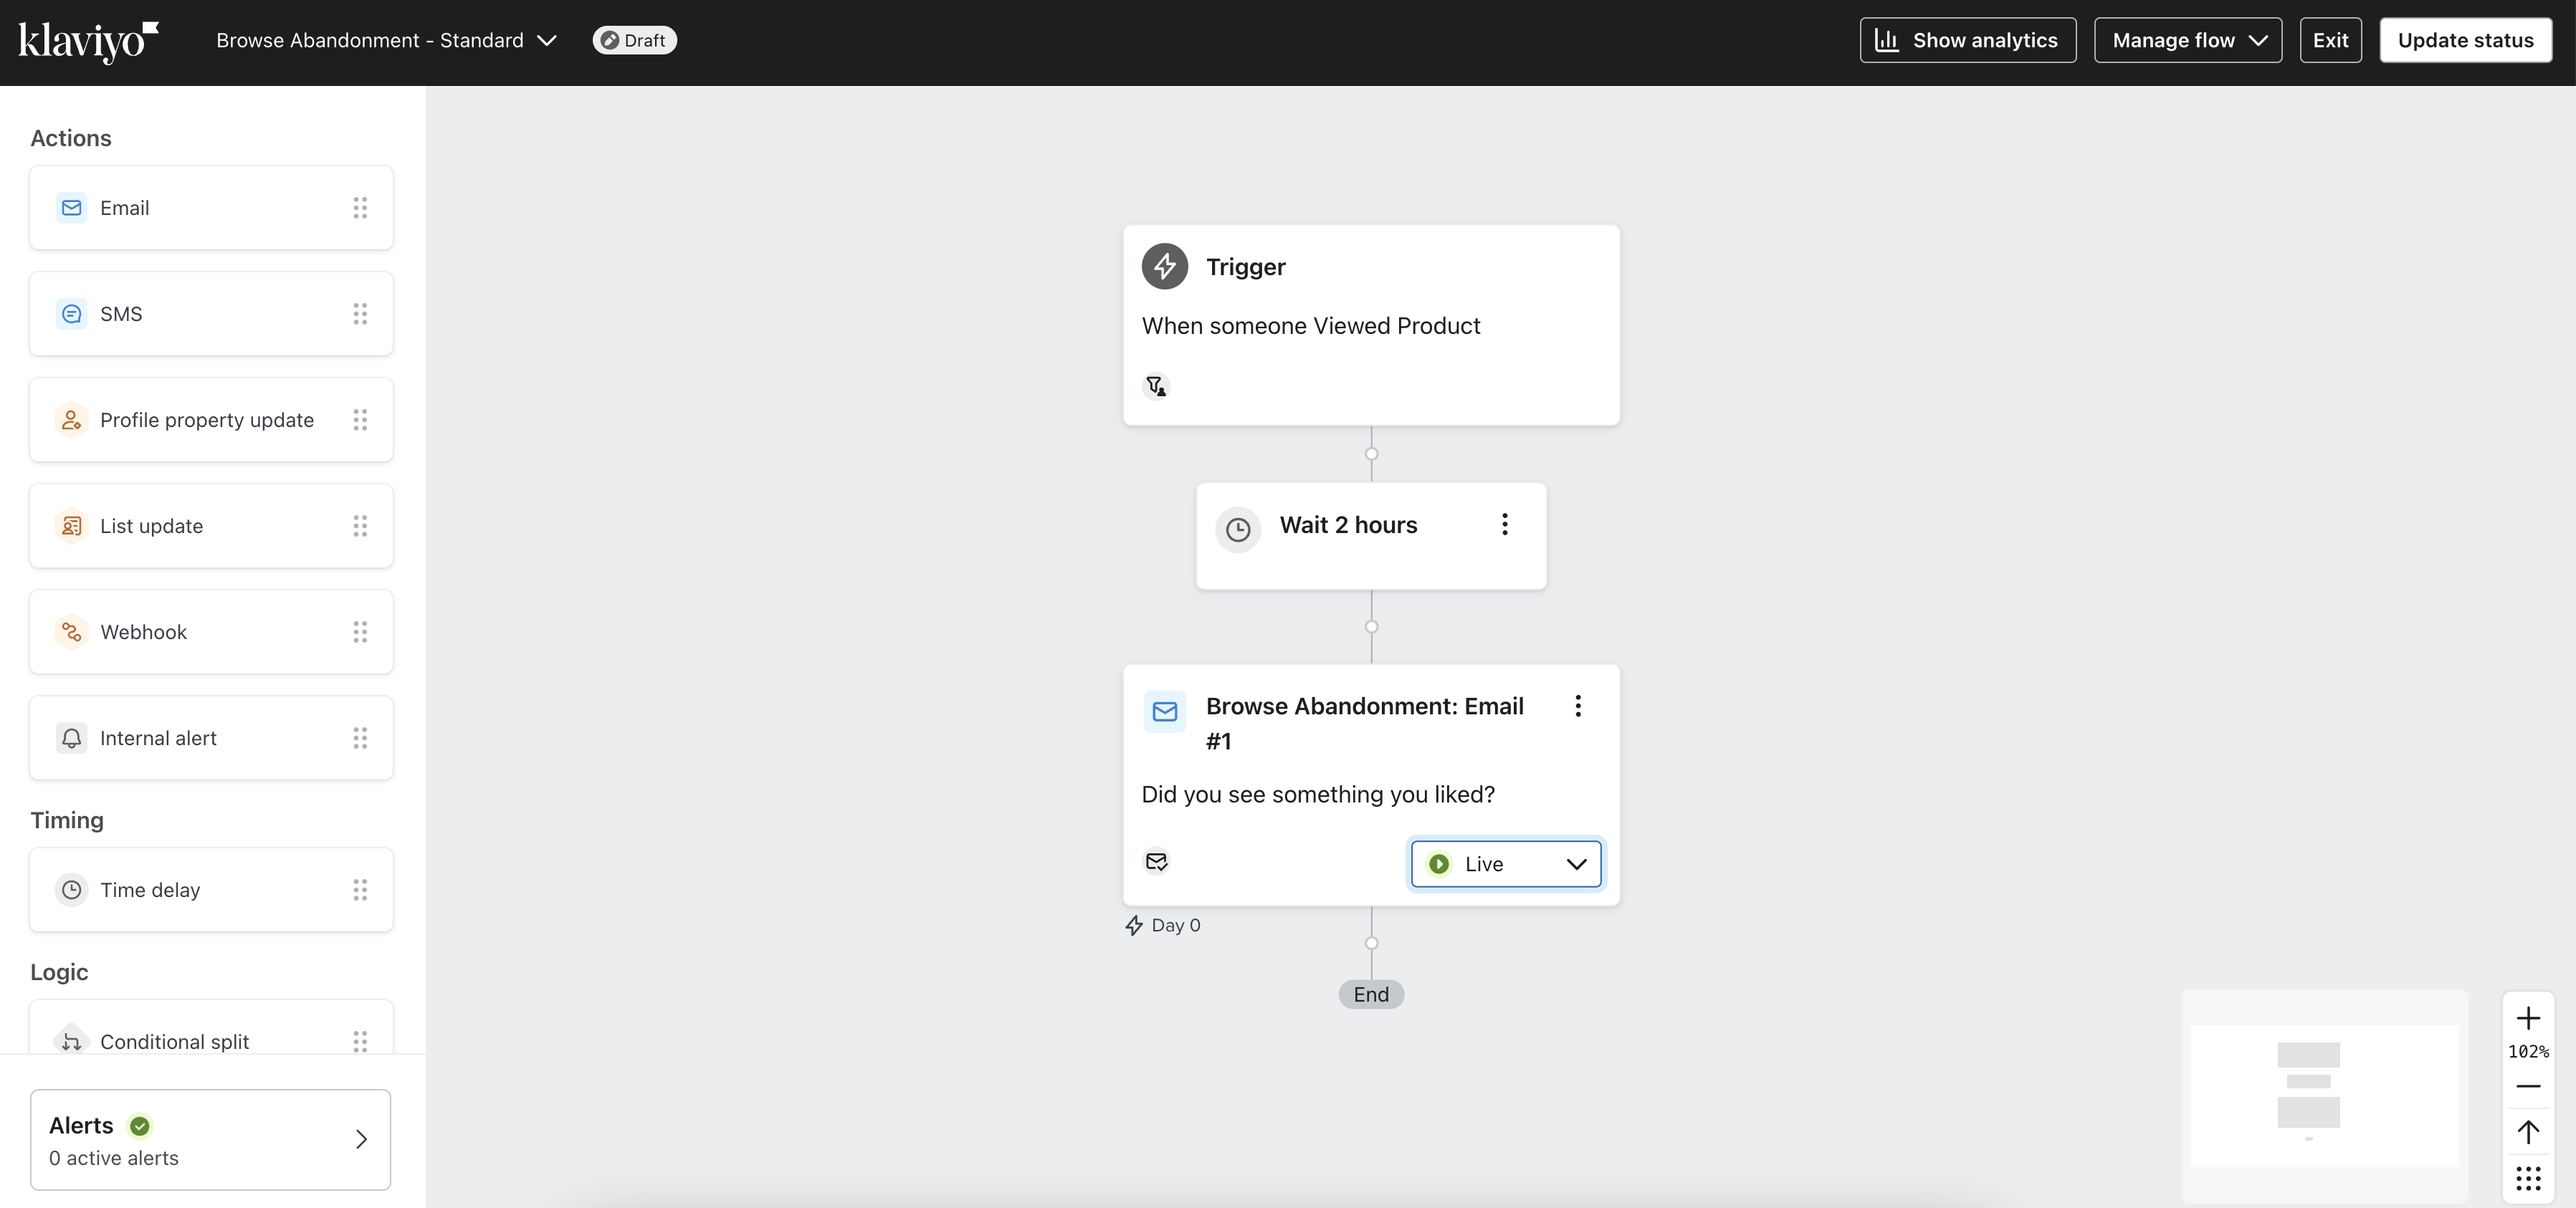
Article URL: https://help.instant.one/flow-management-during-sales
Keywords:
## Managing Customer Profiles in Instant AI
Your Shoppers tab gives you a full view of every customer who appears in your Instant account. When you open a shopper’s profile, you’ll see their subscription status, subscription type, when it last updated, and a timeline of their recent activity — including emails sent, opens, clicks, browse activity, and add-to-cart events.
Unsubscribing or Suppressing a Shopper
On the right-hand side of every profile, you’ll see a three-dot menu (⋮). This is where you can manually manage a shopper’s communication preferences.You have two options:
Unsubscribe Shopper
If a customer asks to stop receiving marketing emails, you can manually unsubscribe them. This immediately updates their subscription status to Unsubscribed and prevents all future emails.Use when a customer opts out of marketing
Suppress Shopper
Suppressing a shopper prevents them from receiving any emails — even if they are technically subscribed. This is useful for internal accounts, fake signups, or anyone you don’t want included in sending or reporting. Use when you want to block an address entirely
You can also reverse this at any time by selecting Unsuppress Shopper from the same menu.
FAQ's
Why was this profile suppressed?
There are two common reasons:
1. The shopper was suppressed manually inside Instant AI. This occurs when someone on your team chooses Suppress Shopper from the profile menu.
2. The suppression came from Klaviyo. Instant AI automatically respects suppression states from Klaviyo
If a profile is marked as suppressed or “Do Not Email” in Klaviyo, Instant AI mirrors that status to keep your compliance and consent data consistent.
If you would like to override Klaviyo suppressions inside Instant AI only, please contact your CSM or reach out to our support team. We can safely adjust your integration settings and advise on best practice.
Article URL: https://help.instant.one/managing-customer-profiles-in-instant-ai
Keywords:
## How do I retrieve the ID of a Klaviyo form?
You may need to retrieve a form ID from a Klaviyo sign-up form to use for configuration in Instant.
The instructions below outline how you can retrieve a Klaviyo form ID.
- Proceed to Klaviyo's Sign-up forms page.
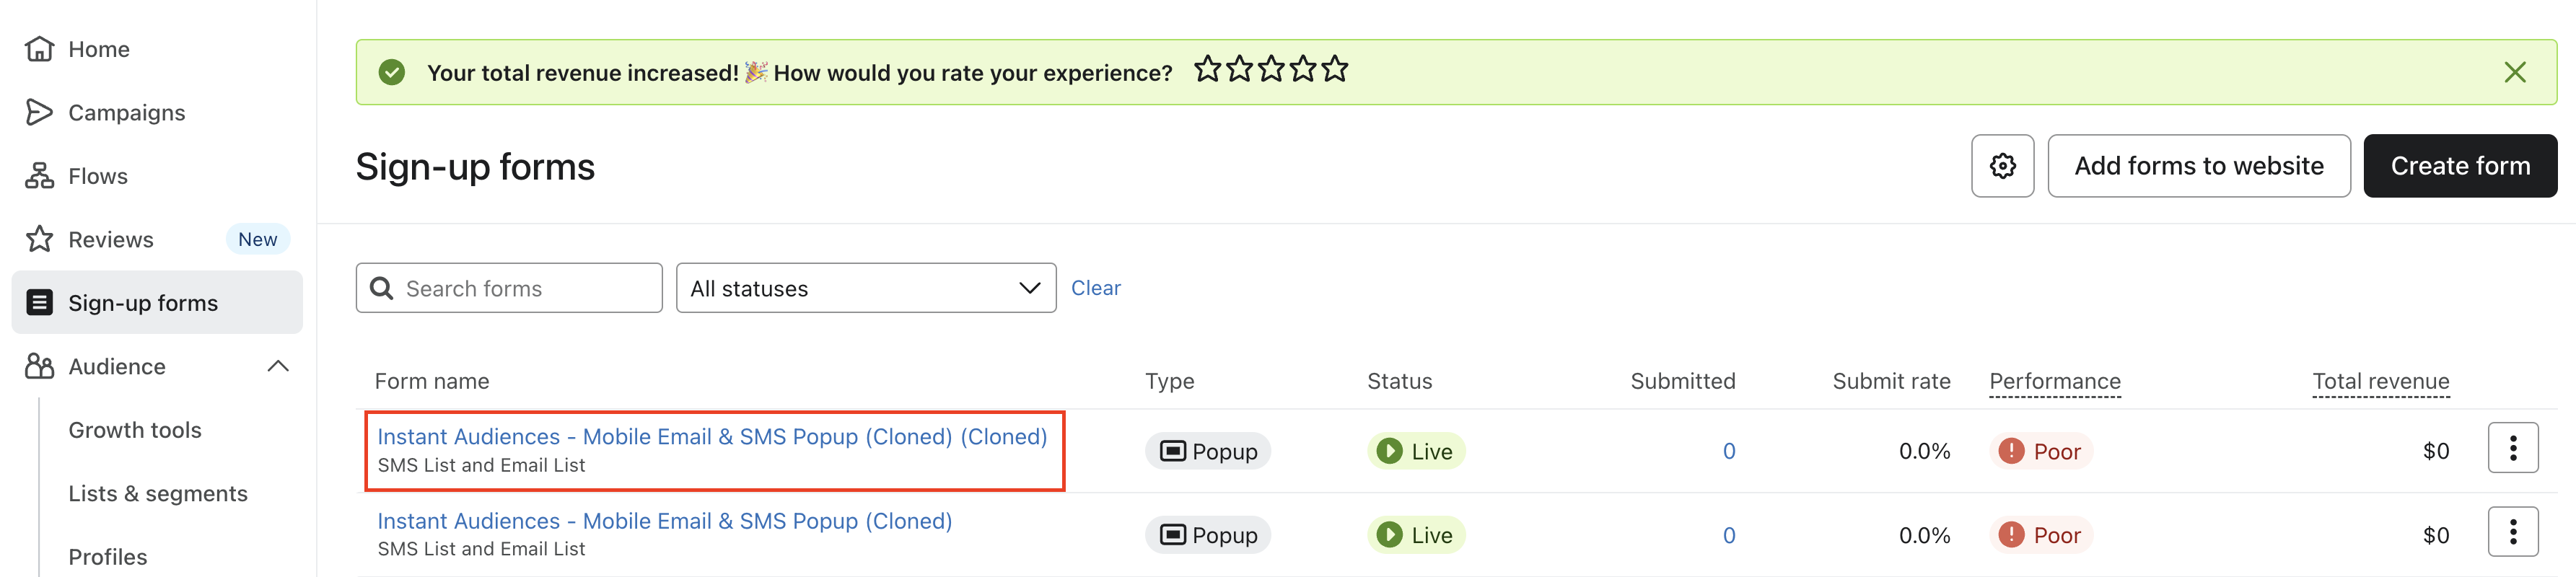
- Click into your form.
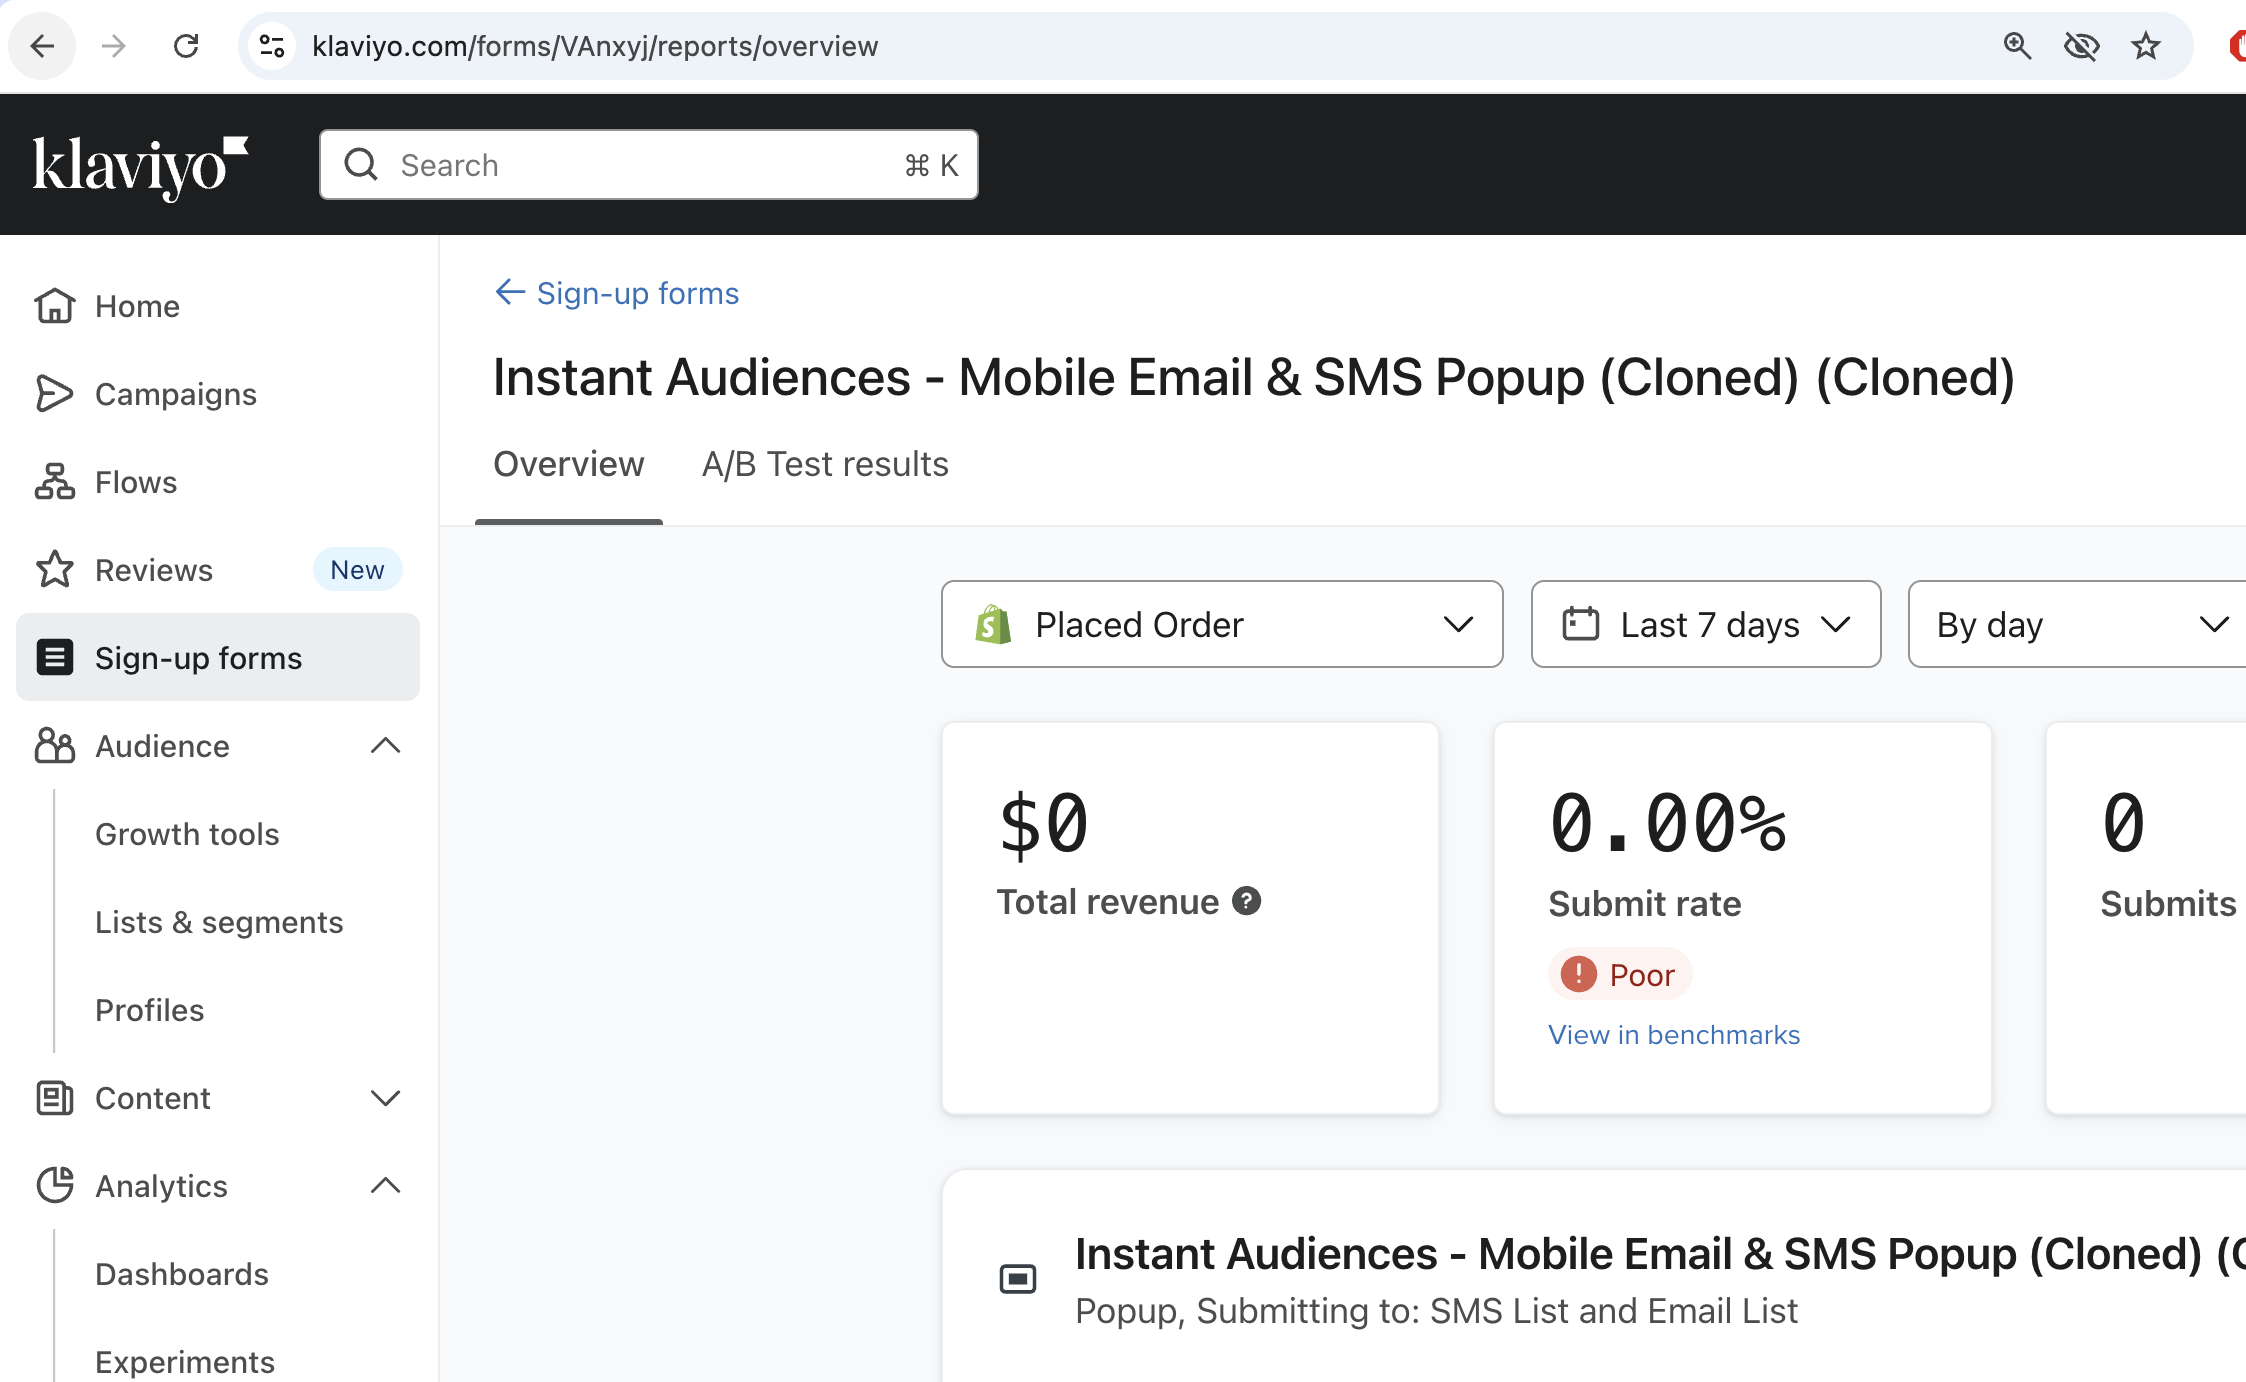
- Inspect the URL you are currently on.

- The 6 character code after /forms/ is your form ID.

For example, the form ID above is VAnXyj. Once you have this form ID, you can use this throughout Instant, such as in our Predictive Opt-In feature.
Article URL: https://help.instant.one/retrieve-klaviyo-form-id
Keywords:
## How Instant Manages Links in Flow Emails
Instant automatically generates a unique URL for each shopper at the time their email is sent, and applies it across every element in the email. Including every image, button, product block, and CTA. This happens dynamically per send, so you don't need to configure any links manually.
How the URL is chosen
The link we generate depends on the context of that shopper's journey at send time:
- Cart or checkout abandonment — we link directly to the shopper's active checkout so they can pick up exactly where they left off.
- Browse abandonment (no cart) — we link to the product page they were viewing.
- Other flows (back in stock, price drop, etc.) — we link to the relevant product page.
If a coupon is configured in Instant, we go one step further: when the shopper has an active cart, we automatically build the URL so the coupon is pre-applied when they arrive at checkout. We'll also include mentioning the coupon in subject lines and body copy automatically, which is another benefit of always configuring coupons in Instant.
When to add a manual link override
You don't need to override anything for standard flow emails. The one case where you might is if you've added a custom image or custom CTA block and want it to link somewhere specific. For example, a best-sellers section or about us within your email template. You can set a manual URL on that individual element in the block settings.
When you do this, only that specific element uses the custom URL. Everything else in the email continues to use the automatically generated link.
Tip: If you're manually editing a URL, don't add UTM parameters. Instant appends these automatically to every link we generate. Adding your own can cause conflicts.
How to check if coupons are auto-appending to links
If you're including a coupon in your flow but haven't set one up in Instant, shoppers will see the code in the email but will need to apply it manually at checkout. To enable automatic coupon application at checkout:
- Go to Coupons in your Instant dashboard.
- Select Use an existing coupon and choose the coupon you've already created in Shopify.
- Choose whether to use the same code for all shoppers, or generate unique codes per send.
Once connected, Instant will automatically pre-apply the coupon to every checkout URL we generate for that flow.
FAQs
Does Instant automatically add UTM tracking to links?
Yes. UTM parameters are appended to every link we generate. You don't need to add them yourself. Read more about UTM tracking with Instant AI →
Why might my UTM data look incomplete in Google Analytics, Triple Whale, or Shopify?
By default, Instant links shoppers directly to checkout for cart and checkout abandonment flows. Shopify can strip UTM parameters from checkout URLs during its redirect, which means external analytics tools may not record those clicks. If UTM-based attribution matters for your reporting, there's a setting to link to your storefront instead — this preserves UTMs at the cost of one extra step to checkout. Contact your CSM or help@instant.one to explore this. Read more →
How can I see which URL was included in a specific shopper's email?
You can preview exactly what was sent to any shopper, including the links used. In your Instant dashboard, open the relevant flow and click the Activity tab to see a live feed of sent emails. Click on any email in the list to open a preview of what that shopper received. From there, hover over any element in the email: image, button, CTA, and the URL generated for that send will appear in your browser's status bar at the bottom of the screen.
What happens to a link if a coupon expires?
Shopify handles coupon validation. If a shopper clicks a pre-applied coupon link after the code has expired, Shopify will redirect them to checkout without the discount applied.
Article URL: https://help.instant.one/how-instant-manages-links-in-flow-emails
Keywords:
## Setup Instant Audiences
There are three steps to getting started with Instant:
- First, install the Instant pixel on your ecommerce platform storefront. This allows Instant to analyse your opted-in web traffic.
- Second, connect your Email Service Provider to your Instant account to notify your Email Service Provider of identified shoppers.
- Third, connect a payment method to your account for future billing.
- Next, configure flows in your Email Service Provider to market to shoppers identified by Instant.
- Finally, activate Instant and start boosting your email marketing revenue!
1. Install the Instant pixel to your Storefront
Installing the Instant pixel on your storefront enables Instant to identify anonymous shoppers on your website.
- First, create an account.
- Once you have created an account, you will presented with the first step of our onboarding flow.
- Select the ecommerce platform you are using (e.g., Shopify, Bigcommerce, or Magento)
- Follow the detailed instructions provided based on your platform.
Once you have installed the Instant pixel, you are ready to start collecting email addresses from your anonymous website visitors.
2. Connect your Klaviyo Account
Integrating Instant Audiences with Klaviyo allows Instant to notify them of identified shoppers.
- Once you have installed the Instant pixel on your storefront, you will be asked to integrate with Klaviyo.
- Follow the detailed instructions to obtain and copy your API Keys.
- Paste the API Key's into the fields provided.
- Click Verify to complete the setup.
3. Set up billing so your Instant Subscription can begin when you go-live
After integrating with Klaviyo, you'll be prompted to add your billing information.
No charges will be applied during setup – we simply collect your payment details for future billing in accordance with our terms of service. Your account stays completely free throughout the entire setup process, and your paid subscription only begins once you've finished all integration steps and Instant is actively running on your site.
4. Configure flows in your Email Service Provider
By configuring flows in your Email Service Provider, you can automatically market to shoppers identified by Instant, driving revenue to your business.
This step is typically completed by the Instant team. This will ensure flows are configured quickly and accurately, with maximal ROI for your business.
- Cart Viewed/Checkout Started Abandonment
This flow markets to shoppers identified by Instant who have visited your cart or checkout pages but have not placed an order.
- Add to Cart Abandonment
This flow markets to shoppers who have added a product to cart on your website, but not completed checkout.
- Product Viewed
This flow markets to shoppers who have viewed products on your website.
- Collection Viewed
This flow markets to shoppers who have browsed collection pages on your website.
Once you proceed to the flow cloning step of Activation, you will be able to book a call with the team to complete this step.
5. Go-Live!
Your customer success manager will activate your account once your flows are cloned and you're ready to go live – this typically happens during your onboarding call!
Your subscription and billing will begin as soon as you go live, in accordance with our terms of service.
Article URL: https://help.instant.one/setup-audiences
Keywords: sign up form
## How can I load Instant's pixels via Google Tag Manager for Shopify?
Instant’s tracking for Shopify sites relies on two separate scripts:
-
Theme Pixel (Added via API)
-
Installation Method: Automatically injected via API as a <script> tag on the storefront.
-
Purpose: Tracks interactions and events on the Shopify storefront, including email opt-ins.
-
Maintenance: Instant frequently checks for theme changes. If removed, the pixel will be re-injected automatically.
- Customer Events Pixel (Added manually during onboarding)
-
-
Installation Method: Manually added via Shopify admin panel during onboarding.
-
Purpose: Tracks Shopify customer events (e.g., purchases, add to cart, checkout events) and sends them to Instant.
-
Maintenance: Must remain unchanged after onboarding.
To use GTM to manage these pixels, please follow the instructions below. Please note that incorrect implementation will cause the pixels to become inoperable.
To install Instant via GTM on a Shopify site:
Important note:
When you add GTM to both the storefront and as a Customer Events Pixel in Shopify’s admin panel, GTM will fire Instant's tracking tags in both contexts.
This ensures that Instant's pixels are injected on all pages and during all relevant customer events (e.g., checkout, thank you pages).
-
GTM serves as a single point of configuration for tracking across both the storefront and Shopify customer events.
-
All tags you configure in GTM (including Instant’s pixel) will be applied wherever GTM is loaded, whether through the storefront or Shopify’s Customer Events.
1. Inject the Theme Pixel via GTM (Custom HTML Tag)
- Go to your Google Tag Manager Dashboard.
- Click on Tags > New > Tag Configuration > Custom HTML.
- Paste the following script and click Save.
{% raw %}<script>
!function(i,n,s,t,a,u,d){
    i.InstantConfig = i.InstantConfig || {};
    d = i.InstantJS = i.InstantJS || {};
    d.trackQueue = [];
    d.track = function() { d.trackQueue.push(arguments) };
    u = n.createElement(s);
    u.async = true;
    u.src = t;
    a = n.getElementsByTagName(s)[0];
    a.parentNode.insertBefore(u, a);
}(window, document, 'script', 'https://cdn.instant.one/instant.js?siteId={{SITE_ID}}');
</script>{% endraw %}
2. To support Instant via GTM for the Customer Events pixel, pass raw events into payloads pushed to the dataLayer.
- For every event sent by Shopify, you must also pass the raw event in the payload pushed to the
dataLayer so this event can be sent to Instant.
See an example below for the product_added_to_cart event. Please note that this is just an example — the properties in this event should match the properties in your existing added to cart event that you send to Shopify, as it is these properties that are used in your Klaviyo emails.
- This step must be completed for all events, such as product_viewed, page_viewed, etc.
// Subscribe to events
analytics.subscribe("product_added_to_cart", (event) => {
  window.dataLayer.push({
    event: "product_added_to_cart",
    timestamp: event.timestamp,
    id: event.id,
    client_id: event.clientId,
    url: event.context.document.location.href,
    price: event.data?.cartLine?.merchandise?.price?.amount,
    currency: event.data?.cartLine?.merchandise?.id,
    product_title: event.data?.cartLine?.merchandise?.product?.title,
    quantity: event.data?.cartLine?.quantity,
    total_cost: event.data?.cartLine?.cost?.totalAmount?.amount,
    // IMPORTANT: Including the raw_event here is crucial so Instant can fully process the event
    raw_event: event
  });
});
3. Create Event Triggers for All Events
The following events need to be tracked and sent to Instant: collection_viewed, product_removed_from_cart, product_added_to_cart, product_viewed, page_viewed, payment_info_submitted, checkout_address_info_submitted, checkout_shipping_info_submitted, checkout_contact_info_submitted, checkout_started, checkout_completed, cart_viewed
- In GTM, go to Triggers > New > Trigger Configuration > Custom Event.
- Enter the Event Name (e.g.,
product_added_to_cart, checkout_completed, etc.).
- Set Trigger to fire on All Custom Events.
- Click Save.
4. Create Data Layer Variable for raw_event
- In GTM, go to Variables > New > Variable Configuration > Data Layer Variable.
- Enter Variable Name:
raw_event.
- Click Save.
5. Create Tags to Send Events to Instant
{% raw %}<script>
InstantJS.track('SHOPIFY_EVENT', {{raw_event}});
</script>{% endraw %}
- Set the Trigger to the relevant Custom Event Trigger (e.g. product_added_to_cart)
Important Considerations
- The Instant Pixels must be loaded as early as possible, on all pages, and must never be blocked under any circumstance.
- Always test your GTM setup using Preview Mode before publishing.
-
Once you decide to implement the Instant pixel via GTM, ensuring the Instant pixel always loads is your responsibility.
-
The event data sent to Instant must always match Shopify’s standard event data. Custom events are not supported.
- Replace the {{SITE_ID}} placeholder with your actual site ID throughout this documentation.
We understand that there are many different ways to set up GTM, so our support team are always happy to help.
Please reach out to Instant support at help@instant.one, or your dedicated customer success manager for further assistance if needed.
Article URL: https://help.instant.one/how-can-i-add-instant-pixels-via-gtm-for-shopify
Keywords:
## How are disputes handled?
Disputed Payments from Customers
A dispute (also known as a chargeback) occurs when a cardholder questions your payment with their card issuer.
To process a chargeback, the issuer creates a formal dispute on the card network, which immediately reverses the payment, pulling the money for the payment, as well as network dispute fees from Instant.
When a dispute is initiated, Instant will notify you of the dispute and relevant information via email. We will also debit the disputed amount, plus a $30 dispute fee, until the dispute is resolved.
Disputes will fall under one of the following dispute category types:
-
Credit not processed: The cardholder claims that they were eligible for a refund or credit that was not completed or processed, likely relating to a return of the product or service.
-
Duplicate: The cardholder notices multiple charges on their statement for the same transaction, indicating an accidental duplication of charges.
-
Fraudulent: The cardholder suspects unauthorised use of their card for a transaction they did not make, indicating potential fraud or identity theft.
-
Product not received: The cardholder made a purchase but did not receive the ordered product or service within the expected timeframe.
-
Product unacceptable: The cardholder received the purchased item or service but found it to be significantly different from the description or of unsatisfactory quality.
-
Subscription canceled: The cardholder claims that they canceled their subscription, but they are still being billed for it.
-
Unrecognised: The cardholder does not recognise the transaction on their statement and believes it may be fraudulent or a mistake.
How to Respond to a Dispute
When you receive a notification of a dispute via email from Instant, you will need to decide how to respond. There will be a date you need to respond by which we will advise you.
You can respond by:
- Accepting the dispute. This means that you agree to refund the customer and pay the dispute fee.
- Challenging the dispute. This means that you believe the dispute is in error. You will need to provide evidence to support your claim.
Providing evidence to challenge the dispute
If you choose to challenge the dispute, Instant will require evidence which we will provide to the customer's bank.
The evidence required would vary based on the dispute category type, Instant will advise you the reason for the dispute and best evidence to provide in our email.
Examples of evidence can include:
• Communications with the customer
• Proof of postage/delivery
• Tax invoice/order details
• Confirmation the customer was refunded
• Any document that proves the authenticity of the transaction
• That the legitimate cardholder did in fact make the payment
• Confirmation email sent to cardholder
• That the product wasn’t damaged or defective
• That the customer withdrew the dispute
Dispute Resolution Process
The customer's bank will investigate and make a final decision. The dispute resolution process can take several weeks or even months. We will keep you updated on the status of the dispute along with any additional evidence required. Once the dispute is resolved, we will notify you of the outcome via email.
If Your Challenge is Successful
If you win a dispute, the debited amount and the $30 dispute fee will be returned to you.
If Your Challenge is Unsuccessful
If you lose a dispute, you will be responsible for the customer's refund and the $30 dispute fee. Instant will have already debited the disputed amount and fee so this will not be returned to you.
Article URL: https://help.instant.one/disputes
Keywords: dispute,charge back
## Prohibited & Restricted Businesses
While Instant offers its services to a wide range of industries, there are certain businesses that are prohibited or subject to restrictions when it comes to using payment services. These restrictions are in place due to various legal, regulatory, and risk considerations.
Certain businesses listed on the Restricted Business list can use Instant after additional detailed review and approval. This requires us to gather additional information and documentation about your business during the sales process.
Prohibited Businesses
-
Illegal products and services: Instant prohibits businesses involved in the sale or distribution of illegal drugs, fake references or ID-providing services, telecommunications manipulation equipment, and organisations promoting unlawful violence or harm.
-
Intellectual property infringement: Instant restricts businesses from selling unauthorised copyrighted materials, pirated music/software, counterfeit goods, unauthorised brand name or designer products/services that infringe upon intellectual property rights.
-
Unfair, predatory, or deceptive practices: Instant prohibits businesses engaged in pyramid schemes, deceptive marketing, predatory lending, or offering unrealistic rewards without delivering on promises.
-
Adult content and services: Instant does not permit businesses involved in the sale or distribution of pornography, adult services, adult video stores, or online dating services focused on adult content.
-
Certain legal services: Instant restricts businesses such as law firms collecting funds for non-legal purposes, bankruptcy attorneys, and bail bonds services.
-
Firearms, explosives, and dangerous materials: Instant prohibits businesses engaged in the sale or distribution of guns, firearms, explosives, or toxic materials.
-
Gambling: Instant does not allow businesses engaged in gambling activities, including games of chance, internet gambling, sweepstakes, contests, and lotteries.
-
Marijuana: Instant restricts businesses involved in the sale or distribution of cannabis products and cannabis dispensaries.
Restricted Businesses
-
Financial products and services: Instant has restrictions on businesses offering investment and brokerage services, lending services, buy now pay later services, crowdfunding platforms, debt collection agencies, insurance services (including medical benefit packages), money transmitters, and other financial institutions.
-
Government services: Businesses involved in government grants, embassy or foreign consulate services, and services related to foreign governments are restricted from using Instant.
-
CBD Products: Instant allows CBD products containing negligible amounts of THC, but restricts businesses engaged in other CBD-related activities.
-
Pharmaceuticals, medical devices, and telemedicine: Instant has restrictions on online pharmacies, prescription-only products, regulated medical devices, telemedicine, and tele-health services.
-
Tobacco: Instant restricts businesses engaged in the sale of tobacco products, including vapes, e-cigarettes and e-liquids.
-
Credit card and identity theft protection services: Businesses offering credit card and identity theft protection services are restricted by Instant.
-
Other age-restricted goods or services: Instant has restrictions on businesses selling age-restricted goods or services.
- Travel: Instant restricts businesses in the travel industry, including travel reservation services, airlines, cruises, and timeshare services
-
Non-fiat currency and stored value: Businesses involved in non-fiat currency and stored value, such as virtual currencies, cryptocurrencies, non-fungible tokens (NFTs), prepaid phone cards, sim cards, phone services, and sale of stored value or credits by anyone other than the seller. Additionally, the sale of in-game currency or game items is restricted unless the merchant is the operator of the virtual world.
-
Business models prone to abuse by 'bad actors': Instant has restrictions on multi-level marketing businesses, network marketing and referral marketing programs, shipping and forwarding brokers, and businesses involved in shipping services, including shipping brokers, forwarding brokers, and drop shipping.
-
Charity sweepstakes and raffles for fundraising: Instant restricts businesses conducting charity sweepstakes and raffles explicitly for fundraising purposes.
FAQ
Why can't Instant work with these businesses?
Behind the scenes, Instant works closely with payment networks and banking partners. These institutions are governed by strict legal regulations and have specific rules regarding the types of businesses they work with. Instant must adhere to these requirements and also comply with the laws of the countries where it operates. Additionally, Instant must consider the financial risks associated with different businesses, both for the benefit of customers and the company itself.
While the goal is to provide businesses using Instant with a seamless payment experience, the reality is that every payment transaction involves multiple financial companies, each with their own set of restrictions. These restrictions can be broad and often confusing, making the decision to support a business not solely up to Instant but also dependent on the regulations and guidelines imposed by the various financial entities involved in the credit card processing chain.
Why are entire business categories prohibited or restricted?
Rather than assessing each business individually, many financial institutions prefer to make decisions based on broad categories of businesses. As a result, certain categories are often restricted or prohibited from accepting payments. These restrictions can be quite rigid and may not provide nuanced consideration to individual businesses. Instead, they are designed to manage risk in a general sense, rather than support the maximum number of businesses possible, offering a blunt and uniform solution rather than a precise and tailored one.
Article URL: https://help.instant.one/prohibited-busineses
Keywords:
## How Reviews and Social Proof Work in Instant AI Emails
Reviews are one of the strongest drivers of trust and conversion. Instant AI automatically includes them in your emails so shoppers can see real feedback at the right moment — without you needing to set anything up.
Star Ratings in Product Blocks
Whenever you use a Product Block that includes showing the product price and product description, Instant AI will automatically add star ratings and review counts (from supported providers).
-
If a product has no reviews, ratings will be hidden.
-
If the average rating is below 4 stars, we also hide it.
-
Ratings appear in any flow that includes product blocks — for example Abandoned Cart, Checkout, Browse Abandonment, or Welcome flows.
-
If you're using a product block that is images only, star ratings will also be hidden.
We currently support:
-
Okendo
-
Judgeme
-
Reviews.io
-
Yotpo
-
Loox
- Stamped
As long as your reviews are available on your product pages through one of these providers, Instant AI will scrape and display them automatically. No integration or API is required.
Support for other providers may be available depending on the method used to embed these on your site. Some providers embed reviews in a way that cannot be scraped and detected by Instant AI.
Adding Testimonials with Social Proof Blocks
In addition to star ratings, you can also feature longer customer quotes. This is done by adding a Social Proof Block to your email.
Instant AI will automatically pull in testimonials from your store and display them in the block. If there aren’t any suitable reviews, the block will stay hidden.
Our algorithm selects reviews that are most likely to build trust and help conversion. It only includes:
-
Reviews with 4 stars or higher
-
Reviews that are at least one full sentence long
-
Reviews with positive, helpful sentiment
-
Reviews with signals of usefulness (e.g. Okendo upvotes) where available
You can choose between:
FAQ
Why don’t I see reviews in my emails?
There are a few common reasons why reviews may not appear:
- Block type
- Reviews only show in Product Blocks with price. If you’re using an image-only block, switch to a block design that includes product details.
- Provider support
- Reviews are only pulled from supported providers (Okendo, Judgeme, Reviews.io, Yotpo, Loox, Stamped most Klaviyo Reviews).
- If you use another provider, reviews won’t display. Adding a Social Proof Block with an unsupported provider will also result in the block being hidden.
- Review quality
- Instant AI only includes valid, positive reviews.
- Placeholder content will never be sent. If you see placeholder text in the on-screen editor but not in your test email, it means no valid reviews are available. This could be that this product has no reviews, or the review provider isn't supported.
- Ratings and counts
- Ratings below 4 stars or products with no reviews are automatically hidden.
- Check that the product you’re testing has valid reviews available.
- Test product selection
- Test emails use sample products. If the sample product doesn’t have reviews, none will display.
- Try previewing a different flow (e.g. Welcome Flow, which uses Best Sellers) since those products usually have more reviews.
- Preview vs. real emails
- The on-screen editor shows rotating sample reviews that refresh every 24 hours to give you examples while designing.
- The Send Test Email option is the most accurate preview of what will appear in real emails, as it pulls real-time review data.
Can I turn reviews off?
Yes. If you’d prefer not to include reviews, just select a block without product details.
Article URL: https://help.instant.one/how-reviews-and-social-proof-work-in-instant-ai-emails
Keywords: Judgeme
## I already use Audiences. How do I get started with Targeting?
If you're using Instant already, and you wish to get started with the Meta integration (Instant Targeting), please proceed to the Meta setup instructions in the Instant dashboard here.
You should now see setup instructions!
Please complete the Meta setup steps to enable Instant Targeting.
If you run into any issues or would like any assistance, please reach out to us at help@instant.one or contact your dedicated customer success manager.
Article URL: https://help.instant.one/getting-started-with-targeting
Keywords:
## Installing Instant Checkout onto Magento 2
This guide will walk you through the process of installing the Instant Checkout module onto Magento 2.
⚠️ Installing the Instant Checkout module should be first performed on a sandbox
environment before enabling Instant in your live production storefront.
Our team is available to complete this process for you if we have been provided with credentials. Please email help@instant.one for more information.
Access
Instant requires to access set up the checkout component. Please make sure you have allowed access to the following:
Access to modify Instant Checkout configuration under Stores > Configuration
Access to Settings > Integrations
Access to Orders (for test orders)
Access to System > Cache Management & Index Management
Installing the Instant extension
- To begin, ensure you have installed the Instant Checkout extension via composer by running the following command in the main directory of your Magento project composer require instant/instant-checkout. For more information on Composer, see the website: https://getcomposer.org/.
- If composer is unavailable, you can install the extension manually by downloading the files from the repository here: https://github.com/InstantCheckout/instant-magento2 and then placing the files in the app/code/Instant/Checkout directory.
- Once installed, run the following command to enable the plugin: bin/magento module:enable Instant_Checkout.
- Finally run Magento’s setup command: php bin/magento setup:upgrade.
- Check that the extension has installed successfully by going to Stores → Configuration. The Instant extension should be listed as per the image below.
You can also confirm this by going to System > Integrations. Instant again should be listed with the status "Active" as per the image.
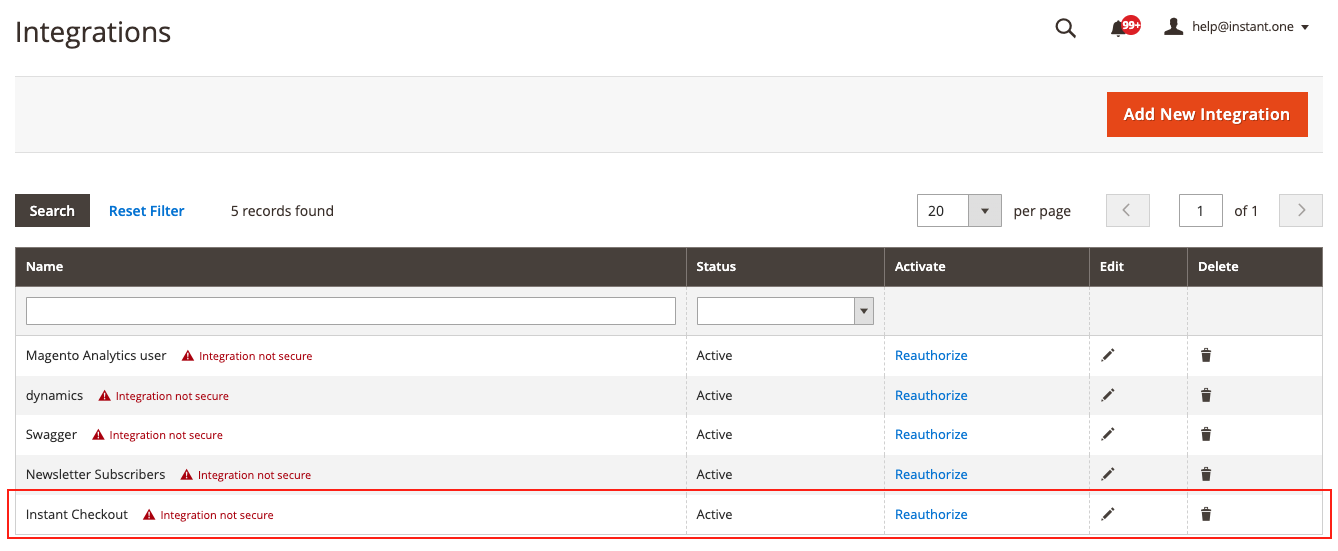
Activation
For your store to be able to communicate with Instant, you will need to activate your plugin installation. Fortunately, much like our checkout, this is a one-click experience.
- Log into your Magento store.
- Visit the Stores → Configuration link:
- From the left hand menu on this page select Instant → App Configuration.
(If you do not see this, it likely means the plugin is not installed correctly - Please repeat the steps for Installing the Instant Extension above):
- You should see the following page. Here you see an Activate button, and an Instant App ID field, which should be empty.
If you are on a staging/testing environment, you will want to make sure you have selected Yes, under the Is Staging Environment dropdown box.
Once you have selected the environment click the "Activate" button, and wait for your extension to activate (this should only take a few seconds).
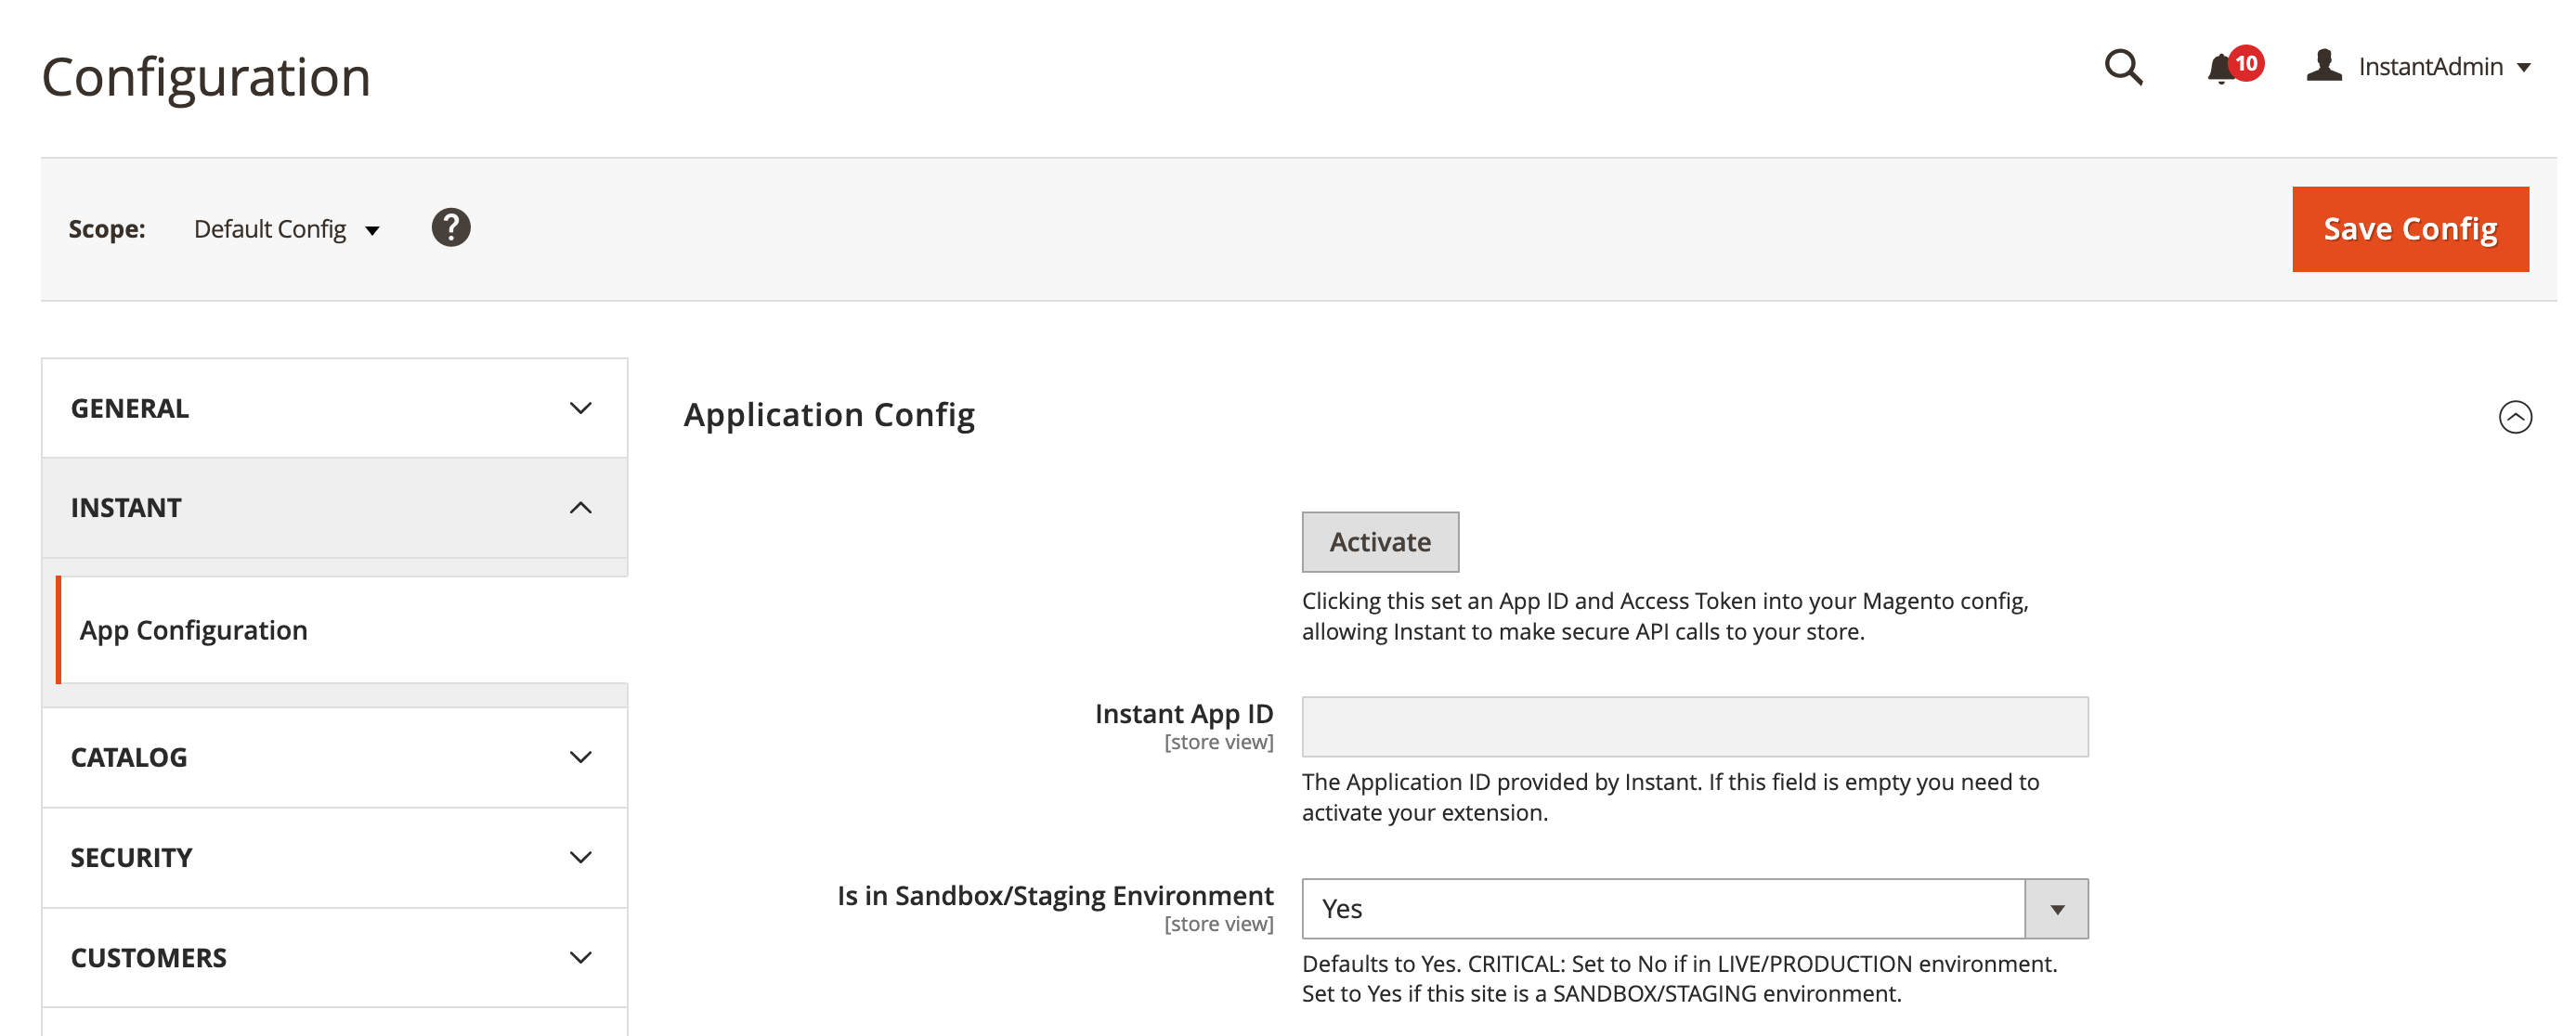
5. Once complete, you should see the following message:
.png)
6. Select where you would like the Instant Checkout button to be visible:
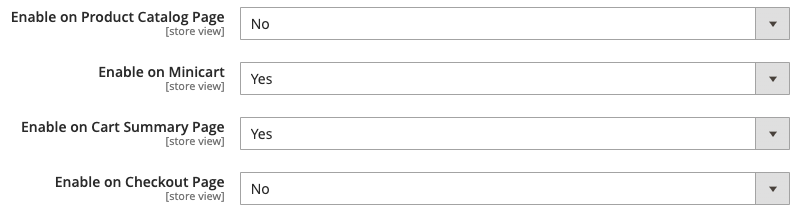
7. Head to your staging site and the
Troubleshooting
Testing
Once you can see the Instant checkout button, you can test by placing an order on your staging site.
- Add an item to your cart and click Instant Checkout
- You should now see the Instant checkout window displayed.
- Enter your email address to log in or create a new account.
- We recommend using a fake card number such as:
Card number: 4242 4242 4242 4242 Date: 24/42 CVC: 424
- Once you have filled out you details, select "Buy Now". This will place a mock order to your staging site.
- Check your order has been processed by visiting your Magento orders page. Help: My order is not showing in Magento
Customisation
For our guide on how to personalise the styling of the Instant Checkout button please head to: https://help.instant.one/customise-the-instant-checkout-button
Instant Dashboard
Please email help@instant.one if you do not have access to you Instant seller dashboard
Troubleshooting
If you encounter an error upon clicking the Activate button, follow these steps to troubleshoot and diagnose the problem:
After I click the Activate button, I get an error.
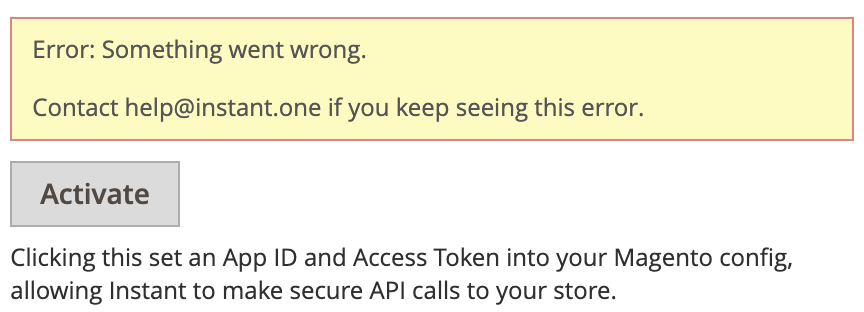
- Double-check check the extension is installed correctly.
- In the left-hand side menu select System > Integrations. You should see the list of all Integrations. Make sure Instant Checkout has the status "Active".(If not, please follow this guide above to Install the Instant Checkout Extension)
- Check the console for error messages.
- Open your developer tools by right-clicking and selecting "Inspect."
- Within the developer tools, navigate to the console tab and check for any error messages.

- Errors
Instant Domain Blocked
 Problem:The error was related to Instant's domain not being whitelisted in the merchant's CSP directive
Solution: The merchant needs to:
Add *.instant.one and api.instant.one to their CSP whitelist.
HTTP Authentication:
Problem: Instant communicates via API meaning we cannot authenticate via API as well as provide HTTP authentication
Solution: If you have HTTP Authentication for your staging site please deactivate it temporarily for integration.
Testing Errors
I have placed an order but I cant see it in Magento
- Go to System > Cache Management and flush the cache
- Go to System > Index Management and .... ADD
- Refresh your browser and hc
If you encounter any issues while installing or activating, please see our troubleshooting link guide link, or don’t hesitate to get in touch with our team at help@instant.one!
Article URL: https://help.instant.one/instant-onto-magento
Keywords: magento,installation
## How do I whitelist Scripts, Cookies, and Local Storage for the Instant Pixel?
To ensure proper functionality of the Instant Pixel, please whitelist the following scripts, cookies, and local storage items.
While these requirements do not frequently change, they are subject to occasional updates; please periodically verify them.
Scripts
Ensure your Content Security Policy (CSP) or other script-blocking configurations allow scripts from these domains. These are essential for the Instant pixel to work.
-
cdn.instant.one
-
m.instant.one
Cookies
The following cookies must be permitted for accurate tracking and analytics:
-
_vid
-
_vid_t
-
_vid_i
-
_vid_lr
-
_iidt
Instant-Session-Cookie
These cookies are essential for user identification, session tracking, and accurate reporting.
Local Storage
Allow the following local storage keys to enable correct session and user tracking:
These local storage items are essential to maintain session continuity and user identification across browser sessions.
Implementation Tips
-
Verify your CSP or script-blocking tools allows scripts from the above-listed domains.
-
Configure cookie consent tools or privacy platforms to permit these cookies and storage items.
-
Regularly review your configurations to ensure compliance and functionality.
For further assistance, please contact Instant support.
Article URL: https://help.instant.one/how-do-i-whitelist-scripts-cookies-localstorage-instant-pixel
Keywords:
## How to troubleshoot installing the Instant App and Instant Shopify Integration
Important: Before beginning, your account in Shopify must have Administrator permissions, or if using custom staff permissions you need to have Develop Apps and Manage and Install Apps permissions granted.
If you do not have these permissions please contact your administrator to request them before starting, or they must complete the set up on your behalf. Read more
As of 1 January 2026, Shopify updated how apps are installed and connected to stores. Instant uses this updated connection method, so the steps may look different to what you’re used to.
During onboarding, Instant will always show the latest, up-to-date install instructions. Follow the on-screen steps first. If you’d like a guided tutorial, watch this step-by-step video and follow along:
Still not working?
Steps to troubleshoot will depend on what errors you're seeing. If you're seeing the “Integration error: Failed to verify Shopify integration” error. In almost all cases, this is caused by one of the following:
-
The app isn’t installed
-
The app is installed on the wrong store
-
Required permissions weren’t fully granted
-
The app was installed via a distribution link
Follow the below steps to check each option, and if in contact with one of our team members for support, please share screenshots when prompted below with our team.
1. Check to confirm that the Instant App is both created and installed
It is possible that the app was created, but not correctly installed or connected. First, it's best to check that the app is installed on the right store and is accurately working.
-
Go to Shopify Admin > Settings
-
Select Apps > Develop Apps
- Select Build apps in Dev Dashboard
- This will open the Shopify Dev Dashboard in a new tab
- Find the Instant App from the list of created apps and select
(Note: This should already be installed from following earlier steps, otherwise refer to steps 8+ on the standard installation instructions)
- Confirm that the app has 1 Installs next to it on the right
- If there are 0 installs, then select Install App and follow the prompts to correctly install Instant to your store. If you have made any changes to the installation, return to the Instant integration page and try and re-verify your integration.
- If there is 1 installs, then select click on the number of installs to see the name of the stores installed and verify that it is the correct site.

2. Check to the scopes and permissions on the app
It is possible that the app was created, and installed, however we are missing some key Shopify permissions to validate the integration.
-
Complete the steps above to locate, and view the installed app
- Under Versions, select the name of the latest version that is active
- Confirm that all of the scopes are listed under Scopes
- If there are any listed as optional (this section will be missing if there is none) or
If the list of permissions does not match the expected list
- To do this, click the back option to return to the app home
- Select New Version
- Delete all of the existing options under Scopes or Optional
- Replace these with new scopes by Copy and paste the below list under Scopes in the app
write_themes,read_themes,write_script_tags,read_script_tags,write_customers,read_customers,read_products,read_orders,read_customer_events,write_discounts,read_discounts,write_content,read_content,read_inventory,write_online_store_pages,read_online_store_pages,write_pixels,read_pixels,unauthenticated_write_checkouts,unauthenticated_read_checkouts,unauthenticated_read_customers,unauthenticated_read_product_listings
- Select Release
- A pop-up will appear, select release again
- If this section looks correct, but you aren't certain please take a screenshot and share it with our team for verification
Why else might the integration not work?
-
Installed via a distribution link - It's critical that this method must be followed exactly. Alternative methods such as installing via a distribution link are no longer supported by Shopify and have moved to the new partner installation. If you have attempted to install using this method, unfortunately none of the scopes will save and the app will not function. Please try again using the correct method
- Missing permissions to publish or install the app - If your permissions in the Shopify store are missing the ability to create and install apps you may be limited in what steps you can execute. If you can't see the ability to build apps in Dev Dashboard, this is usually a good indicator that your permissions are what's stopping you from setting up.
Your account in Shopify must have Administrator permissions, or if using custom staff permissions you need to have Develop Apps and Manage and Install Apps permissions granted. If you do not have these permissions please contact your administrator to request them before starting, or they must complete the set up on your behalf.
- You have an existing integration with Instant, or a previous integration - We can only support one Shopify ID connected to Instant at one time. If it is possible that you had a previous or old account with Instant, parts of your set up may already be in use. If that is the case please contact our team for assistance to reset your old account so it is available for use and try again.
If all of the above is executed correctly, and it is still failing, please reach out to our team for assistance and provide screenshots of the relevant steps.
Article URL: https://help.instant.one/why-am-i-getting-an-error-when-installing-the-instant-app-to-shopify
Keywords:
## Best practices for new profile export with email EDMs and campaigns
Sending campaigns to new profiles is generally not recommended.
Instead, focus on welcome flows or abandonment flows to engage these customers meaningfully.
Please use Klaviyo filters to exclude profiles that are not in your main newsletter list from EDMs/campaigns.
It is important to focus on welcome flows and abandonment flows to meaningfully engage new profiles that have been identified on your website, rather than un-targeted, broad campaigns. This will minimise any risk of increasing unsubscribe and spam rates when using new profile export.
To achieve this, you can either
- Ensure campaigns are sent only to a list of shoppers that have opted into marketing via your newsletter signups / opt-in popup.
To do this, add a filter to the segment which you send campaigns to which ensures you are targeting customers in your main newsletter list.
For example, if your main list is named "Online Store Subscribers", then add a filter below.
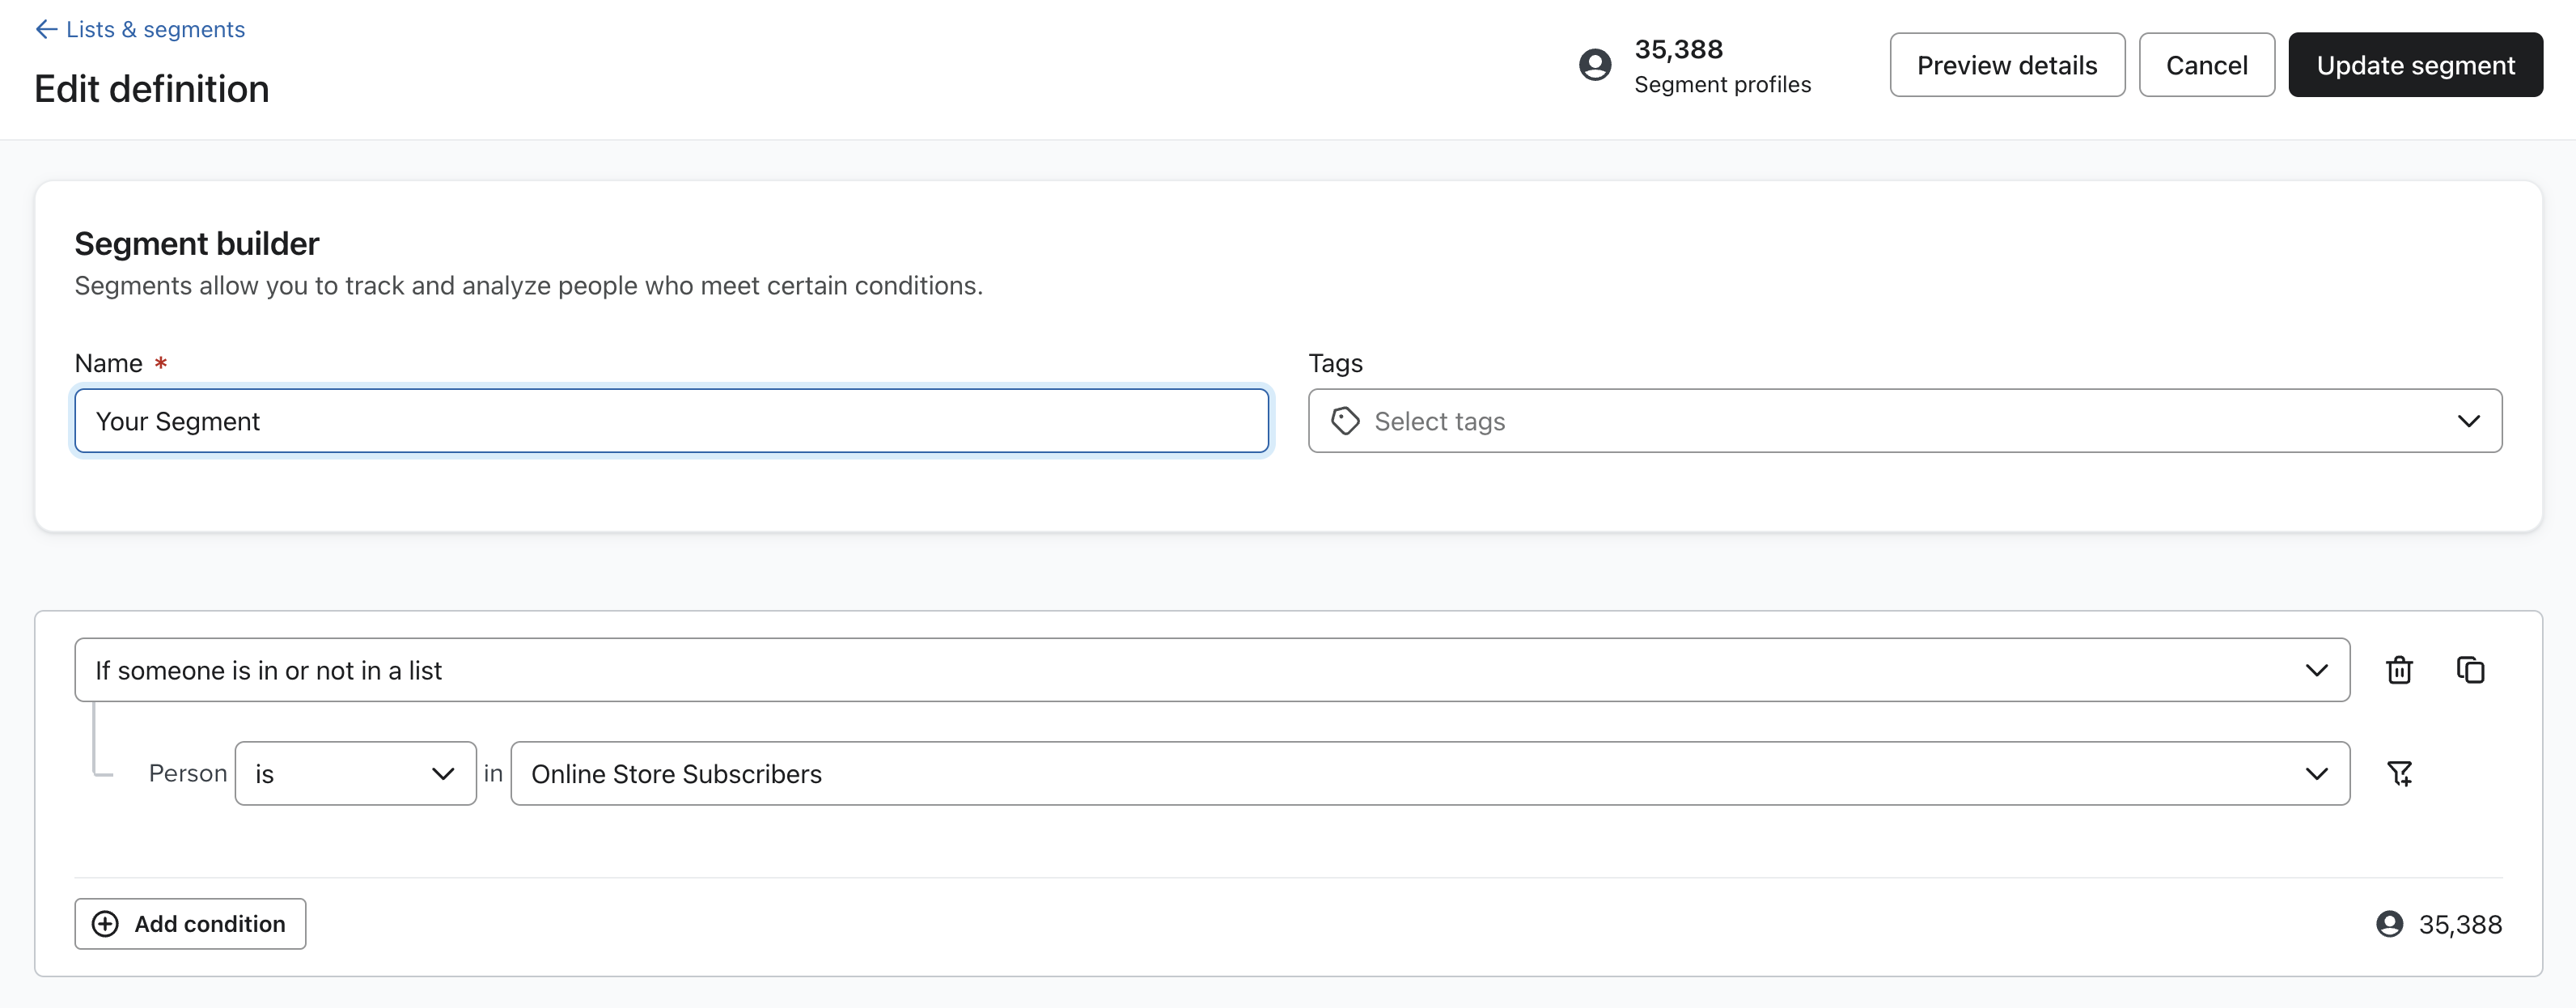
- Add a filter to segments which you send campaigns to, to ensure that you are only sending campaigns to subscribed shoppers.
To do this, add a filter to the segment which you send campaigns to which ensures that you are only sending campaigns to shoppers that have subscribed.
This filter is "If someone can or cannot receive marketing - person can receive email marketing - because person subscribed". Please see the screenshot below for reference.
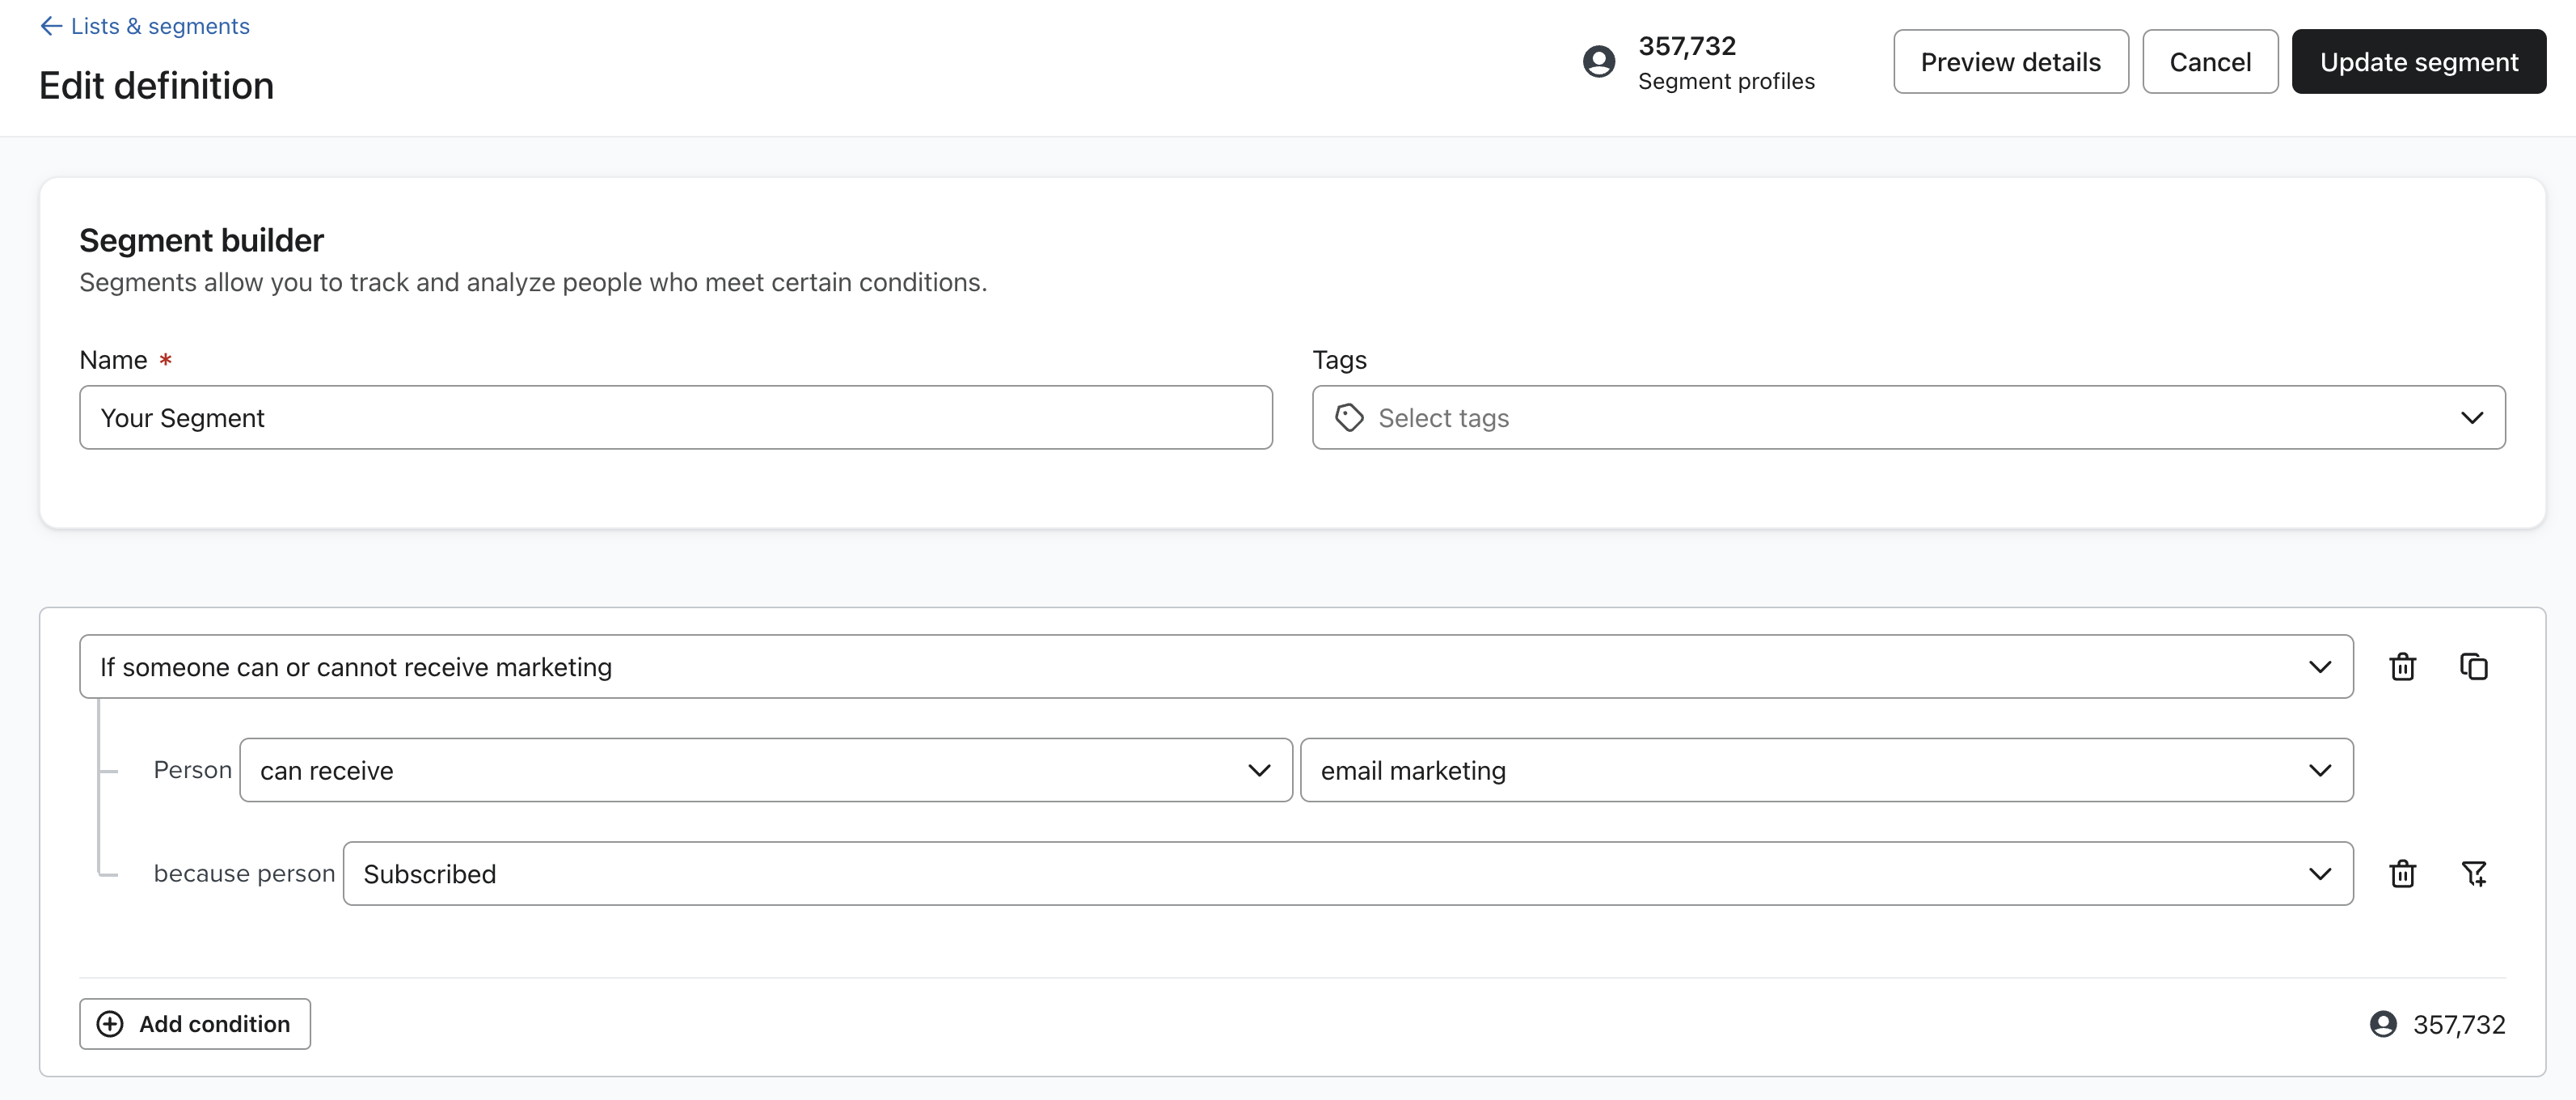
This is particularly important when emailing a segment that is built off site engagement. For example, if your campaign is targets anyone who has viewed a product in the last 30 days, ensure this filter is added.
- Don't send campaigns to profiles that have their subscription status as "Never subscribed".
Profiles with their subscription status as "Never subscribed" should only be enrolled into flows, not added to campaigns.

To ensure that these profiles are not added to campaigns, add the filter is "If someone can or cannot receive marketing - person can receive email marketing - because person subscribed". Please see the screenshot below for reference.
Article URL: https://help.instant.one/net-new-profiles-with-edms
Keywords:
## Flow Setup: Add to Cart Abandonment
Add to Cart abandonment flow targets visitors who have added an item to their cart and left the site without completing a purchase.
These flows are triggered through the "Add to Cart - Instant Audiences" metric in Klaviyo.
If you have an existing flow setup for 'Add to Cart', please duplicate it for Instant Audiences.
If not, we suggest duplicating your Cart Viewed/ Checkout Started flow.
When creating this Instant Audiences flows, ensure it's named '[Instant Audiences] - Add to Cart Abandonment'.
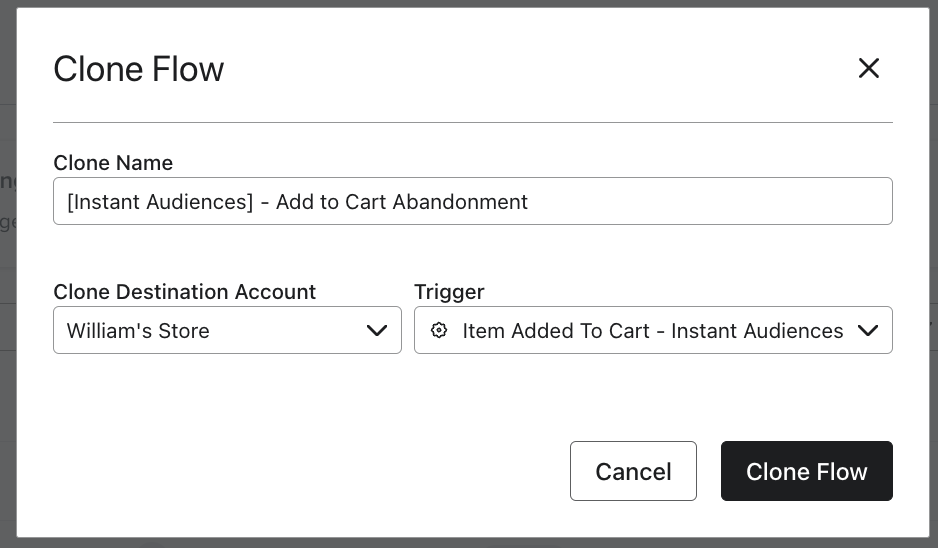
Flow Filters
To ensure that contacts are not enrolled multiple times or if they have made a purchase, it's crucial to add the following flow filters to your new flow:
- Placed Order > zero times since starting this flow
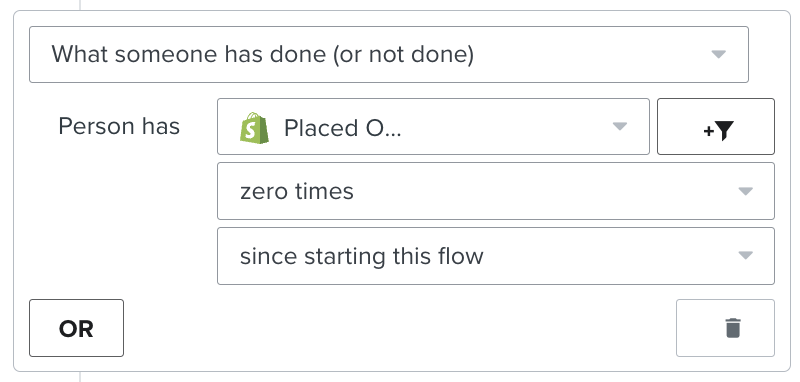
- Has not been in this flow in the last 7* days

*The cooldown period is how long you want before a customer can reenter this flow to prevent over-messaging. You can configure this as you wish. If you do not wish to have a cooldown, skip adding this filter.
If you have these existing flows:
If you have any of these flows, you'll also need to add these filters on your new '[Instant Audiences] - Add to Cart Abandonment' flow to prevent enrolling contacts already in your existing flow or in a higher intent Audiences flow.
| If you have, or are going to create this existing flow: |
Add these filters to your new Instant Audiences flow: |
Add to Cart abandonment flow
|
Add the filter: Added to Cart > zero times > since starting this flow
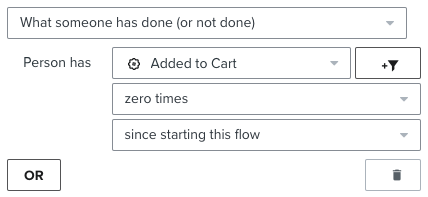
|
|
Extend the delay on your new flow to be 15 minutes later than your existing flow
(e.g. if your existing flow was 1 hour, set the Audiences flow to 1 hour, 15 minutes)
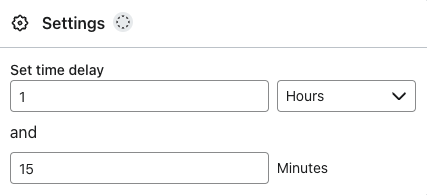
|
|
If your existing Browse Abandonment flow has a cooldown (i.e. Has not been in this flow > in the last X days), then add the following filter to your new flow.
- Person has Received Email > where Flow > equals {{ Your Existing Abandonment Flow }} > zero times > in the last 7* days
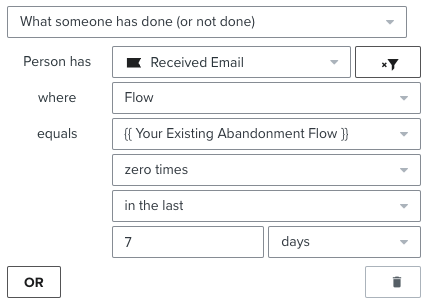
If this Audiences flow also support SMS, then also add the filter:
- Person has Received SMS > where Flow > equals {{ Your Existing Abandonment Flow }} > zero times > in the last 7 days
|
| Checkout Started abandonment flow |
Add the filter: Checkout Started > zero times > since starting this flow
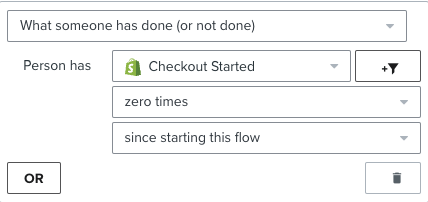
|
| Instant Audiences - Cart Viewed / Checkout Started abandonment flow |
Cart Viewed / Checkout Started - Instant Audiences > zero times > since starting this flow
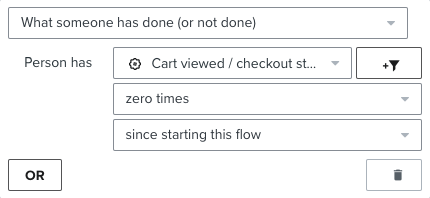
|
Add these filters to your existing flow's
If you have any of these existing non-Instant Audiences flows, these additional filters must be added to your existing flows to prevent enrolling contacts already in those flows.
| If you have, or are going to create this existing flow |
Add these filters to your existing flow |
Add to Cart Abandonment
|
Cart Viewed / Checkout Started - Instant Audiences > zero times > since starting this flow
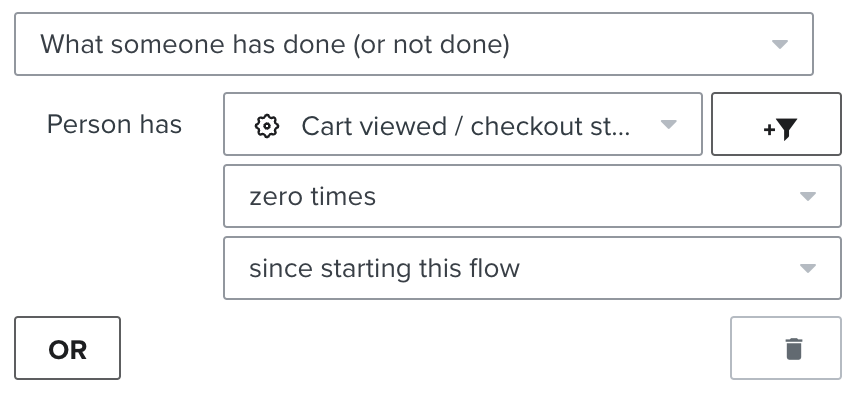
|
|
If you have a cooldown on your existing flow:
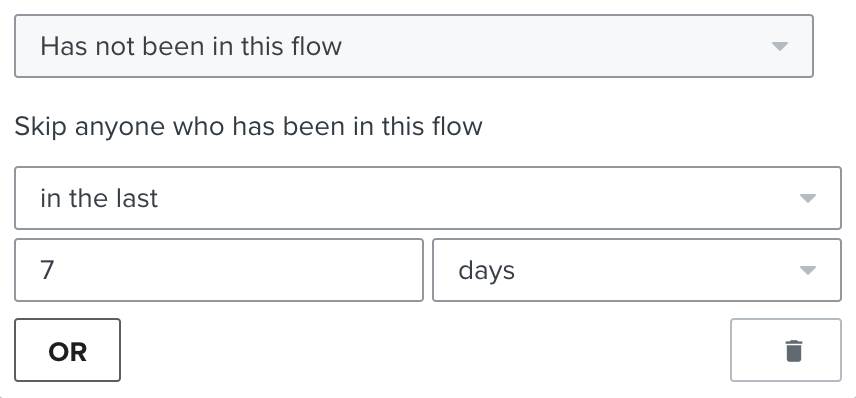
then add the following filter to your new flow:
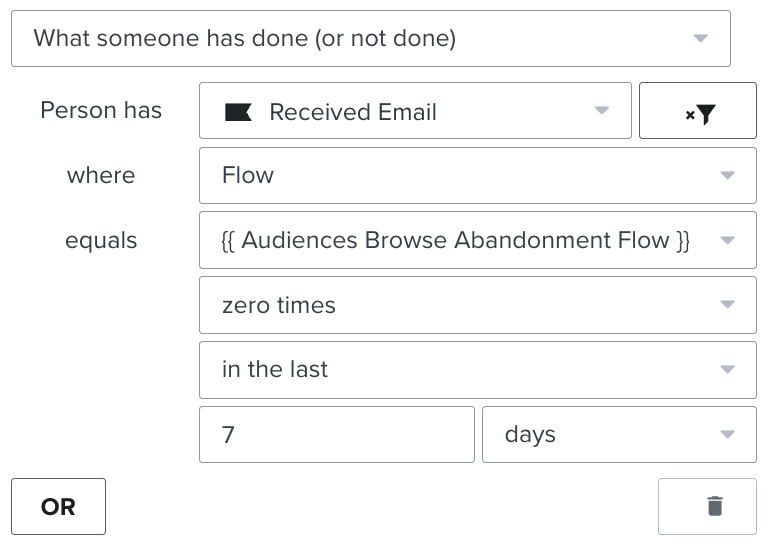
If the Audiences flow also supports SMS, add another identical flow filter to your existing flow, but with "Person has Received SMS" as the filter.
|
Article URL: https://help.instant.one/add-to-cart-abandonment
Keywords: add to cart
## How to add Gmail Annotations for Instant AI
When your Instant AI email includes a discount, we automatically add the Gmail Promotions “deal” markup in the HTML. Gmail can then show a promo chip like “Free shipping” and “Expires today” in the Promotions tab preview. The code itself won’t be exposed in the preview.
No setup in Instant is required. The only step is getting your sending domain approved by Google.
One-time setup with Google
-
Prepare your sender list
Collect every domain and subdomain you send marketing emails from. Examples:
-
example.com
-
email.example.com
-
news.example.com
-
Email Google to request allowlisting
Send a request to p-Promo-Outreach@google.com. Use the template below.
Subject: Request to enable Gmail Promotions Annotations for
Body (copy and paste)
Hi Google Team,

Please enable Gmail Promotions Annotations for our brand.
Brand name: <Your brand name>
Primary website: <https://www.example.com/>

Sending domains and subdomains:
- <example.com>

- <email.example.com>

- <news.example.com>


Description of content:
Promotional emails to opted-in subscribers. Emails may include annotated deals such as discount amount, free shipping, and expiry dates.
We already include the required annotations in our email HTML via Instant AI.

Thank you!
- Wait for approval
Google manages this process end to end. Approval timelines vary. If you need an update, reply to p-Promo-Outreach@google.com.
After approval
You’re done. Instant AI already includes the required markup whenever a discount is present, so your existing emails will start showing eligible promo chips in Gmail automatically.
How to verify
-
Send a test email with a discount to a Gmail address.
-
Check the Promotions tab preview. You should see a chip such as “Free shipping” and an expiry label when relevant.
-
If you don’t see it, give it time and test a few more sends. Gmail decides when to surface chips.
What Instant AI annotates
-
Deal label: e.g., “Free shipping” or “10% off”
-
Expiry: shown when an expiry exists on the discount
-
Code visibility: hidden in the preview. The code stays inside the email body.
FAQs
Do I need to add or edit HTML?
No. Instant AI adds the markup automatically when a discount is present.
Does this work outside Gmail?
Annotations are a Gmail Promotions feature. Other inboxes ignore the extra markup without any downside.
Will this reveal the coupon code in the preview?
No. Gmail shows the deal and expiry, not the code.
What if I use static Shopify codes or other code formats?
If a discount exists in the email, Instant AI will annotate it. Expiry is shown when we detect one.
Does this affect deliverability?
Annotations don’t change deliverability. Normal authentication (SPF/DKIM/DMARC) still applies.
Why don’t I see the chip every time?
Gmail decides when to show annotations based on its own logic. Allowlisting is required, but chips may still not appear 100% of the time.
Troubleshooting checklist
-
You emailed p-Promo-Outreach@google.com and included all sending domains/subdomains.
-
You’re testing an email that actually contains a discount.
-
The discount has a valid future expiry if you expect “Expires…” to appear.
-
You tested to a real Gmail inbox and checked the Promotions tab.
-
Your domain is properly authenticated for email (SPF/DKIM/DMARC).
Article URL: https://help.instant.one/how-to-add-gmail-annotations-for-instant-ai
Keywords:
## Why am I receiving '400' status code errors for my API calls to Instant?
If you've noticed '400' errors in your API calls to Instant, this is expected behavior and not a cause for concern.
These errors occur when we attempt to retrieve a profile using a Klaviyo encrypted ID, known as the 'kxID', which may have expired.
What is a kxID?
A kxID is a unique identifier associated with your customer's profile and is used to securely link their profile to an email address and other information.
These IDs are temporary and will expire after a few days to ensure added security and privacy.
Why Are "400" Errors Occurring?
The "400" occurs when we attempt to retrieve a profile using a kxID that has expired.
- If the kxID is still valid (i.e., not expired), we can successfully exchange it for the corresponding email address.
- If the kxID has expired, a "400" error is returned. This is the error that is being reported on your dashboard.
Why Does the "kxID" Expire?
The kxID is tied to a specific session or visitor. When a shopper hasn't visited the website for a while, the kxID may expire (typically within a few days). If an attempt is made to retrieve a profile using this expired ID, this error occurs.
What Should I Do?
There’s no immediate action required on your part regarding these errors. They are expected and occur simply due to expired kxIDs.
Article URL: https://help.instant.one/error-for-my-api-calls
Keywords:
## Transactions Summary Report
Instant offers a variety of reports for users to download and access. These reports provide valuable insights and data on transactions, payouts, and reconciliation.
The Transactions Summary Report downloads a summary of transactions from the specified time range. This report contains:
- Reporting Category
- Currency
- Count
- Gross
- Fee
- Net
Example
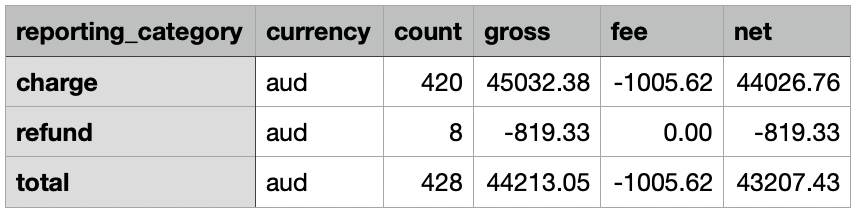
Other Reports
- Transactions Itemised
- Payouts Itemised
- Payouts Summary
- Payouts Reconciliation Itemised
- Payouts Reconciliation Summary
Article URL: https://help.instant.one/transactions-report
Keywords:
## Removing the Cancel Order Button from Instant Checkout
Some merchants might want to remove the "Cancel Order" button from the Instant Checkout process.
Before making this change, it's crucial to consider the implications of this action before proceeding.
Understanding the Implications
- Elimination of Cancellation Window: By removing the button, the 5-minute cancellation window is also removed. This means customers won't have the opportunity to cancel orders post-purchase within this timeframe.
- Potential Increase in Refund Requests: Without the option to cancel immediately after purchase, customers may resort to requesting refunds instead.
- Possible Boost in Conversions: The absence of an easy cancellation option might reduce impulse cancellations, potentially leading to more conversions.
To remove the Cancel Order button reach out to our support team at help@instant.one
Article URL: https://help.instant.one/removing-cancel-order-button
Keywords:
## How to Make Sure Your Email and SMS Metrics Aren’t Inflated by Bots
If your Klaviyo open or click rates look unusually high, it may be because bot traffic is being included in your reporting. Bots are automated systems that can trigger opens or clicks without a shopper ever interacting with your message.
By default, Klaviyo includes this activity in its metrics. The good news is you can adjust your settings so your reports only reflect real human engagement.
Why this matters
Counting bot interactions makes your open and click rates look better than they really are. This can:
How to update your Klaviyo settings
To exclude bots and automated activity from your Klaviyo reports:
-
In Klaviyo, go to Attribution Settings.
-
Scroll to Tracking and reporting data.
- Tick the options to:
-
Exclude bot interactions from clicked email
-
Exclude bot interactions from clicked SMS
-
Exclude Apple Mail Privacy Protection (MPP) opens
-
(Optional) Exclude transactional messages if you only want to measure marketing activity
After updating these settings, your reports will better reflect genuine shopper engagement.
FAQ
What are bots in email reporting?
Bots are automated systems that scan or interact with emails for reasons unrelated to a shopper’s behaviour. Examples include:
-
Email security filters that click every link to check for phishing or malware.
-
Apple Mail Privacy Protection (MPP), which automatically downloads all emails so they appear opened even if the user never read them.
-
Inbox monitoring systems that test links or images as part of spam filtering.
Why exclude them?
Including bots inflates open and click rates, which makes it difficult to understand what’s really working. Excluding them ensures your reporting reflects true human engagement.
Article URL: https://help.instant.one/how-to-make-sure-your-email-and-sms-metrics-arent-inflated-by-bots
Keywords:
## How does Instant AI manage alt text in emails?
Alt text helps make emails more accessible and reliable. It ensures that people using screen readers can understand your images, and it provides helpful context when images don’t load. Alt text can also support overall email quality and deliverability, as inbox providers use it to understand your content.
Instant AI automatically adds alt text to every image included in your emails so you don’t need to create it manually.
Logos, icons and structural images
Instant AI assigns straightforward, descriptive alt text to all non-product images, including logos, icons, and elements like review stars.
Product images
Alt text is generated using AI and populated from your Shopify product data, ensuring each product image has an accurate, context-specific description.
Custom images you upload
Any uploaded image, such as banners, lifestyle photos, or campaign graphics, are automatically analysed and given AI-generated alt text based on its visual content.
The generated alt-text is saved and re-used every time this image is used in future flows or campaigns.
Alt text is added automatically in the background and doesn’t require any configuration. If you’d like to see it in practice, you can send yourself a test email and check the alt text on any image.
Article URL: https://help.instant.one/how-does-instant-ai-manage-alt-text-in-emails
Keywords:
## Troubleshooting Your DNS Settings for Instant AI
To send emails through Instant AI, your DNS must be set up and verified correctly. If your preview emails are failing or your domain hasn’t verified after 48 hours, it’s likely due to a DNS issue. Here’s how to troubleshoot and get back on track.
1. Check Your DNS Status
- Go to Configuration → DNS in the Instant dashboard.
- Click Verify
- If your verification is still pending, we'll display a message that we're working on your verification
2. Try Connect your DNS Automatically
- If you see the “Connect your DNS automatically” button, you’re eligible to use our one-click DNS setup powered by Entri.
- This is the fastest and easiest way to configure your DNS, and we recommend using it if available.
- Select this option and follow the prompts to authenticate and automatically integrate
Troubleshooting Tips: Most domain providers allow only one CNAME record per host. If you’re trying to connect automatically but already using a CNAME with another platform (like Klaviyo or Mailchimp), you won’t be able to add ours without removing the existing one.
-
If you’re ready to switch entirely to Instant, you can replace the existing CNAME.
-
If not, contact our support team and we’ll help you explore alternative setup options.
3. Try Connect your DNS Manually
-
If you don’t see the automatic setup option, your domain provider isn’t currently supported by Entri, or their service is temporarily down.
-
In this case, you’ll need to complete setup manually.
-
Click “Connect your DNS manually” in the DNS screen.
-
You’ll be shown a list of DNS records (e.g. CNAME, TXT).
-
Copy these values exactly. DNS is case- and character-sensitive.
-
Log into your domain provider (e.g. GoDaddy, Cloudflare, Shopify) and add the records.
-
Save the changes and return to Instant to click “Verify”.
Tip: If you’re unsure how to add DNS records with your provider, search “[your provider] add DNS records” (e.g. “Shopify add DNS records”) for provider-specific guides.
Still Stuck? If your DNS hasn’t verified within 48 hours, send us a screenshot of your DNS records and we’ll help troubleshoot from there.
Article URL: https://help.instant.one/manage-your-dns
Keywords:
## Customising your SMS brand prefix
Every SMS you send through Instant starts with a brand prefix so that recipients can immediately recognise who the message is from. Setting your prefix is a one-time configuration that applies to every SMS you send through campaigns and flows.
This article covers where to find your prefix settings, the difference between the two prefix options, and how to choose between them.
Before you start
You'll need SMS configured on your account to access prefix settings. If you haven't done that yet, see Enabling Instant AI SMS in Australia.
Where to find prefix settings
Your prefix is configured in SMS Settings, accessed from your SMS configuration page in the dashboard. It's set once and applies globally to every SMS you send, both in campaigns and in flows.
Short prefix (up to 4 characters)
A short, abbreviated version of your brand name. The short prefix has one extra benefit: it also lets you customise the prefix used in your shortened links, so your brand appears at both the start of the message and inside the link itself.
For example, if your brand prefix is EM'S and your link prefix is also EM'S, your SMS might look like:
EM'S: New arrivals just dropped. First look here: https://em's.insst.io/tYynpd Reply STOP to unsubscribe
Long prefix (up to 10 characters)
A longer version of your brand name (or your full name, if it's short enough). The long prefix gives you stronger brand recognition at the start of every SMS, but the link prefix uses the Instant default and isn't customisable.
For example, with the long prefix AFTERSHOCK:
AFTERSHOCK: Hi Gemma, we saw you checking out our new product. Here's 25% off: https://insst.io/KXLWES Reply STOP to unsubscribe
Which option should I pick?
The right choice depends on your brand name and what you want to optimise for.
Pick short prefix if:
- Your brand name fits comfortably in 4 characters, or has a recognisable abbreviation.
- You want your shortened links to also carry your brand.
- You want to leave more characters available for your message body.
Pick long prefix if:
- Your brand name needs more than 4 characters to be recognisable.
- You'd rather shoppers see your full brand at the start of every SMS than at the link level.
Both options satisfy the legal requirement to identify your business in every commercial SMS, so either is compliant.
Changing your prefix later
You can update your prefix at any time from SMS Settings. Changes apply to all future SMS sends across campaigns and flows.
Already-sent messages aren't affected. If you have a campaign scheduled but not yet sent, the new prefix will apply when the campaign sends.
Removing the prefix on a specific campaign
You can delete the prefix from an individual SMS campaign during drafting. If you do this, you must include your business name somewhere else in the message body. Australian law requires every commercial SMS to clearly identify the business sending it. Keeping the prefix is the easiest way to make sure every message is compliant by default.
Related articles
Article URL: https://help.instant.one/customising-your-sms-brand-prefix
Keywords:
## Trialling Instant Audiences
Instant offers discounted trials to new customers for Instant Audiences. Trials enable merchants to see the value of Instant Audiences first hand, before committing to our full-price offering.
How trials work
Trials of Instant Audiences last thirty days and come at a discounted price. Our discounted trial price is contingent on a few simple conditions.
First, customers on trial must commit to enabling all three of our standard email marketing flows, configured as recommended by our team. This is to ensure a fair test of our full capabilities, unhindered by the lack of a specific email marketing flow that would improve ROI.
Second, if you're using another email marketing solution, Instant's abandonment flows must be given priority over all other retention marketing solutions, other than your standard flows. For example, if you use Klaviyo, Klaviyo's abandonment flows will take first priority, Instant's will take second, and any other competitors you may use or be testing will take third, or fourth priority. If you wish to prioritise a competitors abandonment flows above ours, you will not see the full potential of Instant, rendering the trial pointless.
Merchants who wish to trial Instant, but want to design their own test that does not meet the above criteria, are welcome to trial Instant at it's full price, and we're happy to provide advice on running an effective test.
FAQ
Why are trials of Instant thirty-days long?
Most merchants already do some retention marketing, whether that is through abandonment emails or paid social retargeting, and most of their existing software systems will remember shopper identities for between twenty-four hours and seven days. For this reason, Instant's results typically balloon after the first week of use, and again after the second. This is why Instant insists on thirty-day trials: this is the ideal length of time to get at least two weeks of Instant at optimal performance.
Will my results stay flat, improve, or decline after my trial?
After adjusting for the seasonality of your business (i.e., January will most likely be slower than November), Instant results should compound over time. This is because we remember shoppers indefinitely, and many shoppers do not come back to your website for a few months or even years. So, the more shoppers we remember (and this increases with time), the more likely we are to identify a returning shopper, and the better results you will see. Many of our customers see a fifty-percent increase in performance over their first year.
Instant also regularly releases improvements to our engine, further improving ROI over time.
What is the price of my trial? What will my price be after my trial?
Trials of Instant come at a discounted price, set based on our estimated performance for your business. We estimate this performance based on your current email and website revenue.
At the end of the trial, you will move to a price that is set based on the performance of Instant (i.e., we charge more if we generate more revenue for you). We target a 4x return on investment, and our price is capped on our largest plan to ensure you only ever pay our standard full price or less, based on performance.
The price cap for Instant Audiences is currently $2.5K per month. Given we target a 4x return on investment, merchants earning $10K or more in return from Instant Audiences each month will pay this price. This cap means that many larger brands earn ROI north of 20x.
Smaller merchants who earn less than $10K in monthly return from Instant Audiences pay between $500 and $2K, depending on their performance, targeting at least 4x ROI from the product.
e.g.,
- A merchant earning $4K from Instant Audiences each month will have a monthly price of $1K.
- A merchant earning $2K from Instant Audiences each month will pay $500 each month.
For more pricing information, please contact our sales team.
Article URL: https://help.instant.one/trials
Keywords: sign up form,instant audiences trial
## Why is an order showing as 'Pending'?
When a customer places an order through Instant, the customers card is authorised and the order is placed in a "Pending" status.
Instant Checkout provides a 5 minute window, where a customer can cancel their order or update their details. If they cancel their order, the order status in your ecommerce system is set to "Cancelled", and the card authorisation is cancelled (meaning the customer will not be charged.)
After 5 minutes, the order is then progressed to "Processing" and the card authorisation is captured.
Only orders in a "Processing" status should be fulfilled.
Please ensure that Instant Checkout orders with a status of "Pending" are not fulfilled as they can still be cancelled.
Once an order is "Processing", it cannot be cancelled and therefore can be fulfilled.
Orders Stuck in Pending
If an order stays stuck as 'Pending' in your platform, please search the order number in your Seller Dashboard to confirm if the order was paid. If the order is there, it can be manually updated in your platform and fulfilled.
If the order is not in the Instant dashboard, this indicates that your server/website may have had an outage and the order was not paid and should not be fulfilled.
Feel free to contact help@instant.one for any clarification on pending orders.
Article URL: https://help.instant.one/pending-orders
Keywords: magento,merchant help,pending,order status
## Getting Started with Analytics
This page highlights key data to track progress and success during your Audiences subscription.
The Analytics page gives you a clear view of your revenue uplift through using Instant Audiences, as reported by your connected Klaviyo account.
Your data is organized into easy-to-read cards, allowing you to track key performance metrics like ROI, projected revenue, and Instant Flow statistics.
Each card offers valuable insights to help you analyze both your current and future performance.
Accessing the Dashboard
1. Navigate to the Instant Dashboard and log in.
2. After logging in, you'll be taken directly to the Analytics view, where you can see your total Instant Audiences revenue uplift across your entire subscription period.
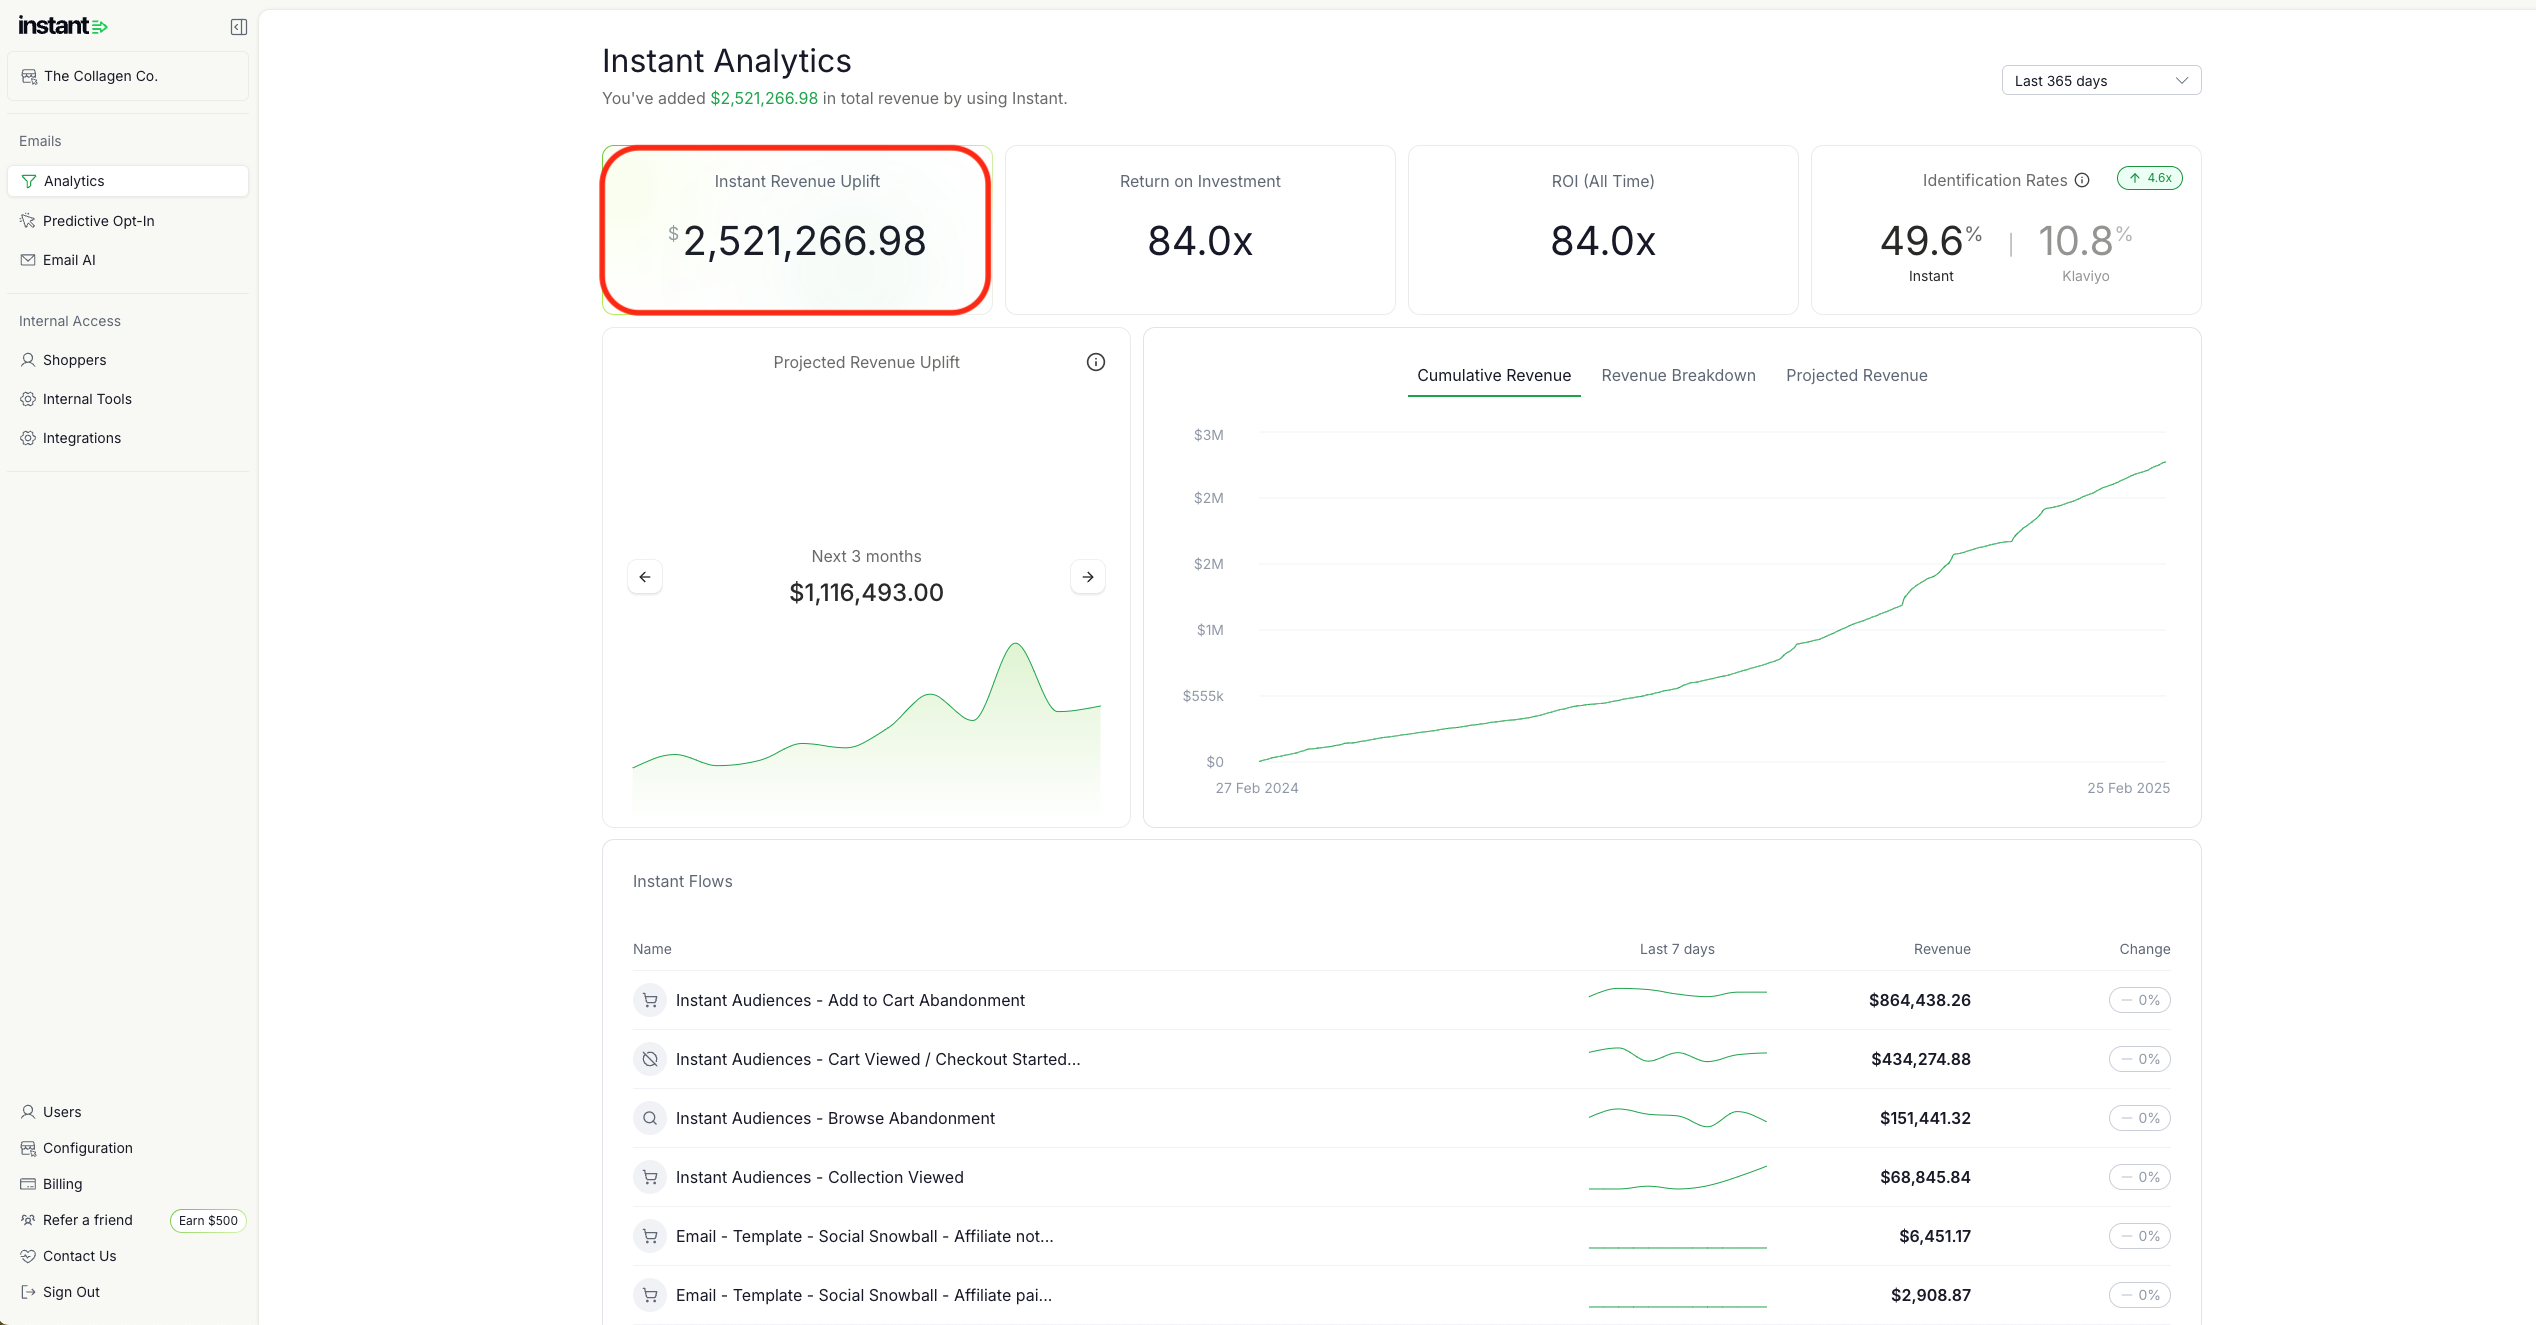
Default Cards
Return on Investment cards
This card displays how much revenue you have generated with us and your ROI relative to your subscription cost.
- You can adjust the time period for earnings calculation using the date range tab.

How We Calculate Your Card Data:
-
Instant Revenue Uplift – Revenue attributed to all Instant Audience flows from Klaviyo.
-
Return on Investment (ROI) – Revenue uplift compared to your subscription cost over the selected period.
For instance, if your subscription is $2,500 and your Instant Audiences revenue uplift is $20,000, the ROI is 8X.
-
ROI (All-Time) – Total Instant Audiences revenue uplift since you started using Instant Audiences
-
Identification Rates – A side-by-side comparison of the shopper identification rate achieved by Instant versus Klaviyo.
Identification rate highlights the percentage of shoppers that land on your website that are identified by Instant versus Klaviyo. Instant is always able to identify more shoppers that would otherwise be anonymous to Klaviyo.
For example, If the Instant identification rate is 60% and the Klaviyo rate is 30%, this would mean Instant is able to identify 60% of shoppers that visited your website, instead of 30% without Klaviyo. This would equate to a 2x uplift in shoppers that are identified and can receive marketing communications, resulting in more deliveries and higher revenue!
Projected Revenue Uplift Cards
The Projected Revenue card displays your projected revenue uplift over the next 3-month and 12-months periods.
To change the estimated uplift dates, click the arrow on the right-hand side of the card.
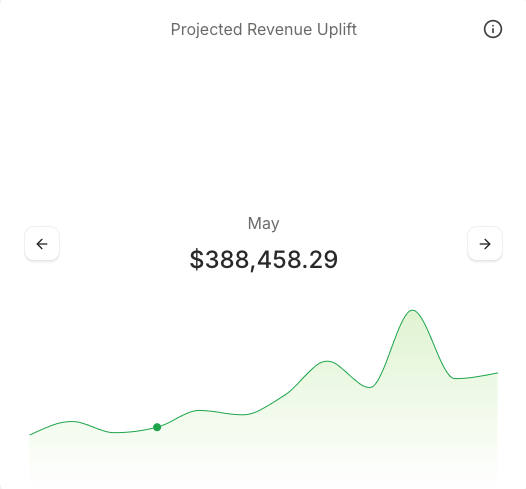
The Projected Revenue Graph illustrates cumulative revenue, revenue breakdown, and projected revenue over the selected period. To see a breakdown of your revenue in the graph, simply hover over a date.
-
Cumulative Revenue – The total revenue uplift added up over time.
-
Revenue Breakdown – Revenue uplift each day.
-
Projected Revenue – The estimated revenue uplift based on past trends and recent uplift.
To see a breakdown of your revenue in the graph, simply hover over a date.

How We Calculate Your Card Data:
We retrieve your Shopify order data from the past year, gathering total revenue for the current and previous months. Using historical year-over-year trends and recent uplift, we project future revenue.
Instant Flows Card
This card displays each Instant Flow and the revenue generated in the time period selected. You can also see trend data over the last 7 days.
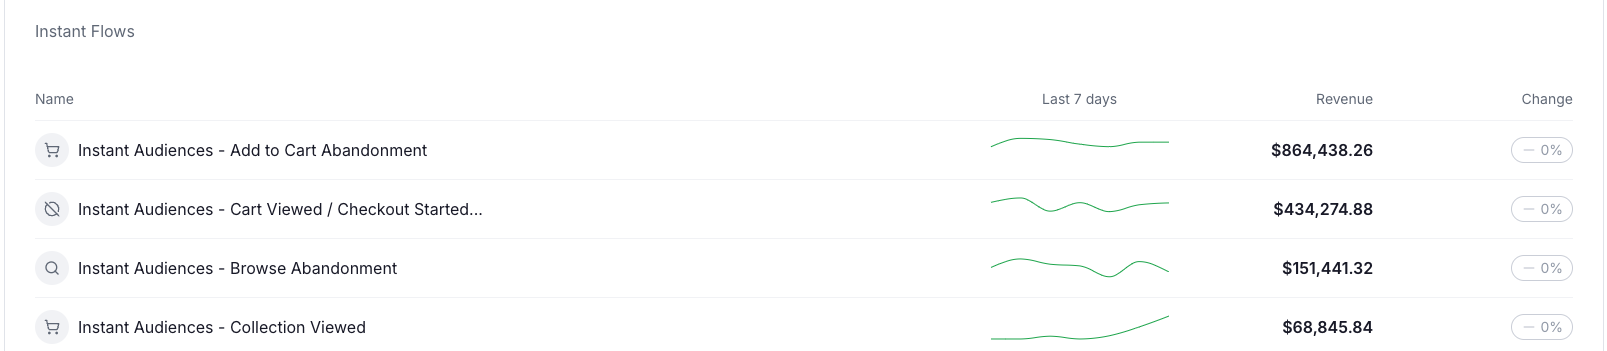
Article URL: https://help.instant.one/analytics-dashboard
Keywords:
## Why Instant AI Emails Require a Physical Address
All Instant AI emails include a physical postal address in the footer by default. This ensures your emails remain legally compliant and trustworthy across all regions, especially if your store has international traffic.
Legal and Deliverability Requirements
-
United States: Under the CAN-SPAM Act, all commercial emails must include a valid physical postal address. This applies even if your business is not US-based, as inbox providers often enforce CAN-SPAM standards globally.
-
Australia: Under the Spam Act 2003, marketing emails must clearly identify the sender and provide accurate contact information. Businesses must supply contact details that allow recipients to reach the sender. A physical address is the most widely accepted and recognised way to meet these identification requirements, and it is strongly recommended by deliverability experts
Including a physical address helps ensure your emails meet global compliance standards and reduces the risk of being flagged as spam by inbox providers.
Where does Instant AI get the address from?
By default, we use the Shopify store address set in your Shopify admin. This allows us to automatically populate a valid address without requiring manual setup.
If you prefer to use a different address (e.g. not your warehouse), you can override it in your brand settings.
-
Visit your Brand Configuration settings
-
Scroll to the Email Footer Address section
-
Enter the address you’d like to use in your emails
-
Once saved, this will update your physical address used on all emails
You can use a business address or PO box instead of your warehouse address if preferred. If you need help updating your address, feel free to contact help@instant.one for assistance,
Article URL: https://help.instant.one/why-instant-ai-emails-require-a-physical-address
Keywords:
## How long does it take for a customer to receive a refund?
When there is sufficient funds in your Instant Account, we submit refunds to your customer’s bank immediately. Depending on the bank's processing time, it can take around 5-10 business days for the refund to show up on your customer’s bank account.
When there isn’t sufficient funds, the refunds will be pending and you will need to ensure that the balance is brought out of negative before the refunds will be sent out.
Article URL: https://help.instant.one/customer-refunds
Keywords: refund,processing time
## Understanding SMS character limits
When drafting an SMS in Instant, you'll see a character counter showing 120/120 at the start. This article explains where that limit comes from, what counts toward it, and why the count can change as you type.
This applies to SMS in campaigns. SMS in flows is generated automatically by Instant and stays within the same limit, so there's nothing to manage on your end.
Why we manage your character count
Behind the scenes, SMS has a strict set of technical rules that decide how many credits a single message costs and how it arrives on a shopper's phone. Get them wrong and a message can be split into multiple parts, billed multiple times, arrive out of order, or look unprofessional.
Instant takes care of all of that for you. Your counter shows you exactly how much room you have, accounts for the encoding rules automatically, and reserves space for the things that legally have to be in every commercial SMS. That means:
- Predictable cost. One SMS sent = one credit charged. You'll never accidentally pay for a multi-part message.
- Clean delivery. Every message arrives as a single SMS, in one piece, exactly as you wrote it.
- Compliance built in. Your unsubscribe line is added automatically, so you can't forget it.
- Less to think about. You don't need to understand SMS encoding rules. The counter tells you what you have, and the editor enforces the rest.
The rest of this article explains how the counter works so you can write messages that make the most of the space available.
Why 120 characters?
A standard SMS holds 160 characters when sent in the default character set. Instant reserves the remaining 40 characters for two things that send automatically with every message:
- The link (a shortened URL is added at the end)
- The
Reply STOP to unsubscribe line (required by law in Australia)
That leaves 120 characters for your prefix and message body. By keeping every send within a single SMS, your messages always cost one credit each, regardless of length.
What counts toward your 120 characters
- Your brand prefix (set in SMS Settings)
- The message body you type
- Variables like first name (more on this below)
- Spaces, punctuation, line breaks
What doesn't count toward your 120 characters
- The link at the end of the message
- The
Reply STOP to unsubscribe line
- The line breaks between your message, the link, and the STOP line
So if your prefix is EM'S:, you start with 6 characters used and 114 remaining for the body. If your prefix is AFTERSHOCK:, you start with around 11 characters used and 109 remaining.
A shorter prefix gives you more space for your message. If you want to maximise message length, the short prefix option is the way to go.
Why your character count can change as you type
Standard SMS messages are encoded in a character set called GSM-7, which fits 160 characters per message. As soon as you include a character outside that set (emojis, curly quotes, accented letters, Chinese or Arabic characters), the message switches to a different encoding called UCS-2, which only fits 70 characters per message.
To keep your sends to one SMS per recipient (and one credit), Instant automatically calculates which encoding your message uses and reduces your available character count if needed. So if you add an emoji, you'll see your remaining characters drop. Remove it and the count goes back up.
You don't need to think about the encoding itself, just keep an eye on the counter.
How variables affect your character count
When you add the First name variable, Instant reserves 7 characters in your count to account for the name being inserted at send time. This covers most first names without going over.
When the SMS actually sends:
- If the shopper's name is 7 characters or shorter, their name is inserted directly.
- If their name is longer than 7 characters, your fallback is used instead.
- If the shopper has no first name on file, the fallback is used.
This is why setting a fallback is important. It's not just for unknown contacts, it's also what gets used when someone's name is too long to fit. A short, friendly fallback like there or friend works well.
Example: With a fallback of there, the message "Hi {First name}!" sends as "Hi Sam!" to a shopper named Sam, but "Hi there!" to a shopper named Christopher.
Tips to maximise your character count
- Pick the short prefix option in SMS Settings if you want more room for your message.
- Avoid emojis and special characters unless they're essential. They shrink your limit significantly.
- Use straight quotes (
' and ") instead of curly quotes (' and "). Curly quotes count as special characters.
- Keep your fallback short. A 5-character fallback like
there saves more space than friend (6) or valued shopper (14).
Related articles
Article URL: https://help.instant.one/understanding-sms-character-limits
Keywords:
## Maintaining Instant Checkout on BigCommerce Through Theme Updates
During a site theme update, be aware that the Instant Checkout code is embedded within the current theme. This requires manually transferring the Instant Checkout code snippets to the new theme to guarantee seamless functionality and uninterrupted service.
The specific code for the Instant button can be located in the theme file where the button appears on the site.
If you need help with this process, contact our support team at help@instant.one.
Article URL: https://help.instant.one/instant-checkout-big-commerce-theme-updates
Keywords: BIGCOMMERCE
## Instant AI Sign-up Forms
Instant AI offers sign-up forms that will appear as a pop-up on your website to encourage new shoppers to subscribe. You can access the Instant AI sign-up forms here.
How they work
Instant AI supports one sign up form, that's used to capture new subscribers and enrol them in a Welcome Flow. You can configure the design of the Sign-up form and make changes to the overall layout, size, colour, images and what details you would like to capture from shoppers such as email, SMS and shopper name.
Read more here about how sign-up forms and welcome flows work together
How fonts and styling are applied
Use the Sign-up form editor to design the look and feel of your pop-up. You can configure:
- Shape, size and layout
- Images and background colours
- Button styles and colours
- Content, fields and copy
Fonts are handled automatically. When your pop-up is published, it inherits the font family and base typography from your live site's theme, so the form matches your storefront branding without any extra setup.
This means the font shown in the editor preview may not match the font on your live store as it will inherit the fonts of your Shopify theme. Everything else you configure in the editor will appear exactly as you've set it.
If your published pop-up isn't picking up the font you expect, check that the font is loaded on the page where the pop-up appears, then reach out to support if it still looks off.
How to understand performance analytics
Analytics for sign-up forms are based on how many shoppers are subscribing using your pop-up, compared to all other sign-up sources. Typically, Shopify provides two standard ways of subscribing to email marketing, usually through a form embedded on the footer of your store site and through a checkbox at checkout. Instant sign-up forms provide an additional way to capture new shoppers.
The following metrics are recorded, and shown on your sign-up form analytics:
-
Instant form submissions - The number of shoppers who have signed up to email marketing by submitting their details in an Instant sign-up form
- Total new subscribers - The number of new email subscribers from every source including Shopify, Klaviyo and Instant
- Submissions by source - A summary of what percentage of all new sign-ups come from different sources including Shopify, Klaviyo and Instant
- Submissions over time - The total number of new subscribers in your store over the nominated period of time
- Email/SMS Submissions - A live feed of email addresses of new subscriber sign ups in your store
To query different time ranges, simply update the date range at the top of the sign-up form to view your analytics over different time periods, and to analyse the performance of email submissions and sms submissions.
Article URL: https://help.instant.one/instant-ai-sign-up-forms
Keywords:
## What does Instant AI check before sending an email?
We’ve designed Instant AI to take care of the details that merchants used to manage manually. Every flow is backed by built-in logic to make sure your emails are relevant, accurate, and high-performing, without the time-consuming setup.
You never have to add filters or conditions to send a valid email, we'll do it for you automatically.
Product and Cart Handling
- Stock checks before every send – if a product sells out mid-sequence, it is automatically removed from later emails in that flow.
-
Non-product categories skipped – items like warranties or services are excluded so only shoppable products are displayed.
-
Free and $0 items hidden – complimentary products remain in the customer’s cart and at checkout, but are not shown as primary purchase items.
-
Large carts condensed – when a cart has many items, only the top three products are shown to prevent long, scroll-heavy emails.
-
Product Recommendations Without a Cart – If a customer hasn't interacted with a product yet (e.g. welcome and similar flows) we'll automatically pull in recommended products based on your best sellers, or if they have purchased before, we'll recommend possible products they may be interested in based on their last purchase.
-
Missing or poor-quality images skipped – if a product has no usable image, it is excluded so only complete catalogue items appear. If there are some scenarios of products missing images, or pricing or if a customer happens to accidentally find a product they shouldn't – we'll help you by skipping these in email sends.
Pricing and Discounts
-
Browser currency respected – shoppers see prices in their local currency (e.g. USD for US browsers, AUD for AU browsers). Even if your site currency may be different, we'll automatically detect what the shopper is browsing in and personalise their emails to their specific currency.
-
Sale pricing shown – if a product is discounted, the compare-at and sale price are both displayed to reflect the current promotion. We'll prioritise using Shopify's Compare at price when available, but we'll also automatically hide this if the discount isn't significant (e.g. 1c difference)
Language and Localisation
-
Browser language respected – spelling and wording follow the customer’s browser language settings (e.g. “colour” vs “color”). If the browser language cannot be detected, we'll automatically falls back to your store’s default language. This way your email content will always be personalised to the right format for that shopper.
Email Sends Cooldowns
-
Highest-intent flow prioritised – if multiple flows are triggered, the higher-intent action (e.g. checkout) is selected and lower ones are skipped. Your shoppers won't be enrolled in multiple abandonment flows at once.
-
Multiple Triggers – no customer can trigger more than one flow email in any 24-hour period, even if they trigger multiple flows in the same day. We'll automatically prioritise the most recent, highest intent one only. For example, if I keep getting interrupted in my purchase and stop and start multiple sessions then we'll only ever kick off a flow once.
-
Product-level cooldown – the same product will not trigger a new flow email for 7 days, preventing repeated messaging. For example, if you purchase a product then come back to read some of the benefits of the product a couple days later, you won't trigger a browse abandonment flow.
-
Flows cancelled on purchase – if the customer completes a purchase, any active flow related to that cart is immediately stopped. They then can't re-enrol into a flow unless they pass all of the cooldown conditions.
- Re-enrolment requires new intent – shoppers are only re-enrolled in a flow if they return to the store and take a new action (e.g. viewing a product, adding to cart), and they are not restricted by any cooldown rules. They can't ever re-enrol in a flow automatically unless they have taken a specific action when returning to your site.
Article URL: https://help.instant.one/what-does-instant-ai-check-before-sending-emails
Keywords:
## How does Audiences track profiles for longer than 7 days on Safari/iOS?
Recent updates from Safari/iOS and Chrome/Firefox limit Klaviyo's tracking ability to only 7 days (therefore only identifying 10-15% of abandoners). If a shopper comes back after 7 days, Klaviyo has lost the ability to collect signals on that customer, meaning no abandonment signals are collected.
However, with Audiences, Klaviyo will continue to receive user signals and events indefinitely, even after 7 days on Apple/iOS/Firefox/Chrome. This greatly increases the amount of abandonment events that in Klaviyo, resulting in increased abandonment revenue.
Article URL: https://help.instant.one/ios
Keywords:
## Understanding the Deliverability Dashboard
The Deliverability Dashboard helps you monitor how successfully your emails are reaching inboxes.
You can use it to view overall delivery performance across flows and campaigns, track trends over time, and identify opportunities to improve your deliverability. The dashboard updates dynamically based on the time period you select, making it easy to analyse performance for specific campaigns, flows, or timeframes.
You can access the dashboard by navigating to: Settings → Deliverability
How to use the Deliverability Dashboard
1. Choose a date range
At the top of the page, select the timeframe you want to analyse (for example Last 30 days, a specific month, or a custom range).
Once selected, the dashboard will update to show:
All charts, tables, and metrics will automatically update to reflect the selected timeframe.
2. Review overall deliverability
The summary cards at the top of the page show a quick snapshot of your email performance. Metrics include:
Delivery rate - The percentage of emails successfully delivered to inbox providers.
Emails delivered - The total number of emails delivered within the selected timeframe.
Bounce rate - The percentage of emails that could not be delivered.
Block rate - Emails rejected by inbox providers before reaching the recipient.
Unsubscribe rate - The percentage of recipients who unsubscribed after receiving an email.
These metrics are shown separately for Flows and Campaigns, allowing you to compare performance between automated emails and manual campaigns.
3. Explore deliverability recommendations
The Recommendations tab provides best-practice suggestions to help improve deliverability. These recommendations highlight actions you can take within Instant AI to strengthen email performance, such as:
-
Adding a custom sender name
-
Customising your sender address
-
Increasing email cooldown periods
-
Reducing touchpoints on low-intent flows
These suggestions are optional and intended as helpful guidance. Your emails will still send normally if you choose not to apply them.
4. Track performance trends over time
The Performance tab displays graphs showing how deliverability metrics change over the selected time period. You can track trends for metrics such as:
-
Delivery rate
-
Bounce rate
This makes it easier to identify patterns or changes in performance across your flows and campaigns. Hover over the graph to view the exact values for a specific date.
5. Analyse activity by inbox provider
The Activity tab shows a detailed breakdown of your email performance across different inbox providers.
This table includes metrics for providers such as:
-
Gmail
-
Microsoft
-
Yahoo
-
Apple
-
Other providers
For each provider, you can see:
-
Emails sent
-
Open rate
-
Click rate
-
Bounce rate
-
Unsubscribes
-
Spam reports
This view helps identify whether performance varies between providers. You can also:
FAQs
What happens if no campaigns were sent during the selected period?
If no campaigns were sent in the chosen timeframe, the dashboard will display “No campaign data available.”. Your flow data will still appear if flows were active during that period.
Can I analyse a specific campaign?
Yes. In the Activity section, you can filter the table by a specific campaign to view its deliverability metrics.This allows you to see exactly how that campaign performed across inbox providers.
Can I export deliverability data?
Yes. You can export the Activity table as a CSV file for further analysis or reporting.
Why might deliverability vary between providers?
Different inbox providers use their own filtering systems. It’s normal to see slight differences in metrics like open rate, bounce rate, or unsubscribes between providers such as Gmail, Microsoft, or Yahoo.
Article URL: https://help.instant.one/understanding-the-deliverability-dashboard
Keywords:
## Why should I trust AI to write my abandonment emails?
Instant AI is architected to maximize the positive impact of AI, while minimizing the frequency and impact of hallucinations.
We only use AI when it is the best tool for the job
The only way to write unique, personalized email copy or subject lines for each and every shopper is to use AI, so this is what we use.
Similarly, the only way to instantly design a beautiful and on-brand email template for every brand that signs up for Instant, is to use AI.
For some things, however, absolutely accuracy is crucial, and the value of personalisation is non-existent or minimal. We use deterministic technologies (i.e., statically defined in our code) for these use cases. For example: it is crucial for the products and links in your abandonment emails to be 100% accurate. It makes no sense to ask an AI to decide where to link to: we already know the exact answer to this question, so we don't let AI weigh in at all.
This approach of combining AI with more traditional deterministic code ensures that we can get the benefits of AI without the downsides.
We tightly control and fine tune our AI models
Whenever we delegate to AI, we use extremely specific prompts. The more specific you are, the less likely AI is to hallucinate.
We also use AI to check the work of AI. By feeding all AI outputs back into other AI prompts, we can instantly double, triple, and quadruple check our work. This dramatically reduces hallucinations and inaccuracies.
Lastly, when possible, we give users the chance to review our AI's work. For example, when generating email templates, we show you these templates and let you adjust them before sending any emails. When generating campaigns with AI, we also let you review before sending.
We measure the output and impact of our AI
We have thorough logging and measurement of the work performed by our AI models. This means we can see when updates to our software or models impacts results negatively or positively. We tightly compare results as we rollout features to ensure each and every release improves overall performance and accuracy.
Article URL: https://help.instant.one/why-should-i-trust-ai
Keywords:
## Instant Release Notes | Q4 2025
Stay up to date with the latest Instant feature releases & improvements
Email Intensity Settings
Released 16th December 2025
What's new?
- You now have more granular control over the email sending frequency and cooldowns
- Simply change how intense you would like your email sending strategy to be
- For a conservative strategy, with very high cooldowns, set your strategy to Very Low
- For an intense strategy, with high frequency, set your strategy to Very high
- Now you can centrally control everything with one simple setting and the rest will automate across all of your flows automatically
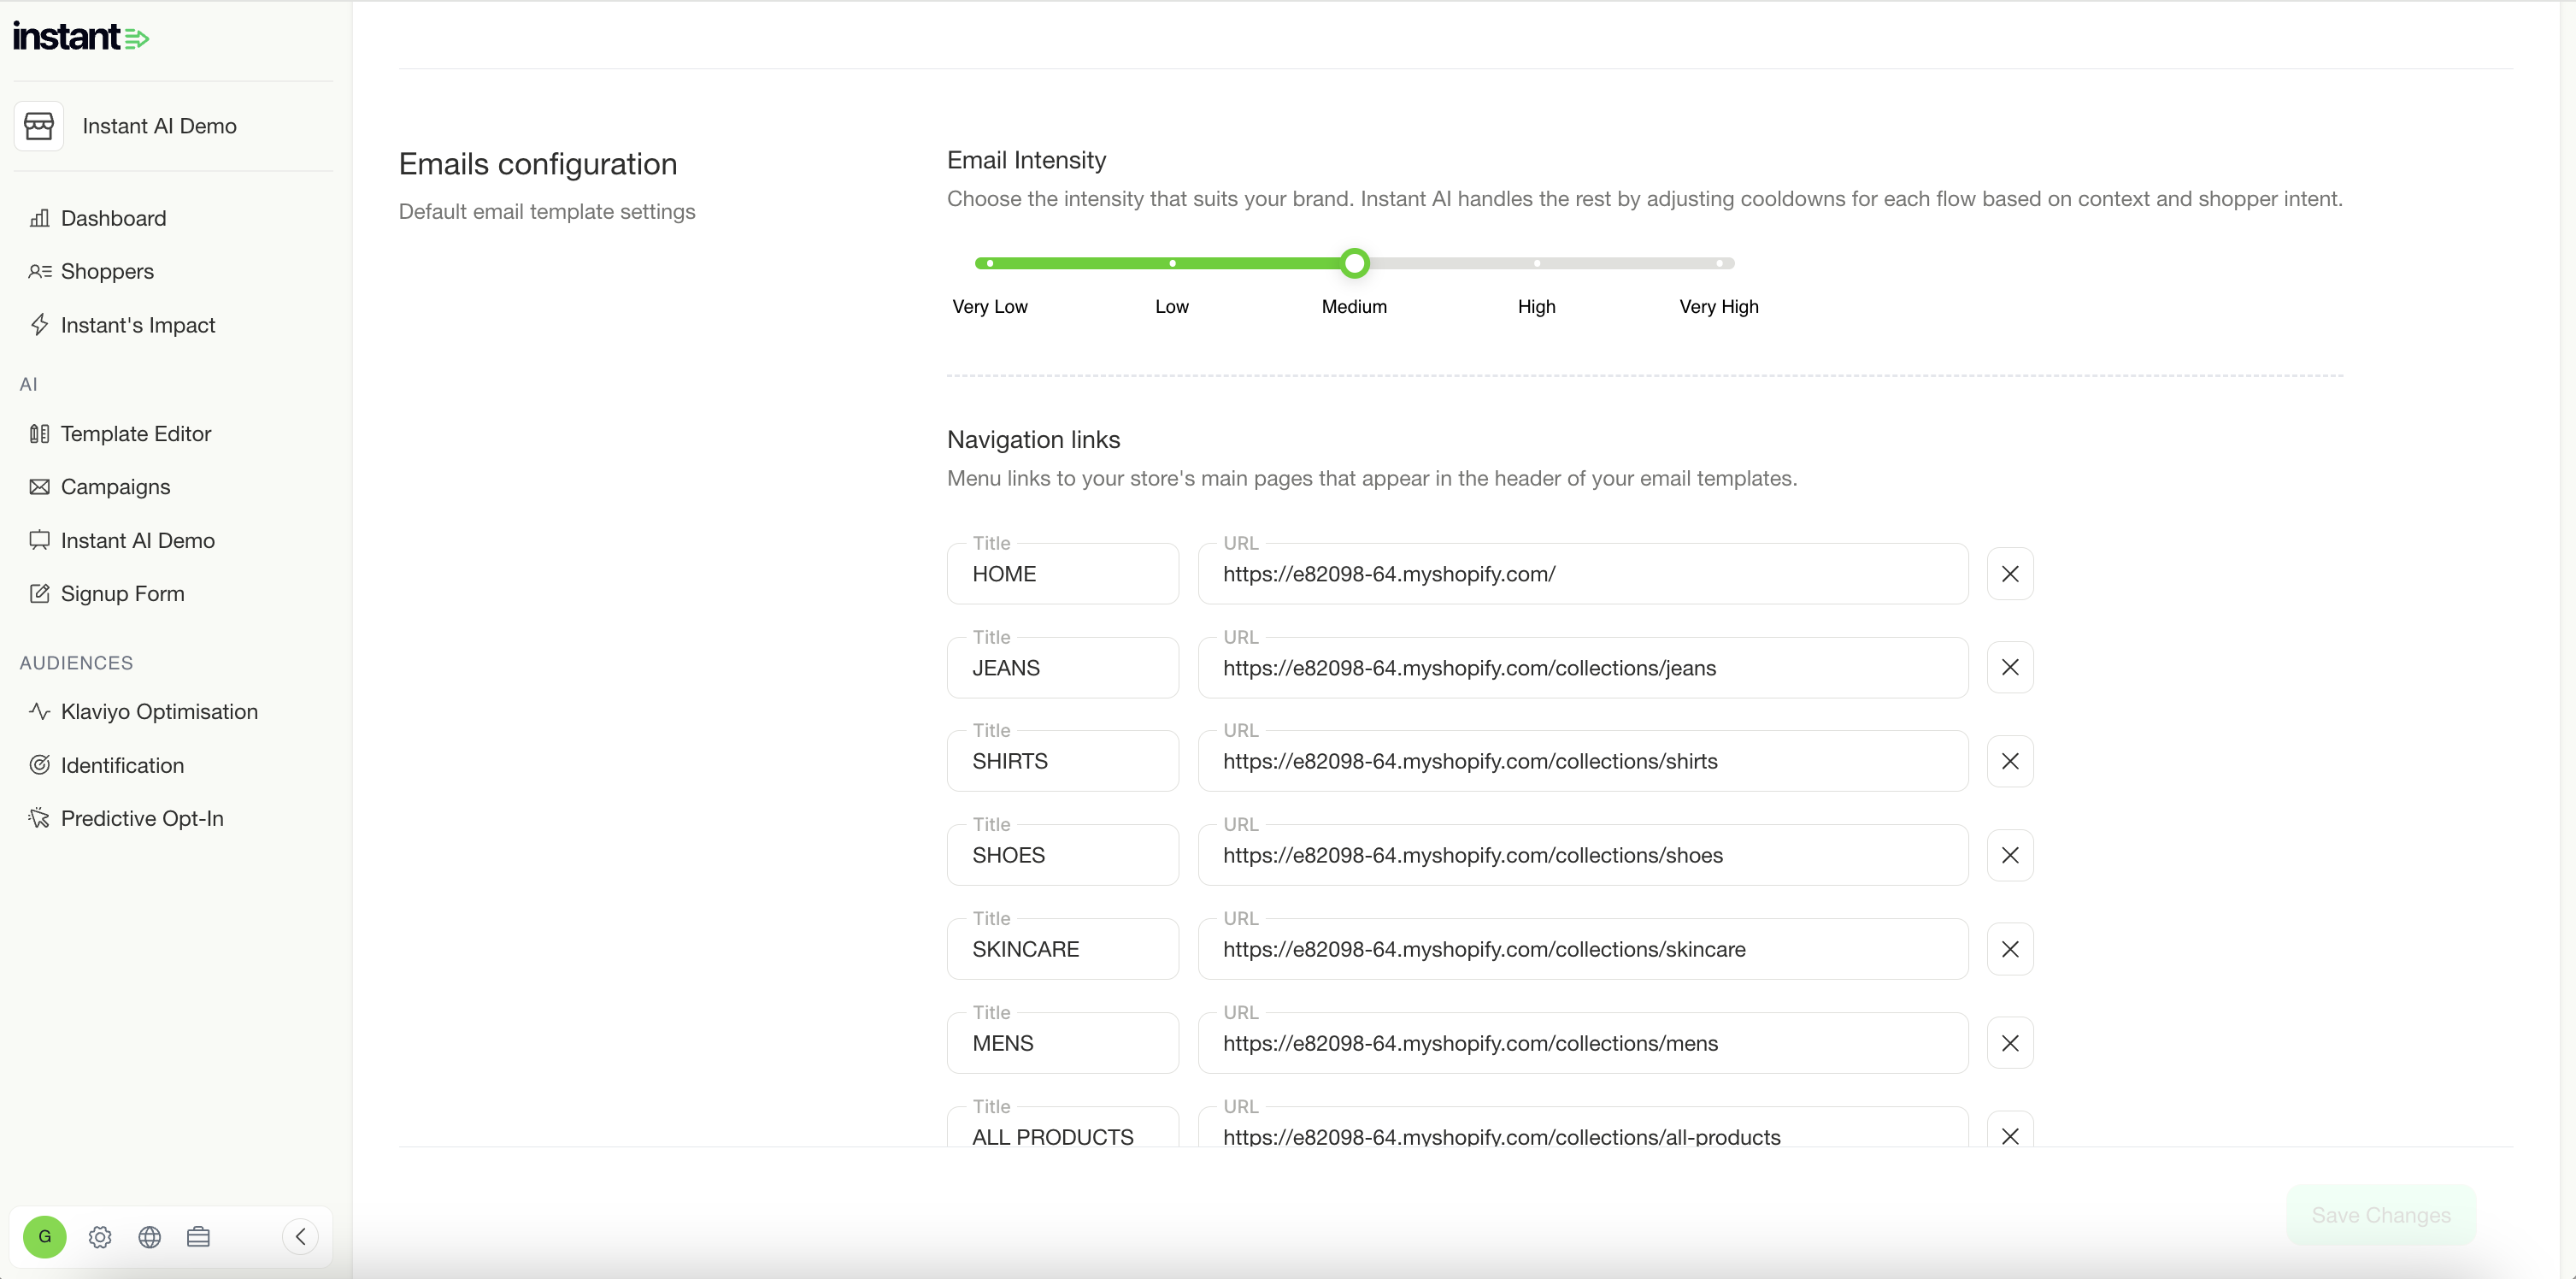
Improved DNS Management
Released 9th December 2025
We've made some core improvements to how DNS is managed in Instant AI, ensuring that your emails are set up for success from the get go.
What's new?
- Instant will no longer send emails until SendGrid has explicitly confirmed that your DNS records are updated. We previously relied on SendGrid to enforce this block, but had a few false-positives, and are now strengthening this on our side.
- You can now change your DNS domain before you've begun set up, ensuring that if you've entered a typo in your URL, you can rectify it without manual intervention from our customer success team.
- We've now made it clearer in the dashboard when your DNS isn't connected, helping you validate why emails aren't sending!
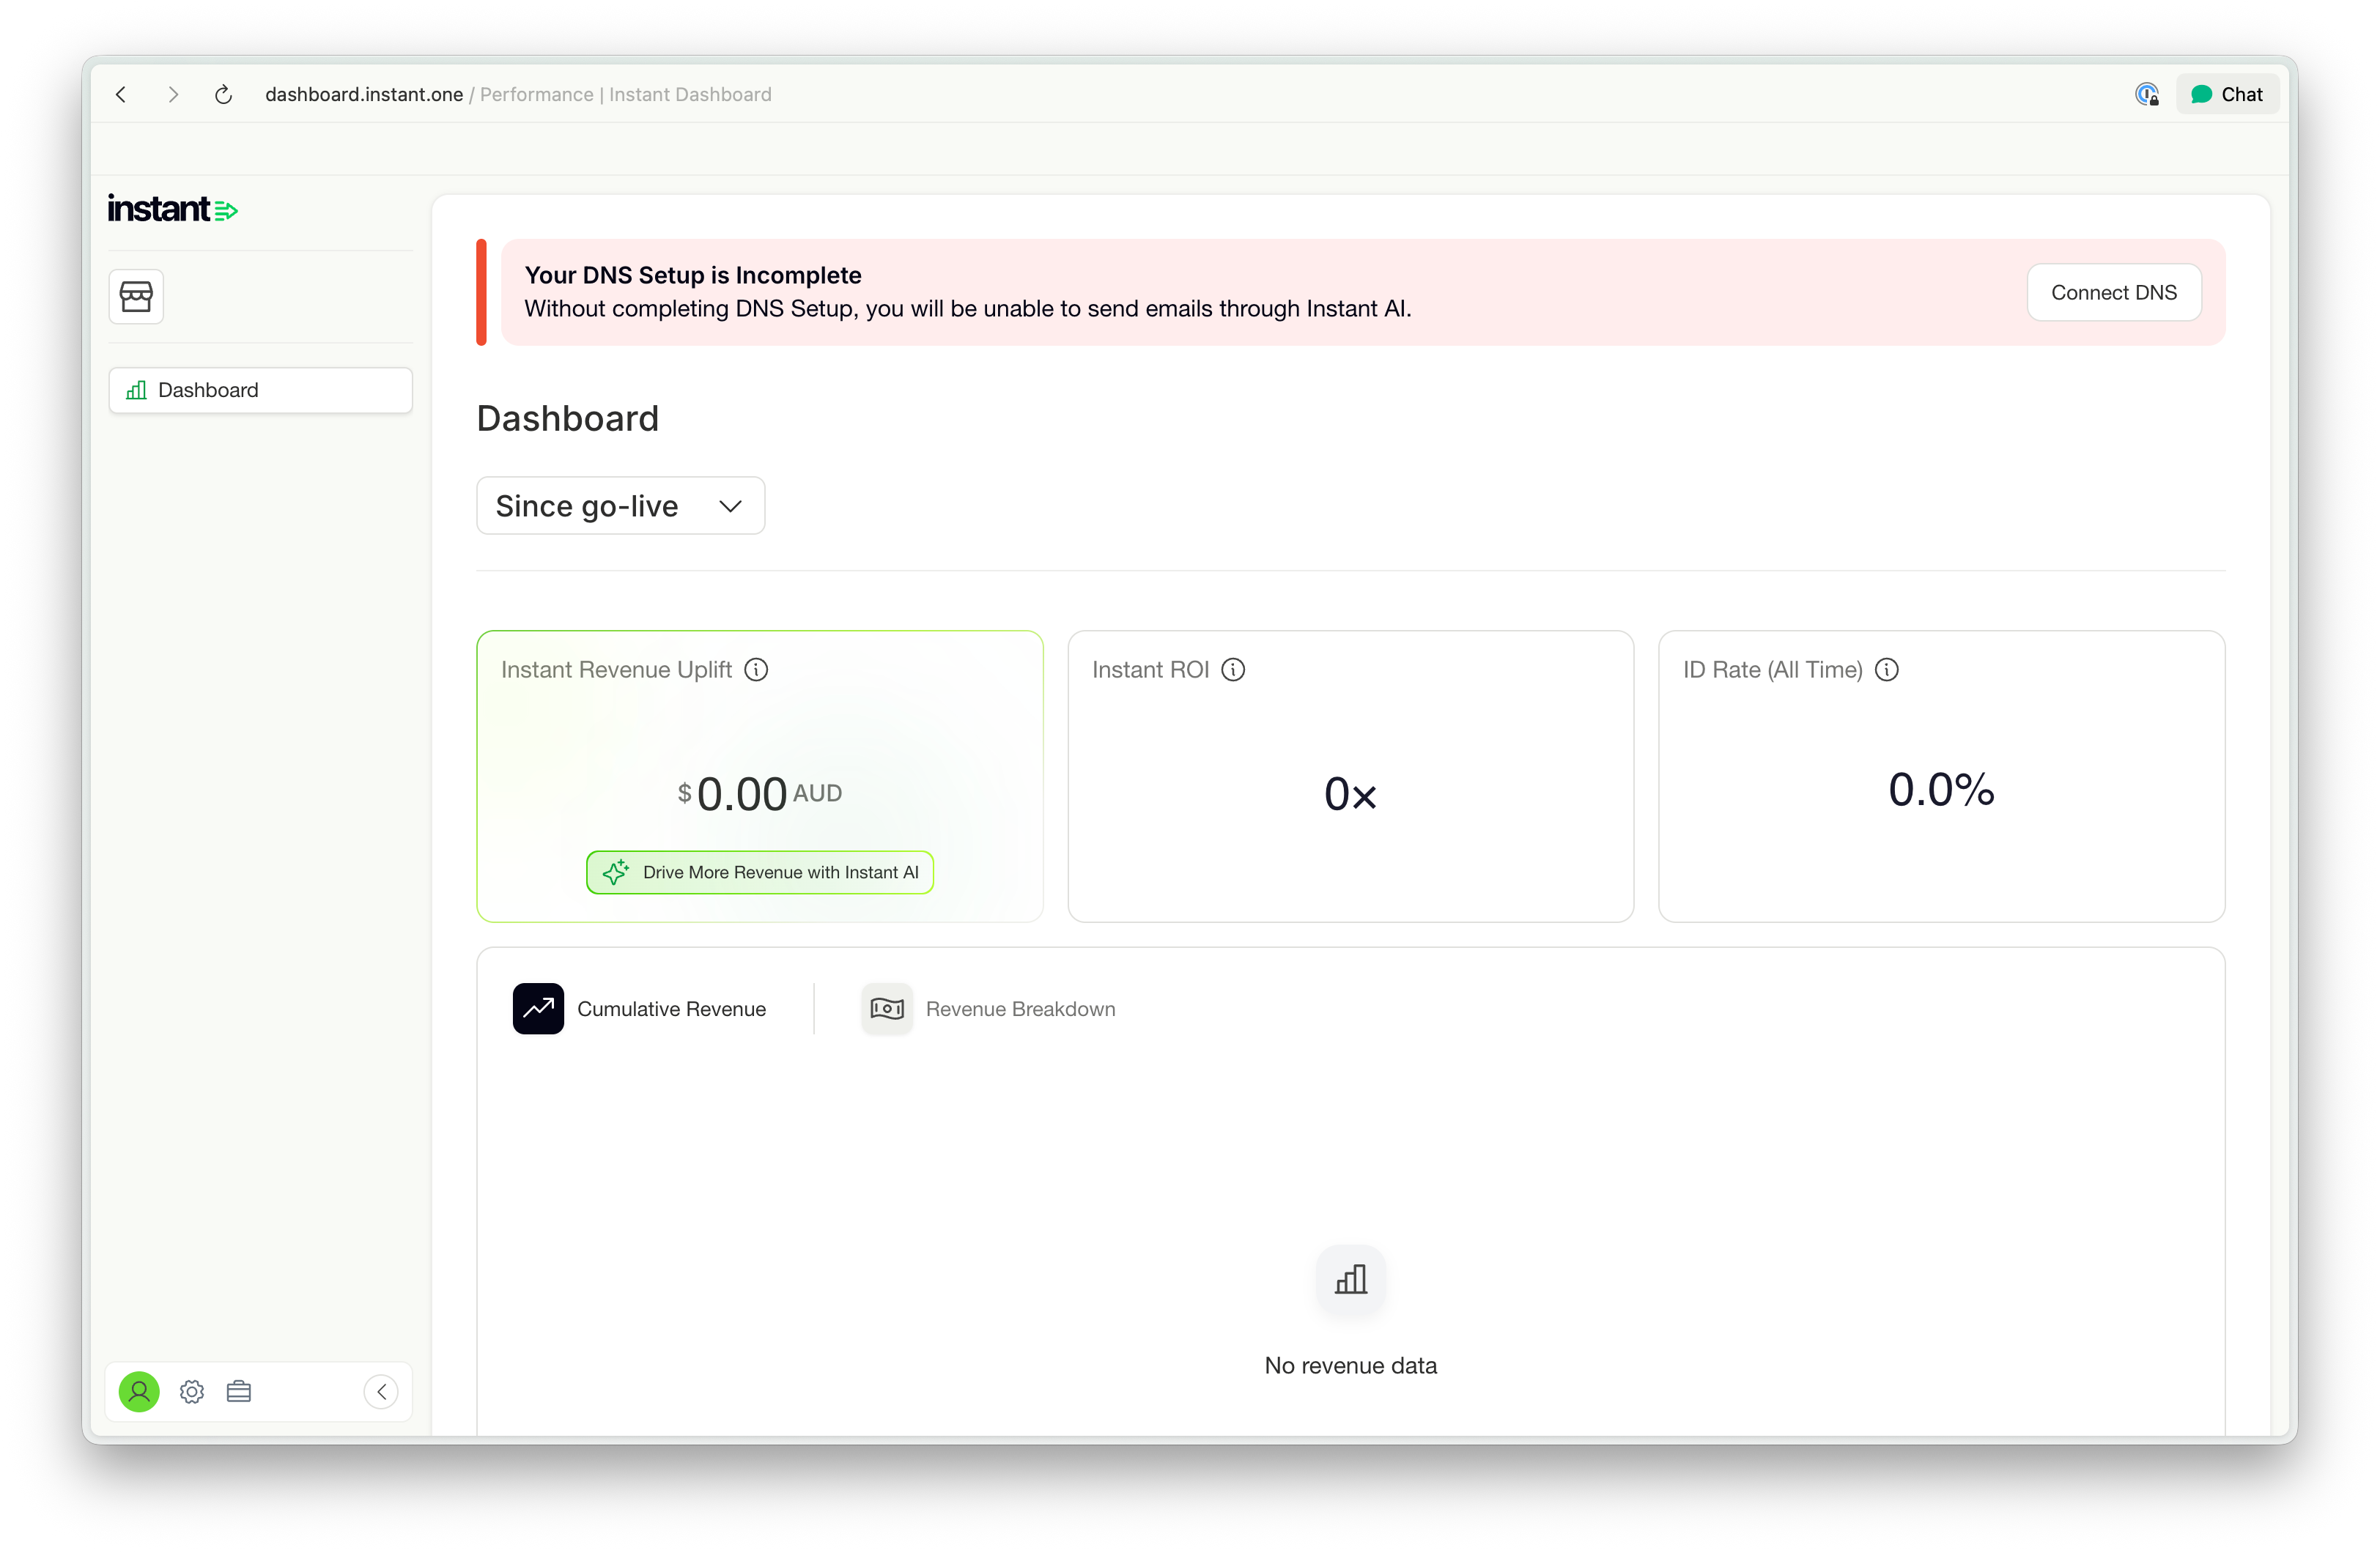
Better Campaign Deliverability Reporting
Released 9th December 2025
What's new?
- Individual Campaigns now have a new view of deliverability reports
- As a part of the interaction funnel, you can now select deliverability to see extra data
- The data will show deliverability, bounced, blocked and dropped in counts and percentages
- This data continues to update in real time and will change while the campaign is sending
- These improvements help make it easier to understand the deliverability of individual campaigns that you're sending and how they perform with your customers
Improvements to manually Suppress & Unsupress a Profile
Released 6th December 2025
What's new?
- There's now an easy shortcut to unsubscribe a customer manually on the profile page
- Profiles can now be suppressed and unsuppressed in the same location
- This makes it easier to make quick changes to profiles
Better visibility on your email usage
Released 1st December 2025
We’ve added a new dashboard card showing how many emails you’ve sent this billing period for both Flows and Campaigns, alongside how this compares to your usage tier.
This makes it easier to:
-
Monitor how close you are to your monthly allocation
-
Understand when an upgrade might be needed
-
Avoid unexpected pauses in sending
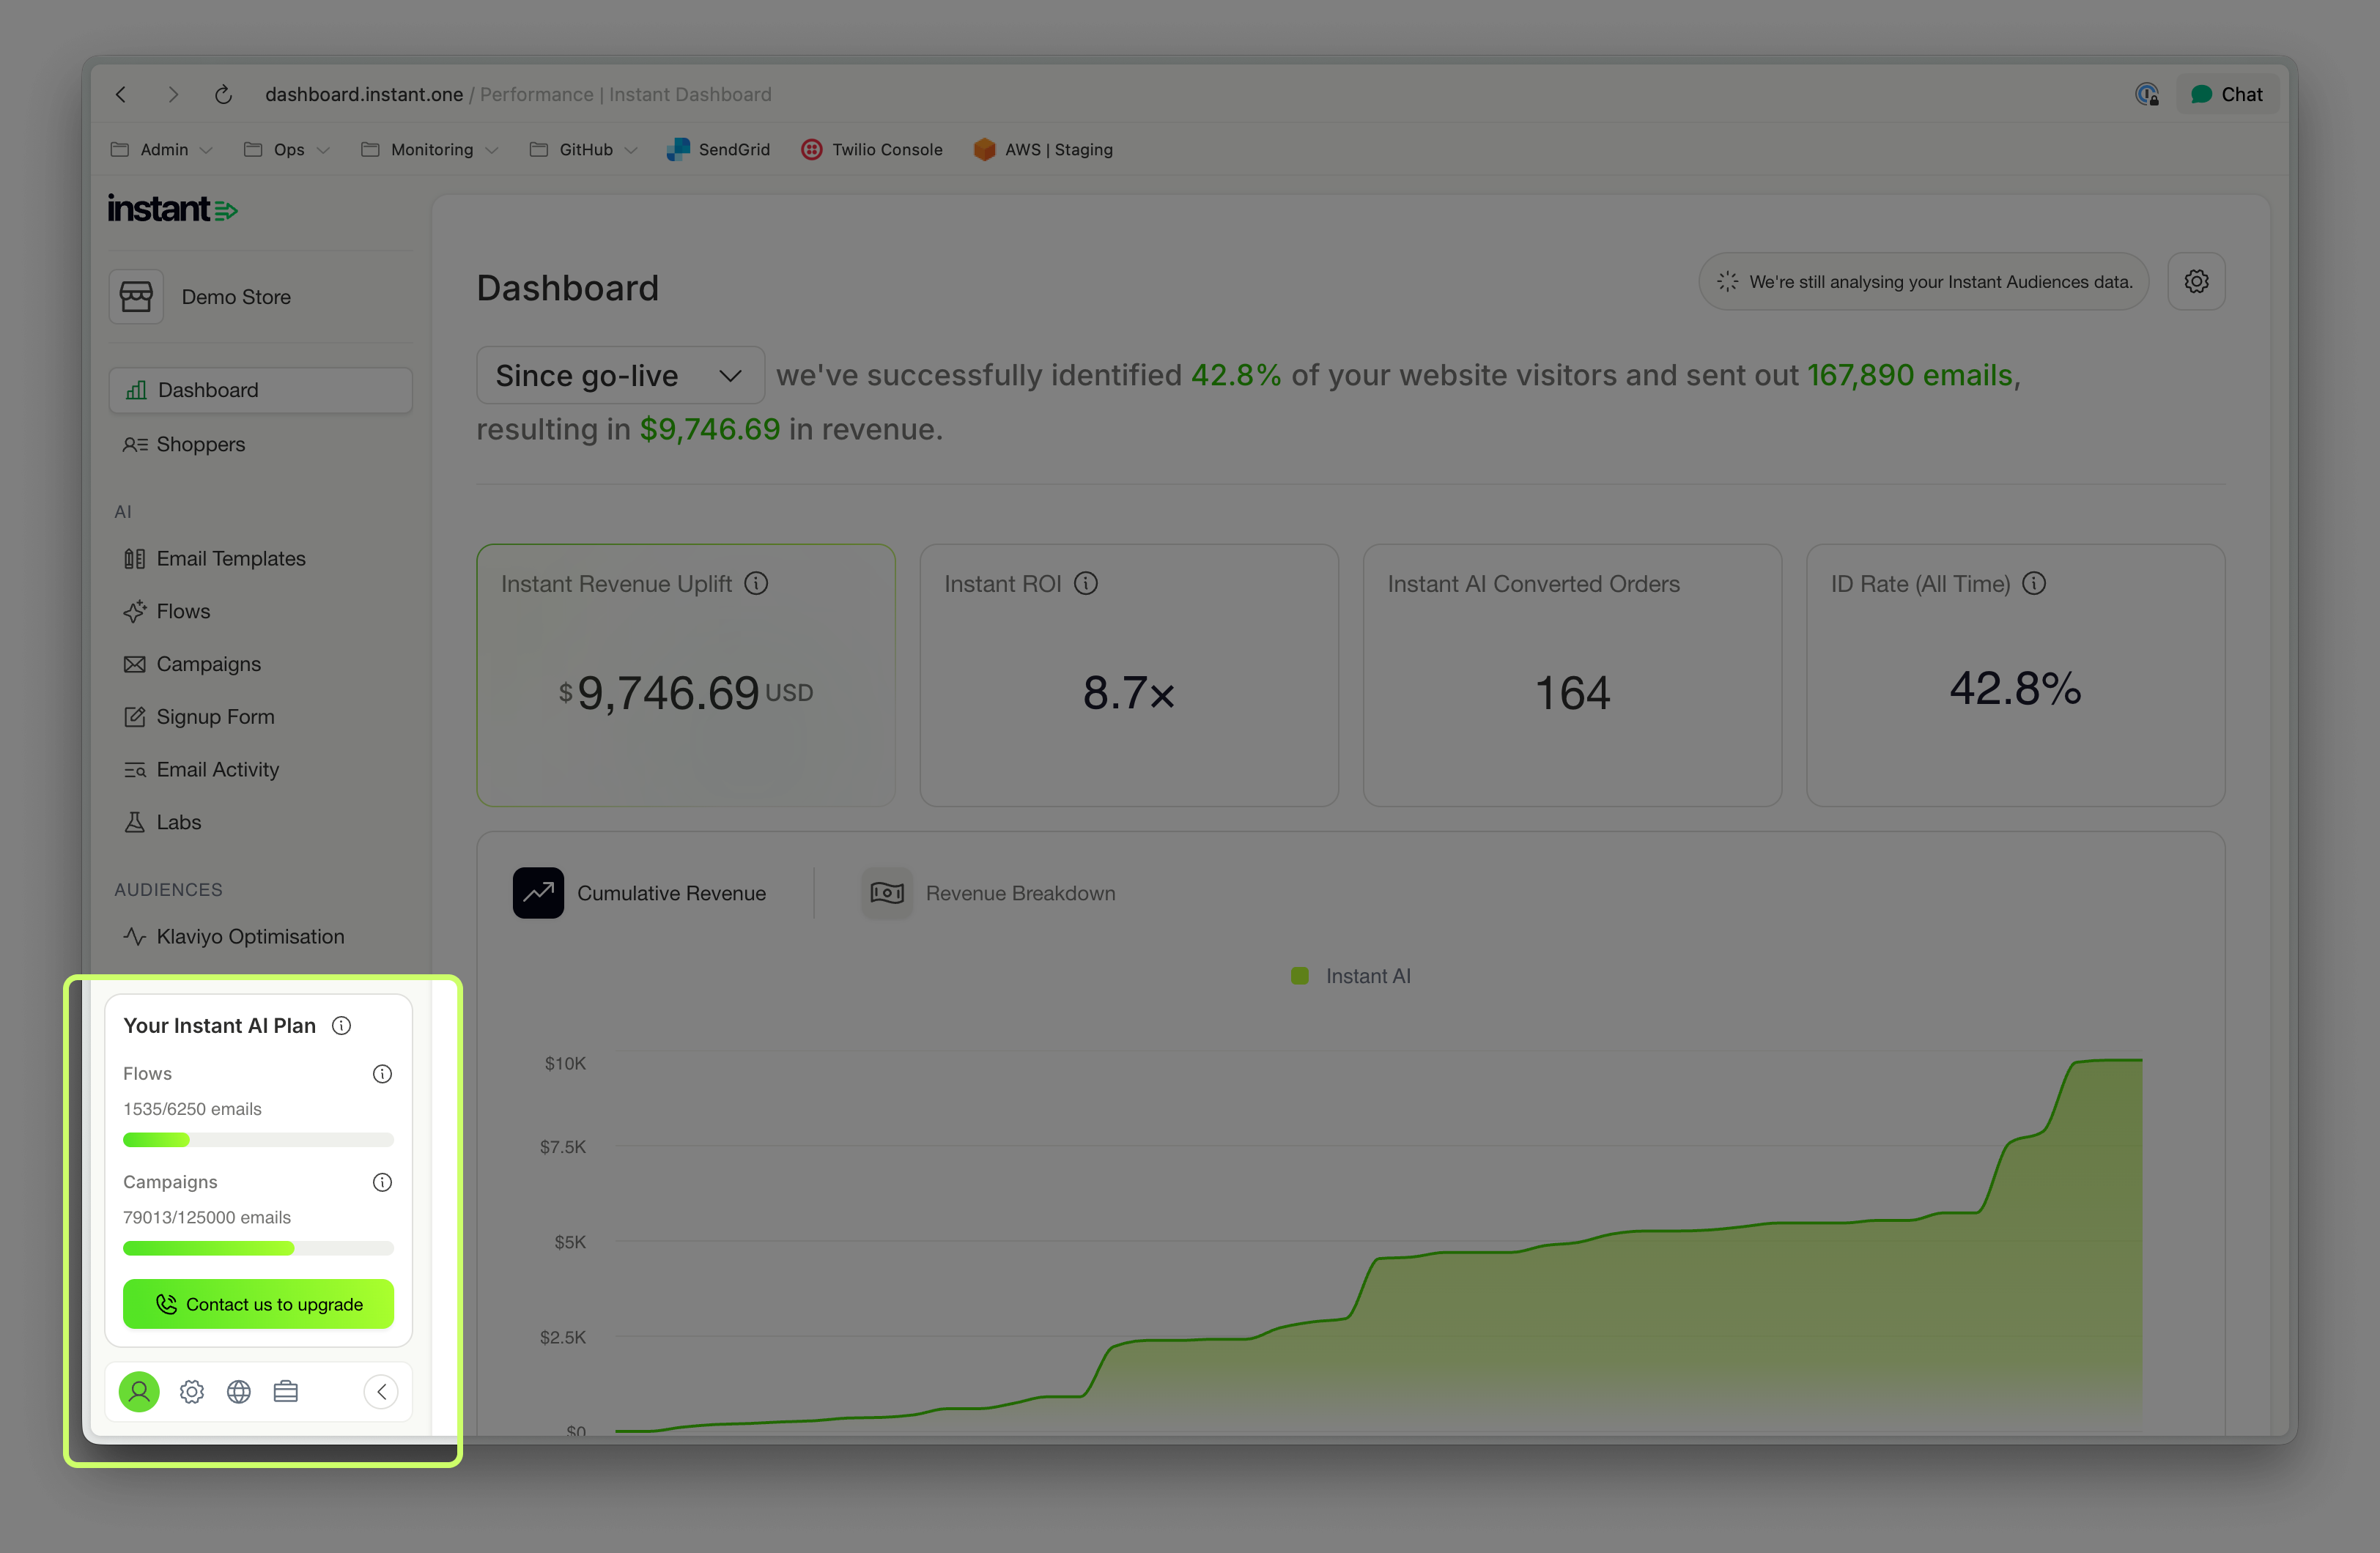
48-hour grace period for trial customers
Released 1st December 2025
Trial customers will now receive a 48-hour grace period after hitting their email send limit.
Previously, email sending stopped immediately. Now, there is additional time to continue sending before the trial pauses.
What’s new?
This update improves the trial experience and ensures you have more room to explore Instant before making a decision.
More enrolments in your Welcome Flow
Released 1st December 2025
We now pick up more events from Klaviyo and Shopify to support triggering a Welcome Flow. This means more opportunities to consolidate all if your sign-ups with Instant.
What's new?
- When shoppers opt-in to email marketing during their checkout purchase and complete their sign up, we can now enrol them in a Welcome Flow
- Customers will continue to only get a coupon code if they have never purchased before
- New sign-ups that have purchased will still enrol in your flow immediately after checkout, but won't receive a discount coupon
- This behaviour matches the default behaviour of other core email providers to provide more opportunities for upsells during their first purchase
Improved mobile-friendly designs of Product Grids
Released 1st December 2025
What's new?
- Product grids with 3 columns now display better on mobile devices by default
- CTA's now scale differently in mobile view for better readability on small devices
- Images now also scale better with multi-column grids, for better mobile viewing
View a pop-up sign-up event from the Profile Timeline
Released 1st December 2025
What's new?
- All sign-ups from a pop-up now appear on your profile timeline
- Previously showing emails only, the timeline now shows pop-up engagement
- This helps get a better timeline visualisation of your customer journey on the profile page
New fonts and improvements to your text editor
Released 1st December 2025
What's new?
- You can now customise which fonts to use in the rich text block
- All default font will still to come from your brand config, but you can now easily override
- Pick one or multiple fonts to use in a single text block
- A new spacer drop down allows you to pick single, double or triple line spacing
- We've also improved how long blocks of text preview in this screen to make it easier
New Design Updates on your email editor
Released 1st December 2025
What's new?
- The menu to see your email steps has moved from the left side, to above your emails
- The "quick shortcut" buttons on the right to add new blocks is also now more compact
- Both of these improvements help make the email editor easier to use on smaller devices
Launching Instant Smart Rules!
What’s new?
- Create custom schedules to change your email content over time
- Schedule email blocks to change over time to easily swap in sale branding
- Preview how your emails will show during different schedules
- Create any number of variants, across any periods of time!
Editable Welcome Flow Subject Lines & Preview Text
Released 19th November 2025
What’s new?
You can now override AI Copy for the subject line and preview text in Welcome Flows
- We'll continue to default to personalised, AI copy for all Welcome Flows
- But if you have specific copy that you'd like to use instead, you can now override
- If overriding, you must change both the subject line and preview
- If you remove all of the override copy, we'll revert back to AI
- You can see if AI copy is in use or not by the AI tag on the subject line
Improved Login Reliability
Released 19th November 2025
What’s new?
We’ve updated how Instant handles API requests inside the dashboard to improve stability and reliability for all merchants.
- All dashboard requests now run through a dedicated endpoint.
- This prevents cross-site API issues that could occur when requests were sent through multiple domains.
- Most importantly, this update resolves the login issues some customers were experiencing on certain networks.
This change reduces friction when logging in and ensures a smoother, more reliable experience across different devices and corporate networks — no extra steps needed on your end.
Dashboard improvements addressing customer feedback
Released 19th November 2025
What’s new?
🌏 Clearer Site Identification During Onboarding
For brands operating across multiple regions, it wasn’t always obvious whether you were onboarding your AU or US site. We’ve now added the site name to the top-left of the onboarding flow. This small improvement makes it much easier to confirm you’re setting up the right storefront from the very first step.
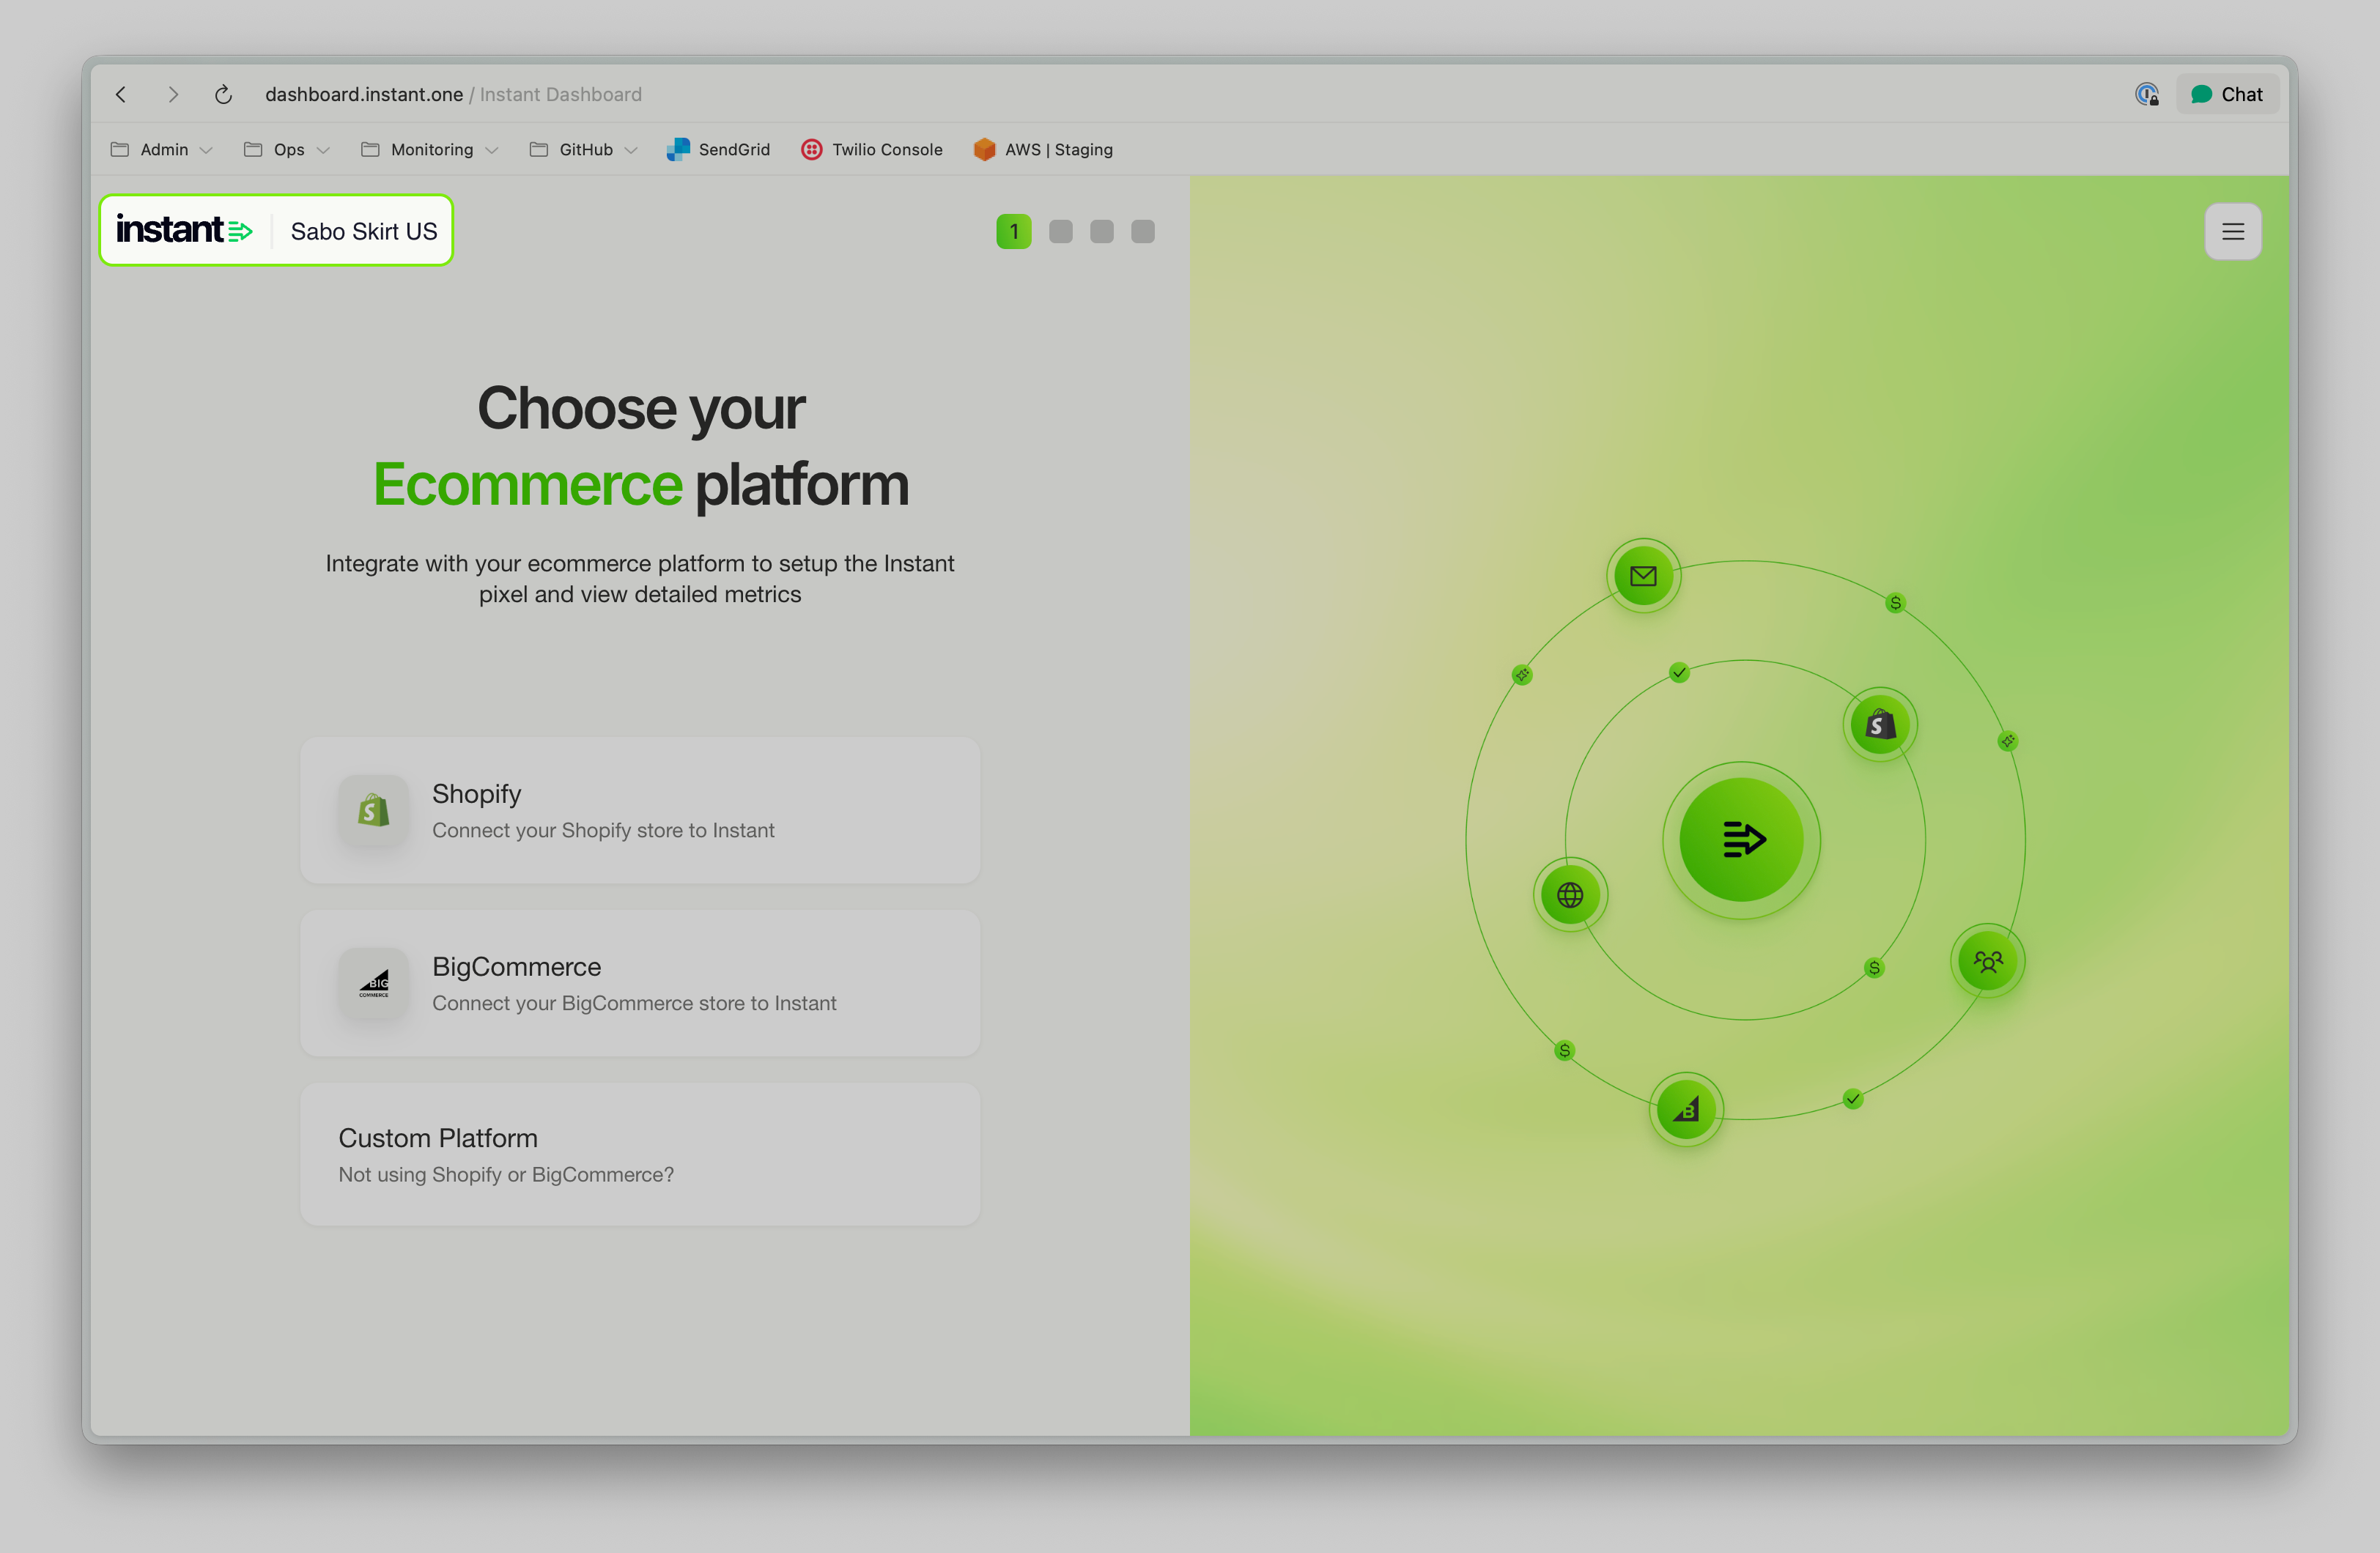
🛠️ Improved Klaviyo & Shopify Integration Instructions
We’ve refined our Shopify and Klaviyo setup guides to make them clearer and easier to follow. Some merchants were missing Shopify’s Storefront API Scopes during setup — which is understandable given how the UI is structured. Our updated instructions now walk you through the process more intuitively, reducing confusion and helping you get fully integrated, faster.
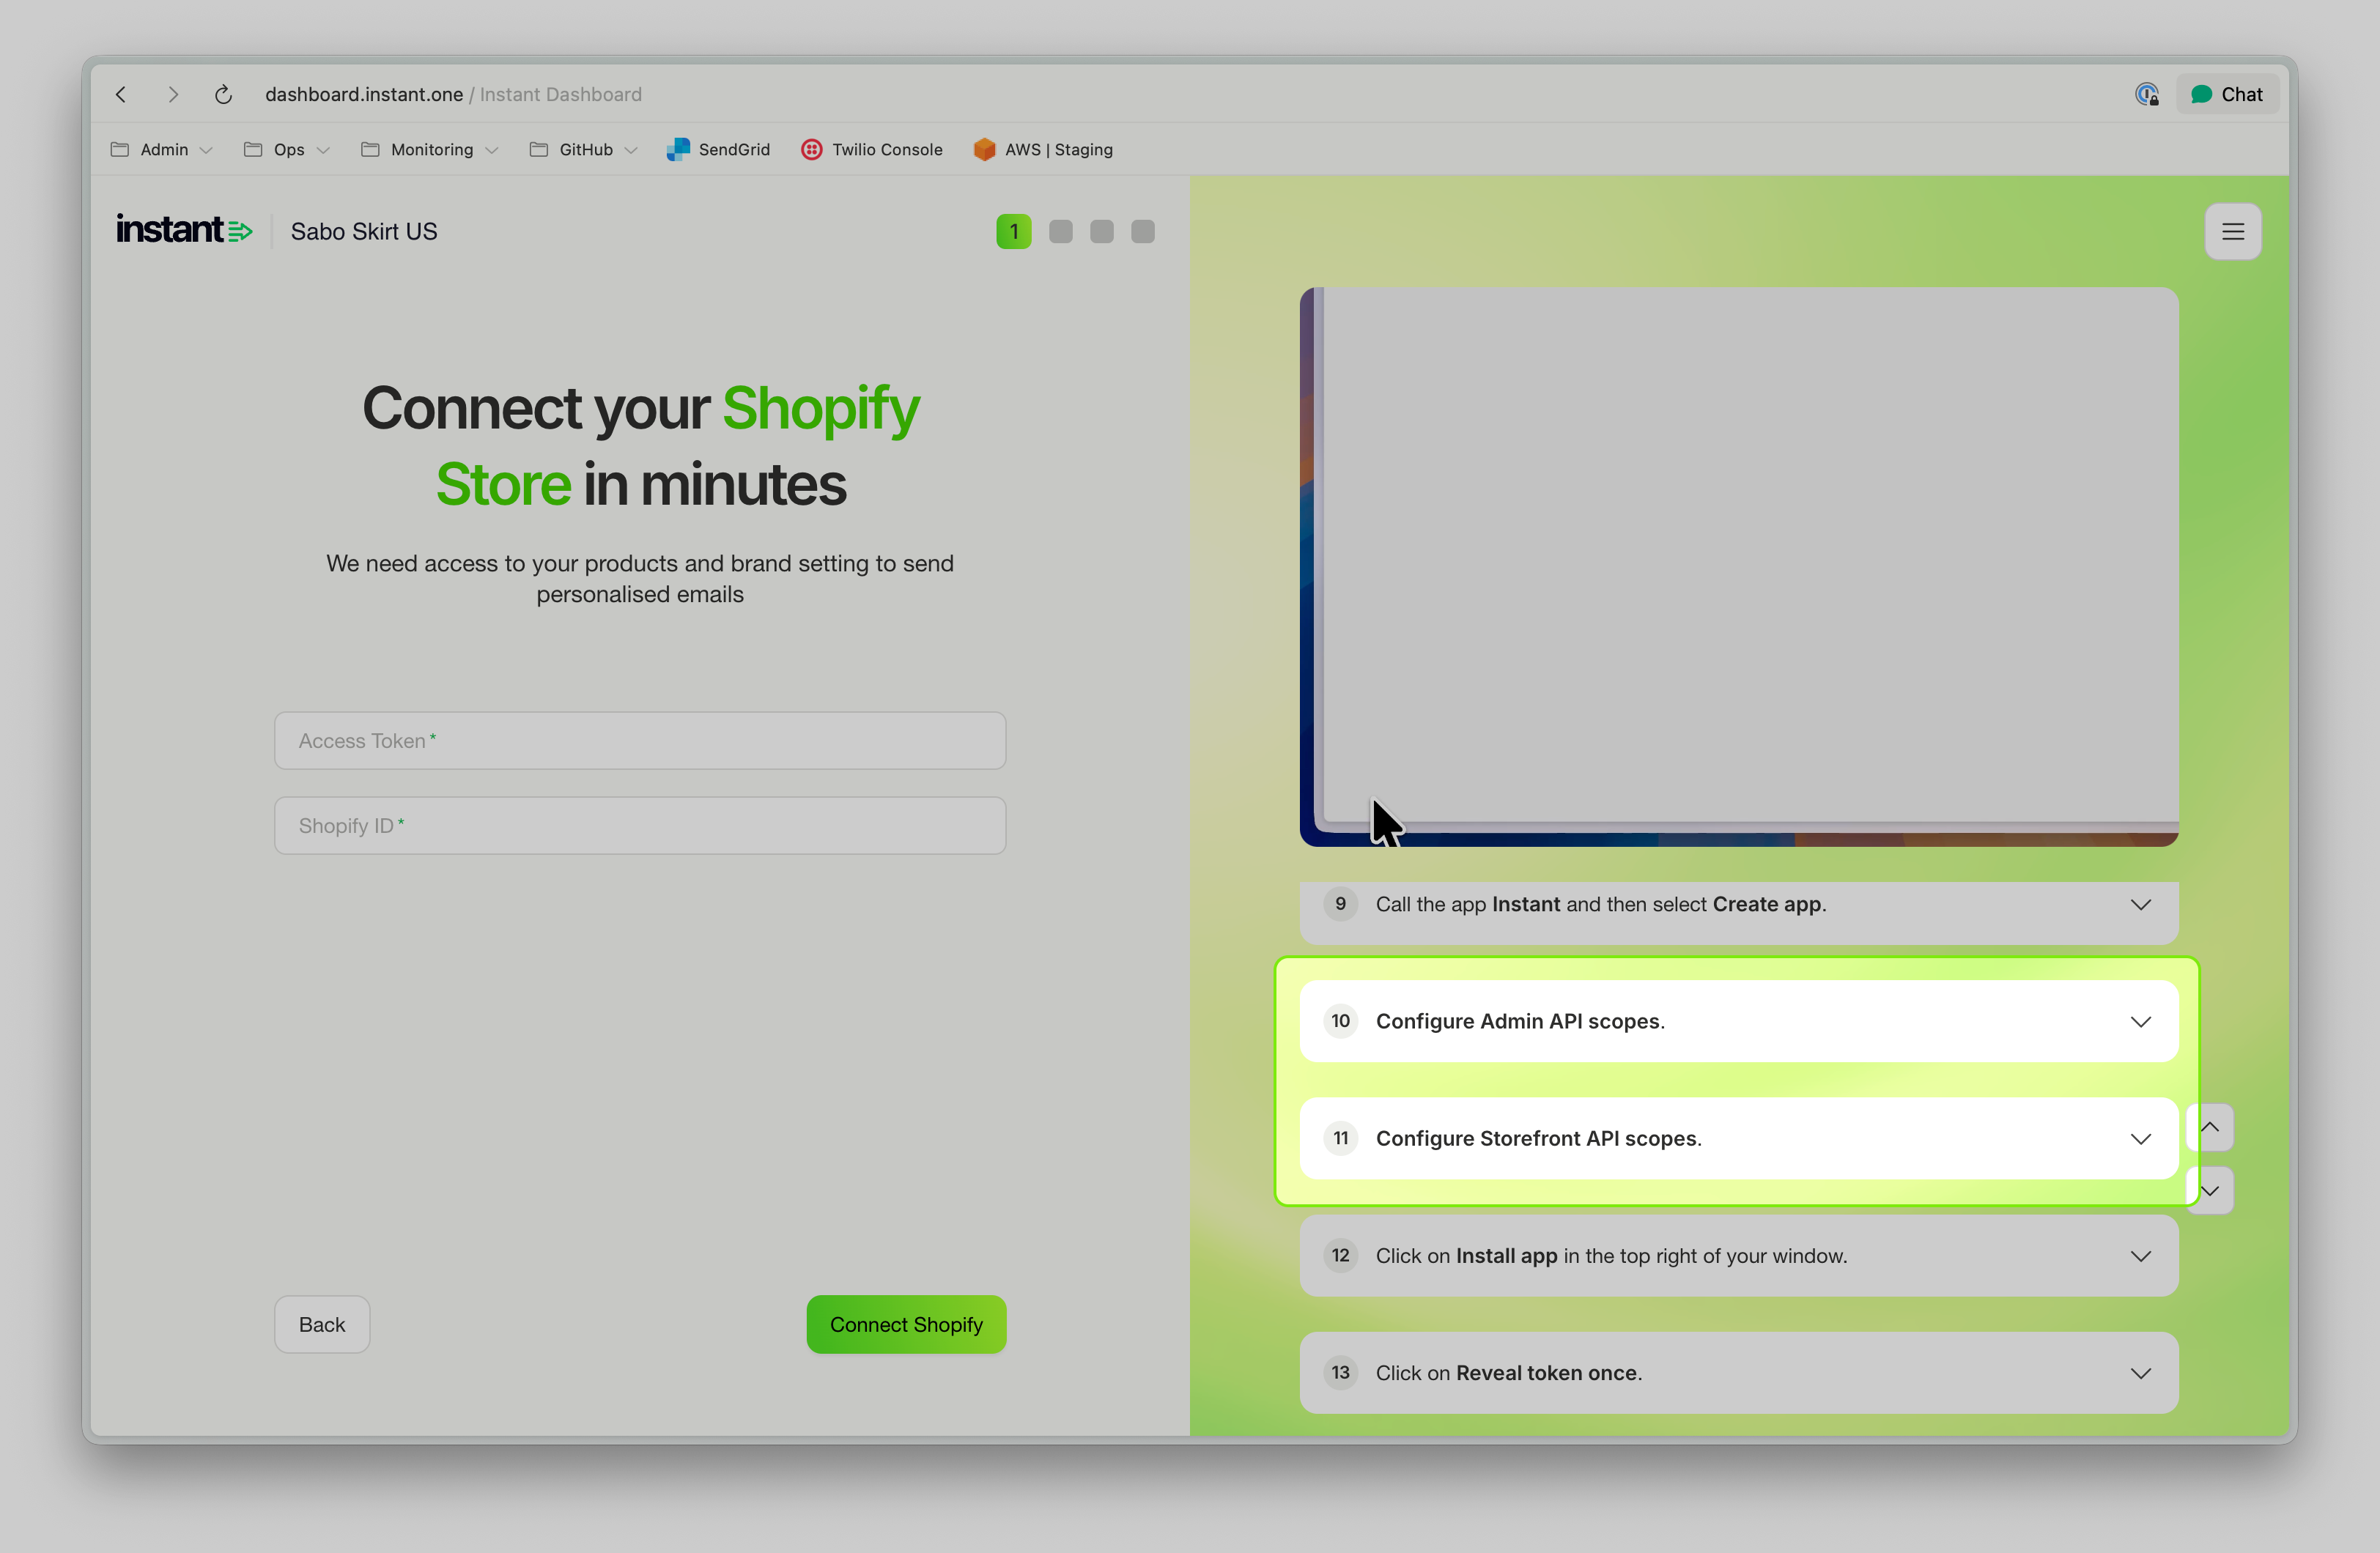
📊 Clearer Error States for Audiences-Only Merchants
If you're using Instant Audiences without Klaviyo, you’ll now see a proper empty state explaining what’s missing — rather than a generic dashboard error. This ensures it’s immediately clear what action is needed (e.g., connecting Klaviyo) and avoids the impression that something is broken.
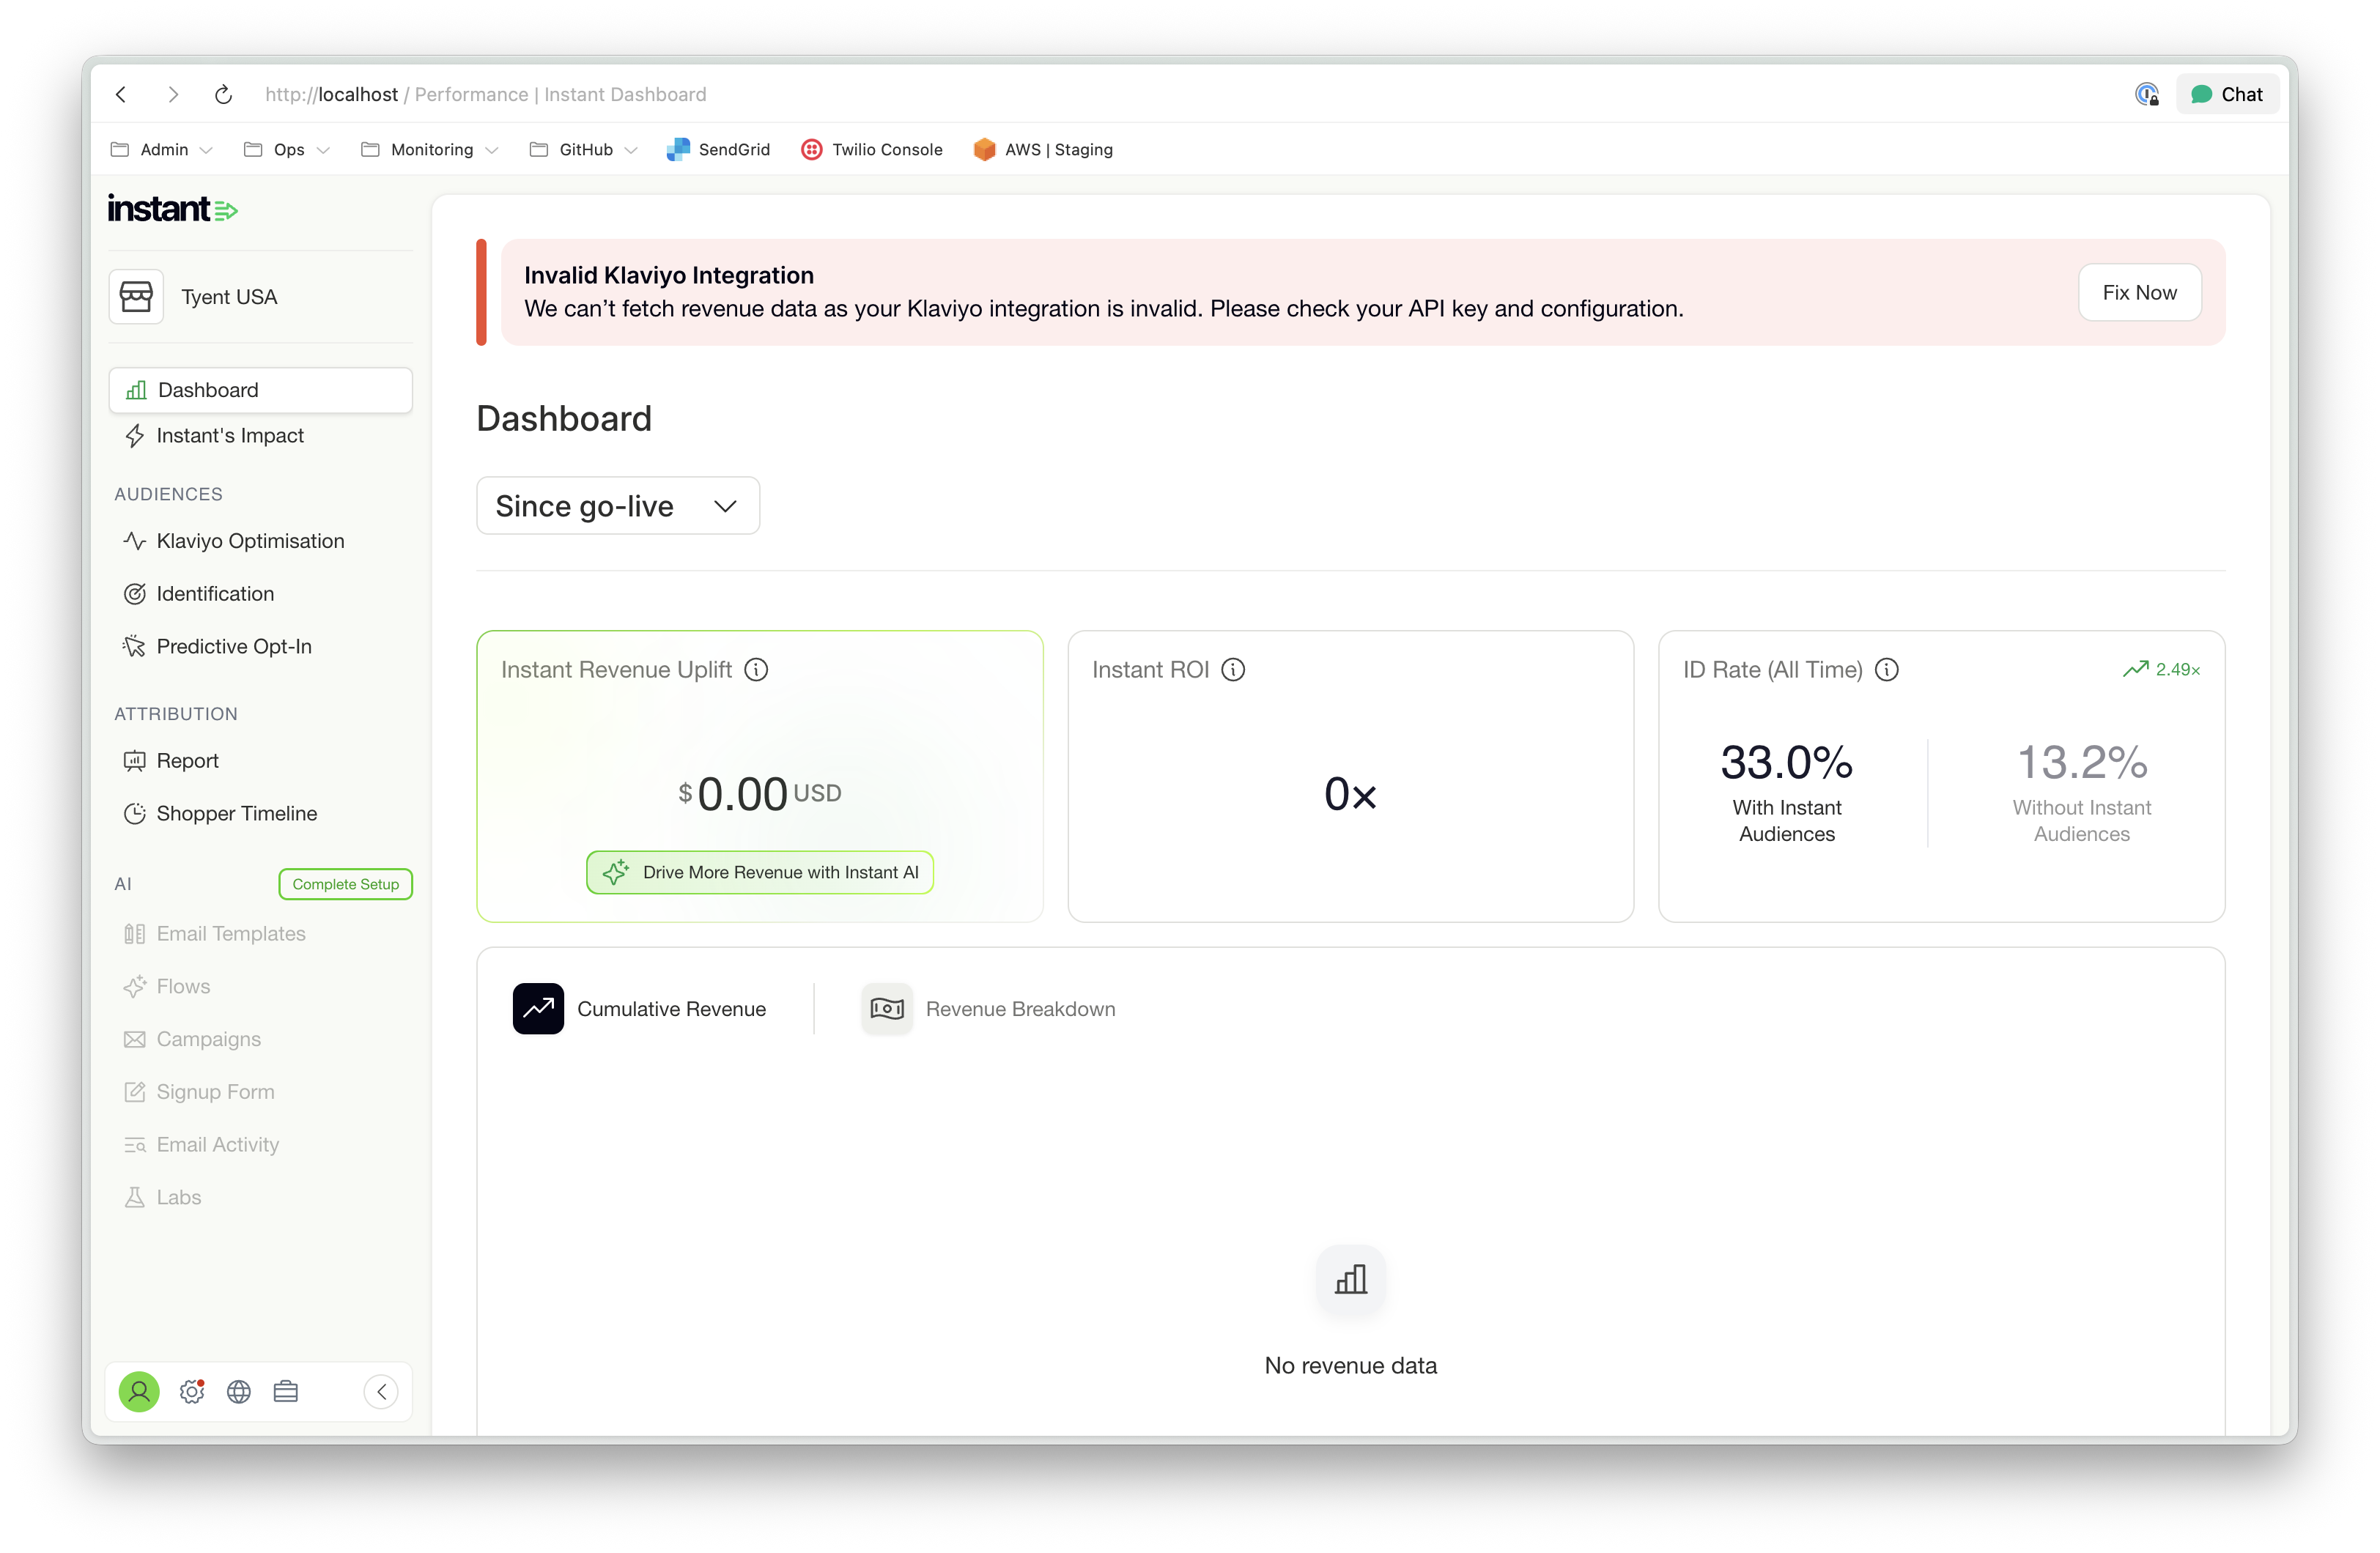
🔍 More Accurate Metrics on the Trial Comparison Page
Your Trial Comparison Page now focuses exclusively on core abandonment flows — exactly what it’s designed to compare between Instant AI and Klaviyo. Previously, open and click rates could be influenced by additional non-abandonment flows, which made the comparison less precise. The page now reflects a cleaner, fairer, and more reliable side-by-side view of flow performance.
Automatic AI Alt Text on Images
Released 19th November 2025
What’s new?
All images included on Instant AI emails now have alt text automatically added
- All product images now have alt-text auto-generated based on product descriptions
- All custom images now have alt-text auto generated using AI describing the images
- Other minor images like logos, start ratings etc continue to have alt-tags added
This is another automatic improvement to ensure that all emails are more accessible to a broader audience and increases trust with email providers such as Microsoft.
Extra Settings to Edit Pop-up Colours
Released 19th November 2025
What’s new?
Pop-ups now have more granular options to override brand colours
- You can override the pop-up background, body text, button background, button text
- These will continue using your brand colours by default
- If adding a colour override, they will change just this pop-up
- All colours added will apply on every step of the pop-up (if multiple)
Preview Text is improved on Apple Mail
Released 14th November 2025
What’s new?
Preview text that shows on Apple Mail, particularly mobile is now optimised
- These changes apply on every header type automatically
- Safely use any content at the start of your email without Apple Mail reading it
- Content in your emails such as header links won't come through to preview text
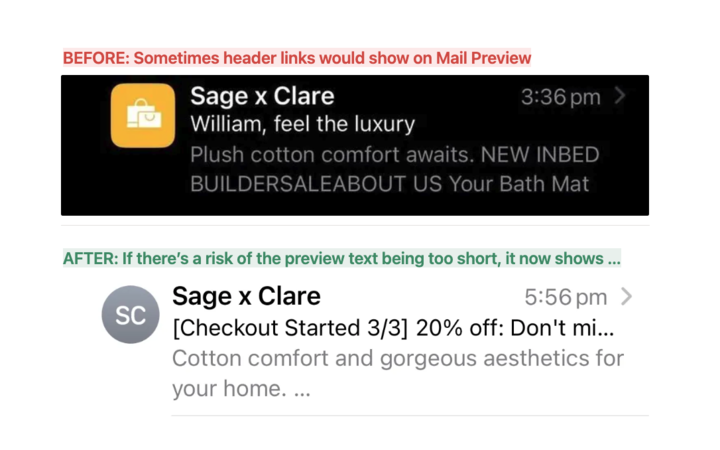
Pop-up images can be shown on left or right side
Released 14th November 2025
What’s new?
Select left or right side for your images on landscape or full size pop-ups.
- Switch the location of your image easily in your pop-up
- Improved hover states for editing text to make it easier to find
Discounts applied at Checkout now mention in AI Copy
Released 14th November 2025
What’s new?
Discounts applied automatically at cart are now mentioned in all email pricing, including AI body copy and subject lines. We'll promote any discounts in their cart to help encourage customers to convert while their products are on sale.
- Any products that have a before and after price on a product page will be highlighted
- Any carts that have a coupon automatically applied at checkout will be highlighted
- We'll calculate the $ or % of the sale and pick which one is more effective
- The subject lines of the email will automatically highlight the savings for customers
- When sales end or prices change, these prices will add or remove
Set Custom Coupons per flow
Released: 14th November 2025
What’s new?
You can now create multiple coupon strategies, all live at once.
- Select Add Coupon to create a new coupon
- Customise the coupon settings and which flows they should apply too
- Only one coupon strategy can be applied per flow
- However every flow can have a different strategy
- For example, Smart Coupons on Multiple Abandonment, 10% on Welcome
- When pausing a coupon using a smart rule, all coupons pause together
Embedded Forms can now trigger a Welcome Flow
Released: 13th November 2025
What’s new?
Welcome flows can now trigger from an embedded form from Shopify or Klaviyo
- In addition to pop-ups, welcome flows can now trigger from embedded footers
- Footers can be from any provider that follows the appropriate structure
- We'll continue receiving all new subscriptions via our integration but they can now trigger a flow
View Coupons paused during a Smart Rule
Released: 13th November 2025
What’s new?
When pausing a coupon during a smart rule, you can now see a preview of the coupon page.
- After you tick "Pause Coupon" during create a rule
- Then visit the coupons page
- Your coupon preview will show a banner with the time it will pause for
- Includes a shortcut to edit the rule and edit the pause
- Currently only works pausing all coupons at the same time
Edit Stacking Coupon Settings
Released: 12th November 2025
What’s new?
You can now configure if Instant coupons can "stack" with other Shopify Coupons
- When creating a new coupon, you can check to stack coupons
- Choose which types of coupons you'd like your customers to be able to combine:
- Shipping – e.g. Combine Instant Coupons with “Free Shipping” codes
- Products – e.g. Combine Instant Coupons with “10% off this product”
- Orders – e.g. Combine Instant Coupons with “10% off all orders”
- Previously, you may have needed to use an existing discount but now any Instant coupon can have stacking rules configured
- Available on every Instant coupon, including Smart Coupons
Reuse Coupon Codes in Flows
Released: 12th November 2025
What’s new?
You can now choose to use the same coupon code for all of your customers instead of a unique code. We still recommend choosing a unique code as this helps us to personalise the expiry date and experience for every merchant, but sometimes it may be required to give everyone the same code.
- When creating a new coupon, you'll be asked if you want to make a unique or shared code
- When selecting shared code, you can pick the name of the code to use
- This code must be unique to your store and can't be an existing code
- No expiry data can apply to shared coupons
- We'll send all customers that coupon in your nominated flows
Editable Pop-up Text
Released: 12th November 2025
What’s new?
Pop-up text is now editable. You can continue to use AI generated copy, or if you wish to override it for a specific use case you can use any of your own test.
- Go to Sign Up Forms and click on the Text on screen
- Edit it to write any text you like
- If you delete all of the text, we'll automatically revert to our default AI changes
- When saving, changes can take ~10mins to update on their site so we show a message that lets you know it may take a few minutes to load
Article URL: https://help.instant.one/instant-release-notes
Keywords:
## How to use a Request Review Flow with Instant AI
The Request Review Flow automatically emails a customer 7 days after their order has been fulfilled.
Instant AI uses the Shopify order status “Fulfilled” to determine when the 7-day countdown begins. In Shopify, this status changes when all items in an order have been marked as fulfilled. This means the products have been shipped, picked up, or otherwise completed in your fulfilment workflow.
Examples
-
Typical fulfilment: If an order is placed on Monday and marked fulfilled on Wednesday, the review email will send the following Wednesday (7 days after fulfilment).
-
Instant fulfilment setups: If your store automatically marks orders as fulfilled at the moment of purchase (common with digital products or instant downloads), the countdown starts right away, and the review email will send 7 days after the order was placed.
-
Partially fulfilled orders: The flow triggers only when the entire order is marked fulfilled, not for partial shipments.
If you use custom fulfilment apps or workflows, make sure your Shopify orders correctly move to the “Fulfilled” status to ensure accurate timing.
How the email works
- Instant will generate a default email template for your email, however this can be customised with your own branding
- If multiple products were purchased, all products will be listed in the email (up to 3) with multiple links within the email
- Each link will go back to your product page for customers to leave a review
- The links aren't provider specific, and your product page will need to have a way for customers to leave a review with your existing provider.
- By default, the review request only includes 1 touchpoint. If you wish to add more touchpoints, you can add additional emails to the flow and they will automate with a 2-day delay between each up to 5.
Automatic exclusions
Instant AI automatically excludes orders with:
- Refunds
- Returns
- Cancellations
These are checked before send time and will only send a review request if the order has been fulfilled and hasn't occurred in any of these scenarios.
Article URL: https://help.instant.one/how-to-use-a-request-review-flow-with-instant-ai
Keywords:
## Flow Setup: Collection Viewed
Collection Viewed abandonment flows target visitors who have viewed a collection page but left the site without completing a purchase.
Instant Audiences has a 'Collection Viewed' metric which enables us to see when a shopper has viewed a collection.
This captures your anonymous shoppers who have not performed a higher intent metric such as 'Product Viewed' or 'Add to Cart'
As these shoppers have shown interest in a particular collection or category. We can now enrol them in a Collection Viewed Flow to move them down your funnel.
What is a Collection Viewed Flow?
A Collection Viewed Flow involves sending targeted messages or sequences of messages to these individuals who have shown interest in a collection of products but haven't taken further actions such as viewing specific products, adding items to their cart, initiating the checkout process, or completing a purchase.
By engaging these potential customers who have already expressed interest in a particular category or collection, we aim to rekindle their interest and guide them towards making a purchase.
Why should I use a Collection Viewed flow?
Reach more Potential Customers: By targeting individuals who have viewed a collection but haven't proceeded further, the flow allows you to engage with a significantly larger portion of your website traffic who are already displaying interest in your products.
Personalise Communication: This flow enables personalised communication based on the specific collections or categories that visitors have shown interest in. By delivering relevant content and offers, you can increase the likelihood of conversion.
Enhance your Lead Gen Efforts: Integrating the Collection Viewed Flow into your lead gen strategy allows you to effectively identify and segment traffic that has landed on specific collections as a result of your marketing efforts. Enrolling browsers in a collection viewed flow increases chance conversion and reduces your acquisition cost.
How do I set up the collection viewed flow?
We have prebuilt a template we can clone into your account ready to go with all the filters and trigger splits per category. Simply put together your content for each collection.
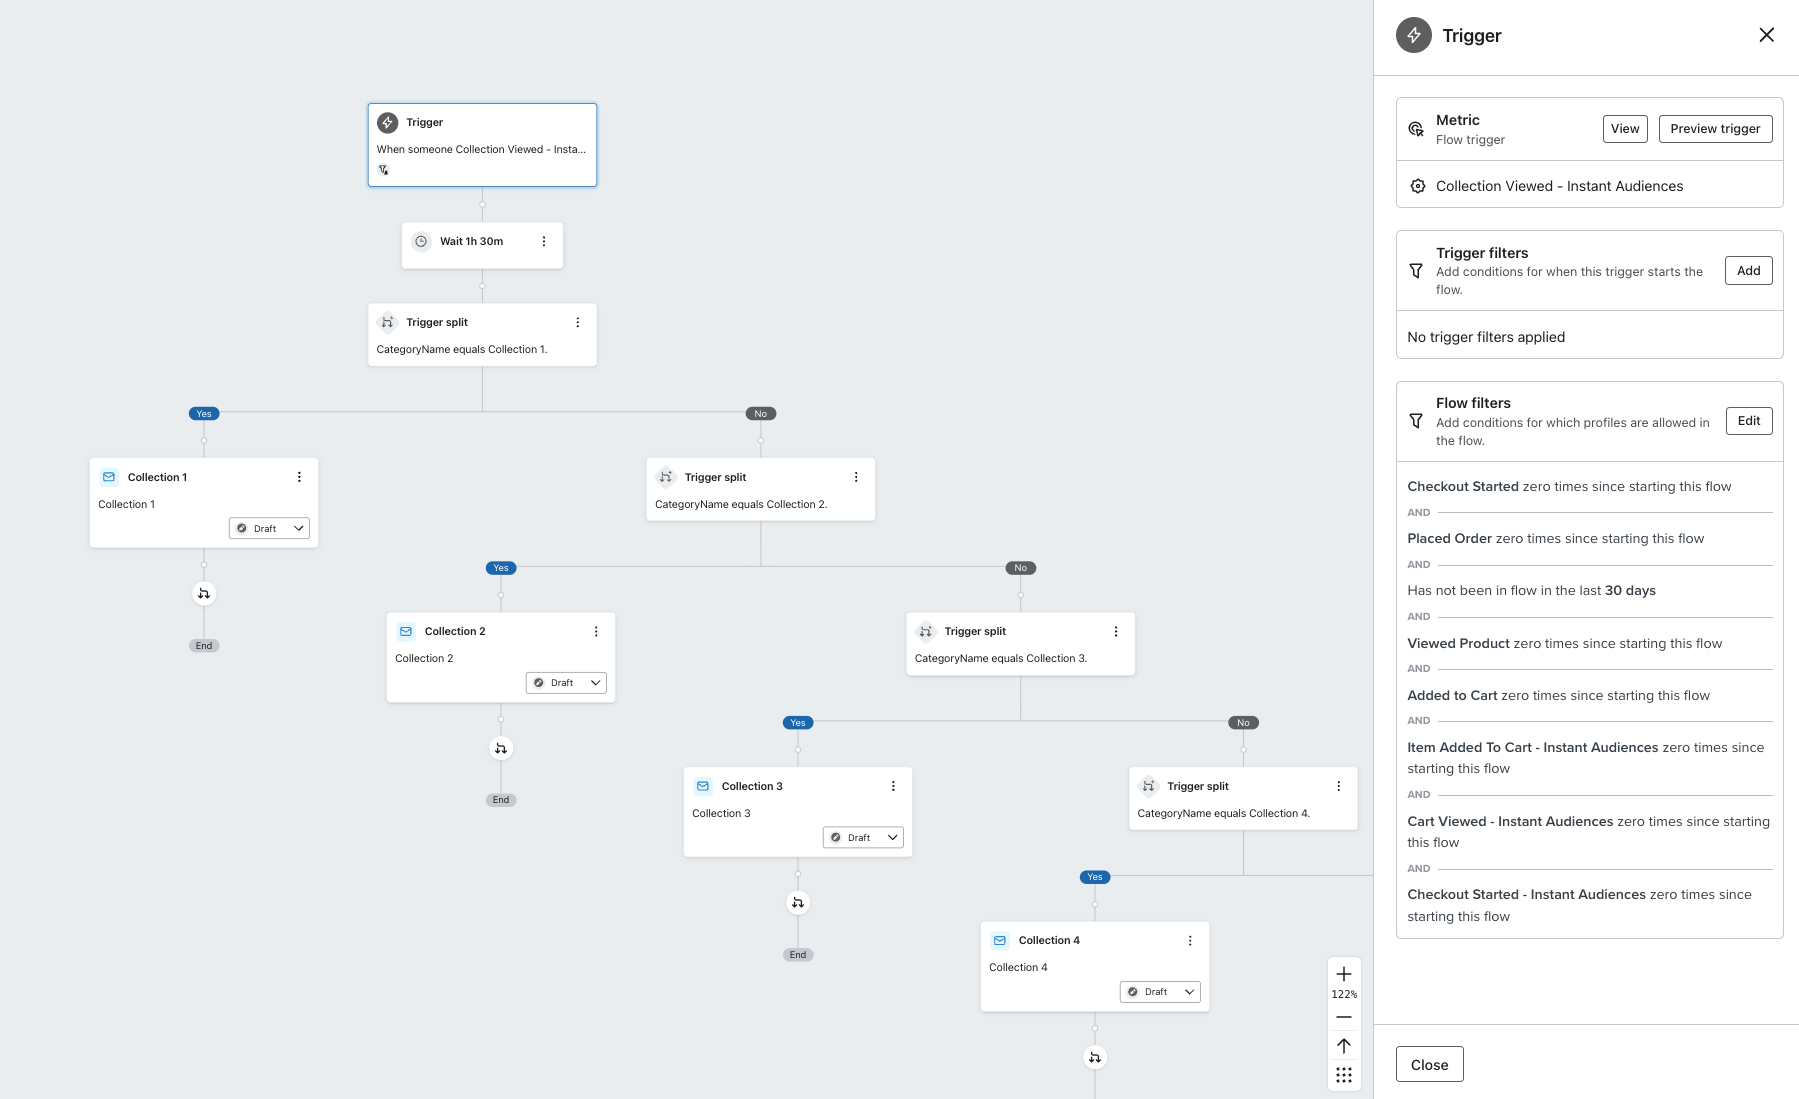
Please reach out to us help@instant.one if you need this template.
Article URL: https://help.instant.one/collection-viewed-flow
Keywords:
## How to Create and Save Segments
A segment is a saved set of filters that you apply to your shoppers list. Segments allow you to target specific shoppers based on actions, behaviour, or profile information. They are dynamic, meaning they automatically update in real time as shopper data changes.
Segments are created and managed from the Shoppers page.
In this article:
- What is the Shoppers Page?
- Why create a Segment?
- How to Create a Segment
- How to edit and manage a segment
- How to delete a segment
- FAQ's
Tip: To learn more about how to use segments in a campaign, read more here
What is the Shoppers Page?
The Shoppers page is a list of every email address stored in Instant AI. This includes all subscription types, whether they be subscribed, unsubscribed, and suppressed.
It is your complete shopper database.
From here, you can filter your shoppers using different criteria to narrow down exactly who you want to see.
Available filter types include:
-
Location
-
Purchased
-
Viewed
-
Added to Cart
-
Email
-
Phone
-
Profile Attributes
-
Email Activity
-
Shopify Tag
-
Subscription
Every filter you add drills down further into your list.
You can layer multiple filters to build highly specific audiences.
Within a single filter, selecting multiple values works as OR logic.
Across different filters, they combine to narrow the audience further.
As you build filters, you will see:
All segments update dynamically as shopper data changes.
Why Create a Segment?
Filters can be used in two ways:
-
To analyse a group of shoppers for reporting or insight
-
To save that filtered group for reuse in campaigns
For example, you might want to find:
-
Everyone who has purchased before and clicked a recent campaign
-
Everyone who viewed a specific product on a specific date
-
Everyone tagged as Wholesale and located in Australia
-
Everyone who is currently unsubscribed
Segments are built from your full shoppers database, regardless of subscription status.
When you later use a segment in a campaign, Instant AI will show:
How to Create a Segment
-
Go to the Shoppers page.
-
Start with the default segment: All Shoppers.
-
Add one or more filters.
-
Continue refining until the list reflects the shoppers you want.
-
Review the live count and preview list to confirm the audience.
-
Once you add at least one filter, a Save button will appear.
-
Click Save.
-
Enter a name for your segment.
-
(Optional) Add a short description.
-
Confirm to save.
Your segment will now appear in your saved segments list.
The most recently updated segment appears at the top. You can click any saved segment to instantly load those filters again.
Tip: Saved segments are shortcuts to a set of filters. They do not create a fixed list of shoppers and will always dynamically generate
How to edit and manage a segment
Segments can be managed entirely from the Shoppers page. Hover over a saved segment to see options to:
Edit allows you to rename the segment or update its description.
If you want to change the filters themselves, the best approach is:
-
Open the segment
-
Adjust the filters
-
Save as a new segment
This preserves your original version and creates a new shortcut to your new filters. You can safely delete the old one if you no longer need it or keep both if you need variants.
Deleting a Segment
Deleting a segment removes the saved shortcut only. It does not:
If a campaign (draft, scheduled, or already sent) used that segment, it will continue using the filters that were applied at the time.
Segments are dynamic and re-calculate in real time. When used in campaigns, the audience is evaluated again at send time.
You can safely delete segments you no longer need to keep your list organised.
FAQ's
Are segments fixed lists of shoppers?
No. Segments are dynamic. They automatically update in real time as shopper data changes.
Can a shopper belong to multiple segments?
Yes. Segments are just saved filters. A shopper can match multiple filter sets at the same time.
Why does my segment show more people than my campaign can send to?
Segments include all shoppers in your database, including unsubscribed and suppressed contacts.
When creating a campaign, Instant AI will show how many shoppers are eligible to receive emails (subscribed).
When are segments re-calculated for campaigns?
Segments are evaluated at send time. This ensures your campaign sends to the most up-to-date eligible audience.
What happens if I delete a segment that was used in a campaign?
Deleting a segment only removes the saved shortcut. It does not affect sent campaigns, drafts, or scheduled campaigns.
Article URL: https://help.instant.one/how-to-create-and-save-segments-in-instant-ai
Keywords:
## How does Instant AI attribute email revenue?
Attribution is how Instant measures whether an email contributed to a sale. When a shopper interacts with one of your emails and then makes a purchase within your attribution window, that sale is credited to that email.
Understanding how attribution works helps you read your dashboard accurately, compare Instant's results to other platforms, and decide whether the default settings are right for your store. Instant AI uses a 5 day open click attribution model by default, however this can be edited depending on your needs.
- What customer events counts towards attribution?
- When does the attribution window start?
- Which email gets the credit?
- How do attributed conversions appear in the dashboard?
- What are the default attribution windows?
- Can I customise the attribution window?
- Why does my Instant revenue look different from Shopify or Google Analytics?
What customer events counts towards attribution?
Instant tracks two types of engagement:
Email
- Opens — a shopper opens your email
- Clicks — a shopper clicks a link in your email
SMS
- Delivered — an SMS was delivered to the shopper
- Clicks — a shopper clicks a link in your SMS
Instant automatically excludes machine-generated opens from attribution. This includes Apple Mail Privacy Protection pre-loads, Gmail image proxies, and spam filter activity. Only genuine human interactions count.
SMS does not track opens. SMS attribution is based on delivery or click events only.
When does the attribution window start?
The window starts from the time of the shopper's interaction,not when the email was sent.
For example: an email sent 8 days ago would normally be outside a 5-day window. But if a shopper opens that email today and purchases today, the sale is attributed to Instant, because their interaction happened within the window.
Which email gets the credit?
If a shopper interacted with multiple Instant emails within the attribution window, the most recently engaged email gets the credit. Only one email is ever credited per purchase, there is no double-counting across flows.
How do attributed conversions appear in the dashboard?
Conversions are displayed against the date the email was sent, not the date the purchase occurred.
This is intentional. The dashboard is a view of how your email sends are performing over time, not a calendar of when purchases happened. It also matches how major ESPs including Klaviyo report attribution, which makes it easier to compare results across platforms.
What are the default attribution windows?
| Channel |
Default |
| Email |
5 days from open, 5 days from click |
| SMS |
1 day from click |
These match Klaviyo's default settings. If you're comparing Instant to Klaviyo and neither has been customised, you're comparing on the same basis.
Can I customise the attribution window?
Yes. You can set your own window in Settings > Email Settings > Preferences > Attribution window.
Email and SMS windows are configured separately, which is standard across the industry given they behave differently as channels.
When you change your window, all data in your dashboard and flow analytics updates immediately and retroactively, including historical results. This lets you see what your performance looks like under any model at any time.
This does not mean your previous numbers were wrong. The underlying conversion events don't change, only the lens you're using to view them.
Why does my Instant revenue look different from Shopify or Google Analytics?
These platforms use different attribution methods, and none of them talk to each other.
Shopify uses last-channel, last-click attribution based on the sales channel recorded at checkout. If a shopper clicked a link in an Instant email, Shopify may show the order sourced from Instant, but Shopify's model and Instant's model are separate calculations and will rarely match exactly.
Google Analytics / GA4 tracks UTM parameters appended to landing page URLs. When a shopper navigates from your store to Shopify's checkout domain, the UTM parameters are frequently dropped, meaning GA4 often records these orders as Direct or Unknown. This is a limitation of third-party tracking across domains, not an error in Instant.
Instant's attribution uses a first-party token appended to every email link. This is independent of UTMs and is not affected by checkout domain changes. This gives us more accurate tracking of all activity more directly in-platform. Your Instant dashboard revenue and your GA4 email revenue will rarely match, and this is expected.
Article URL: https://help.instant.one/how-does-instant-ai-attribute-email-revenue
Keywords:
## What should I consider before changing my flows?
Before making any changes to your flow filters, please consult with your Customer Success Manager to ensure the filters are correctly configured.
This will help prevent customers from receiving duplicate emails and ensure your flows remain optimised
During the onboarding process, your Customer Success Manager will configure profile filters to manage which customers are enrolled in your flows and ensure they receive the appropriate communications.
Any adjustments to these filters could disrupt your flows and result in duplicate emails to customers, which may negatively impact their experience.
Before making any changes, please reach out to your Customer Success Manager to confirm that all filters are correctly set up.
Frequently Asked Questions:
1. Can I adjust my filters the day before a big sale?
If you need to make urgent changes to your flow before a sale or promotion, please contact your CSM or help@instant.one.
2. What if I only need to adjust my flow to run a seasonal promotion?
If you would like to run a seasonal promotion, you can either clone your existing flow or edit the email content within your current flow to align with the seasonal promotion. For a step-by-step guide on how to do this, check out this article linked here.
3. Can I change my cool-down period or profile filters?
For changes to your cool-down period or profile filters, we strongly recommend reaching out to your CSM. This ensures that the flow remains optimised and that any changes to the filters are properly implemented, preventing any impact on customer enrollment or email delivery.
4. What if I only need to change my time delay details?
You can safely adjust any time delays, but please ensure the Instant flows are timed to follow your Klaviyo flow.
5. Can I create an A/B test?
Yes, A/B testing is available and is an excellent way to optimize your flows and emails! Please feel free to contact your CSM or consult the Help Center for detailed instructions on setting up an A/B test.
6. Can I update the subject line and header content?
Yes, you can modify the subject line and header content of your emails. For best practices on optimising for a sale or promotion, please refer to this helpful guide here.
If you have any questions or need further assistance, please reach out to help@instant.one
Article URL: https://help.instant.one/editing-flows
Keywords:
## How to export your Shoppers list
You can export your Shoppers list as a CSV at any time. The export reflects whatever is currently in view — so if you've applied filters, only the filtered results will be included.
To export your Shoppers list:
- Go to Instant AI > Shoppers
- Apply any filters you want to narrow the list (optional)
- Click the ⋯ menu in the top-right corner
- Select Export as CSV
- A loading modal will appear while your file is being prepared
- Once ready, click Download CSV
What's included in the export
Each row represents one shopper profile. The file includes the following columns:
- Profile ID
- Last Event Time
- Email Addresses
- Phone Numbers
- First Name, Last Name
- Address (City, Region, Postcode, Country)
- Unique Instant Email Opens
- Unique Instant Email Clicks
- Total Instant Email Deliveries
The Last Event Time is the date and timestamp of the most recent interaction Instant recorded for this profile, such as an email send, open, or click. This timestamp can be any event, and is useful to indicate the last date we received any activity, of any kind from this customer either on your website or engaged in emails.
Instant manages contacts as profiles rather than individual email addresses. If a shopper has multiple email addresses on their profile, they'll all appear in the Email Addresses column of the same row.
The export includes raw counts for opens, clicks, and deliveries rather than calculated percentages. To get a rate, divide opens or clicks by total deliveries.
Article URL: https://help.instant.one/how-to-export-your-shoppers-list
Keywords:
## How to re-install the Instant Audiences pixel into checkout.liquid (for merchants not yet on checkout extensibility)
The Instant Audiences pixel can be accidentially removed throughout checkout.liquid. This article outlines how to re-install the Audiences pixel if you have been notified that it is missing.
Please note that this is only applicable to your site if the checkout.liquid file is available. The checkout.liquid file is only available to merchants that have not yet updated to Shopify's Checkout Extensibility.
This article outlines how to re-install the Audiences pixel onto checkout.liquid.
The checkout.liquid file ensures that Checkout Started events are sent through to Instant Audiences. If the Audiences pixel is removed from checkout.liquid, the specified events will not be sent to Klaviyo.
If the pixel has been accidentally uninstalled (usually from updating your Shopify theme), it is important to ensure that the Instant Audiences pixel is re-installed into checkout.liquid.
If you have been notified that the Instant Audiences pixel is missing on the checkout.liquid file and requires re-installation, please complete the following:
If you cannot access the Instant dashboard, please reach out to help@instant.one and we will promptly provide access.
Article URL: https://help.instant.one/pixel-checkout.liquid
Keywords:
## How do I process a manual transaction through Instant?
There might be times when you'll want to handle transactions manually with Instant, like when you're taking orders over the phone.
We offer this through the Instant Dashboard: https://dashboard.instant.one
To manually process transactions via the Instant Dashboard, follow these streamlined steps:
- Visit Instant Dashboard and log in.
- Navigate to Payments > Transactions and select "Create Transaction."
- Fill in the transaction details and click "Confirm Transaction" to complete.

Please note: Each transaction is subject to Instant's fees, as outlined in your agreement.
Article URL: https://help.instant.one/manual-transaction
Keywords: one off transaction,payments
## What E-Commerce Platforms Does Instant Checkout Integrate With?
A list of the e-commerce platforms that Instant Checkout integrates with
Instant Checkout offers a convenient and efficient way for customers to complete purchases instantly. Currently, Instant Checkout seamlessly integrates with the following e-commerce platforms:
-
Magento: With our Magento integration, merchants can leverage Instant Checkout to streamline the purchasing process for their customers. Whether it's Magento Open Source, Magento Commerce, or Magento Commerce Cloud, our integration ensures a smooth transaction experience.
-
BigCommerce: Merchants using BigCommerce can take advantage of Instant Checkout to accelerate their checkout process. This integration enables customers to make purchases quickly and securely, enhancing overall satisfaction and conversion rates.
-
WooCommerce: For WordPress-based online stores, our integration with WooCommerce offers a powerful solution. Instant Checkout seamlessly integrates with WooCommerce, allowing merchants to provide a frictionless checkout experience for their customers.
-
Salesforce Commerce Cloud: Our integration with Salesforce CC empowers businesses to optimise their sales processes. Instant Checkout seamlessly integrates with Salesforce Commerce Cloud, enabling merchants to streamline transactions and improve customer satisfaction.
For further assistance or inquiries regarding Instant Checkout integration, please don't hesitate to reach out to our support team at help@instant.one
Article URL: https://help.instant.one/e-commerce-integrations
Keywords:
## How Instant Audiences Attributes Revenue
Audiences pulls data directly from your email platform, ensuring your attribution is both accurate and transparent.
Accurate attribution is crucial for understanding marketing performance and making informed investment decisions. That's why Instant Audiences relies entirely on your email service provider—like Klaviyo—for attributed revenue reporting.
Instead of applying our own attribution model, we pull data directly from your email platform. This ensures the numbers in our dashboard align with what you see in Klaviyo, maintaining consistency, transparency, and reliability in attribution.
Klaviyo Attribution: A Reliable Standard
By default, our flows follow Klaviyo’s multi-channel last-click attribution model, where each email and SMS has a customisable tracking window.
In this model, when a customer event occurs (i.e., placing an order), Klaviyo checks your attribution window for each channel and credits the conversion to the most recent message within an open window.
The default attribution windows are:
- Email: 5-day open or click.
- If a customer makes a purchase within 5 days of opening or clicking an email, and that email was the last marketing message they interacted with, the sale will be credited to that email in Klaviyo.
- SMS: 24-hour click.
- If a customer buys within 24 hours of clicking a text message, and it was the last marketing touchpoint they clicked, the purchase will be attributed to that SMS in Klaviyo.
By setting distinct attribution windows for email and SMS, each conversion is credited to a single message, preventing double-counting.
This approach enables you to accurately measure the impact of your campaigns and make informed decisions regarding your marketing budget.
Note:
Every business is unique, so Klaviyo’s default attribution windows should be aligned with your customer behavior. For details on how to modify your attribution setting, click here.
How Audiences Works With Klaviyo
Audiences Flows
Instant Audiences is designed to enhance your Klaviyo setup by identifying and engaging visitors that Klaviyo may miss—without disrupting your existing flows. We only trigger messages when Klaviyo is unable to trigger the existing flows, ensuring that those Klaviyo native flows always take priority.
To achieve this, we clone your existing abandonment flows and apply time delays and filters to prevent overlap, ensuring that customers never receive duplicate messages.
The cloned flows include:
- Viewed Product – Targets visitors who view a product but leave without purchasing.
- Cart Viewed / Checkout Started – Engages shoppers who visit their cart or begin checkout but don’t complete the transaction.
- Add to Cart – Reaches users who add items to their cart but don’t finalize the purchase.
Note: Some businesses will have more or fewer abandonment flows, which flows you choose to clone is up to you. But best practice is that all three flows are cloned and activated for best Instant Audience performance.
Example
When Klaviyo identifies a visitor on your website, and that visitor then abandons the website and triggers a flow, Instant Audiences remains inactive. If the visitor is not identifiable by Klaviyo, Instant Audiences steps in and sends the corresponding message from your cloned flow.
For example:
-
Day 1: A user visits your ecommerce site, adds a product to their cart, and leaves without completing the purchase.
-
Later: They return to your site. Klaviyo no longer recognizes them, either because they switched browser, device, or their cookies have expired, our Instant Pixel is still able to track them.
Result: We trigger an email based on your cloned Klaviyo flow, recovering a conversion that would have otherwise been missed.
Attributing this conversion
Conversions attributed to Instant come from visitors who have received, opened, and/or clicked on Instant abandonment emails, following your business’s email marketing attribution rules.
In the example above, the visitor would have received an Instant cart abandonment email, because only Instant was able to identify and track their session. That conversion would then be attributed to Instant only if the visitor opened and/or clicked on an email in the flow within the last 5 days (or opened and/or clicked on the SMS in that flow within the last 24 hours).
Tracking your performance
Once your flows are set up, you’ll have access to a personalised merchant dashboard tailored to your specific needs.
Your Analytics page provides a clear view of the revenue uplift driven by Instant Audiences, based on data from your connected Klaviyo account.
Here, you can:
-
View attributed revenue
-
Monitor key performance metrics such as ROI, projected revenue, and Instant Flow statistics
-
See how your audiences are performing—and even watch shoppers convert in real time
To learn more about analytics and tracking your progress with Instant Audiences, click here.
If you have any further questions about attribution, please feel free to email help@instant.one.
Article URL: https://help.instant.one/audiences-attribution
Keywords:
## How does Audiences prevent duplicate emails from being sent?
Flow filters are configured to both the non-Audiences and Audiences Klaviyo flows to ensure that if a customer is identified by both Klaviyo and Instant Audiences, that they only get sent emails from the non-Audiences flow.
This ensures that emails sent from Audiences flows are emails that would not have been sent otherwise, and Audiences flows do not send emails when standard flows would.
Article URL: https://help.instant.one/prevent-duplicate-emails
Keywords:
## Trialling Instant AI
Instant offers discounted trials to new customers for Instant AI. Trials enable merchants to see the value of Instant AI first hand, before committing to our full-price offering.
How trials work
Trials of Instant AI last thirty days and come at a discounted price. Our discounted trial price is contingent on a few simple conditions.
First, customers on trial must commit to enabling all three of our standard retention marketing flows (Abandoned Cart, Abandoned Checkout, Browse Abandonment). If you are apprehensive about switching your flows over to Instant AI, you can start with the Abandoned Cart flow, but you should aim to have all three of our standard retention marketing flows live by week two of your trial.
Second, make sure your coupons and offers for Instant AI match your coupons and offers in your previous email marketing software. Discounts can have a massive impact on performance, so launching with different discounts can heavily distort results. Many merchants realise that, with the added performance of Instant AI, they can reduce their use of discounts in abandonment flows and achieve the same or better results, but it is best to test this after your trial.
Third, look for any obvious email template design gaps between your Instant AI flows and your email templates in your previous email marketing software. Most of the time, Instant AI's standard templates will outperform custom templates in a legacy system. Occasionally, things like social proof and product/brand educational content can boost the performance of emails. So, if you've invested heavily in your templates, and they are currently performing well, it may make sense to migrate some of those design elements over to Instant AI before starting your trial.
Fourth, make sure your Instant AI flows have as many touch points as the equivalent flows in your previous email marketing software. If you used to send five emails for cart abandonment, but Instant AI is configured to only send three, you'll likely hamper the results of the trial.
Finally, if you use Klaviyo, it's a good idea to integrate Instant AI with Klaviyo. This synchronises shopper opt-in status between Instant AI and Klaviyo, enhancing early performance, reducing the warm-up period of Instant AI, and ensuring total opt-out compliance. If you use another email marketing software, let our team know.
Interpreting results
Instant AI matches Klaviyo's default attribution standard. This means that if a customer buys within 5 days of opening/clicking an email or 24 hours of clicking an SMS, and that specific message was the last touchpoint they clicked, then that purchase will be attributed to the last email/SMS. When trialling Instant AI against Klaviyo, make sure you use this default attribution standard, otherwise your comparison between Klaviyo and Instant AI will not be fair.
If you are comparing Instant AI to another email marketing software, given most have configurable attribution models, try to adjust the attribution model in your previous email marketing software to match Klaviyo's default attribution standard, as this will align it with ours.
When comparing Instant AI's results with another platform, it is usually best to compare these results with a rolling three or six-month average from your previous system, as results can vary dramatically from month to month.
FAQ
I don't like Klaviyo's default attribution standard, why can't I use another?
All attribution models over or under attribute revenue. This is because shoppers are rarely converted by a single marketing activity. This is especially true for bottom-of-funnel retention marketing tools like Instant AI. What is important about the attribution standard is not absolute accuracy, but comparability: i.e., when using a fair and equivalent measurement method, does System A, or System B perform better?
If you're considering Google Analytics as an attribution tool, please review these notes first.
Article URL: https://help.instant.one/trialling-instant-ai
Keywords: instant ai,sign up form
## How do I modify the default forms used by Instant Predictive Opt-In?
You may wish to set a different form as your permanent/default form used by Instant Predictive Opt-In.
If you wish to make a temporary change, we recommend scheduling a form. The instructions for this are here.
Step 1: Proceed to your Instant dashboard and click on Predictive Opt-In in the sidebar.
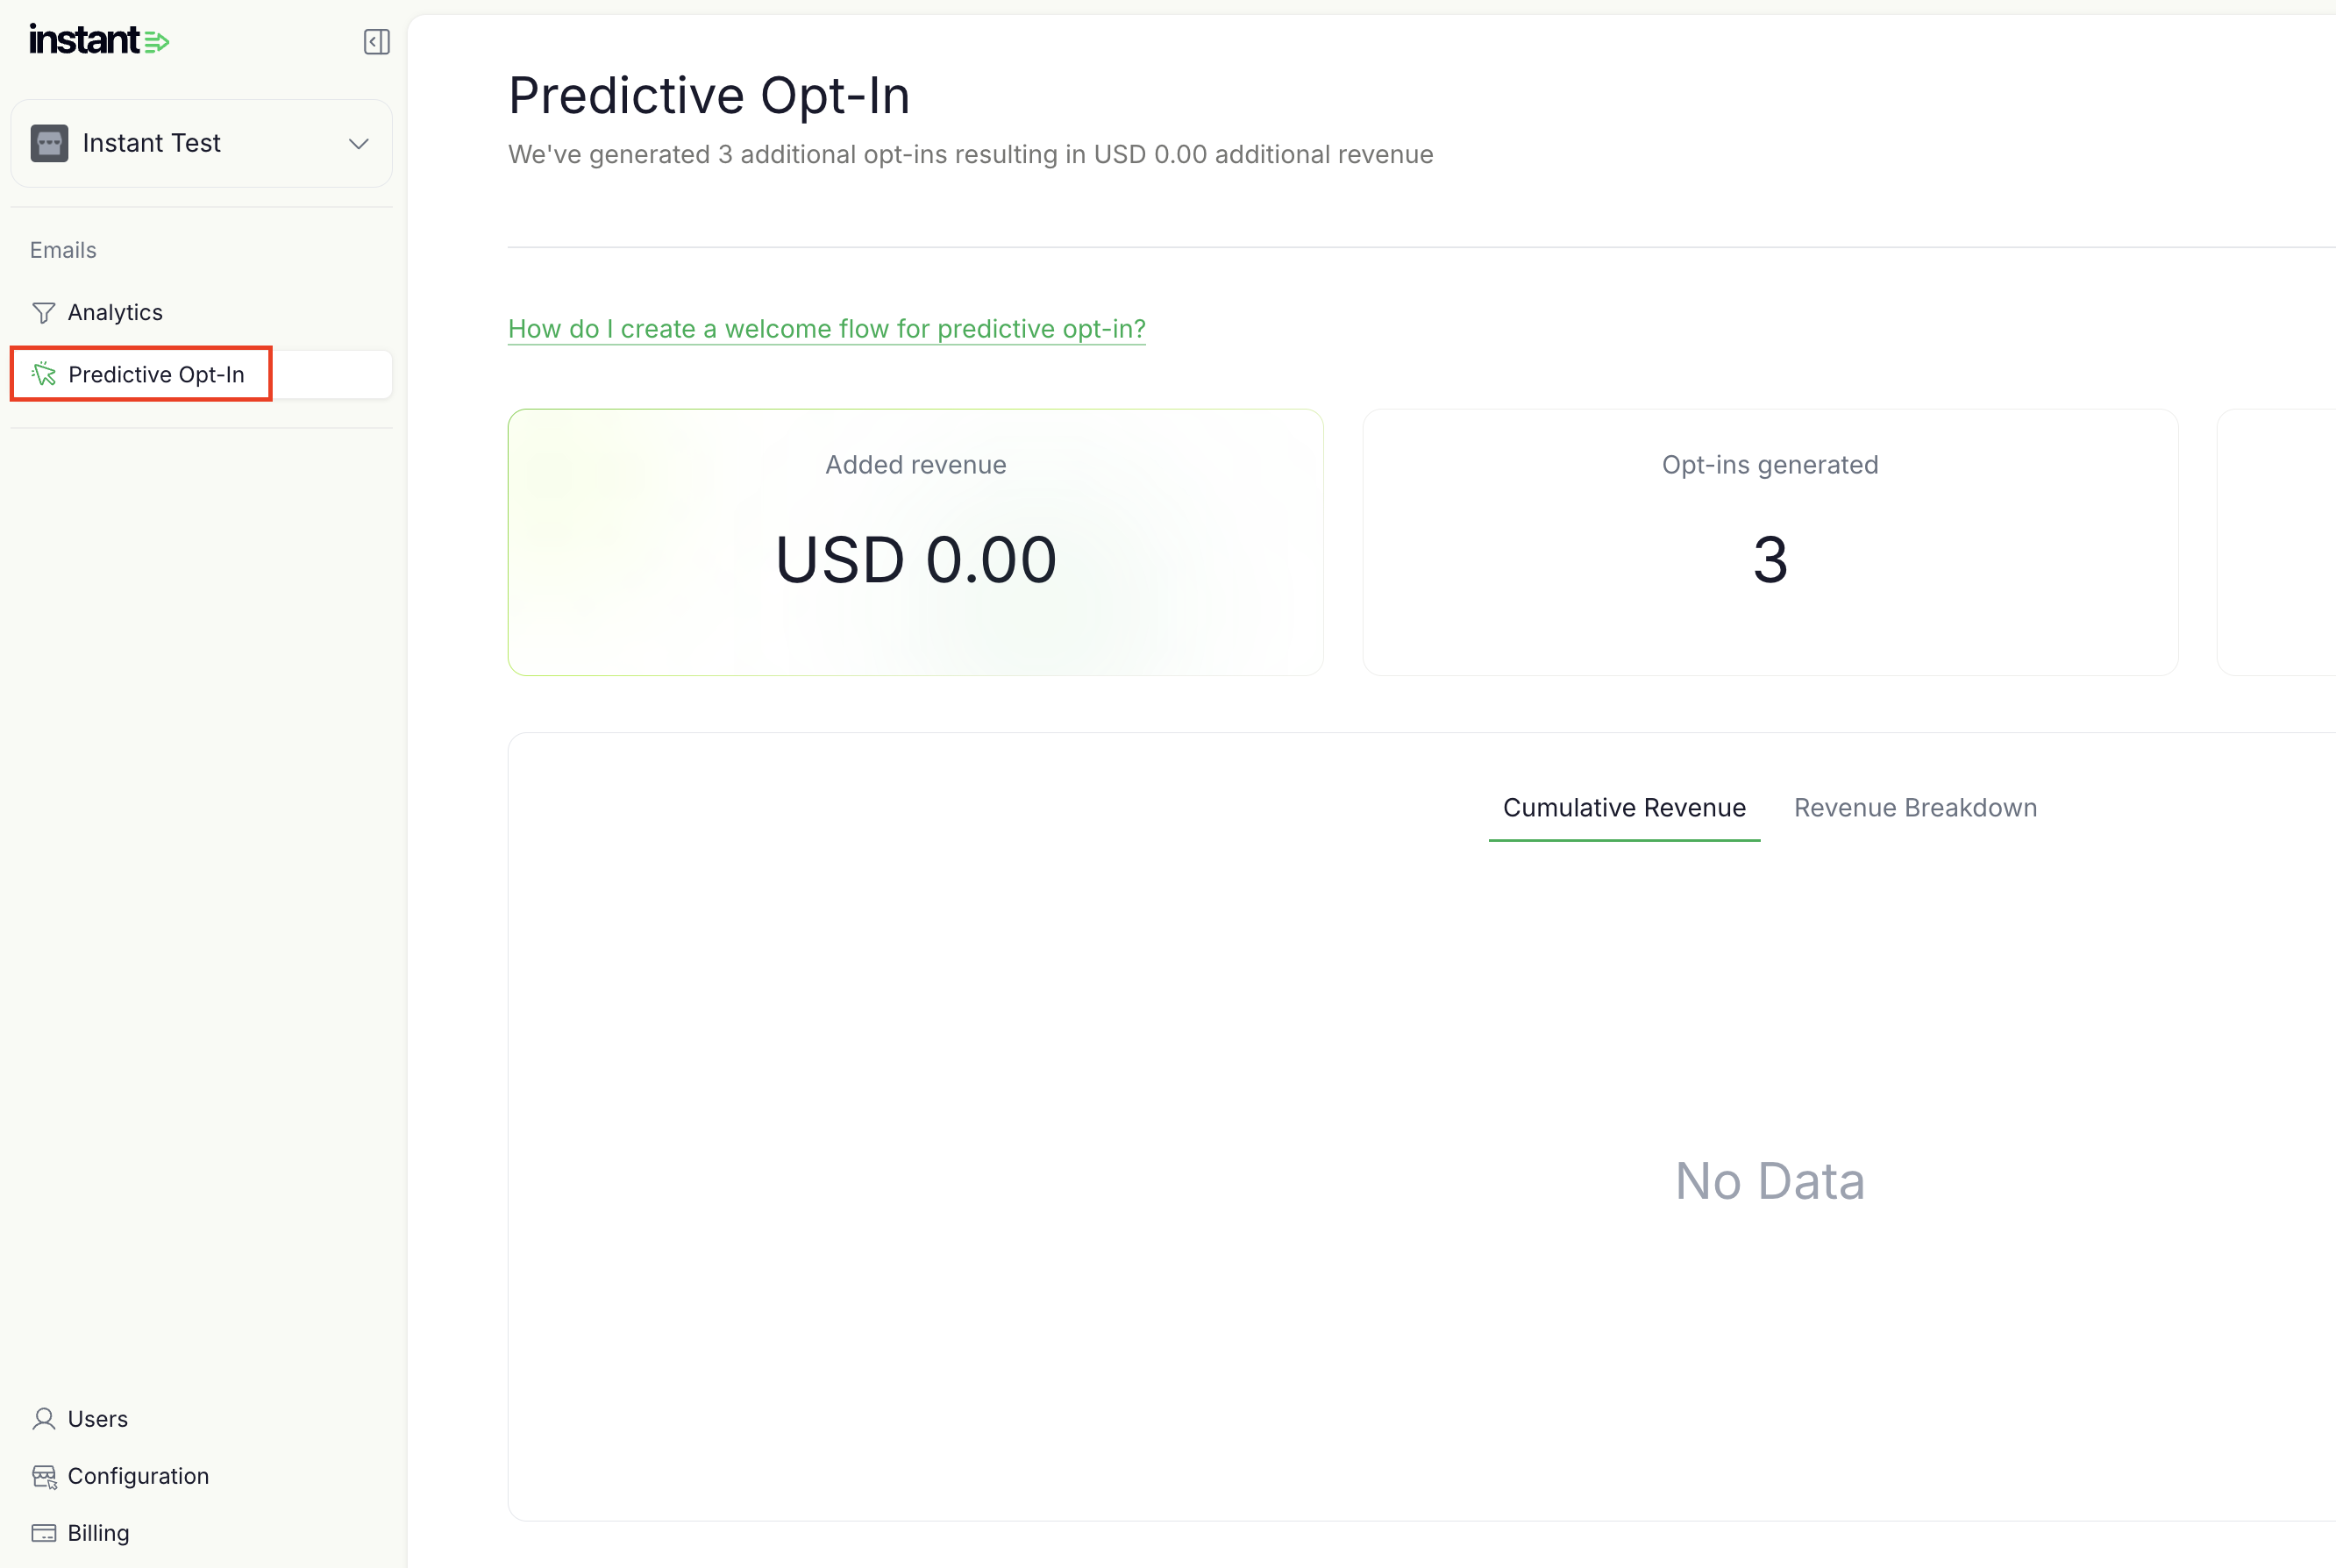
Step 2: Click on Configuration in the top right.
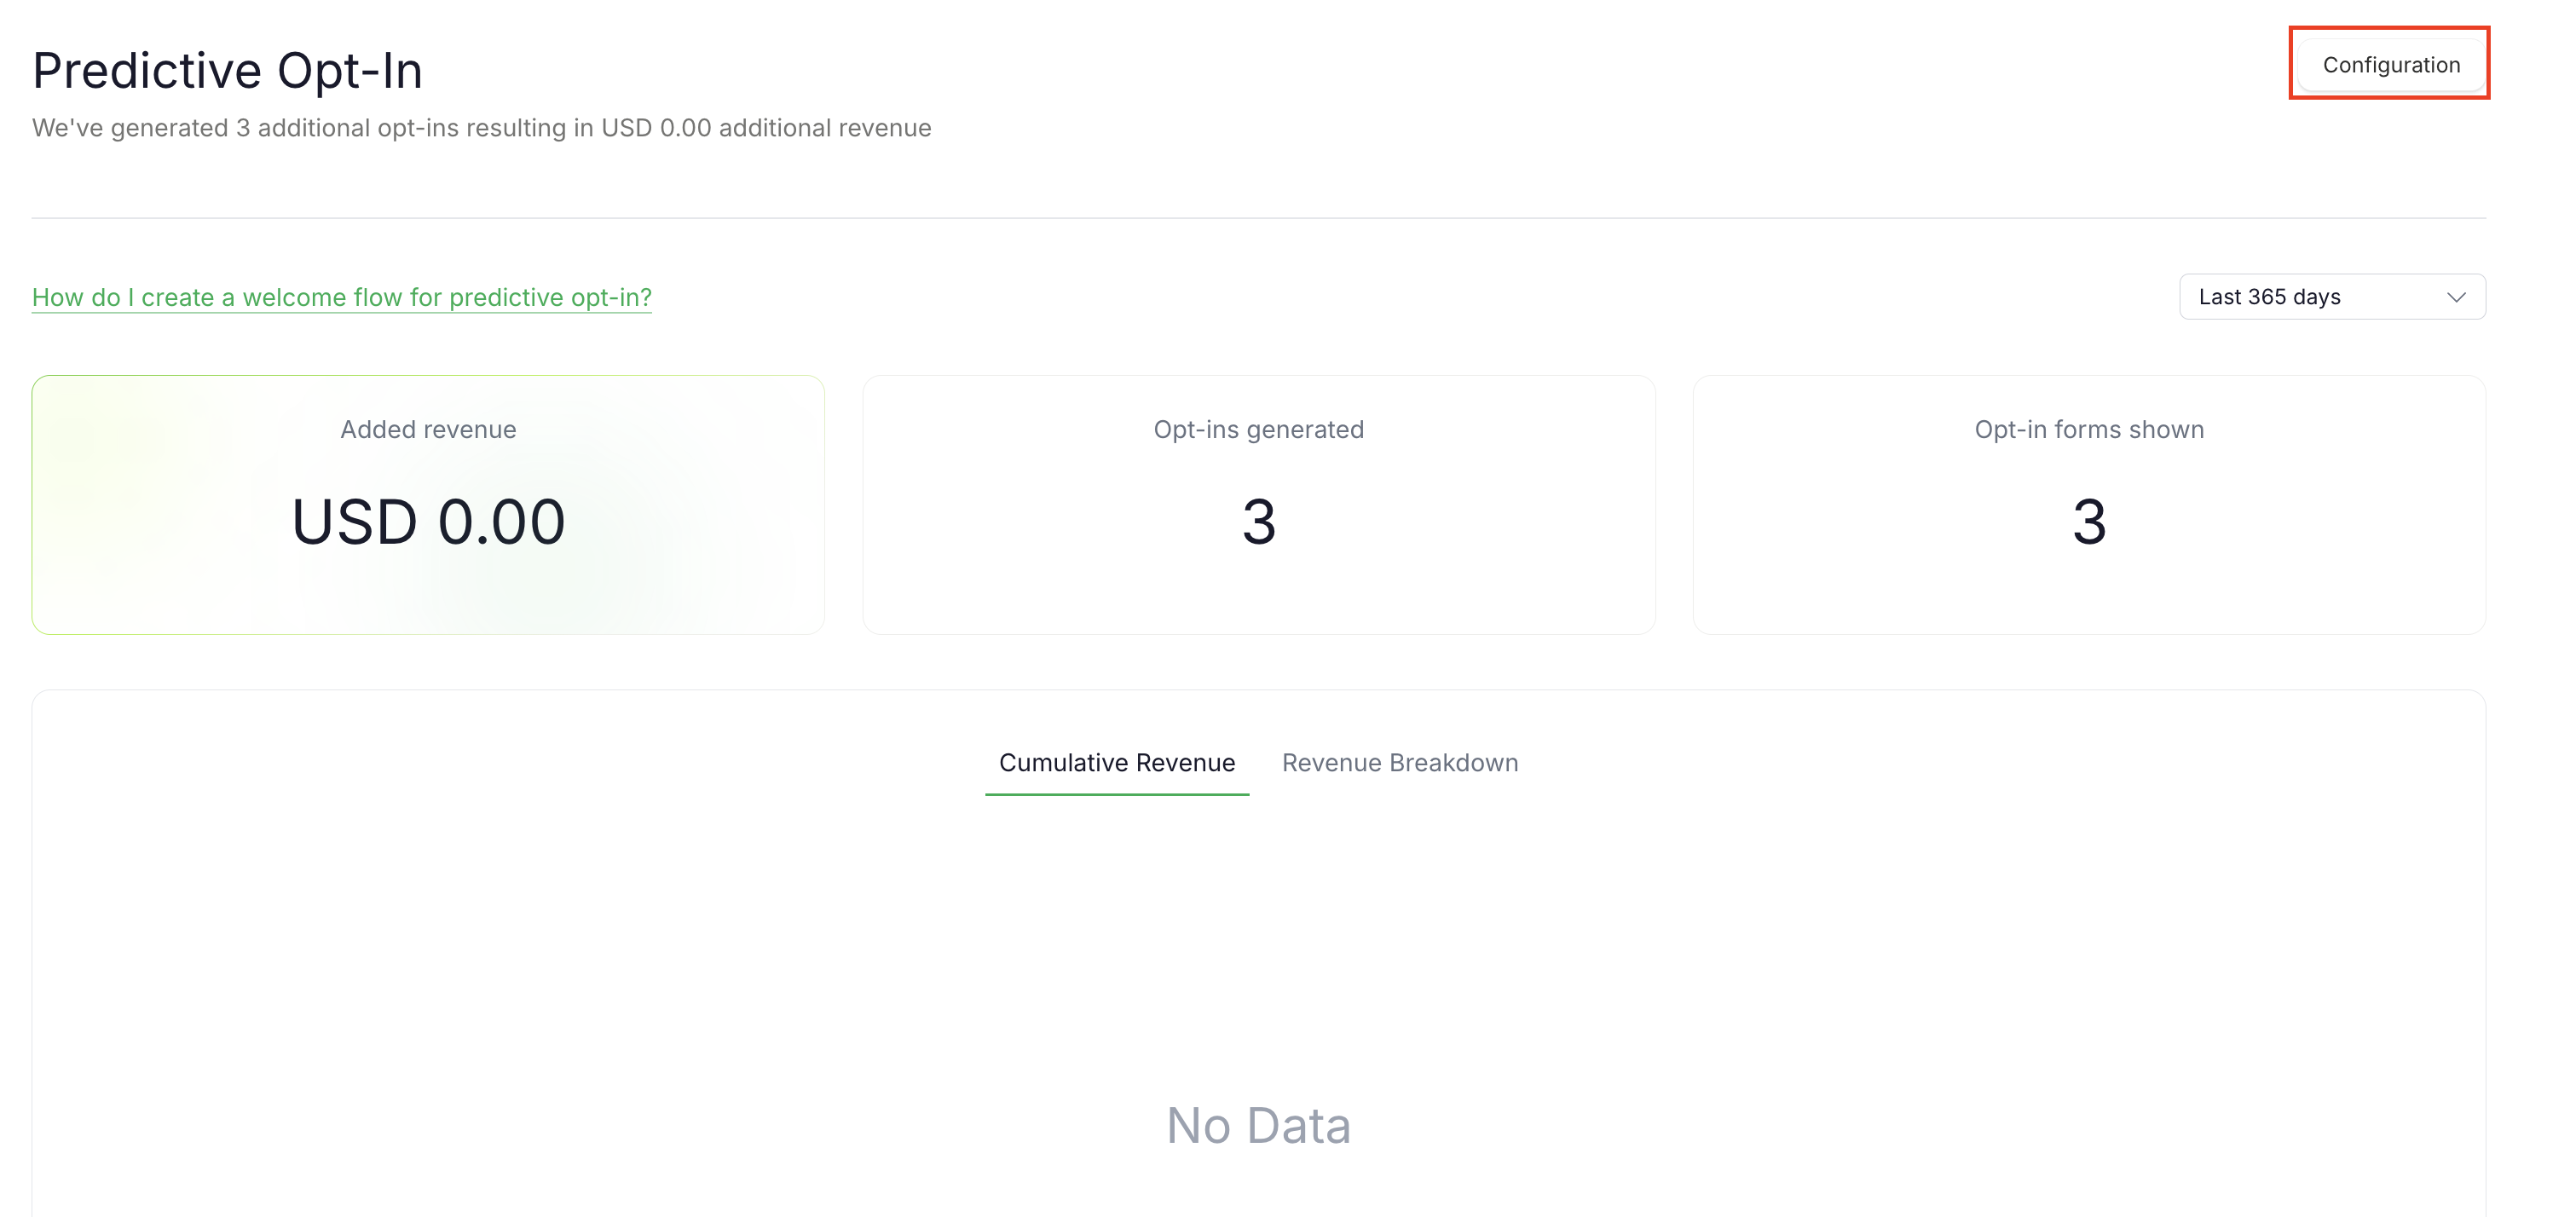
The remaining steps will differ based on the form provider you are using with Predictive Opt-In.
- Klaviyo
- Alia
Klaviyo Integration.
Follow these remaining steps if you are using Klaviyo Forms with Predictive Opt-In.
Step 3: Modify the default form IDs for Desktop and Mobile.
Update the form IDs in the fields highlighted in red below with the Klaviyo Form IDs that you now want to use with predictive opt-in. If you use the same form ID for desktop and mobile, add your form ID to both fields.
Once done, click save!
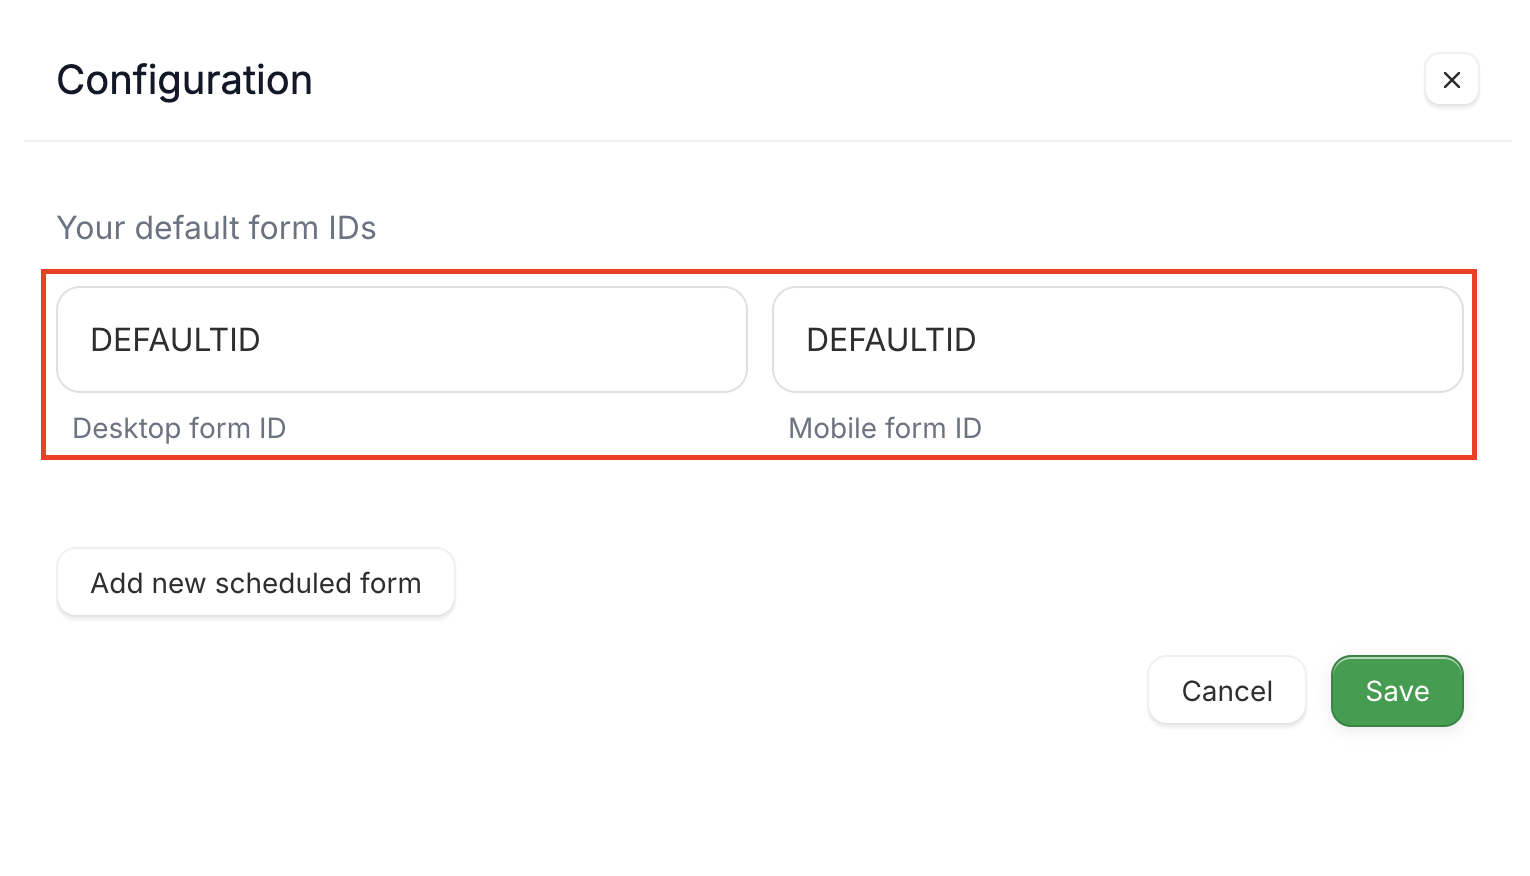
Alia Integration.
Follow these remaining steps if you are using Alia with Predictive Opt-In.
Step 3: Copy your Trigger ID.
Copy the default trigger ID from the field highlighted in red below. This ID will be used by Predictive Opt-In to programatically trigger your Alia pop-ups.
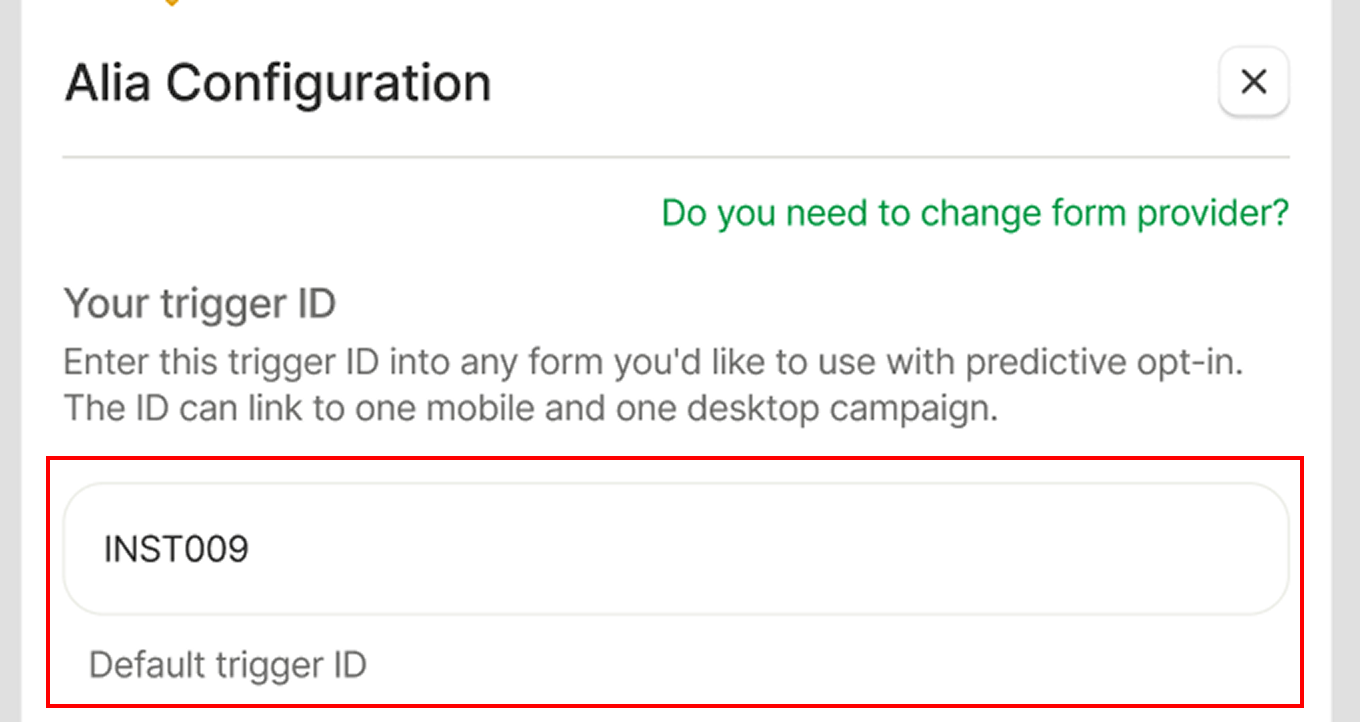
Step 4: Add your Trigger ID to your Alia Campaigns.
Alia only supports showing one campaign to a user at a given time, so one Trigger ID can be used across multiple forms, as long as it is only applied to one desktop and one mobile form simultaneously.
After opening the campaign and pop-up you wish to use with predictive opt-in, remove all triggers underneath your "Secondary Popup" and click on "Show Advanced Options". Enter your Trigger ID into the relevant field.
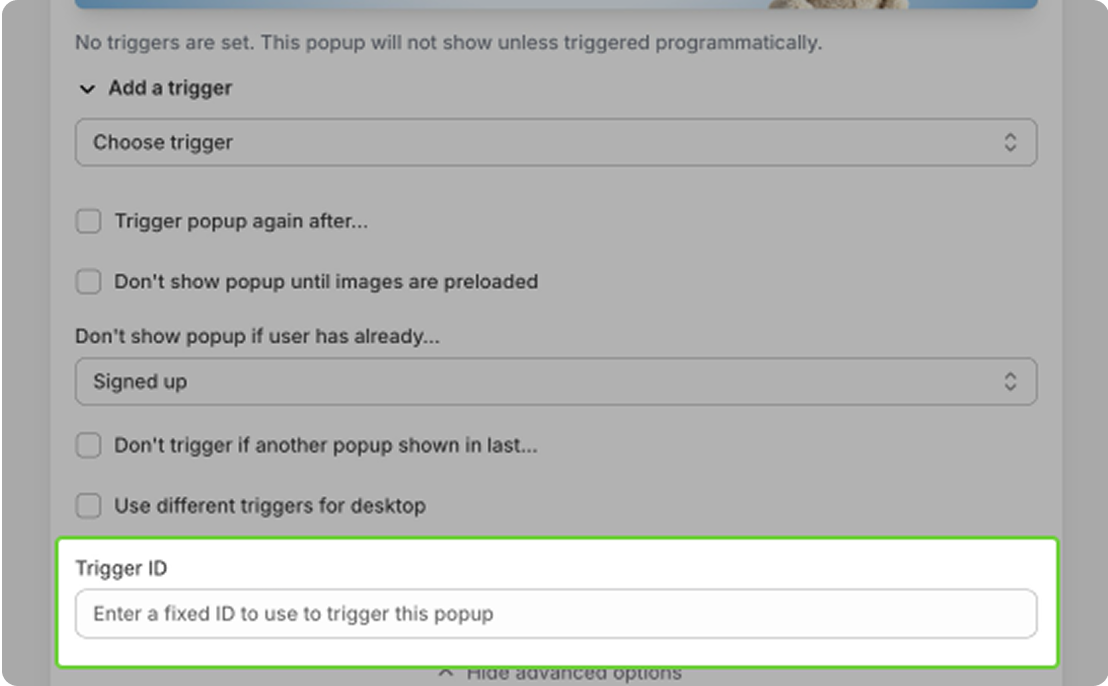
Step 5: Remove your Trigger ID from your old Alia Campaigns.
To ensure that Predictive Opt-In is triggering the correct forms, navigate to your old campaigns and ensure that the trigger ID field is empty.
Predictive Opt-In will now open the new forms!
Article URL: https://help.instant.one/how-do-i-modify-the-default-opt-in-forms-used-by-predictive-opt-in
Keywords:
## How to schedule a change to your emails with Instant AI
Instant AI allows you to add Smart Rules to help dynamically change the content of your emails.
With Smart Rules, you can add a rule to any of your email blocks, on any flow, so that they switch during a nominated period of time. For example, you can create a smart rule during a sale period and switch your standard header to a custom header that you've designed for the sale.
This is useful so that you don't have to re-build any flows or alter any existing optimisations during a key sales period. Instead, you can simply add a smart rule to switch parts of the email during your sale and they'll automatically switch back when the sale is over.
You can schedule multiple smart rules over different periods to confidently plan for back to back sales, or ensure you have dynamic content over an extended period of time.
How to create a new smart rule
- Go to Email Templates
- Navigate to the email you want to change
- Select Edit Template
- Hover over the block that you want to apply the rule to
- Select Add Rule
- If you've never created a Smart Rule,
- Enter the name of your smart rule
- Enter a date and time to start and end your smart rule
- Select Create
- If you have existing Smart Rules,
- Select an existing smart rule from your list
- Or create a new rule in the bottom left of the modal
- Enter the name of your smart rule
- Enter a date and time to start and end your smart rule
- Select Create
- Add the new block that you wish to switch to during the change
- If you have more rules to add, you can repeat the above steps for different blocks
- Select Save Template
TIP: Use the preview tool to see how your smart rule will appear
How to preview a smart rule
- Select "Preview" on the top right to hide all editing tools for a quick preview
- Or select the Smart Rules drop down on the left menu
- Pick from any existing rules for a filtered preview of the email editor during this rule
- Or view "All" to see all scheduled rules together in one email
When won't a smart rule work
- Smart Rules are only available on Headers, Images and Custom HTML blocks.
- You can only have one smart rule live at a time, per block, however you can have an unlimited number of rules scheduled in the future.
Article URL: https://help.instant.one/how-to-schedule-a-change-to-your-emails-with-instant-ai
Keywords:
## How does Audiences identify my website traffic?
Instant Audiences uses signals from your website to help your website to remember the identities of your opted-in shoppers for longer.
When a shopper identifies themselves using an email newsletter subscription form, a completed or partial checkout, or a log-in event, Instant Audiences takes note, and remembers the user for longer than traditional tools like Shopify, Klaviyo, or Google Analytics.
To do this, we leverage a combination of server-side, client-side, cross-device and advanced browser techniques to persistently track web traffic.
Our technology ensures that we are able to identify and track customers even when third party cookies are blocked, iOS/Apple restrictions are active, or when cache/cookies are cleared.
Article URL: https://help.instant.one/traffic-identification
Keywords:
## How to create a Custom Campaigns List in Instant Using Shopify Tags
Sometimes you may want to send a campaign to a very specific group of customers that were manually curated. This list won't be based on purchase behaviour or location, but based on a list you've curated yourself. Common examples include:
- Early access or VIP drops — customers who signed up for exclusive access to a new product or collection
- Birthday sale invites — a handpicked group opted into a birthday promotion
- Black Friday waitlists — customers who registered interest before a sale goes live
- Loyalty or rewards members — a tiered group you manage separately from your general subscriber base
- Event or conference attendees — people who signed up or attended an in-person event and opted in to hear from you
- Migration from another platform — an existing list in Klaviyo or another tool that you want to bring across to Instant
Instant Segments are built on dynamic queries, not static contact lists. This means you can't directly import a list of emails into a Segment. Instead, the way to target a specific group is to apply a Shopify tag to those customers, then build an Instant Segment that filters on that tag. Because Instant reads directly from Shopify, any customer with that tag will automatically be included in your Segment.
This article covers:
- How to bulk-apply a Shopify tag to an existing list (e.g. from Klaviyo)
- How to build an Instant Segment from a Shopify tag
- How to set up future list collection so it feeds directly into Instant
Option 1: When you already have a list (e.g. in Klaviyo)
If your customers are already tagged in Klaviyo or stored as a static list elsewhere, you can migrate them to a Shopify tag using a CSV import.
Step 1: Export your list from Klaviyo
- In Klaviyo, go to Lists & Segments
- Open the relevant list or segment
- Click Export → download as CSV
- You only need the Email column
Step 2: Prepare your Shopify import CSV
Shopify matches customer imports by email address, so you can update existing customers without overwriting their data. Create a CSV with the following columns:
Email, Tags
customer@example.com, vip-sale
another@example.com, vip-sale
Tip: Choose a specific tag name (e.g. vip-bday-sale) so it doesn't conflict with other tags your store uses.
Step 3: Import into Shopify
- In your Shopify Admin, go to Customers
- Click Import (top right)
- Upload your CSV and confirm
- Shopify will match records by email and apply the tag to existing customers
Note: If a customer exists in your Klaviyo list but not yet in Shopify, they'll be created as a new customer on import.
Step 4: Build your Instant Segment
- In Instant, go to Segments → Create Segment
- Add a filter: Shopify Tag → equals →
vip-bday-sale
- Save and name your Segment
You can now use this Segment as the audience for any Instant campaign.
Option 2: Building your list in Shopify from the start (Recommended)
If you're setting up a new campaign list (e.g. a VIP waitlist, early access sign-up, or event registration) the best approach is to capture it directly in Shopify rather than a third-party tool.
Here's why this works well: any sign-up form, pop-up, or landing page you use to collect customers needs to be hosted somewhere, and that's almost always your Shopify store. Since Shopify is already holding that data, it makes sense to have the tag applied there at the point of sign-up. Instant reads from Shopify directly, so once the tag is in place, your Segment is live and automatically up to date. There won't be any exports, imports, and no manual list management.
How to set it up
- Create your sign-up form or landing page in Shopify using a form app or page builder that supports customer tagging on submission (e.g. Growave, a custom Shopify page, or your theme's built-in form tools)
- Configure it to apply a Shopify tag to every customer who submits — for example,
vip-bday-sale or black-friday-waitlist
- Build your Instant Segment with the filter: Shopify Tag = your-tag
As customers sign up, they're tagged in Shopify and immediately available in your Instant Segment. No extra steps needed.
Tip: If you're transitioning from Klaviyo and you've been using Klaviyo's list-specific sign-up forms for this, the Shopify form approach is the direct equivalent. You're just shifting where the sign-up lives so that Instant can read it natively.
FAQ
Can I just import a contact list directly into Instant? Not currently. Instant Segments are dynamic queries, so all audiences are built from real-time filters rather than static lists.
Can I use an Instant pop-up to collect a custom list (like a VIP sign-up)? Instant pop-ups are designed for new subscriber welcome flows — they aren't configurable for custom list sign-ups the way Klaviyo's list-specific forms are. For custom list collection, the Shopify-native approach (a form or app that applies a tag on submission) is the right substitute.
Can Klaviyo bulk-apply Shopify tags to contacts? Klaviyo manages its own tags independently of Shopify. To get contacts from Klaviyo into a Shopify tag, a CSV export/import (as described above) is the most reliable method.
What if some customers on my Klaviyo list don't have Shopify accounts? If a customer email from your Klaviyo export doesn't exist in Shopify, Shopify will create a new customer record for them on import. They'll then be eligible for your Instant Segment once they're identifiable (e.g. they click through an email or sign in).
Article URL: https://help.instant.one/how-to-create-a-custom-campaigns-list-in-instant-using-shopify-tags
Keywords:
## Creating a New Instant Site
Have stores across multiple regions? Own multiple brands? You can now create new sites easily from the Instant Dashboard.
🧩 Add a new site to your Instant account
If you operate multiple stores, you can add each one to Instant and manage them side-by-side. This keeps your data clean, lets you tailor integrations per site, and supports different billing arrangements without needing help from a member of our team.
With the Create New Site button, you can kick off onboarding for another site directly from your dashboard. Your user carries across so you don’t have to re-invite yourself, while the new site’s integrations, billing, and configuration are set up fresh.
How to add a new site
-
Open your profile menu.
Click your profile avatar (or initials) in the bottom left of your dashboard’s sidebar.
-
Click “Create new site.”
This starts the guided setup flow for the new site.
-
Complete integrations.
Connect the new site’s platforms (e.g., Shopify, Klaviyo). Use the credentials that correspond to this site only.
-
Set up billing.
Add or select a payment method for the new site. Billing is isolated per site unless your plan has consolidated invoicing.
-
Review and finish.
When you finish, you’ll land on the new site’s dashboard.
Tip: If you already have many sites, use the site switcher in the sidebar to jump between them at any time.
What gets copied vs. what’s fresh
When you create a new site, your user (name, email, and phone number) comes with you so you can manage setup immediately. Everything else — integrations, lists/segments, flows/automations, web pixel, DNS, and billing — ****is intentionally not copied.
If you need parity with an existing site, treat the existing setup as a reference and re-create only what’s relevant.
Data separation and reporting
Each site maintains its own event stream, deliverability reputation, and revenue attribution. Dashboards, LTV metrics, and campaign performance reflect only activity from that site. This separation minimises the risk of over-attributing performance to the wrong brand or skewing results across brands.
FAQs
Does adding a site affect my existing sites?
No. Sites are isolated. Existing campaigns, flows, and analytics remain untouched.
Can I copy flows/templates from another site?
This is unsupported right now.
Who can see the new site?
Only users with access to that site. After setup, invite additional teammates from Settings → Users within the new site.
Can I consolidate billing across multiple sites?
Each site bills separately by default. You can reach out to our team for consolidated billing.
Article URL: https://help.instant.one/creating-a-new-instant-site
Keywords:
## Audience Profiles & Events
User Profiles
Once Instant Audiences has been set up, it begins the tracking of profiles and user activity. We use this activity to match and identify the anonymous shoppers as they interact with your storefront.
If Instant Audiences is able to identify a user through their interactions, a profile is created or updated within your email service provider. This user profile will record all the tracked activities associated with that specific user.
All profiles identified by Instant Audiences are then tagged with a custom property within your email service provider. This ensures that you have a comprehensive overview of all your customers' interactions and allows you to track all of the profiles we have provided to you.
The 'Instant Audiences Tags' custom property has the following options:
- 'Net New': New contacts identified and created by Instant Audiences
- 'All': All identified profiles, including existing subscribers
Events (Metrics)
Instant Audiences monitors a range of user events, including the following:
- Collection Viewed: Tracks when a user views a specific collection of products.
- Product Viewed: Record when a user views a specific product or service.
- Add to Cart: The user adds item(s) to their shopping cart.
- Cart Viewed/ Checkout Started: Monitors visits and initiation of the checkout.
.png)
Article URL: https://help.instant.one/audience-email-contacts
Keywords:
## How does Instant handle BigCommerce order statuses?
Our native BigCommerce integration provides a comprehensive, end to end integration into the BigCommerce order management system, including order statuses.
Upon placement of an order through Instant Checkout,
- an order is created in BigCommerce in an incomplete, Pending status, and,
- payment from the cardholder for the amount due is authorized.
You can see all Pending orders under Orders > View > Incomplete. Please refer to the screenshots below for examples.
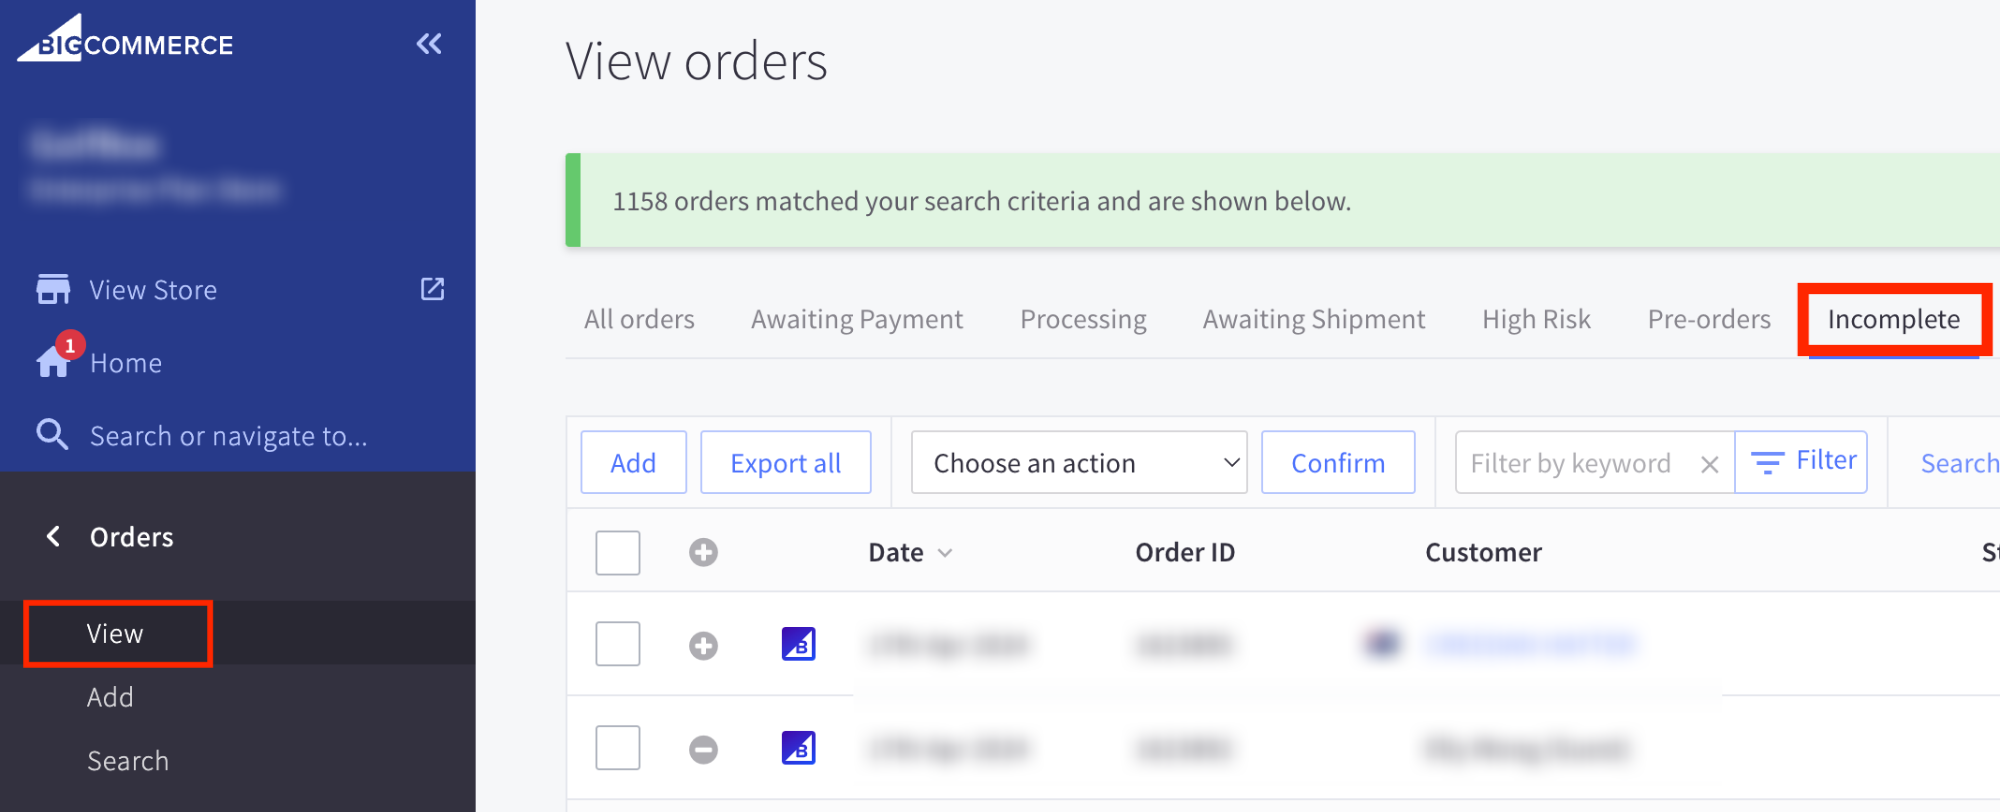 The above screenshot shows where Incomplete orders can be found in BigCommerce.
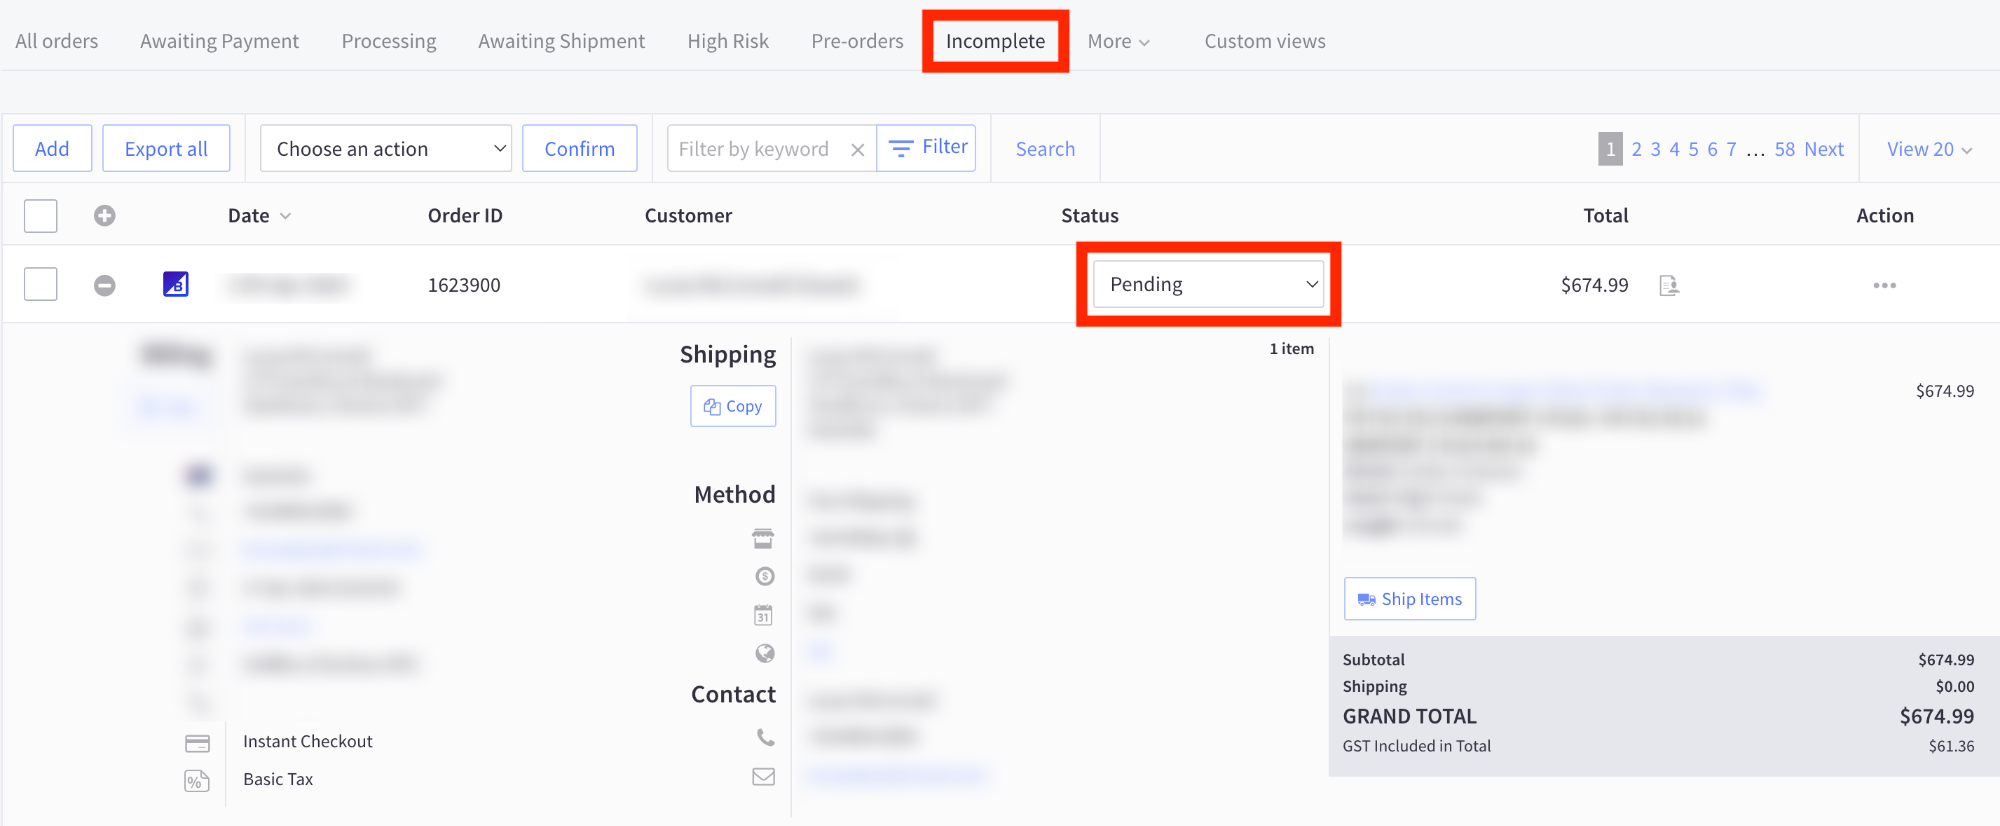
The above screenshot is an example of an incomplete order in BigCommerce.
By default, Instant Checkout gives customers a 5 minute window after placing their order, in which they can cancel their order.
This window enables a customer to cancel if they wish to change their mind, add/remove items, modify shipping etc, significantly reducing support requests. This window is customisable.
Once the 5 minute window is complete and the customer does not cancel their order, Instant Checkout will:
- capture payment from the cardholder, and
- set the status of the BigCommerce order to Awaiting Fulfillment
- It is important to note that some merchants customise the name of this status, e.g. Processing.
-png-1.png)
The above screenshot shows an Instant order with the status of Awaiting Fulfillment. These orders are available under Orders > All orders.
The Awaiting Fulfilment status (or equivalent status) indicates that the order has been processed successfully, cannot be cancelled by the customer and payment has been captured in full.
Once an order is ready to be fulfilled, Instant does not modify the BigCommerce order status any further.
Article URL: https://help.instant.one/bigcommerce-order-status
Keywords:
## Personalisation Elements
Release Date: May 16 2023
What is it?
This element is a personalised experience that appears at the checkout for existing Instant users. This means they have shopped with you or another Instant merchant before.
By welcoming back your current customers, or even customers who have used Instant elsewhere, we increase the chances of converting the sale by 31%.
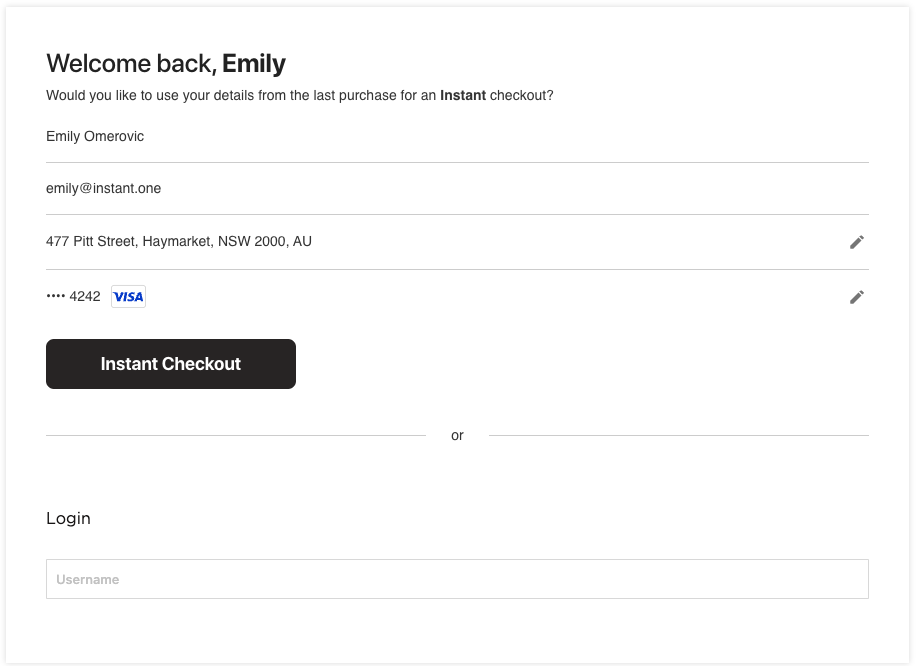
Why did we make it?
We wanted to capture shoppers at their moment of highest intent by removing the friction of inputting data in a typical checkout process. We have seen consistently that the more informed a buyer is about the product and their capacity to buy it, the more likely they are to capitalise on that intent.
So we created a smooth, personalised experience for repeat customers by showing users their previous checkout information, such as email, address and a preview of payment information - with the option to update it of course!
The Results
A significant increase in engagement.
We analysed the effectiveness across our major retailers over a comparison period.
We found a 31% increase in repeat customers.
FAQ
Who will see this feature?
This feature is only available to a logged in, existing user of Instant. The feature shows at the generic checkout page.
How does Instant know the personal details?
Instant securely remembers checkout information, such as email, address and a preview of payment information from the customers previous purchases.
How does Instant keep the credit card numbers secure?
All card numbers are tokenised, which means that we do not store your actual credit card details Read more on How Instant keeps information secure.
What happens when the user presses the 'Instant Checkout' button?
The user will enter the same One-Step checkout process as a regular logged-in Instant user. They will be presented with the order confirmation screen which will give the option to update the details, change the shipping option, add a promo code and confirm or cancel the order.
See the walk through of the user experience here.
Can I customise/remove the banner?
Any changes will need to be made by Instant. Please reach out to us help@instant.one to discuss any feedback/ changes.
Article URL: https://help.instant.one/personalisation
Keywords:
## How to customise your attribution window
Instant uses a 5-day open/click window for email and a 1-day click window for SMS by default. If you need to align with a different standard, to match your Klaviyo setup or other reason, you can configure this in your settings.
See our video walkthrough for a step by step of how to find it, and what to expect when changing your attribution window.
How it works
Email and SMS attribution windows are configured separately. For each channel, you set:
- How many days after an open a purchase should be attributed (email only — SMS does not track opens)
- How many days after a click a purchase should be attributed
- For SMS: whether to attribute on delivery or click
Setting either value to 0 disables that interaction type for attribution. For example, setting open days to 0 and click days to 1 gives you a 1-day click-only model. Our default attribution settings are as below
| Channel |
Open |
Click |
| Email |
5 days |
5 days |
| SMS |
N/A |
1 day |
Step by step
- Go to Settings > Email Settings > Preferences
- Scroll to Attribution window
- For Email, select Custom from the dropdown
- Set your open window and click window in days
- For SMS, select Default or Custom and configure accordingly
- Click Save Changes
Your dashboard and flow analytics will update immediately to reflect the new window — across all historical data.
What happens when you change your window
Changes apply retroactively and immediately across your entire dashboard. Every attributed conversion, including historical ones, is recalculated using your new settings. You don't need to wait for new data to come in.
This is intentional. It lets you compare what the same period of performance looks like under different attribution models, without waiting.
Tip: If you change your window, your total attributed revenue will change. A shorter or stricter window will show less attributed revenue. This does not mean Instant was overcounting before, it means fewer conversions fall within the tighter window. The underlying conversion events are the same.
When should I change my attribution window?
Most merchants should leave this on the default setting. The 5-day open/click email model is standard, defensible, and directly comparable to Klaviyo's default.
Reasons you might change it:
You're running Klaviyo with a custom attribution window If your Klaviyo account is already on a non-default window (e.g. 3-day click only), matching Instant to that window gives you a like-for-like comparison.
Your brand or business has a short purchase cycle High-frequency or low-consideration products sometimes convert within hours of an email. A tighter window may better reflect actual email influence for your store. For example, a same-day gift delivery service.
You have a click-only policy Some brands exclude open attribution entirely, treating click-through as a higher-confidence signal of intent. Set your open window to 0 to achieve this.
You're evaluating Instant against another platform Match both platforms to the same window before drawing conclusions. A comparison across different windows doesn't tell you which platform performs better.
Article URL: https://help.instant.one/how-to-customise-your-attribution-window
Keywords:
## Installing Instant on Big Commerce
This guide is also relevant for headless.
Installation
Installing Instant onto your BigCommerce store is easy.
First, ensure you are logged into your BigCommerce store by visiting: https://login.bigcommerce.com.
Navigate to our App; https://www.bigcommerce.com/apps/instant-checkout/ and click the Get This App button to install Instant onto your BigCommerce store:
.png)
You will be prompted to confirm the app’s installation:
.png)
Activation
After you have pressed Confirm, you should be greeted with the following screen that will allow you to activate your plugin:
.png)
Simply enter your email into the provided field and then press Complete Integration. You will not be able to click the button until a valid email has been entered.
⚠️ Be sure to tick “Is this a staging website?” if you are running in a test environment.
On successful activation you should then see this screen:
.png)
Click on the blue underlined text to then proceed to complete the rest of the onboarding (see “Going Live” section below).
If you encountered any issues while installing or activating, please don’t hesitate to get in touch with our support team at help@instant.one.
Article URL: https://help.instant.one/install-on-big-commerce
Keywords: BIGCOMMERCE
## Invite team members to access your Instant dashboard
To invite members to your Instant dashboard, navigate to Users → Invite Users
To add a new user:
- Navigate to the Instant Dashboard and log in.
- Once logged in, go to the Users section in the side navigation menu.
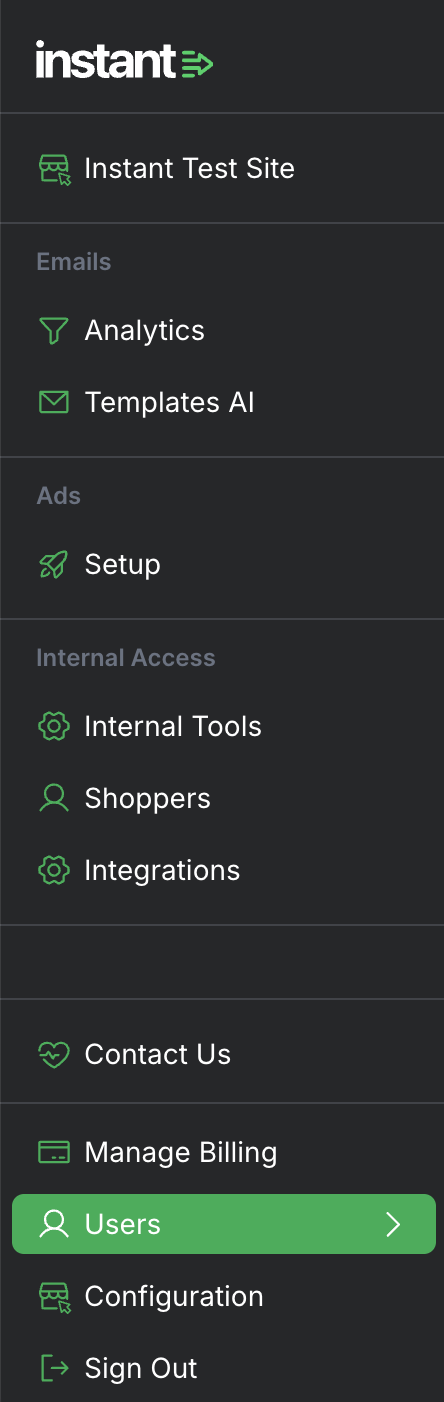
- Click on the Invite User button.
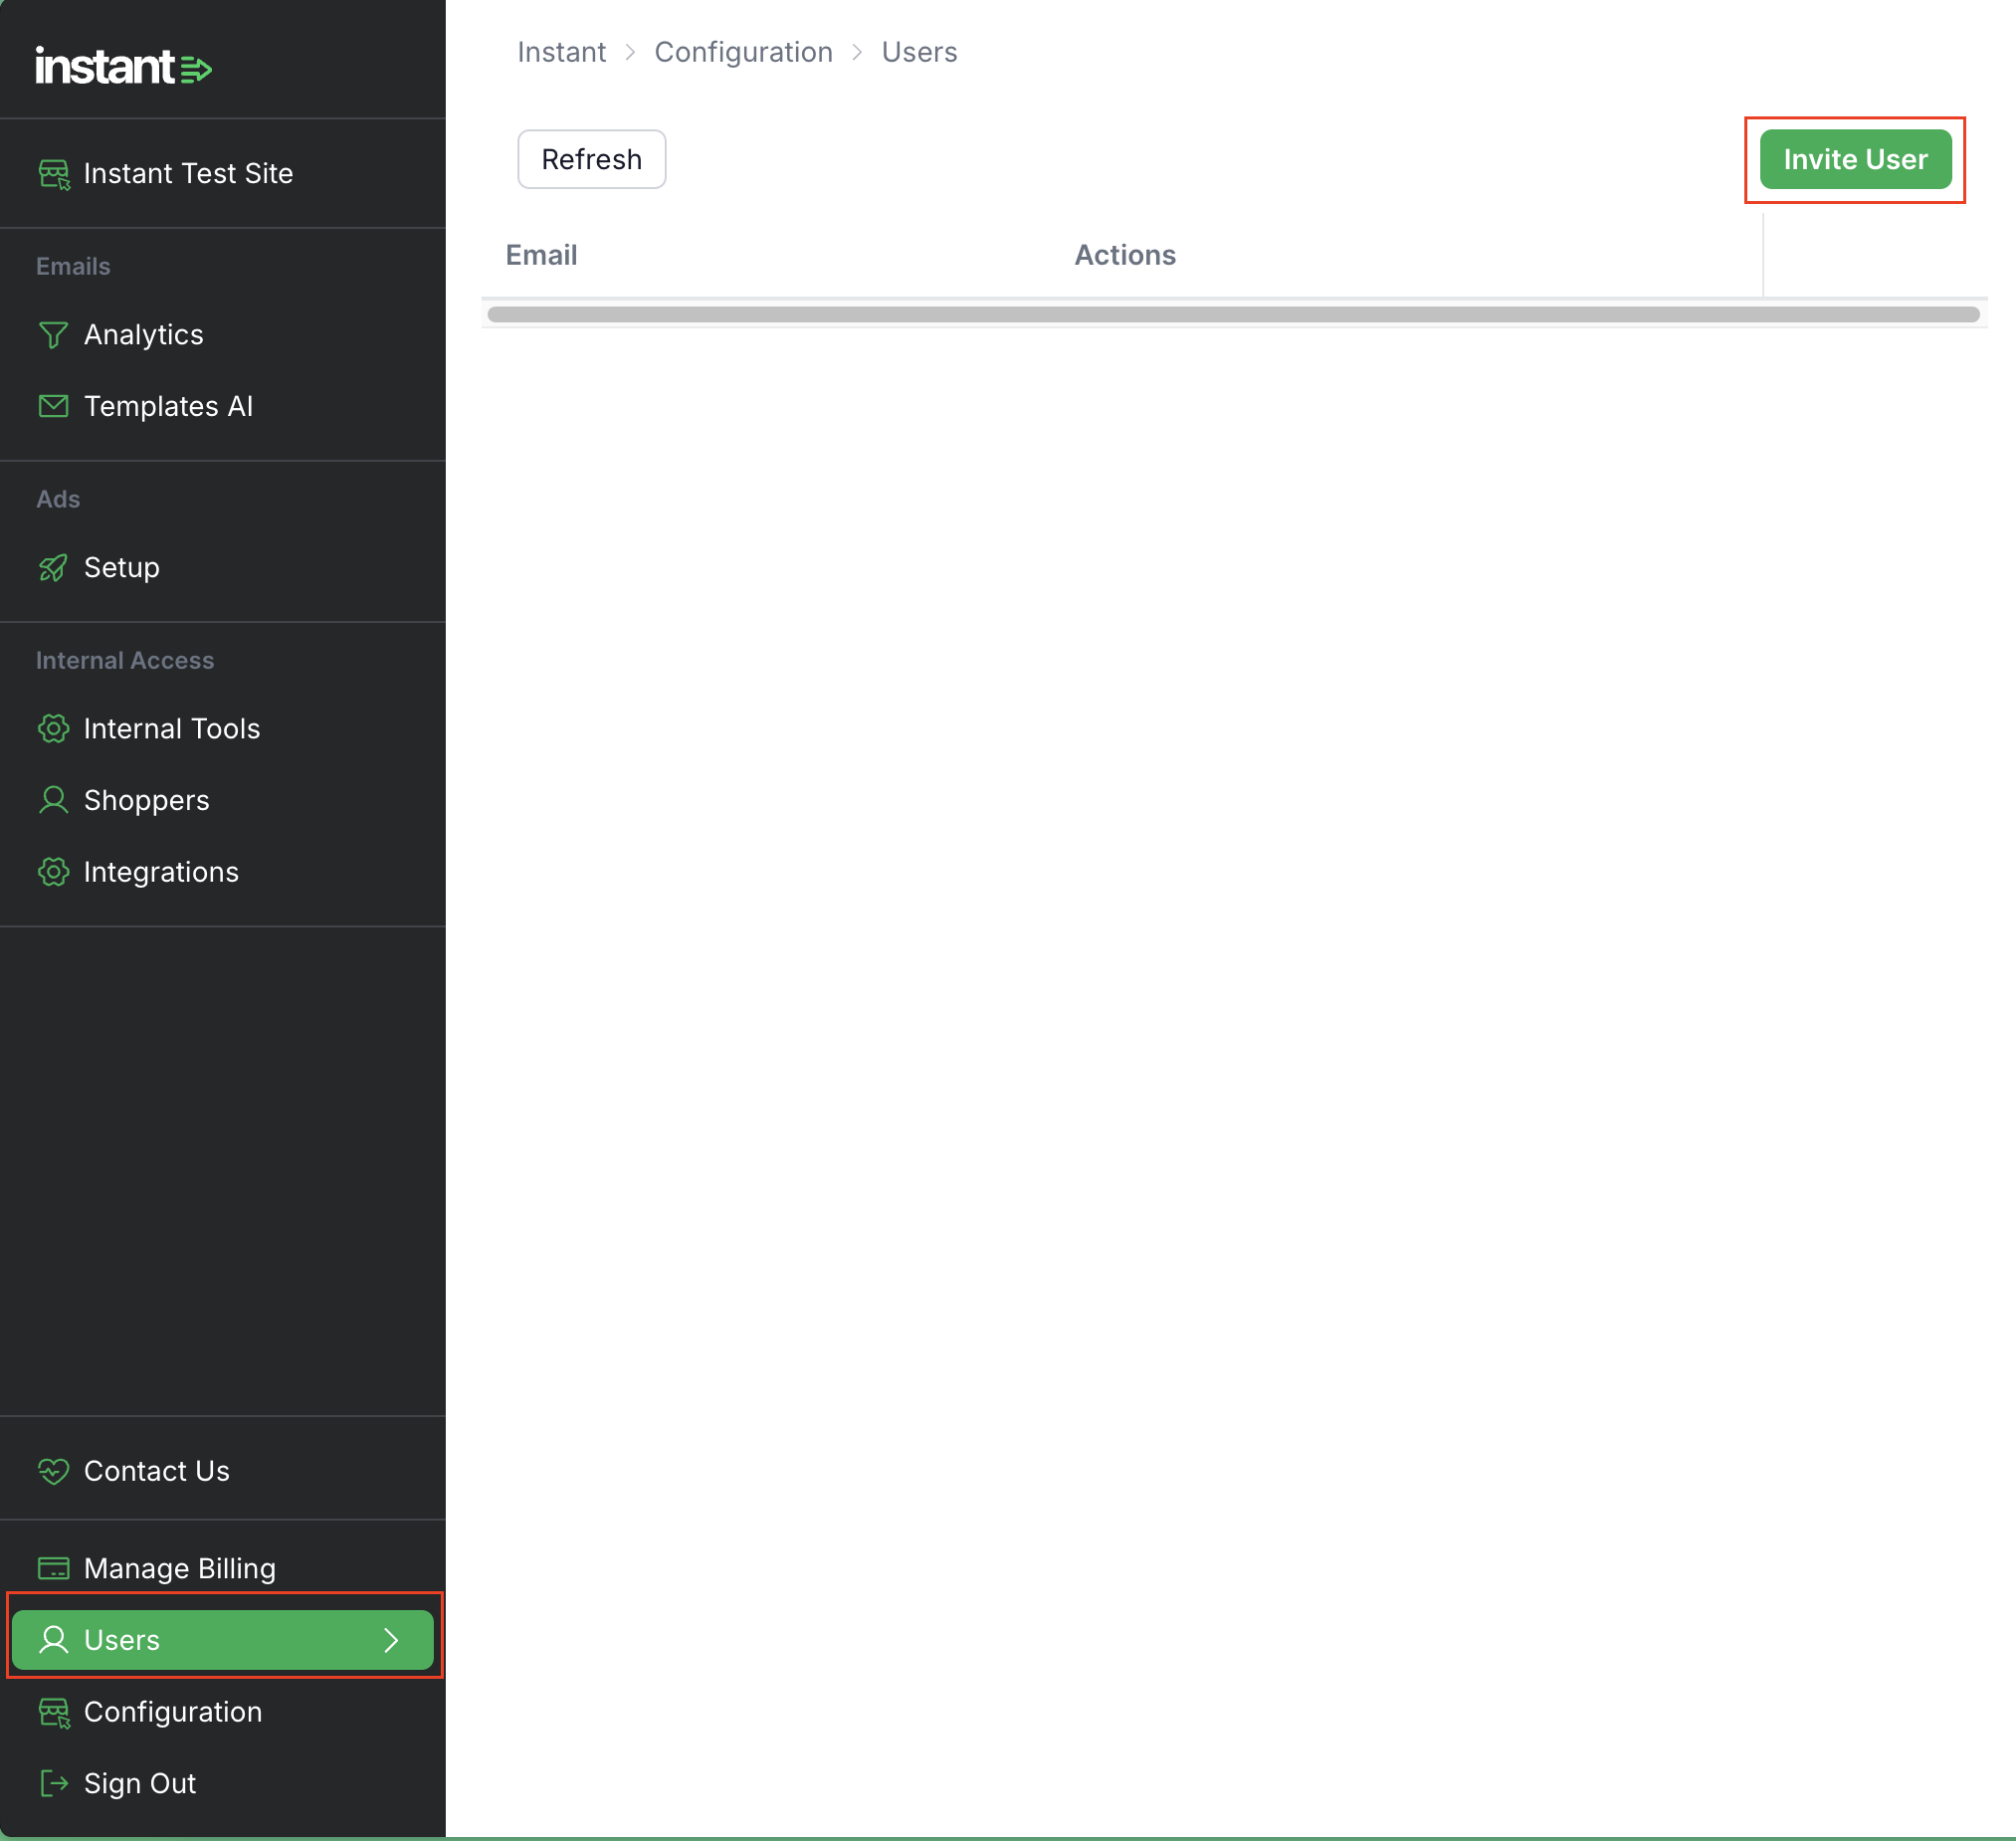
-
Enter User Details
In the pop-up window, enter the email address of the new user and select the appropriate permissions for their account. Once you have set their permissions, click Send Invite.
.png)
- An invitation will be sent to the new user's email address
-
The new user will receive an invitation email. They should click the Join button in the email to begin the process.
- After clicking Join, the user will be directed to the login page. Note that there is no sign-up option on this page. The user can log in using their email address and a One-Time Password (OTP) sent to their email.
Article URL: https://help.instant.one/invite-members
Keywords:
## How to manage UTM Tracking in external platforms with Instant AI
Instant AI automatically appends UTM parameters to every link in your flows and campaigns. These UTMs allow external analytics tools (Shopify, GA4, Triple Whale, etc.) to classify traffic correctly.
Each platform uses a different attribution model, it’s important to understand how UTMs behave in Shopify and what conditions must be met for accurate tracking.
Below is a quick reference of the UTMs we include, followed by the key checks you should make before using external platforms to analyse Instant AI performance.
| UTM |
What It Means |
| utm_source=instantai |
The visit came from Instant AI. |
| utm_medium=email |
The visitor clicked through an email. |
| utm_campaign=ABANDONED_CART |
Identifies the flow or campaign that sent the email. Flow examples include ABANDONED_CART, WELCOME, PRICE_DROP, BROWSE, etc.
For Campaign emails, the campaign field will be
campaignName#touchpoint |
| utm_id=marketingFlow_123abc456def |
A unique identifier tied to the specific flow and event |
Example URL:
https://yourstore.com/products/example-product?_ix=abc123&utm_source=instantai&utm_medium=email&utm_campaign=ABANDONED_CART&utm_id=marketingFlow_123abc456def
Technical Requirements for Accurate UTM Tracking and Attribution
The following conditions directly determine how UTMs appear in Shopify, GA4, and other external reporting tools. These are not recommendations — they are the technical factors that govern how attribution works.
1. How URL Type Affects UTM Preservation
Shopify treats storefront URLs and checkout URLs differently. When a shopper is dropped directly into checkout, Shopify may remove UTM parameters during the redirect process, meaning external reporting tools never receive the tracking information identifying the click as email traffic.
This can cause the purchase to be classified under Direct, Organic, or Paid. Storefront URLs, despite coming from your email provider. If your Abandoned Cart or Abandoned Checkout flows link directly to checkout, contact your CSM or help@instant.one to confirm these flows are configured to use storefront URLs where required. Preserving UTMs at the link level is the first dependency for consistent attribution in Shopify and GA4.
You can read more about this behaviour here:
Why Might Instant Be Underperforming in Reporting Tools That Rely on UTMs?
2. How External Analytics Tools Attribute Traffic
Most external analytics platforms, including Shopify, GA4, use session-based attribution. This model assigns revenue to the channel associated with the final tracked interaction within the purchase session. Because attribution is tied to sessions rather than individuals, several predictable behaviours occur:
- The latest interaction is prioritised over the email click
If a shopper clicks an email but later engages with a paid ad, organic search result, or social link, the final click replaces the earlier email touchpoint.
- A new session resets attribution.
If the shopper returns after a session timeout, reopens the site in a new tab, or resumes activity the next day, the original email click is no longer linked to the conversion. The tool often reclassifies the visit as Direct by default.
- Device switching breaks continuity.
If the shopper opens the email on mobile but completes the purchase on desktop or tablet, the analytics platform sees these as different users. Email influence is lost unless the shopper is logged in (which is rare for most stores).
Does the platform that you're using matter?
Shopify is the strictest example of this behaviour. Shopify attribution depends entirely on the continuity of a single browser session and a single last click. It performs no multi-touch modelling, no assisted conversion logic, and no meaningful identity stitching across sessions or devices. When a session restarts, Shopify drops all previous context and reassigns attribution based solely on the new visit. GA4 has a more flexible attribution engine and can use alternative attribution frameworks beyond strict last-click. These mechanisms allow GA4 to preserve some influence that Shopify cannot, though GA4 still loses attribution frequently in cross-device or multi-session journeys.
As a result, you may find that Shopify, GA4, and similar platforms routinely attribute less revenue to email. It's important to understand this isn't necessarily because the email underperformed, but can be due to a number of factors where the model cannot see the full picture through identity-based attribution.
3. Why ESPs Capture Influence External Tools Cannot See
Email platforms use identity-based attribution, meaning every open, click, and purchase is tied back to a known subscriber’s email address. Because this attribution is built on a persistent identity, the ESP can recognise the same shopper across different devices, sessions, and touchpoints. This enables the ESP to continue attributing influence even when the shopper takes a longer or more complex path to purchase.
External analytics tools (Shopify, GA4, Triple Whale) do not track identity using email addresses. They rely on browser sessions, cookies, device IDs, or Google Signals, which means they treat each session, and in many cases each device, as a separate user. If the shopper changes devices, returns in a new session, or interacts with other channels before converting, these tools have no mechanism to link that behaviour back to the original email.
Because ESPs track identity, not just sessions, they can attribute a purchase even if the shopper only opened the email and didn’t click it. They can also attribute based on influence over a longer window (e.g., 5-day open/click influence) instead of requiring the conversion to happen in the same browser session. This is common in emails where a customer journey needs to be nurtured over a multi-day flow.
4. Why Conversions Don’t Always Come From a Clicked Link
UTM-based reporting only tracks conversions that begin with a recorded click, but many purchases influenced by email do not start this way. A shopper may read an email, absorb the content, and return later through Direct, Organic Search, or another channel without ever clicking a link in the email. In these cases, the email still shaped the purchase decision, but because no tracked click occurred, external analytics tools cannot attribute the visit to email.
Email design plays a significant role in whether UTMs are captured. Emails focused on storytelling, education, social proof, product highlights, or general brand reinforcement often drive intent rather than clicks. These emails influence the shopper’s decision-making, but do not always prompt a direct click to the site. In contrast, emails engineered around click-heavy CTAs (e.g., “redeem your offer” or “shop now”) naturally generate more UTM-tagged sessions simply because they require a click to proceed.
Because UTMs only measure click-driven activity, they capture just one portion of email influence. A low UTM count does not indicate weak performance, it reflects how the shopper interacted with the email, how the email was designed, and whether the conversion journey required a click at all. Many high-performing emails drive revenue through influence rather than direct click-through behaviour, especially in multi-touch or multi-day customer journeys.
Understanding these differences in link behaviour, session attribution, identity tracking, and click dynamics explains why external reporting tools often show lower email-attributed revenue than ESP dashboards.
These discrepancies reflect how each platform measures attribution, not the performance of the emails themselves. If accurate UTM tracking is important for your reporting setup, contact your CSM or help@instant.one to ensure your flows are configured to preserve UTMs across all entry points.
Article URL: https://help.instant.one/understanding-utm-with-instant-ai
Keywords: utm
## How do I determine my abandonment flow revenue?
Based on your abandonment flow revenue, our team can estimate how much revenue you can expect to gain from Instant.
The easiest way to let our team know your abandonment flow revenue is to send us a screenshot of your active flows for the past month.
- In the sidebar of your Klaviyo dashboard, select Flows.
- Set metric time period to last 30 days.
- Set the status filter to live.
- Take and send us a screenshot of this entire page.
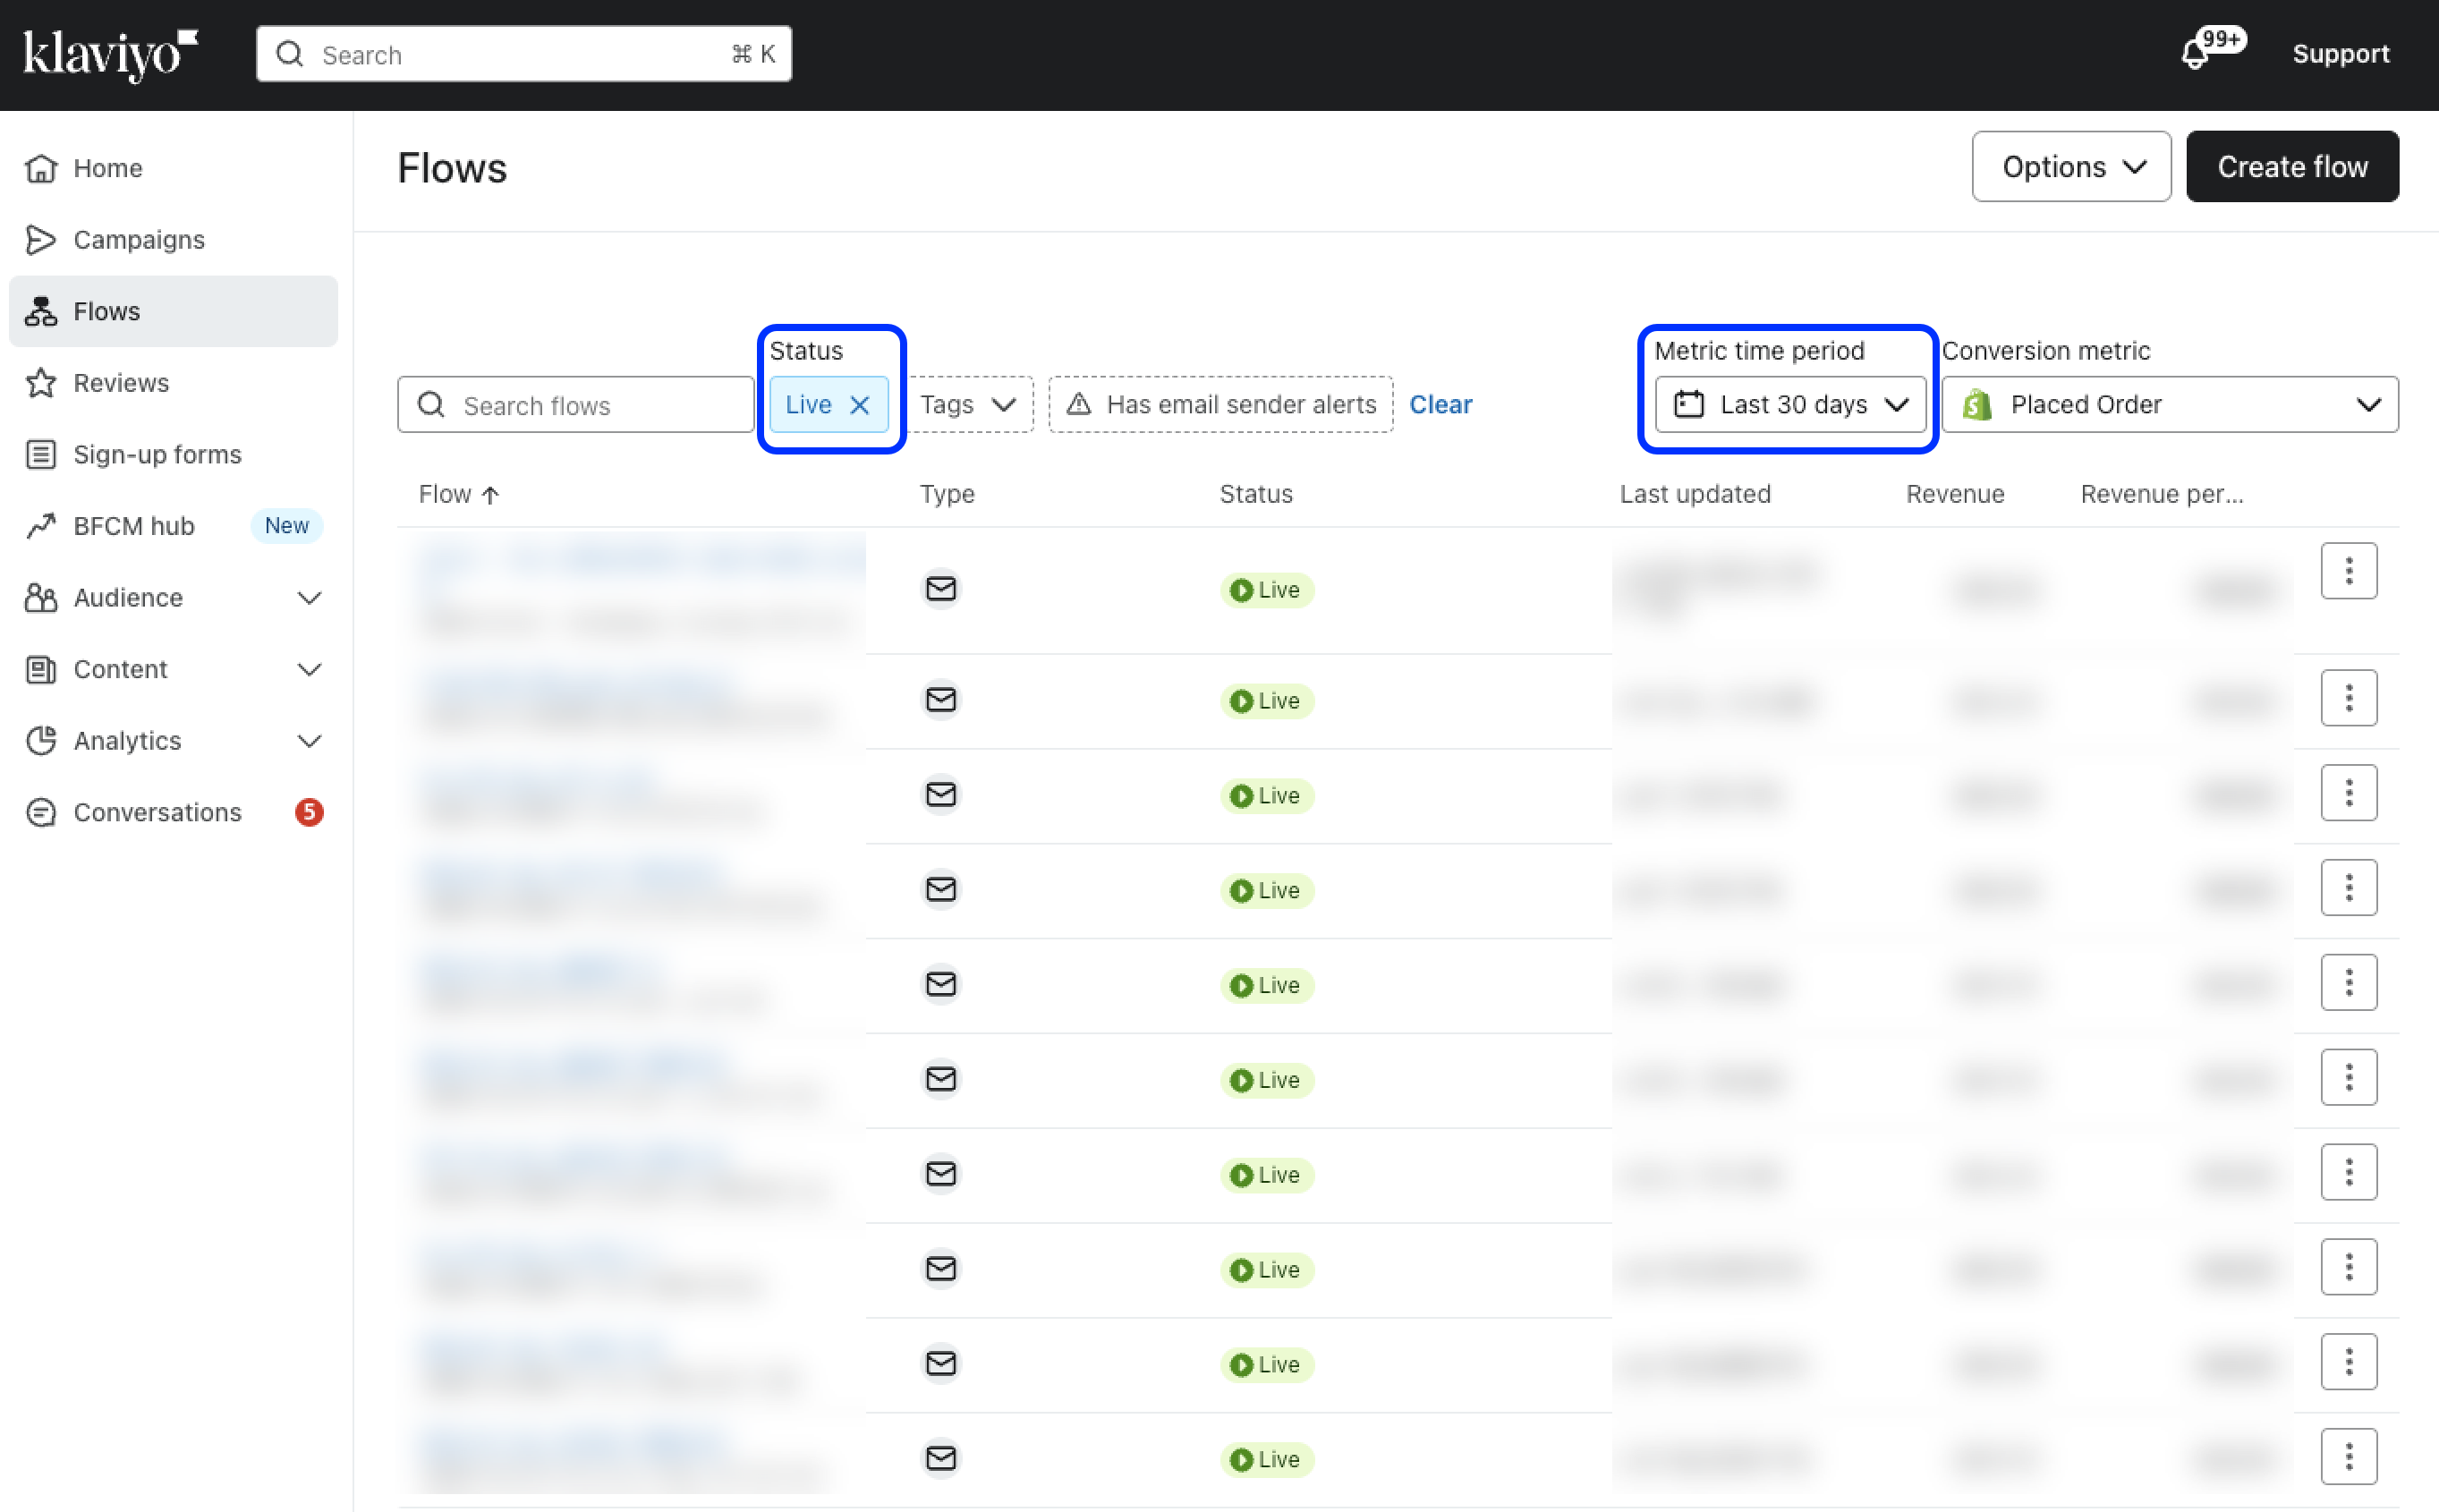
Detailed instructions for Klaviyo
Most accurate: total your abandonment flows for the latest calendar month
The most accurate way to calculate your abandonment flow revenue is to add up the revenue generated by each of your abandonment flows.
- In the sidebar of your Klaviyo dashboard, select Flows.
- Set metric time period to last 30 days.
- Add up the revenue column for each of your abandonment flows (i.e., browse, add to cart, cart, and checkout abandonment flows).
Easier, but less accurate: subtract your welcome flow from your total flow revenue
Many merchants earn the majority of their flow revenue from their welcome flow and their abandonment flows. These merchants can get a rough estimation of their abandonment flow revenue by simply subtracting their welcome flow from their total flow revenue.
- Flow revenue: in the homepage of your Klaviyo dashboard, find your flow revenue. This is located in the attributed revenue section of the business performance summary card.
- Welcome flow revenue: In the top performing flows card (or under view all flows), find the revenue attributed to your welcome flow.
If you're accessing this via the view all flows button, make sure your report is filtered to show the last 30 days.
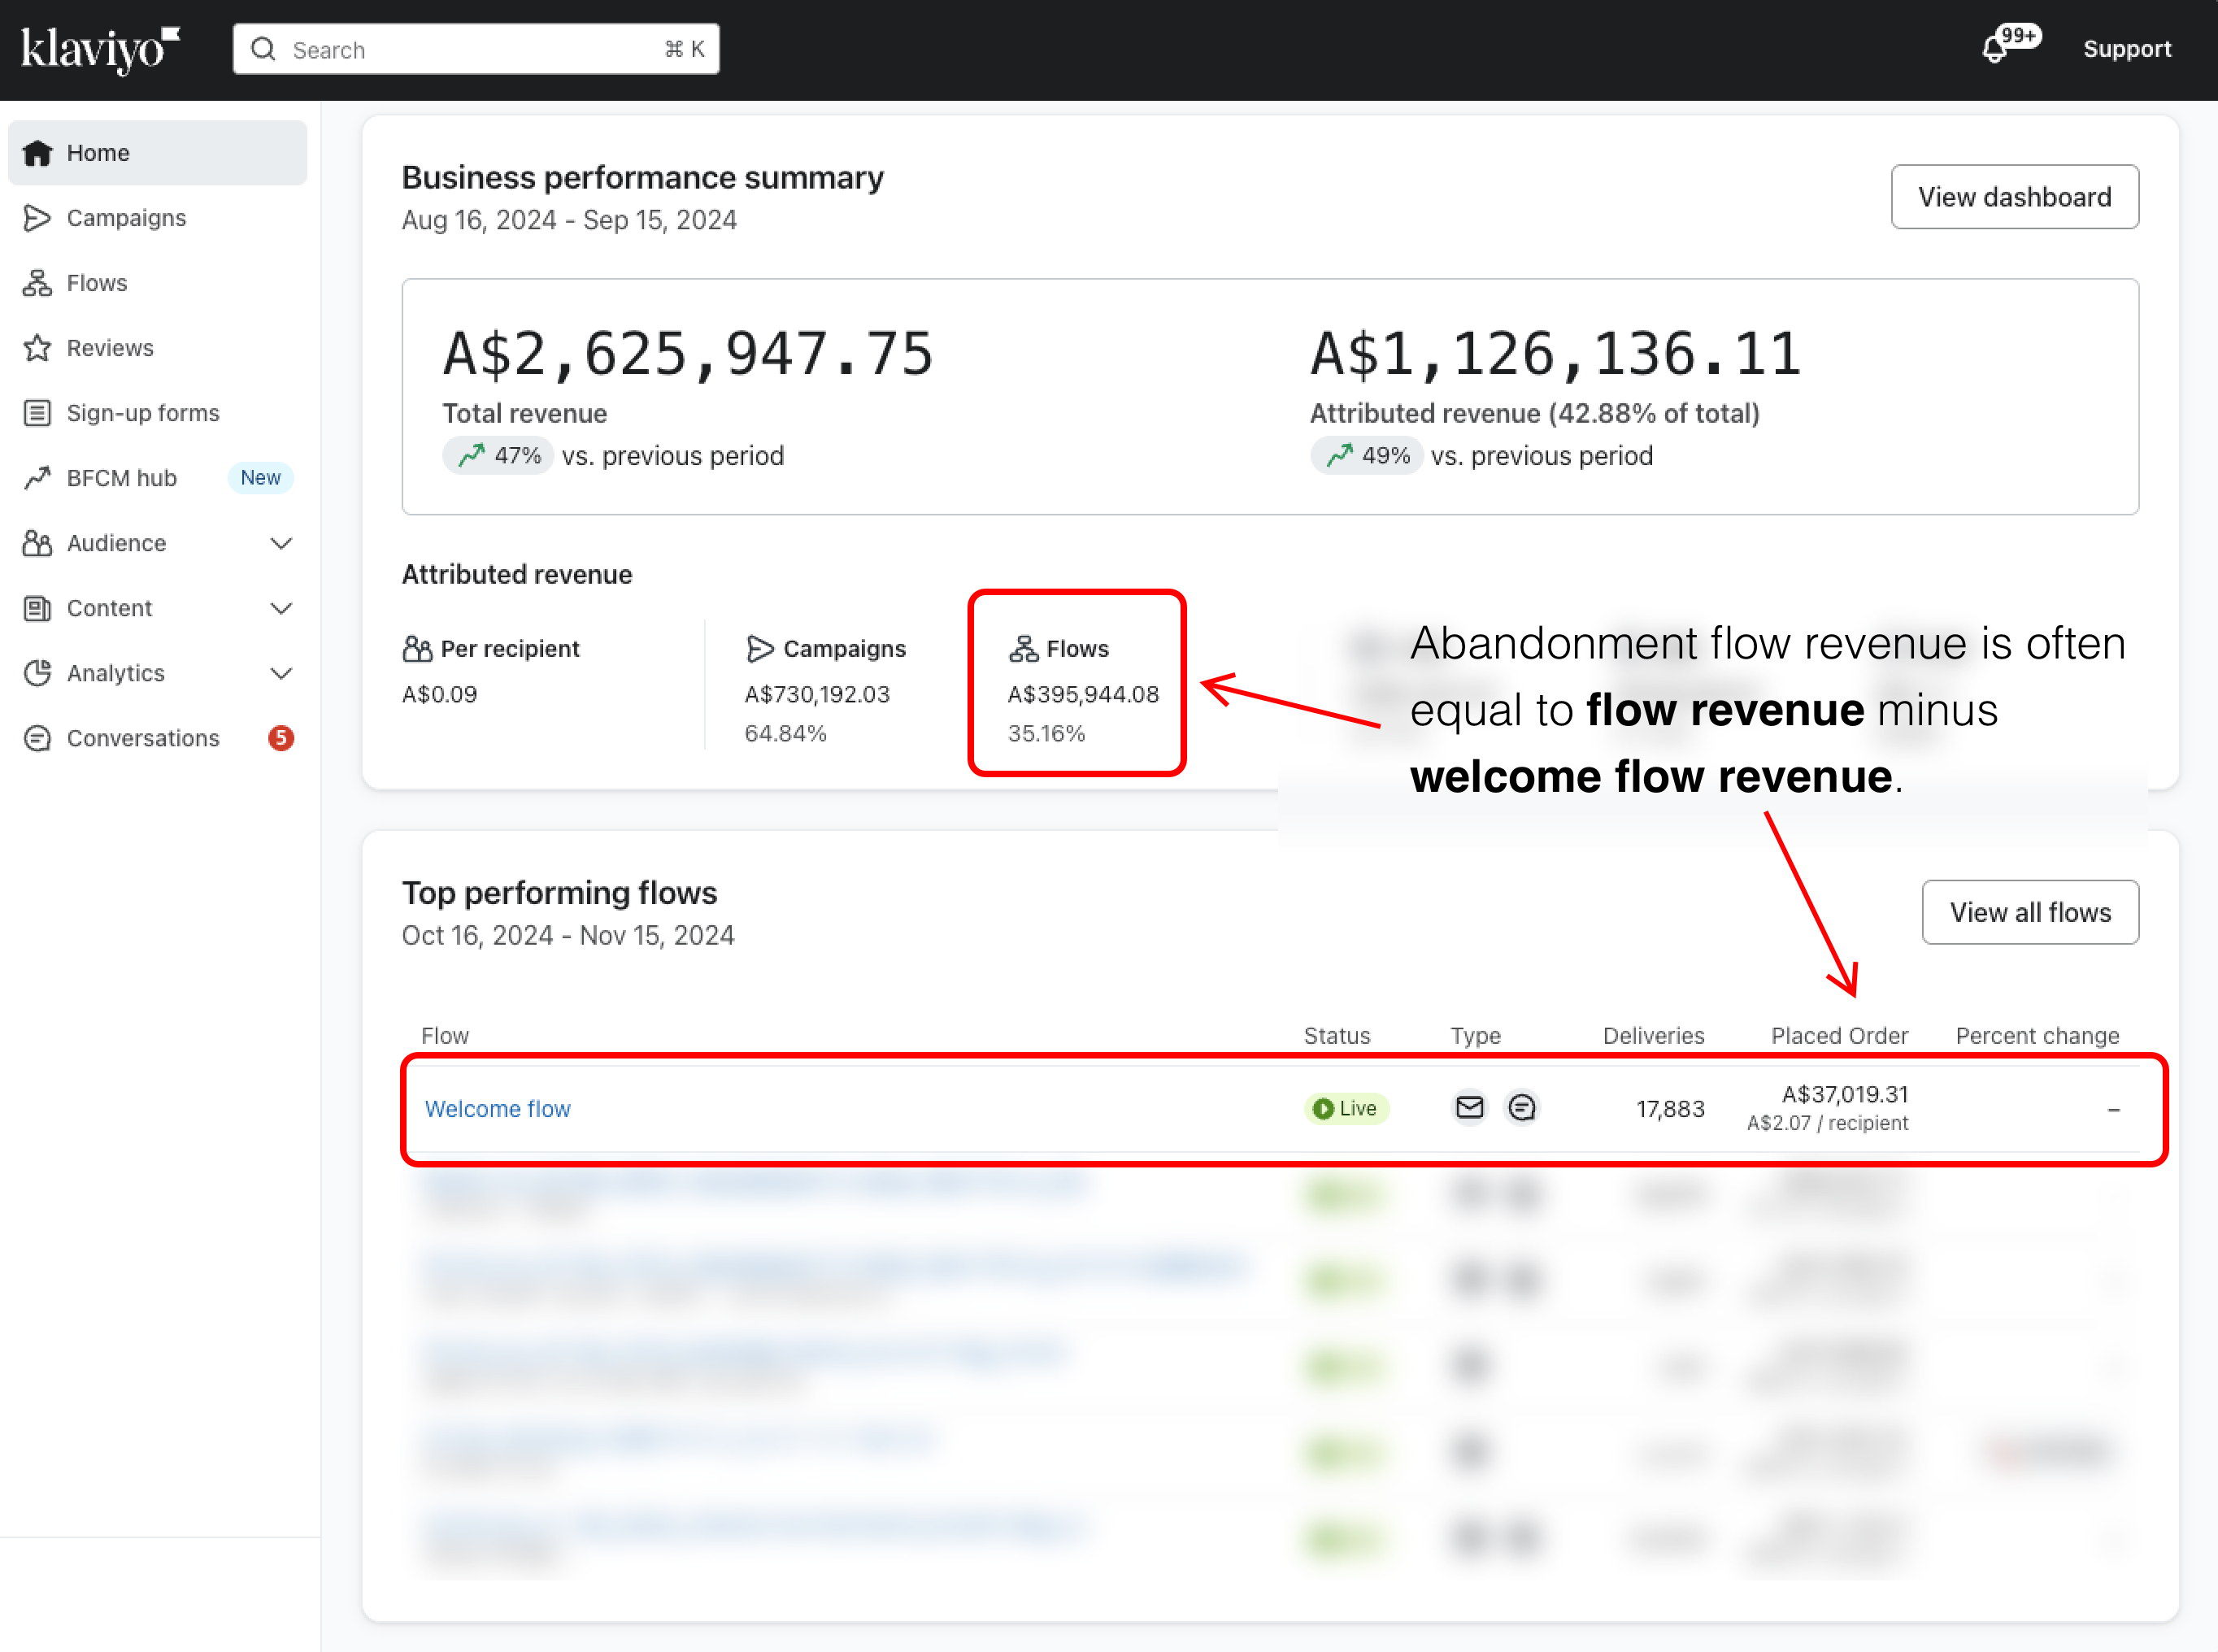
For most merchants, your abandonment flow revenue will be pretty close to your flow revenue, less your welcome flow revenue. If you tell our team both figures, we will do the subtraction for you.
Glossary of revenue terms for Klaviyo
- Total revenue: this is the total revenue for your website.
- Attributed revenue: this is ALL revenue attributed to Klaviyo (i.e., both revenue related to campaigns and revenue related to flows).
- Campaigns revenue: this is all revenue attributed to campaigns/EDMs/newsletters.
- Flows revenue: this is revenue attributed to flows/automations, including abandonment flows, welcome series, and any other flows you may have configured.
- Abandonment revenue: this is flow revenue attributed to your browse, add to cart, cart, and checkout abandonment flows.
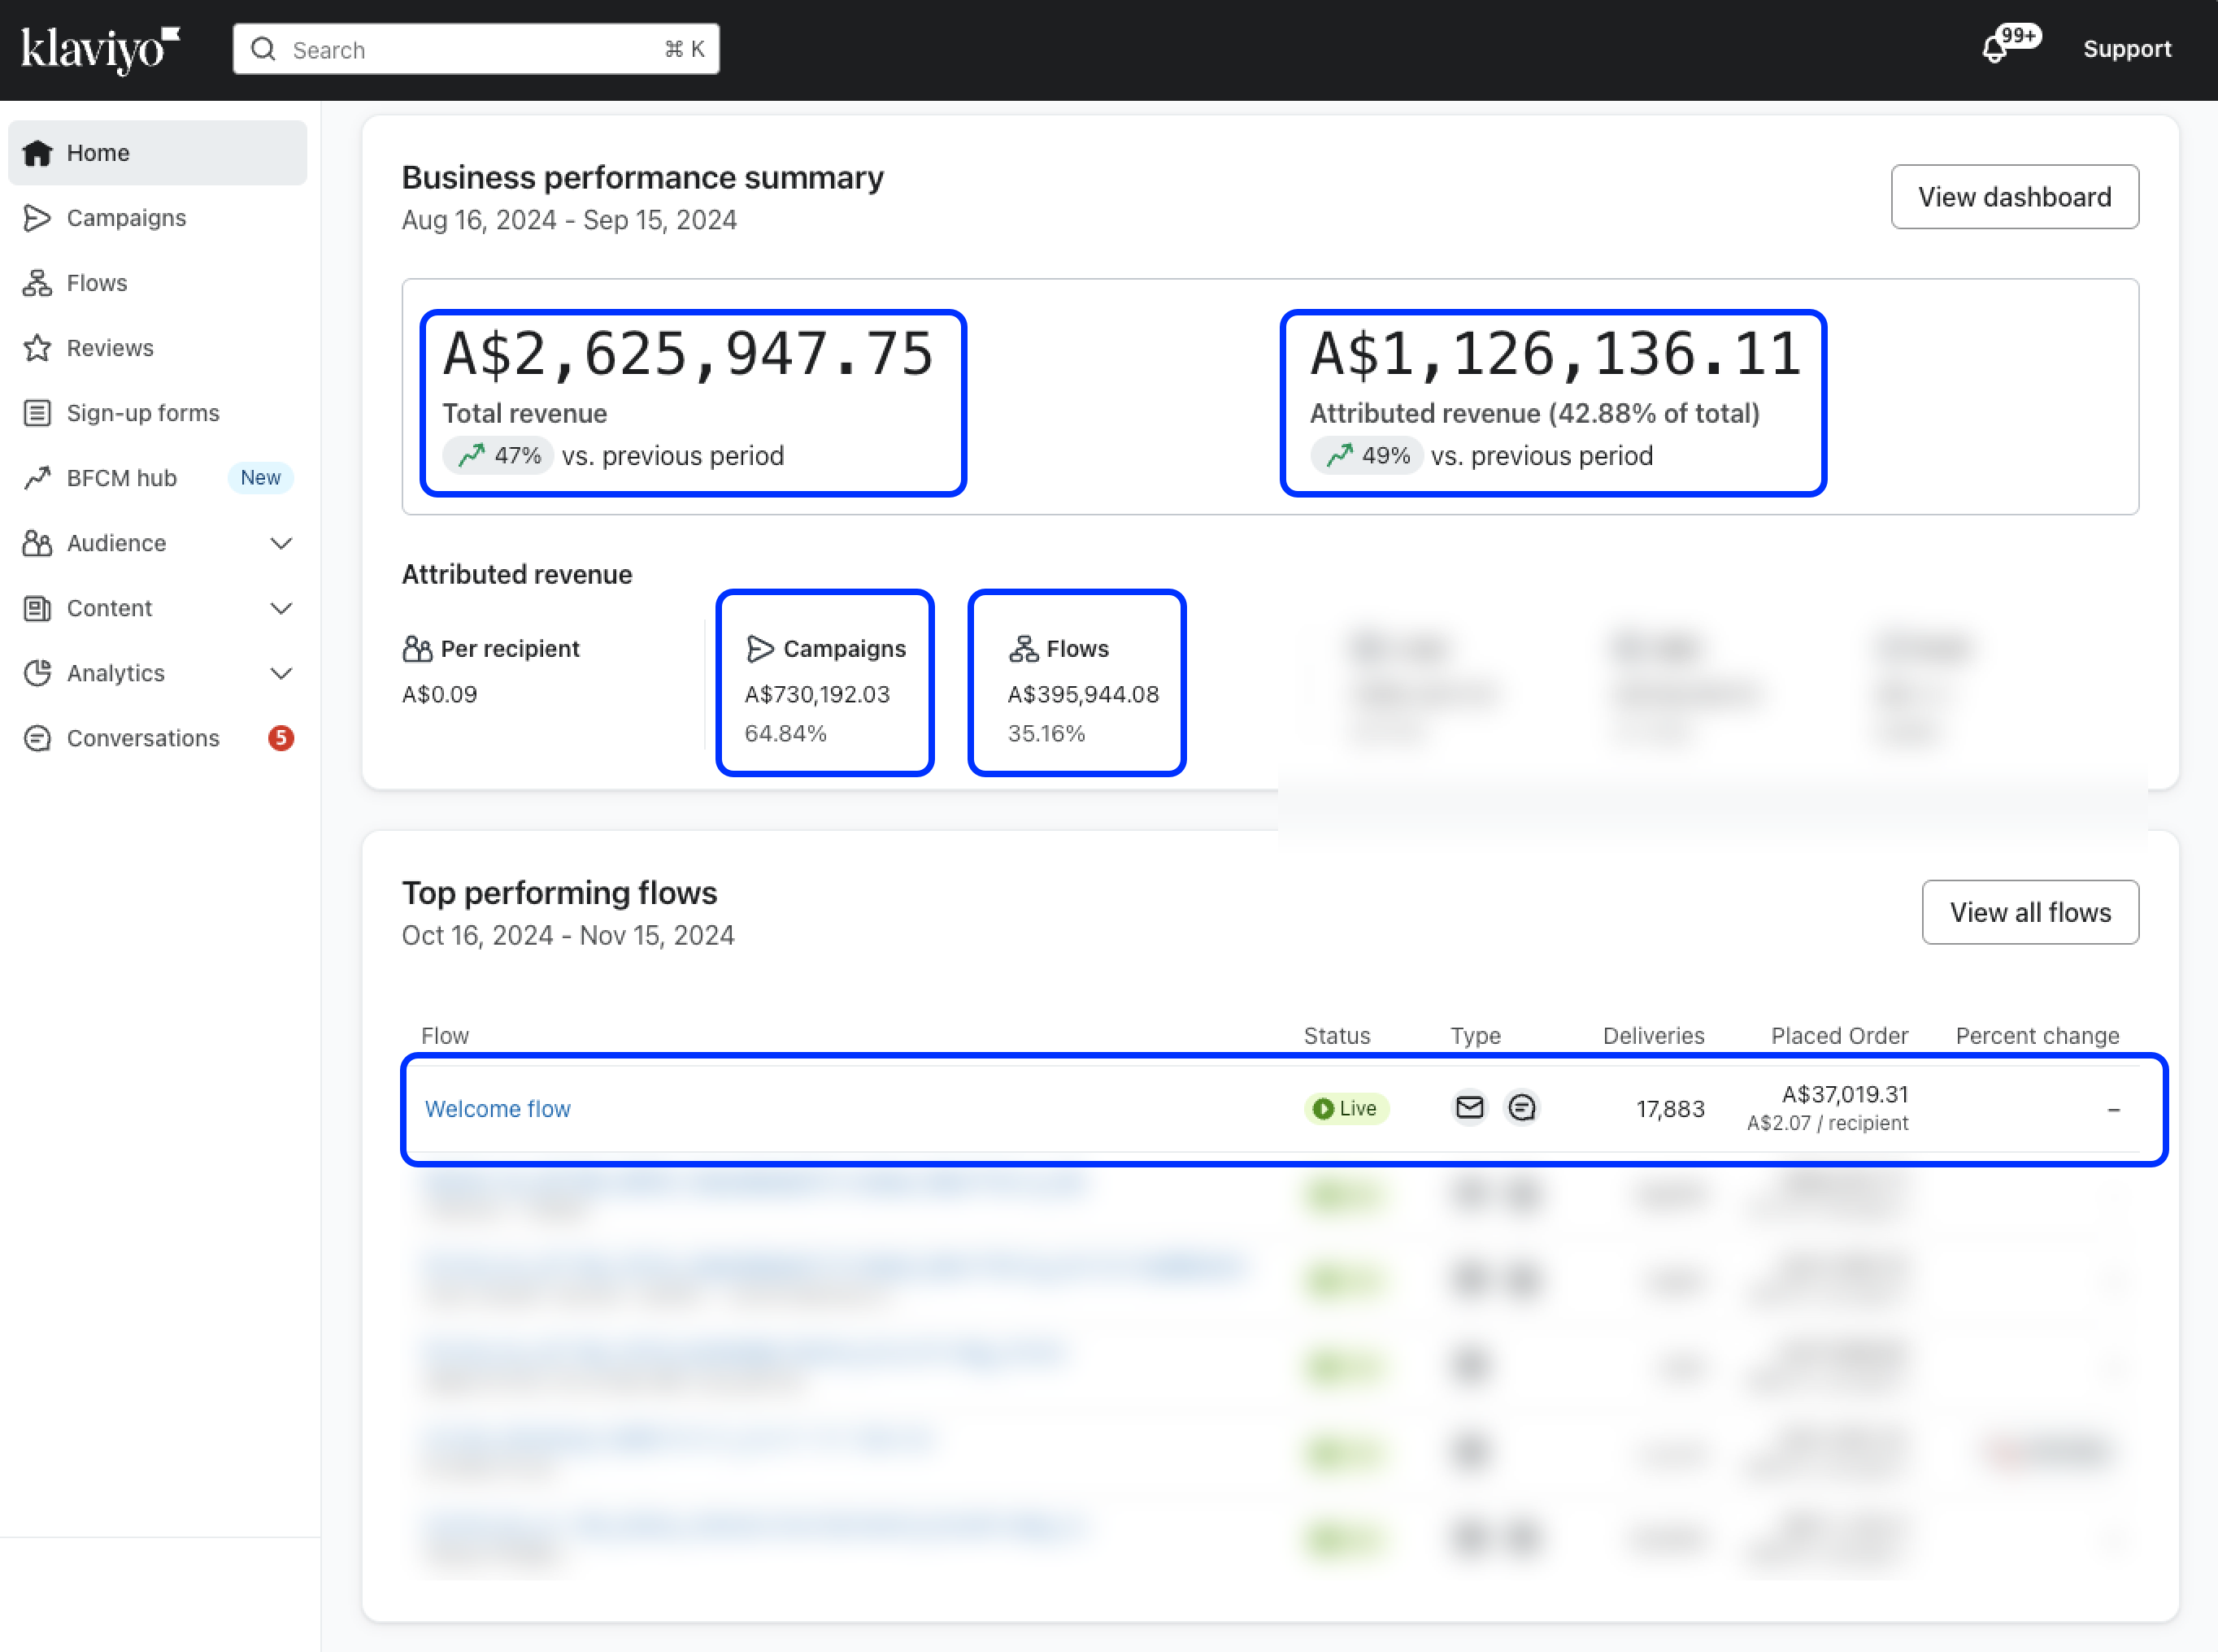
Article URL: https://help.instant.one/abandonment-flow-revenue
Keywords:
## How does the Welcome Flow work?
Instant AI sends a Welcome Flow to every new subscriber automatically. It's designed to greet new subscribers, introduce your brand, and, for first-time shoppers, deliver a coupon offer while intent is high.
- What triggers a welcome flow?
- What content is in a welcome flow?
- How are coupons managed in a welcome flow?
- How do I select a subject and preview text?
- How do I add more rules?
- How do I enable the flow?
What Triggers a Welcome Flow
A Welcome Flow sends as soon as Instant identifies a new subscriber. This happens when someone opts in via:
- An Instant AI sign-up pop-up
- A footer or embedded sign-up form on your storefront
- The "Subscribe to email marketing" checkbox at checkout, including via the Shop Pay default checkout experience
- A Klaviyo or Alia sign-up form (as long as Instant AI is live on your store, our pixel captures these automatically)
No additional setup is required to connect these sources. Instant captures new subscribers across all of them.
What's in the Welcome Flow
By default, your Welcome Flow includes:
- A welcome message and introduction to your brand
- Your bestselling and recommended products
- A coupon offer (if you've configured one, see below)
You can have up to 5 touchpoints in your Welcome Flow. Each email in the series builds on the last, keeping your brand front of mind in the days after signup.
Unlike other flows, the Welcome Flow can run in parallel with abandonment flows. If a new subscriber also browses or abandons a checkout, they'll receive both.
Managing Coupons in Welcome Flows
Setting up a coupon
By default, no coupon is assigned to the Welcome Flow — you need to add one manually. To do this:
- Go to Instant Coupons
- Select an existing coupon and assign it to the Welcome Flow, or create a new coupon specifically for it
- All coupon settings — discount type, fixed vs. percentage vs. free shipping, unique codes per customer, Smart Coupons — are managed here
You can assign a different coupon strategy to each flow. For example, Smart Coupons on your abandonment flows and a fixed 10% on your Welcome Flow. Only one coupon strategy can be active per flow at a time.
When the coupon is sent
If you've assigned a coupon to the Welcome Flow, it's always delivered in the first email, immediately after signup. This is intentional. When a subscriber signs up for a discount, they expect it straight away.
Coupons are only sent to first-time shoppers, someone who hasn't placed an order on your store before.
If an existing customer subscribes, they'll still receive the full Welcome Flow series, including a welcome message and product recommendations. The coupon block is simply skipped.
Updating Subject Lines and Preview Text
By default, Instant AI generates personalised subject lines and preview text for every email in your Welcome Flow.
If you'd prefer to use your own copy instead:
- Open your Welcome Flow in the Template Editor
- Click Edit on the flow
- Hover over the subject line or preview text to override
- You must set both the subject line and preview text together, you can't override just one
- To revert to AI copy, clear both fields
You can tell whether AI copy or manual copy is in use by the AI tag shown above the subject line in the editor.
Getting More Granular Control in Welcome Flows with Rules
The coupon configuration handles the default on/off behaviour automatically — first-time shoppers get the coupon, returning customers don't.
If you need finer control over what different segments see in the email itself — for example, showing a different hero image or message for returning customers — you can use Instant Rules to conditionally show or hide blocks within your Welcome Flow emails.
Learn how to use Rules in your emails →
How to Enable Your Welcome Flow
- Go to Flows in your Instant dashboard
- Find the Welcome Flow and toggle it on
- If you're using another provider (Klaviyo, Alia) for your sign-up forms, make sure you disable their Welcome or New Subscriber flow to avoid duplicate sends
- Send yourself a test email to confirm the content, coupon, and design before going live
FAQ
What if someone signs up twice? Instant won't re-enrol a subscriber into the Welcome Flow if they've already been through it.
Will existing customers receive a coupon if they sign up? No. Coupons are reserved for first-time shoppers. If someone has purchased before and subscribes, they'll receive the welcome email series without the coupon.
Do I need to set up anything to capture subscribers from Klaviyo or Alia forms? No. As long as Instant AI is live on your store, our pixel automatically detects sign-ups from Klaviyo and Alia forms and triggers the Welcome Flow.
What if I don't want to offer a coupon at all? Simply don't assign a coupon in Instant Coupons. The Welcome Flow will send without one.
Can I use a different coupon for the Welcome Flow vs. my abandonment flows? Yes. You can assign different coupon strategies to different flows. Each flow can only have one active coupon at a time, but every flow can have its own.
Where do new subscribers go after the Welcome Flow? They're added to your subscriber list in Instant AI and available for use in campaigns. If you're integrated with Klaviyo, they'll sync automatically as new profiles with Marketing Consent, and also sync to Shopify.
Article URL: https://help.instant.one/how-does-the-welcome-flow-work
Keywords:
## Responsible Disclosure Policy
At Instant, the security of our platform and our customers’ data is a top priority. We welcome and encourage external security contributors to report potential vulnerabilities in a responsible manner.
Reporting a Security Vulnerability
If you believe you've discovered a security issue in any of our systems, please contact us at help@instant.one with the following information:
-
A clear description of the issue.
-
Steps to reproduce the vulnerability.
-
Any relevant screenshots, logs, or proof-of-concept code.
We request that you:
-
Avoid exploiting the vulnerability (e.g. accessing or modifying data without permission).
-
Give us a reasonable time to investigate and remediate before any public disclosure.
-
Comply with all applicable laws and do not compromise the privacy or data of our users.
Our Commitment
We will:
-
Acknowledge receipt of your report within 3 business days.
-
Investigate and aim to resolve valid issues promptly.
-
Credit your contribution (if desired).
We do not currently offer a formal bug bounty program but sincerely appreciate your efforts to help keep Instant secure.
Article URL: https://help.instant.one/responsible-disclosure-policy
Keywords:
## How do I add UTM tracking to Instant Audiences flows for Google Analytics?
UTM tracking can be very useful for sending detailed information and data to Google Analytics about where site traffic and visits are coming from.
Instant's Klaviyo integration leverages Klaviyo's flows, and therefore merchants can use Klaviyo's native integration into Google Analytics for UTM tracking.
By adding UTM tracking to emails sent from Instant Audiences flows, you will be able to track conversions from Instant Audiences flows in Google Analytics.
To understand how to use UTM tracking for Instant Audiences flows, please refer to the following help article from Klaviyo titled "How to add UTM tracking to campaigns and flows" - https://help.klaviyo.com/hc/en-us/articles/360053921252.
The relevant sections from Klaviyo, are:
To understand UTM tracking in Klaviyo, please refer to the following help article from Klaviyo titled "Understanding UTM tracking in Klaviyo" - https://help.klaviyo.com/hc/en-us/articles/115005247808
Please refer to Google analytics' support documentation for any further clarification regarding questions or issues related to your Google Analytics account or setup.
Article URL: https://help.instant.one/add-utm-tracking
Keywords: utm
## How to Use Segments in Campaigns
Segments allow you to quickly target specific groups of shoppers when sending a campaign. You can either select an existing saved segment or build filters directly within the campaign. This article explains how segments behave when used in campaigns and how eligibility works.
Tip: To learn more about how to create a segment view the help article here
In this article:
- How to use a Saved Segment
- How to use once off filters
- How Segmentation Counts in Campaigns Work
- What Happens if a Segment Changes?
- When Should I Use a Saved Segment?
- FAQ's
Option 1: Use a Saved Segment
When creating a campaign:
-
Go to Campaigns.
-
Click Create Campaign.
-
Select your audience.
For a single email campaign, you’ll choose your segment during the audience selection step.
For a multi-step campaign, you’ll select your segment during setup. After the campaign is created, you can click into Contacts within the campaign to review or update which segment and filters the campaign is sending to.
Once selected, all filters from that segment are automatically applied.
You will immediately see:
Campaigns can only send to subscribed shoppers. If your segment includes unsubscribed or suppressed shoppers, they will be excluded from the eligible count.
If a segment contains only unsubscribed shoppers, you will see 0 eligible recipients.
You can also preview the list of shoppers included in the campaign audience before sending.
Option 2: Add once off filters
If you don’t select a saved segment, Instant AI automatically starts with All Marketing Subscribers — everyone who has opted in for marketing emails.
You can then refine that audience using filters such as:
-
Last emailed (e.g. last 7 days)
-
Last engagement timeframe (e.g. last 180 days)
-
Last purchased (e.g. last 30 days)
-
Country
-
Location
-
Shopify tag
These filters apply only to this campaign.
If you find yourself reusing the same filter set often, consider saving it as a segment from the Shoppers page for quicker access next time.
How Segmentation Counts in Campaigns Work
When defining your audience, you will see two numbers:
Total shoppers: This includes everyone who matches the filters, regardless of subscription status.
Eligible to receive emails: This includes only subscribed shoppers who can legally receive marketing emails.
Segments are built from your full database, but campaigns automatically restrict sending to eligible (subscribed) shoppers. You can preview the full list of shoppers included before sending. Campaign eligibility is evaluated at send time.
This means:
-
If someone unsubscribes before the campaign sends, they will not receive it.
-
If someone newly subscribes and matches the filters before send time, they may be included.
Your final audience is always based on the most up-to-date data.
What Happens if a Segment Changes?
Segments are dynamic and update in real time. If you edit a saved segment, its filters update immediately.
If you delete a saved segment:
-
It removes the saved shortcut only.
-
It does not delete any shopper data.
-
It does not affect sent campaigns.
-
Draft or scheduled campaigns will continue using the exact filters that were applied when the segment was selected, even if the saved segment is later deleted.
When Should I Use a Saved Segment?
Use a saved segment when:
-
You regularly target the same group of shoppers
-
You want consistent reporting across campaigns
-
You want to build the audience now and reuse it later
Use one-off filters when:
FAQs
Can I add additional filters on top of a saved segment?
Yes. You can refine a selected segment further by adding more filters inside the campaign.
Can a shopper belong to multiple segments?
Yes. Segments are saved filter sets. A shopper can match multiple segments at the same time.
Why does my eligible count change before sending?
Audience eligibility is recalculated in real time. Subscription status and shopper behaviour may change between scheduling and sending.
Will unsubscribed shoppers ever receive a campaign?
No. Instant AI automatically excludes unsubscribed and suppressed shoppers from campaigns.
Can I build a segment of unsubscribed shoppers?
Yes. You can create segments that include unsubscribed shoppers for reporting or analysis. However, unsubscribed shoppers will never receive campaigns.
Article URL: https://help.instant.one/how-to-use-segments-in-campaigns
Keywords:
## How to Use Sign Up Forms and Welcome Flows with Instant AI
Instant AI offers a Welcome Flow that can send new shoppers an email and enrol them in their first flow. To help customers opt-in to a Welcome Flow, you can use an Instant AI Sign-up form OR you can use the Instant AI Welcome flow in conjunction with an alternative providers sign-up form.
Option 1: Use Instant Sign-Up Forms + Instant Welcome Flow
Instant Sign-Up Forms are branded pop-ups that appear on your Shopify storefront. They’re generated automatically, styled to match your brand, and powered by Predictive Opt-In so they appear at the best time to convert.
The benefits of using Instant for both the form and the flow include:
-
Predictive timing: resurfaces when a visitor is most engaged.
-
Higher conversions: standard pop-ups average ~2.3% submit rates, while Predictive Opt-In averages 7% (and some brands reach 20%+).
-
Full integration: subscribers captured trigger your Welcome Flow instantly.
-
Fully branded: your store logo, colours, and tone of voice are automatically applied.
Coupons and offers
-
Make sure you have a coupon added in Instant Coupons.
-
By default, we don't assign a coupon and you will need to pick an option
-
By default, your selected coupon will assign to Welcome Flows, but you can confirm this by clicking Settings inside the Coupons page.
- If you assign a fixed coupon (percentage, fixed price, or free shipping), the exact offer will appear both in your pop-up and Welcome Flow.
-
If you’re using Smart Coupons, Instant automatically hides the specific discount amount on the pop-up and uses “exclusive discount” wording until the Welcome Flow email is sent.
Capturing Phone Numbers
- If you want to capture a phone number as part of your sign-up forms, you need to add "Phone Capture" as a step in your form.
- By default, this step is disabled, You will need to add it manually.
- You can enable this step, and allow customers to skip it if they don't want to provide their phone numbers.
- We currently do not support capturing phone numbers alongside emails, as we've seen that keeping them as two distinct steps helps boost sign-up rates. However, this is something we are exploring support for.
- Phone numbers will automatically be saved against a shopper, for use when Instant AI supports SMS as a marketing channel.
Option 2: Use External Pop-Ups (Klaviyo or Alia) + Instant Welcome Flow
If you already use Klaviyo or Alia for your pop-ups, you don’t need to integrate anything extra. As long as you’re live with Instant AI, our pixel automatically detects new sign-ups and feeds them into your Welcome Flow.
Important checks when using external forms
-
Match your offer: make sure the discount or offer displayed in your external pop-up matches what you’ve set up in Instant AI. For example, don’t show “Sign up for 10% off” in Alia and then send a Welcome Flow email from Instant without that 10% coupon.
-
Using Smart Coupons: because the discount is generated dynamically, we recommend your external pop-up also use wording like “exclusive” or “mystery” discount instead of a fixed % off. Instant does not automatically adjust wording in Klaviyo or Alia forms.
-
Subscriber capture: all submissions through Klaviyo or Alia pop-ups will automatically trigger the Welcome Flow in Instant AI — no manual setup required.
Customising Your Welcome Flow
Whether you use Instant’s forms or another provider, the Welcome Flow behaves the same way:
-
By default, subscribers receive their first email instantly, including your set coupon, brand voice, and recommended products.
-
You can customise the design and content in the Template Editor.
-
By default, the coupon is shown in the first email so shoppers can use it right away.
Quick Checklist
Follow these steps to make sure your Sign-Up Forms and Welcome Flow are set up for success:
- Choose your path
- Option 1: Instant Sign-Up Form.
- Option 2: External pop-up (Klaviyo or Alia).
- Configure your coupon
-
Add or confirm your coupon in Instant Coupons.
-
By default, coupons are not assigned — you’ll need to pick one.
-
By default, your selected coupon will assign to Welcome Flows, but you can confirm this under Settings → Flows.
-
If using Smart Coupons → Instant automatically handles “exclusive discount” wording on pop-ups.
-
If using Klaviyo/Alia → update your wording manually to avoid mismatched offers.
- Enable your Welcome Flow
-
Go to AI Flows → Welcome Flow.
-
Toggle the flow ON.
- Preview your Flow
- If using Instant’s pop-up → go to Settings → Sign-Up Forms to preview the design and offer.
- If using Klaviyo/Alia → confirm your pop-up is live in their platform.
- Customise your Welcome Flow
-
Open the Template Editor to update design, messaging, or product recommendations.
-
By default, the coupon is shown in the first email.
- Send a test email
- Use the “Send Test” feature inside your Welcome Flow to confirm the content, coupon, and design.
- Monitor performance
- After going live, track how many Welcome Flow emails are being sent in your dashboard. This confirms subscribers are entering correctly and helps you measure success.
FAQ
What happens if someone signs up twice?
Instant AI won’t re-enrol a subscriber into the Welcome Flow if they’ve already been through it.
Do I need to connect Klaviyo or Alia manually?
No, as long as Instant AI is live on your store, our pixel automatically connects to those forms assuming that you have an existing Klaviyo integration.
Where do new subscribers go?
They’re added to your subscriber list in Instant AI. You can use them in flows and campaigns. If you're integrated with Klaviyo, these will automatically sync as new profiles plus we automatically sync these over with Marketing Consent to Shopify
Do I have to configure discounts twice?
If you use Instant pop-ups: no, your assigned coupon automatically shows in both the pop-up and the Welcome Flow. If you use Klaviyo or Alia: yes, you should double-check your pop-up offer matches what’s in Instant AI.
When will my pop-up show?
Instant pop-ups use Predictive Opt-In, which resurfaces forms when visitors are most likely to subscribe. External pop-ups show according to your provider’s own logic.
Article URL: https://help.instant.one/how-to-use-sign-up-forms-and-welcome-flows-with-instant-ai
Keywords:
## How do I measure revenue generated by Audiences?
Create an Audiences Dashboard in Klaviyo
In Klaviyo, proceed to Analytics > Dashboards
Click on Create Dashboard
.png)
Name your dashboard “Instant Audiences”
.png)
Click Add Data View
.png)
Select Flows Conversions from the Data View Library and click Add Data View
.png)
Ensure that the Conversion metric is selected to Placed Order
.png)
Under All flows, select the Instant Audiences flows
.png)
Article URL: https://help.instant.one/measure-revenue-generated-by-audiences
Keywords:
## Why are my Klaviyo flow emails being skipped due to "Fails Flow Filters"?
Failed flow filters means that one or more of the configured trigger or profile filters against the flow prevented a profile from entering a flow.
For example, a profile may not enter an add to cart abandonment flow because they have since placed an order.
Or, a profile might not enter a browse abandonment flow because they have since added to cart or started checkout.
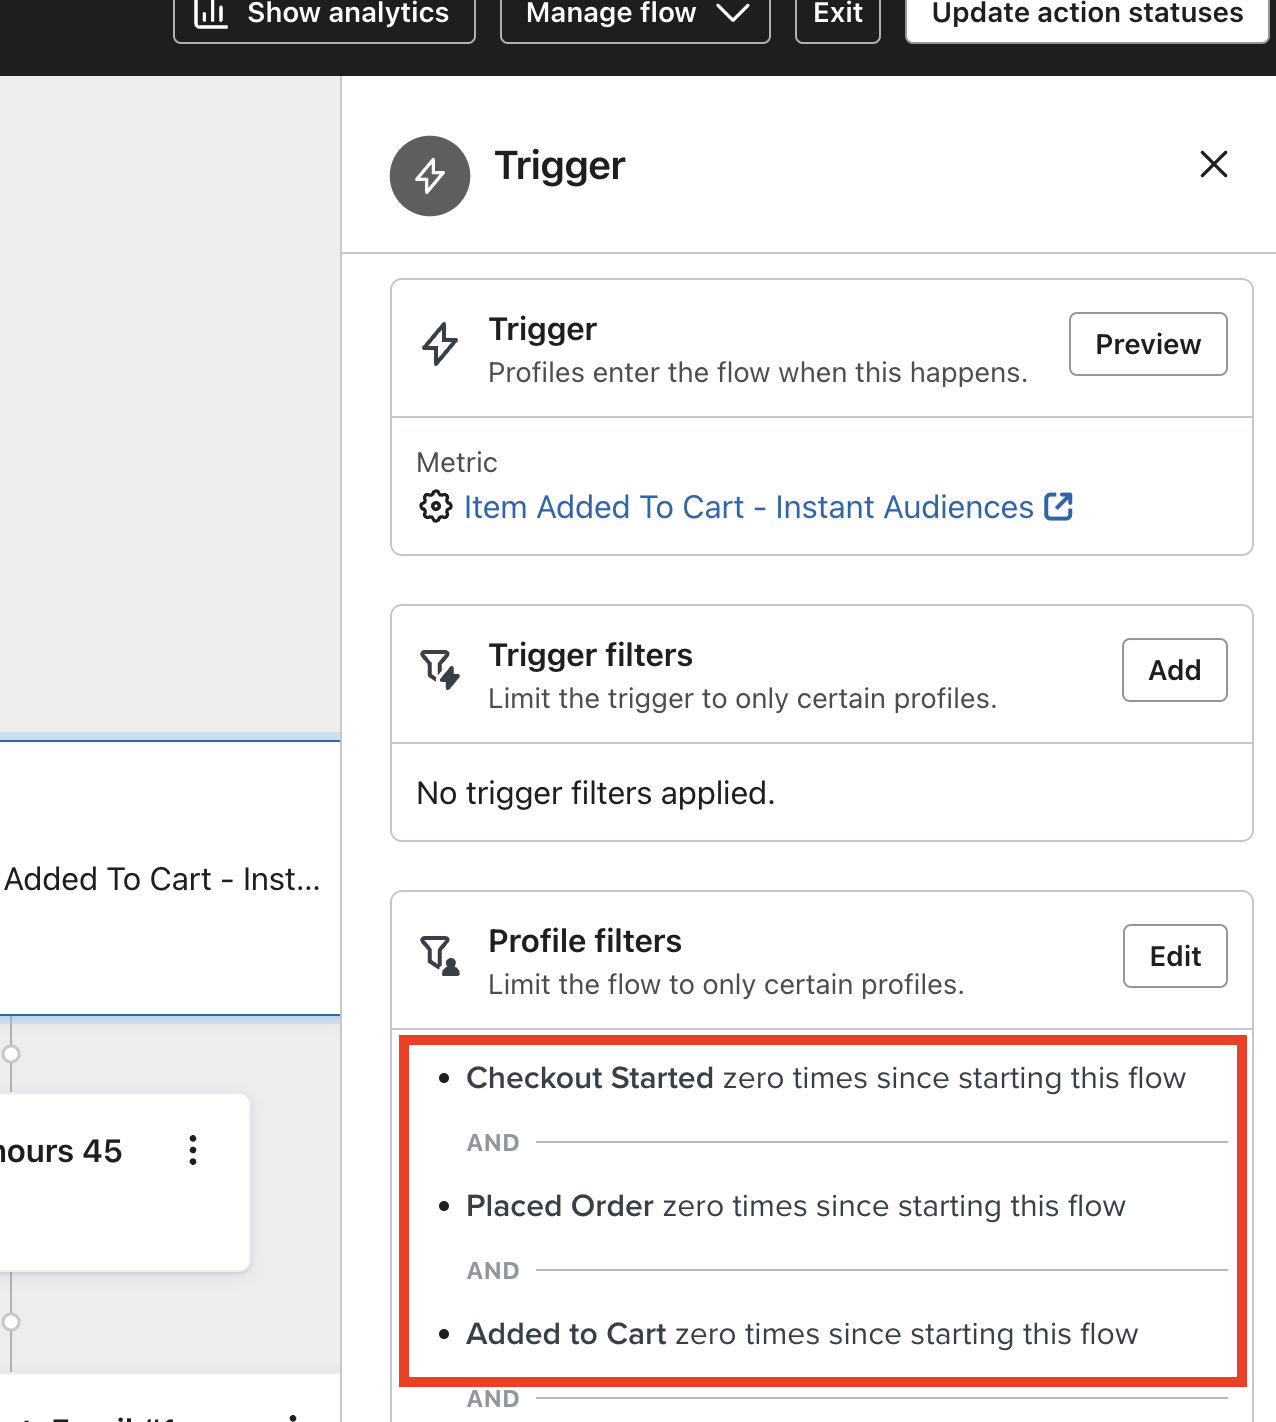
If you click into "Fails Flow Filters", you can identify the failed filters.
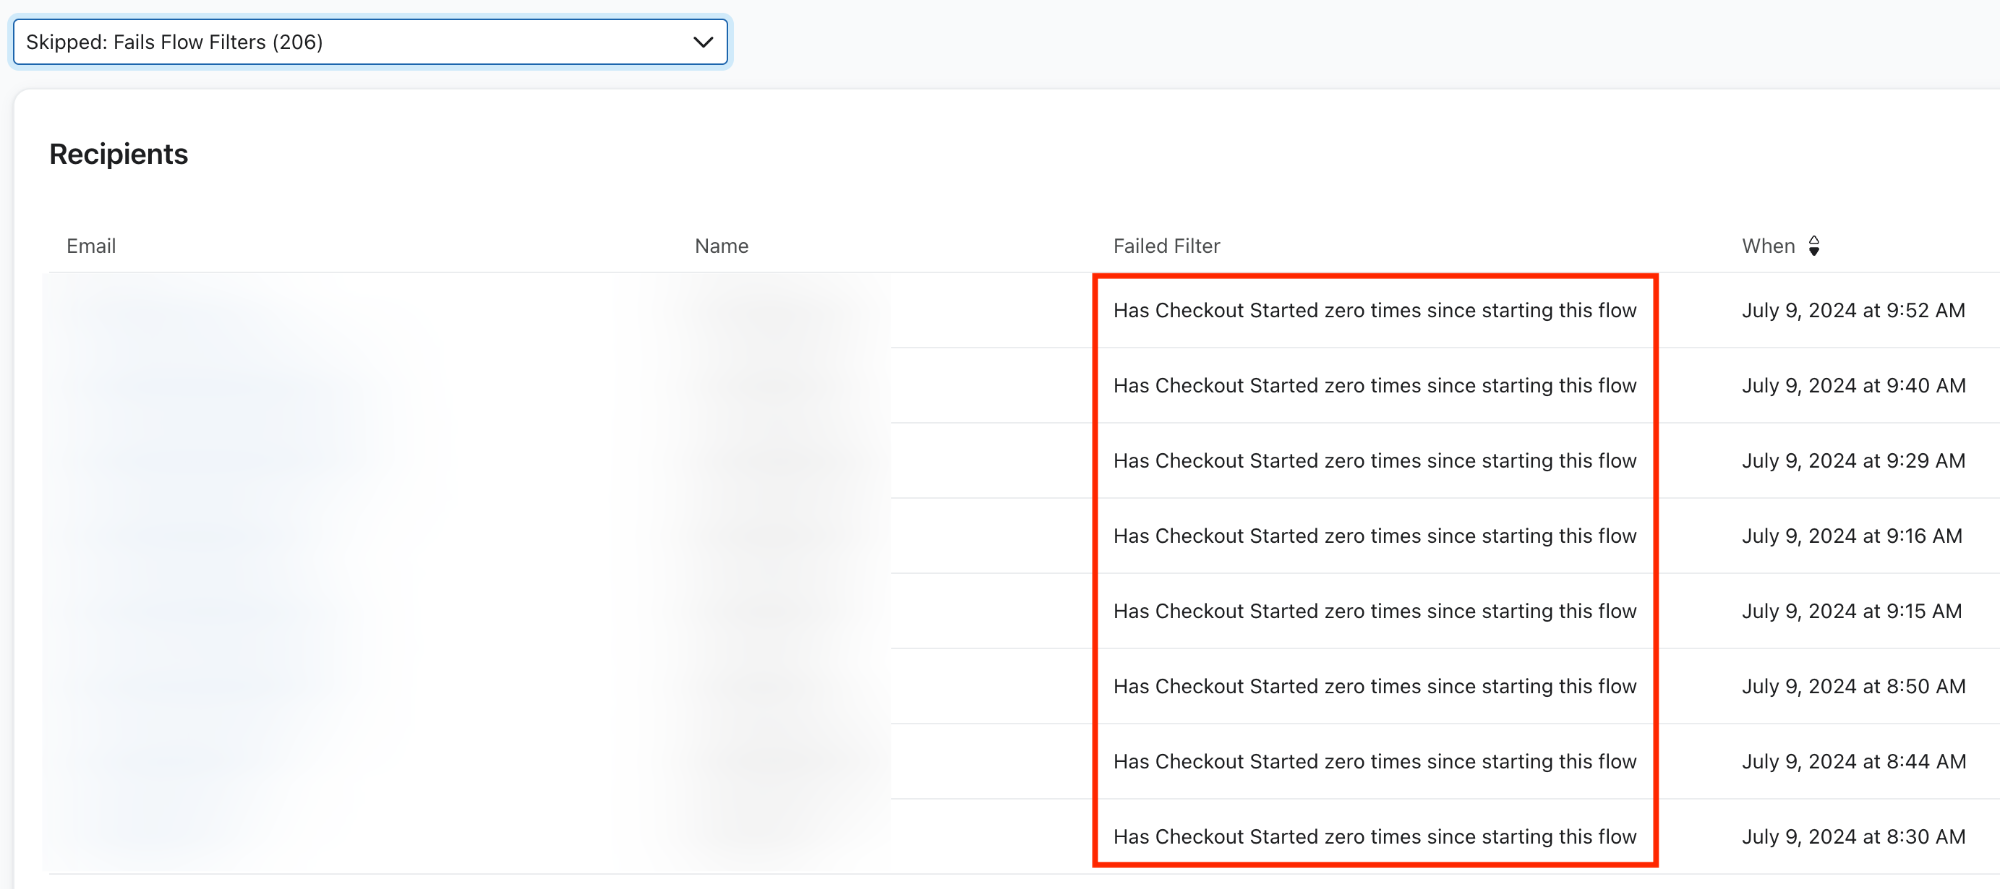
If you identify any flow filters that look inaccurate, consider removing the flow filter.
Article URL: https://help.instant.one/emails-skipped-fails-flow-filter
Keywords:
## Payouts Reconciliation Itemised Report
Instant offers a variety of reports for users to download and access. These reports provide valuable insights and data on transactions, payouts, and reconciliation.
The Payouts Reconciliation Itemised Report downloads the full list of individual transactions from the specified time range. This report contains:
- Balance Transactions Id
- Created
- Available On
- Currency
- Gross
- Fee
- Net
- Reporting Category
- Description
- Connected Account
Example

Other Reports
- Transactions Itemised
- Transactions Summary
- Payouts Itemised
- Payouts Summary
- Payouts Reconciliation Summary
Article URL: https://help.instant.one/payouts-reconciliation-itemised-report
Keywords:
## How does Instant AI accurately import all of my contacts?
Instant AI will automatically import your existing contacts through 2 methods:
- Shopify Integration
- Klaviyo Integration
For most merchants, these methods cover every scenario and there is no need for any manual data migration. If you still think you need to import a manual CSV, check our guide further below.
TIP: You can view all of the contacts that you have synced with Instant AI by viewing your Shoppers List.
Shopify Integration
When you connect Shopify, we automatically start syncing all of your contacts into Instant AI.
We import any shoppers who have Marketing Consent = Yes in your Shopify Profiles.
If a contact doesn’t have marketing consent, or has unsubscribed, we’ll skip them automatically. If new contacts subscribe or unsubscribes from either us or Shopify, we update both sides automatically.
Klaviyo Integration
When you connect Klaviyo, we also sync all contacts into Instant AI.
We import any shoppers who have Email Marketing Consent = Subscribed in your Profiles.
We continue checking subscription status with every send to keep both systems in sync.
If new contacts subscribe or unsubscribes from either us or Klaviyo, we update both sides automatically.
If you’re using Klaviyo, we also import key events from your contacts, such as opened and clicked, as part of our integration.
This means that once you’ve onboarded to Instant AI and connected your Klaviyo integration, you can immediately send a campaign using a filter like Engaged Last 60 Days. Even if you haven’t been using Instant AI for that long, we’ll bring in up to 60 days of engagement data from Klaviyo so you can start with accurate, ready-to-use filters.
Multiple Integrations
If you have multiple integrations live (e.g. both Shopify and Klaviyo) then we will sync both records automatically. If the same contact exists in both systems with different subscription statuses, we use the most recent update as the source of truth.
For example:
In Shopify, Mary Jones is Subscribed 2025-01-01 but
In Klaviyo, Mary Jones is Unsubscribed 2025-02-02
Then we will honour the unsubscribe in Klaviyo because it is the most recent information.
Our own Identification
Instant AI can also identify new subscribers after our pixel is installed.
If someone subscribes through your site (for example via a welcome flow) we’ll automatically capture that data and add it as a new contact. Even if the sign-up form or flow is powered by Klaviyo, Alia or Shopify, Instant AI will still save the new subscriber to your database.
If you're using Instant Audiences alongside Instant AI, you will have advanced identification to to remember returning shoppers that already exist in your contacts. The of saving a new shoppers, and new shopper identification is the same.
When you may need a manual import of contacts
You’ll only need a manual import if:
- You’re using a platform other than Klaviyo and
- Your Shopify contacts aren’t kept in sync with that platform.
If you're using an alternative platform (e.g. Mailchimp, Sendlane) and your contacts are being automatically updated to Shopify through these platforms then you won't need to manually import any data and the existing Shopify integration will pick them up. To maintain a neat ongoing sync, we recommend ensuring that your alternative providers are set up to accurately sync subscription status' to Shopify.
If this is not possible, you can import a CSV of contacts as a once off activity so that Instant has the most accurate starting point. Follow our step-by-step guide here to complete your CSV import.
FAQ's
Why would my total count of subscribers be higher than Klaviyo?
Instant AI combines both your Shopify and your Klaviyo subscribers into a single list. If you're using Klaviyo as your dominant ESP, then 100% of your explicitly subscribed contacts will be listed. There may be a small number of extra profiles that Instant adds from your Shopify database since Instant combines two data sources rather than just one. We automatically de-duplicate records between both systems and will only include profiles where they have explicitly subscribed in Shopify, and haven't unsubscribed in any other platform.
Article URL: https://help.instant.one/how-does-instant-ai-automatically-import-all-of-my-contacts
Keywords:
## Why does BigCommerce report more carts and abandoned carts since enabling Instant Audiences?
Unlike Shopify, cart abandonment links from BigCommerce do not encode the contents of each shoppers cart. This means that, without Instant Audiences, there is a high chance that by the time a shopper clicks the links in your cart abandonment emails, their cart has expired, and they'll land on your checkout with no products in their cart. This harms overall conversion rates and therefore revenue for your website.
To get around this problem, Instant Audiences generates a new cart for each abandoned shopper, encoding the contents of their cart in the URL sent by your email marketing software.
This feature increases the likelihood of shoppers converting on your website after receiving a cart abandonment link.
Because Instant Audiences creates new carts via BigCommerce's API, this feature may distort BigCommerce's inbuilt abandoned cart reporting, making it report more carts (and therefore more abandoned carts). We generate a cart once for every visitor that performs either an add to cart, or a checkout started event. Once it is generated, we cache that new cart. If the customer adds an item or removes an item from their cart, it then gets regenerated and re-cached.
We recommend merchants use a tool like Google Analytics to accurately track conversion rates and abandoned carts, though our team can disable this feature for merchants who would rather use BigCommerce's inbuilt abandoned cart reporting, noting that this will negatively impact revenue generated by your cart abandonment flows.
Article URL: https://help.instant.one/bigcommerce-carts-abandoned
Keywords:
## Does Instant impact the speed or performance of my website?
Our integration is designed to run seamlessly in the background of your store’s website, ensuring there is no impact on speed or performance.
Website speed is crucial for delivering an exceptional experience.
To ensure your eCommerce site performs at its best, we've implemented industry best practices for third-party tracking integrations.
This approach enables us to provide advanced tracking and analytics while ensuring your customers enjoy a seamless, uninterrupted shopping experience.
How our Tracking Scripts work
API Calls Are Made After Your Page Is Fully Loaded
During the initial setup, our API is integrated into your website to track and send browser events (e.g. product viewed, collection viewed, add-to-cart, checkout abandonment) to your Klaviyo account.
Similar to Klaviyo, our API transmits data only after your customer's browser has fully loaded. This ensures that our API calls won’t interfere with the speed or performance of your eCommerce store.
Our JavaScript File Is Small and Loads Asynchronously
Asynchronous JavaScript loading is a standard best practice used by industry leaders like Facebook Pixel, Google Analytics, Shopify, Stripe, and others.
Our JavaScript file is designed to load asynchronously, ensuring it doesn’t delay your website's rendering. This means your customer’s browser won’t wait for our script to load before displaying the rest of the page. Instead, our script runs in the background, collecting data without blocking page rendering, resulting in a faster and smoother user experience.
By adhering to these principles, our integration ensures your website stays fast and responsive while still providing powerful tracking and analytics.
Addressing Site Speed Concerns
Some customers have asked if our pixel impacts site speed. Here’s what you need to know:
Common Speed Issues Diagnosed
-
Duplicate Installations: One frequent cause of pixels slowing down a site's speed is that they are installed twice. This doubles the script load and can lead to unnecessary processing, both for the Instant pixel and others. Check your theme and tag manager to ensure there's only one installation.
-
Script Execution Time vs. Script Size: The main factor affecting site performance is script execution time, not just the size of a file. In extensive testing, including Google Lighthouse audits, our script consistently shows minimal impact on key user-facing metrics like First Contentful Paint. Tools like Google Tag Manager and Klaviyo often have much larger footprints in term of execution time.
Understanding Performance Reports
-
Lighthouse vs. GTMetrix: Tools such as Google Lighthouse focus on how quickly content appears to users, while platforms like GTMetrix break down CPU time at a granular level. Sometimes you'll see “CPU time allocation” in GTMetrix directed at services (anything containing instant.one). This service runs asynchronously, so while it uses CPU cycles, it does not block or degrade the user’s perceived experience.
-
Unattributable CPU Time: Occasionally, tools may report “unattributable” CPU time after integration. This typically happens when several scripts are running in parallel and sharing resources. Without detailed profiling, it's difficult to isolate whether what script is responsible, but real-world tests show the visible user experience remains unaffected.
-
Synchronous vs. Asynchronous Calls: The most important part when monitoring is cdn.instant.one, which is responsible for any synchronous elements. Across thorough client tests, this component has not appeared as a significant contributor to page load time.
FAQs and Best Practices
Why am I seeing multiple calls to your pixel in my reports?
Most commonly, this is due to installing the pixel more than once (e.g., both in theme code and through a tag manager). Confirm there’s only one instance running.
Should I be concerned about the CPU time shown in performance tools?
Not in most cases. Our core function is optimized to run in the background without affecting what your users see. Long CPU times associated with our script in diagnostics are not tied to slower page loads.
By using asynchronous loading and only firing API calls after the page is fully loaded, Instant’s tracking scripts are specifically engineered to avoid impacting site speed.
If you have any questions or need additional assistance, please feel free to contact us at help@instant.one
Article URL: https://help.instant.one/website-performance
Keywords:
## How do I generate a Test Event Code for a Meta pixel?
If you would like to generate a test event code for your Meta pixel, please complete the following steps.
- Proceed to the Meta events manager and click on Test events next to the Overview tab.
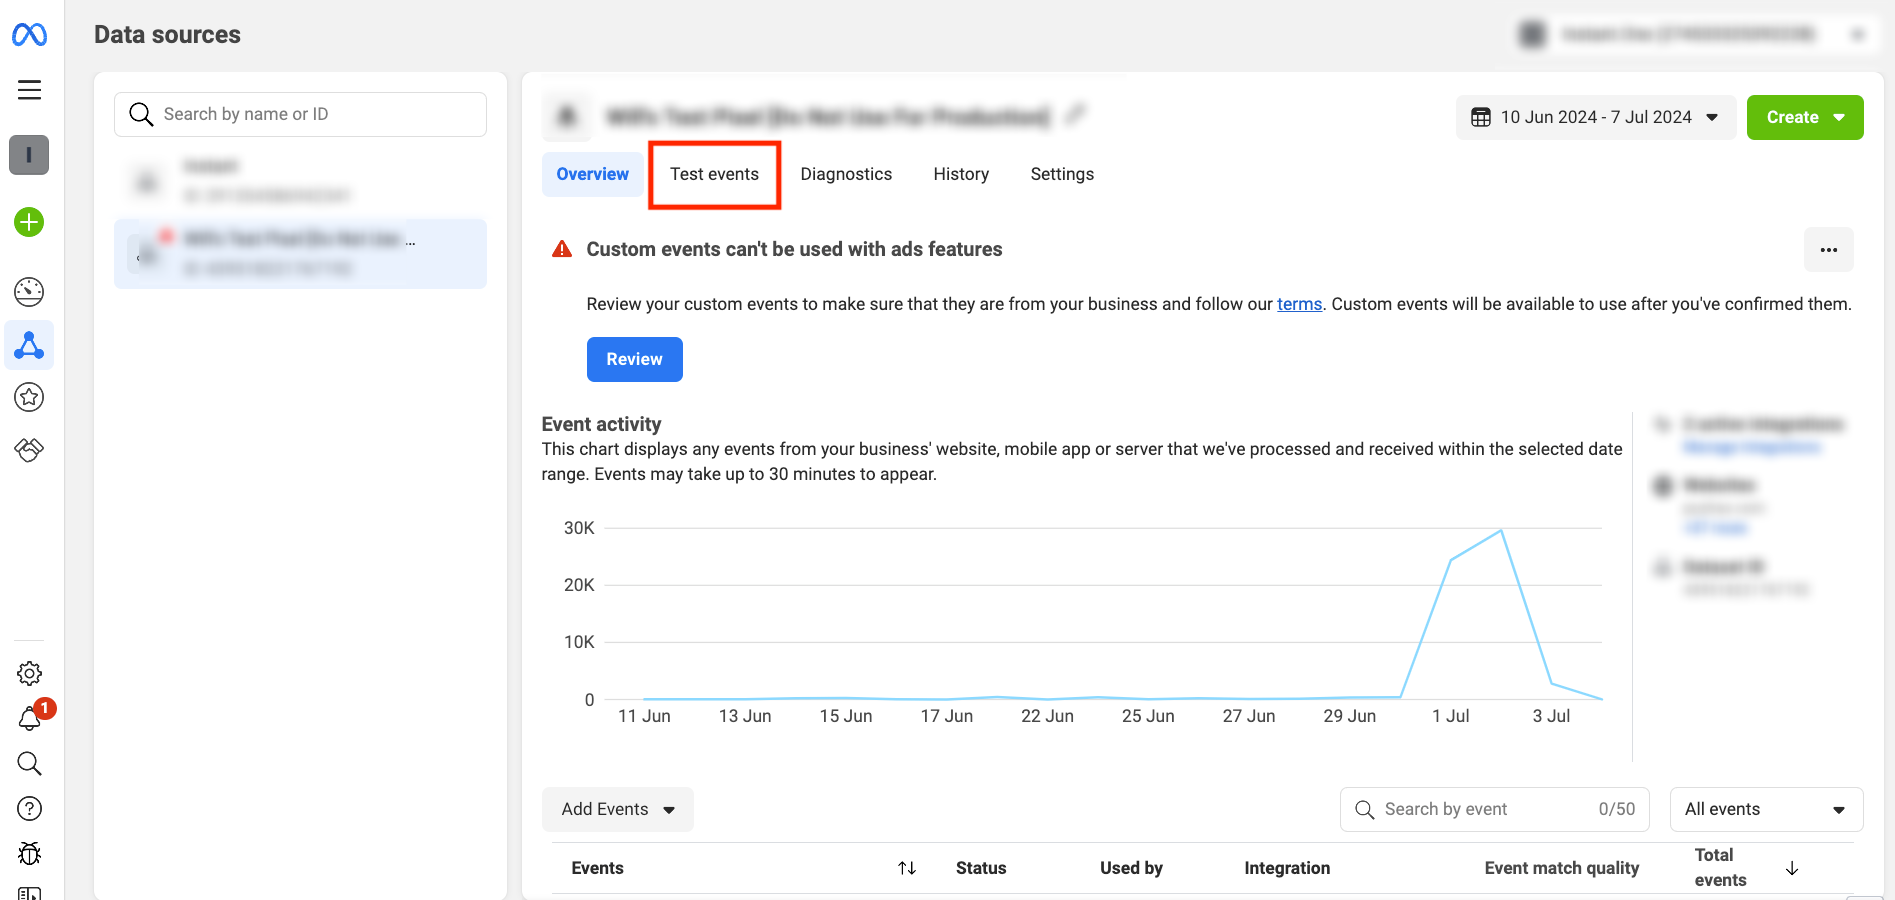
- Expand the "Confirm that your server's events are set up correctly" section.
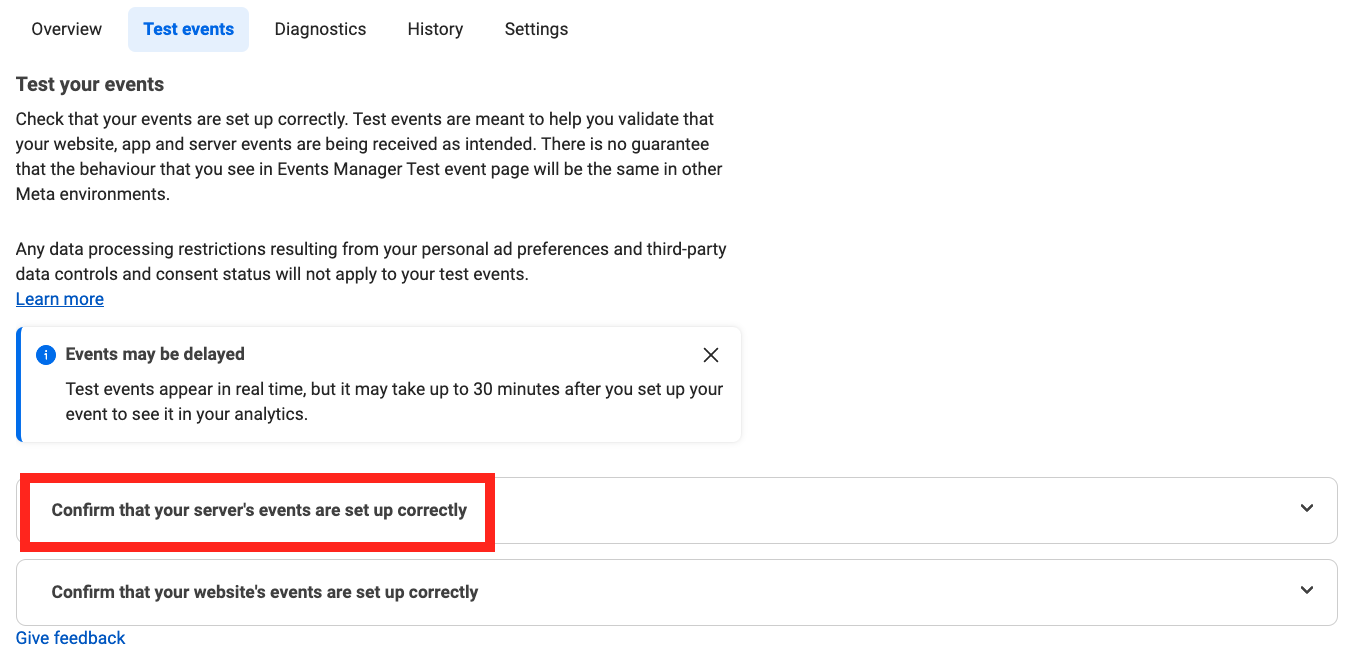
- Once expanded, you will be presented with a test event code.
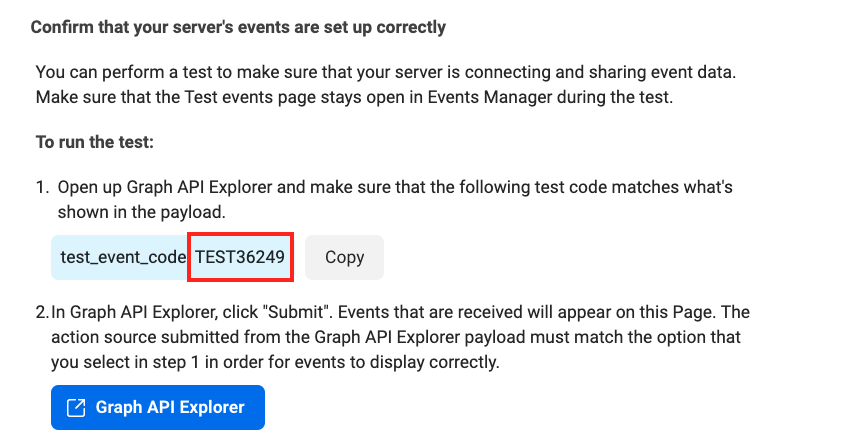
- Your test event code will look different, but it will start with TEST and ends with 5 random digits, e.g. TEST36249.
If you provide the code as part of Instant Targeting onboarding, you should see test events in your Events Manager shortly.
For more information regarding test events, please refer to Metas official documentation here.
Article URL: https://help.instant.one/generate-test-event-code
Keywords:
## How to Add Custom HTML to Your Instant AI Emails
Instant AI allows you to add custom HTML directly into your emails if you need more control over layout or styling.
You can add a Custom HTML block just like any other block in the email editor. Open an email, click Add block, select HTML, then paste your custom HTML code and save. The HTML will render as part of your email.
It’s important to note that email HTML is different from web HTML. The editor preview is rendered in a web browser, so code may look fine there but break once the email is sent. Some HTML and CSS that works on websites is not supported by email clients.
Because of this, you should always:
-
Use HTML that was originally built for emails
-
Avoid pasting raw website HTML
-
Send yourself a test email and check it in your inbox (Gmail, Outlook, Apple Mail, etc.)
If you’re copying HTML from an existing email (for example from Klaviyo or an email in your inbox), open the email, inspect the HTML, copy the block you want, and paste it into a Custom HTML block in Instant AI. If it doesn’t render correctly, try copying a parent container instead — email styling often relies on surrounding table or wrapper markup.
Once saved, the HTML block can be reused in future emails without needing to copy and paste again.
Unsubscribe links and custom footers
Every Instant AI email must include an email address and an unsubscribe link. Emails cannot be saved or sent without an unsubscribe link.
If you’re using a custom footer, there are two ways to handle this.
The easiest option is to add your custom HTML above Instant’s footer and remove the unsubscribe section from your custom footer. This lets you fully customise the design while keeping Instant’s unsubscribe block at the bottom.
If you want to fully replace the footer, you must use Instant’s unsubscribe link in your HTML. Find where the unsubscribe URL exists in your footer and replace it with:
href=" {{ unsubscribe_link }}"
You can keep the visible text (for example, “Unsubscribe”) — only the URL needs to change. If the Instant unsubscribe link is missing, the email won’t save.
Tip: use Ctrl + F (or Cmd + F) and search for “unsubscribe” to find it quickly.
If you’re unsure how to update the HTML, you can paste it into a tool like ChatGPT and ask it to replace the unsubscribe URL with {{ unsubscribe_link }}. Always send a test email afterward to confirm it works as expected.
Article URL: https://help.instant.one/how-to-add-custom-html-to-your-instant-ai-emails
Keywords:
## Email compliance best practices in the United States
Like any email marketing software, it's important that you use Instant in a way that protects your brand reputation and is compliant with United States spam regulations.
1. Only send compliant emails
The CAN-SPAM Act 2003 and the accompanying CAN-SPAM Rule outline your responsibilities as an email sender in the United States. The Federal Trade Commission has published a useful guide to assist businesses with their compliance.
When sending an email, ensure that you:
- Don’t use false or misleading header information. your “From,” “To,” “Reply-To,” and routing information – including the originating domain name and email address – must be accurate and identify the person or business who initiated the message.
- Don’t use deceptive subject lines. The subject line must accurately reflect the content of the message.
- Identify the message as an ad. The law gives you a lot of leeway in how to do this, but you must disclose clearly and conspicuously that your message is an advertisement.
- Tell recipients where you’re located. Your message must include your valid physical postal address. This can be your current street address, a post office box you’ve registered with the U.S. Postal Service, or a private mailbox you’ve registered with a commercial mail receiving agency established under Postal Service regulations.
- Tell recipients how to opt out of receiving future marketing email from you. Your message must include a clear and conspicuous explanation of how the recipient can opt out of getting marketing email from you in the future. Craft the notice in a way that’s easy for an ordinary person to recognize, read, and understand. Creative use of type size, color, and location can improve clarity. Give a return email address or another easy Internet-based way to allow people to communicate their choice to you. You may create a menu to allow a recipient to opt out of certain types of messages, but you must include the option to stop all marketing messages from you. Make sure your spam filter doesn’t block these opt-out requests.
- Remember that subscribers and members can opt out of marketing emails, too. Recipients of emails from a sender that runs a subscription service or membership program still have the right to opt out of marketing messages from you. While you don’t need to get members’ consent to send them marketing emails, subscribers and members don’t lose their ability to opt out of marketing emails from you simply because they have a subscription or membership. Before sending a message without an unsubscribe link to subscribers or members, be sure that the primary purpose of the message fits within one of the five categories of “transactional or relationship” message set out in the Act. If it doesn’t, you need to include a way for recipients to opt out of further marketing messages from you.
- Honor opt-out requests promptly. Any opt-out mechanism you offer must be able to process opt-out requests for at least 30 days after you send your message. You must honor a recipient’s opt-out request within 10 business days. You can’t charge a fee, require the recipient to give you any personally identifying information beyond an email address, or make the recipient take any step other than sending a reply email or visiting a single page on an Internet website as a condition for honoring an opt-out request. Once people have told you they don’t want to receive more messages from you, you can’t sell or transfer their email addresses, even in the form of a mailing list. The only exception is that you may transfer the addresses to a company you’ve hired to help you comply with the CAN-SPAM Act.
- Monitor what others are doing on your behalf. The law makes clear that even if you hire another company to handle your email marketing, you can’t contract away your legal responsibility to comply with the law. Both the company whose product is promoted in the message and the company that actually sends the message may be held legally responsible.
2. Keep your privacy policy and terms up to date
When implementing any new website analytics product, businesses should update their privacy policies to keep their customers informed.
When implementing Instant in the United States, merchants must update their privacy policies.
The following clause is our standard recommendation:
We use Instant to help us understand how our customers use our site, and use this information to retarget for marketing purposes. You can read more about how Instant uses your Personal Information here: https://www.instant.one/privacy-policy. You can opt-out by contacting help@instant.one
Merchants should also obtain legal advice specific to their businesses.
3. Consider brand reputation when sending emails
From product pricing and visual identity to product manufacturing quality and marketing strategies, everything you do as a business impacts your brand.
Email marketing continues to be a key growth area in the United States. In 2023, 62% of marketers in the United States reported that their email marketing budget had increased in the past 12 months — the leading area relative to any other direct marketing channel.
Shopper engagement marketing is incredibly common in online retail. Even the most premium brands utilise cart abandonment marketing, discounts for returning shoppers, and other strategies to maximise customer lifetime value.
Merchants can use insights from Instant to trigger a variety of email marketing campaigns from their email marketing software. While most choose to configure each of our recommended marketing flows, some innovate and create additional flows, while others only implement a subset of our recommended flows. We encourage brands to find what is right for them, balancing business growth and brand reputation.
Article URL: https://help.instant.one/best-practices-email-compliance
Keywords:
## Maximizing ROI from Instant Audiences
Like any other marketing product, the return-on-investment you can achieve through Instant Audiences is dependent on how you configure and utilize it.
Email marketing software can be high maintenance. Instant AI can send abandonment emails for you, removing the need to manually setup and manage flows in your Email Service Provider like Klaviyo. We automate literally everything outlined in this help doc.
Go live with Instant AI in minutes.
1. Configure all recommended email marketing flows
By configuring flows in your Email Service Provider, you can automatically market to shoppers identified by Instant, driving revenue to your business.
Instant Audiences performs best when a shopper has displayed high intent to purchase, but is unlikely to have been identified by your ecommerce platform or ESP.
Therefore, the most important flow to configure is the Add to Cart Abandonment flow, which markets to shoppers who have added a product to cart on your website, but not completed checkout.
The second most important flow is typically the Cart Viewed/Checkout Started Abandonment flow. This flow markets to shoppers identified by Instant Audiences who have visited your cart or checkout pages but have not placed an order.
While these are the two flows absolutely required in order to achieve results from Instant, there are two additional flows recommended for optimal performance.
First is the Product Viewed flow, which markets to shoppers who have added a product to cart on your website, but not completed checkout.
And finally, we have the Collection Viewed flow, which markets to shoppers who have browsed collection pages on your website.
It's equally important to ensure your email flows are configured optimally:
- Never enable Klaviyo's Smart Sending feature for your Add to Cart Abandonment or Cart Viewed/Checkout Started Abandonment flows. While this feature can improve deliverability for your campaigns and low-intent flows, abandonment flows are very high intent, and typically see fantastic deliverability. Erroneously enabling Klaviyo's Smart Sending feature for your Add to Cart Abandonment or Cart Viewed/Checkout Started Abandonment flow could reduce the performance of Instant Audiences by 50% or more.
- Ensure all your emails correctly link to the cart. Many users erroneously link their abandonment emails to a static URL like https://www.mollyjogger.com/cart. Linking directly to the cart will often mean users land on an empty cart page (try the link above to see what happens). This is because their cart session may have expired (very likely if their cookies with Klaviyo have expired), or they may be using a different device/web browser to where they originally added products to cart. Always use the correct
 dynamic tags when linking in abandonment emails.
- Send at least three emails in each abandonment flow. Many shoppers won't convert until they've received three or four abandonment emails. If you never send that third or fourth email, they may never convert.
2. Dispatch emails at an effective time
Your Email Service Provider allows you to choose when to dispatch emails triggered by data provided by Instant.
If you dispatch emails too early, you may market to a shopper who is already about to complete a half-finished purchase on your website. If you dispatch emails too late, you have a much lower chance of retaining abandoned shoppers.
We've found the sweet spot for email dispatch to be between 45 and 60 minutes after each flow is triggered. Note that emails should also be dispatched 15 minutes after any generic equivalent flows.
If you are sending your emails too late, you will not achieve optimal results from Instant.
3. Include offers in your emails
Shoppers are most likely to return to your website to complete an abandoned purchase if you offer them some kind of deal.
Many of our customers include product or shipping discount codes in their emails. Others offer free gifts with purchase.
Your Email Service Provider makes it easy to experiment with these offers, so you can test how much they improve your revenue, and whether this improvement is sufficient, given your margins, brand value, and other factors.
4. Send attractive emails
Shoppers are more likely to open an email if it has an effective subject line. Shoppers are more likely to accept an offer in an email if the email is well-designed.
Best practices for email content and design include:
- Use concise and attractive subject lines.
Shoppers receive many emails per day. You need to grab their attention. Your Email Service Provider allows you to A/B test subject lines. Sometimes the best effective subject lines can be surprising, so test various options. If you're offering shoppers a discount in your email, include this in your subject line.
- Send beautiful but simple emails.
Attractive emails convert better. You can over do it, though. It's important to strike a balance between aesthetics and usability, just like with the design of your website.
- Feature clear calls-to-action.
Your emails should include a prominent call-to-action button or link that makes it obvious and easy for a shopper to accept an offer or pick up where they left off in their shopping cart.
If you're struggling to achieve your desired return-on-investment from Instant, reach out to us. We're happy to review your flows and make recommendations.
We can also introduce you to agency partners who can work with you to improve your flows, email templates, and email marketing more generally
5. Create a prominent newsletter subscription form.
A newsletter subscription form is a powerful tool for growing your audience and converting visitors into customers. Through these forms, you can effectively capture visitor information, ultimately enhancing user identification and boosting revenue for your store.
Best practices for newsletter subscription forms include:
-
Incentives: Consider offering a welcome series pop-up that includes a special discount or exclusive access to products, services, or new content. This will encourage visitors to subscribe.
- Placement: Position the form prominently on your homepage, such as in the header, footer, or as a pop-up. Ensure it’s easily visible without being intrusive.
-
Clear Call to Action: Use compelling language in your call to action. Phrases like “Get 15% OFF or Join our community for exclusive offers!” can motivate visitors to sign up.
- Use Instant's Predictive Opt-in to intelligently trigger newsletter subscription pop-ups. This can dramatically increase your number of opted-in shoppers, and directly lead to revenue uplift due to additional enrollments in your welcome series flows.
6. Send more campaigns
Sending multiple email campaigns can significantly boost engagement and conversions, ultimately driving revenue growth. With Instant, we identify shoppers who click links in your Klaviyo campaigns, allowing us to identify more potential customers with each campaign you launch.
Campaigns suggestions:
- Product Updates: Back in Stock, New Collections, or Product Launches.
- Product Education: Highlight Features & Usages, Tips & Tutorials.
- Sales and promotions: Free shipping, Referral Discounts, Coupons, Bundles, Seasonal promotions (e.g., Black Friday, Boxing Day, Christmas).
- Seasonal or Holiday themes: Back to School, Mother's Day, Valentine's Day, Christmas.
Article URL: https://help.instant.one/maximising-audiences-roi
Keywords:
## How to Use Dynamic Product Blocks in Emails
Dynamic Blocks let you automatically showcase products in your emails without needing to manually update them each time. You choose a collection, sort order, and number of products — Instant AI does the rest.
How Dynamic Blocks Work
-
Add a Dynamic Products block from the right-hand menu, or click the + button inside an empty placeholder block.
-
Choose one of your existing collections, set the number of products, and select how to sort them (Best Selling, Highest/Lowest Price, Newest, Oldest).
-
You can add multiple Dynamic Blocks per email. Instant AI will never show the same product twice.
-
If there aren’t enough unique products, we’ll hide duplicates automatically.
-
Out-of-stock or unavailable products are always excluded.
-
If no data is available at send time, the block is hidden — shoppers never see placeholder content.
-
You can add headings or supporting text using the rich text editor above or around the block.
Campaigns
In campaigns, Dynamic Blocks only use the products and rules you select.
For example, if you add a Best Sellers block with two products and later add another Best Sellers block with three products, the final email will display five unique best-selling products.
Flows
Flows work the same as campaigns, but Dynamic Product blocks can be used in addition to the standard product blocks needed for abandonment emails.
-
Shoppers will still see their cart by default using the existing flow product block
- As an optional step, you can then add an extra Dynamic Product Block for recommendations, like Best Sellers or New Arrivals, further down the email.
-
Our logic ensures products shown in Dynamic Blocks won’t duplicate what’s already shown from the cart or browse section.
Example: In an Abandoned Cart email, you might show the shopper’s cart items at the top, then add a Best Sellers block at the bottom to extend the email and highlight additional products.
FAQ
Will duplicate products ever appear in the same email?
No. We automatically ensure each product is only shown once per email, even if you use multiple Dynamic Blocks.
What if my collection doesn’t have enough products?
We’ll display as many as are available. If there aren’t enough unique products, the block will be hidden.
Do out-of-stock products show up?
No. Instant AI automatically excludes products that are out of stock or unavailable.
What happens if there’s no product data available at send time?
The block will be hidden so your customer never sees placeholder content.
Can I add titles or descriptions above Dynamic Blocks?
Yes. Use the rich text editor to add headings, subheadings, or other content around the block.
Article URL: https://help.instant.one/how-to-use-dynamic-product-blocks-in-emails
Keywords:
## How do I import a list of shoppers to Instant AI?
Instant AI will automatically import your existing contacts from Shopify and Klaviyo when both platforms are first integrated. If either of these platforms are your source of truth, there is no need to manually import any data to Instant AI.
If your current contact list lives outside of Klaviyo or Shopify, such as within another email sending platform, you can upload a CSV to have all contacts imported.
How to import contacts from an existing system
There are some critical pieces of information that are required when importing, and your import must match our formatting exactly.
Step One: Create your CSV to import
There are some critical pieces of information that are required when importing, and your import must match our formatting exactly.
Your CSV must include the following columns, with each row representing a contact:
- Email
- Email Marketing Consent
- Email Marketing Consent Timestamp
IMPORTANT: The Email Marketing Consent Timestamp is critical so that we know the exact time of the subscription change. In the instance there are duplicates, or you are importing data when Instant AI is already live, this helps us prioritise the latest actions and avoids accidently re-subscribing an unsubscribed customer.
The timestamp is acceptable in the following format only "YYYY-MM-DD HH:MM:SS". For example 2024-01-13 10:20:35
The following fields are optional
- First Name
- Last Name
Example CSV:
| Email |
First Name |
Last Name |
Email Marketing Consent |
Email Marketing Consent Timestamp |
| one@instant.one |
Instant |
One |
Subscribed |
2024-01-13 10:20:35 |
| two@instant.one |
Instant |
Two |
Unsubscribed |
2025-01-13 10:20:35 |
Step Two: Import your CSV
- Go to the Instant Dashboard
- Select Shoppers on the left side navigation
- Select the three dots in the right corner of the table
- Select Add Shoppers or follow this link
- Select Upload a CSV
- Upload your prepared CSV
- Wait for the load to Complete - do not exit this page
- Once Completed, go back to Shoppers and view your total list
Article URL: https://help.instant.one/how-do-i-import-a-list-of-shoppers-to-instant-ai
Keywords:
## How do I measure the performance of Instant Targeting?
To view the impact of Instant Audiences on CPC and ROAS in Facebook, you can generate a report in Facebook Ads Reporting.
We highly recommend running reporting on Instant Targeting at least 7 days after go live, to ensure results have had time to materialize.
Please follow the below steps to generate before/after in Facebook Ads Reporting.
- Navigate to your Facebook Business Manager and proceed to Ads reporting.
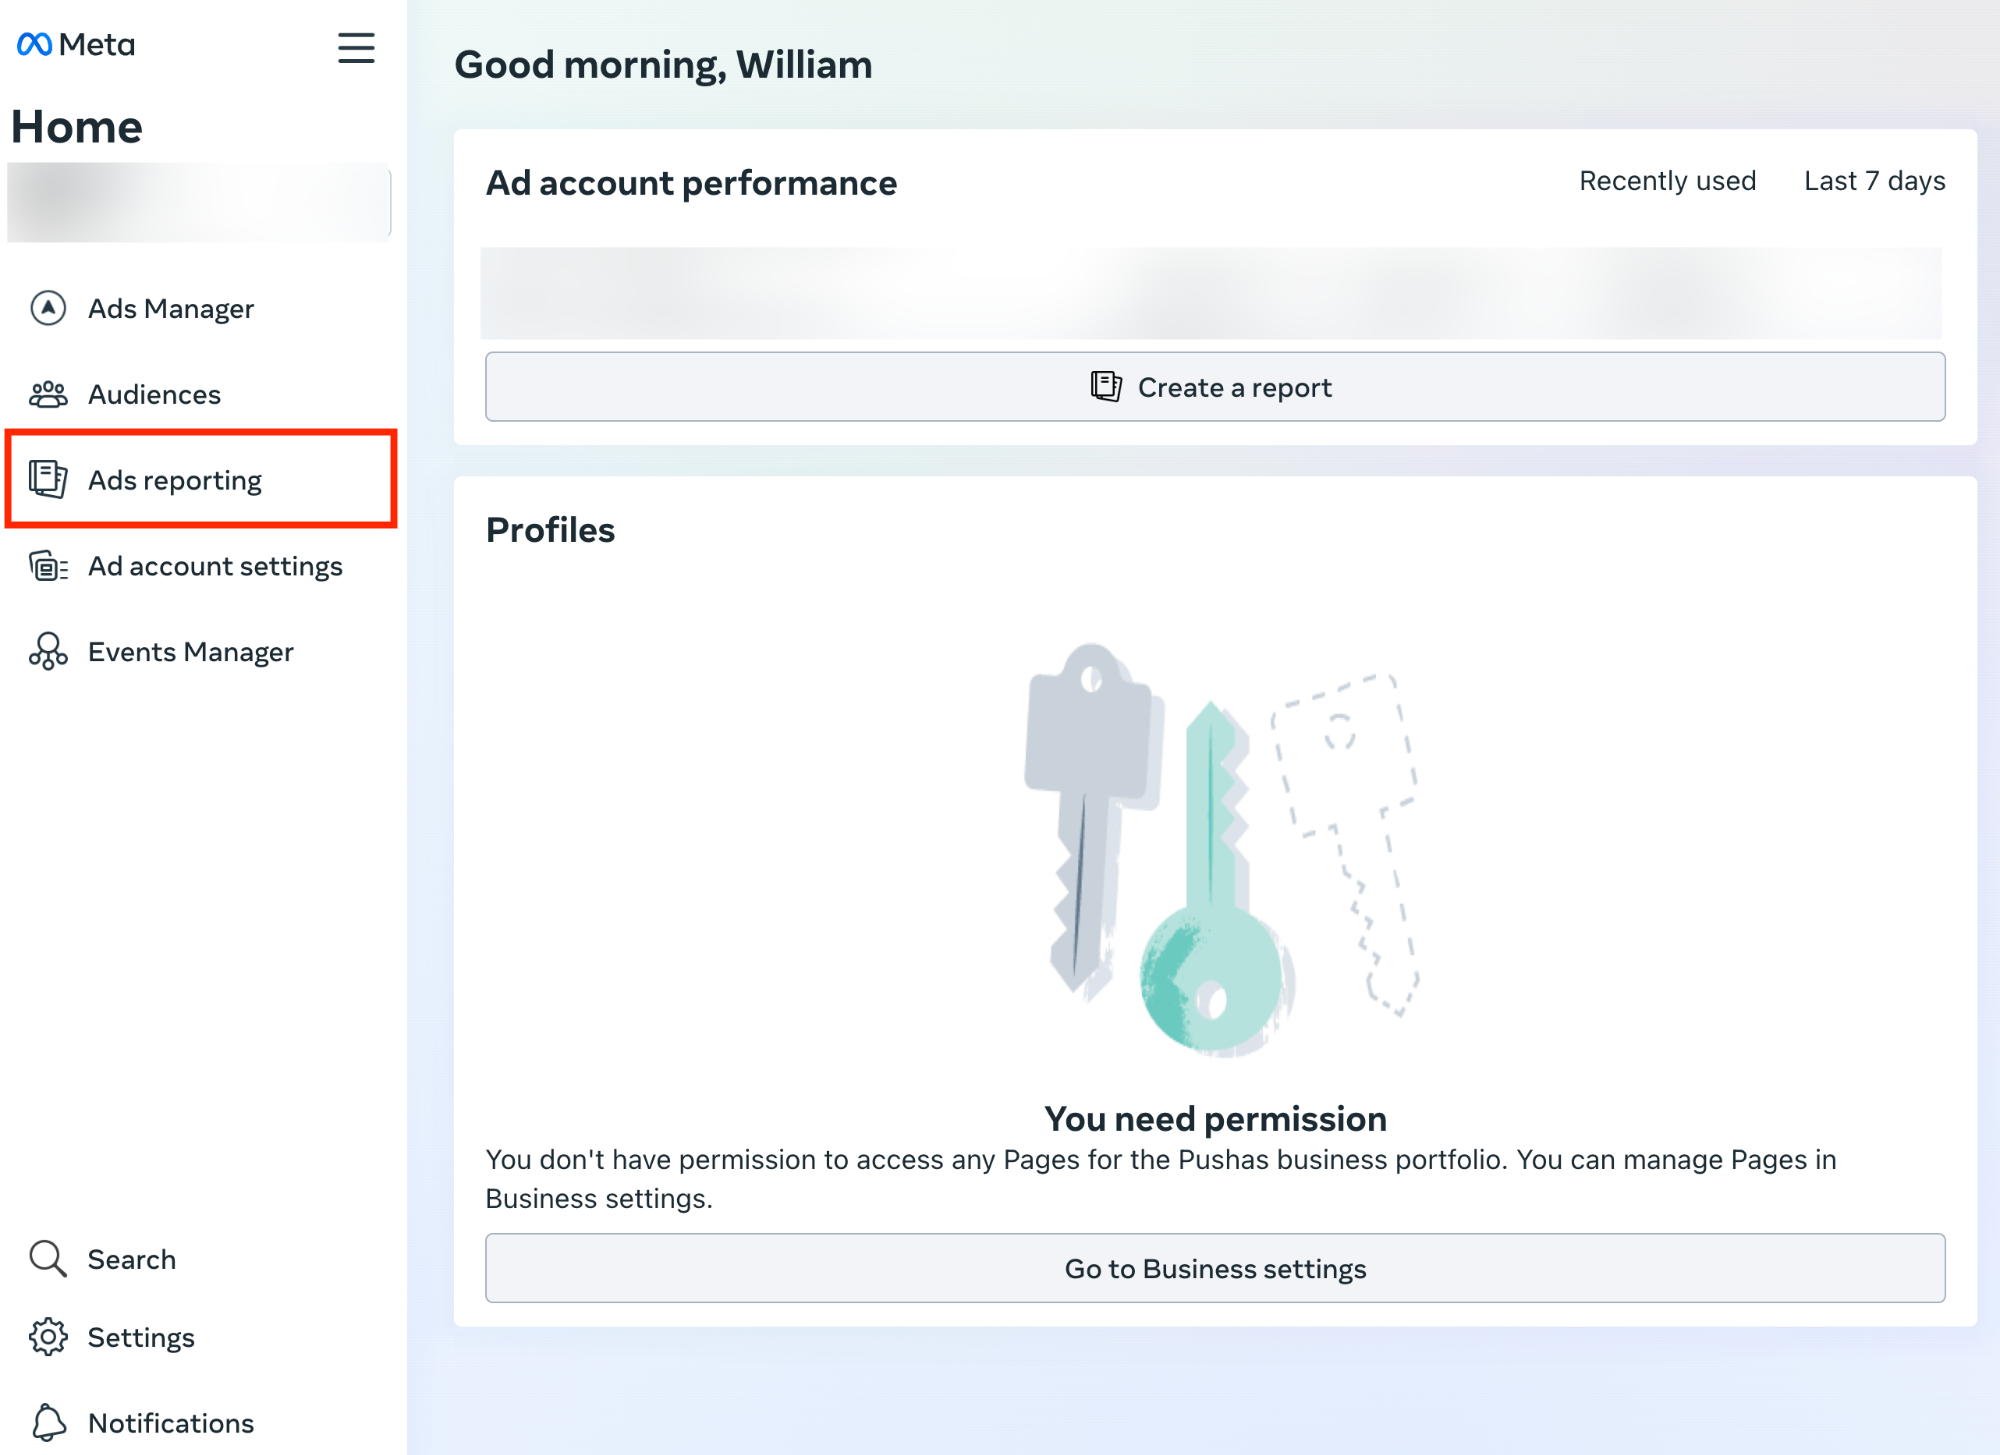
- Click Create Your Report
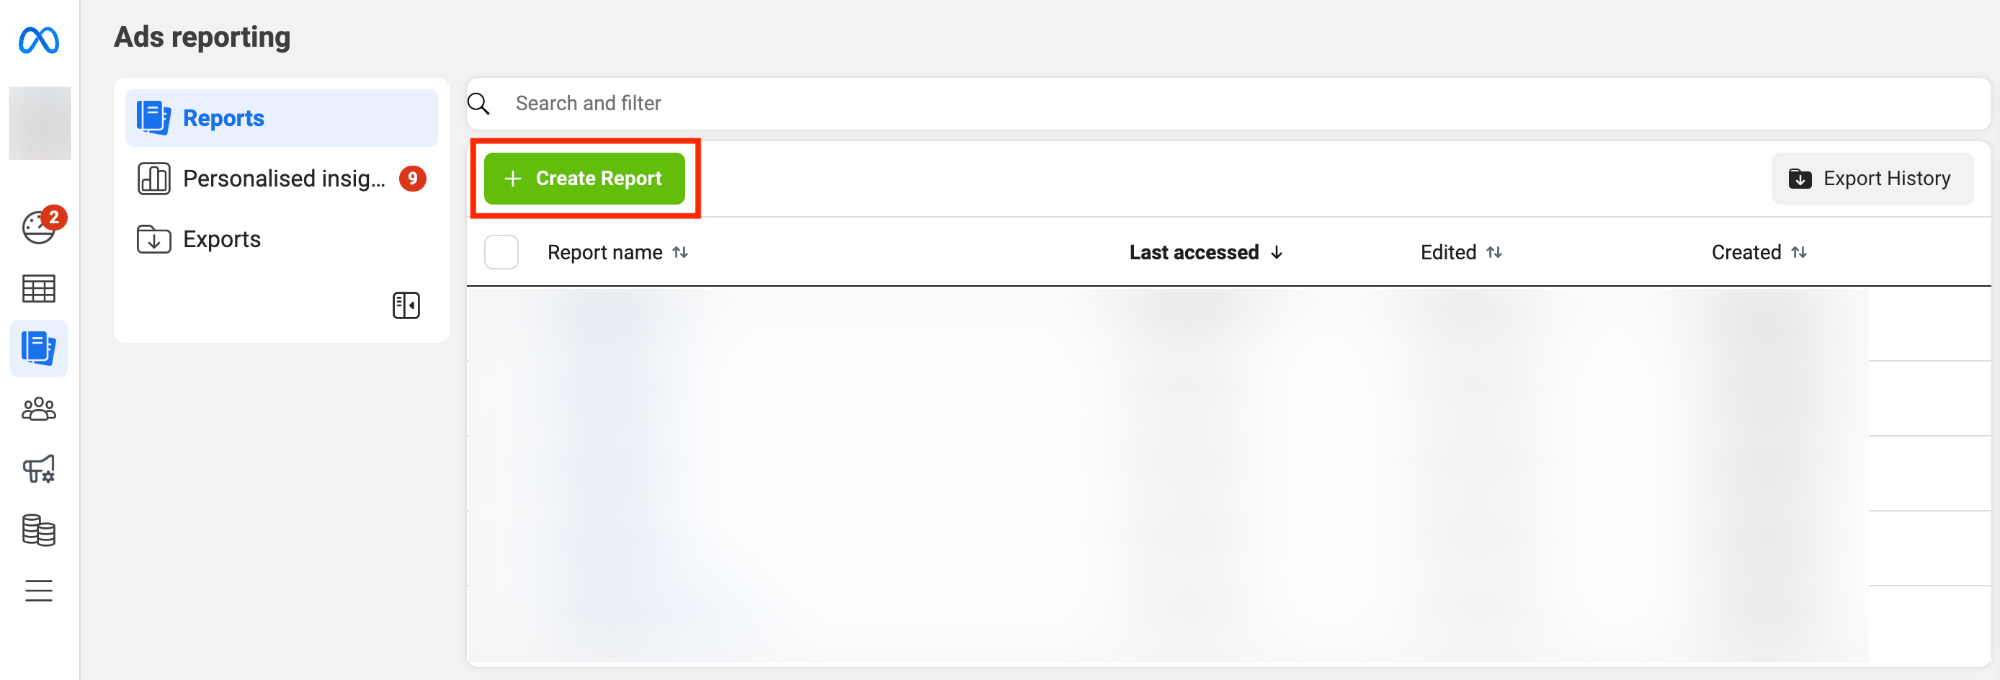
- You will be prompted to Choose a layout. Select Pivot table and click Continue.
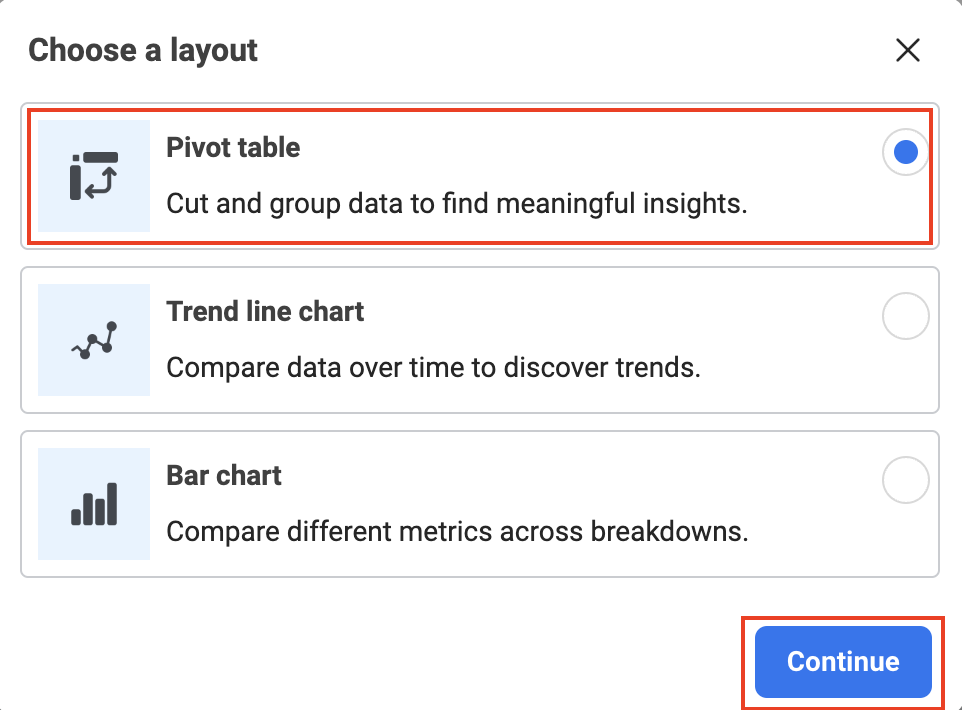
-
Edit the date range so that:
- The selected date range is a time range after Instant Targeting was enabled
- The Compare setting is enabled. This will enable us to compare the performance of ads before and after.
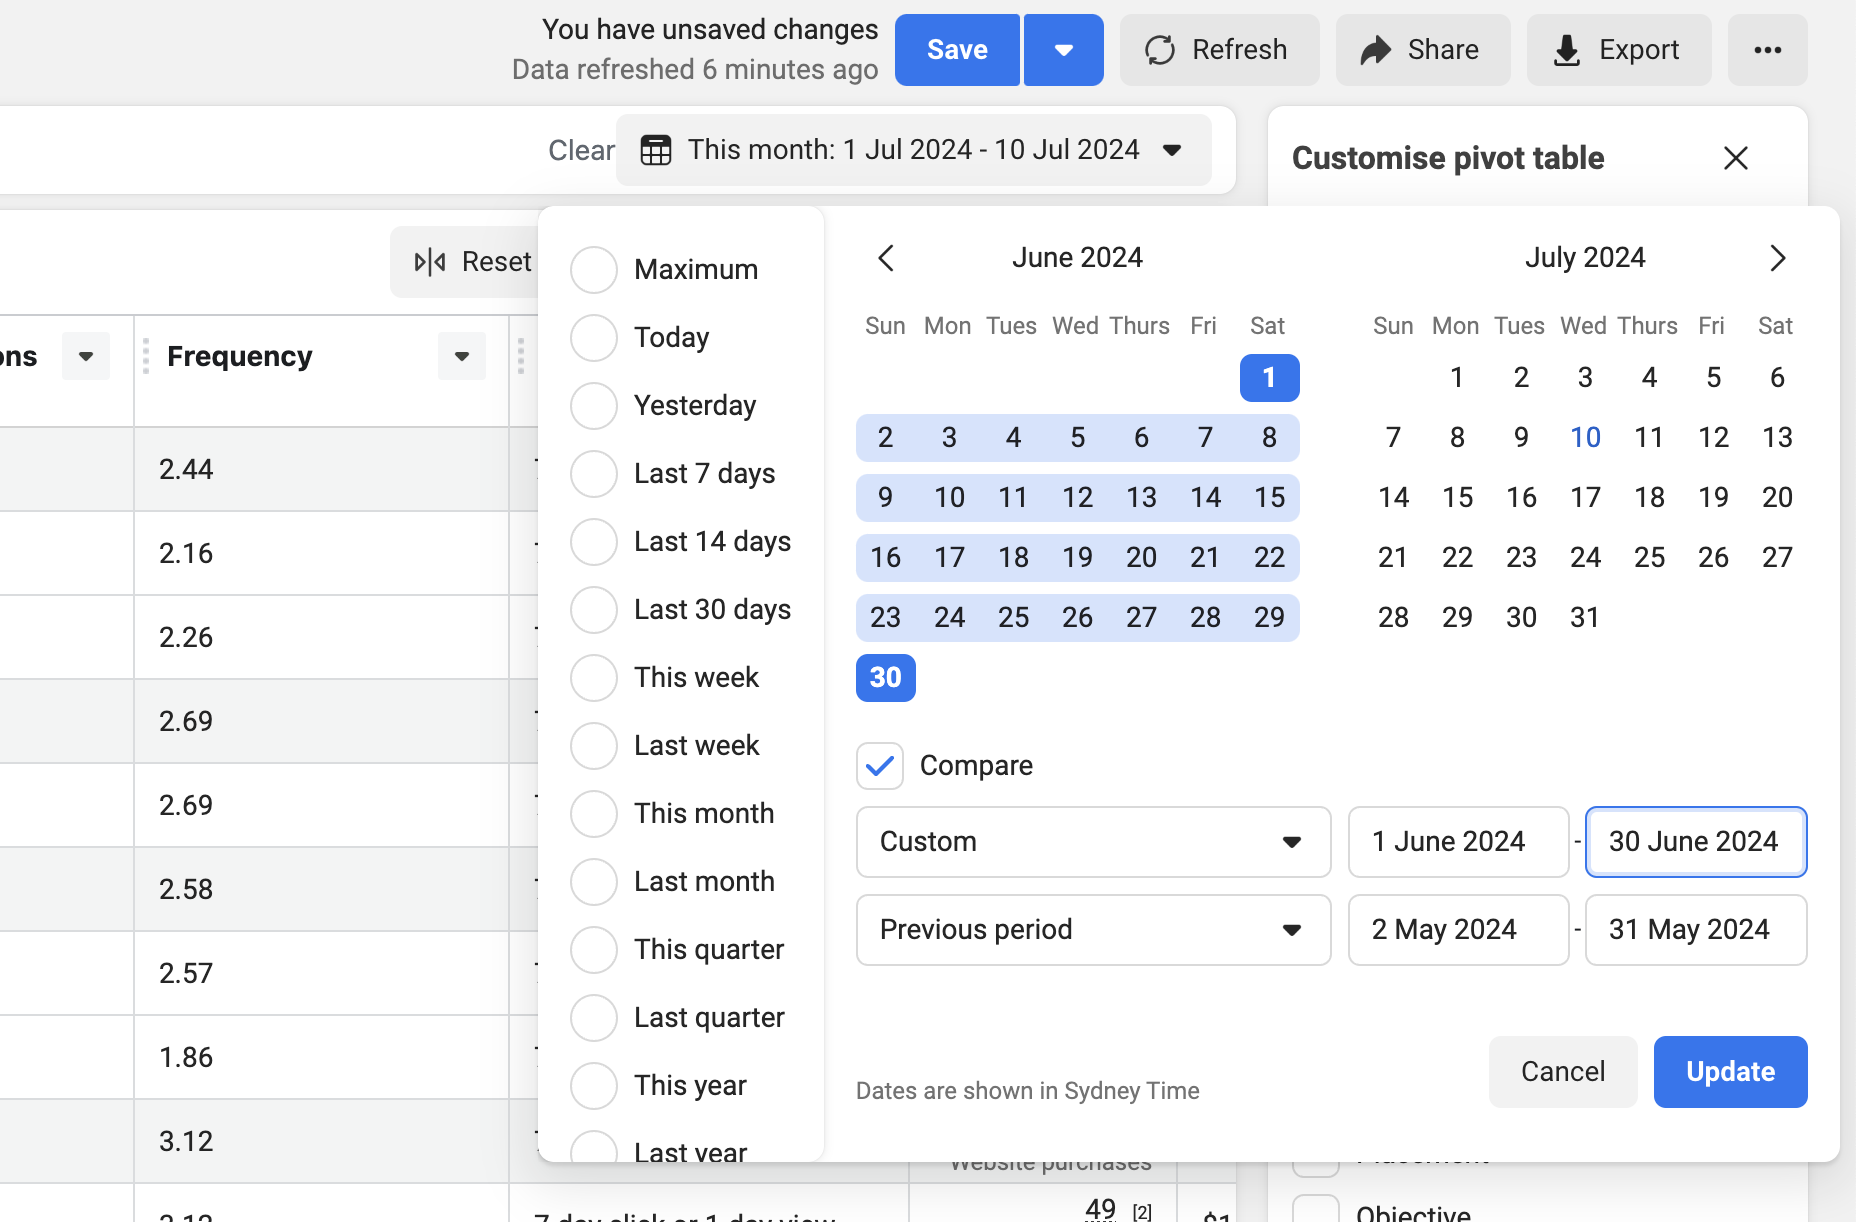
- Under Customise pivot table, remove Ad set name. Switch over to metrics, and remove all currently selected metrics.
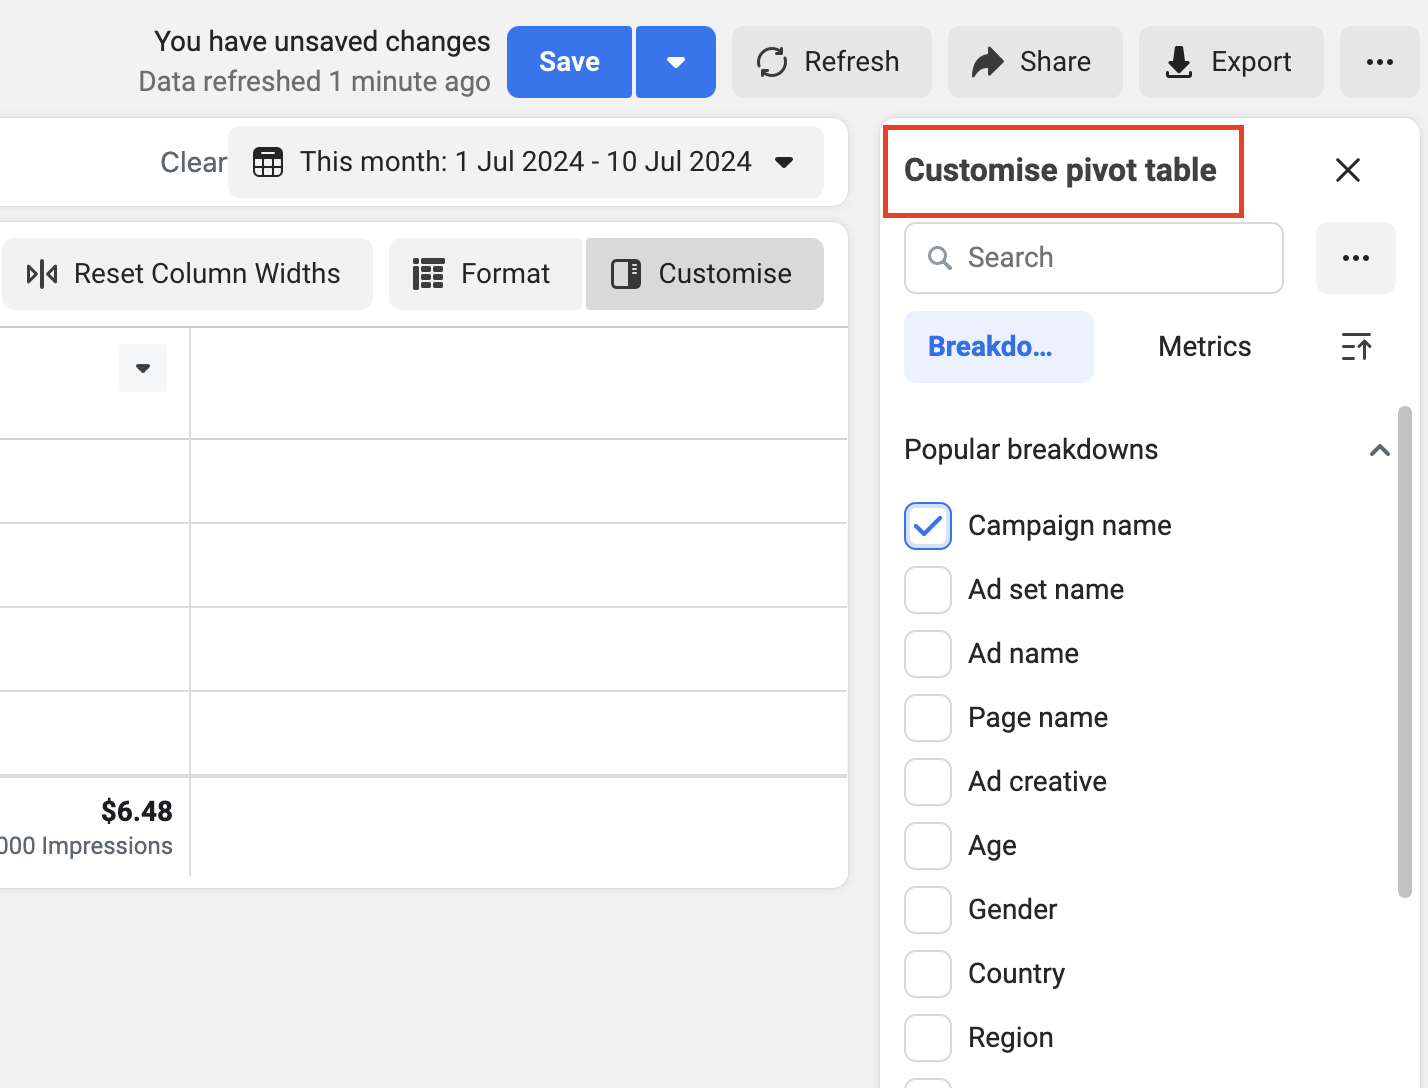
- Then, add the metrics that you would like to analyse. In particular, enable CPC (cost per click), CPM (cost per 1,000 impressions), Website ROAS, Cost Per Result.
- You may also want to measure: Cost per 1,000 Accounts Centre accounts reached
- Analyze the results. With the Compare option selected, you will see % changes between the time period where Targeting was enabled, compared to the time period before.
- Please note, that before/after analysis does not take into account natural fluctuations or seasonality in business into context.
- For success, you want to see a
- Decrease in CPC
- Decrease in CPM
- Increase in Website ROAS
- Decrease in Cost Per Result
- Please note that the dashboard shows an % avg change, however this is often very skewed due to ads being turned on and off etc.
- Example of improved ROAS (note the increase in ROAS per ad set)
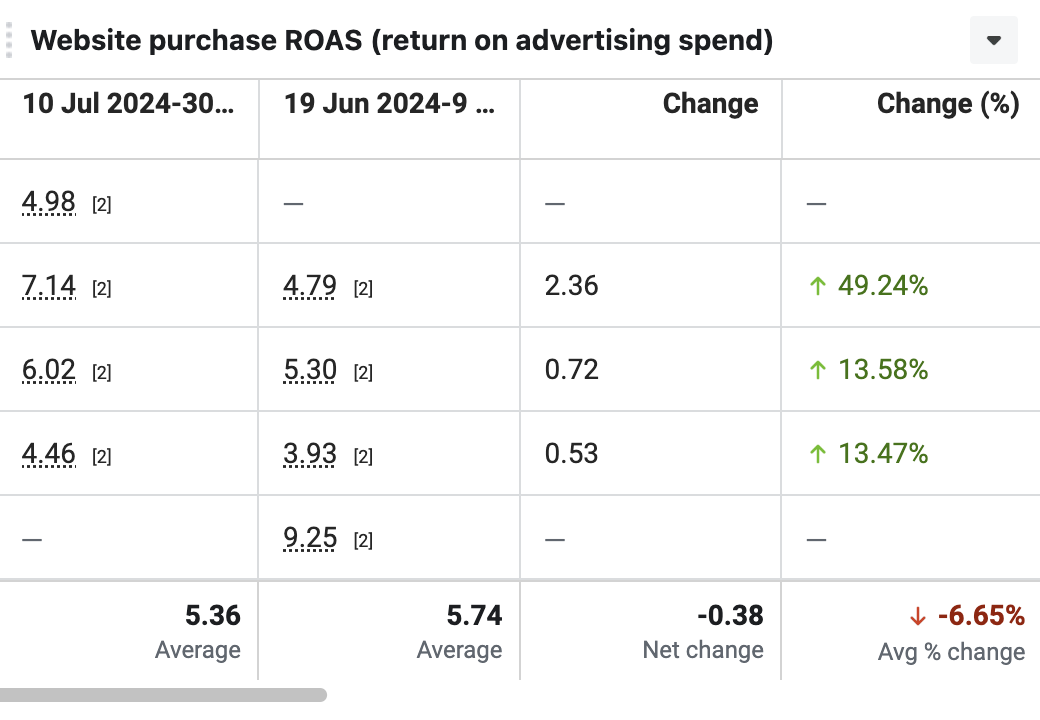
- Example of decreased CPC (note the decrease in CPMs per ad set)
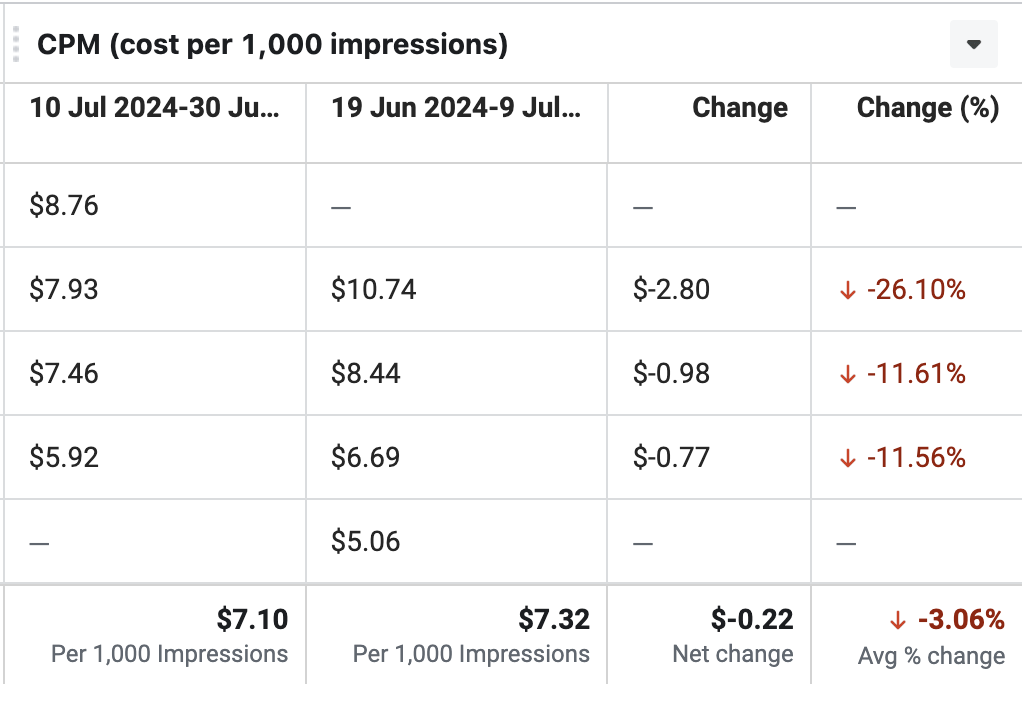
Article URL: https://help.instant.one/measure-targeting-performance
Keywords:
## Installing Instant AI for Headless Shopify Sites
Instant has native integrations into Shopify, however Shopify Headless stores require a custom integration, with five steps:
- Connecting to the Shopify API
- Installing Instant's Identification Pixel
- Tracking Customer Events
- Updating Event Properties
Please contact your customer success manager if you experience any issues. We are happy to guide you or your developers through this implementation if needed.
Step 1: Connecting to Shopify's API
The first step of the integration process requires connecting to Shopify's API.
- Proceed to the Instant dashboard and go to Pixel > Select Shopify. You will see the instructions for connecting to Shopify's API under "Step 1: Shopify API Setup".
- Follow these instructions and verify your integration.
Step 2: Installing Instant's Identification Pixel
The first step of the integration process requires adding Instant's pixel to your site. This allows Instant to identify anonymous shoppers who visit your website.
- Proceed to the Instant dashboard and go to Pixel > Select Shopify. You will see instructions to complete your pixel setup under Step 2: Storefront Pixel.
- Follow these instructions and verify your integration.
Step 3: Tracking Customer Events
Event triggers determine when Instant interaction events are sent and contain all the relevant information to generate a relevant email. Throughout your website, where you may be sending events to an alternative email provider, you will also need to send them to Instant.
- Add
track calls for the following events, if you are able to track them.
PAGE_VIEWEDCOLLECTION_VIEWEDPRODUCT_VIEWEDITEM_ADDED_TO_CARTCART_VIEWEDCHECKOUT_STARTED
- Update all existing usages of
window.InstantJS.track() to add new calls to track events and send to provider INSTANT. If you are using another provider, such as Klaviyo, your events may look like the below. If not, you may have just Instant listed.
For Example: If multiple providers
window.InstantJS?.track("ITEM_ADDED_TO_CART", [
    {
        provider: "KLAVIYO",
        event: {
            // ...
        },
    },
    {
        provider: "INSTANT",
        event: {
            // ...
        },
    },
]);
For Example: If just Instant
window.InstantJS?.track("ITEM_ADDED_TO_CART", [
    {
        provider: "INSTANT",
        event: {
            // ...
        },
    },
]);
- The instant event object supports three top level properties
- For
ITEM_ADDED_TO_CART, use both cart and items:
cart.items must include all items currently in the cart- top-level
items field should include only the new item(s) being added
type InstantEvent = {
    provider: "INSTANT";
    event: {
        /** Current state of the cart */
        cart?: InteractionCart;
        /** Items that were added or removed from the cart */
        items?: InteractionCartItem[];
        /** The product or products that were interacted with */
        products?: InteractionProduct[];
    };
};
- You can provide as many of these properties as are available, but certain events need specific top-level properties.
- PAGE_VIEWED
- COLLECTION_VIEWED
- PRODUCT_VIEWED
- ITEM_ADDED_TO_CART
- CART_VIEWED
- CHECKOUT_STARTED
- Note that you can provide more than just the properties list here per event, e.g. if you always have access to the cart object, then you are free to include it on all events, but it is not required.
Examples
Replace the URL examples below with your own that’s relevant to the URL structure of your cart or store checkout.
window.InstantJS?.track("ITEM_ADDED_TO_CART", [
    {
        provider: "KLAVIYO",
        event: {
            CheckoutURL: "",
            Items: [
                {
                    ProductName: "",
                    Quantity: "1",
                    ItemPrice: "19.95",
                    ImageURL: "",
                },
                {
                    ProductName: "",
                    Quantity: "1",
                    ItemPrice: "221.95",
                    ImageURL: "",
                },
            ],
        },
    },
    {
        provider: "INSTANT",
        event: {
            cart: {
                cart_url: "<https://store.store.com/cart/c/Z2NwLWFzaWEtc291dGhlYXN0MTowMUpZNjFIWTBTMUhTTlNLTVEzMUE2UUVUNw?key=b5be5fb92dc9c590a8e9d2efbf678eeb>",
                currency: "AUD",
                grand_total: 20000,
                cart_id: "",
                discounts: [],
                sub_total: 20000,
                shipping_total: 0,
                tax_total: 0,
                transaction_id: "",
                items: [
                    {
                        item_id: "12345",
                        item_name: "Example Product",
                        item_sku: "EX-PROD-001",
                        product_id: "prod_12345",
                        product_sku: "prod_sku_12345",
                        product_name: "Example Product Name",
                        product_description: "This is an example product description.",
                        product_brand: "Example Brand",
                        product_type: "Example Type",
                        variant_id: "var_12345",
                        variant_sku: "var_sku_12345",
                        variant_title: "Example Variant Title",
                        quantity: 1,
                        price: 20000,
                        currency: "AUD",
                        handle: "example-product-handle",
                        affiliation: "",
                        categories: [],
                        options: [],
                        image: {
                            url: "<https://example.com/image.jpg>",
                        },
                    online_store_url: "<https://yourstore.com/range/range>",                    },
                ],
            },
            items: [
                {
                    item_id: "12345",
                    item_name: "Example Product",
                    item_sku: "EX-PROD-001",
                    product_id: "prod_12345",
                    product_sku: "prod_sku_12345",
                    product_name: "Example Product Name",
                    product_description: "This is an example product description.",
                    product_brand: "Example Brand",
                    product_type: "Example Type",
                    variant_id: "var_12345",
                    variant_sku: "var_sku_12345",
                    variant_title: "Example Variant Title",
                    quantity: 1,
                    price: 20000,
                    currency: "AUD",
                    handle: "example-product-handle",
                    affiliation: "",
                    categories: [],
                    options: [],
                    image: {
                        url: "<https://example.com/image.jpg>",
                    },
                    online_store_url: "<https://yourstore.com/range/range>",
            },
        ],
    },
},
]);
window.InstantJS?.track("PRODUCT_VIEWED", [
    {
        provider: "KLAVIYO",
        event: {
            Items: [
                {
                    ProductName: "Example Product Name",
                    Quantity: "1",
                    ItemPrice: "19.95",
                    ImageURL: "<https://example.com/image.jpg>",
                },
            ],
        },
    },
    {
        provider: "INSTANT",
        event: {
            products: [
                {
                    product_id: "prod_12345",
                    product_sku: "prod_sku_12345",
                    product_name: "Example Product Name",
                    product_description: "This is an example product description.",
                    product_brand: "Example Brand",
                    product_type: "Example Type",
                    variant_id: "var_12345",
                    variant_sku: "var_sku_12345",
                    variant_title: "Example Variant Title",
                    price: 20000,
                    currency: "AUD",
                    handle: "example-product-handle",
                    affiliation: "",
                    categories: [],
                    options: [],
                    image: {
                        url: "<https://example.com/image.jpg>",
                    },
                    online_store_url: "<https://yourstore.com/range/range>",                },
            ],
        },
    },
]);
Types for track function
/******************** TYPES ********************/

type InteractionProductOption = {
    /** The label of the option, e.g. "Color" */
    label: string;
    /** The value of the option, e.g. "Red" */
    value: string;
    /** The ID of the option, e.g. "OPTION-1" */
    option_id: string;
    /** The value of the option, e.g. "OPTION-1-VALUE-1" */
    option_value: string;
};

type InteractionProductImage = {
    url: string;
    aspect_ratio?: number;
    alt?: string;
    height?: number;
    width?: number;
};

type InteractionProductCollection = {
    id: string;
    name: string;
};

type InteractionProduct = {
    /** The ID of the product, e.g. "prod_12345" */
    product_id: string;
    /** The SKU of the product, e.g. "BLANKET-SMALL" */
    product_sku: string;
    /** The name of the product, e.g. "Blanket" */
    product_name: string;
    /** The description of the product. e.g. "A fluffy blanket" */
    product_description?: string;
    /** The brand of the product. e.g. "Google" */
    product_brand?: string;
    /** The type of the product. e.g. "custom", "gift_card" */
    product_type?: string;

    /** The ID of the product variant */
    variant_id?: string;
    /** The SKU of the product variant */
    variant_sku?: string;
    /** The title of the variant SKU. e.g. "Small" */
    variant_title?: string;

    /** The price of the product, in the smallest unit of the currency */
    price?: number | null;
    currency?: string;

    /** Collections that this product belongs under. */
    categories?: InteractionProductCollection[];
    /** The affiliate of the product. e.g. "Google" */
    affiliation?: string;
    /** Available options that the product has. */
    options?: InteractionProductOption[];

    /** The URL of the product image */
    image: InteractionProductImage;
    /**  The handle of the product. e.g. "blanket-small" */
    handle?: string;
    /** The url of the product page */
    online_store_url?: string;
};

type InteractionCartItem = InteractionProduct & {
    /** The ID of the cart item */
    item_id: string;
    quantity: number;
    item_name?: string;
    item_sku?: string;
};

type InteractionPurchaseDiscount = {
    id: string;
    type: "DISCOUNT_CODE";
    percentage: number;
    amount: number;
};

type InteractionCart = {
    /** The URL of the cart page */
    cart_url: string;
    cart_id?: string | null;
    currency?: string | null;
    transaction_id?: string | null;
    /** The total amount of the cart after shipping and discounts in the smallest unit of the currency */
    tax_total?: number | null;
    /** The total amount of the cart before shipping and discounts in the smallest unit of the currency */
    sub_total?: number | null;
    /** The total amount of shipping costs in the smallest unit of the currency */
    shipping_total?: number | null;
    /** The total amount of the cart in the smallest unit of the currency */
    grand_total?: number | null;
    discounts?: InteractionPurchaseDiscount[];
    /** All items currently in the cart */
    items: InteractionCartItem[];
};

type KlaviyoEvent = {
    provider: "KLAVIYO";
    event: unknown;
};

type InstantEvent = {
    provider: "INSTANT";
    event: {
        /** Current state of the cart */
        cart?: InteractionCart;
        /** Items that were added or removed from the cart */
        items?: InteractionCartItem[];
        /** The product or products that were interacted with */
        products?: InteractionProduct[];
    };
};

type InteractionType =
    | "PAGE_VIEWED"
    | "COLLECTION_VIEWED"
    | "PRODUCT_VIEWED"
    | "ITEM_ADDED_TO_CART"
    | "CART_VIEWED"
    | "CHECKOUT_STARTED";

/******************** GLOBALS ********************/

export {};
declare global {
    interface Window {
        InstantJS?: {
            track: (type: InteractionType, body: (KlaviyoEvent | InstantEvent)[]) => void;
        };
    }
}
Testing your Implementation
Open DevTools Console and verify InstantJS.track() is firing with the correct provider payloads and confirm:
- cart_url is complete
- online_store_url exists for each product
- All cart items are present in cart.items
- Newly added items are only in items
Article URL: https://help.instant.one/installing-instant-ai-for-headless-shopify-sites
Keywords:
## Flow Setup: Cart Viewed/Checkout Started Abandonment
Cart Viewed/Checkout Started abandonment flows target visitors who have viewed their cart or the checkout page but left the site without completing a purchase.
These flows are triggered through the "Cart Viewed / Checkout Started - Instant Audiences" metric in Klaviyo.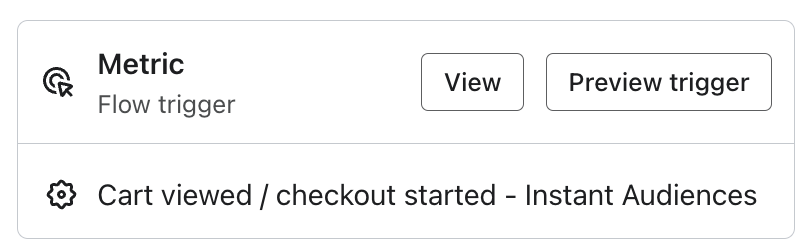
If you have an existing flow setup for 'Checkout Started', please duplicate it for Instant Audiences.
If not, we suggest duplicating your 'Added to Cart' flow.
The naming convention for this new flow should be '[Instant Audiences] Cart Viewed/ Checkout Started'
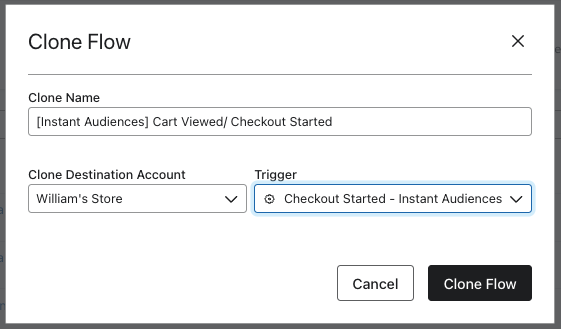
Flow Filters
To ensure that contacts are not enrolled multiple times or if they have made a purchase, it's crucial to add the following flow filters to your new flow:
- Placed Order > zero times since starting this flow
- Has not been in this flow in the last 7* days
*The cooldown period is how long you want before a customer can reenter this flow to prevent over-messaging. You can configure this as you wish.
If you have these existing flows:
If you have any of these flows, you'll also need to add these filters on your new '[Instant Audiences] - Cart Viewed/ Checkout Started' flow to prevent enrolling contacts already in your existing flow or in a higher intent Audiences flow.
| If you have, or are going to create this existing flow: |
Add these filters to your new Instant Audiences flow: |
Checkout Started Flow
|
Flow filter: Checkout Started > zero times > since starting this flow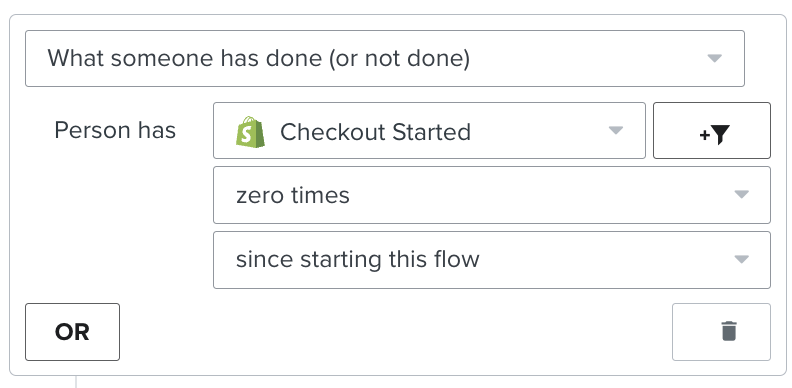 |
Extend the delay on your new flow to be 15 minutes later than your existing flow |
|
If your existing Checkout Started flow has a cooldown (i.e. Has not been in this flow > in the last X days), then add the following filter to your new flow.
- Person has Received Email > where Flow > equals {{ Your Existing Checkout Started Flow }} > zero times > in the last 7* days
If this Audiences flow also support SMS, then also add the filter:
- Person has Received SMS > where Flow > equals {{ Your Existing Abandonment Flow }} > zero times > in the last 7 days
|
Add these filters to your existing flow's
If you have any of these existing non-Instant Audiences flows, these additional filters must be added to your existing flows to prevent enrolling contacts already in those flows.
| If you have, or are going to create this existing flow |
Add these filters to your existing flow |
Checkout Started Flow
|
If you have a cooldown on your existing flow:
then add the following filter to your new flow:
Person has Received Email > where Flow > equals {{ [Instant Audiences] Cart Viewed/ Checkout Started }} > zero times > in the last 7* days
If this Audiences flow also support SMS, then also add the filter:
- Person has Received SMS > where Flow > equals {{ Your Existing Abandonment Flow }} > zero times > in the last 7 days
|
Article URL: https://help.instant.one/checkout-started-abandonment
Keywords: flow filters
## Boost Your Email List & Revenue with Instant Predictive Opt-In
Capture more emails by displaying pop-ups when shoppers are most engaged.
# Instant Predictive Opt-In
Every visitor to your site is a potential customer—but not all will subscribe the first time they see a pop-up. Traditional opt-in forms appear once and disappear if ignored, missing valuable opportunities to capture leads.
Instant Predictive Opt-In changes that. Instead of relying on a single pop-up, we analyse shopper behaviour in real time and resurface the opt-in form at the perfect moment—when a visitor is most engaged and likely to subscribe.
By targeting high-intent shoppers at the right time, you can increase sign-ups, strengthen your email list, and boost welcome flow revenue—all with no extra effort.
---
## How Predictive Opt-In Works
1. **User Arrival** – A visitor arrives on your website and begins browsing your homepage.
2. **Initial pop-up display** – They receive your standard email/SMS opt-in form.
3. **Behaviour analysis** – If they dismiss the initial pop-up, we track their browsing activity in real time and predict when they are most likely to say "yes" to joining your mailing list based on their intent. We factor in different browser behaviours such as 'Product Viewed' and 'Item Added to Cart.'
4. **Strategic re-engagement** – At peak engagement, the Predictive Opt-In form reappears, increasing the likelihood of capturing their email or phone number.
By timing the Predictive Opt-In form strategically, we help you collect more contacts and maximise the impact of your welcome emails.
---
## Viewing Real-Time Revenue Uplift from Instant Predictive Opt-In
Once set up, your Predictive Opt-In dashboard provides real-time insights into revenue generated and new subscribers captured—giving you a clear view of its impact.
---
## Key Notes about your Predictive Opt-In
- **More Subscribers** – Engage visitors when they're more likely to opt in.
- **Increased Welcome Flow Revenue** – More sign-ups mean more opportunities to convert customers.
- **No Extra Design Work** – Uses your existing pop-up, requiring no edits to your existing form. Our CS team is happy to help with the initial set-up.
- **Smart Automation** – We track engagement in real time to optimise when the pop-up appears.
---
## Frequently Asked Questions
### 1. Will the emails collected go into a different segment?
No, all emails and phone numbers collected through Predictive Opt-In are added directly to your existing list.
### 2. Do I need to design a new pop-up?
Our Predictive Opt-In clones your current pop-up, so there's no need to design a new form.
### 3. Is Predictive Opt-In on my Instant AI sign-up form by default?
Yes! Predictive Opt-In is enabled by default on the sign-up form within Instant. This means your Instant AI sign-up form is already set up to resurface at the optimal moment—no additional configuration needed.
---
## Conclusion
Predictive Opt-In is an effortless way to turn more visitors into subscribers and increase revenue from your welcome flows. By surfacing the opt-in form at the right time, it helps you capture more leads—without changing a thing.
> **To get started with Instant Predictive Opt-In**, click [here](https://help.instant.one/how-do-i-get-started-with-instant-predictive-opt-in).
>
> If you have any questions or need assistance, contact your Customer Success Manager or email [help@instant.one](mailto:help@instant.one).
Article URL: https://help.instant.one/predictive-optin
Keywords:
## How to create a Multi-step Campaign with Instant AI
A multi-step campaign is an easy and effective way to send a series of campaign emails to send to your subscribers.
Typically, most promotions in your business will involve multiple touch-points or be run over a series of time. For example, you may run a Valentines Day promotion for 14 days or a Summer Collection Launch for 30 days.
With Instant AI Multi-step Campaigns, you can schedule all of your campaign emails into one sequence. This helps you:
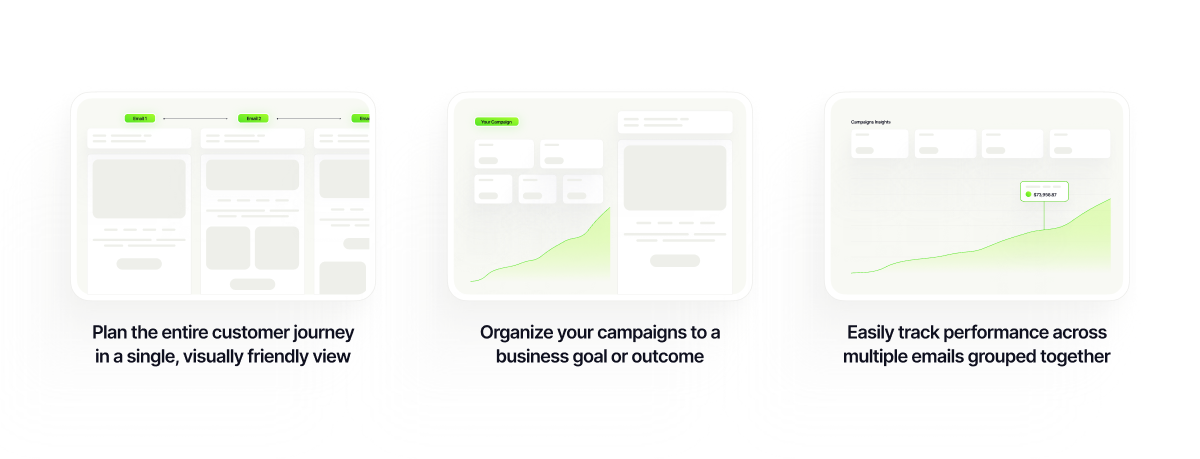
Multi-step campaigns can be created manually from scratch, or you can use AI to help build your first draft and make any further edits that you need.
How to create and draft a multi-step campaign
- In your Instant Dashboard, select ‘Campaigns’ from the side menu.
- Select Create Multi-Step Campaigns

- You'll see two ways to begin:
- Use a suggested campaign - Instant recommends one based on your activity in your shopify store
- Pick a goal manually - choose from the list at the top of the page
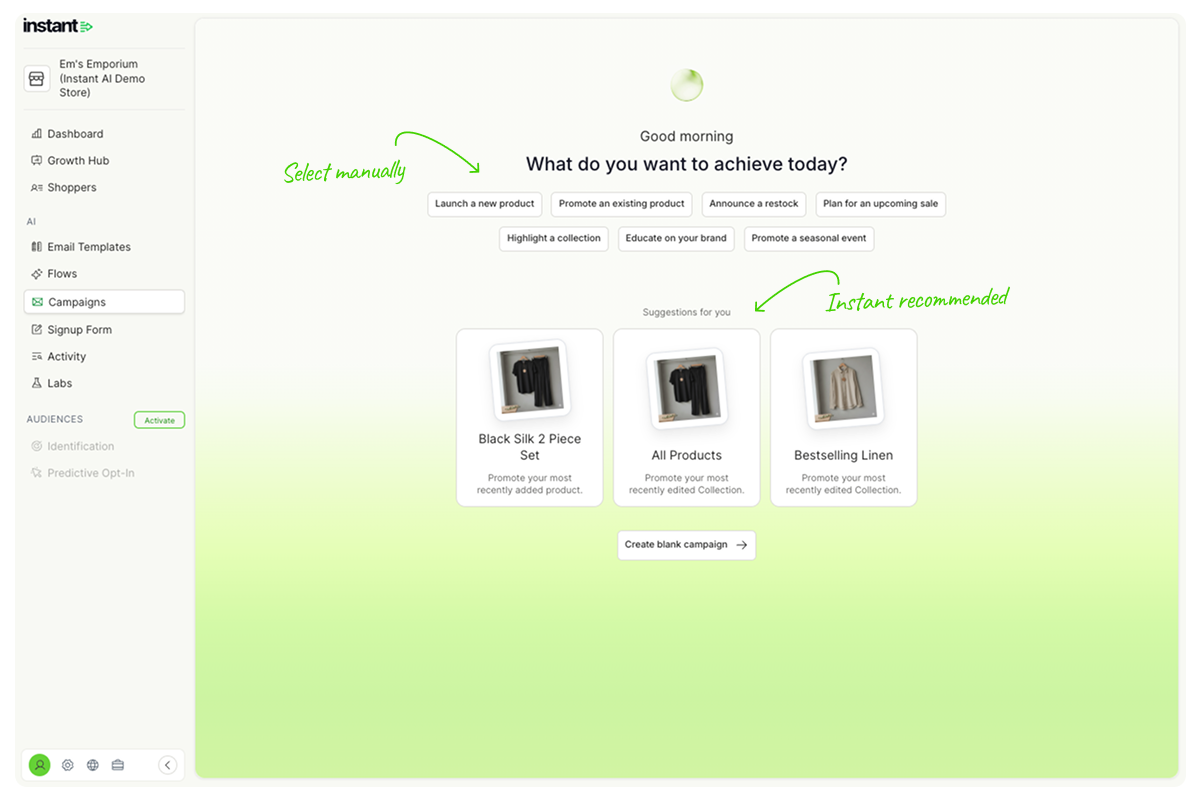
-
Pick what to promote
- If you chose a suggested campaign, skip ahead to step 6, your product is already selected.
- If you picked a goal manually, you can choose what to feature. You have three options from here:
- Suggested product: based on activity in your Shopify store
- Product search: search for a specific product to feature
- Collection search search for a whole collection to feature
- Choose how many emails to draft.
Pick the number of emails you want AI to draft for your campaign. Four is a good starting point for a two-week promo.
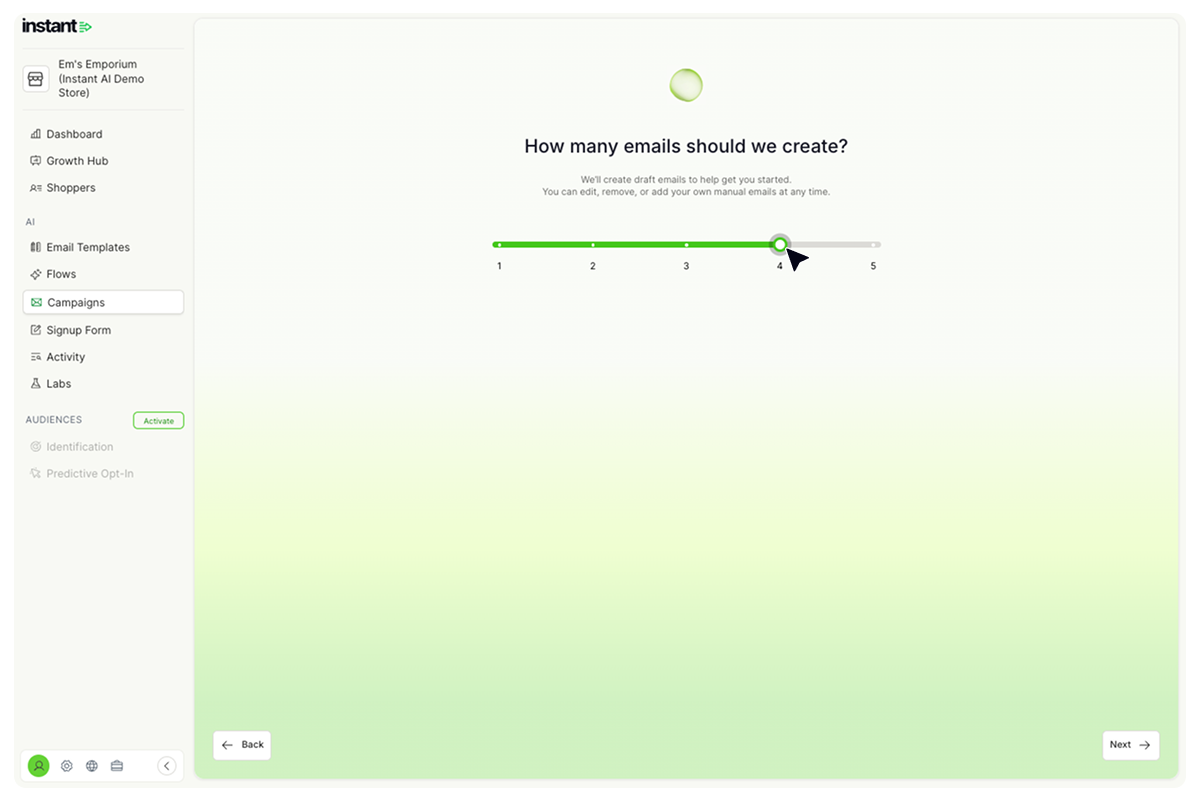
- Select ‘Next’ and sit tight. Your campaign draft will be ready in seconds.
- Finally, click ‘See your campaign’.
How to create a manual multi-step campaign
- In your Instant Dashboard, select ‘Campaigns’ from the side menu.
- Select Create Multi-Step Campaigns
- Select Create Campaign
Next, you'll be immediately taken to the email editor to build your campaign.
How to edit your multi-step campaign
Before we start, let's understand all of the properties if your Multistep campaign:
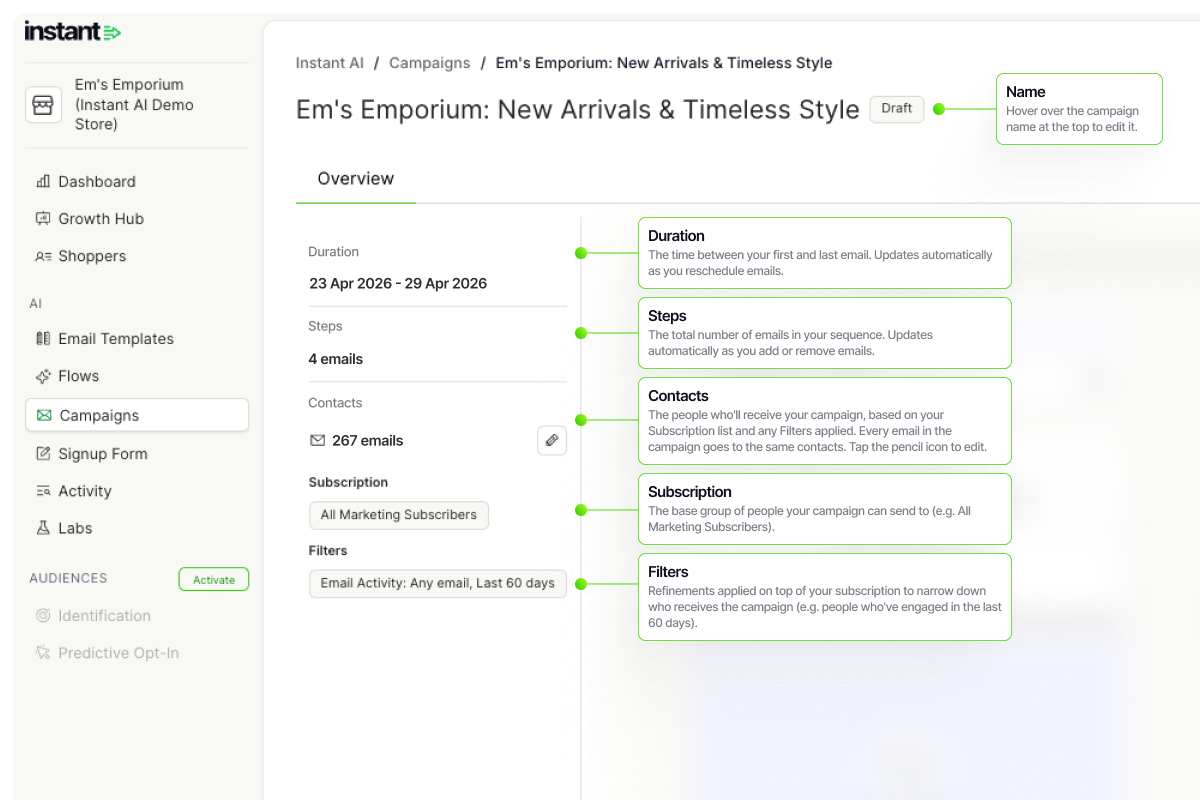
Editing an email in your sequence
- Find the email you want to edit and select Edit
- Update the design in the editor, then edit the subject line and preview text
- Select Save
- Check the send date and time are correct
Adding an email in your sequence
- Scroll to the end of your sequence and select Add Email
- Design your email and add a subject line and preview text
- Select Save
- Check the send date and time are correct
Tip: To reuse an existing email, hover over it in the sequence and select Clone.
Emails must be scheduled at least 15 minutes in the future and will send in your store's default timezone. New emails default to 2 days after the previous email, but you can change this to any date after the previous email.
Deleting a step in your sequence
- Hover over the email you want to delete and select Delete
- Select Save in the top right
This only deletes the email you selected, not the whole campaign.
Reordering emails
- Hover over any email in the sequence
- Select the left or right arrows to move it
- Select Save in the top right
Reordering moves the email content only, send dates and times stay linked to their original step. For example, if you swap steps 1 and 2, the emails move but the send times don't.
Editing a sending segment
Every multistep campaign starts with a default segment. To change who receives it:
- Select the underlined number of contacts to open the filters
- Apply your filters and confirm the estimated contact count
- Select Done, then Save in the top right
Sending a preview
Select Send Preview in the editor. You'll receive a preview of every email in the campaign at your email address, with subject lines labelled [1/1 Campaign], [2/3 Campaign], etc., so you can follow the sequence.
Some inbox providers may not deliver preview emails in order if several arrive at once. Use the subject line labels to check the sequence. These labels only appear on previews, customers won't see them.
How to schedule your Multistep Campaign
- Select Review and Schedule. A modal will show your full campaign configuration
- Check everything is correct:
- Dates are right
- Contacts and filters look good
- Emails preview correctly (select any step to see them)
- No placeholder images left in your emails
- Select Schedule
Your campaign is now scheduled and ready to send.
How to edit a scheduled campaign
If you need to change a campaign that's already scheduled or in progress:
- Select Edit Campaign, then Pause and Edit
- Make your changes and save
The campaign stays paused while you edit, so all your changes can be validated before resuming.
A few things to know:
- Your changes take effect once you save and resume the campaign
- Cancelling or discarding will revert any changes
- You can edit a campaign as long as at least one email is still scheduled to send
- Contacts and segments can't be changed once the campaign has started sending
Article URL: https://help.instant.one/how-to-create-a-multi-step-campaign-with-instant-ai
Keywords:
## How do I modify the Instant site ID of my Shopify Customer Events pixel?
You may need to modify the Instant site that your Customer Events pixel is associated to. This may be because
- The customer events pixel has been installed with an incorrect Instant site ID, leading to pixel performance / data issues.
- You have registered a new Instant site (e.g. if you are migrating websites) and wish to use the new one going forward.
Please note that it is important that your Customer Events pixel site ID matches your Instant site ID.
It is also important to ensure that you do not install your site pixel on an Instant account, then use the Customer Events pixel of another Instant account.
This will result in mis-matching site IDs, which can have unintended consequences such as the Instant pixel processing events incorrectly, causing reduced performance and tracking accuracy.
If you are unsure about this, please reach out to our support team at help@instant.one, or your dedicated customer success manager.
- Proceed to your Shopify dashboard and select Settings in the sidebar.
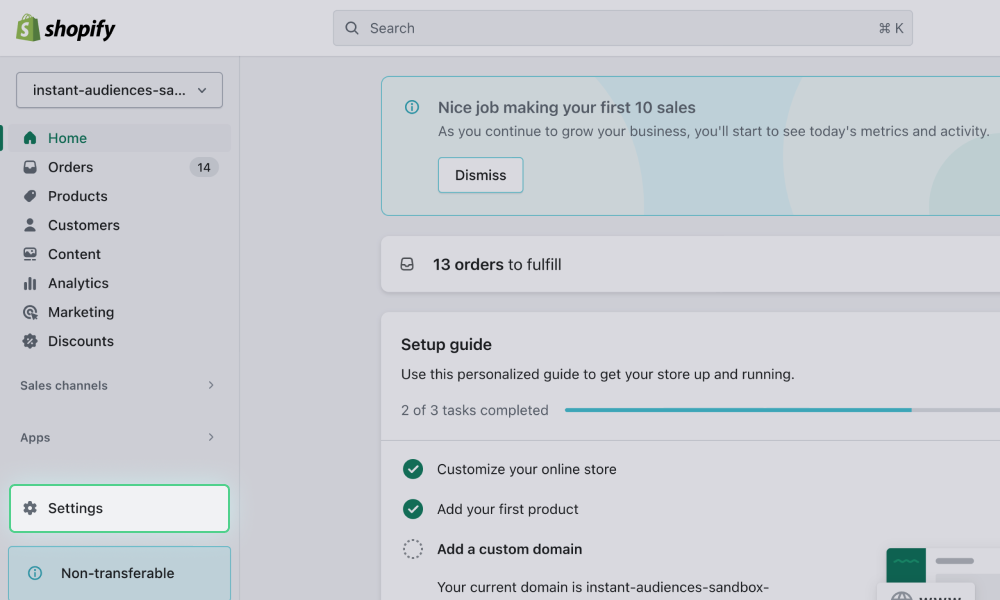
-
Select Customer events in the settings sidebar.
- Identify the currently installed Customer events pixel, and click on the three dots on the pixel, then click Delete. Please click Delete in the confirmation window.
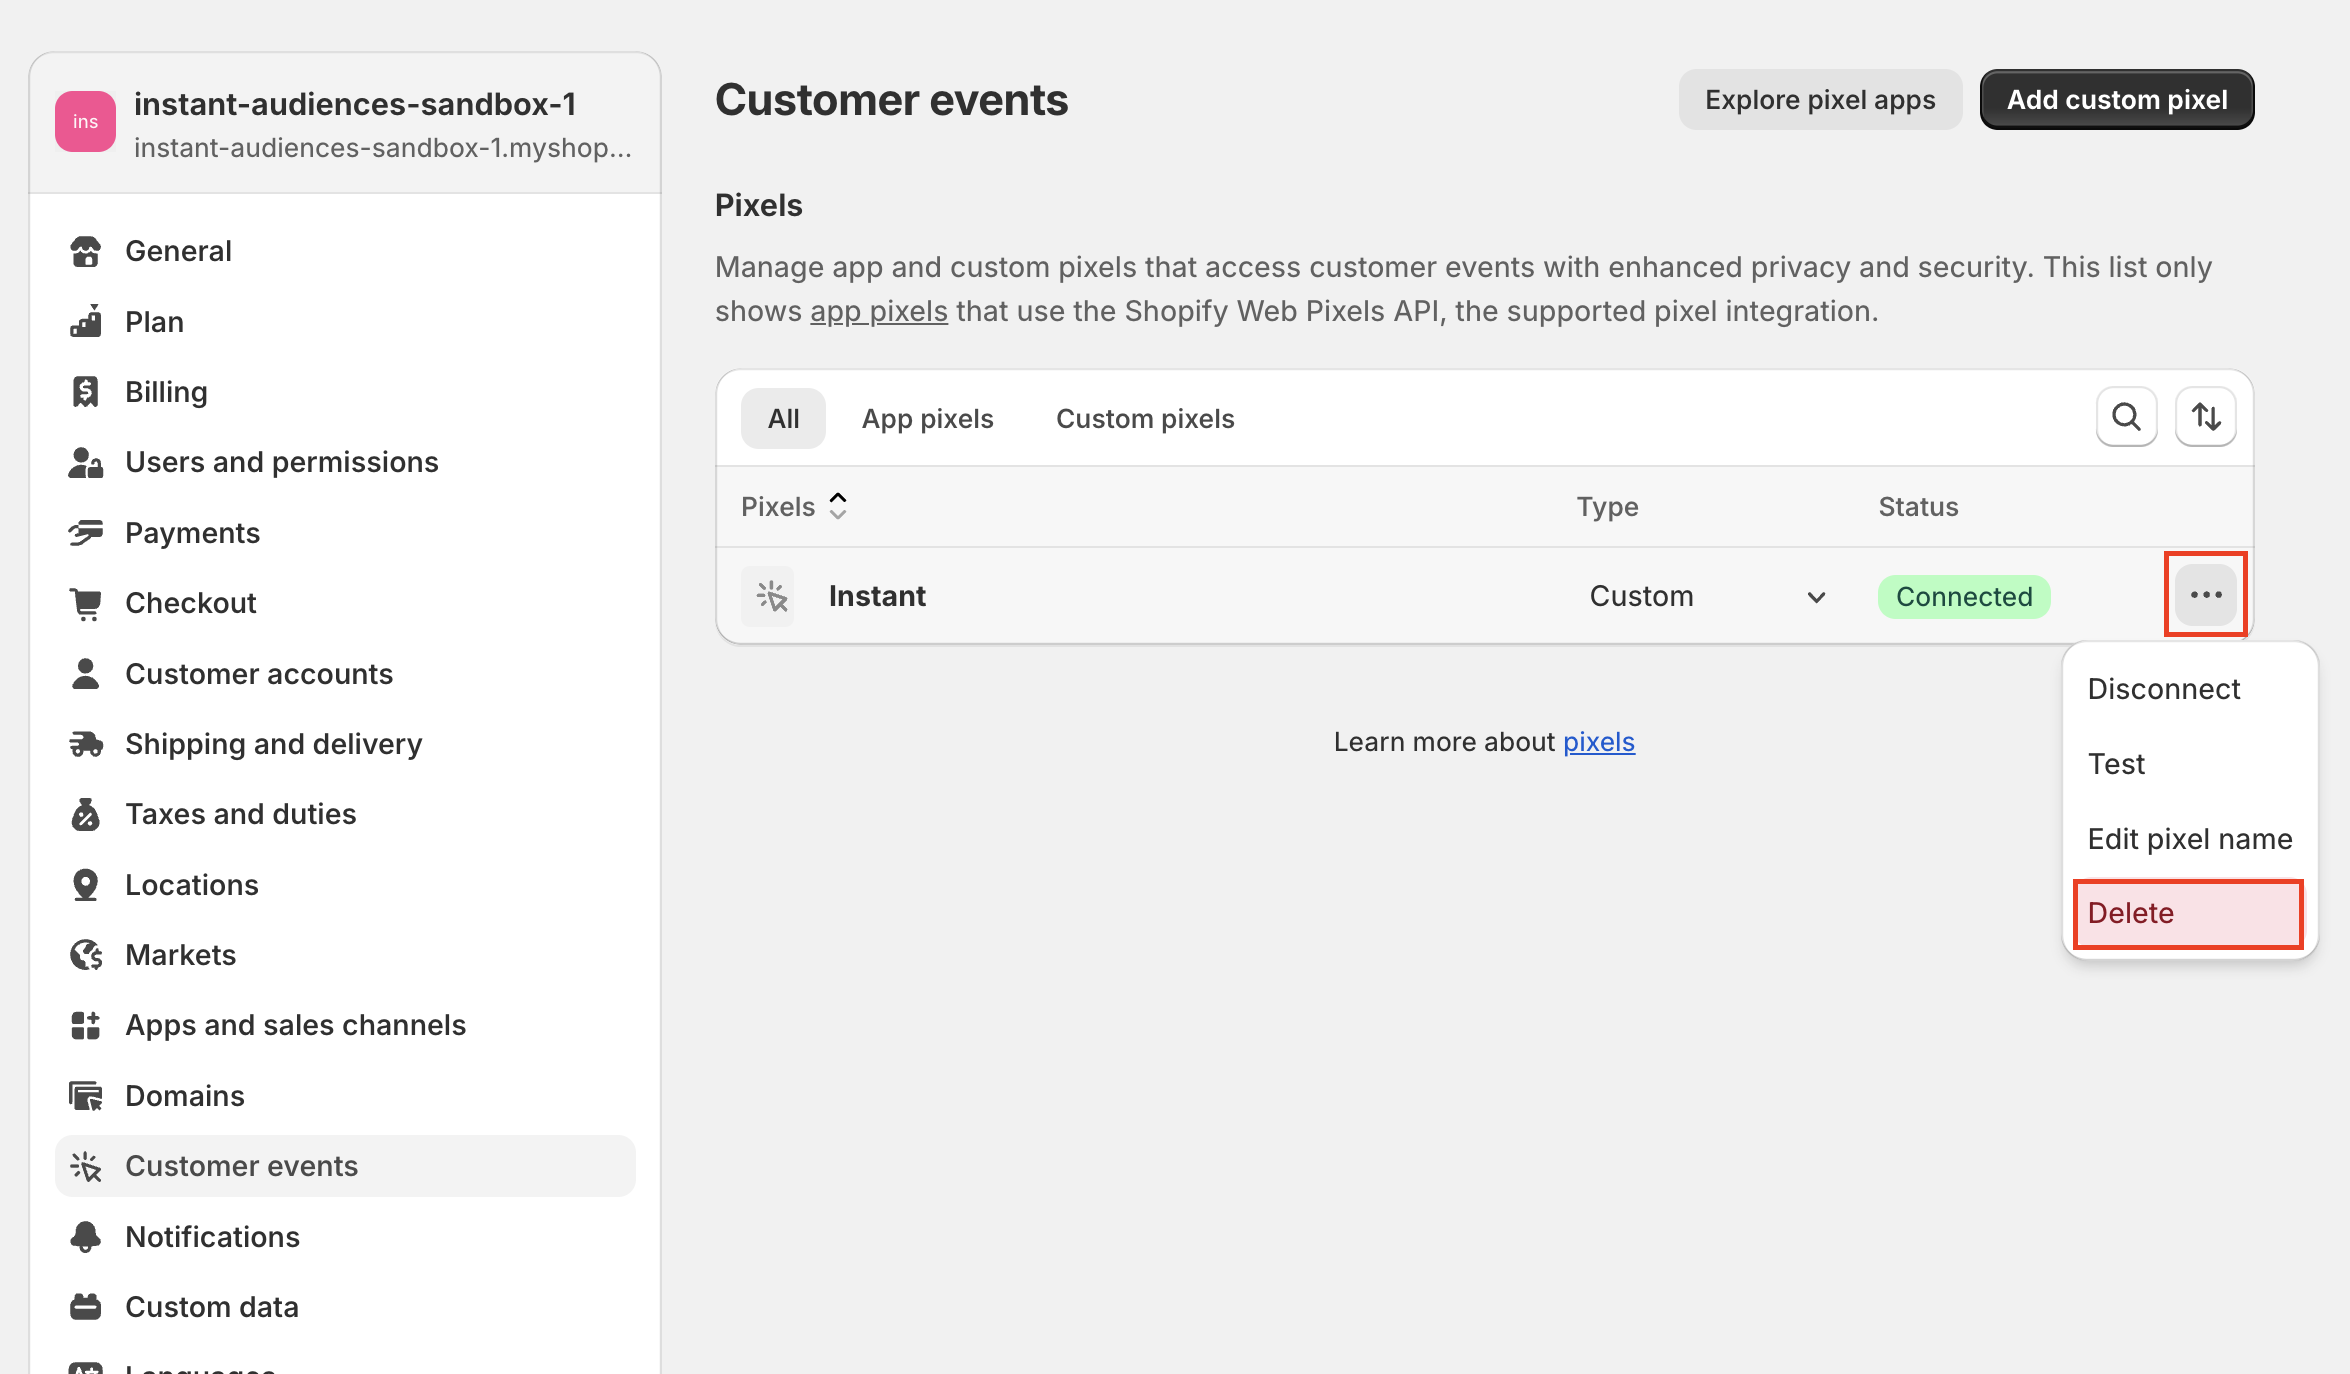
- Log into the Instant dashboard here.
- Once you are logged in, use the site selector button to navigate to the site you would like to use. If your site is already selected, please skip this step.
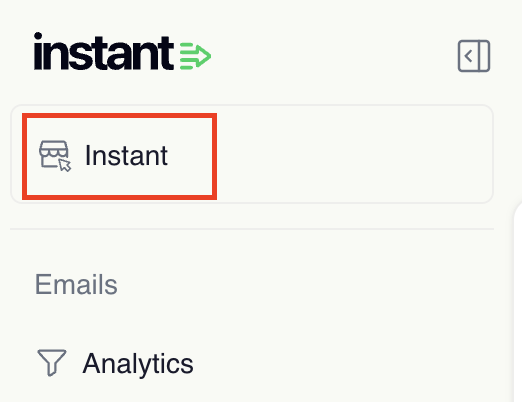
- Navigate in the sidebar to Configuration > Pixel > Shopify > Step 1: Pixel Installation.
For your convenience, here is a direct link. You should land on a page that walks you through installing the Shopify Customer Events pixel.
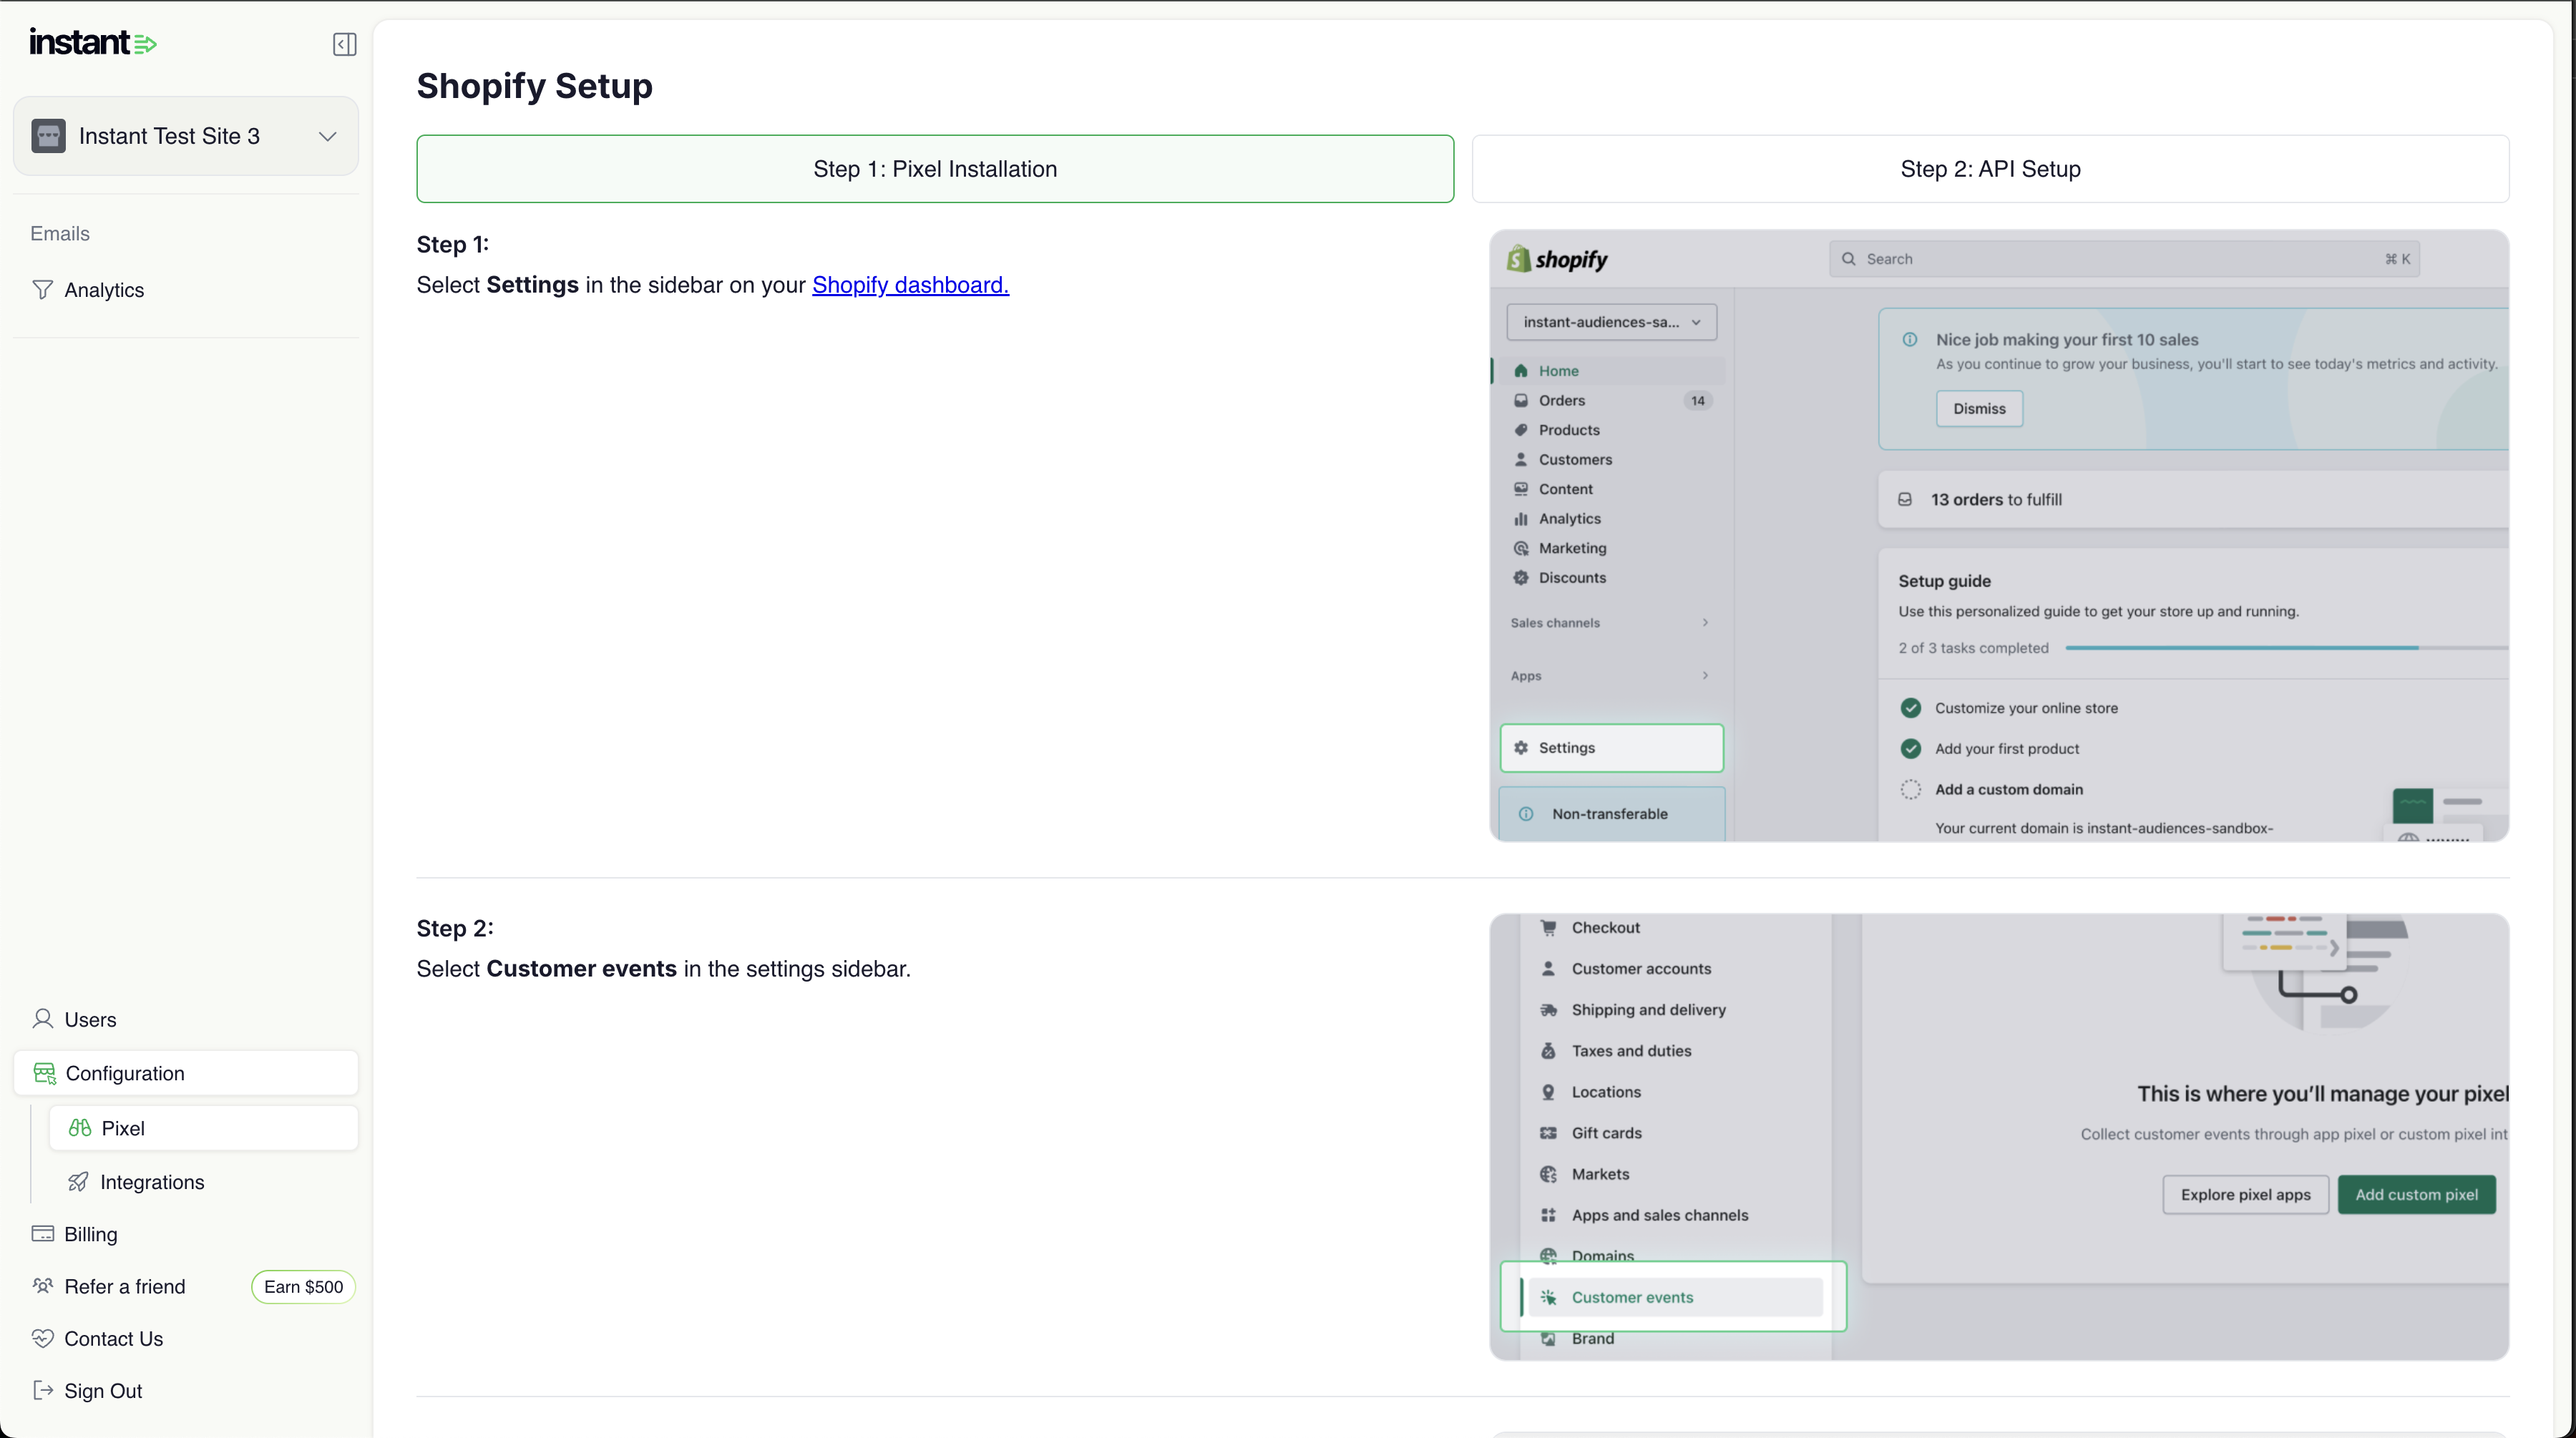
- Please complete all steps under Step 1: Pixel Installation. Please note that there is no need to complete the API setup for installing the customer events pixel.
Once this is complete, you will now be using the site ID of your preferred Instant account.
If you have any questions, or are unsure about any of the above steps, please reach out to our support team at help@instant.one, or your dedicated customer success manager and we will gladly help.
Article URL: https://help.instant.one/modify-shopify-pixel-site-id
Keywords:
## What is multi-profile identity resolution?
Multi-profile resolution is a feature that identifies and links multiple email addresses and profiles to a single browser or device.
This maximises identification, boosting revenue and deliveries, even when shoppers use different emails.
Multi-profile identity resolution is a feature that identifies and links multiple email addresses and profiles to a single browser or device.
Many online shoppers use multiple emails when shopping online. If only one of their emails is identified on a given browser, it can lead to fewer deliveries for your remarketing flows.
With multi-identity resolution, Instant can identify that multiple email addresses belong to the same customer and link them into a single profile. By connecting these emails, your company can create a more accurate customer profile, even as shoppers switch between different emails.
This leads to more effective remarketing, increased delivery rates, and ultimately maximized revenue.
Why Multi-Profile Identity Resolution is Essential for Your Business
-
Maximised Email Re-Marketing Opportunities: By linking multiple emails to a single customer profile, you can significantly increase the number of email campaigns you send. This boosts your chances of converting visitors into customers, driving higher sales and a greater return on investment (ROI).
For example:
Say Sally browses your website and signs up for your newsletter with the email sally@email.com, but leaves without making a purchase. A few days later, she returns to your site and signs up again using a different email, sally123@email.com, to claim a special discount. By linking both email addresses to a single profile, you can identify Sally as the same person and send her personalized remarketing emails to both email addresses. This ensures she receives targeted offers, increasing the chances of her converting into a customer.
-
Enables Instant to build a more holistic customer profile as a shopper switches between emails for online shopping.
For example:
James shops on your website using two different emails: james@email.com to browse and james123@email.com to make a purchase. Without multi-identity resolution, these would be seen as separate customers, and his preferences and shopping habits wouldn’t be connected. By linking both emails to a single profile, your site can better understand his interests and provide a more personalized experience.
Can I enable Multi-Profile Identity Resolution?
Yes, you can enable this feature at any time through your Instant dashboard. You can also contact our Customer Support team, or your Customer Success Manager, to turn on this feature.
If you do decide to enable this, you can easily do so in your Merchant Dashboard:
- Log in to your Merchant Dashboard here and navigate to Integrations in the left-hand panel.
- Select Klaviyo under Integrations and uncheck the box to Disable Multi-Profile Export.
- Click Update to save your changes.
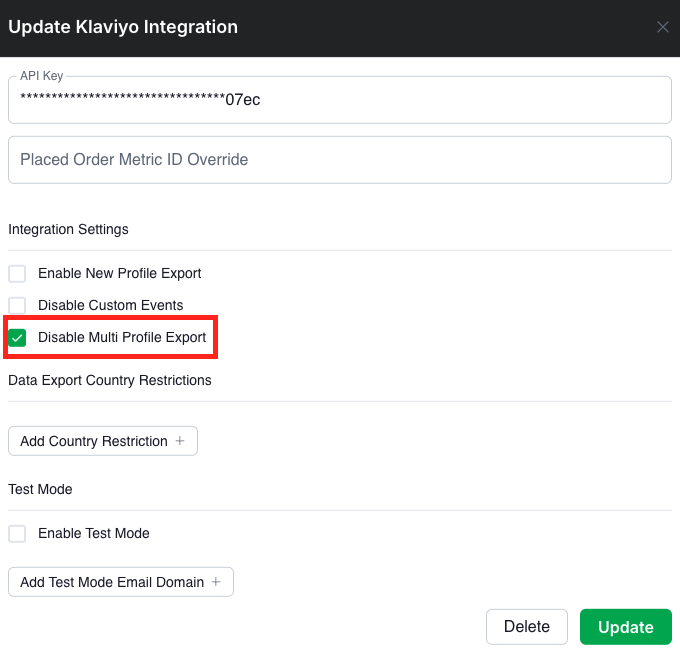
If you have any questions, please feel free to reach out to us at help@instant.one
Article URL: https://help.instant.one/multi-profile-export
Keywords:
## How Instant AI Mentions Sale Prices in Emails
Instant AI automatically includes sale prices and discounts in your email copy when that information exists in Shopify.
It reads your Compare-at Price (original price) and Price (current price). When both are set and the Compare-at Price is higher, Instant AI calculates the saving and may write a line like: “Save $100” or “Over 25% Off.”
This information comes directly from the Shopify API, so it’s always accurate. Instant AI can only mention discounts that are truly active in your store.
Example: Shopify shows $229.95 → $129.95, so Instant AI may write:
“Save $100 on our White T-shirt” or “Over 40% Off our White T-shirt.”
Sale mentions only appear in flows triggered by individual products, such as:
- Browse Abandonment
- Cart Abandonment
- Checkout Abandonment
They won’t appear in flows that don’t include specific product prices, such as Collection Abandonment, Welcome, or Winback.
If a product doesn’t have a Compare-at Price set, or if both prices are the same, Instant AI will still generate strong, benefit-focused copy, it just won’t mention a discount.
To make sure discounts appear correctly:
- Set a Compare-at Price in Shopify for all sale products.
- Keep the Compare-at Price higher than the current Price.
- Avoid adding “on sale” or “% off” in product titles rather than using the price field
- If you use discount apps or scripts, make sure they update Shopify’s pricing fields.
FAQs
Why didn’t my email mention a sale?
This may happen because:
- The product doesn’t have a Compare-at Price set.
- The Compare-at Price and current Price are the same.
- The email was triggered by a collection or non-product page (like a Welcome or Winback flow).
You can double check by opening the product in Shopify and confirming that both the Compare-at Price and Price fields are set correctly.
Can Instant AI ever show a discount that isn’t real?
Instant AI only uses data pulled directly from Shopify’s API. This ensures that every discount mentioned in your emails is valid and visible on your store, never inflated or incorrect.
Can I choose whether it says $ or % off?
You don’t need to. Instant AI automatically decides whether to mention a dollar or percentage discount based on what sounds most natural for the product and sale size.
Do I need to edit my templates or flows?
No, as long as your pricing in Shopify is correct, Instant AI will automatically detect and include sale mentions where relevant in our AI generated copy.
What if I have a coupon or discount code live on my website?
Instant AI doesn’t automatically calculate savings from coupon codes that are simply published on your website or written in text. This is because those codes may not be visible to all shoppers, may apply to only certain products or collections, or may change over time.
To keep your pricing accurate, Instant AI only promotes discounts that can be verified through Shopify’s pricing data. If you’d like to highlight a general sitewide code (for example, “Use SAVE10 at checkout”), you can still include that manually when editing your campaign or flow.
How does Instant AI handle coupons sent within a flow and product discounts?
If you’ve configured a coupon directly within an Instant AI flow, the system will automatically compare the coupon discount and the product discount to decide which offer gives the shopper the better deal.
- The better offer (higher saving) will be prioritised for the subject line.
- If the coupon is still valid, it will also appear in the email body.
- If a product isn’t eligible for that coupon (for example, excluded from the offer), Instant AI won’t include that product in the email at all.
This ensures shoppers always see the most relevant and accurate promotion — and you never risk showing a coupon or sale that doesn’t actually apply.
Article URL: https://help.instant.one/how-instant-ai-mentions-sale-prices-in-emails
Keywords:
## How to Make Sure Your Promotions Sync Correctly with Instant AI
Instant AI automatically scans your Shopify site for live promotions so your emails always reflect what’s on your store. To make sure everything syncs correctly, it’s important that your promotions in Shopify are always up to date.
If an expired promotion is still present in your site’s HTML (for example, in the announcement bar), tools like Google, ChatGPT, and Instant AI can continue to pick it up. That means outdated codes or offers may keep appearing even if you think you’ve already turned them off.
How to Check
-
Open your live website in a browser.
-
Right-click anywhere and choose View Page Source (or Inspect).
-
Use Ctrl+F / Cmd+F to search for the old code or text (e.g. “15% off”).
-
If you find it in the HTML, it means the promotion is still being published from your Shopify theme.
How to Fix
-
In Shopify, go to Online Store → Themes → Customise.
-
Open the Announcement Bar / Top Banner section.
-
Remove the expired promotion text completely, or replace it with your current offer.
-
Save your changes, then refresh your live site and repeat the View Page Source step to confirm it’s gone.
Simply hiding the banner won’t work. The text must be deleted or updated so it’s not in the HTML. See Shopify’s guide to editing announcement bars
Why This Matters
-
Accurate promotions – Shoppers only see offers that are truly live.
-
SEO optimisation – Google and other search engines won’t surface outdated deals.
-
Consistency across channels – Instant AI, ChatGPT, and other tools will always stay in sync with your current store.
By keeping your promotions clean and current in Shopify, you ensure Instant AI and every other channel reflects the right offer every time.
Best Practices for Writing Promotion Banners
Your announcement bar should be short and punchy, but it also needs to give enough detail to be accurate. Instant AI (and tools like Google and ChatGPT) will use the text exactly as it appears, so vague or misleading wording can create problems.
Keep it short but precise
Include important conditions
Match your marketing rules
Clarify currency when relevant
-
✅ “Spend $150 AUD, get $20 off”
-
❌ “Spend $150, get $20 off” (currency ambiguous)
Think of your banner as the source of truth. If a shopper — or Instant AI — wouldn’t fully understand the offer from the text alone, add one more word or phrase to make it clear.
Article URL: https://help.instant.one/how-to-make-sure-your-promotions-sync-correctly-with-instant-ai
Keywords:
## How do I add new profiles from Audiences into a welcome flow?
Incorporating new profiles from the Audiences new profile export into a welcome flow or other low-touch, incentive-driven flows is highly recommended.
This approach effectively engages shoppers who have shown intent but may still be undecided or browsing.
By integrating welcome flows with the Audiences new profile export, you can create a powerful conversion strategy that maximizes the ROI from your top-of-funnel traffic.
- Create a segment in Klaviyo which contains all new profiles identified by Instant Audiences.
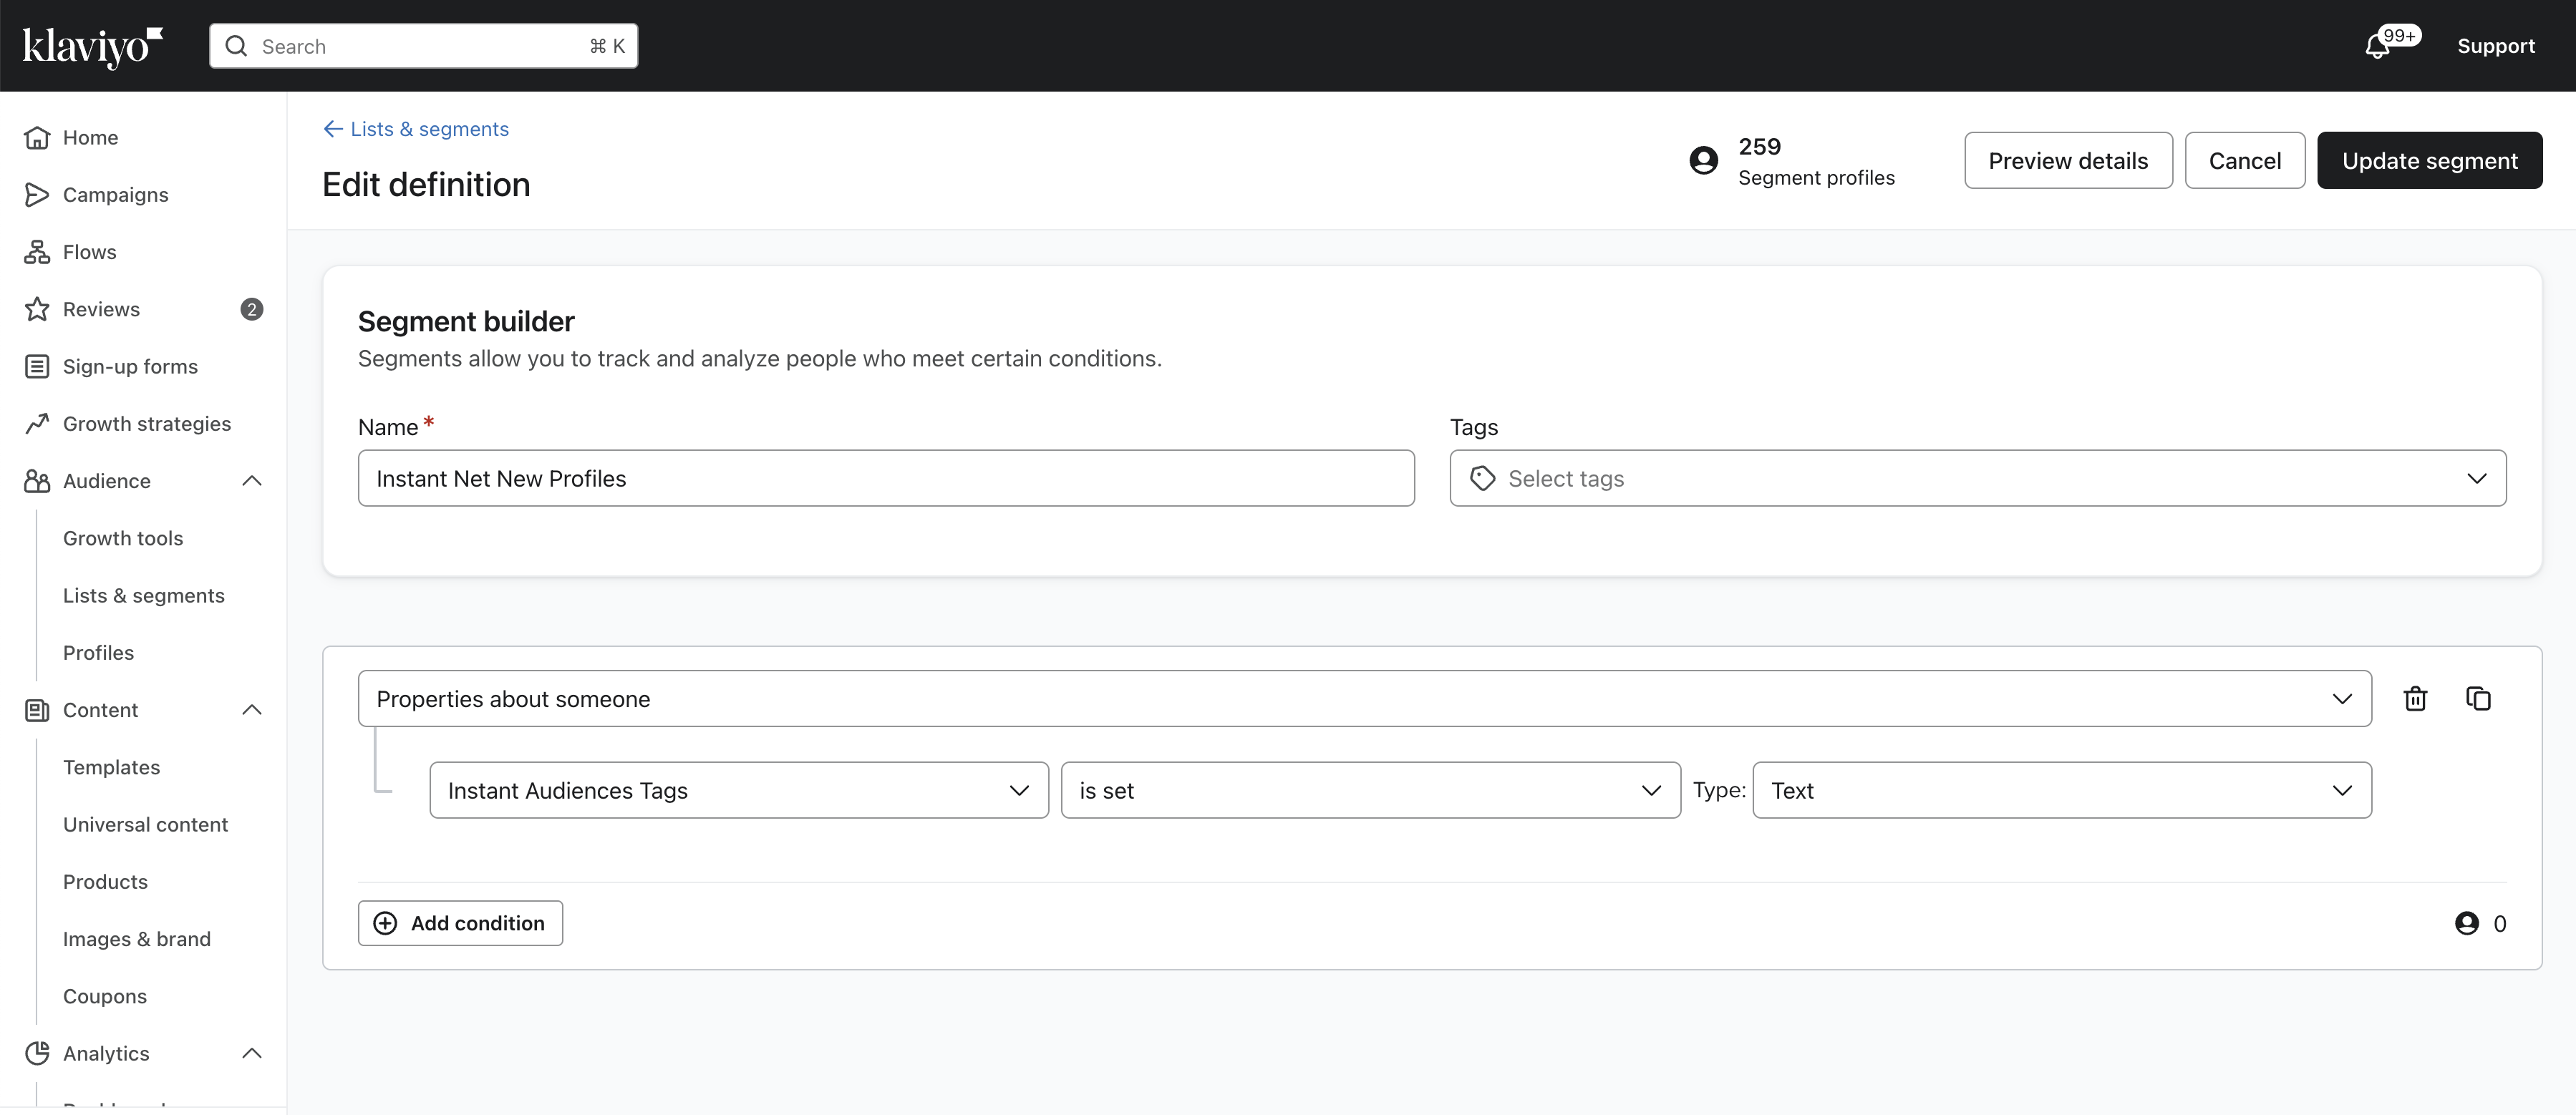
- Follow the Klaviyo documentation on how you can create a segment triggered flow. When creating the flow, ensure you use this segment.
https://help.klaviyo.com/hc/en-us/articles/360003040052
- Once you have created a segment triggered flow, add the following filters to the flow
(1) Placed Order zero times since starting this flow
(2) Placed Order zero times in the last 7 days
(3) Received email where flow equals {{ your existing welcome flow }} zero times in the last 30 days
(4) If someone is in or not in a list - person is not in {{ your main subscriber list }}
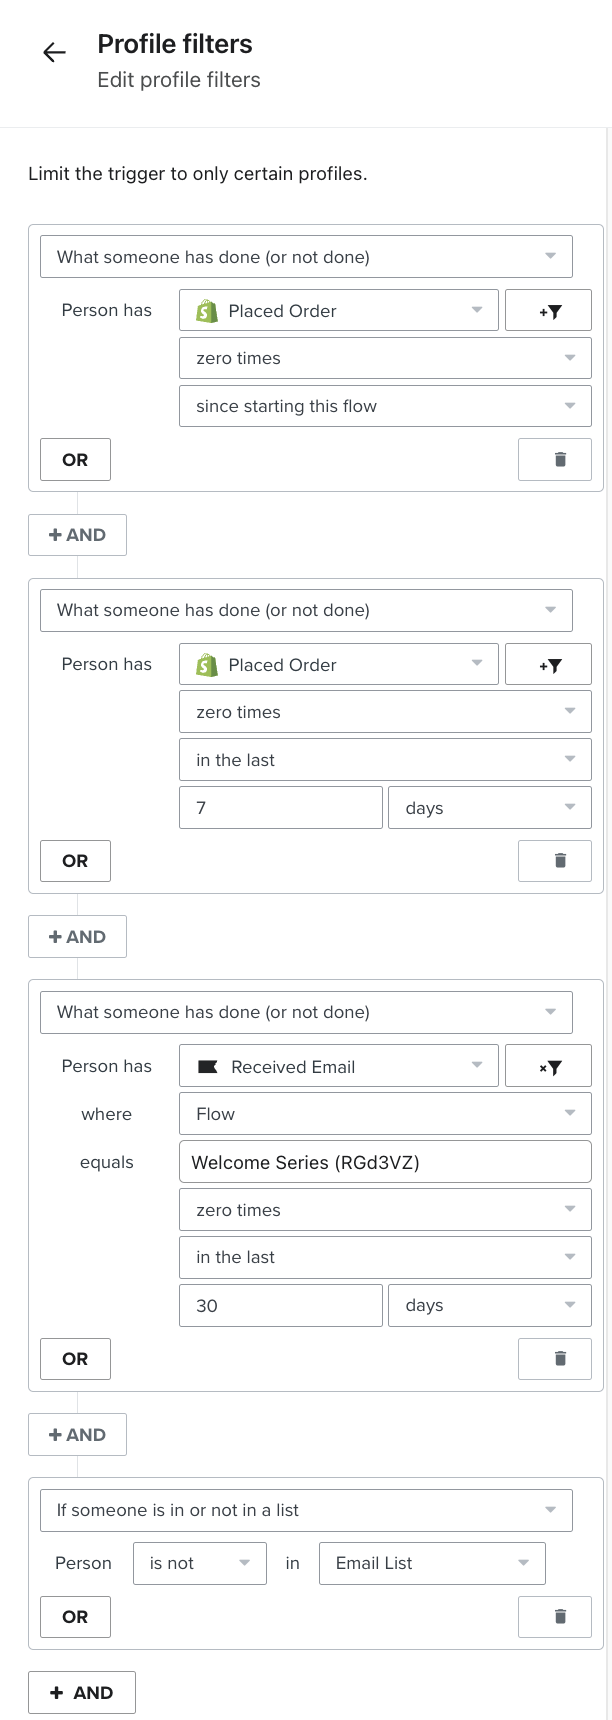
Article URL: https://help.instant.one/add-new-profiles-to-welcome-flow
Keywords:
## How Instant AI handles empty and coming soon collections in flows
Instant AI automatically checks whether a collection has published products before sending a collection abandonment email. This means merchants don't need to manually exclude collections that are empty, in draft, or being used for waitlists and sign-up pages.
What counts as a valid collection?
For a collection abandonment email to send, the collection must have at least one published product at the time a customer views it.
Collections that will be skipped automatically include:
- Collections with no products
- Collections where all products are in draft or unpublished
- Collections set up as coming soon or pre-launch pages
- Collections used for waitlists or sign-up forms with no live products
Tip: This check happens at the time of customer enrolment into the flow — not at the time of send. If a collection has no published products when a customer views it, they won't be enrolled, and no email will be sent.
What if my collection gets products added later?
If a customer views an empty collection and later products are added, the customer will not receive a retroactive email. Instant only enrols customers into collection flows at the point of viewing, based on what's published at that moment.
Once products are published to the collection, any future visitors who view it will be enrolled as normal.
What if a collection has been deleted or removed?
If a customer received a collection abandonment email but the collection page has since been deleted or unpublished, links in the email will return a 404 error. This is expected behaviour — the email was sent when the collection existed, and Instant has no way to retroactively update links in emails that have already been delivered.
This most commonly happens when:
- A merchant deletes a collection after emails have already been sent
- A coming soon or pre-launch page is removed once a product launches elsewhere
No action is needed. Future emails will not link to deleted collections, as customers will not be enrolled if the collection has no published products.
FAQ's
My collection is a sign-up page with no products. Will Instant send emails for it?
No. Instant will not enrol customers into a collection abandonment flow unless the collection has at least one published product. Sign-up and waitlist collections are skipped automatically.
I have a "Coming Soon" collection with products in draft. Will emails send?
No. Draft products don't count. The collection needs at least one published product for emails to send.
A customer received an email for a collection that's now empty. Why did this happen?
The email was sent at a time when the collection had published products. If the collection was emptied or deleted after the email was sent, links in that email may no longer work. This is expected, and no new emails will send for that collection going forward.
Can I manually exclude a specific collection from emails?
Instant automatically excludes collections with no published products. There is currently no option to manually exclude a collection that has published products.
Article URL: https://help.instant.one/how-instant-ai-handles-empty-and-coming-soon-collections-in-flows
Keywords:
## How to re-install the Instant Audiences pixel into theme.liquid
The Instant Audiences pixel can be accidentially removed throughout theme.liquid updates. This article outlines how to re-install the Audiences pixel if you have been notified that it is missing.
We require the Instant Audiences pixel to be installed in two locations:
- theme.liquid
- Shopify Customer events (for docs on how to re-install the Customer events pixel, see here)
It is critical that both pixels remain installed for Instant Audiences to operate.
If either of the pixels have been removed, events will be dropped and therefore not sent to Klaviyo.
If the pixel has been accidentally uninstalled from theme.liquid, it is important to ensure that the Instant Audiences pixel is re-installed promptly to minimise dropped events.
If you have been notified that the Instant Audiences pixel is missing on from theme.liquid and requires re-installation, please complete the following:
If you cannot access the Instant dashboard, please reach out to help@instant.one and we will promptly provide access.
Article URL: https://help.instant.one/pixel-shopify-theme-liquid
Keywords:
## What's the ideal image size for my emails?
For best results across all devices, we recommend keeping your email images 600px wide.
This ensures your content displays clearly in every inbox and avoids cropping or stretching.
For best results, keep all email images 600px wide — this ensures your emails look sharp and consistent across all inboxes.
Recommended banner sizes:
- Small Banner: 600 × 200 px
- Medium Banner: 600 × 400 px
- Large Banner: 600 × 600 px
Tips:
- Keep file sizes under 1MB to ensure fast loading and good deliverability.
- Centre any important text or visuals so they display properly on mobile.
- Instant AI will automatically compress all images for deliverability
Example Files:


Article URL: https://help.instant.one/whats-the-ideal-image-size-for-my-emails
Keywords:
## How to manage excluded products in Instant AI Emails
Sometimes products show up in a cart that aren’t real products a shopper is buying — like “Shipping Protection” or a “Free Gift.” These items are valid at checkout but don’t make sense to display in your marketing emails. To keep your emails clean and relevant, Instant AI automatically excludes these products.
How do I manually exclude products?
Any products that have the tag "instant_exclude" assigned to them will automatically be skipped from every Instant AI email. If you add a tag to your products that matches this format exactly, they won't be included.
Alternatively, you can visit Settings > Preferences and select "Add Tag" and enter any custom Shopify tags from you're store and we'll exclude all products with that tag from emails.
What products are excluded automatically?
Instant AI checks both product names and handles against a list of common non-product keywords. If a match is found, the item is hidden from your emails. The check is not case sensitive and only needs to include the term somewhere in the name.
Our current exclusion list includes (with all variations such as underscores or hyphens):
How does this work in practice?
-
If a shopper’s cart has both a “Gold Ring” and “Shipping Protection,” Instant AI will only show the “Gold Ring” in the cart email.
-
Exclusions apply automatically, so you don’t need to set anything up.
Can I customise this list?
At this stage, exclusions are handled by Instant AI’s system list. If you have products being incorrectly excluded or want to request additional keywords, please contact support.
Article URL: https://help.instant.one/how-to-manage-excluded-products-in-instant-ai-emails
Keywords:
## Understanding Instant AI Flows
A complete guide to flow triggers, switching logic, and why enabling more flows leads to better results.
Instant AI Flows are automated emails triggered by shopper behaviour. They're designed to recover lost revenue, increase conversion, and keep your brand front of mind — all with zero manual setup.
Unlike traditional platforms, Instant AI dynamically enrols each shopper into the single most relevant flow based on what they do on your site. You don't need to worry about conflicts, multiple flows running at once, or shoppers receiving too many emails.
Because of this, we recommend enabling all available flows. The more flows you have turned on, the more opportunities AI has to identify high-intent behaviour and respond with the right message at the right time.
How Flows Work
- Each flow targets a different type of shopper behaviour — like viewing a product, abandoning checkout
- Shoppers are only ever in one flow at a time.
- If someone triggers a higher-intent action after a flow has started, their current flow is automatically cancelled and the new one begins from the start.
- Shoppers will dynamically move between all of your enabled flows, depending on which is most suitable to their latest action
How Flow Timing is Calculated
Instant AI automatically adjusts send times to increase open and conversion rates. This optimisation happens in three stages:
1. Instant Default Timing
Used when a flow is first activated.
- We use industry-tested default delays: 1hr, 24hr, and 72hr
- Once we start to see enough activity amongst your customers, we can begin to personalise your send time logic
- Typically used for the first week, depending on how many emails are sent per flow
2. Site-Wide Average Timing
Once enough data is collected, we calculate the best-performing send times for your store.
- Based on when your existing customer base tend to open and click
- Each flow still sends 3 emails over 7 days, but delays will vary (e.g. 2hr → 28hr → 68hr)
- The delay time may differ for different merchants, depending on the behaviour of your demographic
- This becomes your new default timing for all shoppers, including new shoppers who enroll in their first flow on your site
3. Per-Shopper Personalised Timing
Once we have a site specific average, for returning customers, Instant AI personalises send times based on that specific shopper's past behaviour.
- We look at the average time of day the shopper opens emails
- Personalise the send time to close to when they typically open emails, to increase your chance of opens
- Every email in a flow may go out at different times for different people, depending on their email habits
- This only applies once a shopper has received enough emails to establish a pattern
You don't need to do anything to enable this dynamic send times. We'll auto calculate it and display what time was selected on the email preview.
How are Flows Triggered
Instant AI automatically selects the most relevant, highest-intent flow and ignores all others. This prevents conflicting messages and duplicated emails.
- A shopper can only be in one flow at a time
- If they take a higher-intent action (e.g. abandon checkout after browsing), we:
- Cancel the old flow
- Start the new one from the beginning
Flow logic also handles product content smartly:
- Abandon Browse: Sends about the last product viewed
- Abandon Collection: Sends based on the most recent collection viewed
- Abandon Cart: Includes all items in their cart
- Price Drop: Focuses on the most relevant product viewed or carted in the last 60 days
- Low in Stock / Back in Stock: Always reference a specific, recently interacted product
Breakdown of Available Flows
The flows below are listed in order of shopper intent, from highest to lowest. If a shopper qualifies for multiple flows, the highest-intent option (top of the list) will always take priority.
1. Abandoned Checkout
Sends 1 hour after a shopper progresses to checkout but leaves without purchasing. Sends as a 3-part email series and includes a coupon offer.
Turn off in other tools:
If you are enabling this flow, we recommend switching off any existing flows in other solutions that classify as "Checkout Abandonment" to avoid double emailing your customers.
Coupons:
Automatically applied to this flow based on master coupon rules here
2. Abandoned Cart
Sends 1 hour after a shopper adds a product to their cart but leaves without purchasing. Sends as a 3-part email series and includes a coupon offer. Emails will only send if the shopper has not already triggered an abandon checkout series.
Turn off in other tools:
If you are enabling this flow, we recommend switching off any existing flows in other solutions that classify as "Cart Abandonment" to avoid double emailing your customers.
Coupons:
Automatically applied to this flow based on master coupon rules here
3. Abandon Browse
Sends 1 hour after a shopper views a product page but leaves without adding to cart or purchasing. Sends as a 3-part email series and includes a coupon offer. Emails will only send if the shopper has not already triggered an abandon cart or checkout series.
Turn off in other tools:
If you are enabling this flow, we recommend switching off any existing flows in other solutions that classify as "Browse Abandon" to avoid double emailing your customers.
Coupons:
Automatically applied to this flow based on master coupon rules here
4. Abandon Collection
Sends 1 hour after a shopper visits a collection page but leaves without clicking into a product. Sends as a 3-part email series and includes a coupon offer. Emails will only send if the shopper has not already triggered an abandon browse, cart or checkout series.
Turn off in other tools:
If you are enabling this flow, we recommend switching off any existing flows in other solutions that classify as "Collection Viewed" to avoid double emailing your customers.
Coupons:
Automatically applied to this flow based on master coupon rules here
5. Low in Stock
Sends 1 hour after a product has 10 units in stock or less, if it was in their cart in the last 60 days, and they have not removed or purchased it. Sends as a 3-part email series. Emails will only send if the shopper is not in an existing abandonment series. Does not include a coupon offer.
Turn off in other tools:
If you are enabling this flow, we recommend switching off any existing flows in other solutions that classify as "Low Stock" to avoid double emailing your customers.
Coupons:
Not applied to this flow
6. Back in Stock
Sends 1 hour after a product becomes back in stock. Sent to shoppers who viewed the out of stock product in the last 60 days, and haven't converted or added it to their cart. Sends as a 3-part email series. Emails will only send if the shopper is not in an existing abandonment series. Does not include a coupon offer.
Only compatible with standard Shopify inventory management and excludes products that can be purchased when out of stock.
Turn off in other tools:
If you are enabling this flow, we recommend switching off any existing flows in other solutions that classify as "Back in Stock" to avoid double emailing your customers.
Coupons:
Not applied to this flow
7. Price Drop
Sends 1 hour after a product price drops by 10% or more, if it was in their cart in the last 60 days, and they have not removed or purchased it. Sends as a 3-part email series. Emails will only send if the shopper is not in an existing abandonment series. Does not include a coupon offer.
Note:
- Focuses on a single relevant product — not every item on sale
- If multiple products go on sale, we will notify them on the last product viewed
- We will automatically pick which messaging is the most appealing depending on the sale
- E.g. We'll calculate the discount amount and alter the messaging according to whether saying $20 off or 50% off will be more appealing for conversions
Turn off in other tools:
If you are enabling this flow, we recommend switching off any existing flows in other solutions that classify as "Price Drop" to avoid double emailing your customers.
Coupons:
Not applied to this flow
8. Welcome Flow
Sends immediately after a new signup or subscriber is identified. Sends as a 3-part email series and includes a coupon offer.
Note:
- This is the only flow that can run in parallel with others (e.g. a shopper can receive welcome emails while also qualifying for abandonment flows)
- Works automatically if you're using Shopify forms, Klaviyo forms, Alia, or Instant AI's forms. We'll capture the new contact information automatically through whichever sign up form you have enabled and trigger a welcome flow
- Our recommended setup is to use Instant AI forms for simplicity, to handle both capture and email delivery in one flow. However it is possible to continue using the sign up form from another provider, then just disable the welcome flow in the other provider and use Instant AI to send the email but another provider to capture their details.
- If using an Instant AI sign up form, we'll automatically sync the new email address with your Shopify and Klaviyo (if integrated)
Turn off in other tools:
If you are enabling this flow, we recommend switching off any existing flows in other solutions that classify as "Welcome" to avoid double emailing your customers.
Coupons:
Automatically applied to this flow, and automatically shown in the pop-up based on master coupon rules here
9. Win-Back
Sends immediately when a past customer hasn't purchased in 90 days and is not enrolled in an existing flow. Sends as a 3-part email series. Flow will cancel if they engage in browsing behaviour and the shopper will move to the relevant abandonment flow. Does not include a coupon offer.
Turn off in other tools:
If you are enabling this flow, we recommend switching off any existing flows in other solutions that classify as "Winback" to avoid double emailing your customers.
Coupons:
Not applied to this flow
10. Post Purchase
Sends 24 hours after a completed order. Sends 1 follow-up email thanking them for their purchase. Does not include a coupon offer. Recommends similar products encouraging them to keep browsing while they wait.
Turn off in other tools:
If you are enabling this flow, we recommend switching off any existing flows in other solutions that classify as "Post Purchase" to avoid double emailing your customers.
Coupons:
Not applied to this flow
11. Request Review
Sends 7 days after a customer has had their order fulfilled, sending 1 follow-up email prompting them to review the product they purchased.
Turn off in other tools:
If you are enabling this flow, we recommend switching off any existing flows in other solutions that classify as "Request Review" to avoid double emailing your customers.
Coupons:
Not applied to this flow
How to Enable Flows
You can view and manage all flows directly in your Instant AI dashboard.
- Scroll to see which flows are enabled or disabled
- Click into each one to view conversion metrics and performance
- Toggle flows on or off at any time
- Send yourself a preview of any flow email to see what's going out
How to transition from other Platforms
If you're using other email platforms like Klaviyo, we recommend pausing any flows that overlap with Instant AI. Because Instant AI sends flows based on shopper behaviour, keeping similar flows active elsewhere can lead to duplicate or conflicting emails. Particularly when other platforms don't have the same dynamic flow rules, they may enrol shoppers in multiple flows at once.
Here's what we suggest:
- Check for any live flows in your other platform that have similar triggers to the above
- Pause or disable any flows that would send under the same conditions Instant AI already handles.
Once you've moved that flow to draft in your alternative system, you are ready to enable them in Instant AI
Article URL: https://help.instant.one/understanding-instant-ai-flows
Keywords:
## Understanding Payouts on Instant
At Instant, we aim to make your experience smooth and transparent, including when it comes to payouts. Here's everything you need to know about payouts and our payout schedule.
What is a Payout?
A payout is the process of transferring funds from Instant to your designated bank account. This transfer occurs as a result of transactions, sales, or earnings made on our platform.
Payout Schedule
Your payout schedule is country-dependent. A list of payout speed by country is below.
Instant follows a T+2 payout schedule where available, which means payouts are processed two business days after the transaction. For example, if you make a sale on Monday, your payout will typically be processed and initiated by Wednesday.
| Country |
Payout Speed |
| Australia |
2 business days |
| Europe |
3 business days |
| New Zealand |
4 business days |
| Singapore |
7 business days |
| United Kingdom |
3 business days |
| United States |
2 business days |
Extended Payout Times
During public holidays, banks may operate on reduced schedules or be closed entirely. As a result, the processing of payouts may be delayed beyond the usual T+2 timeframe.
When a bank holiday falls within the standard two-day payout window, delays may occur in receiving your funds.
If you have any further questions regarding payouts please contact help@instant.one
Article URL: https://help.instant.one/payouts
Keywords:
## How do I create a Welcome flow for Predictive Opt-In?
- Proceed to your Klaviyo dashbard, and click on "Flows" in your sidebar.
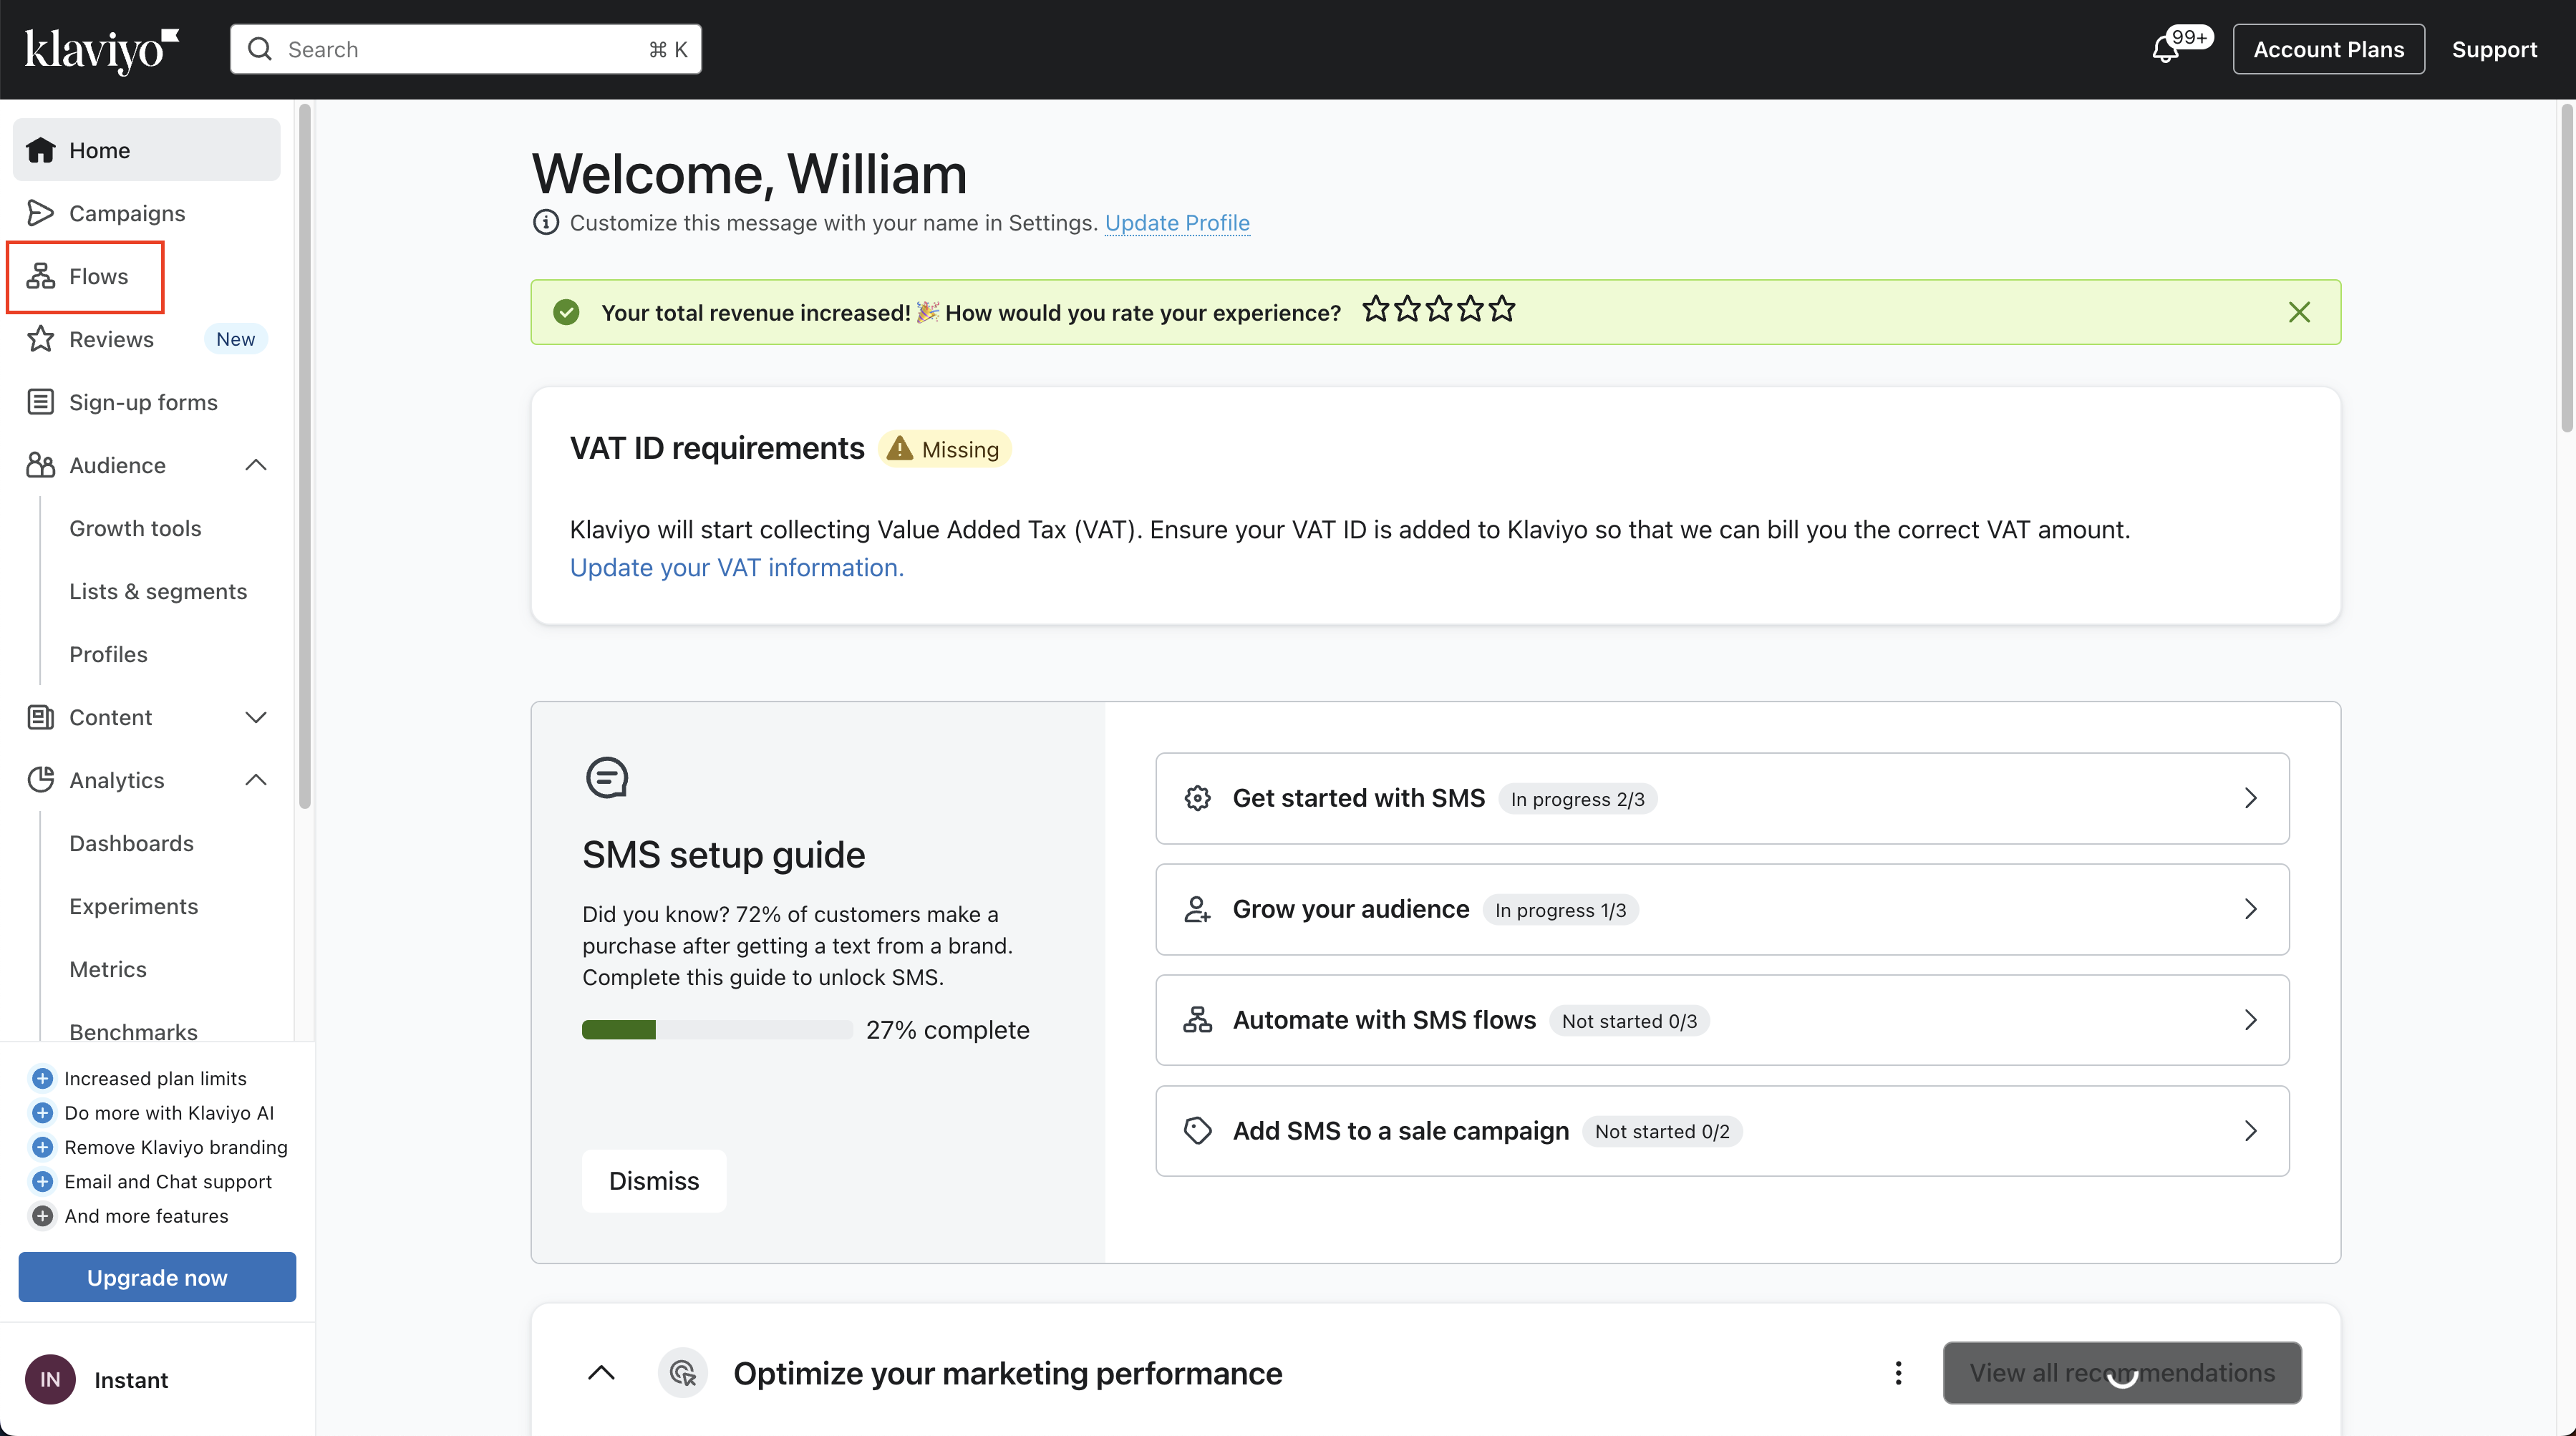
- On your existing welcome flow, click on the three dots and click on Clone.
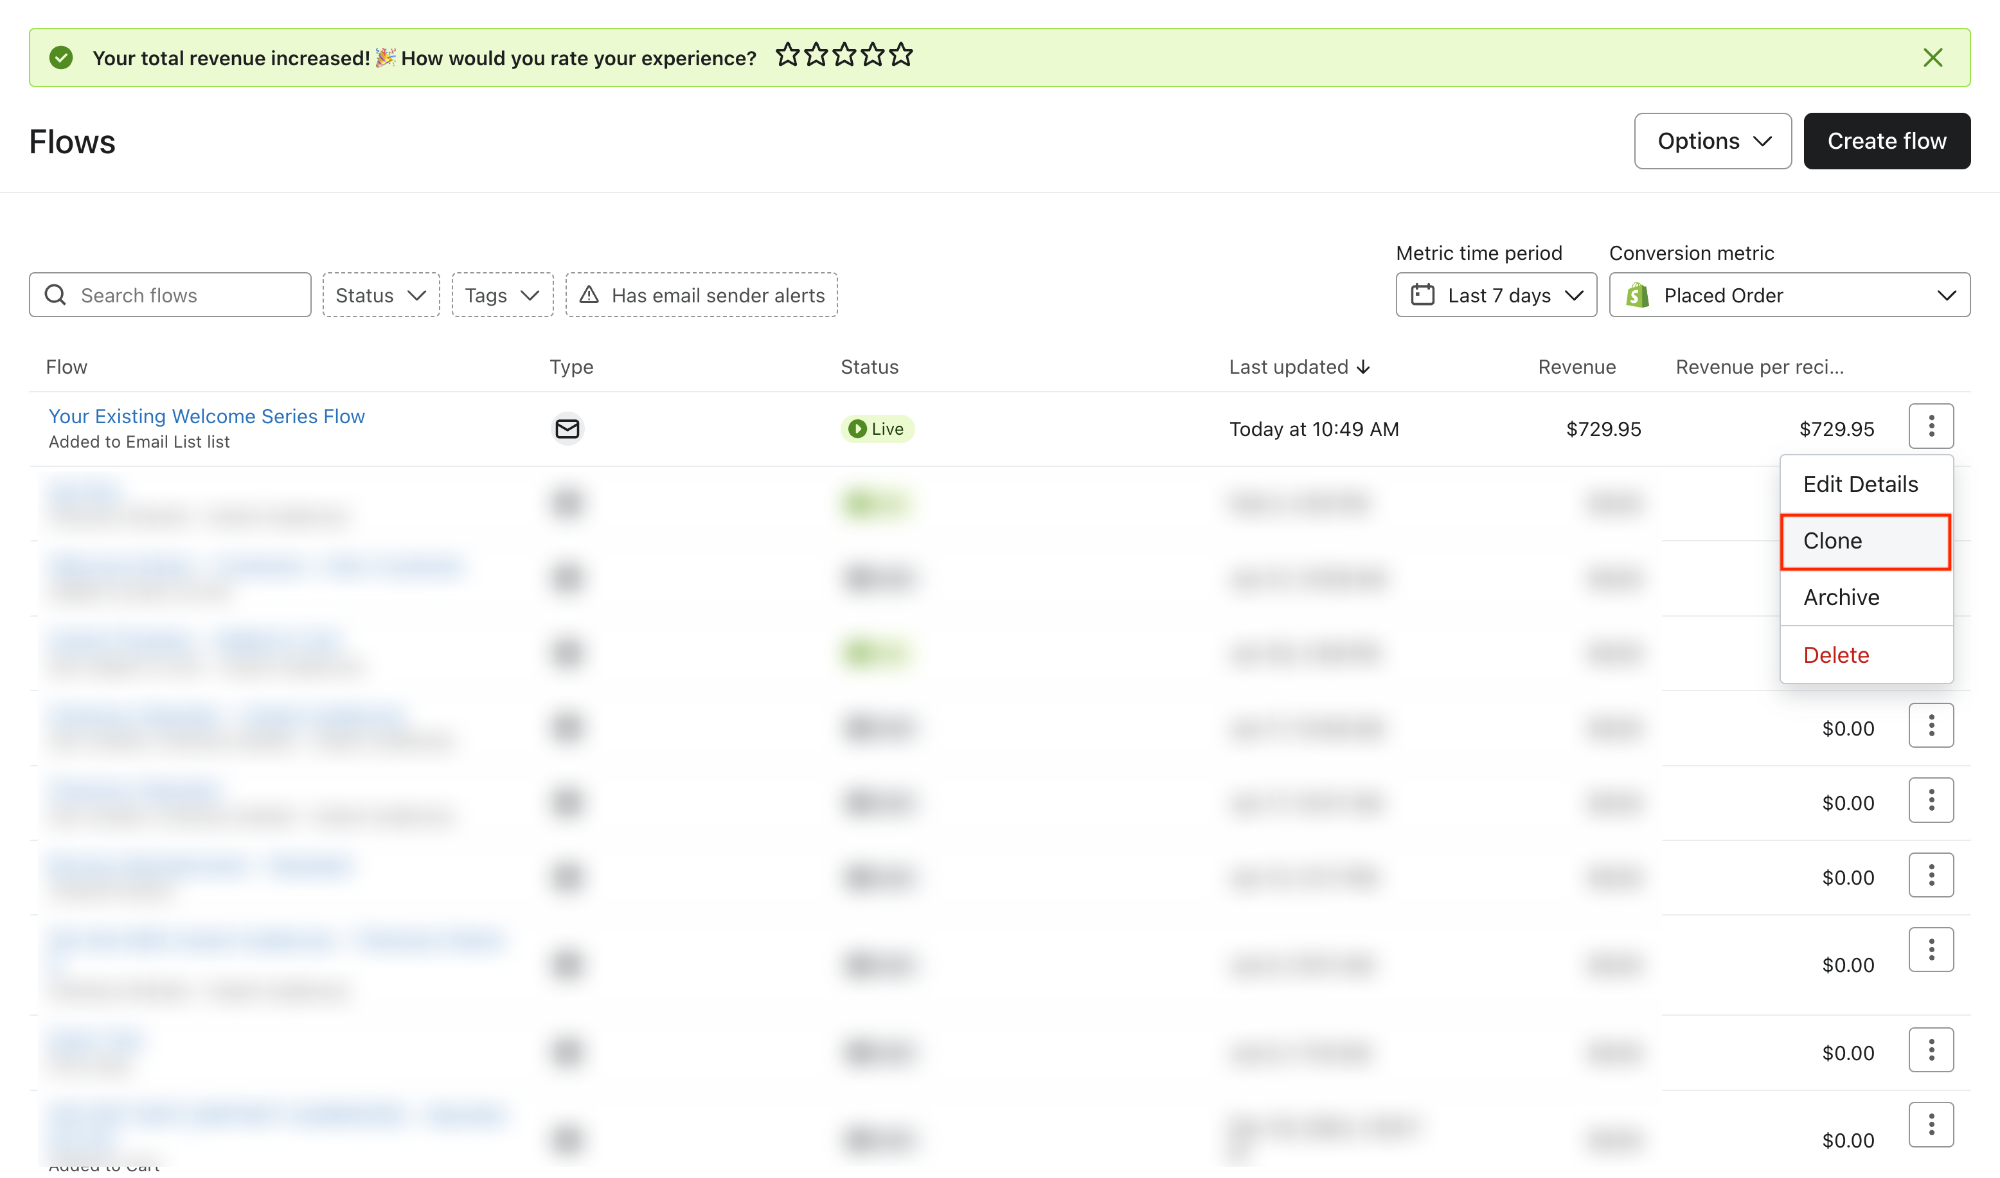
- Add Instant Audiences as the prefix on your new flow name. Click on Continue.
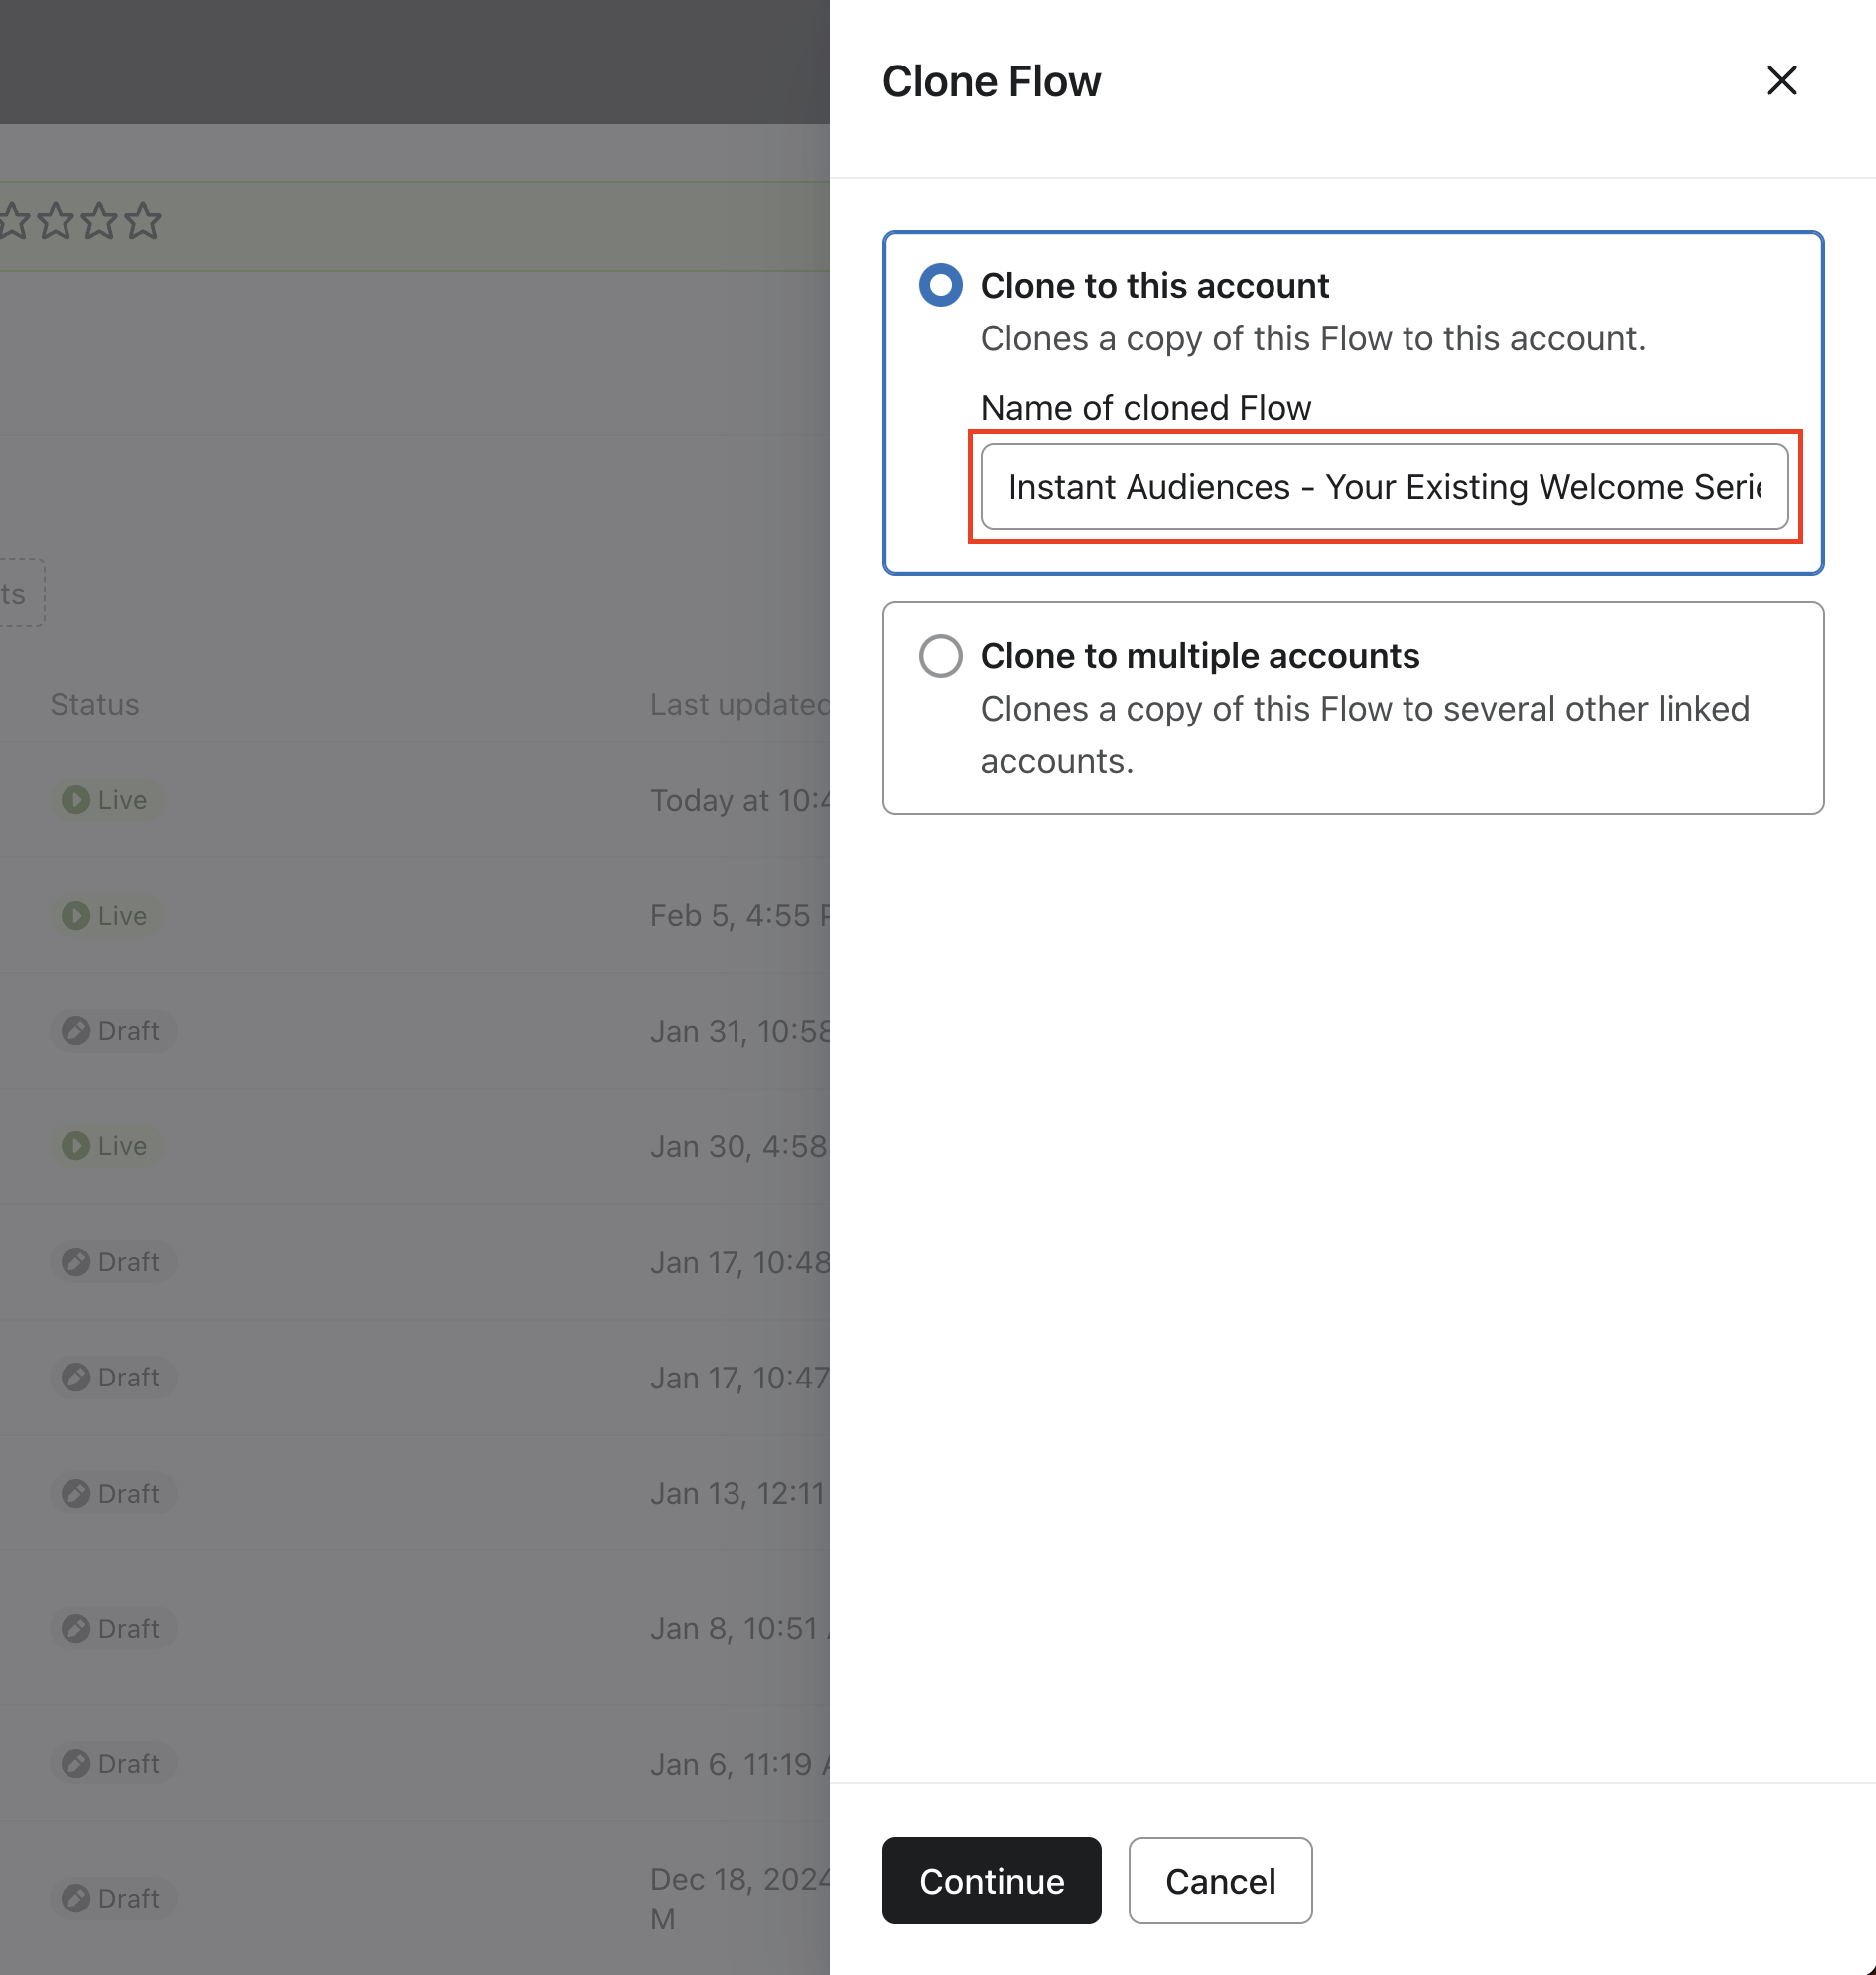
- In the modal that shows up, click "Clone Flow".
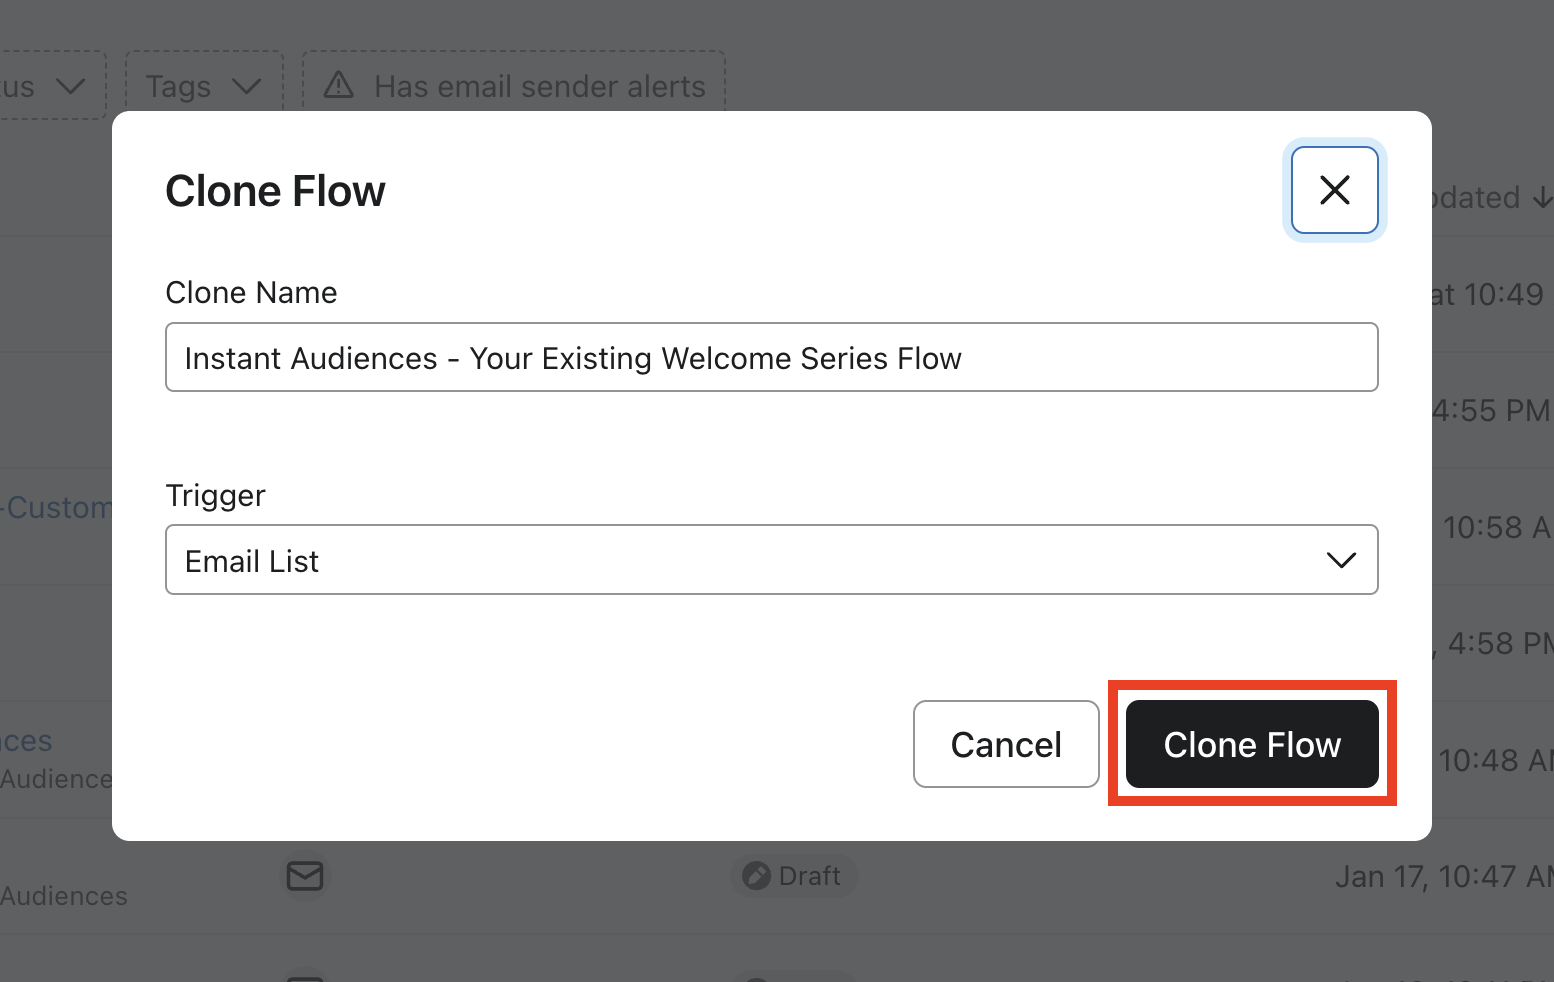
- Click onto your newly cloned Instant Audiences welcome flow.
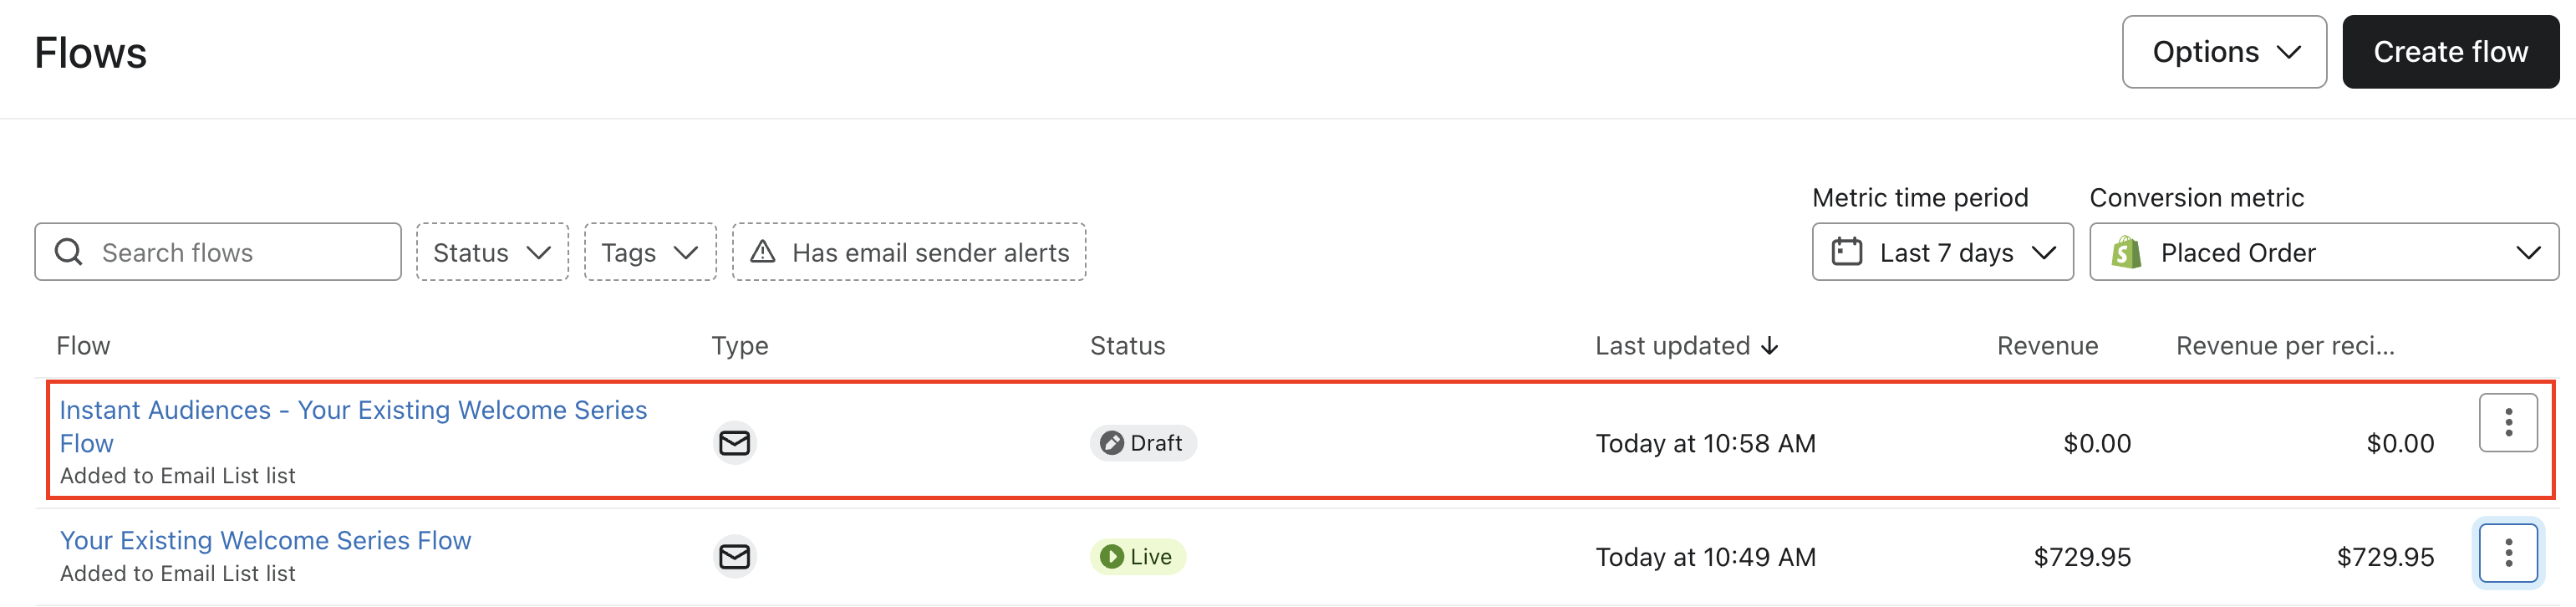
- Click into the Trigger of the flow, and click Add.
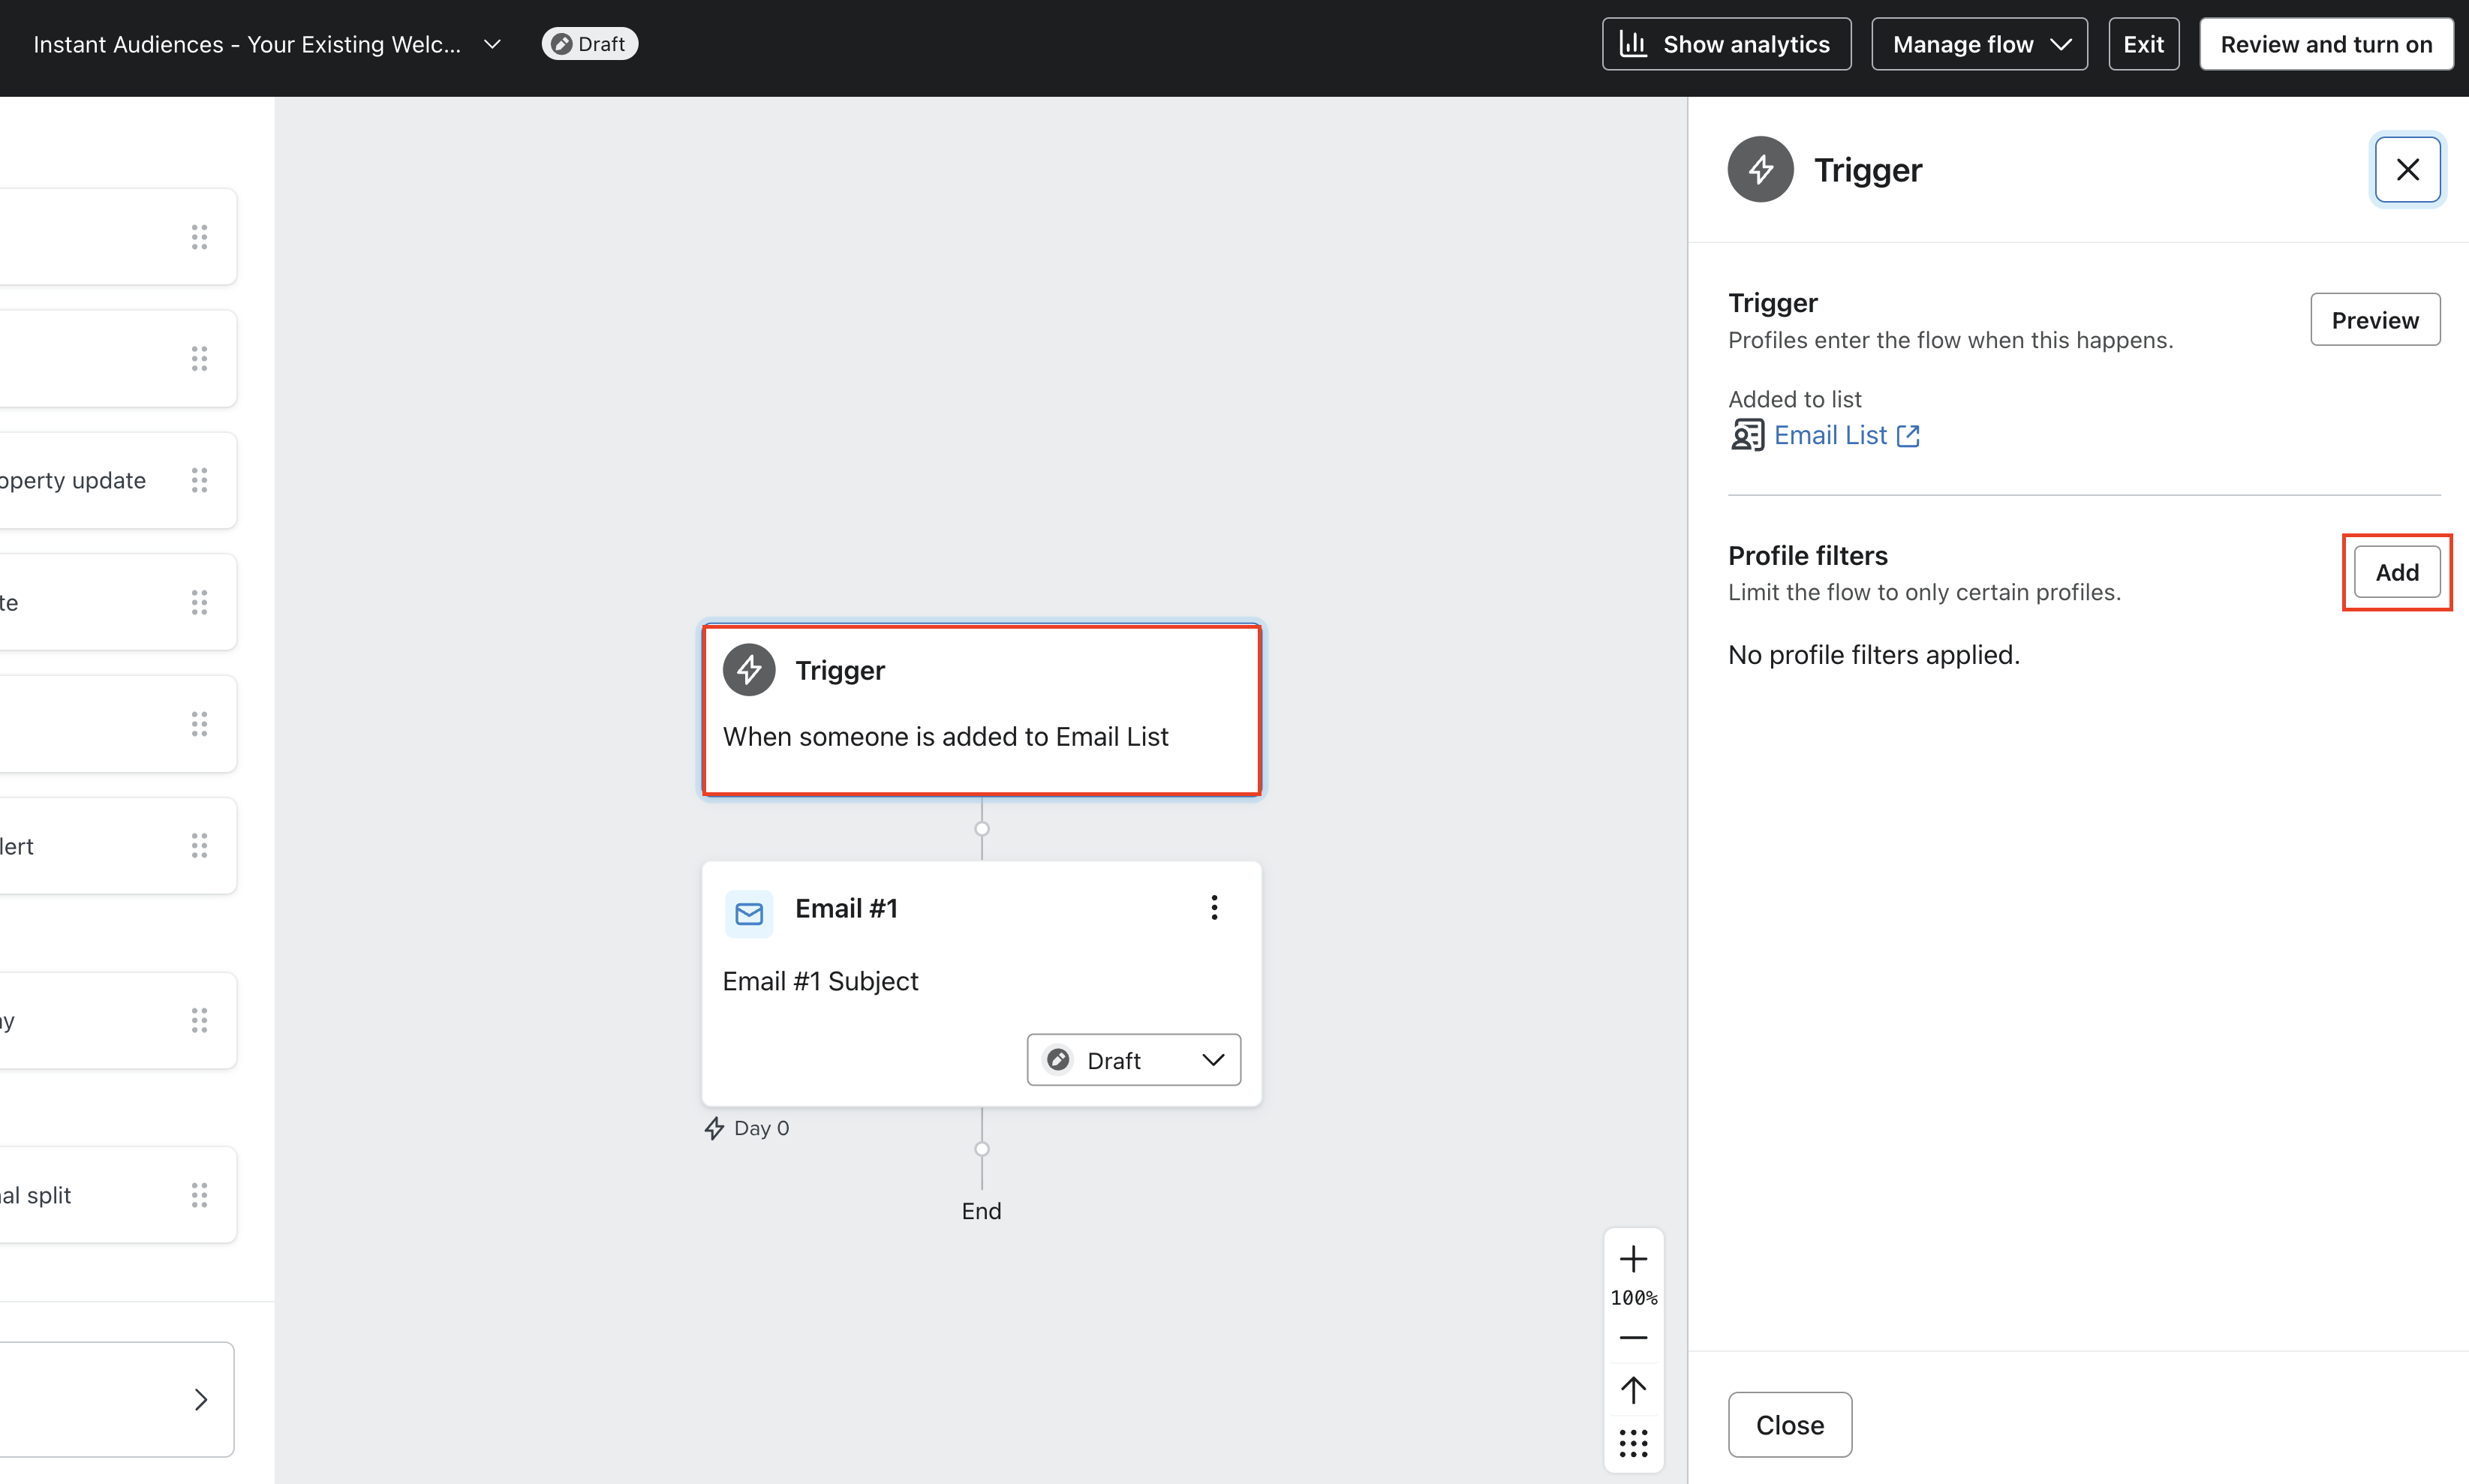
- Add a profile flow filter as follows: "Properties about someone, Opted-In Via Instant Predictive Opt-In is set". Ensure any existing filters are not removed.
Ensure the type of the property is set to "Text", and click Save.
This filter ensures that only profiles opted-in through Instant triggered pop-ups are enrolled into this flow, making it easy to attribute revenue and track your results.
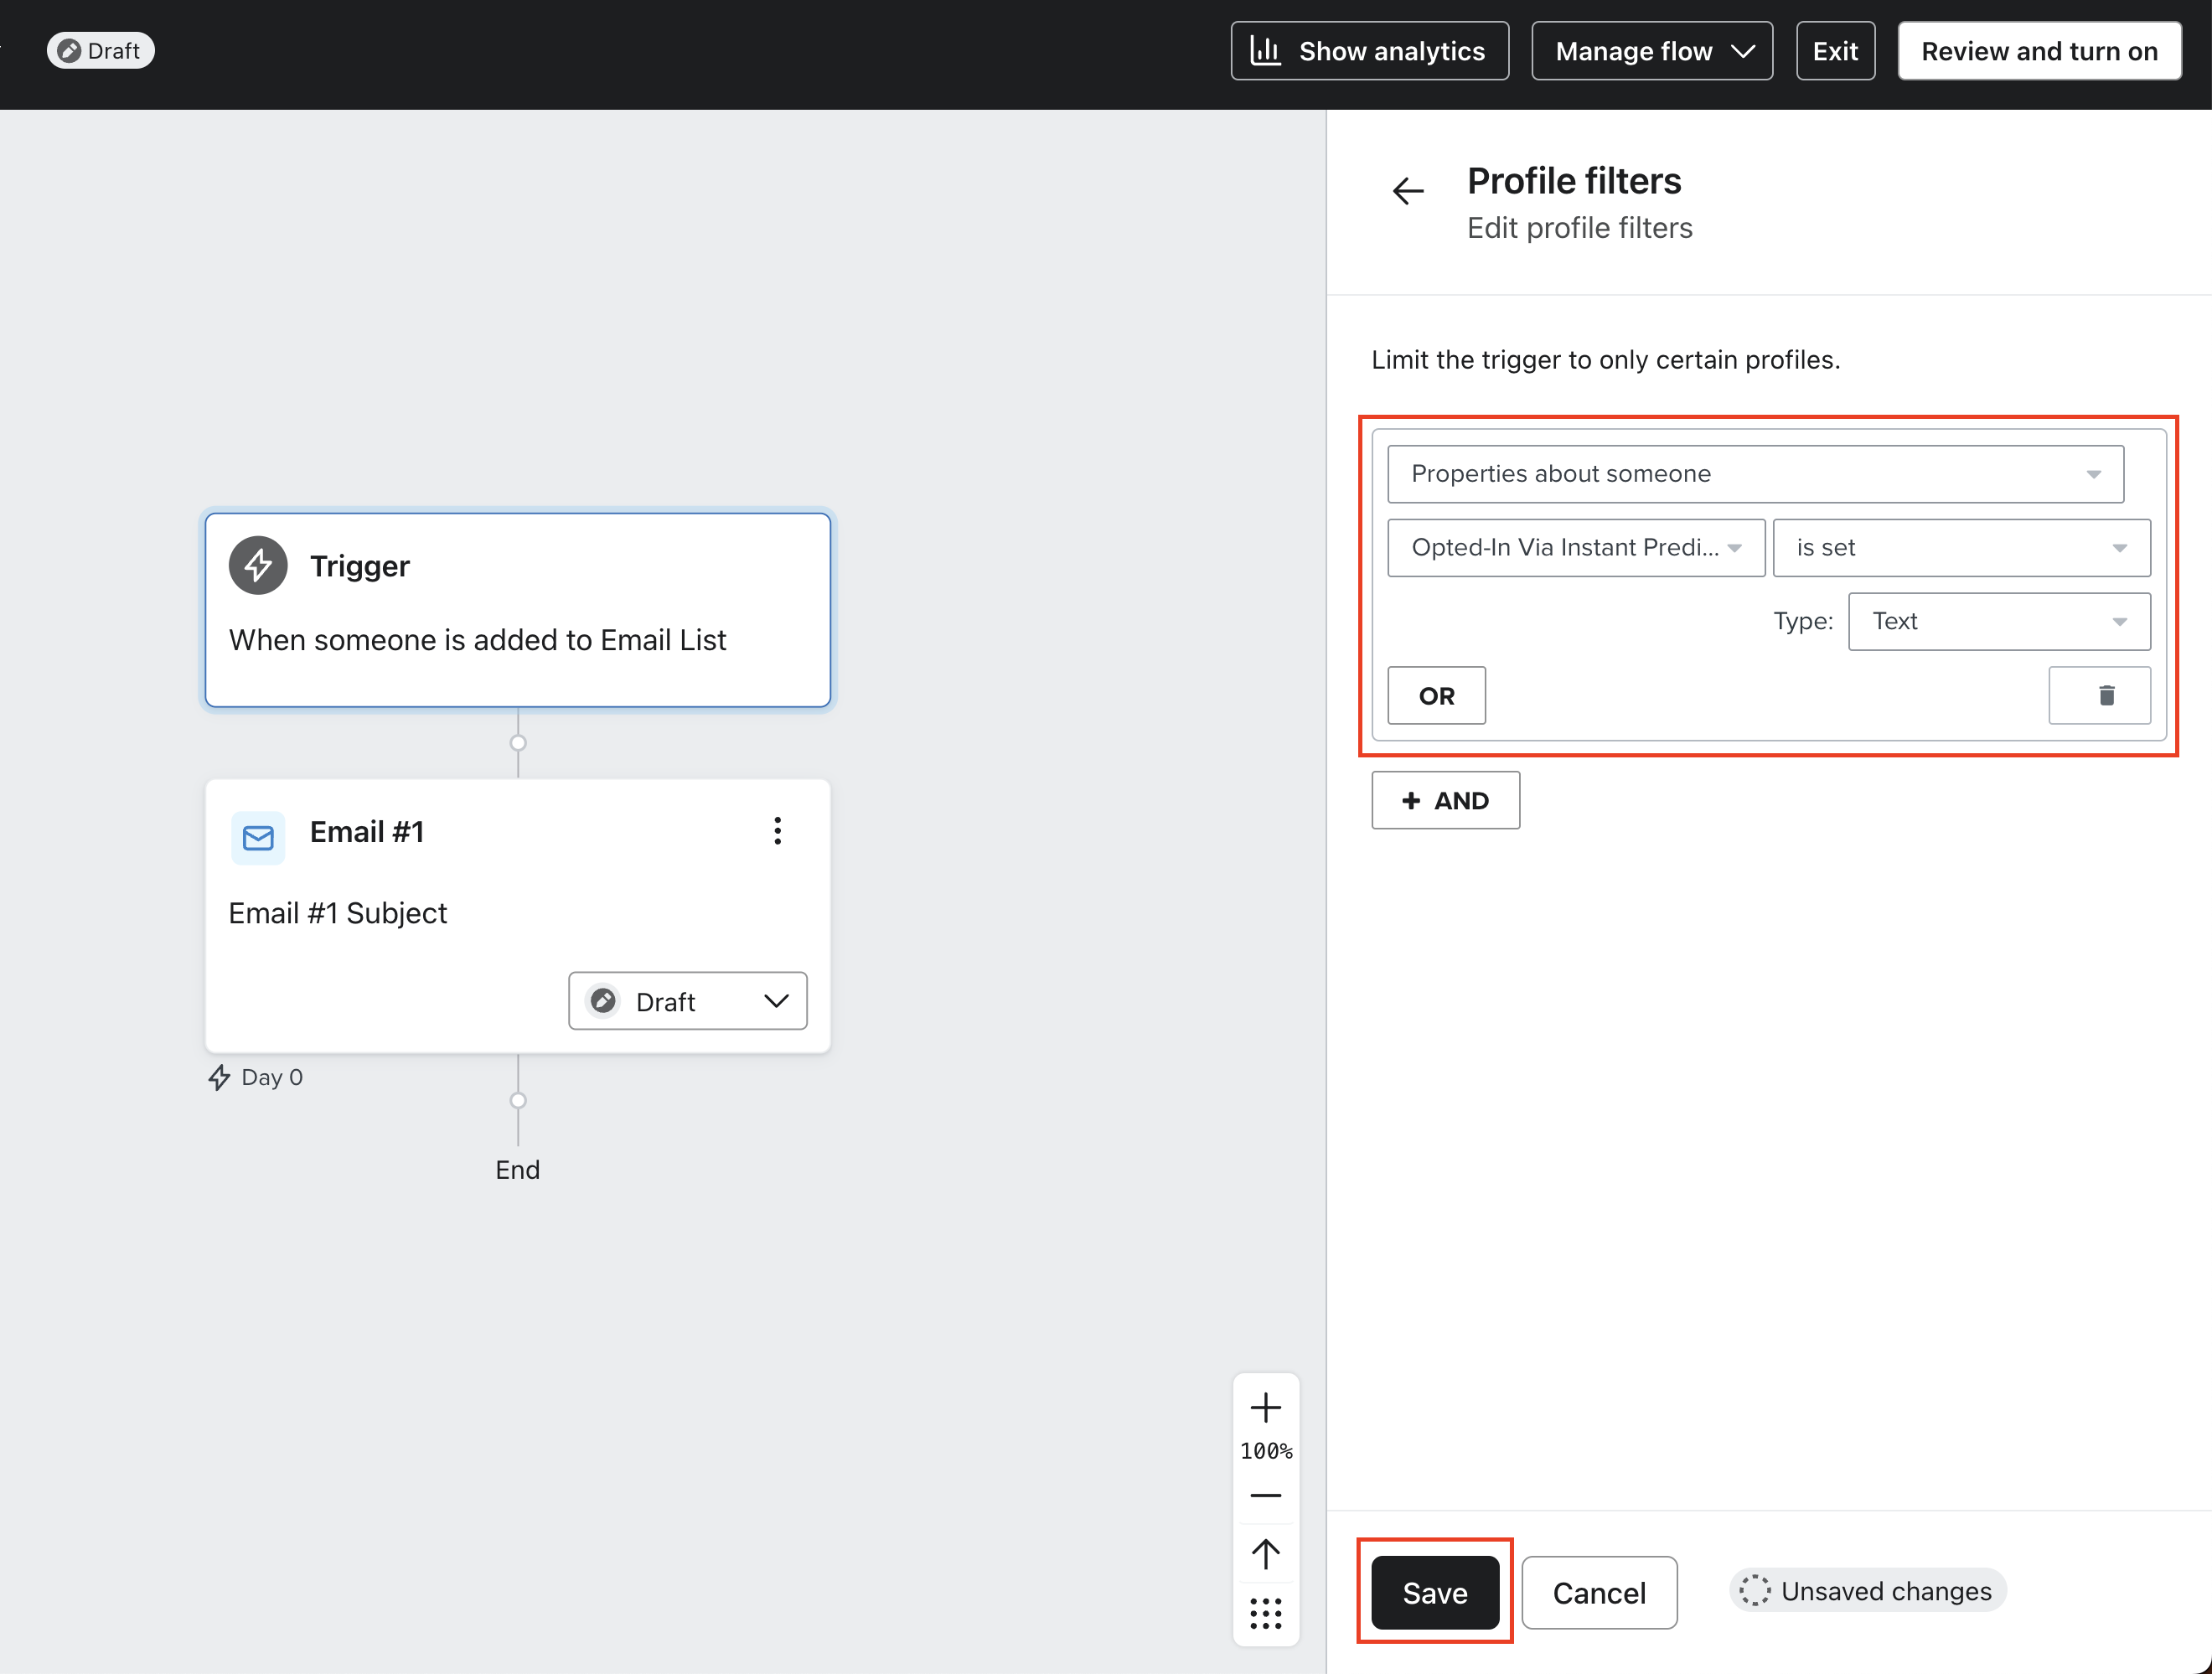
- Click Review and turn on in the top right of your screen, and click Save in the screen that follows. Once this is done, click Exit.
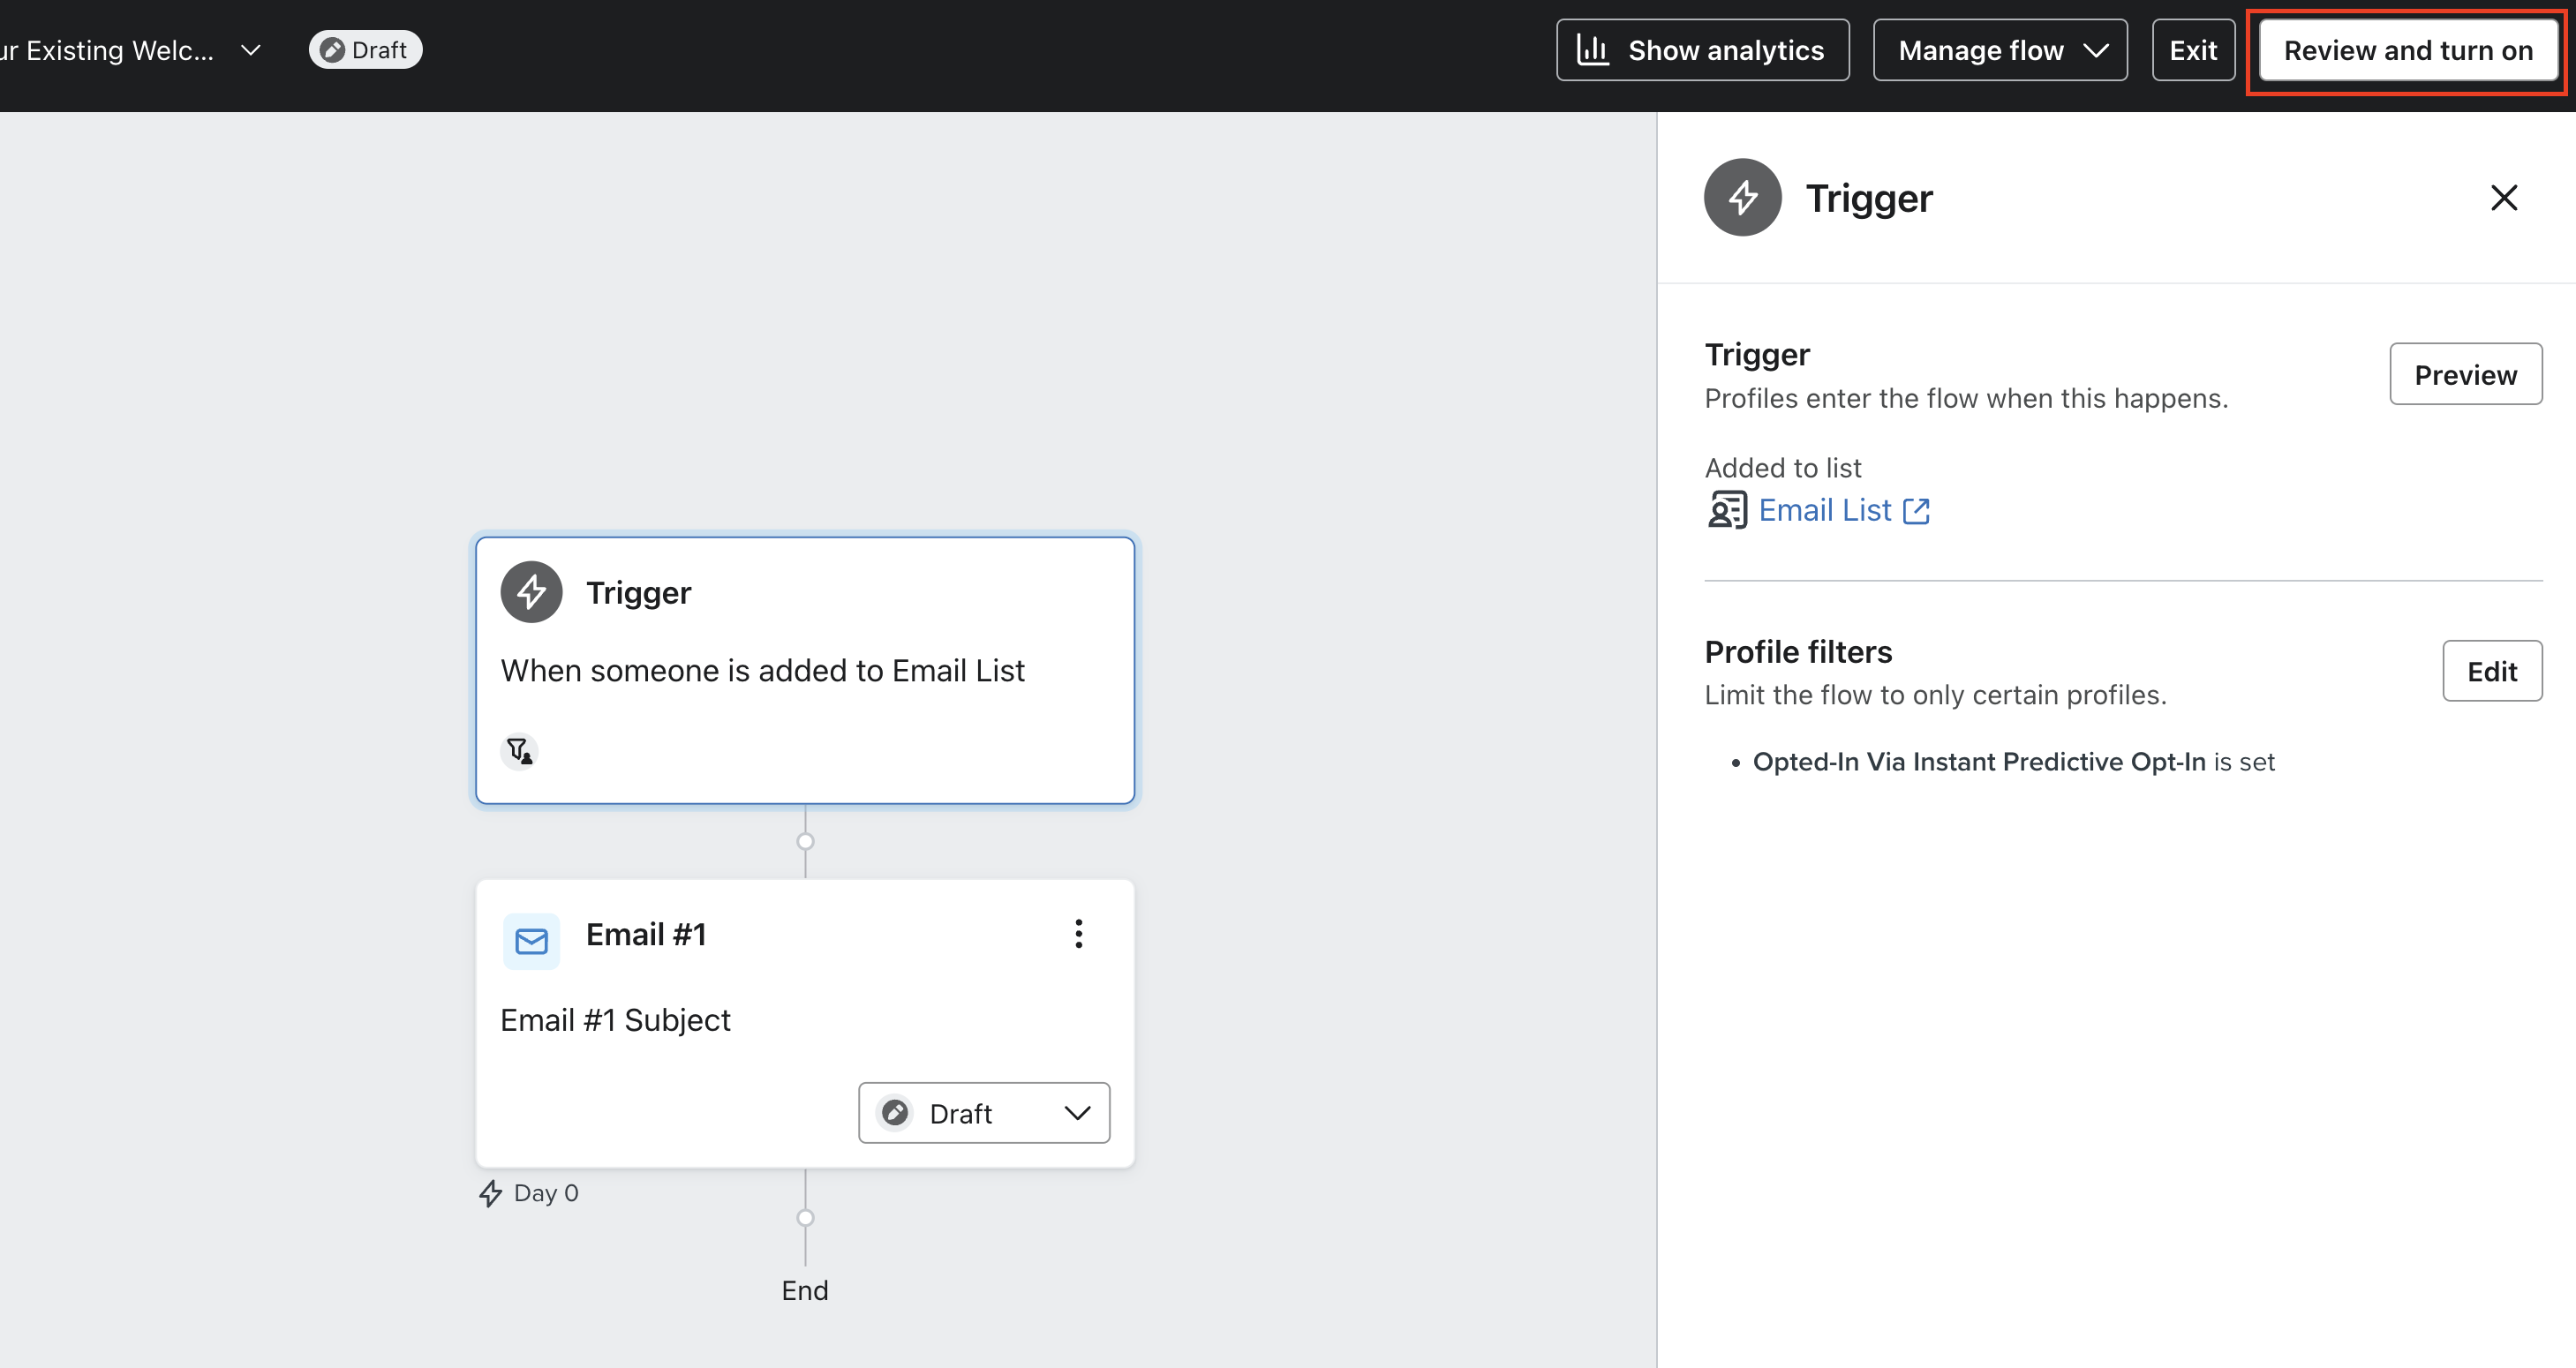
- Click into your existing welcome series flow.
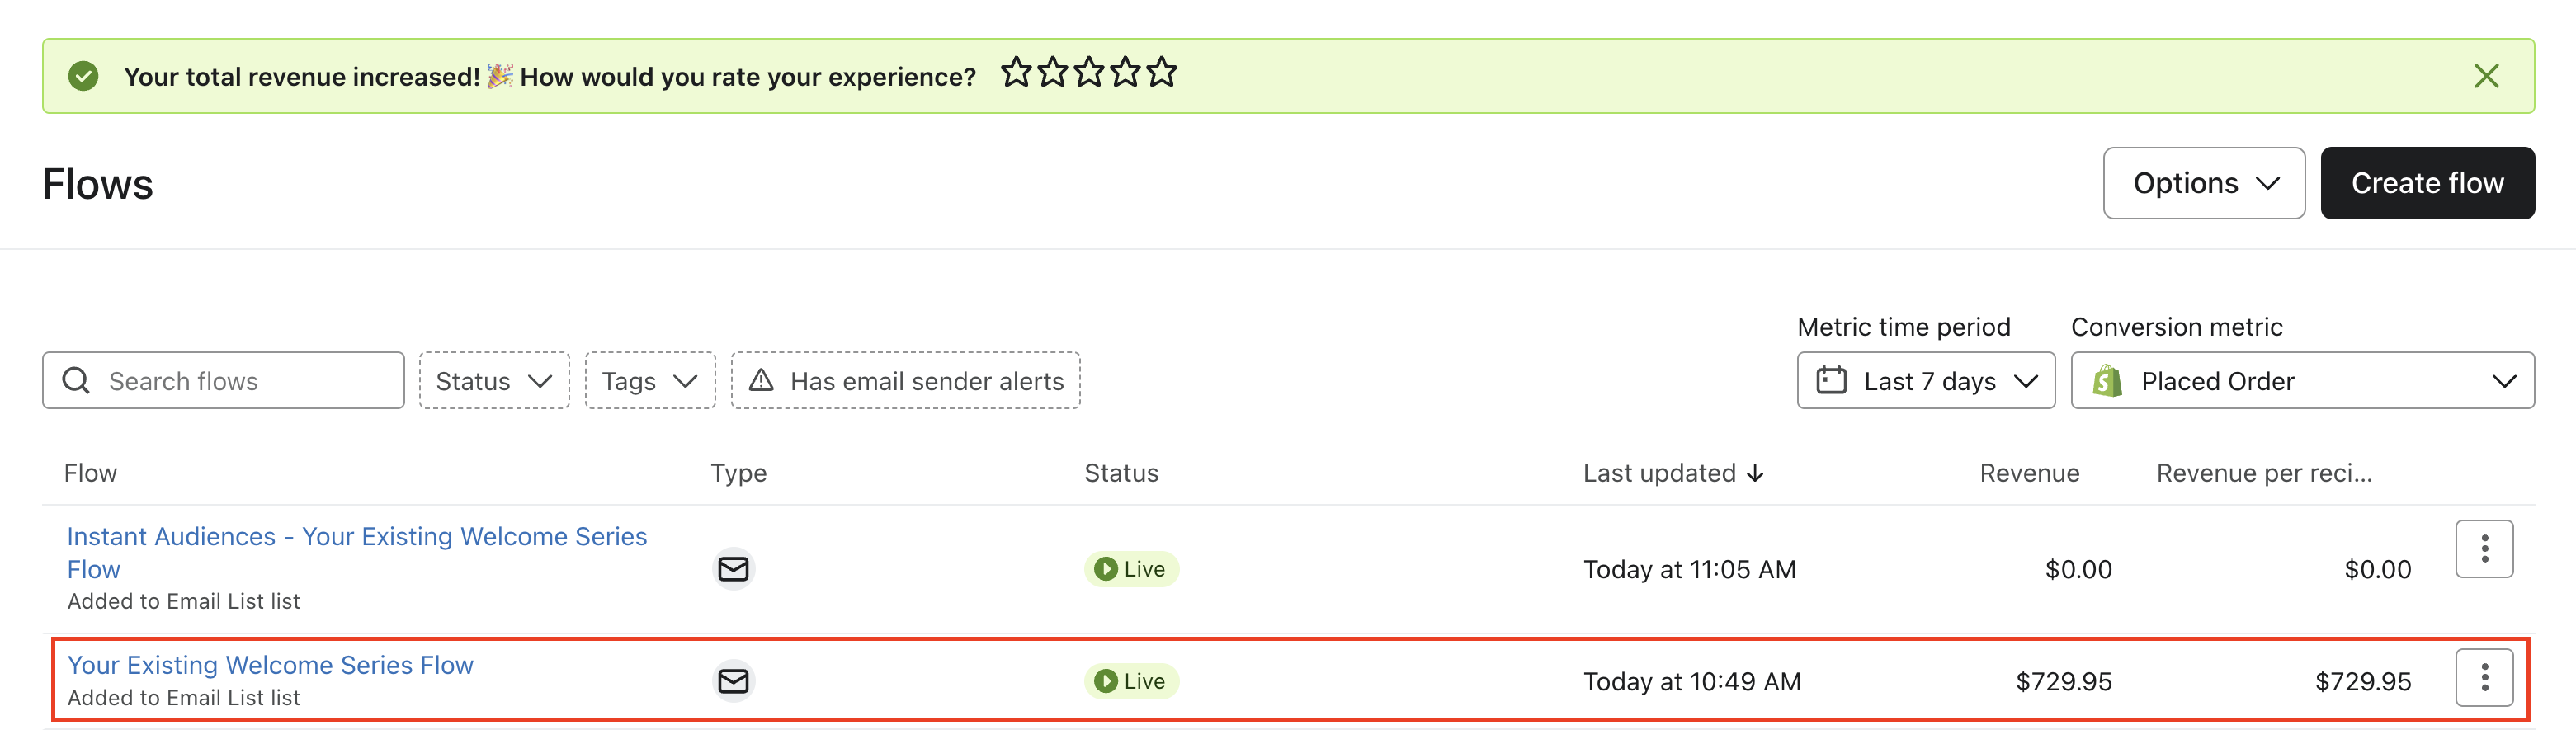
- Click into the Trigger of your flow, and click on "Add" next to Profile filters.
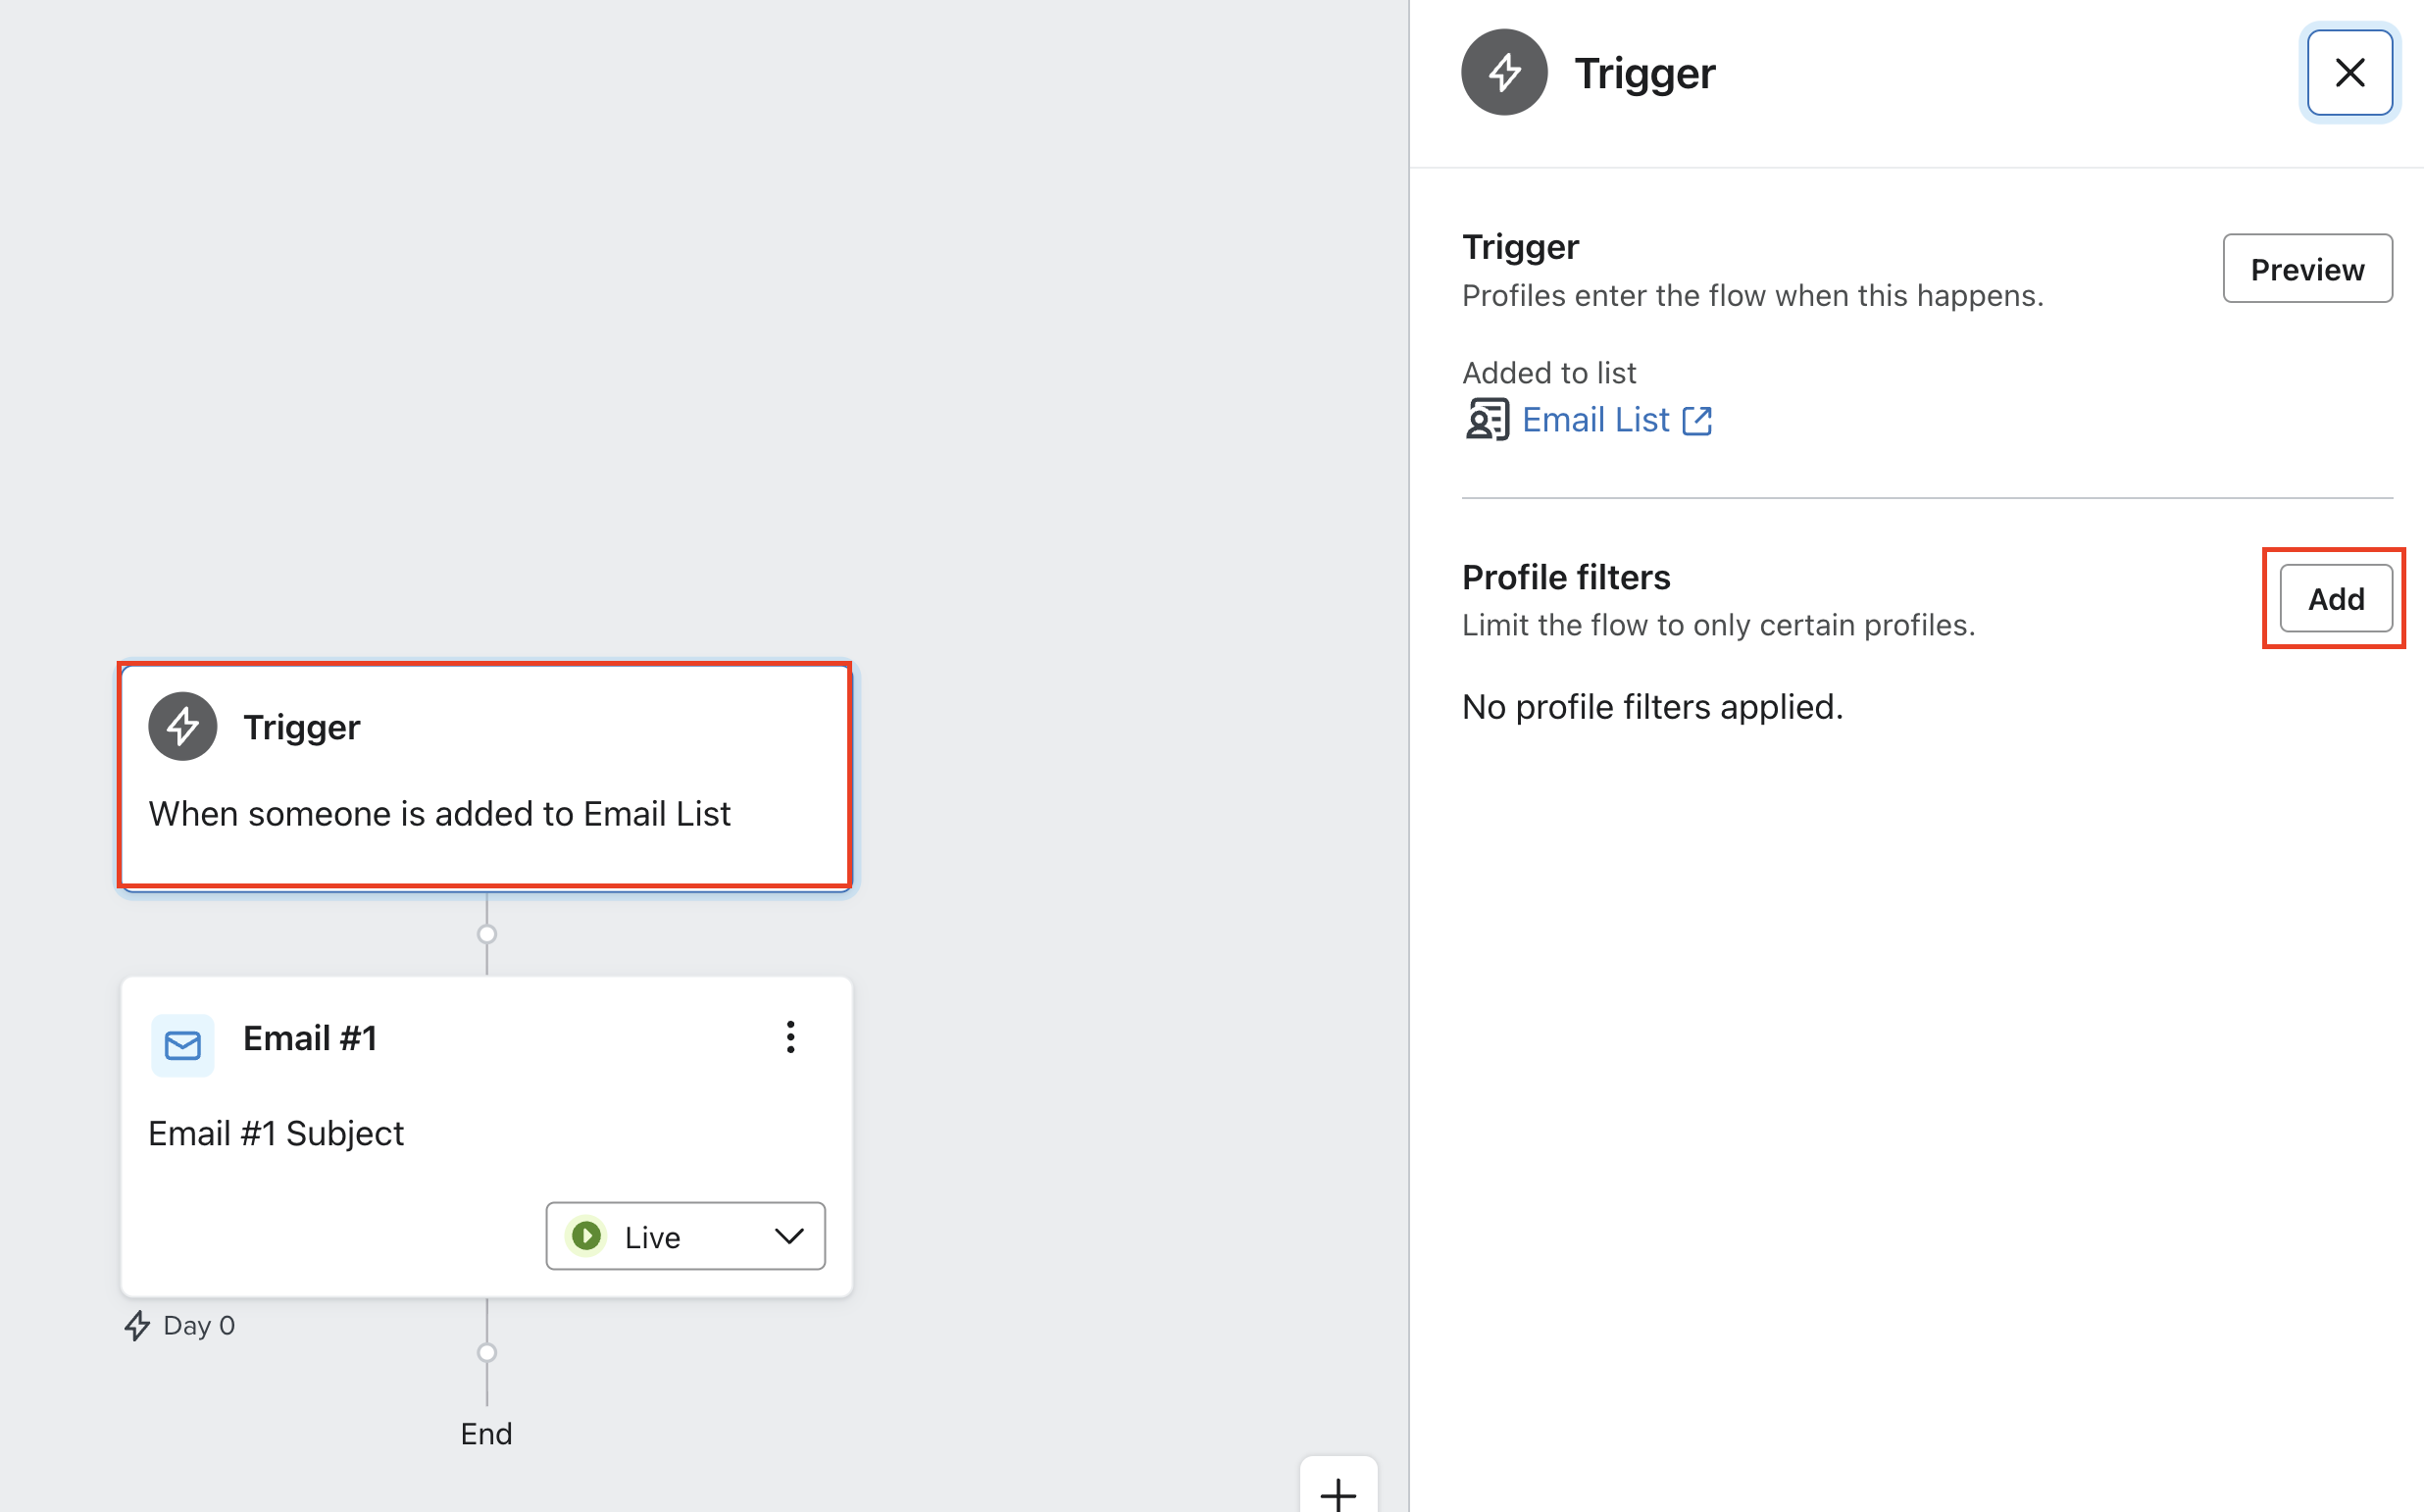
- Add a profile flow filter as follows: "Properties about someone, Opted-In Via Instant Predictive Opt-In is not set". Ensure any existing filters are not removed.
Ensure the type of the property is set to "Text", and click Save.
This filter ensures that profiles opted-in through Instant triggered pop-ups are not enrolled into this flow, instead they will be enrolled into the cloned flow created earlier. This makes it easy to attribute revenue and track your results.
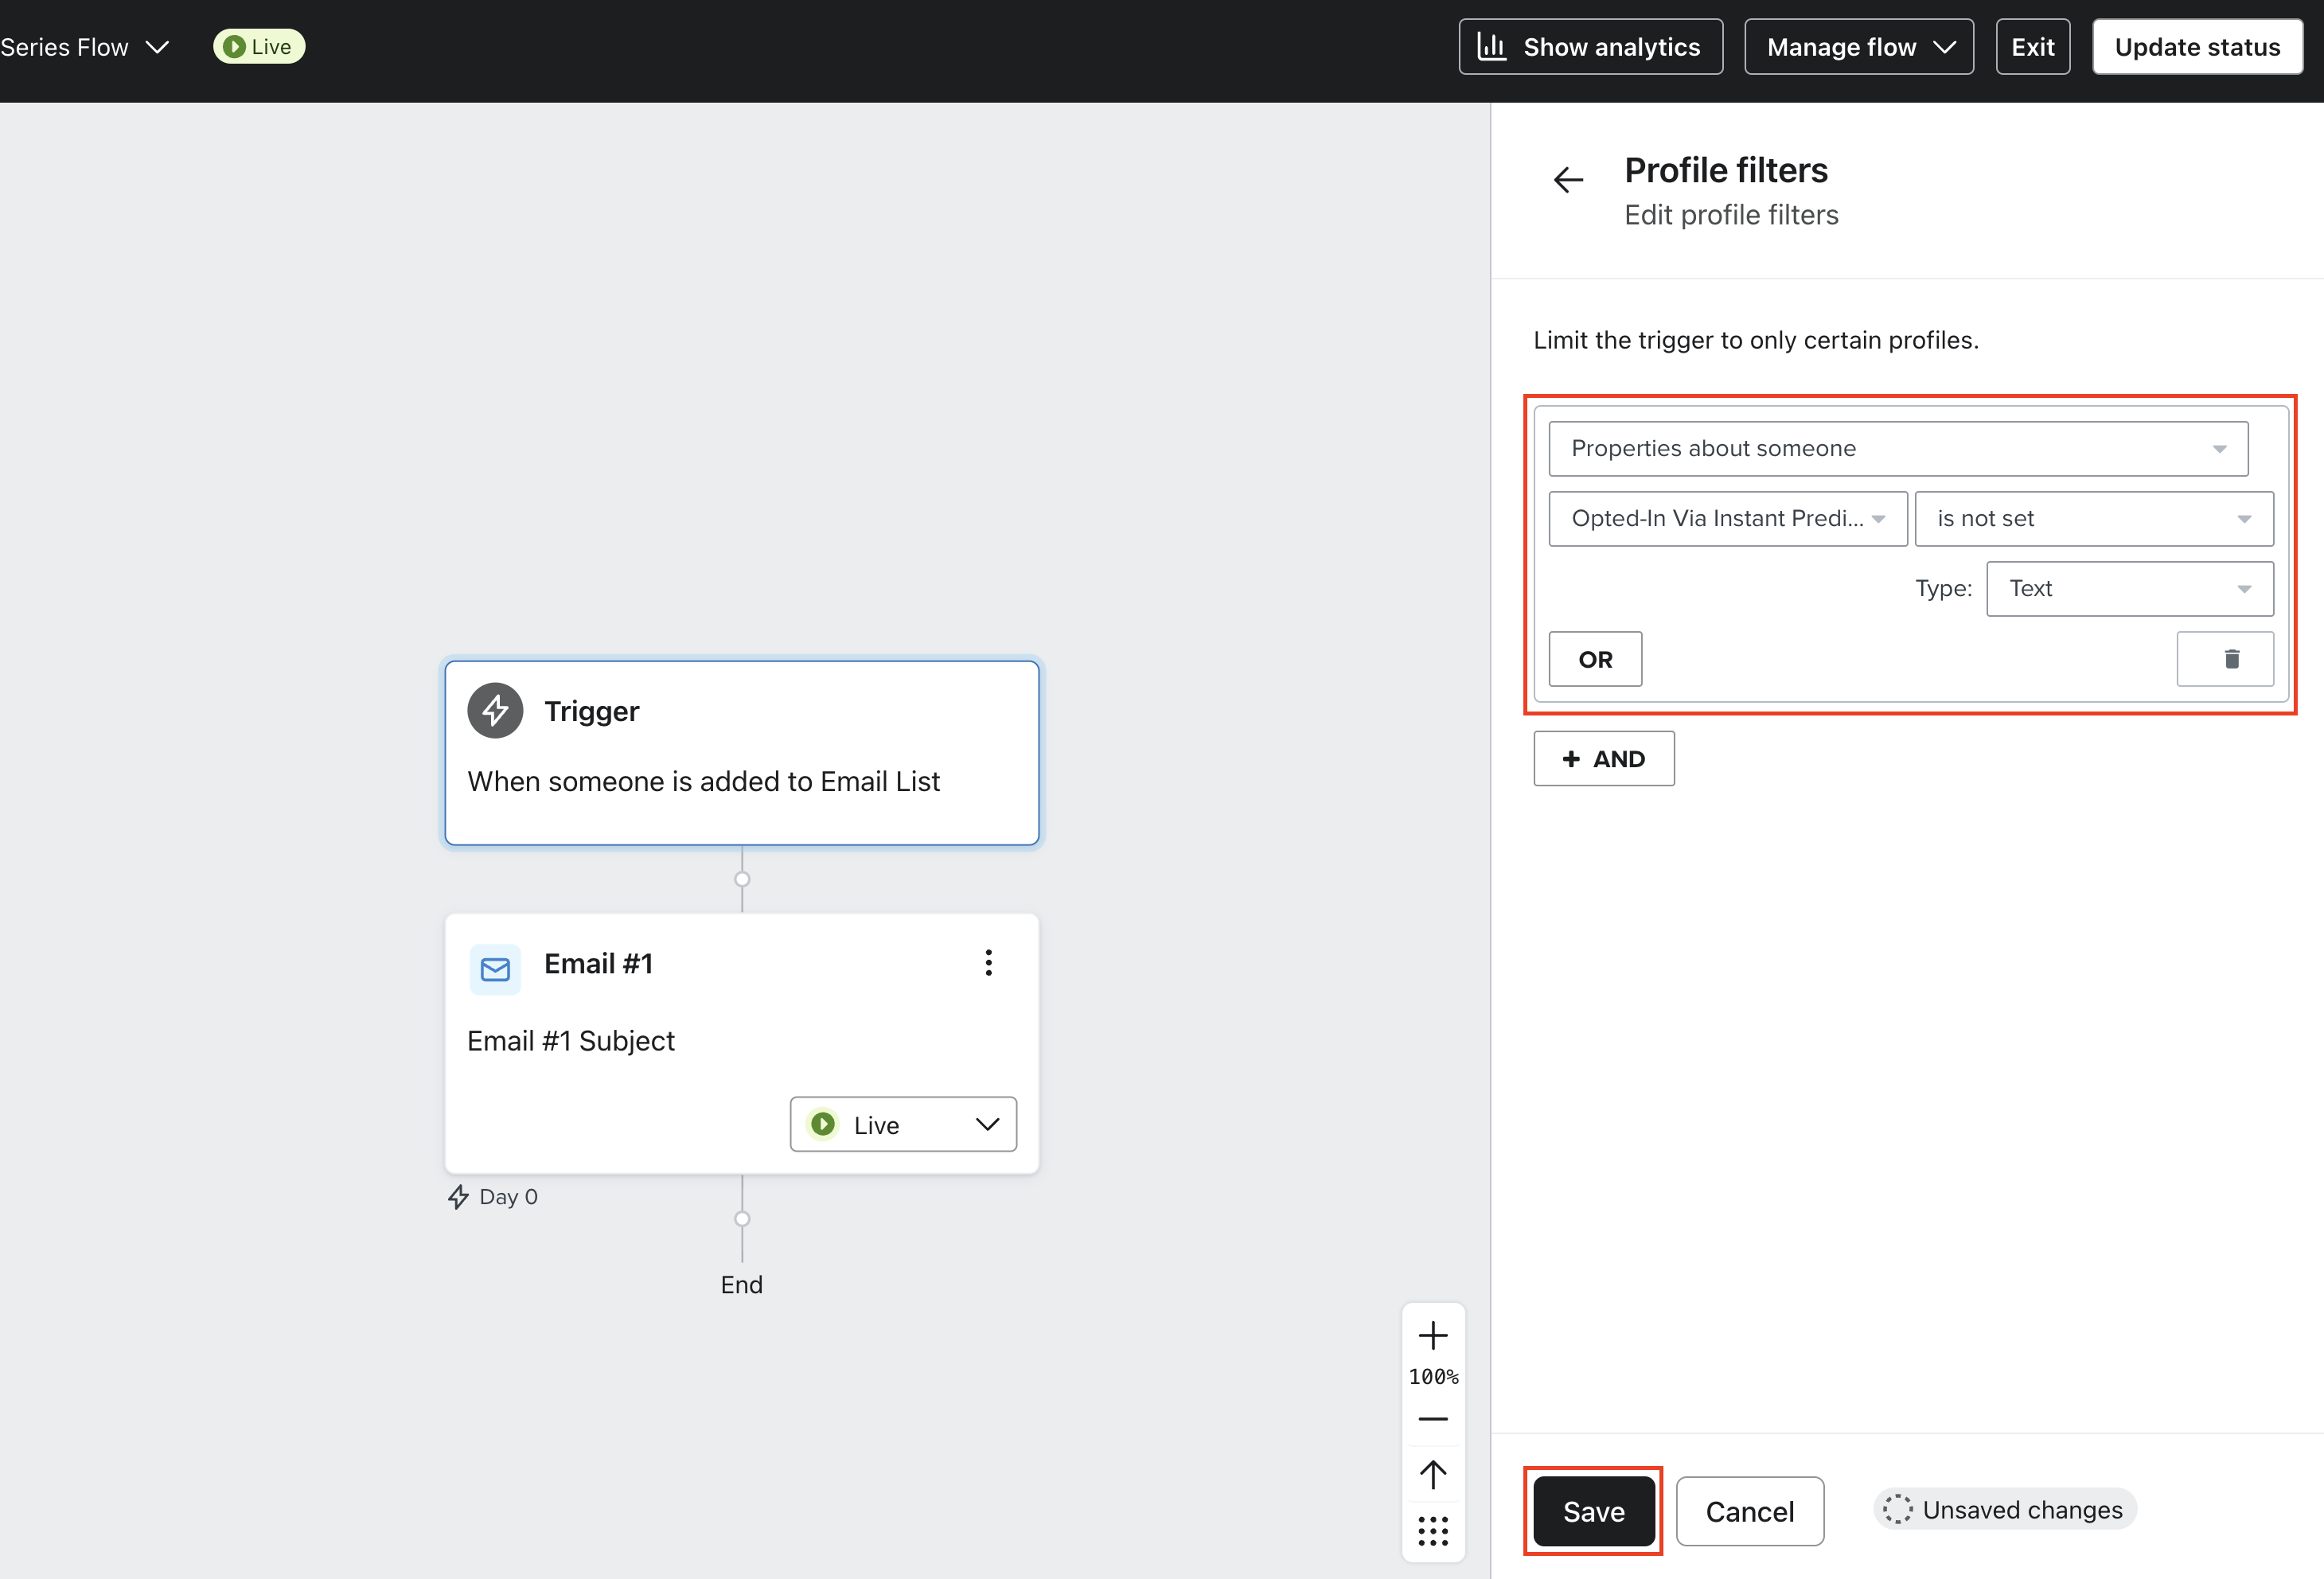
Article URL: https://help.instant.one/how-do-i-create-a-welcome-flow-for-predictive-opt-in
Keywords:
## Best Practices to Keep Your Emails Out of Spam and Promotions
Inbox placement depends on how inbox providers (like Gmail and Outlook) evaluate your emails across a few key areas — authentication, reputation, engagement, content, and consistency.
Instant AI helps manage the technical setup and automates your content to follow proven best practices, so you’re sending from a strong foundation. While inbox placement is always determined by the recipient’s email provider, the combination of a verified setup, consistent sending, and engaging content gives your brand the best chance of reaching shoppers reliably.
Authentication
Authentication tells inbox providers that your emails genuinely come from your brand. It’s the foundation of trust and deliverability. Instant AI connects through your DNS provider by adding CNAME records. These records allow Instant AI to send authenticated emails on your behalf, without changing your existing setup.
If your main domain is already in use (for example with Klaviyo), Instant AI connects using a dedicated subdomain such as mail.yourbrand.com or send.yourbrand.com. This prevents conflicts and helps protect your primary domain’s reputation.
We also check whether your domain already has a DMARC record. This helps inbox providers know how to handle unauthorised messages and supports long-term deliverability. If you already have DMARC in place, Instant AI uses your existing policy without requiring changes. Emails are only activated once your DNS records verify successfully, ensuring everything is connected correctly before sending.
Reputation
Your sender reputation is like your email trust score. It builds over time based on how consistently you send, how people interact with your messages, and how many are reported, ignored, or bounced.
Instant AI helps maintain this by managing bounce and complaint tracking automatically, and by sending emails at natural, behaviour-based times rather than in bulk. But your sending patterns still play an important role:
- Send regularly — avoid long gaps or sudden bursts of activity.
- Focus on engaged shoppers who open, click, or purchase.
- Remove inactive or bounced contacts from your lists periodically.
- Avoid purchasing or uploading external lists.
Consistency and engagement build trust slowly, but reliably. Every healthy send strengthens your reputation.
Content
Inbox filters don’t just look at technical setup, they analyse your content and engagement patterns. The goal isn’t to force emails into the Primary inbox; it’s to create messages that look legitimate, valuable, and relevant to your shoppers.
Keep your content simple, brand-aligned, and balanced:
- Use clear subject lines that match your message.
- Keep a healthy balance between text and imagery — too many images or links can trigger filters.
- Always include a visible unsubscribe link (Instant AI checks for this automatically).
- Send from a monitored, real “Reply-To” address.
Encourage authentic engagement. Small, natural prompts like: “Need help deciding? Just reply to this email.” or “We’d love to hear what you think — hit reply to tell us.” These help to encourage reply-to's which also help improve deliverability.
Instant AI also structures your emails for compliance and clarity — with clean HTML, safe tracking links, and balanced layouts that support strong deliverability performance.
Consistency
Inbox providers value consistency and authenticity. Instant AI’s automated flows — like abandoned cart, winback, or replenishment — naturally send at relevant times based on shopper behaviour, which helps maintain a stable sending pattern.
Mixing these automated flows with occasional plain-text emails (for example, a short note from your founder or CEO) can also help strengthen deliverability. Plain-text emails tend to look more personal and conversational, which inbox providers interpret as trusted, one-to-one communication.
Campaigns, on the other hand, are more visual and often appear in Promotions — which is perfectly fine. Together, this mix of automated flows, campaigns, and occasional plain-text sends creates a healthy pattern that inbox providers recognise as natural and brand-led.
Instant AI ensures your emails are technically sound, authenticated, and structured according to recognised best practices. You maintain that trust by sending valuable, relevant content that feels personal and aligned with your brand.
Article URL: https://help.instant.one/best-practices-to-keep-your-emails-out-of-spam-and-promotions
Keywords:
## Flow Setup: Product Viewed
Product Viewed abandonment flows target anonymous visitors who have viewed a product but left the site without completing a purchase.
These flows are triggered through the "Product Viewed - Instant Audiences" metric in Klaviyo.
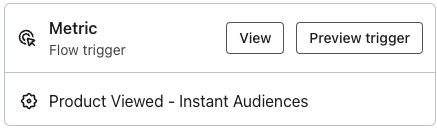
If you have an existing flow setup for 'Product Viewed' or 'Abandoned Browse', please duplicate it for Instant Audiences.
When creating this Instant Audiences flows, ensure it's named '[Instant Audiences] - Product Viewed'.
Flow Filters
To ensure that contacts are not enrolled multiple times or if they have made a purchase, it's crucial to add the following flow filters to your new flow:
- Placed Order > zero times since starting this flow
- Has not been in this flow in the last 7* days
*The cooldown period is how long you want before a customer can reenter this flow to prevent over-messaging. You can configure this as you wish. If you do not wish to have a cooldown, skip adding this filter.
If you have these existing flows:
If you have any of these existing non-Instant Audiences flows, add these filters on your Instant Audiences flows to prevent enrolling contacts already in your existing flow.
| If you have, or are going to create this existing flow |
Add these filters to your new Instant Audiences flow |
Product Viewed / Browse abandonment flow
|
Add the filter: Viewed Product > zero times > since starting this flow
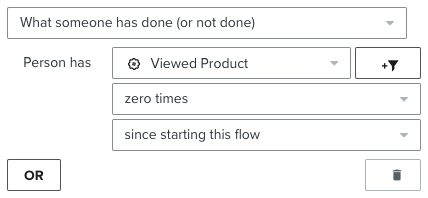
|
|
Extend the delay on your new flow to be 15 minutes later than your existing flow (e.g. if your existing flow was 1 hour, set the Audiences flow to 1 hour, 15 minutes)
|
|
If your existing Browse Abandonment flow has a cooldown (i.e. Has not been in this flow > in the last X days), then add the following filter to your new flow.
- Person has Received Email > where Flow > equals {{ Your Existing Abandonment Flow }} > zero times > in the last 7 days
If this Audiences flow also support SMS, then also add the filter:
- Person has Received SMS > where Flow > equals {{ Your Existing Abandonment Flow }} > zero times > in the last 7 days
|
| Add to Cart abandonment flow |
Add the filter: Added to Cart > zero times > since starting this flow
|
| Checkout Started abandonment flow |
Add the filter: Checkout Started > zero times > since starting this flow
|
| Instant Audiences - Add to Cart abandonment flow |
Add the filter: Item Added to Cart - Instant Audiences > zero times > since starting this flow
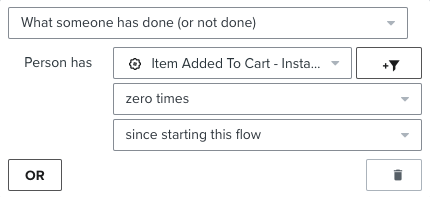
|
| Instant Audiences - Cart Viewed / Checkout Started abandonment flow |
Cart Viewed / Checkout Started - Instant Audiences > zero times > since starting this flow
|
Add these filters to your existing flow
If you have any of these existing non-Instant Audiences flows, these additional filters must be added to your existing flows to prevent enrolling contacts already in those flows.
| If you have, or are going to create this existing flow |
Add these filters to your existing flow |
Browse Abandonment
|
Add: Item Added to Cart - Instant Audiences > zero times > since starting this flow
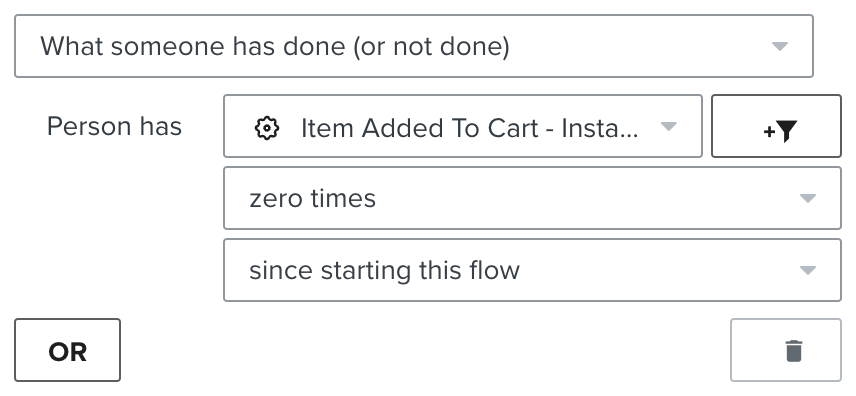
|
|
Add: Cart Viewed / Checkout Started - Instant Audiences > zero times > since starting this flow
|
|
If you have a cooldown on your existing flow:
then add the following filter to your new flow.
If the Audiences flow also supports SMS, add another identical flow filter to your existing flow, but with "Person has Received SMS" as the filter.
|
Article URL: https://help.instant.one/browse-abandonment-product-viewed
Keywords:
## Payouts Summary Report
Instant offers a variety of reports for users to download and access. These reports provide valuable insights and data on transactions, payouts, and reconciliation.
The Payouts Summary Report downloads a summary of transactions from the specified time range. This report contains:
- Reporting Category
- Currency
- Count
- Gross
- Fee
- Net
Example

Other Reports
- Transactions Itemised
- Transactions Summary
- Payouts Itemised
- Payouts Reconciliation Itemised
- Payouts Reconciliation Summary
Article URL: https://help.instant.one/payouts-report
Keywords:
## How to Create a Campaign with Instant AI
Campaigns let you send one-off marketing emails in Instant AI. You can use them for launches, promotions, or seasonal updates where you want to control the message and timing.
With the new AI option, you can pick a collection and have Instant AI create a ready-to-send draft for you. Or you can start from scratch with a manual campaign.
Quick start (6 steps)
-
Create a campaign
- Pick a collection
-
Choose your audience
-
Build the email (subject, preview, content)
-
Preview and save
-
Schedule or send
- View Analytics
Step 1. Start a campaign
Step 2. Pick a collection (AI option)
If you choose the AI option:
- You’ll see 6 collections to start with.
- We'll show your recommended collections, otherwise you can click Use another collection to view all your active collections.
- Select up to 5 collections.
Instant AI will use your selection to build the email content for you.
If you choose Create manually, you’ll skip this and move straight to the next step.
Step 3. Choose your audience
You have two ways to define your audience:
1. Use a saved segment
Select one of your existing segments created on the Shoppers page. This will instantly apply all the saved filters for that group.
2. Add filters for just this campaign
If you don’t select a segment, we’ll default to All Marketing Subscribers — everyone who has opted in for marketing emails (recommended). You can then apply additional filters just for this campaign without saving them as a segment.
For example:
-
Last emailed (e.g. Last 7 days)
-
Last opened any email timeframe (e.g. Last 180 days)
-
Last purchased (e.g. Last 30 days)
-
Country (e.g. United States of America)
-
Location (e.g. 10km of Postcode 2000, Australia)
As you adjust your audience, you’ll see:
If you’re using Klaviyo with Instant AI, your marketing subscriber list matches Klaviyo’s “Marketing consent exists + Subscribed” group. Read more.
When ready, click Create draft.
Tip: If you’re using Klaviyo with Instant AI, your marketing subscriber list matches Klaviyo’s “Marketing consent exists + Subscribed” group. Read more
Step 4. Review your draft
If you chose a collection:
-
Instant AI generates a draft with a subject line, preview text, header, body copy, CTA, and product blocks.
-
You can keep everything as is or edit any part.
If you chose manual:
Step 5. Edit your email
In the editor, you can:
-
Update the subject and preview text.
-
Add or remove blocks (Rich Text, Images, Dynamic Products, CTA buttons, etc).
-
Rearrange sections.
-
Swap in your own images or copy.
Tip: Make sure your emails always include a footer block to automatically include the unsubscribe link and address (required to save).
Step 6. Preview and send
-
Click Preview to see your email as subscribers will.
-
Send yourself a test with Send Preview.
-
Save your work at any time.
- When ready, click Schedule Campaign to:
Step 7. Track results
After sending, go back to the Campaigns page. Here you can see:
-
Emails sent
-
Open rate
-
Click rate
-
Conversions and revenue
Click into a campaign for detailed analytics, including performance over the first 7 days and the exact email variants people received.
FAQ
Do I always need an unsubscribe link?
Yes. Every campaign must include an unsubscribe link before it can be saved. Instant AI checks this automatically.
⚠️ You won’t be able to save the campaign until the unsubscribe link is present.
Can I edit or delete a campaign after creating it?
Yes, there are different campaign status' available with different options:
-
Draft: Editable and deletable.
-
Scheduled: Switch back to Draft to make major edits or delete.
-
Sending, Sent, or Cancelled: Cannot be edited or deleted.
What happens if I select multiple collections when creating a campaign?
You can pick up to 3 collections. The AI draft will pull products from all of them, with subject lines, body copy, and CTAs tailored to your selection. You can then rearrange or remove blocks before sending.
Can I override the AI content?
Yes. Subject lines, preview text, headers, body copy, CTAs, and product blocks are all editable. You can keep the AI defaults, tweak them, or replace them entirely.
Why don’t I see my collection listed?
Make sure the collection is active in your store. If it’s new, click Use another collection to see the full list, or refresh if it doesn’t appear straight away.
What if I want to build without AI?
Choose Create manually when starting a campaign. You’ll still pick an audience, then get a blank email where you can add blocks from scratch.
Article URL: https://help.instant.one/campaigns-for-instant-ai
Keywords:
## How to export Flow Activity
You can export the Activity table from any flow as a CSV. The export reflects whatever is currently in view — so if you've applied filters, only the filtered results will be included.
To export Flow Activity:
- Go to Flows and open the flow you want to export
- Click the Activity tab
- Apply any filters you want (Status, Channel) or search by email or phone (optional)
- Click the download icon in the top-right corner of the table
- A loading modal will appear while your file is being prepared
- Once ready, click Download CSV
What's included in the export
Each row represents one activity event. The file includes the following columns:
- Profile ID
- Event Email
- Event Phone
- Event Type
- Event Time
- Subject Line
- Preview Text
- SMS Body
Event types
The Event Type column tells you what action was recorded for that row, for example:
- EMAIL_SENT — an email was successfully sent to the shopper
- EMAIL_OPENED — the shopper opened the email
The Event Type column records what action was taken at that point in the flow — for example, whether a message was sent, or whether the shopper engaged with it. Each row captures a single event, so the same shopper may appear more than once if they triggered multiple actions.
Tip: Because each row is an event rather than a shopper, the same profile may appear multiple times if they triggered more than one event in the flow.
Article URL: https://help.instant.one/how-to-export-flow-activity
Keywords:
## Effective Emails for Audience Events
Engaging with your new Audience contacts through well-crafted email copy is crucial for driving conversions and building brand loyalty.
To help you create impactful email sequences for various customer events, we've put together a guide that includes recommendations, examples, and best practices for each event type.
When creating this content, it's important to keep the following in mind:
- Use personalised and friendly language.
- Keep emails mobile-responsive and visually appealing.
- A/B test different subject lines, copy, and CTAs to optimise results.
- Always include an unsubscribe option.
Collection Viewed
Collection Viewed refers to the action taken by a customer when they browse through a group of products within a specific category or theme. This event indicates their interest in a particular assortment of items and offers an opportunity to engage them with targeted content related to that collection.
Recommendations for Email Copy:
- Use captivating subject lines that hint at the value of the collection.
- Showcase the variety of products within the collection.
- Include a call-to-action encouraging users to explore further.
Example:
Subject: "You have great taste: New Knits Collection"
"Hello [Customer's Name],
We noticed you were browsing our New Knits Collection. Did you like what you saw? Keep exploring now and find your perfect fit.
CTA: "Explore Now"
Best Practices:
✔ Send the email within a few hours of the collection view.
✔ Limit collection-viewed emails to once per week to avoid overwhelming users.
Product Viewed
Product Viewed signifies the action of a customer viewing a specific product's details, images, and information on your website. This event provides insights into individual product preferences and serves as a chance to send tailored follow-up emails to remind customers about their interest in that particular item.
Recommendations for Email Copy:
- Remind customers of the specific product they viewed.
- Highlight key features, benefits, and customer reviews.
- Create a sense of urgency or offer a personalised recommendation.
Example:
Subject: "We saw you checking us out"
"Hi [Customer's Name],
Remember the [Product Name] you were checking out? We saved it for you, make it yours now.
CTA: "Shop Now"
Best Practices:
✔ Send the email within 24 hours of the product view.
✔ Include a clear and attractive product image.
✔ Consider offering a limited-time discount or free shipping to entice purchase.
Item Added to Cart
Item Added to Cart is the action of a customer placing a product into their shopping cart on your store. This event signals a higher level of intent to purchase and can trigger relevant communication to encourage the customer to proceed with the checkout process.
Recommendations for Email Copy:
- Confirm the addition to the cart.
- Highlight key features, benefits, and customer reviews.
- Include shipping and returns information to give the buyer confidence.
- Include a strong call-to-action to complete the purchase.
Example:
Subject: "[Customer's Name], you left [Product Name] behind!"
Hello [Customer's Name],
No need to worry! We saved your [Product Name] in your cart. Still not sure? - here's some more details to help you decide!
CTA: "Continue Shopping"
Best Practices:
✔ Send the email 1 hour after the item is added to the cart.
✔ Include a clear and attractive product image.
✔ Avoid being too pushy; focus on providing value.
Cart Viewed
Cart Viewed refers to when a customer accesses their shopping cart, reviewing the products they have added. This event presents an opportunity to remind customers about their pending items, address potential hesitations, and provide incentives to complete the purchase.
Recommendations for Email Copy:
- Remind customers about the items in their cart.
- Highlight the benefits of the products.
- Emphasise scarcity or limited-time offers.
Example:
Subject: "Go ahead, take another look"
"Hi [Customer's Name],
We noticed you recently looked at the items in your cart. They're going fast, and we wouldn't want you to miss out.
CTA: "Complete Purchase"
Best Practices:
✔ Send the email within 24 hours of cart viewing.
✔ Include a clear CTA and a direct link to the cart for easy checkout.
Checkout Viewed
Checkout Viewed indicates that a customer has reached the stage of reviewing the items in their cart and is navigating the checkout process. This event is a critical touchpoint where personalised assistance and persuasive content can be delivered to facilitate the final steps toward making a purchase.
Recommendations for Email Copy:
- Encourage customers to complete the checkout process.
- Reiterate the benefits and value of the purchase.
- Offer assistance or address potential concerns.
Example:
Subject: " Your cart is having abandonment issues… "
"Hello [Customer's Name],
We know life can be hectic - it’s easy to forget about your shopping cart, even when it’s full of great items.
We’ve saved you a reminder to return to when you are ready.
CTA: "Return to my Items'
Best Practices:
✔ Send the email within a few hours of the checkout view.
✔ Offer a secure and hassle-free checkout process.
✔ Provide customer support contact information for any questions.
Article URL: https://help.instant.one/effective-emails
Keywords:
## Why are my Klaviyo flow emails being skipped due to "Catalog Item Unavailable"?
Catalog Item Unavailable
Catalog item unavailable occurs when a Klaviyo email template for Browse Abandonment or Added to Cart Abandonment uses the catalog lookup syntax to retrieve product information, but the product ID provided is invalid.
Commonly, the following syntax is used to inject catalog information based on the event product ID.
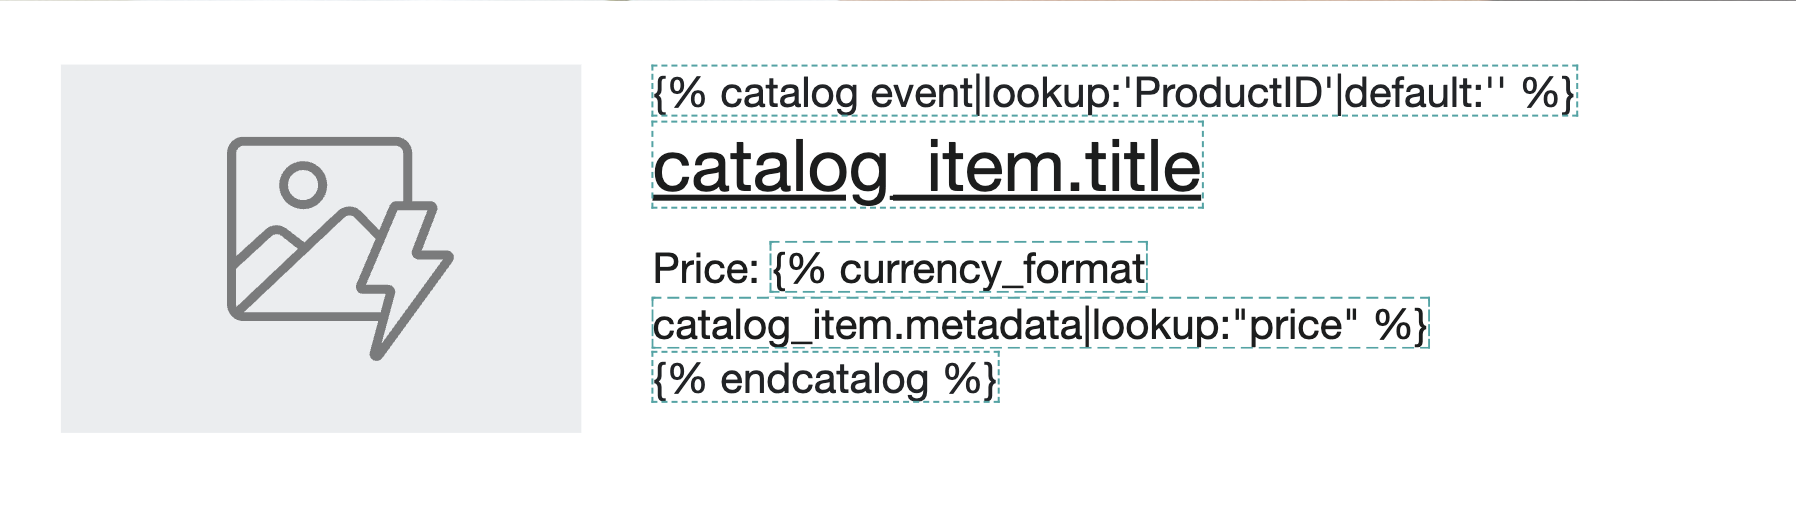
{% raw %}
{% catalog event|lookup:'ProductID'|default:'' %}
{{catalog_item.title}}
Price: {% currency_format catalog_item.metadata|lookup:"price" %}
{% endcatalog %}
{% endraw %}
Used correctly, the above template will show as:
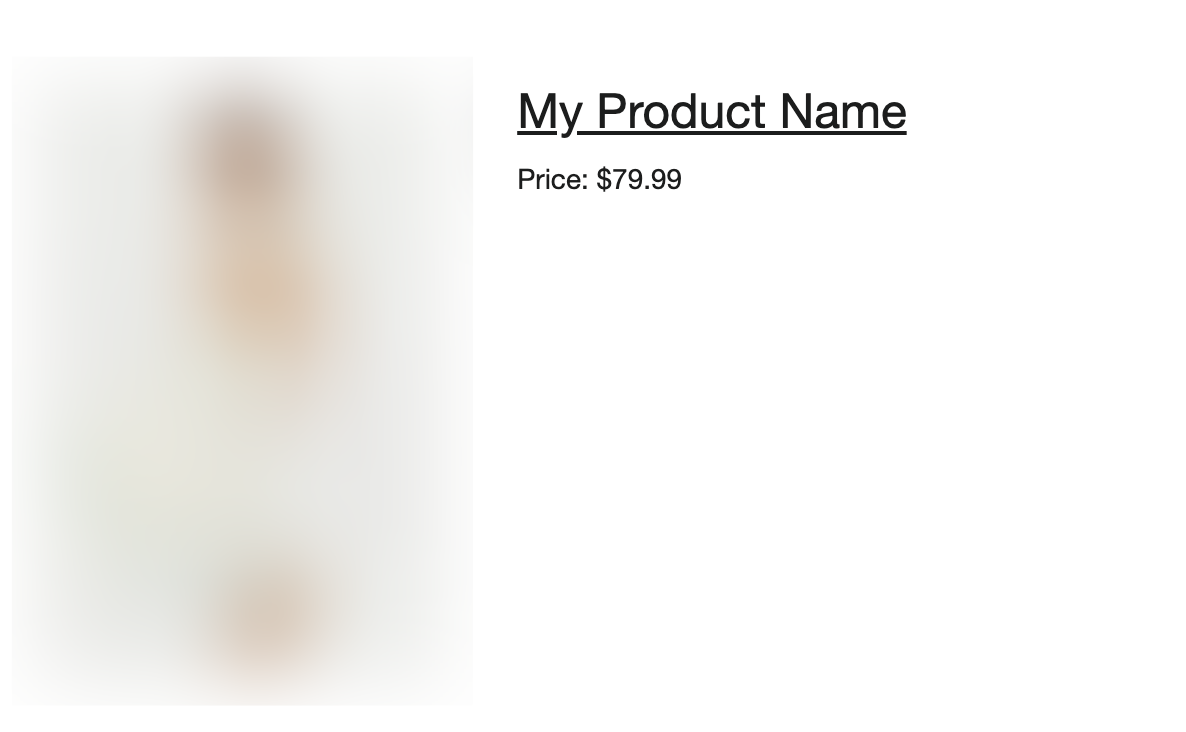
A common issue when using this format is that the lookup property is a field other than "ProductID".
For example, properties like "Product ID", "productID" or "productId" etc. are invalid.
Providing an invalid lookup property will cause the following error to show in emails, and cause emails to be skipped.
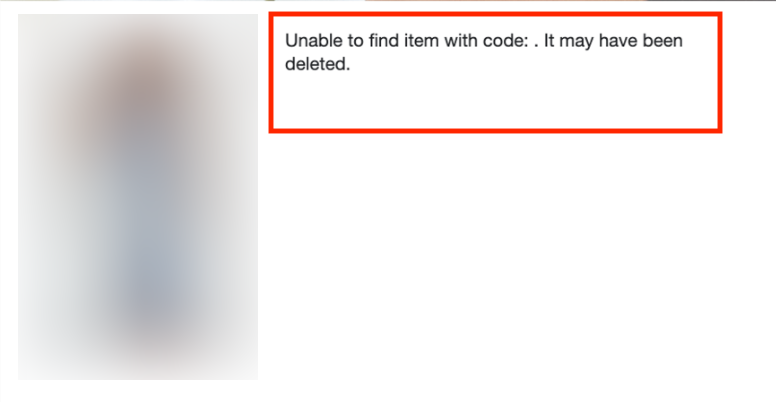
Please ensure that the catalog lookup is being done on "ProductID".
For example, if the syntax is "{% catalog event|lookup:'Product ID'|default:'' %}", this is invalid as "Product ID" is not a valid property.
To resolve this, please ensure the lookup is on "ProductID" instead.
Product Image not displaying correctly
If your images are also not displaying correctly and your product images are also using catalog lookups, please ensure the dynamic variable is using "ProductID" as well.
The correct syntax for dynamic images using catalog lookups is
{% raw %}{% catalog event|lookup:'ProductID'|default:'' %} {{catalog_item.featured_image.thumbnail.src}} {% endcatalog %}{% endraw %}
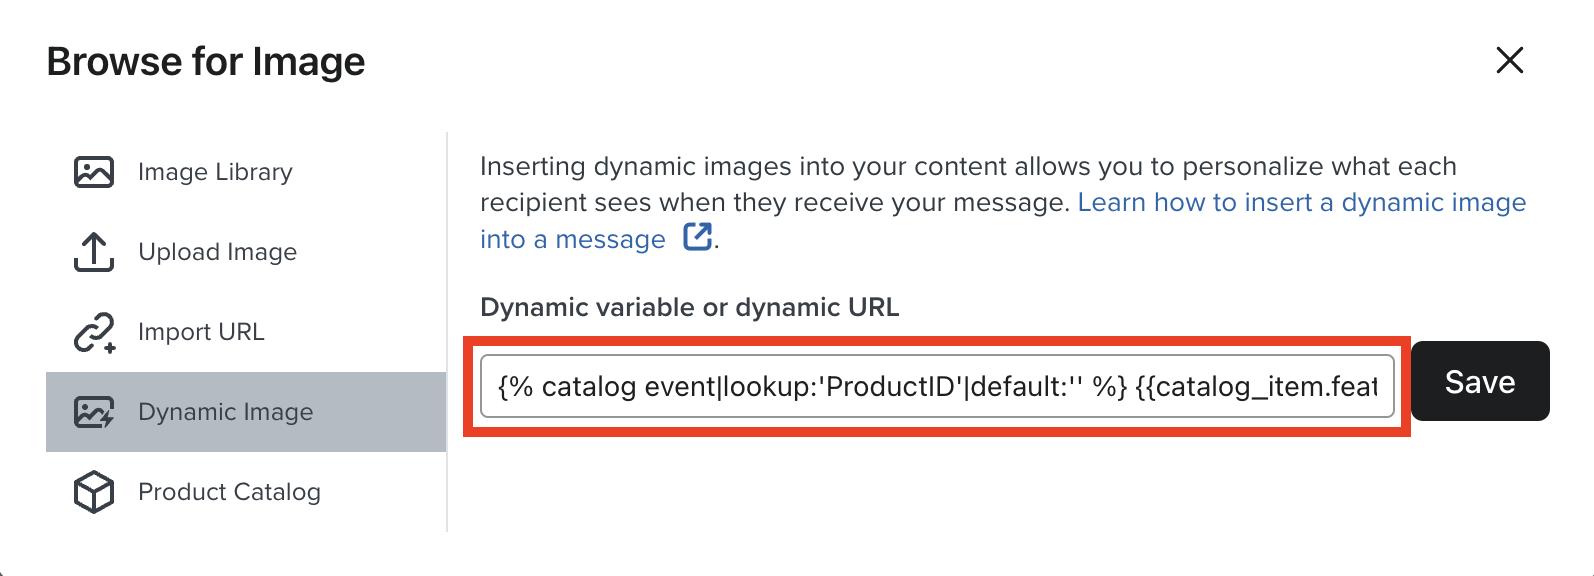
Article URL: https://help.instant.one/skipped-emails
Keywords:
## Upgrading your Audiences Shopify Permissions for Instant AI
If you're an existing Instant Audiences customer and are upgrading to Instant AI, we may require new permissions to your existing integration. These new permissions will allow Instant to integrate with your discounts,
How to Update Your Shopify API Permissions
-
Go to Configuration → Pixel in the Instant dashboard.
-
You’ll see an alert saying “Installed – Requires Attention.”
-
Click Setup, then follow the API Setup instructions.
-
You’ll be prompted to update your Shopify app permissions.
-
Make sure the following scopes are selected:
- write_themes, read_themes
- write_script_tags, read_script_tags
- read_customers
- read_products
- read_orders
- read_customer_events
- read_discounts, write_discounts
- write_content, read_content
- write_inventory, read_inventory
- write_discounts_allocator_functions, read_discounts_allocator_functions
- write_online_store_pages, read_online_store_pages
- write_pixels, read_pixels
and then click Save.
Note: If you're having trouble with this step, please use the "Filter access scopes" search to search for each scope.
6. Select Verify to refresh the permissions. f they are correct, the warning banner will disappear from your dashboard.
Article URL: https://help.instant.one/update-pixel-settings-to-include-coupons
Keywords:
## Instant AI SMS in Flows
Instant can now send an SMS as part of your Abandoned Cart and Abandoned Checkout flows. There is no extra setup to building the flows, once you enable it on your chosen flow, we handle everything automatically.
Before you start
SMS in Flows requires SMS to be configured on your account first. If you haven't done that yet, head to the SMS setup guide. only takes a few minutes. Your per-SMS cost is shown there too.
-
Available for Australian phone numbers only. Shoppers with international numbers are skipped automatically.
-
Using Instant pop-ups? Make sure you've added the SMS opt-in step to your pop-up so you're capturing new SMS subscribers. If you're using a third-party pop-up tool that's integrated with Instant, or syncing an existing subscriber list from Klaviyo or Shopify, those consents are picked up automatically — no extra steps needed.
-
Turn off SMS in any other platforms you use for the same flows. Customers are forgiving of receiving a duplicate email, but a duplicate text is a fast way to lose a subscriber. If you're currently sending abandoned cart or checkout SMS through Klaviyo or Attentive, disable those before enabling SMS in Instant.
How it works
When SMS is enabled on a flow, Instant sends one SMS per enrolment.
Here's an example how it fits into a standard flow:
- Touchpoint 1 — Email
- Touchpoint 2 — SMS (if the shopper has SMS consent & an Australian number), or Email (if they don't)
- Touchpoint 3 — Email
If your flow has more than 3 touchpoints, SMS still only sends once at touchpoint 2. All other touchpoints send email only.
A few things worth knowing:
- One SMS per enrolment, always. A shopper will never receive more than one text for the same abandoned cart.
- Predictable cost. Every message is kept within the standard character limit, so you're never charged more than one SMS credit per send.
- AI-generated content. Each message is unique to the shopper and their cart so there's nothing to write or configure to keep it relevant to that interaction.
- Coupons carry through. If you have a coupon configured on touchpoint 2, it's included in the SMS automatically.
- If a shopper converts or unsubscribes before touchpoint 2, the SMS is skipped.
Example SMS
Each message follows this structure:
[store name]: [personalised AI message]
[cart link]
text STOP to opt out
The store name prefix (e.g. inst:) is set during SMS configuration and can be customised to your brand name. Additionally, the prefix used in your links can also be customised. In this example, we've used Inst as the setting, but this could be replaced with any 4 characters to suit your business. The cart link takes shoppers directly back to their cart.
Here's what a few look like in practice:
Inst: Hi Steve, still thinking about the House Jeans? Its durable denim is built to last. https://inst.insst1.io/TdPai — text STOP to opt out
Inst: Flawless foundation that blends effortlessly and lasts all day. See it again? https://inst.insst1.io/ZO2pW — text STOP to opt out
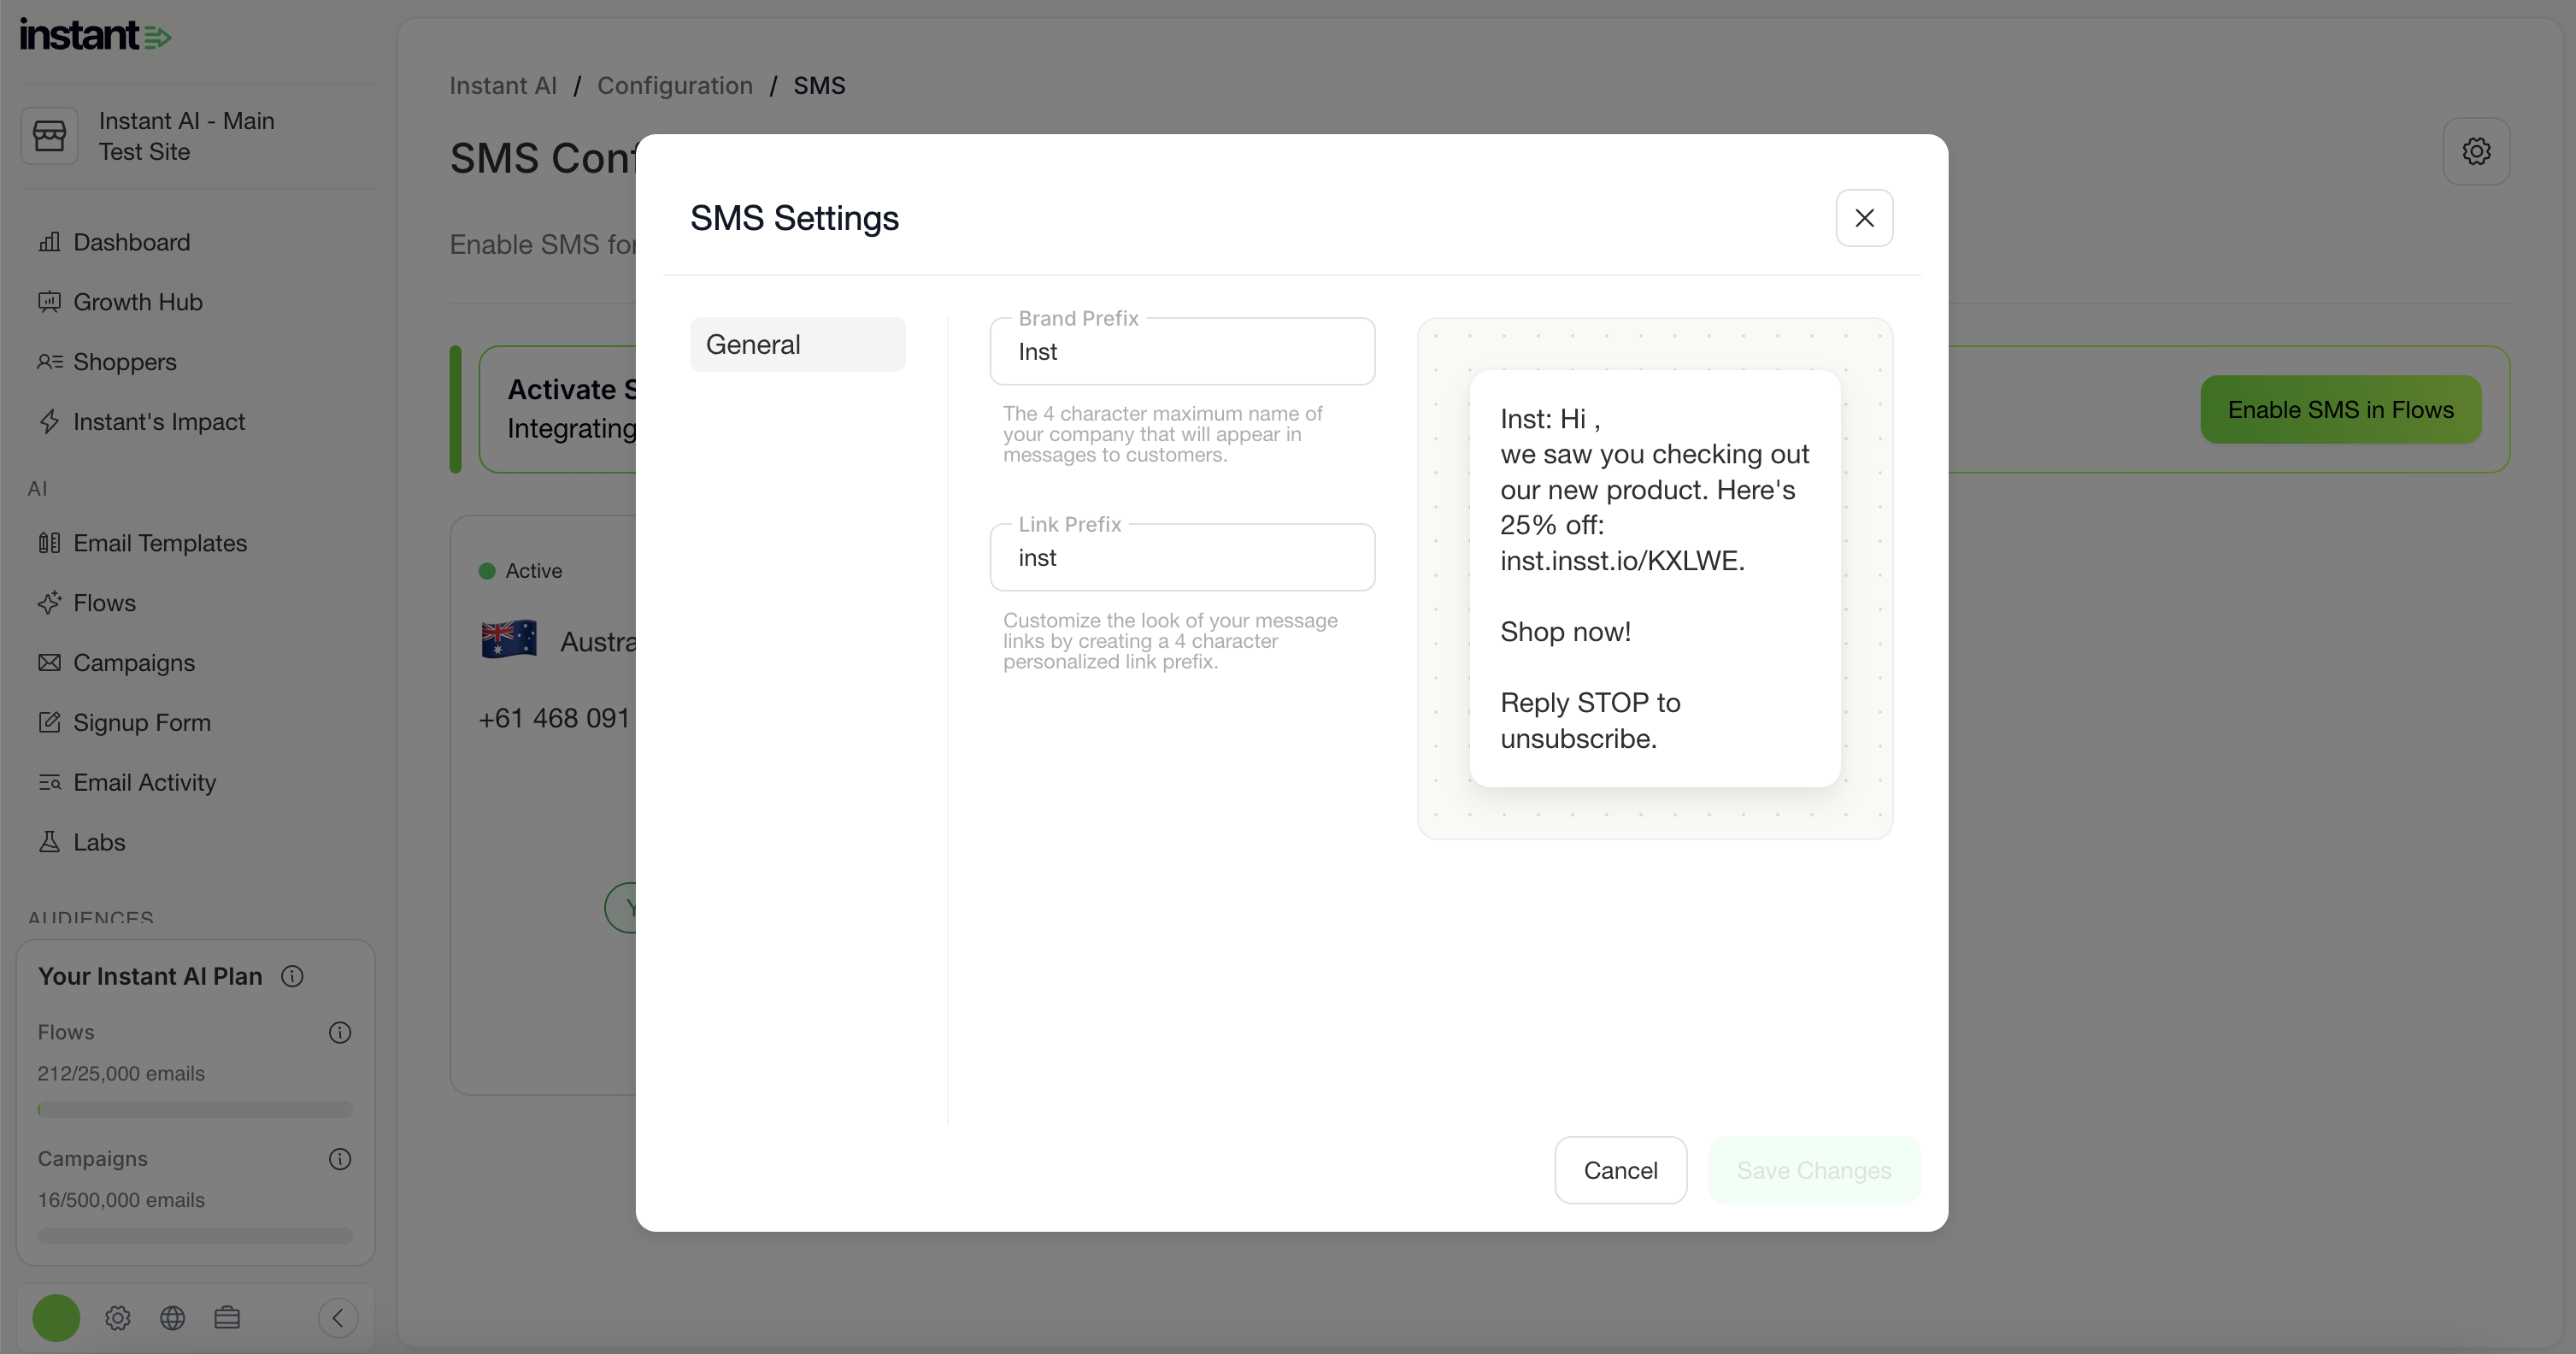
SMS Consent
Instant only sends SMS to shoppers who have given explicit SMS consent. This is separate from email consent. Shoppers need to have actively opted in to receive texts.
Unsubscribes are handled automatically and synced in both directions with Klaviyo, if you have an integration.
- If a shopper replies STOP to an Instant SMS, we notify Klaviyo and suppress them there too.
- If a shopper unsubscribes from SMS in Klaviyo, Instant receives that notification and stops sending to them.
A shopper can be unsubscribed from SMS but still subscribed to email, or the reverse. These are managed as seperate subscriptions.
Enabling SMS on a flow
When you open an Abandoned Cart or Abandoned Checkout flow, you'll see one of the following banners:
-
"Unlock SMS for Your Flows"
If SMS isn't configured on your account yet, click Try SMS to get set up, here's how.
-
"Add SMS to This Flow"
If SMS is configured and ready. Click Enable SMS on this Flow and it goes live immediately.
-
"SMS Is Paused on This Flow"
If you've previously disabled SMS on this flow. Click Re-enable SMS to turn it back on.
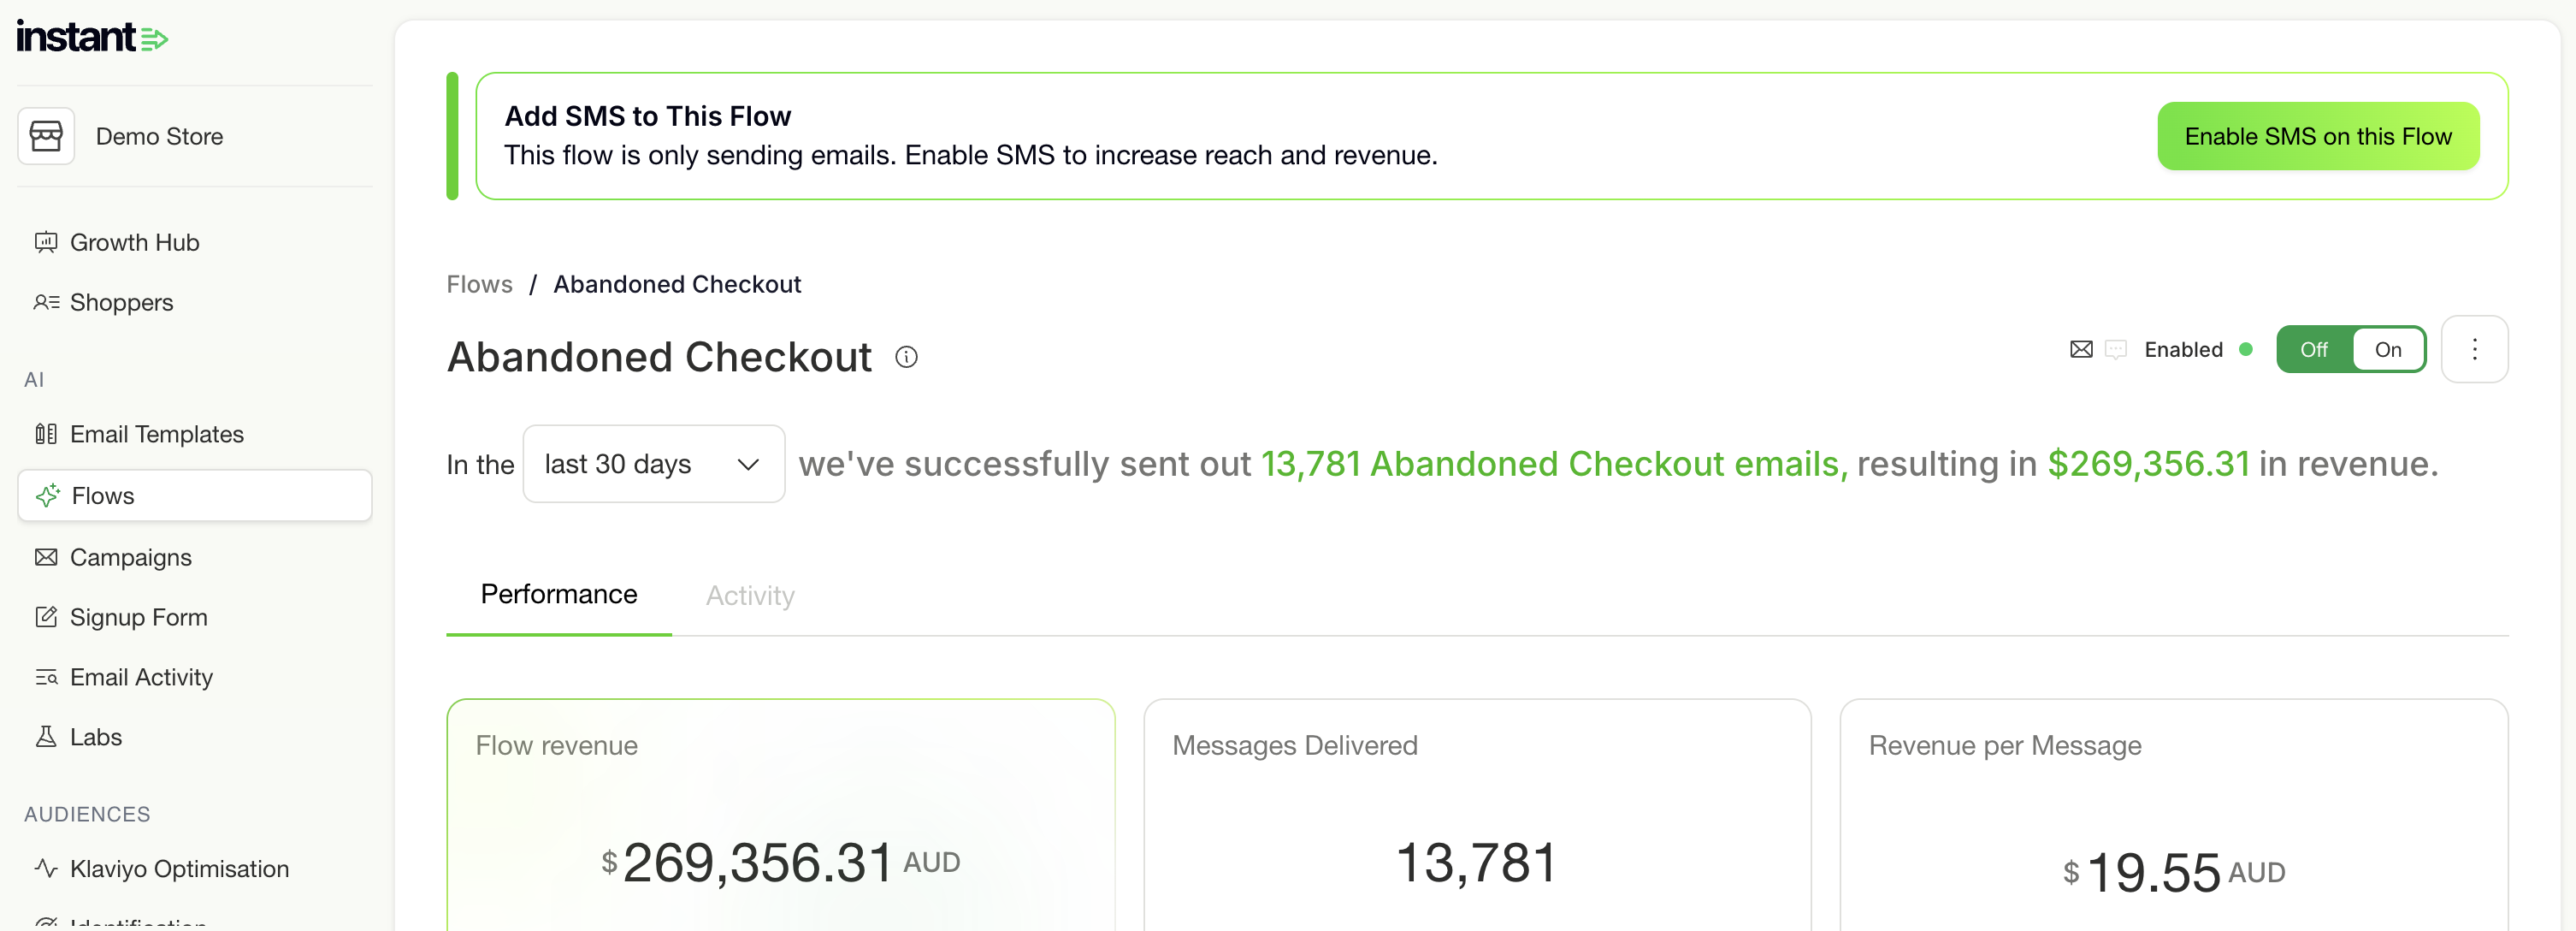
Viewing performance
Once SMS is live, your flow dashboard shows a full breakdown by channel.
At the top of the Performance tab:
- Flow Revenue (total, with an email/SMS split shown below)
- Emails Sent (total sends across both channels)
- Revenue per Email
The Sends chart lets you toggle between Opens, Clicks, and Sends, with Email and SMS shown as separate bars so you can see how each channel performs over time.
The Interaction and Deliverability section can be filtered by All, Email, or SMS, which is useful for checking deliverability health per channel. The flow header updates to "Enabled on Email & SMS" so you can always see both channels are running at a glance.
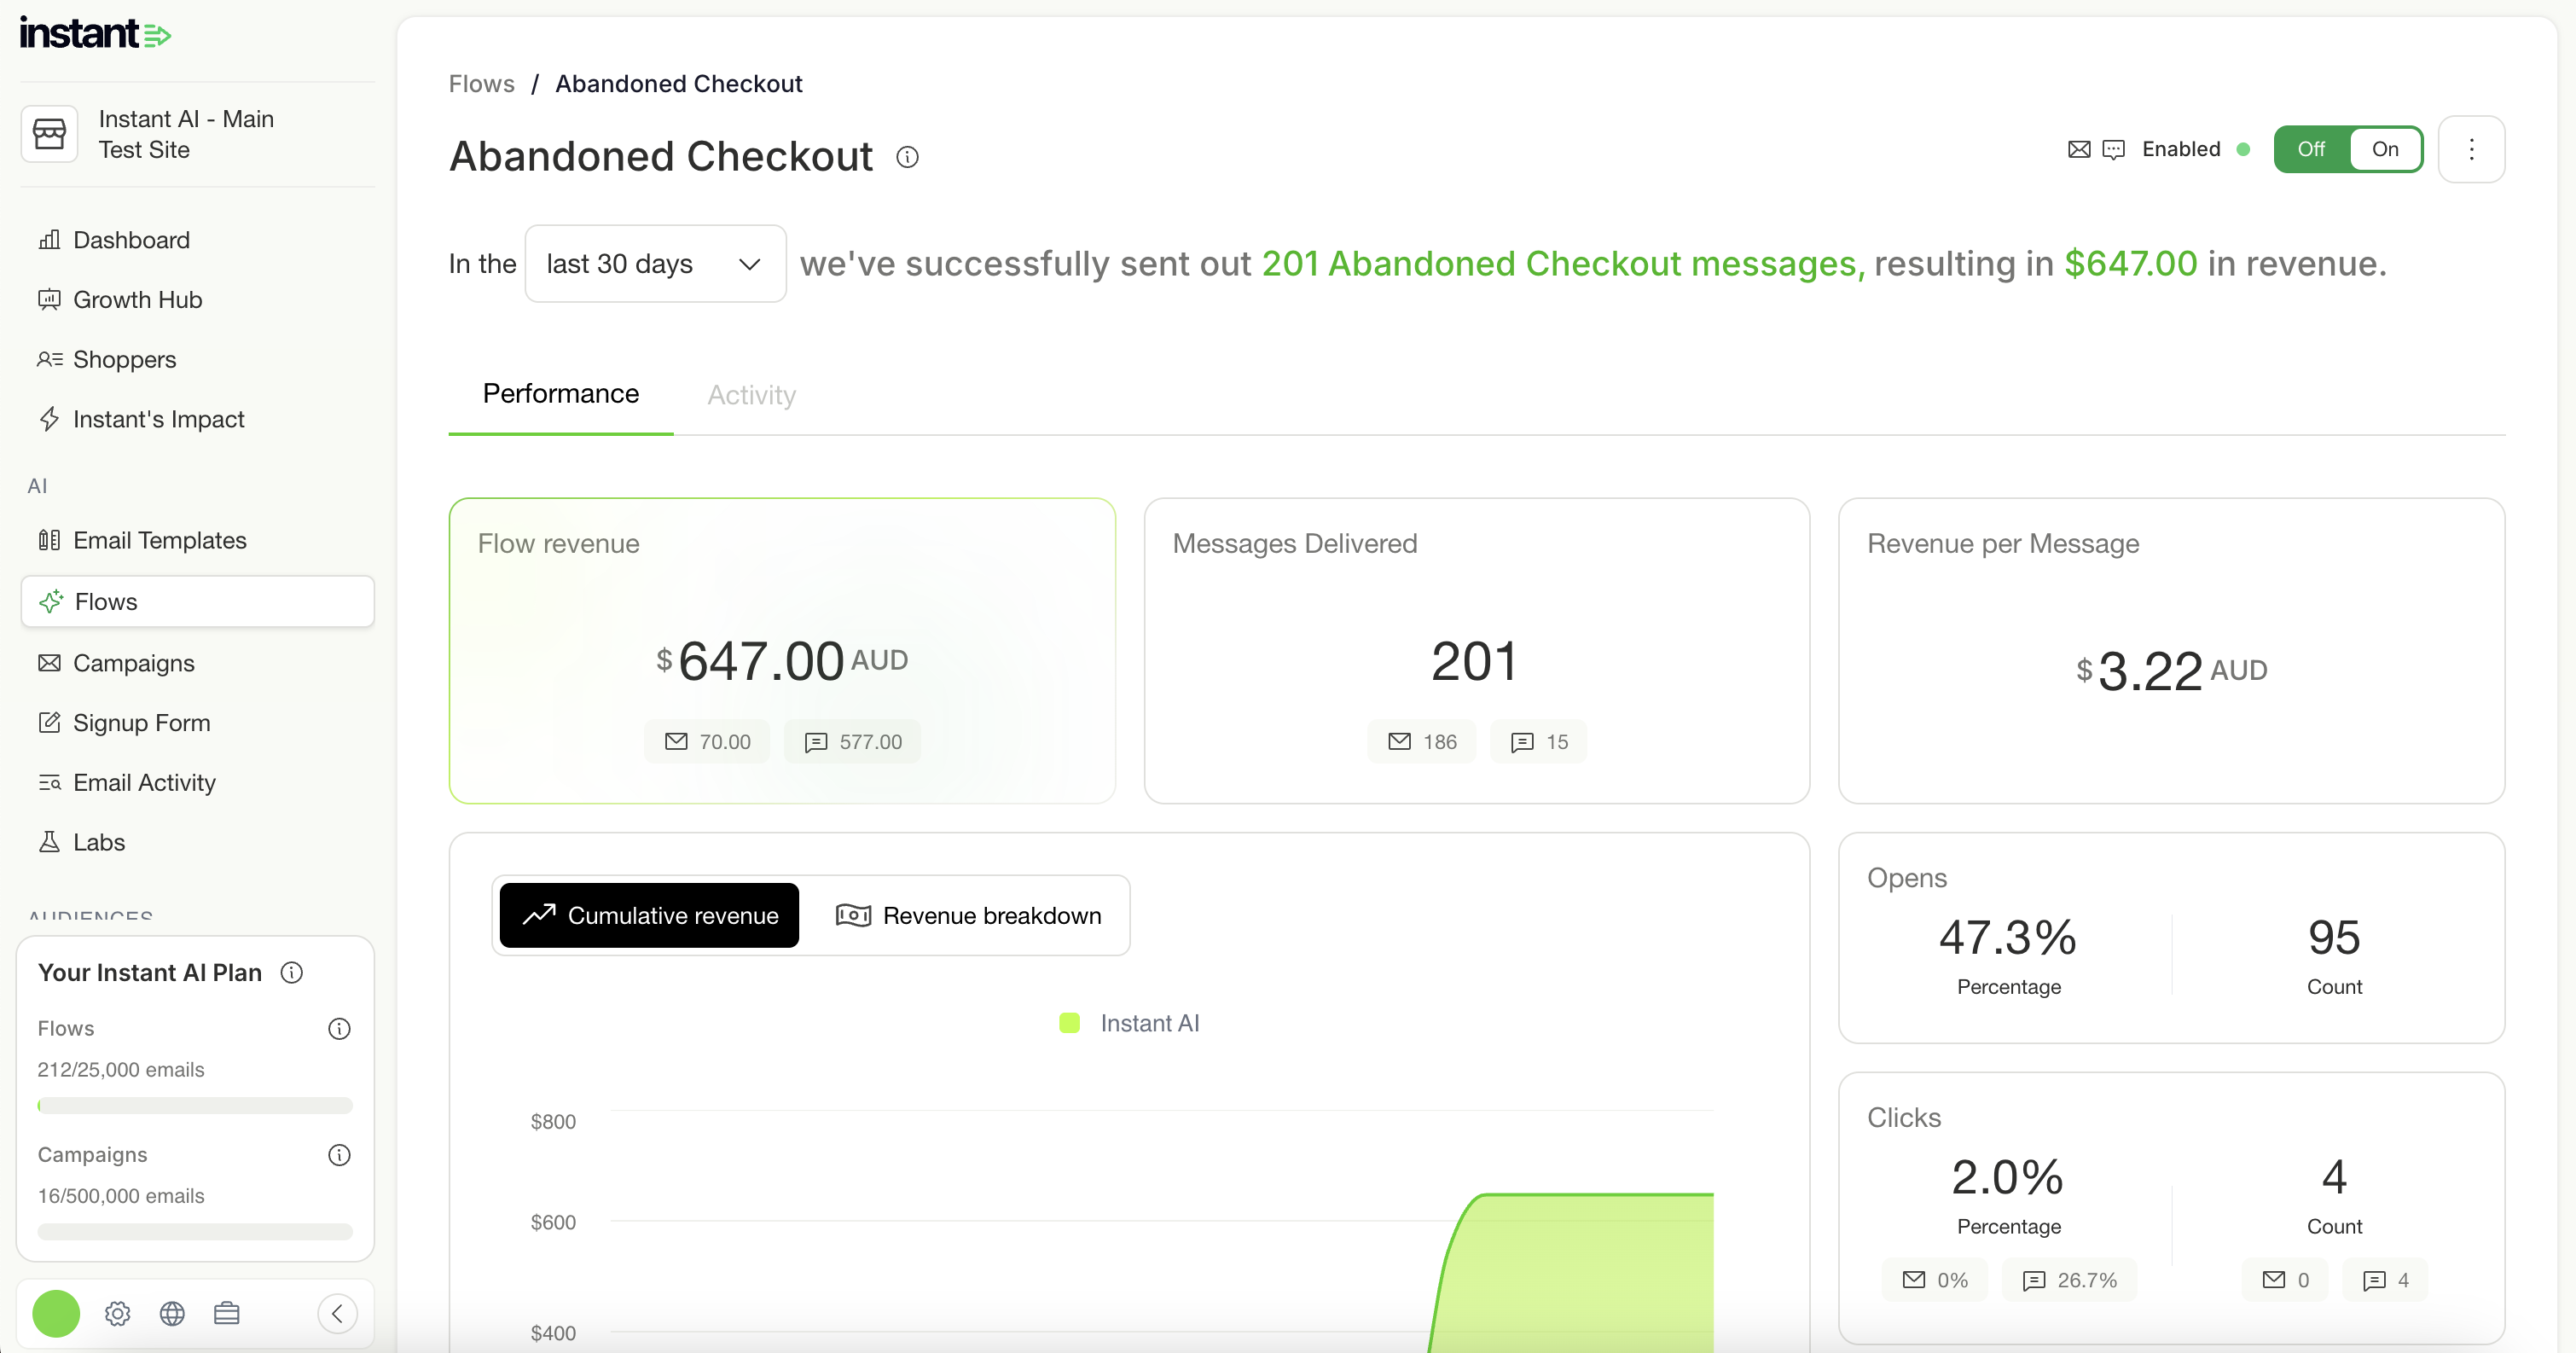

Viewing activity
The Activity tab shows every message sent — email and SMS in one list. Each row shows:
- Shopper name or email
- A preview of the message content
- Send status (Sent, Clicked, Blocked)
- Channel (Email or SMS)
- Date and time sent
Filter by Status or Channel to find what you're looking for quickly.
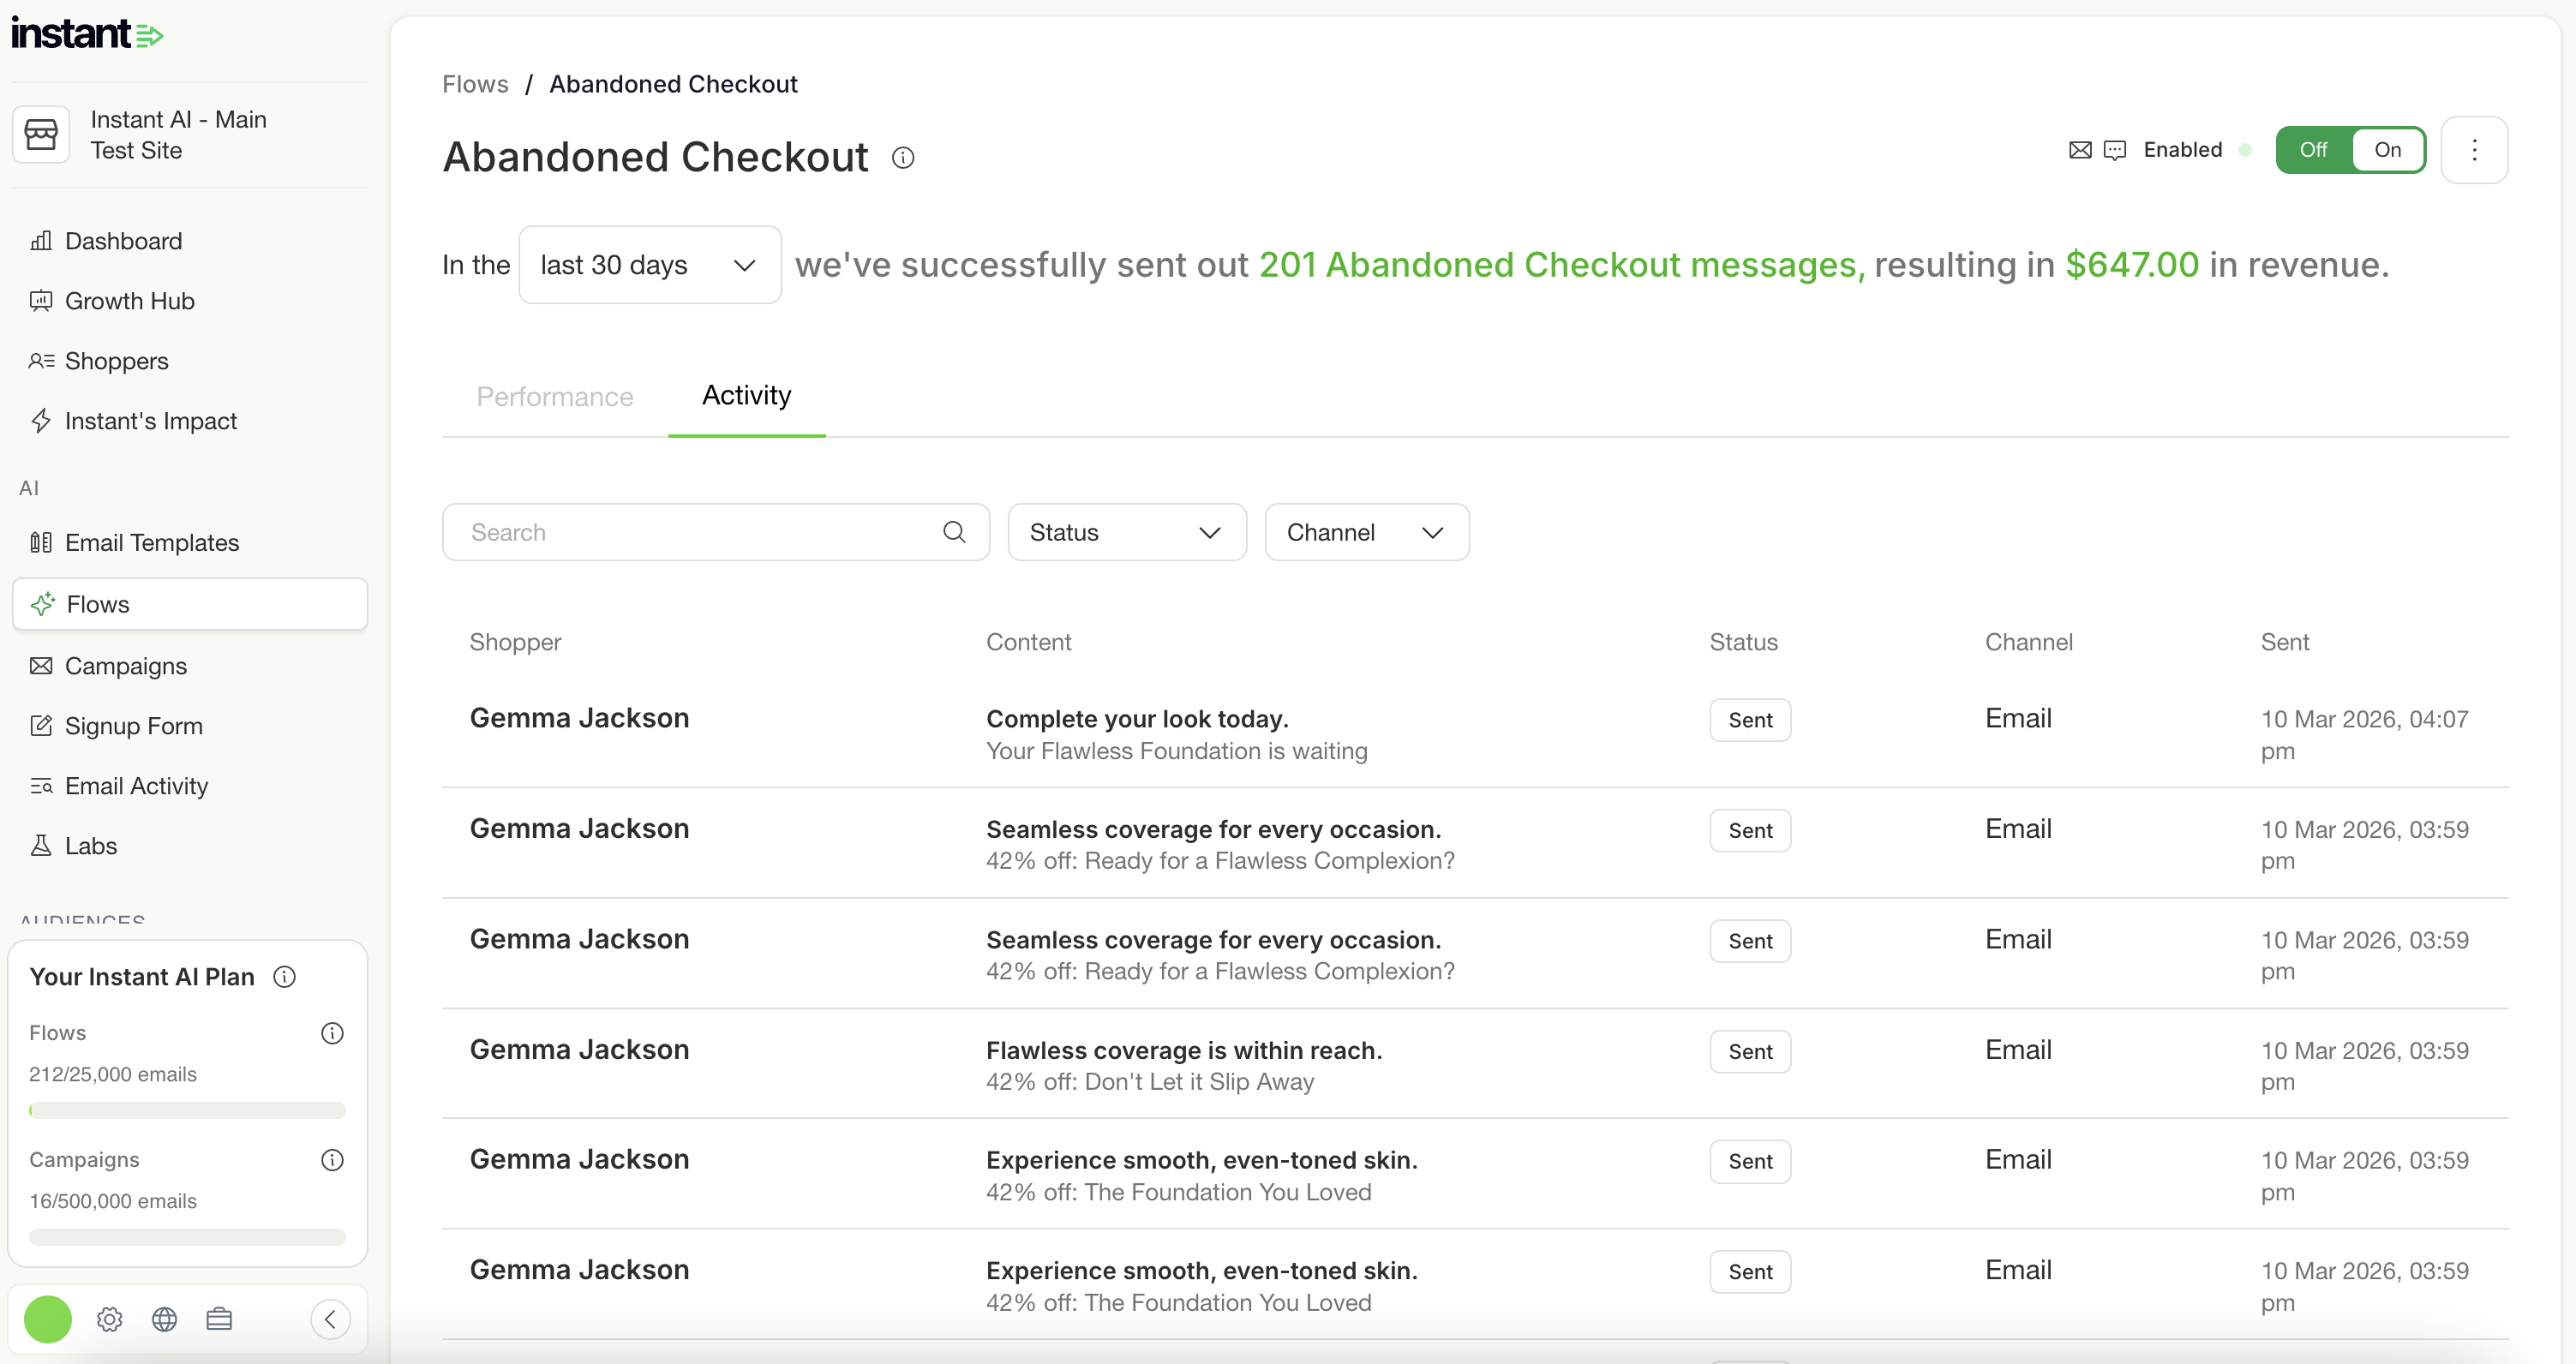
Viewing an individual SMS
Clicking any row opens the shopper's full flow preview. For SMS touchpoints you'll see:
- A preview of the exact message sent, displayed as it appears on a phone
- The shopper's full timeline — when they were recognised, what they browsed, every touchpoint sent, and whether they converted
- Full attribution and conversion data, same as email
All revenue attributed to an SMS conversion counts toward your flow's total revenue and the main dashboard.
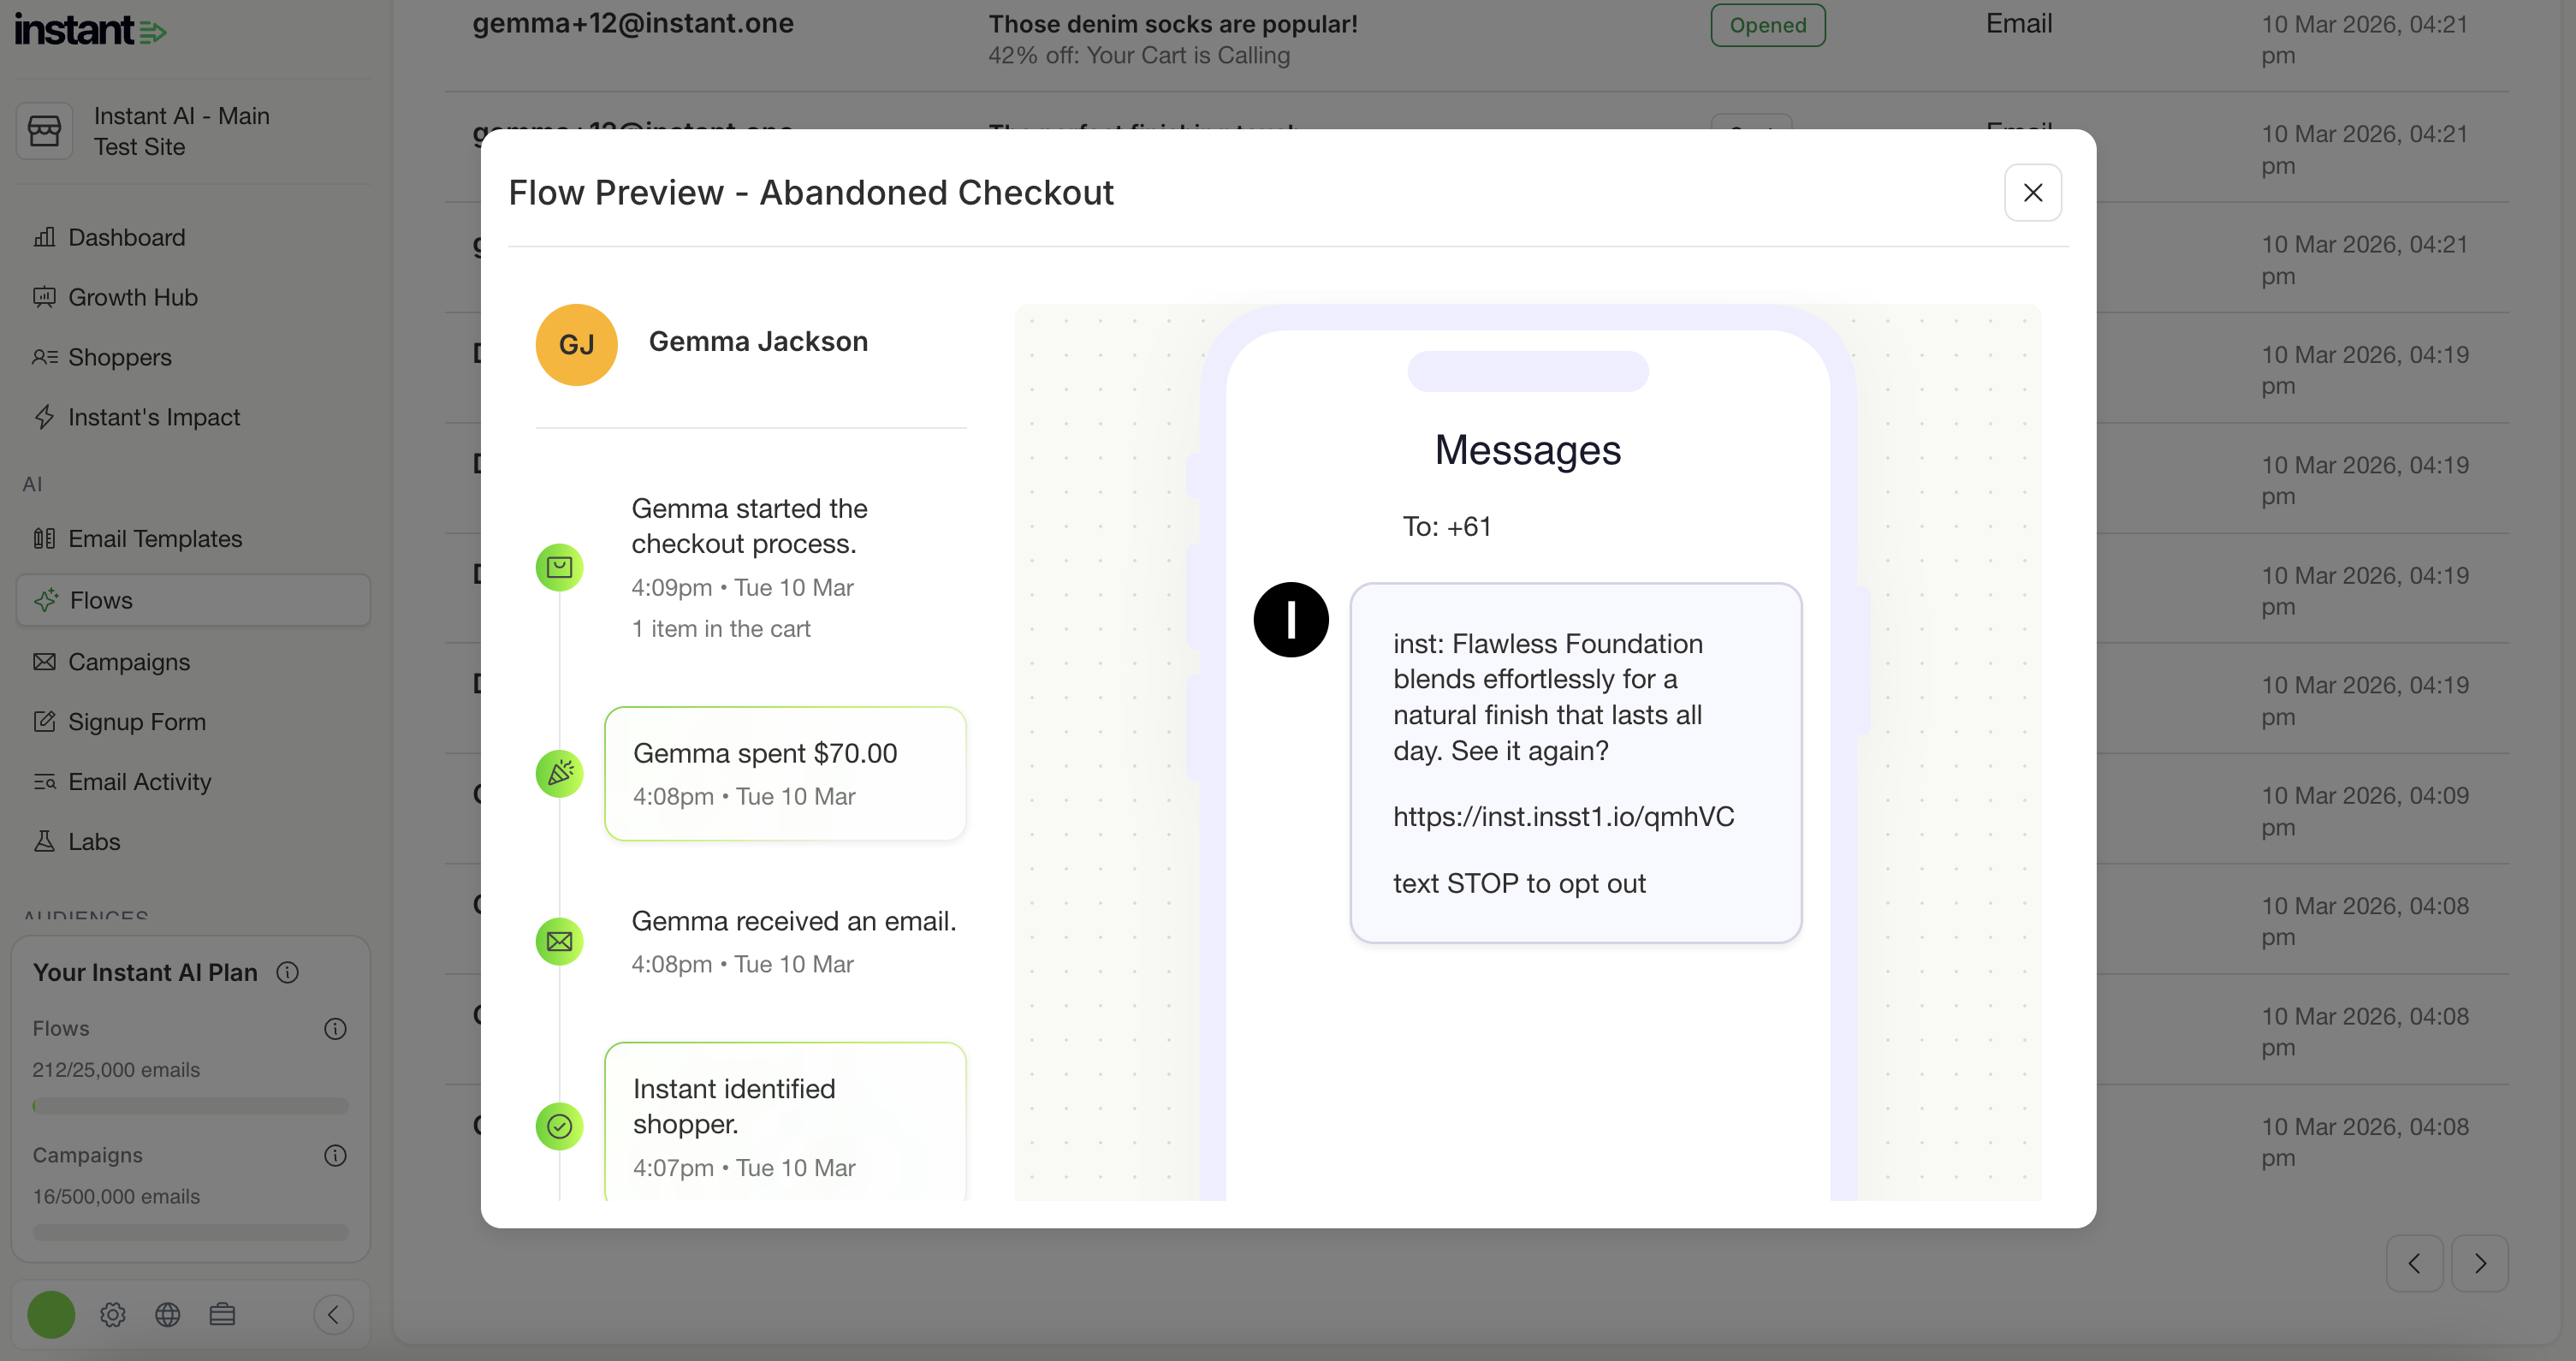
Disabling SMS on a flow
Select the three dots in the in the top-right corner of the flow, then Disable SMS to turn SMS off at any time. SMS stops immediately and our flow keeps sending emails as normal.
When you re-enable it later, the "SMS Is Paused" banner will prompt you to turn it back on. Historical SMS data from before it was paused stays visible in your dashboard.
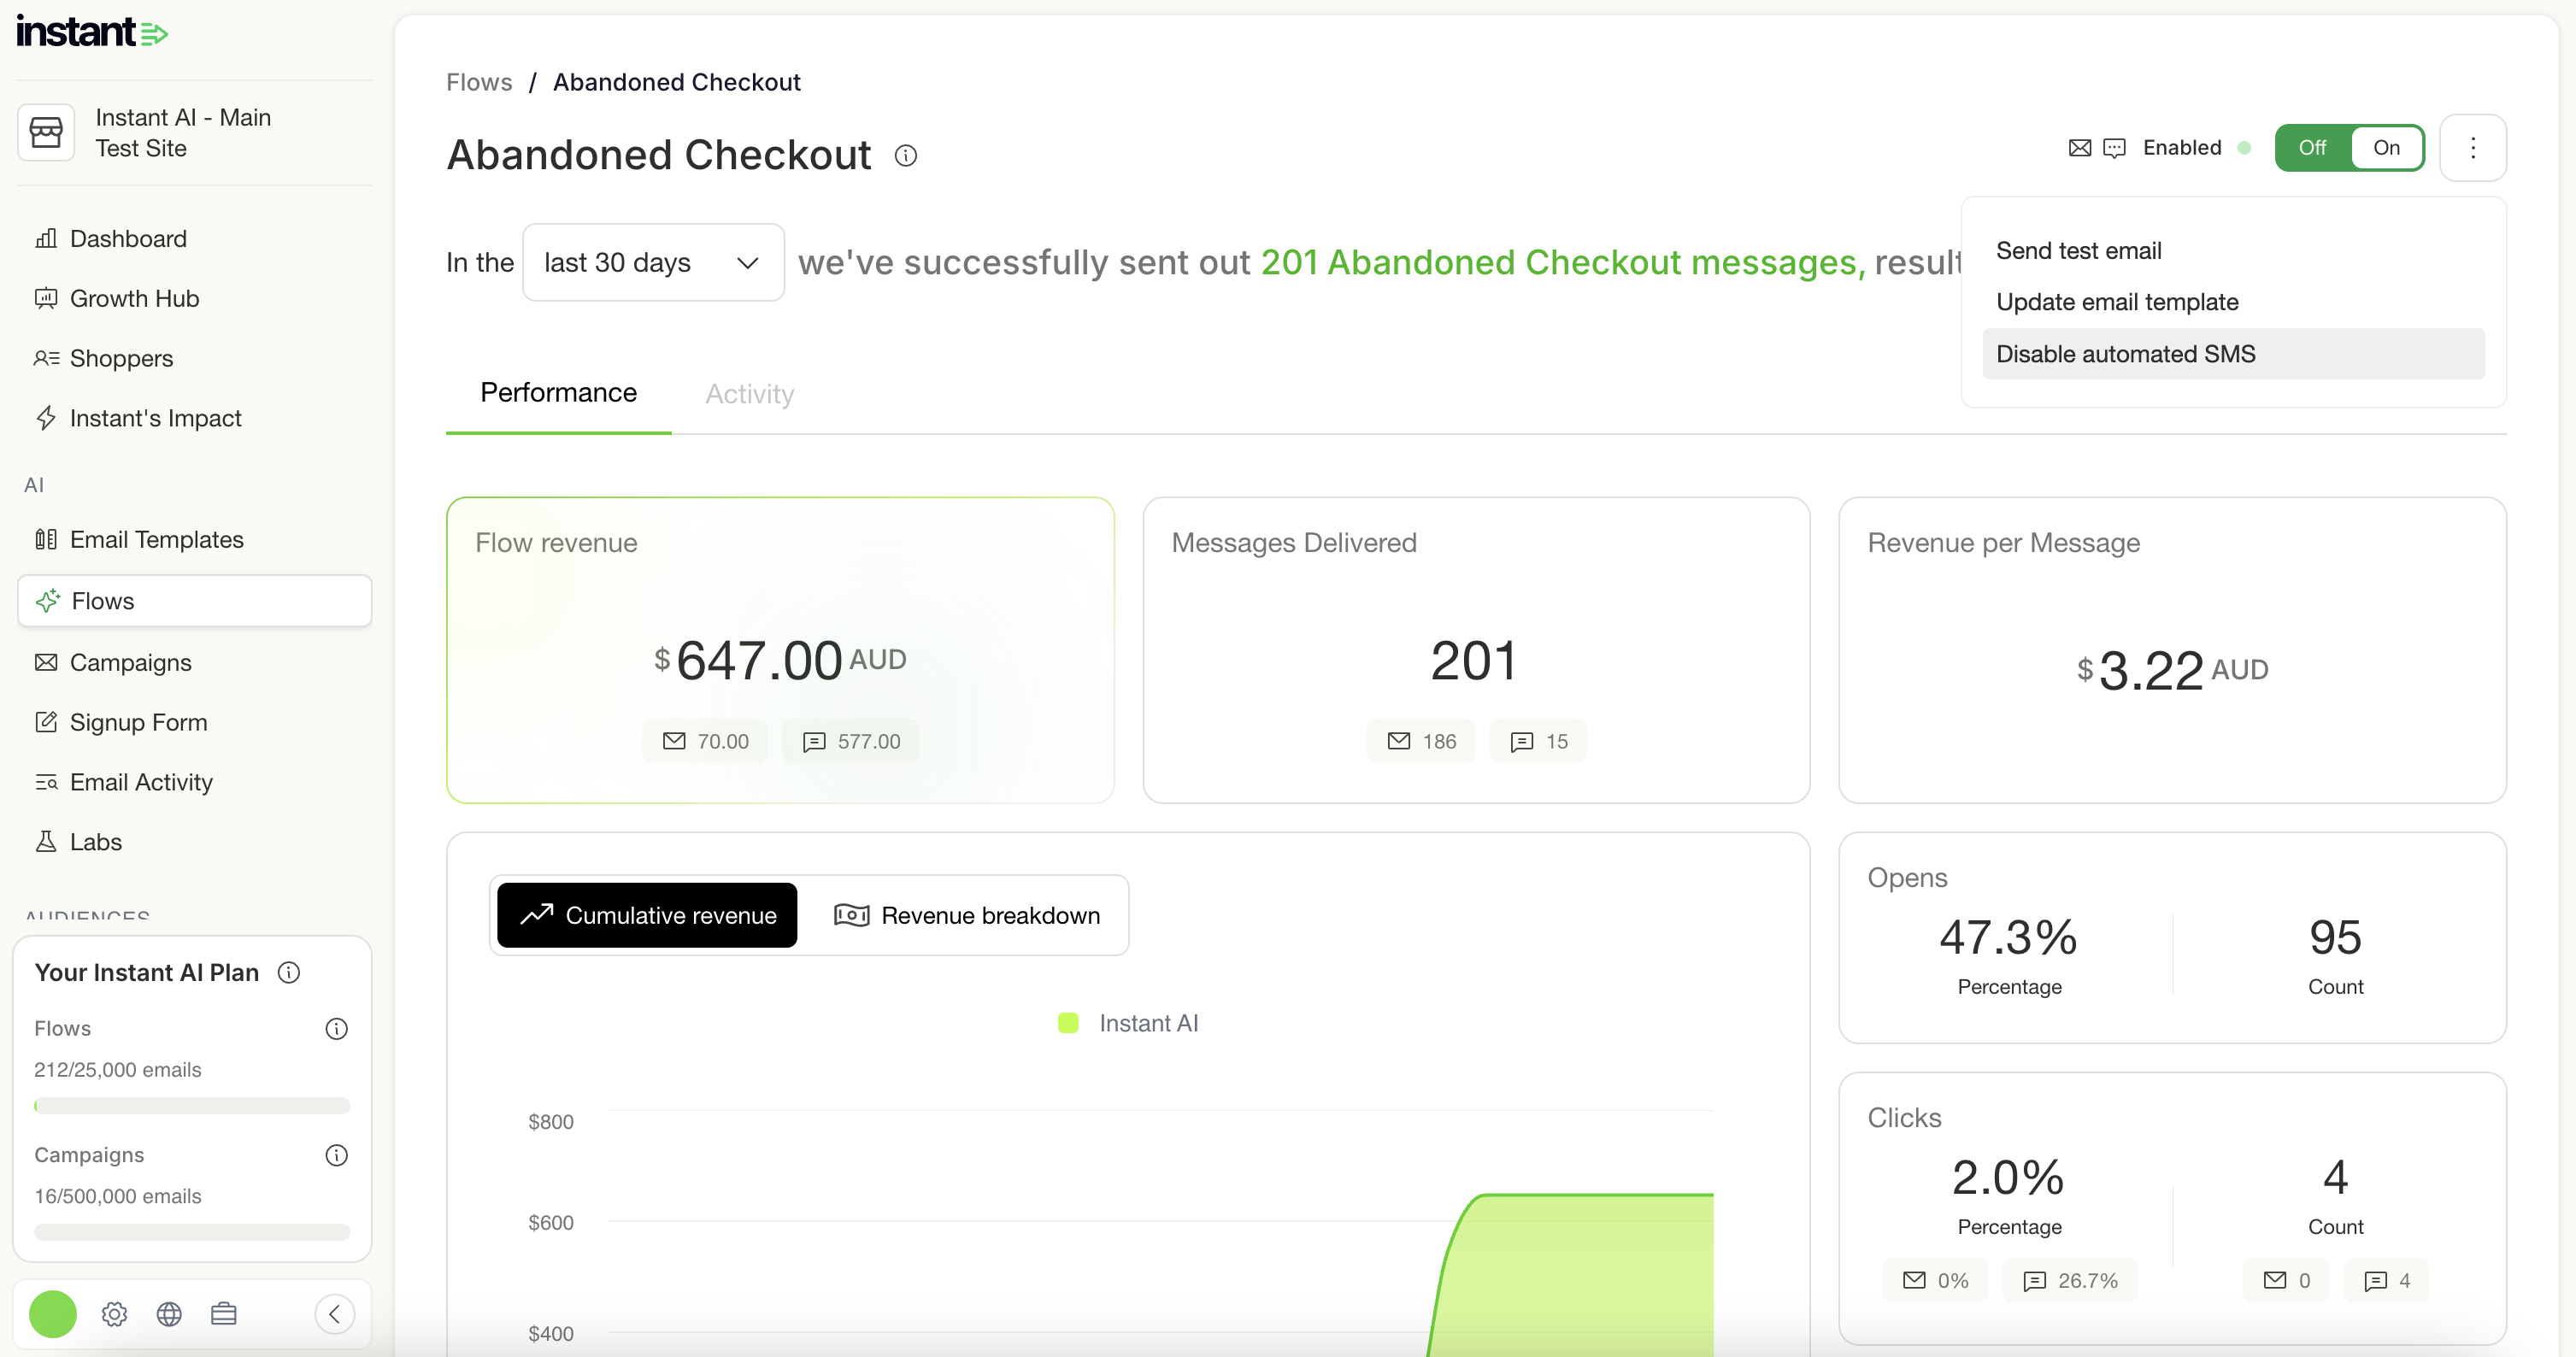
Article URL: https://help.instant.one/instant-ai-sms
Keywords:
## How do I submit a Partner referral?
All referrals from agency partners to Instant must come via direct email to an Instant Partner Manager.
Article URL: https://help.instant.one/how-do-i-submit-a-partner-referral
Keywords:
## How to Customise Email Templates in Instant AI
How It Works
The Template Editor gives you creative control over your email layout, without adding complexity.
When you onboard with Instant AI, you choose a default layout. This layout is applied across every flow in your account and automatically styled using your logo, brand colours, and footer details.
Each time a shopper enters a flow, Instant generates the full email at send time. The layout stays consistent, but the content is dynamic, personalised by AI to match the shopper’s behaviour and the flow’s purpose.
Instant handles all the logic, content writing, and product selection. The Template Editor simply lets you control how that content appears.
What’s Automated by Default
Every email generated by Instant includes:
-
AI-written subject line, preview text, body copy and CTA
- Product blocks based on the shoppers cart or recommended products
-
A compliant unsubscribe footer
These defaults apply automatically.
What You Can Edit
The Template Editor allows you to:
-
Rearrange or delete non-required blocks
-
Add new blocks using existing branded content
-
Upload and reuse your own HTML snippets (if enabled)
-
Switch between templates by editing each flow independently
Note: Any changes you make in a flow only apply to that specific flow and step. You can customise the layout per email, without affecting your other flows.
Required Blocks (Cannot Be Deleted)
Some content blocks are required to ensure your emails remain compliant and effective. These include:
These cannot be removed. If you attempt to delete them, you’ll see a warning.
Editing Your Email Layout (Step-by-Step)
Step 1: Open the Flow You Want to Edit
Navigate to the flow you want to customise (e.g. Welcome, Abandoned Checkout, Post Purchase). Then click the Template Editor tab.
You’ll see your default template preloaded for each step in the flow.
Step 2: Click a Block to Edit
Each email is built from a series of blocks — for example: header, body, product, and footer. Hover over any block to:
Step 3: Add a New Block
Click the + icon between any two blocks to add a new one. You’ll be prompted to:
Step 4: Browse Your Block Library
When selecting an existing block, you can choose from two tabs:
-
AI-Powered Blocks: Standard, branded content blocks that follow your styling
-
Custom Blocks: Any custom HTML you’ve uploaded previously, available to reuse
Step 5: Save Your Changes
Click Save to confirm your edits. These changes apply only to the flow and step you’re editing — all other flows will remain unchanged. This makes it easy to create reusable headers, promo banners, or content sections across multiple flows.
Using Custom HTML (Advanced)
If custom HTML editing is enabled on your account, you’ll see the option to insert or replace a block with your own code.
Important notes:
-
You must remove all platform-specific logic from your code (e.g. Klaviyo tags like {{ product.name }} will not work)
-
Your footer must include a valid unsubscribe link to meet compliance
-
Instant will not generate AI copy for any content inside custom HTML blocks
Need Help?
If you’d like support editing your templates or want help migrating custom content, reach out to your Customer Success Manager or email help@instant.one.
Article URL: https://help.instant.one/customising-email-templates-in-instant-ai
Keywords:
## Smart Coupons for Instant AI
Smart Coupons lets you configure a single maximum % off discount (e.g. 20%, 30%, 50%). Instant AI automatically distributes scaled discounts across flows based on shopper intent.
The distribution ensures:
- Higher discounts for higher-intent flows
- First-time shoppers automatically receive one level higher than their current flow
- Discounts are rounded for simplicity and clean presentation
Example:
If you set a max discount of 50% off, Instant AI distributes discounts roughly as follows:
- Welcome Flow: 50% off
- Checkout Abandonment: 35% off
- Cart Abandonment: 25% off
- Browse Abandonment: 10% off
- Collection Abandonment: No discount
For first-time shoppers, we automatically move them “one level up” in intent:
-
A first-time shopper in Checkout Abandonment would get 50% off
-
A first-time shopper in Cart Abandonment would get 35% off
-
A first-time shopper in Browse Abandonment would get 25% off
- A first-time shopper in Collection Abandonment would get no discount
OR
If you set a max discount of 20% off, Smart Coupons would distribute and round the discounts like this:
-
Welcome Flow: 20% off
-
Checkout Abandonment: 15% off
-
Cart Abandonment: 10% off
-
Browse Abandonment: 5% off
-
Collection Abandonment: No discount
For first-time shoppers, we automatically move them “one level up” in intent:
-
A first-time shopper in Checkout Abandonment would get 20% off
-
A first-time shopper in Cart Abandonment would get 15% off
-
A first-time shopper in Browse Abandonment would get 10% off
-
A first-time shopper in Collection Abandonment would get no discount
How rounding works:
To keep offers simple and clean:
- We round down to the nearest 5% (e.g. 37.5% → 35%)
- If the discount is 10% or less, we round down to the nearest 0.5%
- If the discount is 5% or less, we don’t round — we maintain precision
- No rounding is applied to the max discount
- If you set a minimum purchase amount, this is supported only if the minimum amount is in the same currency as your store.
Key details:
- You only need to set the max discount — Instant AI handles scaling and rounding
- Prioritises first-time shoppers automatically with stronger offers
- Only supports % off discounts
- Not compatible with fixed dollar discounts or linking to an existing Shopify discount
- Instant AI generates all codes automatically:
- Unique, one-time use per customer
- Expire 24 hours after the last email in the flow
- Included automatically in the second and third emails
FAQs
How is the discount determined for each flow?
Smart Coupons distributes your max discount across flows based on shopper intent, scaling down by flow type. First-time shoppers always get a stronger offer (one level higher than their current flow).
How does rounding work?
We round discounts down for simplicity:
- Nearest 5% for discounts over 10%
- Nearest 0.5% for discounts 5–10%
- No rounding below 5%
When is rounding skipped?
The max discount itself is never rounded.
Can I use $-off discounts?
No — only % off discounts are supported.
Can I link this to an existing Shopify discount?
No — Smart Coupons generates its own discount codes.
Can I set a minimum purchase amount?
Yes, but only if the amount is in the same currency as your store.
Are discount codes unique?
Yes — every code is single-use, created per shopper interaction, and expires 24 hours after the last email in the flow.
When will shoppers see the discount code?
In the second email of the flow and again in the third as a reminder.
Article URL: https://help.instant.one/smart-coupons-for-instant-ai
Keywords:
## How to re-install the Instant Audiences pixel into Shopify Customer Events
We require the Instant Audiences pixel to be installed in two locations:
- theme.liquid (for docs on how to re-install the theme.liquid pixel, see here)
- Shopify Customer events
It is critical that both pixels remain installed for Instant Audiences to operate.
If either of the pixels have been removed, events will be dropped and therefore not sent to Klaviyo.
If the pixel has been accidentally uninstalled from Customer Events, it is important to ensure that the Instant Audiences pixel is re-installed promptly to minimise dropped events.
If you have been notified that the Instant Audiences pixel is missing from Customer Events and requires re-installation, please complete the steps below.
- Proceed to the Shopify admin and click Settings in the bottom left.
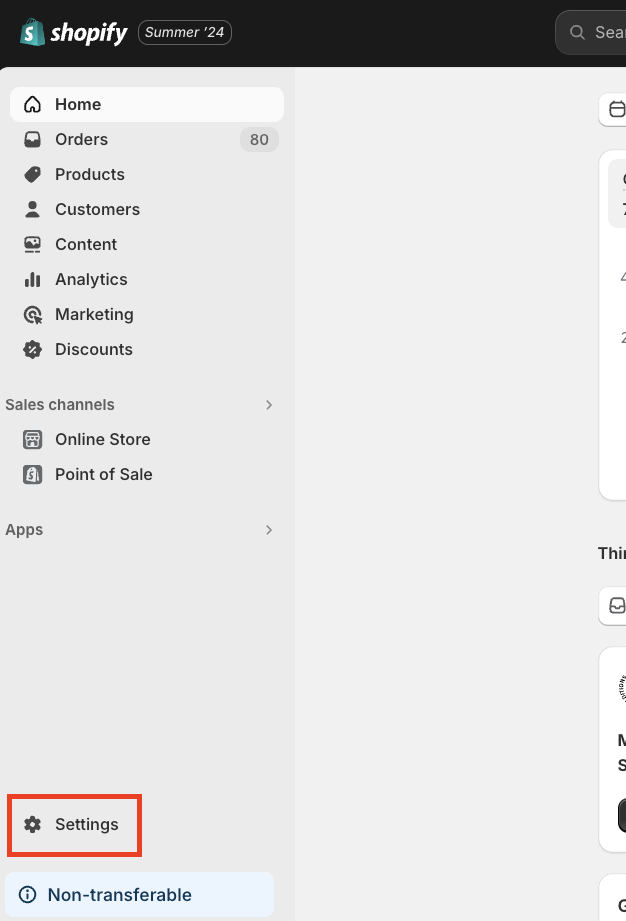
- Proceed to Customer events in the sidebar. You will now see a table listing all the active custom pixels on your Shopify instance.
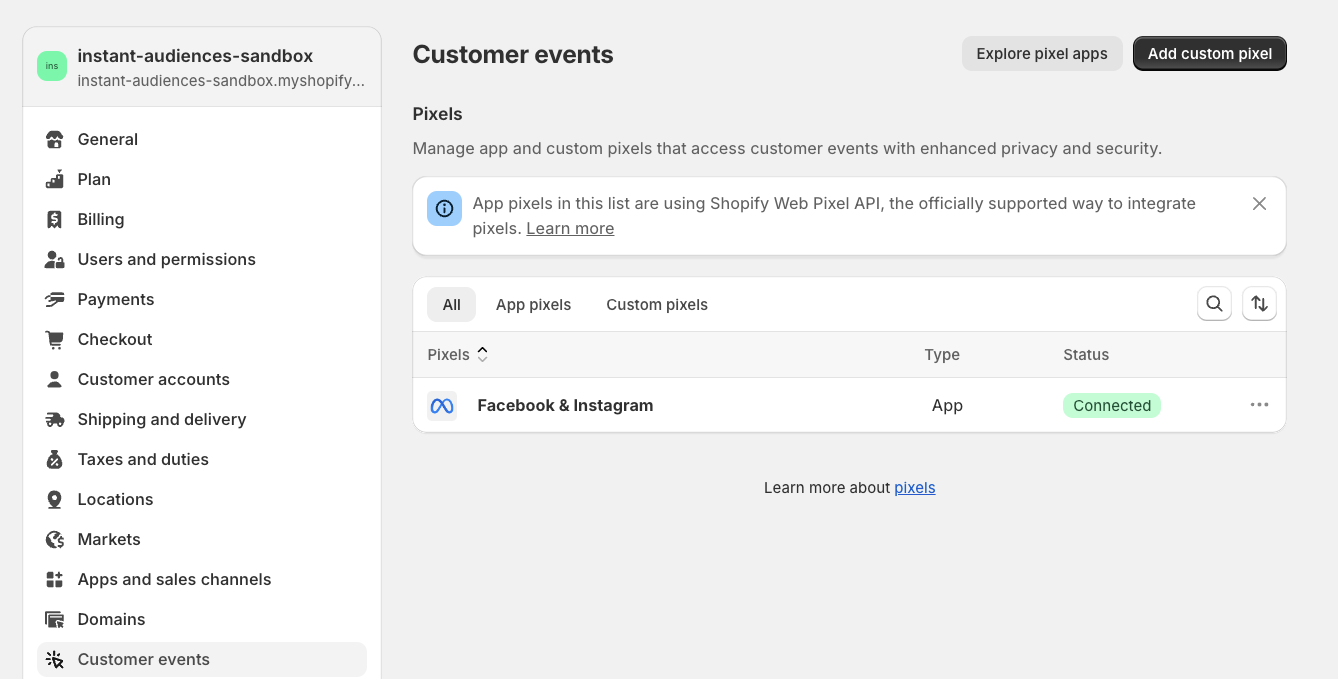
- If you do see an Instant Audiences Custom pixel, but the Status is connected, then this means the Customer events pixel is active.
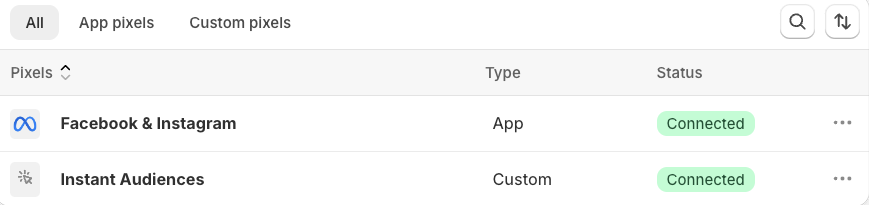
If the pixel is active, but you are still experiencing dropped events, please click into the Instant Audiences integration, and ensure that Permission and Data sale are configured correctly. (for more info, see here)
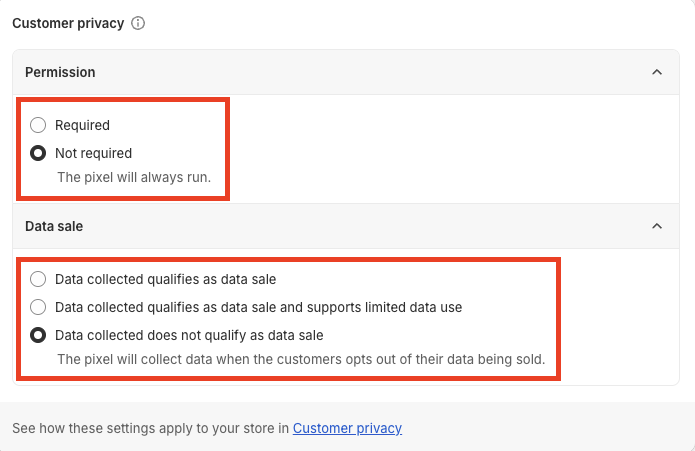
- If you do not see an Instant Audiences Custom pixel, then please proceed to the Instant dashboard (https://dashboard.instant.one/audiences/setup/ecommerce-platform/shopify), and complete Steps 1 to 8 under Audiences > Setup > Ecommerce platform > Shopify.
- If you do see an Instant Audiences Custom pixel, but the Status is disconnected, please click the three dots > Connect. Please click Connect in the confirmation modal.
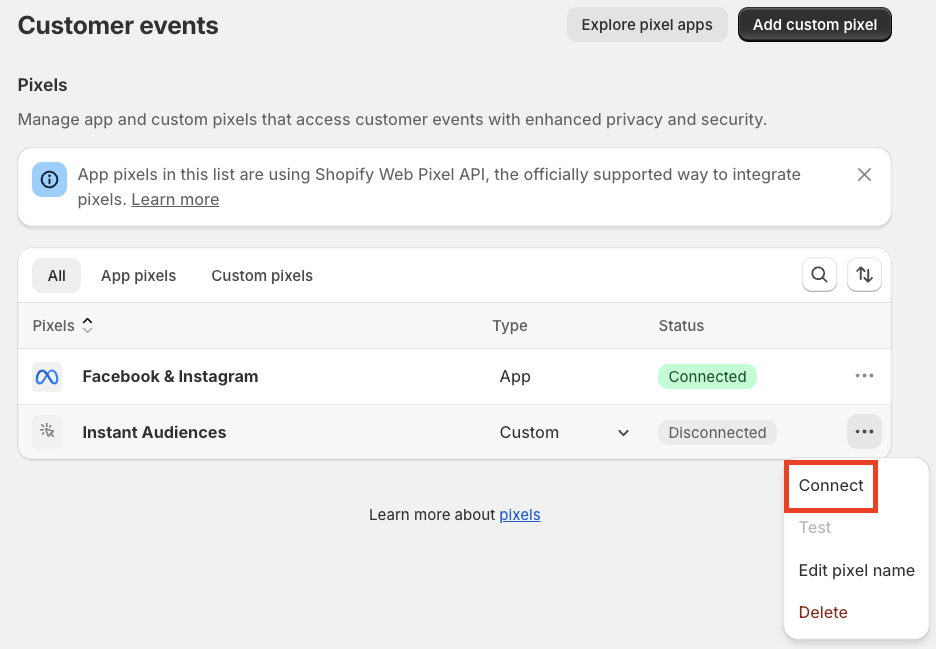
Upon re-installation or re-connection of the Audiences Customer Events pixel, events will begin to be sent to Instant.
If you have confirmed that both your theme.liquid pixel and Customer Events pixel is installed correctly and you are still not receiving events, or are experiencing dropped events, please reach out to support via live chat in the Instant Dashboard, or email us at help@instant.one.
Article URL: https://help.instant.one/re-install-pixel-into-customer-events
Keywords:
## Using Shopify to Sync Customer Profiles to Meta for Retargeting
Many merchants rely on Meta custom audiences to run retargeting campaigns. If you’re using Instant AI to completely run your email marketing, or switching from another platform, you can still fully sync your customers and shopper activity to Meta using Shopify’s built-in integration.
This guide explains how the Shopify <> Meta sync works, what data is included, and how Instant AI fits into the picture.
1. How the Shopify → Meta Sync Works
Shopify offers a native integration called Facebook & Instagram by Meta. Once connected, Shopify automatically sends the following data to Meta:
- Customer list uploads (hashed for privacy)
- Purchase events
- Page view / product view events
- Add to cart events
- Checkout started
- Order placed
- Product & collection catalogue
Meta uses this data to build audiences such as:
- All website visitors
- Product viewers
- Add-to-cart but did not purchase
- Recent purchasers
- High-value customers based on Shopify profile data
This integration is managed entirely inside Shopify and doesn’t depend on Klaviyo, Instant AI, or any other ESP. You can view the documentation here.
2. How to Set Up the Shopify → Meta Integration
- Open Shopify → Apps → Facebook & Instagram by Meta
- Connect your Meta Business Manager
- Choose the Pixel you want to use
- Select your Customer Data Sharing level
- Standard: Browser events only
- Enhanced: Browser + some server-side events
- Maximum: Uses Shopify’s server-side events (recommended for accuracy)
- Publish the integration
Once connected, Shopify will automatically begin syncing events and customer data.
3. How Instant AI Fits Into This
Instant AI doesn’t sync new contacts directly to Meta to create audiences. Instead, we sync all customer profiles and email activity back into Shopify, which means:
- All profiles enriched by Instant AI remain available inside Shopify
- Shopify continues to act as the single source of truth
- The Shopify → Meta integration still receives complete profile and event data
If you previously relied on Klaviyo’s custom audience sync, switching to the Shopify → Meta sync ensures you continue to deliver retargeting ads without interruption.
FAQ's
Can I still run retargeting ads if I’ve turned off Klaviyo or another ESP?
Yes. The Shopify → Meta integration works independently of any ESP. You don’t need Klaviyo (or Instant AI) for Meta audience syncing.
Do I need to set anything up inside Instant AI?
No. Nothing inside Instant AI affects your Meta audiences.
Can I export specific segments (e.g., VIPs, lapsed customers) to Meta?
Shopify doesn’t sync custom segments automatically.
If you need a very specific list, you can:
1. Filter customers in Shopify
2. Export a CSV
3. Upload it manually to Meta as a Custom Audience
This is useful for one-off campaigns but not necessary for ongoing retargeting.
Is server-side tracking supported?
Yes — selecting Customer Data Sharing: Maximum enables Shopify’s server-side Conversions API events.
Article URL: https://help.instant.one/using-shopify-to-sync-customer-profiles-to-meta-for-retargeting
Keywords:
## How do I get started with Instant Predictive Opt-In?
- Proceed to the Predictive Opt-In onboarding flow in the Instant dashboard here
- You will be presented with a "Get Started" screen. Click Get Started.
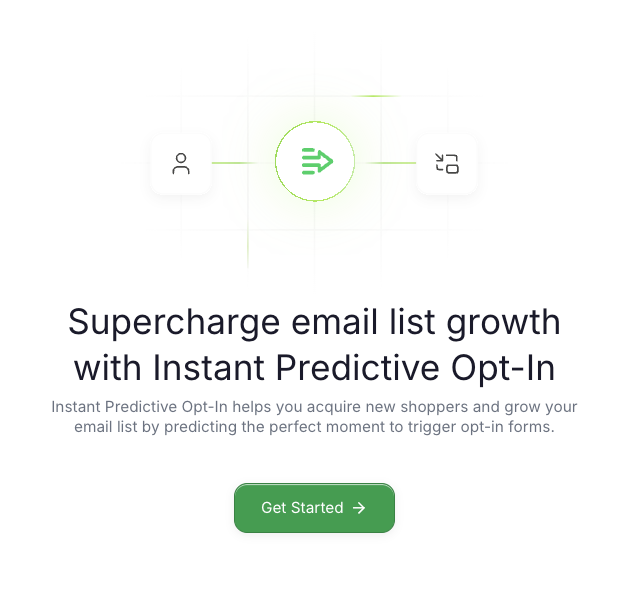
- Choose which form provider you want to integrate with. This should be the form provider that is linked to your welcome flow in Klaviyo.
- Currently, we support both Klaviyo and Alia.
- Follow the steps provided for setting up Predictive Opt-In.
- Once you complete the onboarding steps, you should see the analytics screen. This indicates that you have completed onboarding.
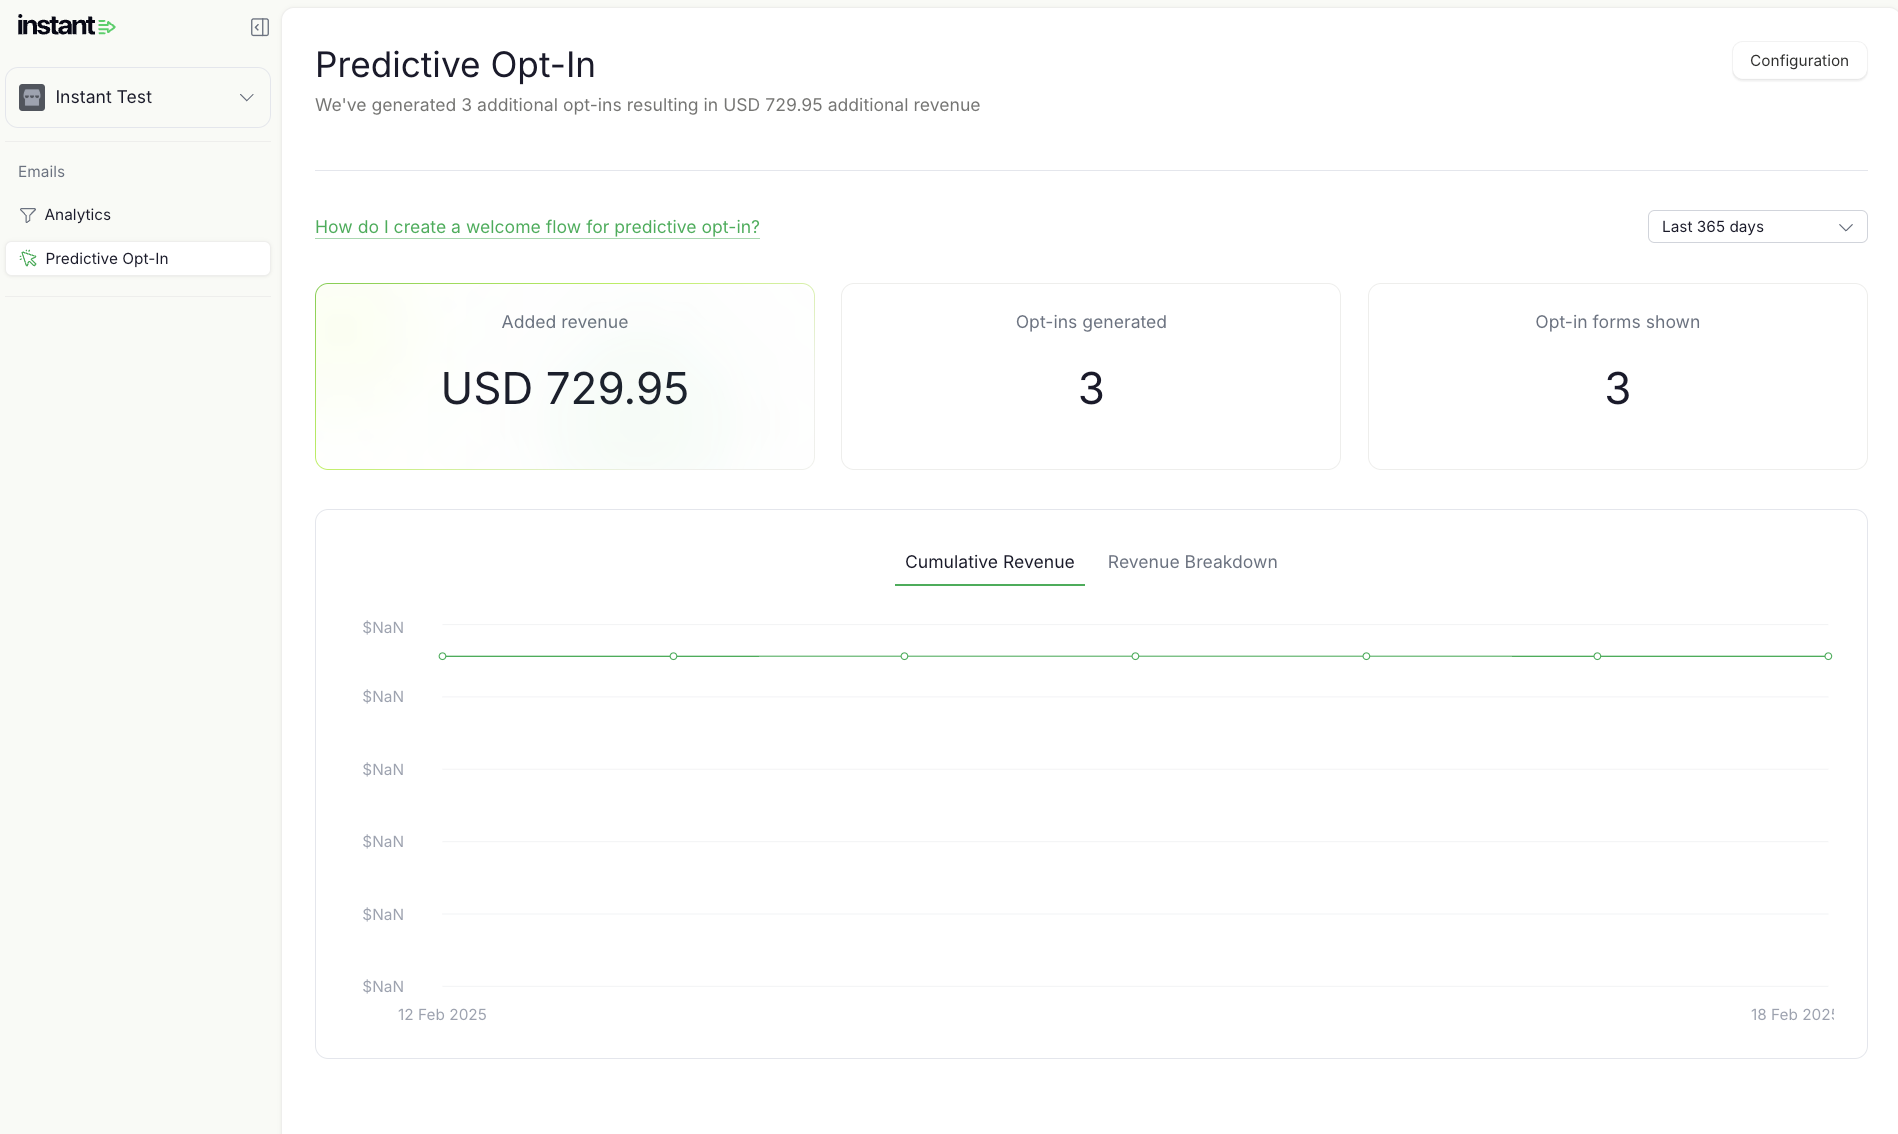
- You will need to set up the cloned welcome flow which shoppers who opt in via predictive opt-in will be enrolled into.
- Please proceed to this article to complete your welcome flow setup.
https://help.instant.one/how-do-i-create-a-welcome-flow-for-predictive-opt-in
Article URL: https://help.instant.one/how-do-i-get-started-with-instant-predictive-opt-in
Keywords:
## Why is my revenue from Instant flows much higher than the number of net new profiles?
The main value that Audiences brings is reclaiming abandoned carts and driving revenue by identifying anonymous traffic.
Instant Audiences leverages a combination of server-side, client-side, cross-device and advanced browser identification techniques to persistently identify and track web traffic. Our technology ensures that our merchants are able to identify and track customers even when third party cookies are blocked, iOS/Apple restrictions are active, or when cache/cookies are cleared.
Instant Audiences provides events for all identified traffic, which also includes site traffic for emails already in your email database to drive flow revenue.
This enables the Audiences flows to re-engage dormant profiles that we can identify and track where Klaviyo is unable to. Audiences is able to identify abandonment events for profiles indefinitely as soon as we identify them, whilst Klaviyo is only able to receives events from your Shopify store if a user is logged in or has logged in within the last 7 days (on Apple/iOS/Firefox and most Chrome browsers)
For example, if customer purchased from store on Safari 10 days ago, then customer returns and abandons a new shopping cart today, Klaviyo would be unable to track that customer has abandoned their cart, therefore not enabling store to re-target customer and re-claim the abandoned cart.
However with Instant Audiences, Klaviyo would receive a signal that customer abandoned their cart, enabling customer to be re-targeted via the Instant flows. This greatly increases the amount of abandonment events that Klaviyo receives, resulting in increased abandonment revenue.
Our main success indicator is the revenue from Instant flows - from both net new and existing profiles, as this demonstrates the amount of abandoned carts we were able to reclaim that the normal flows would not have been able to.
Over time, we expect to see orders from net new profiles specifically to increase, as well as revenue generated from net new profiles converted from campaigns.
Article URL: https://help.instant.one/revenue-higher
Keywords:
## How to add Shopify Collections data to Audiences Checkout events
The Collection field on cart events represents all the unique collections of the products which are in the cart at the time when a customer performs an action.
By default, Instant Audiences does not send through collections data for Item Added to Cart, or Cart Viewed / checkout started events.
For example, see a screenshot below which shows a normal Cart Viewed / Checkout Started field. Note how Collections is an empty field.
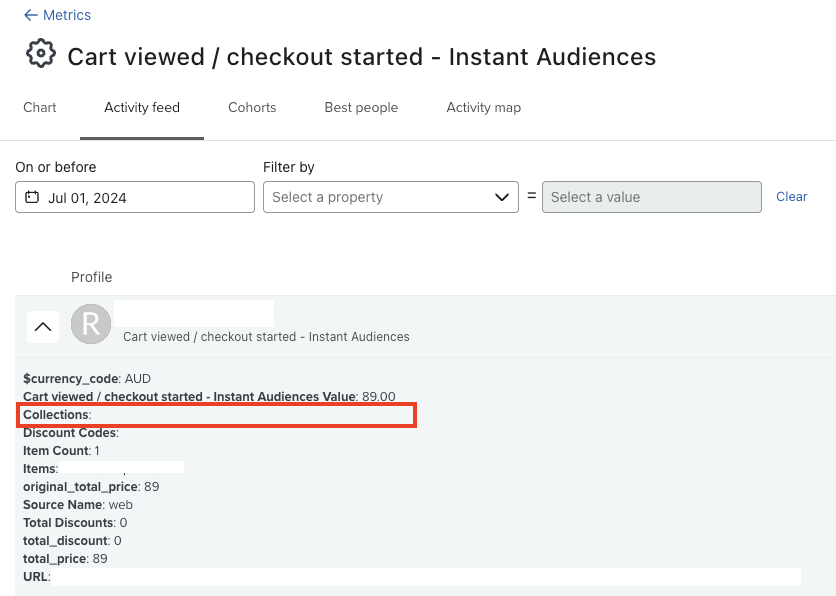
Please note that there is a "Categories" field on Item Added to Cart events, however these are the Categories associated to the specific item being added. The "Collections" field represents the unique Collections of all the items in the cart.
Collections are not populated by default, because Shopify requires an API integration to retrieve Collections data for products.
By default, Instant Audiences integration into Shopify does not require an API integration.
To enable this functionality, we require an API integration into Shopify. Once an API integration into Shopify is configured, Collections data will automatically flow through on all Cart events that Instant Audiences sends through to Klaviyo.
To create an API integration into Shopify, please complete the following:
- Proceed to the Shopify admin and click on Settings in the bottom right.
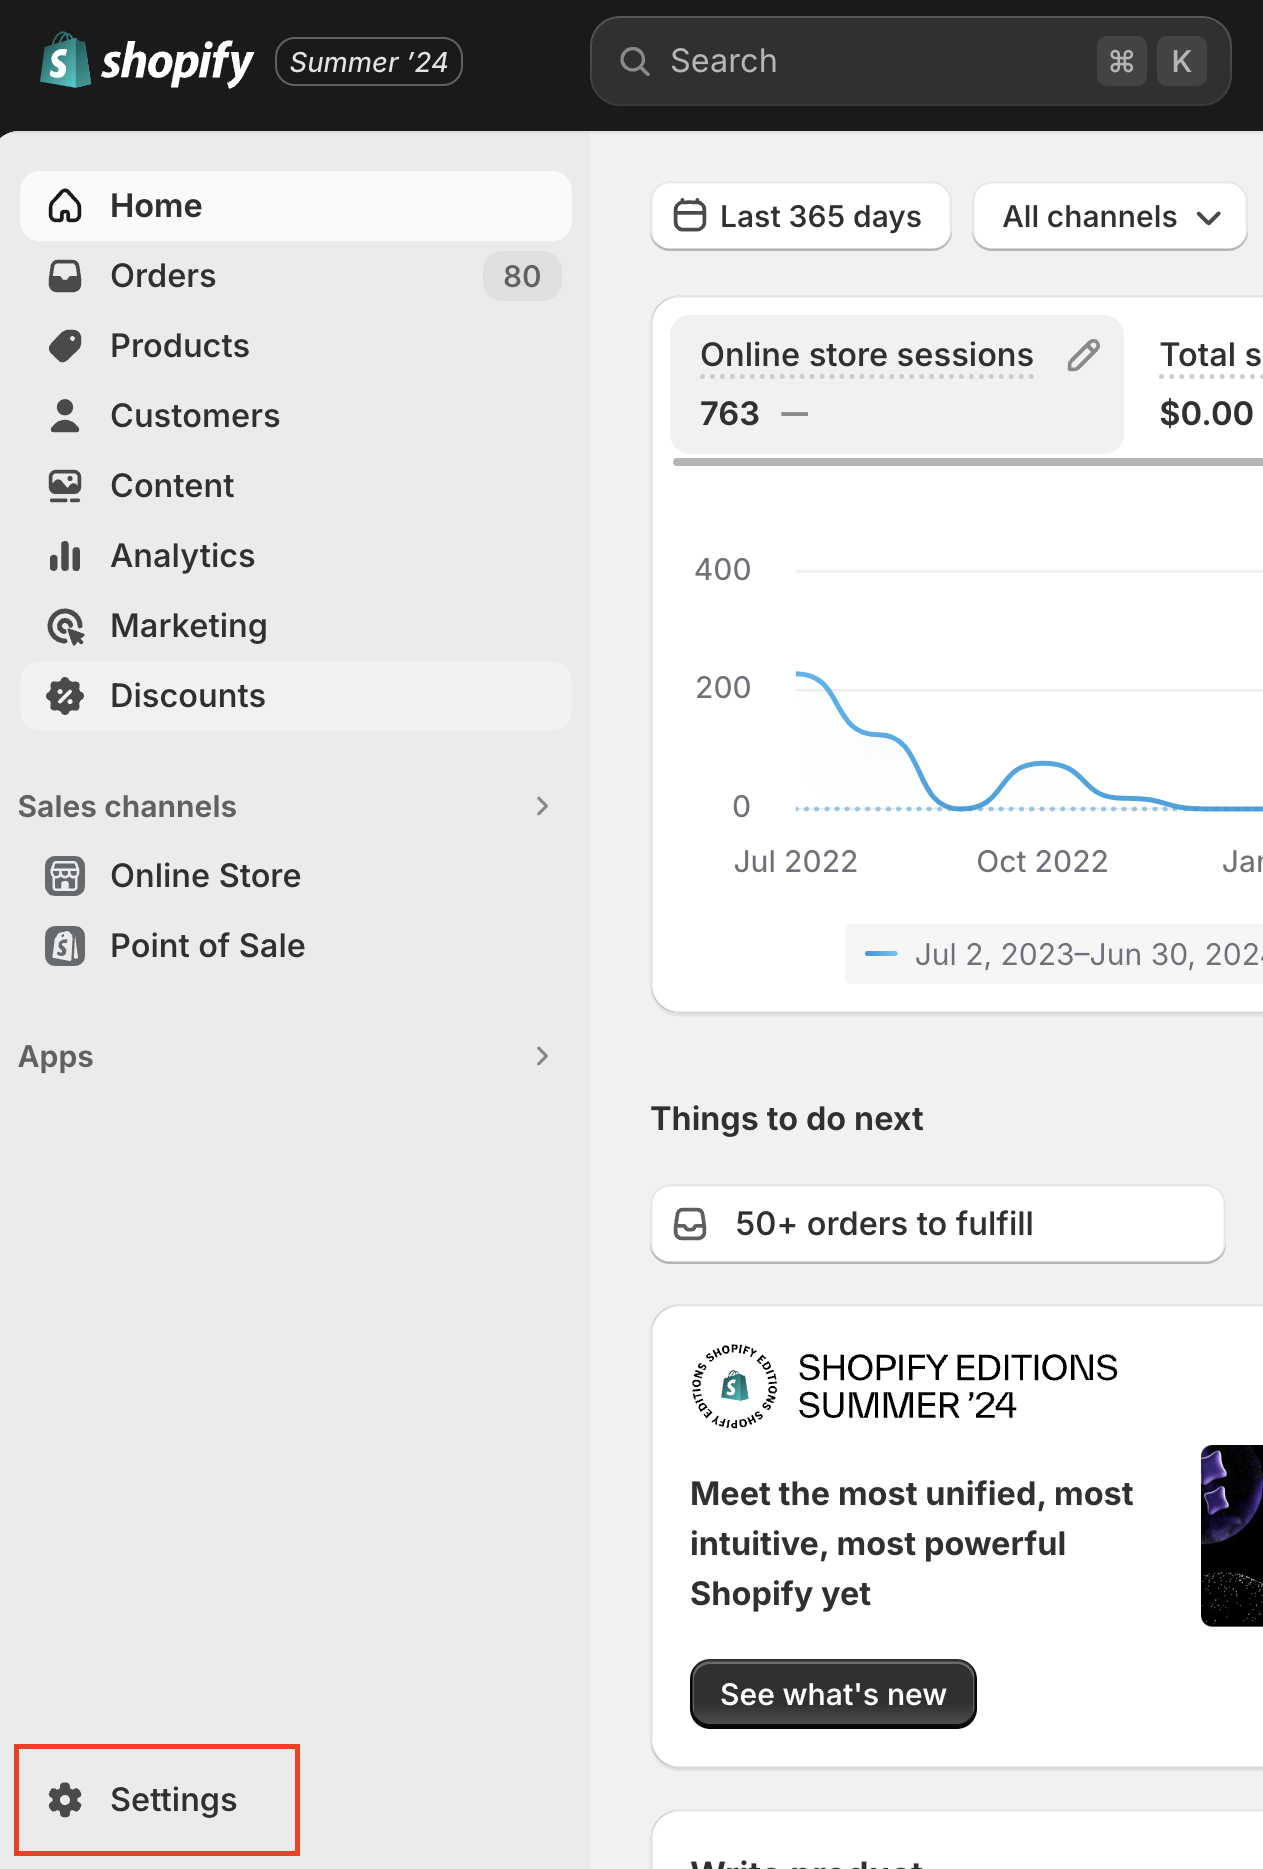
- Proceed to Apps and sales channels > Develop apps
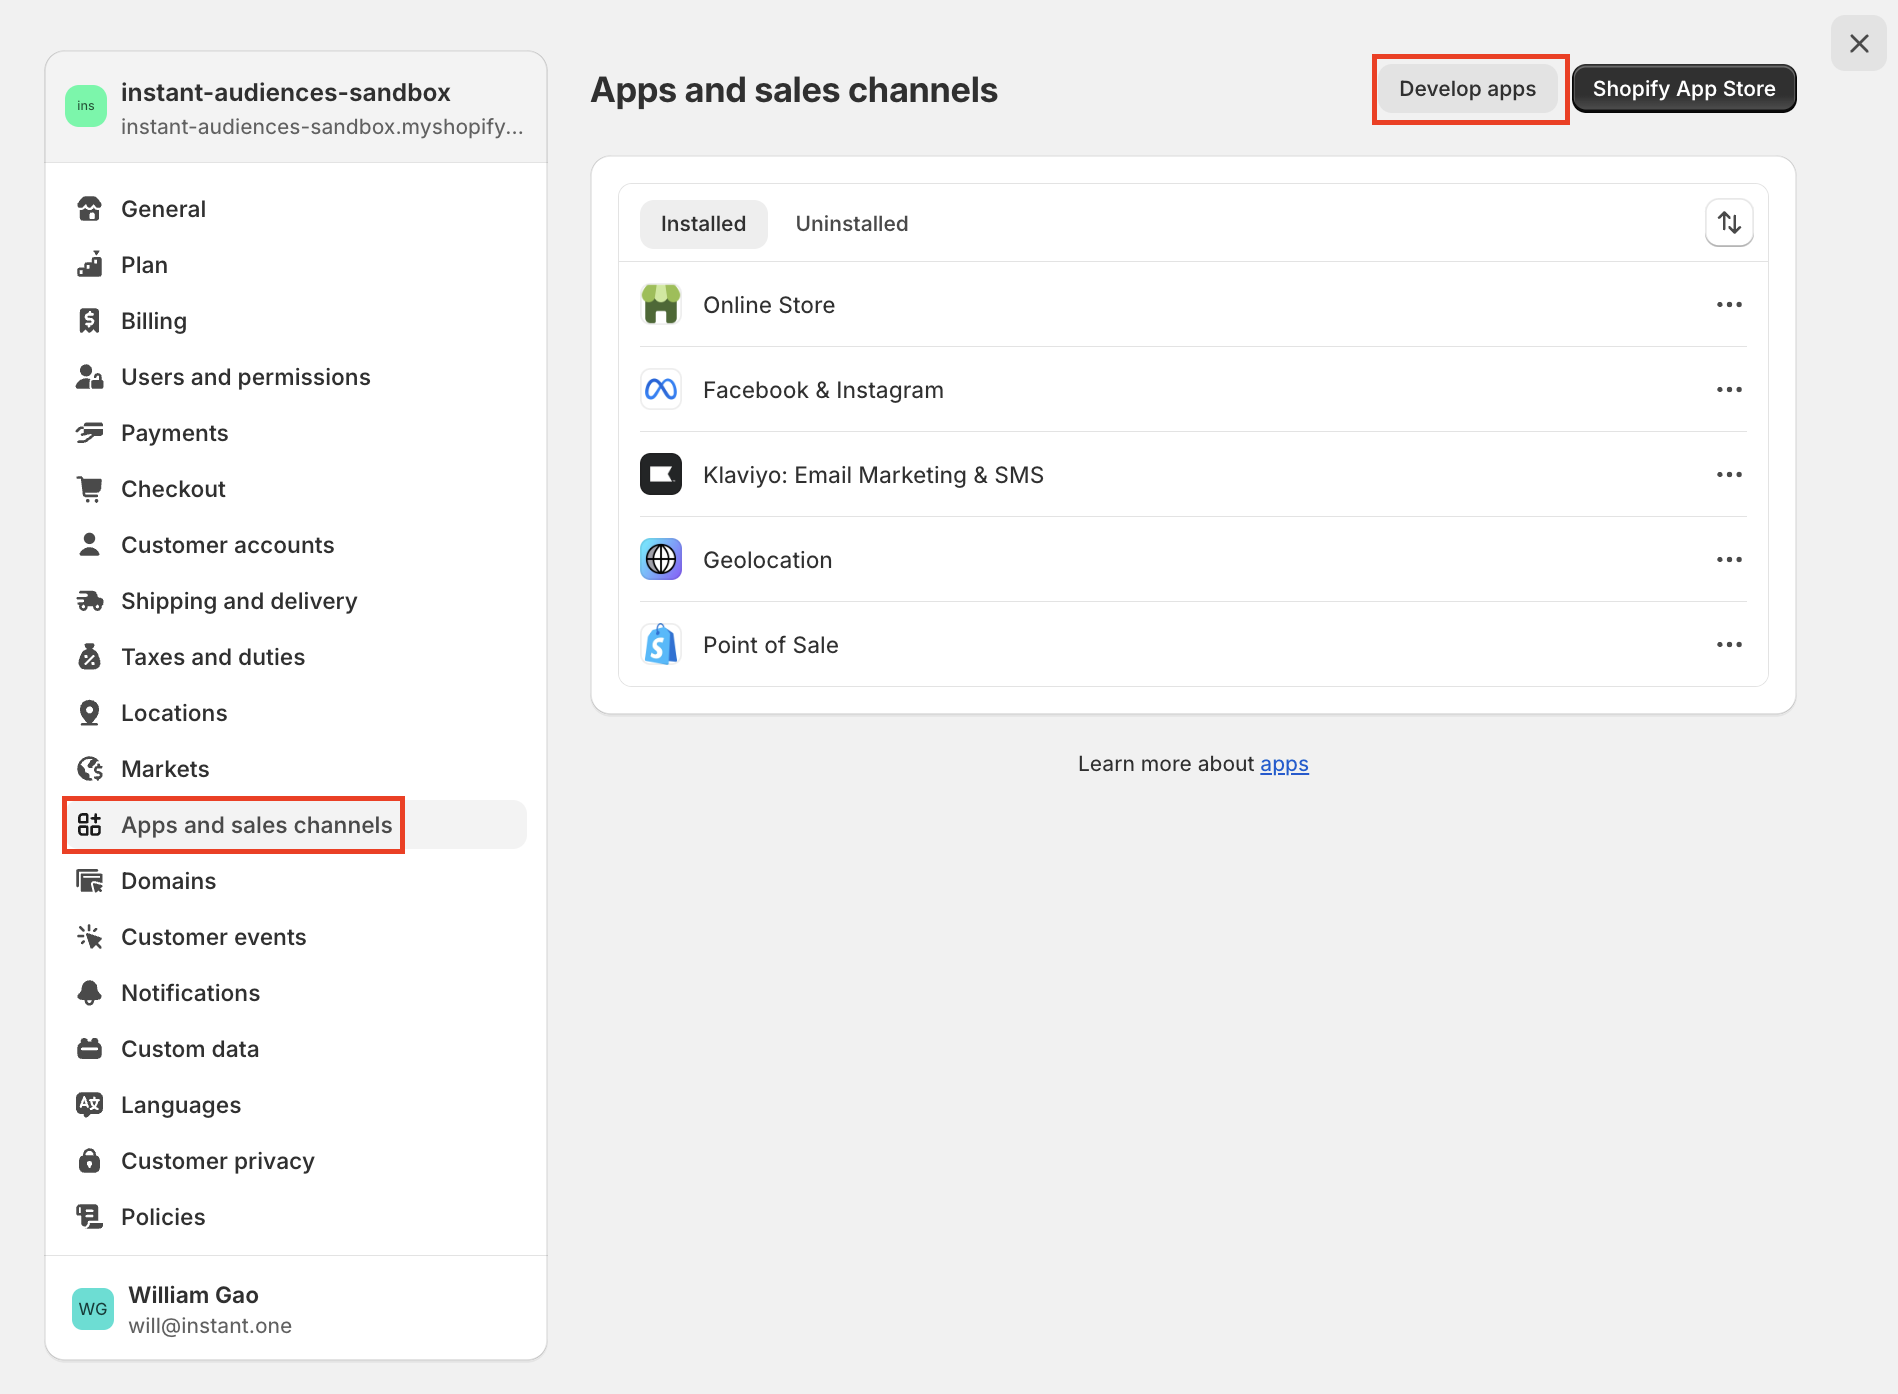
- Click on Create an app. Name the app "Instant App" and click Create app.
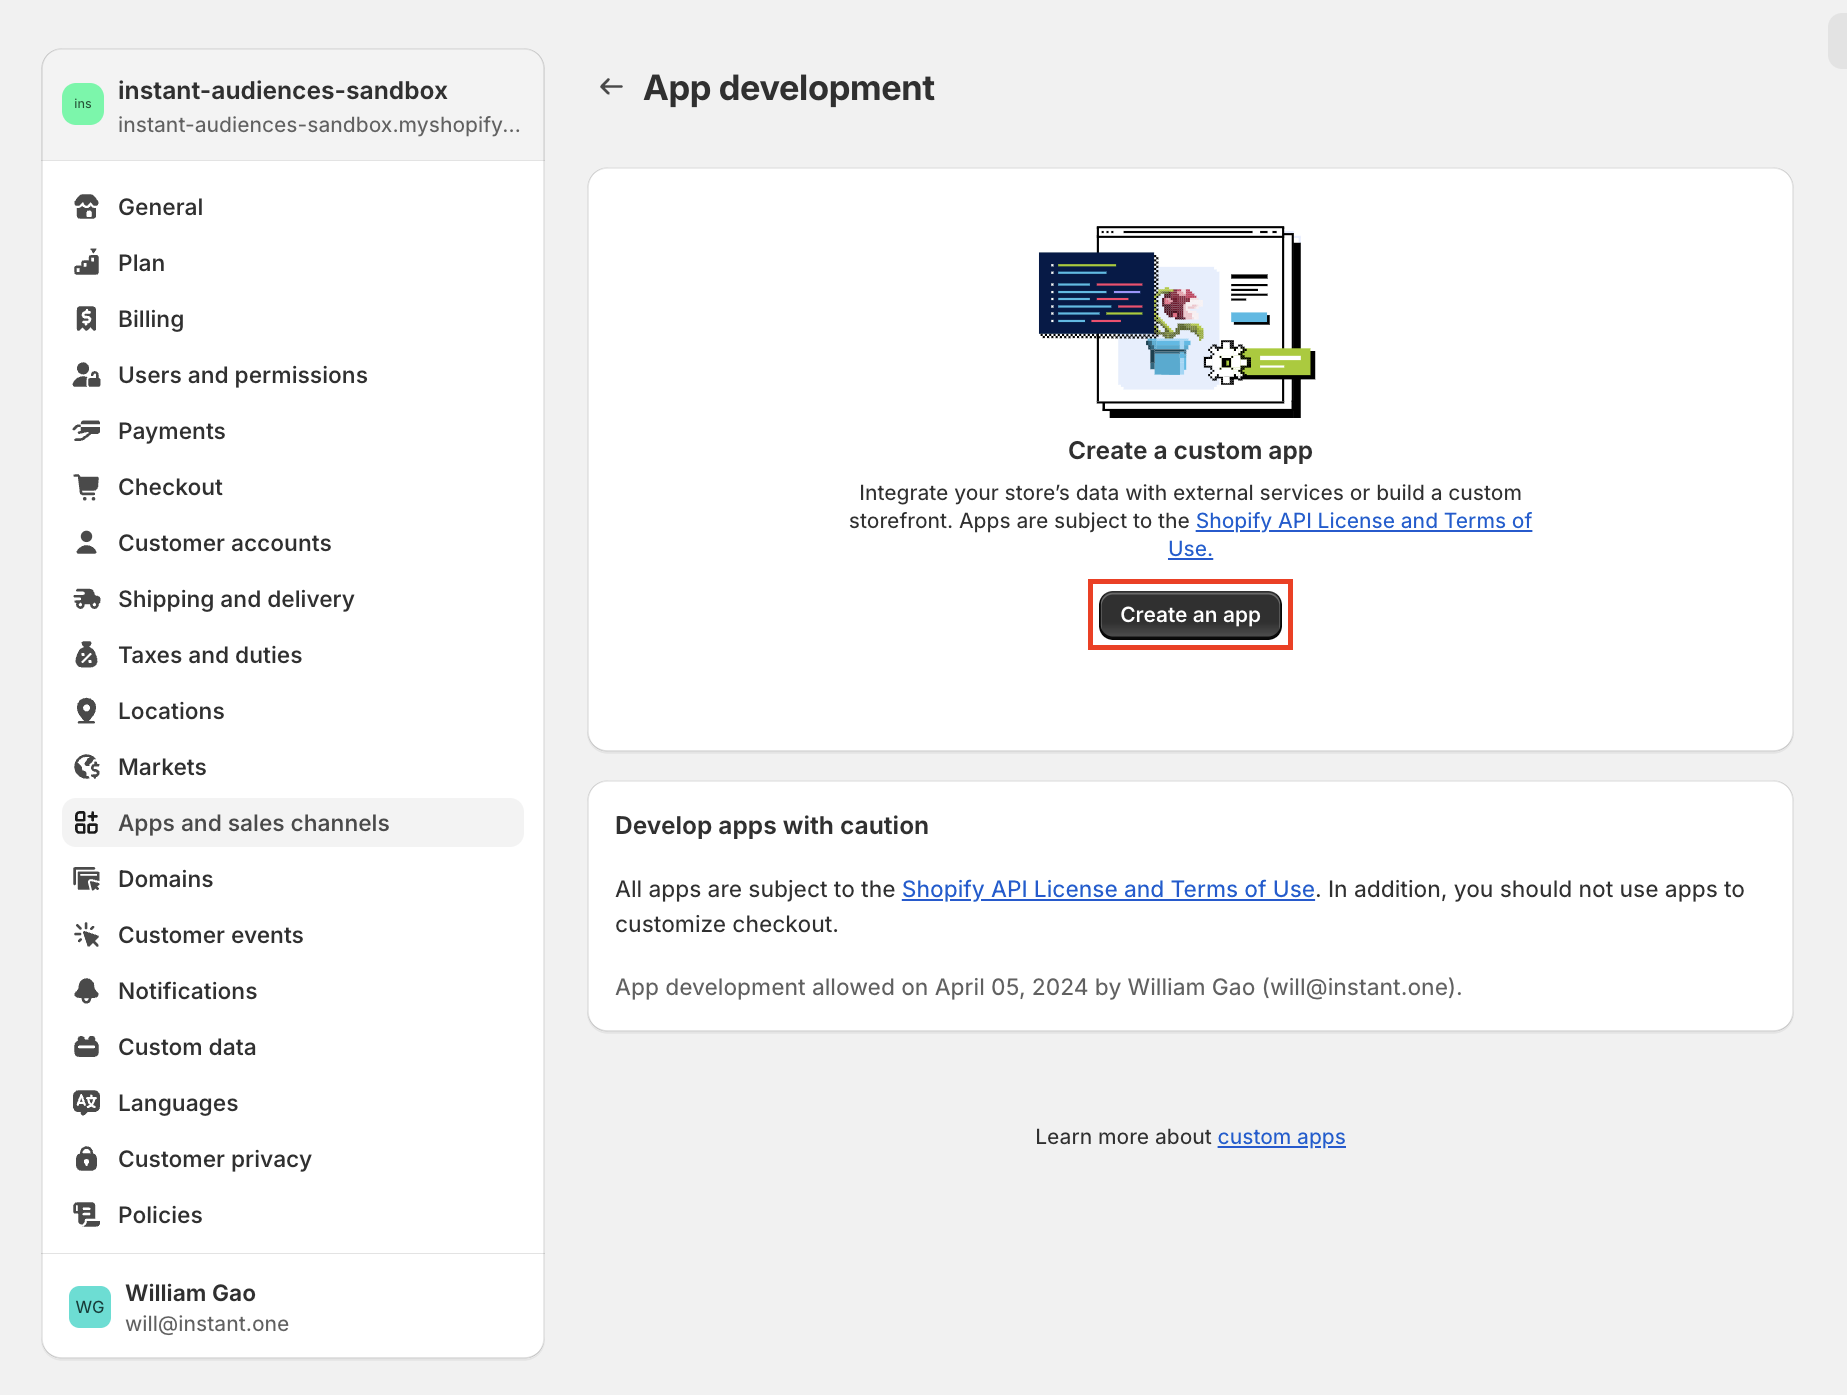
- Proceed to Configuration. Locate Admin API integration, and click on the Configure button.
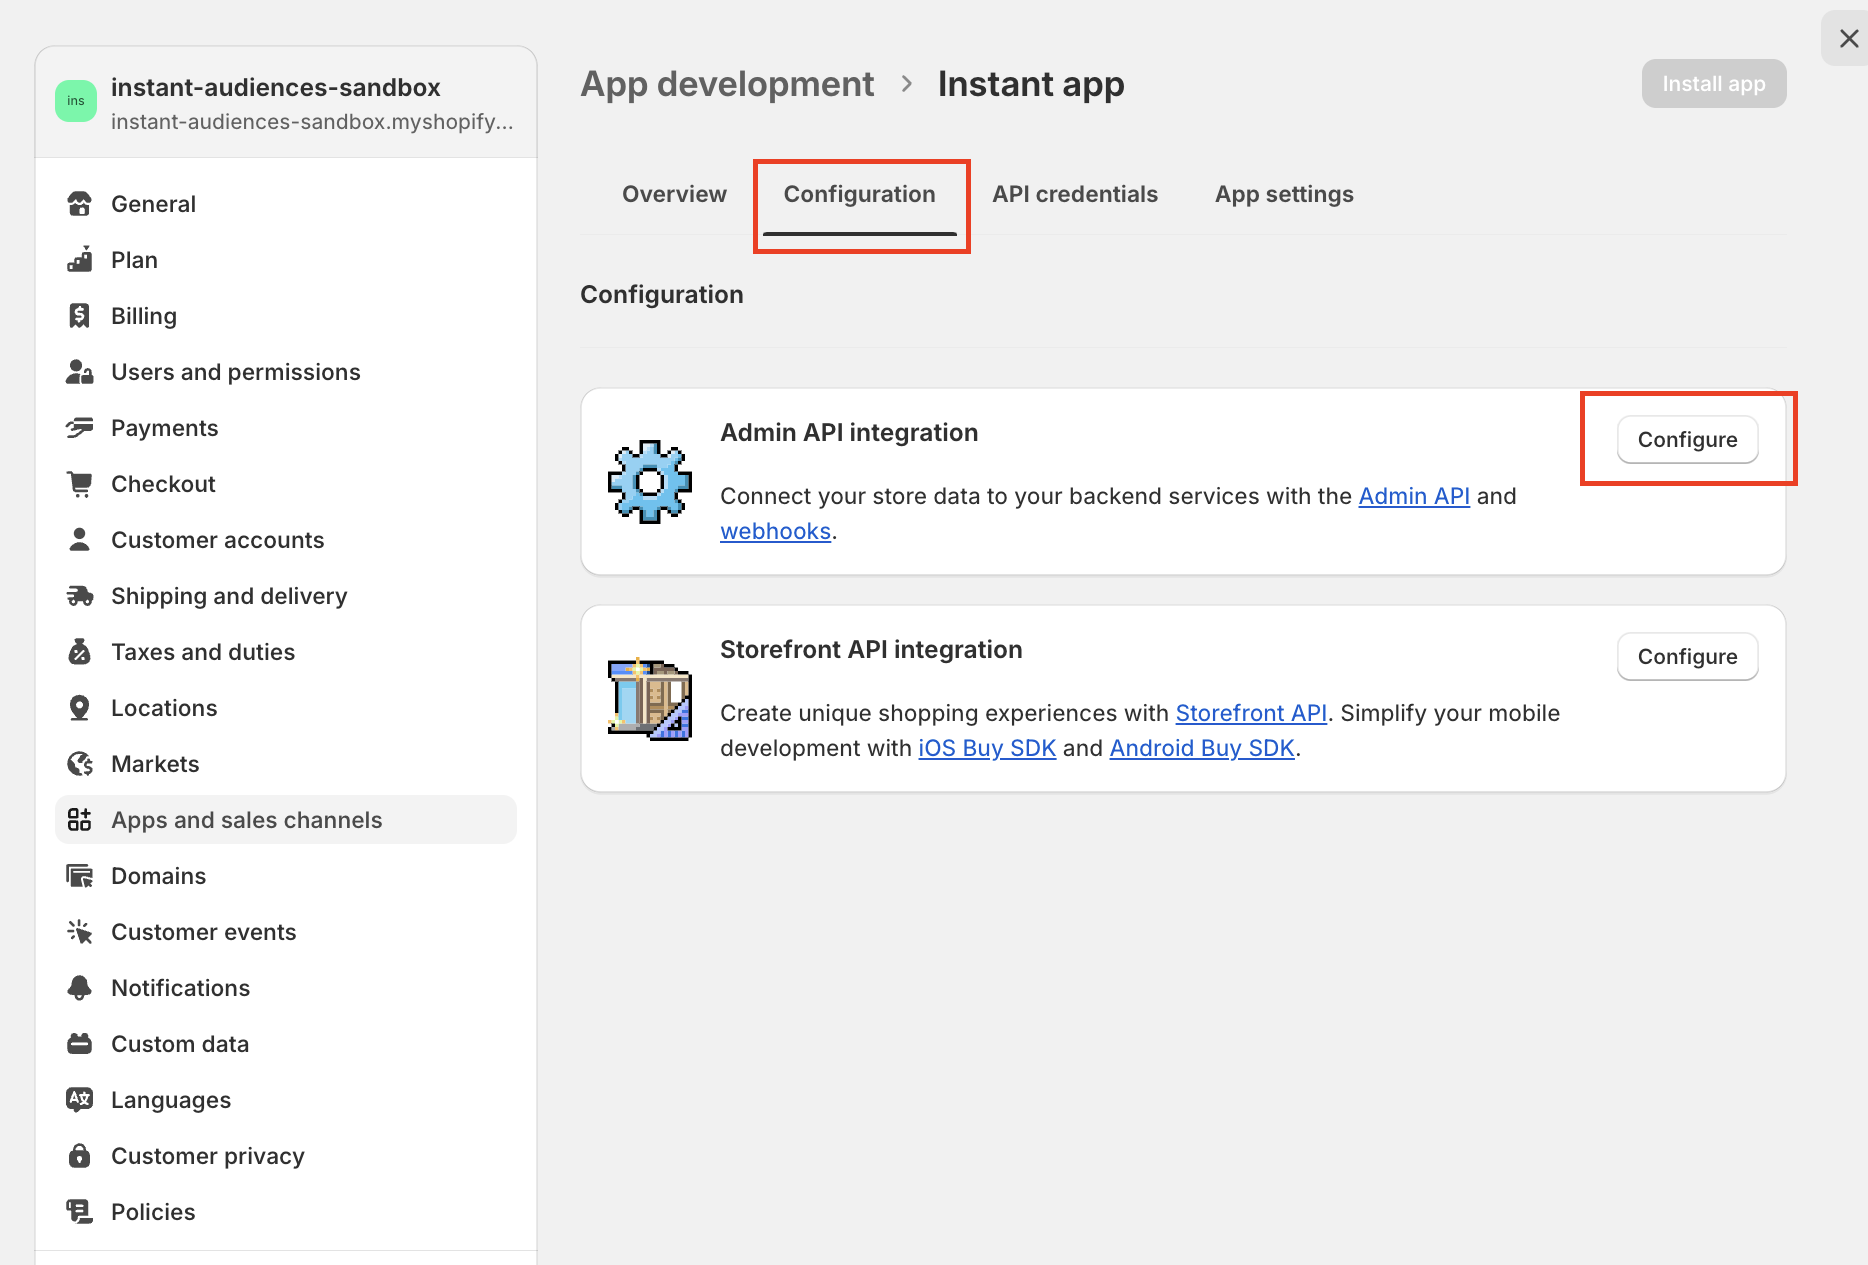
- Select the following access scopes.
- read_themes, write_themes
- read_script_tags, write_script_tags
- read_customers
- read_products
- read_orders
Click on Save.

- Once saved, proceed to API credentials and click on "Install app". In the popup, click on Install.
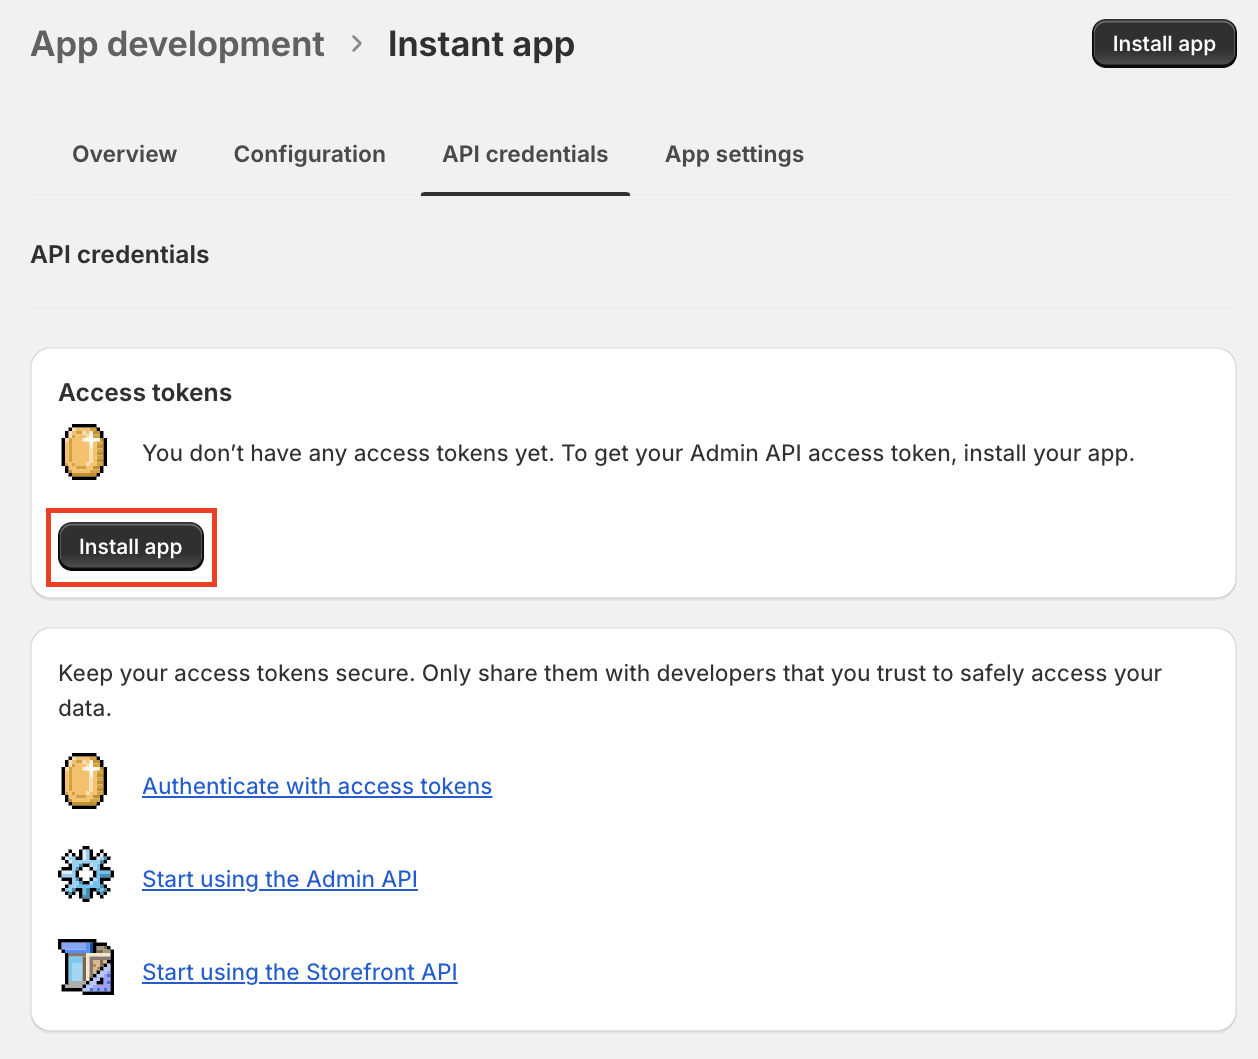
- An Admin API access token will be created. Click on Reveal token once. Once the token has been revealed, please take note of this access token.
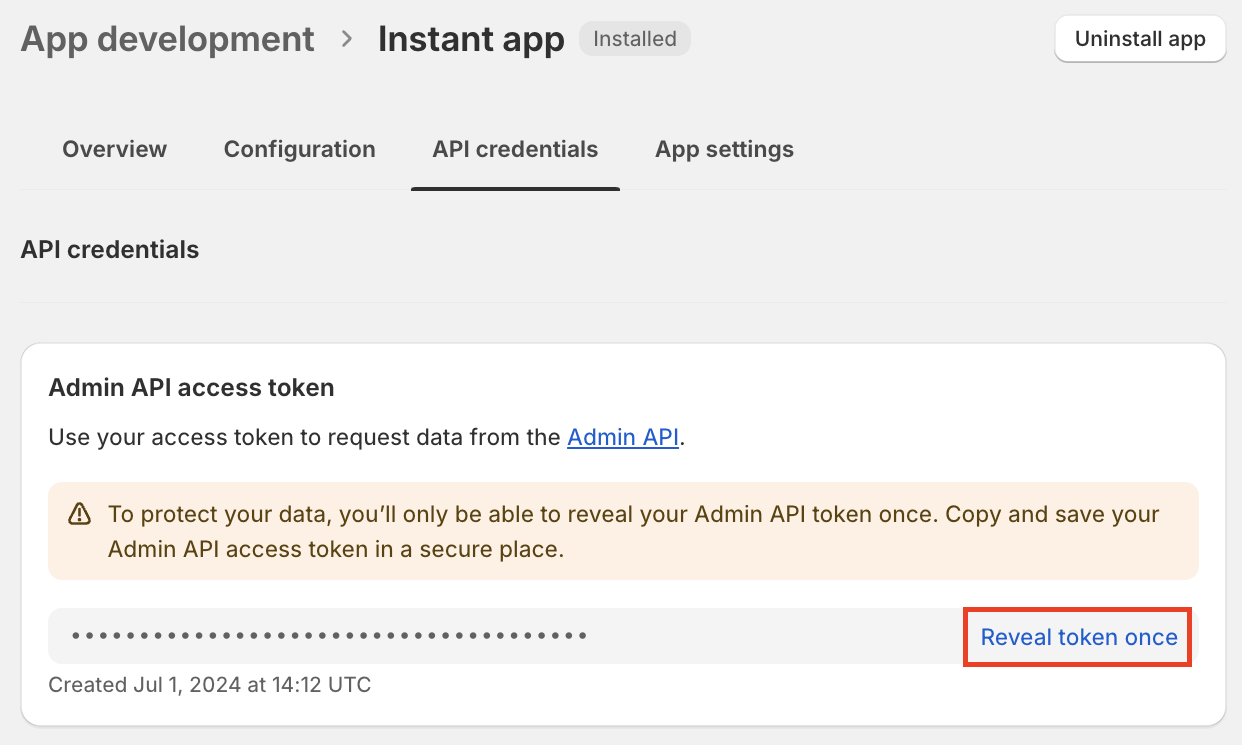
- Proceed to the Instant dashboard. Click on Integrations in the sidebar, and click on Shopify.
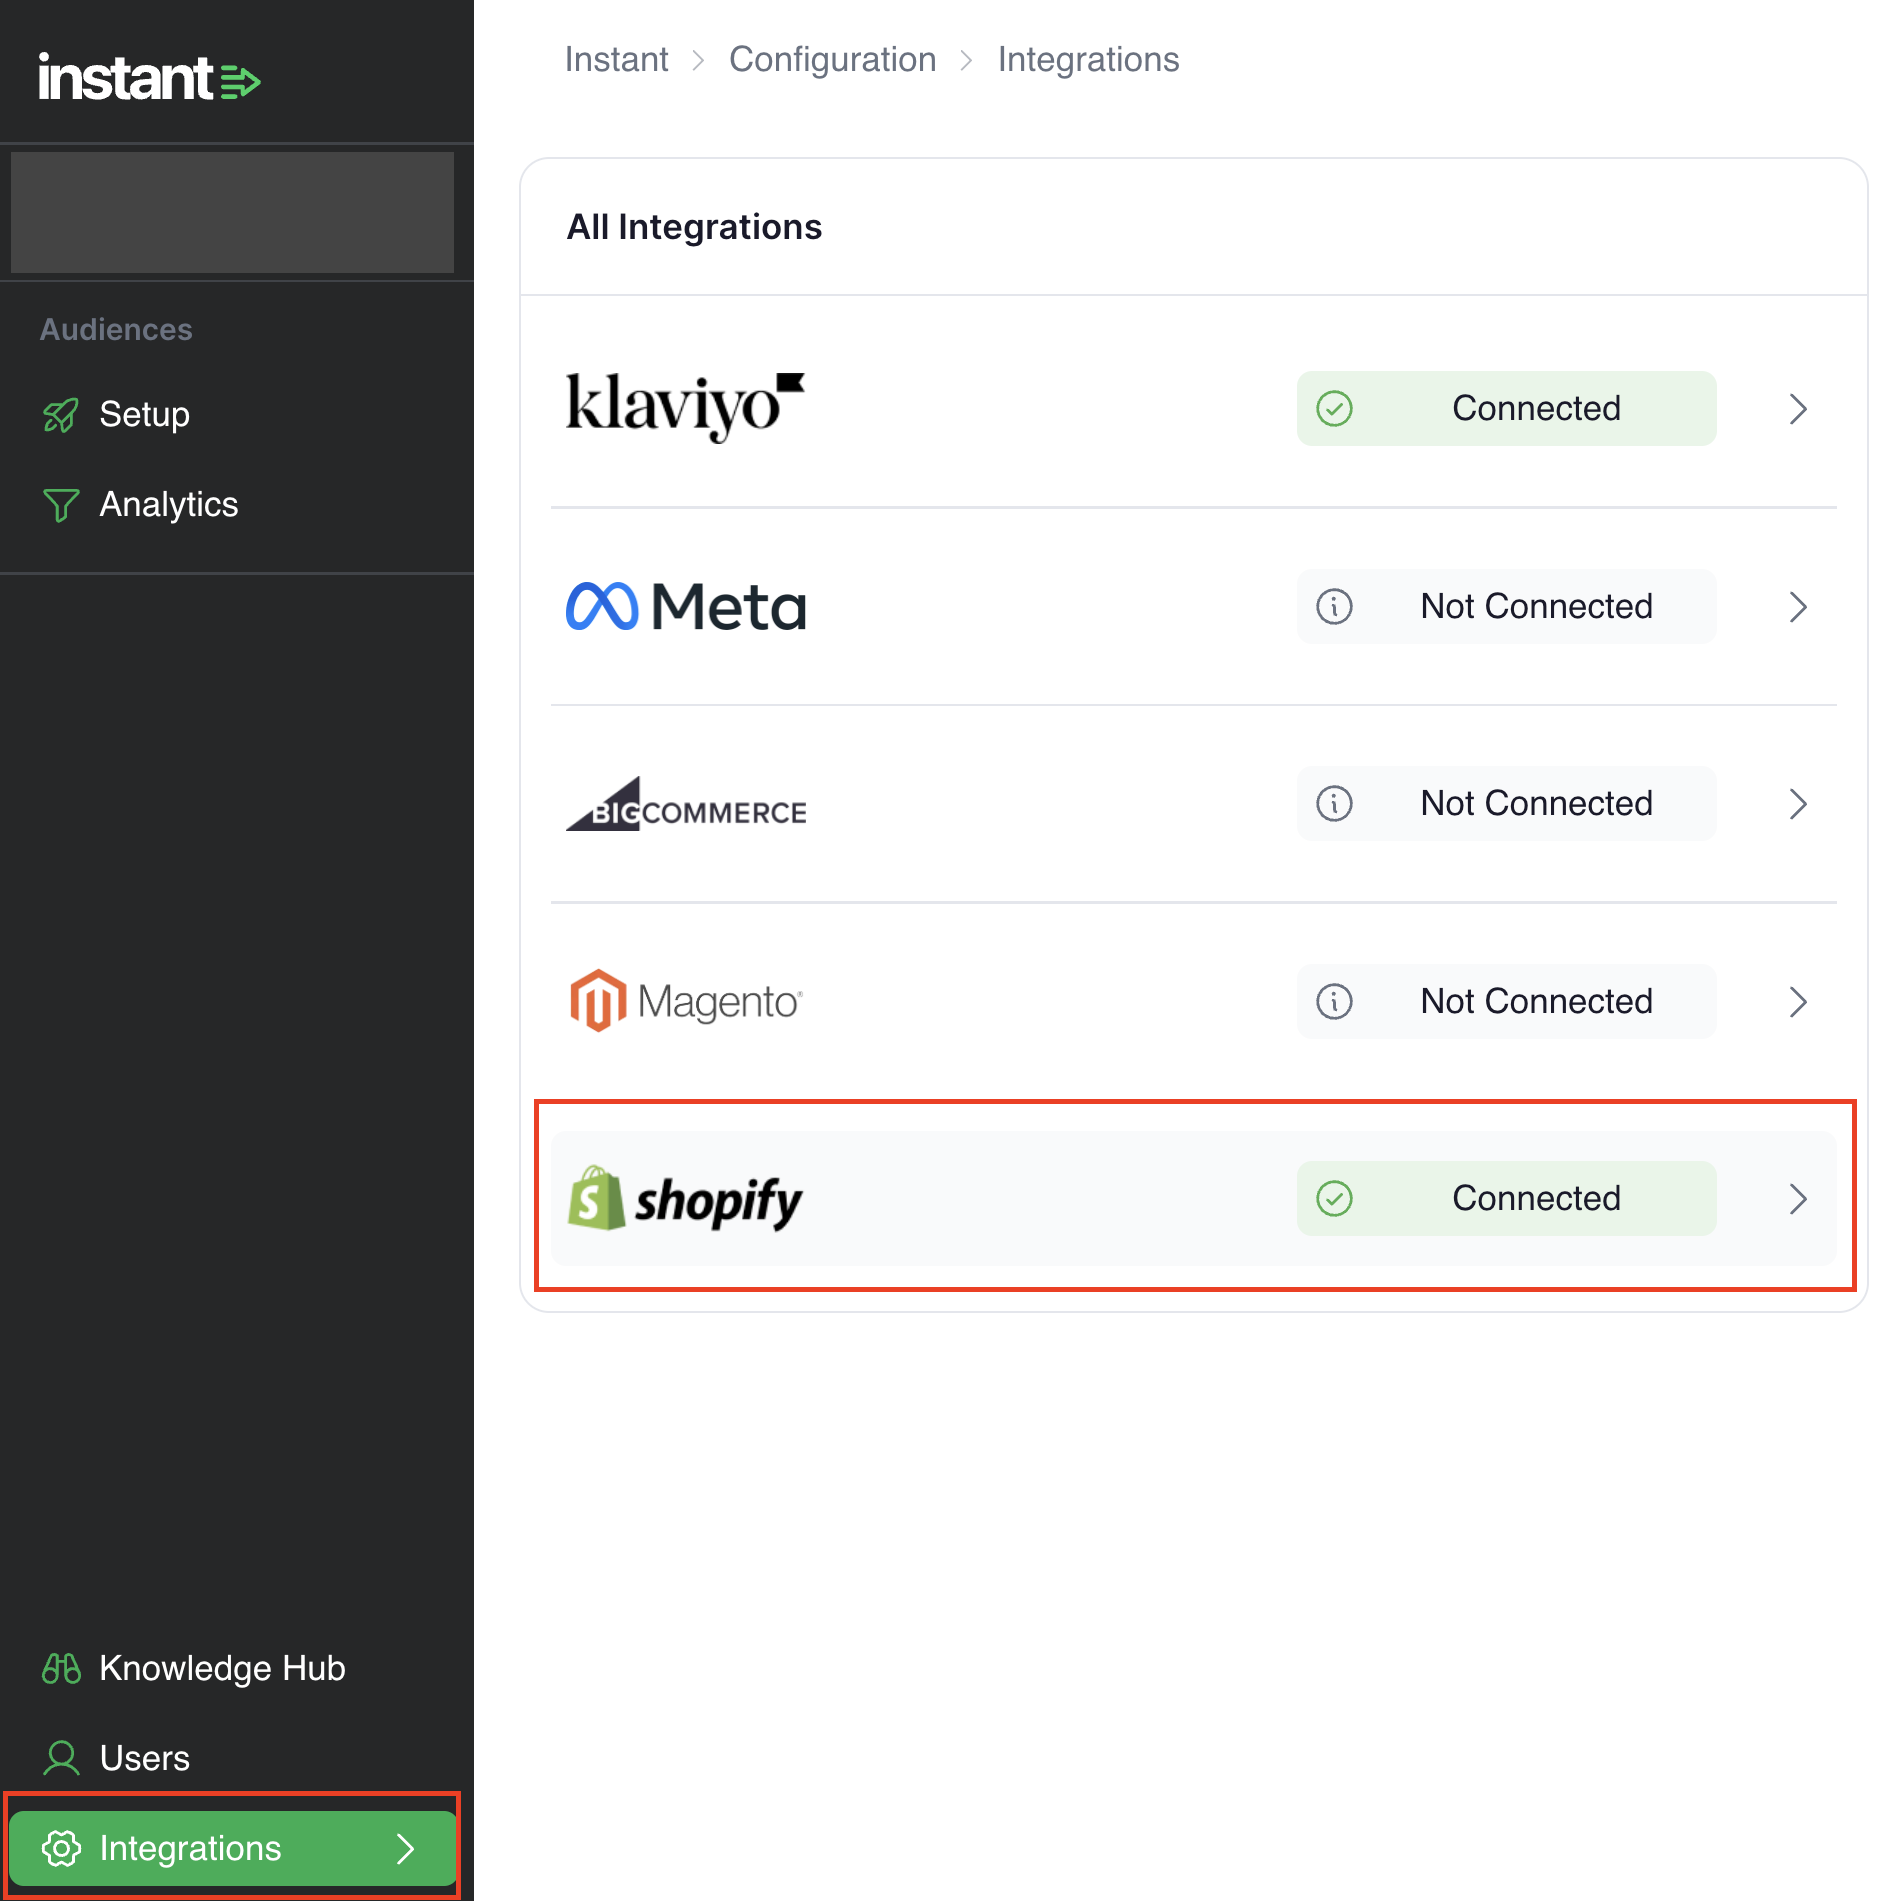
- In the popup, paste your Access Token and My Shopify ID into the inputs. Click on Create / Update. (The Shopify ID is the name of your Shopify store when it was first created. e.g. if your Shopify URL is my-store.myshopify.com, then your ID is my-store) if you do not know how to retrieve your Shopify ID, proceed here)
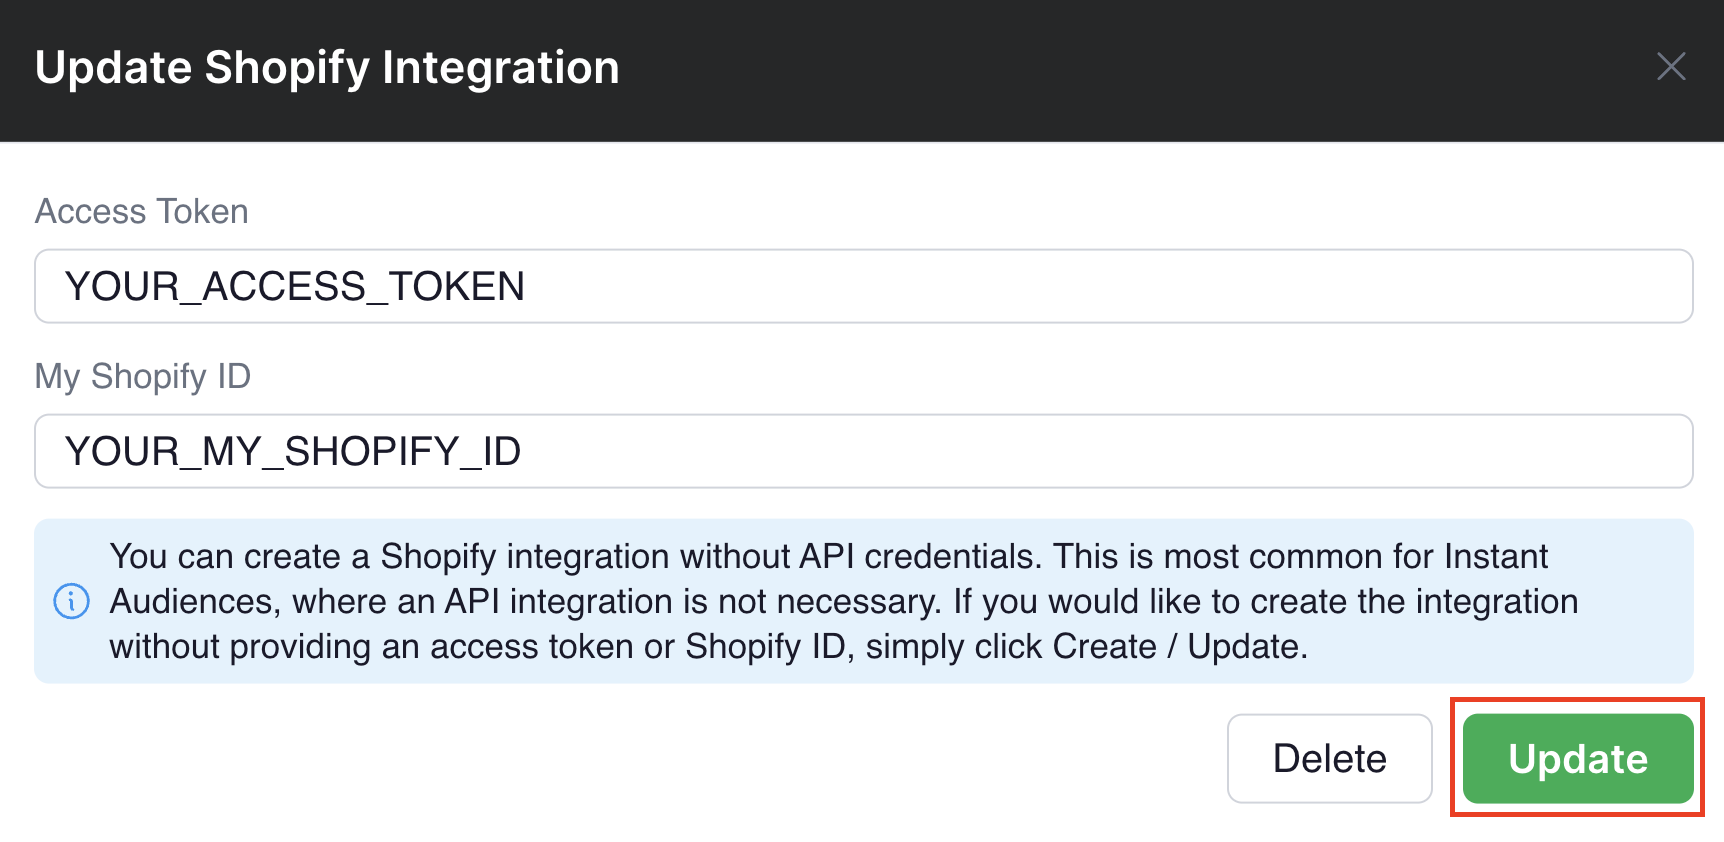
Instant is now integrated into your Shopify via an API integration, and Collection data will begin populating for Klaviyo events.
Article URL: https://help.instant.one/add-shopify-collections-data
Keywords:
## How Instant AI Handles Apple Mail Privacy Protection (MPP) Opens
Apple Mail Privacy Protection (MPP)[^1] is a privacy feature that automatically downloads email content in the background. This can make emails appear as "opened" even if the shopper never actually read them. This means open rates from Apple Mail can be inflated and don't always reflect real human engagement.
Instant AI **automatically excludes Apple MPP opens by default**. These opens are **not counted** as real email opens in any Instant AI reporting, attribution, or performance metrics. There is no setting to turn this on or off and this behaviour is applied consistently across all merchants and all emails.
## **Why we do this**
Apple MPP opens are generated by automated systems, not real shopper behaviour. Including them would:
- Inflate open rates
- Skew performance reporting
- Make optimisation decisions less reliable
By excluding them, Instant AI ensures your metrics reflect **genuine shopper engagement only**. We intentionally don't offer a toggle or setting because excluding automated opens is best practice for accurate reporting, and we want all merchants to have clean, trustworthy data by default.
[^1]: See: [Apple's documentation for *Apple Mail Privacy Protection* (MPP)](https://support.apple.com/guide/iphone/use-mail-privacy-protection-iphf084865c7/ios)
Article URL: https://help.instant.one/how-instant-ai-handles-apple-mail-privacy-protection-mpp-opens
Keywords:
## Net New Profile Guides and Resources
Net New Profile Export helps brands re-target anonymous shoppers on their website through targeted, high-intent abandonment flows.
Guides and docs relating to this feature are available below.
Article URL: https://help.instant.one/net-new-profile-guides-and-resources
Keywords: net new
## How do I add a user to Facebook business manager?
Where the Instant team has requested access to datasets for debugging purposes, please complete the following steps to grant the Instant team access to Meta / Facebook.
-
Proceed to Facebook business manager: https://business.facebook.com/.
If you are not logged in, please log in. You will need to be logged in as a user with sufficient permissions to invite new people onto your Meta business account.
-
Click on Settings in the bottom left of the sidebar, and proceed to Users > People > Invite people
-
In the modal that appears, please specify "help+meta@instant.one" as the email address and click Next.
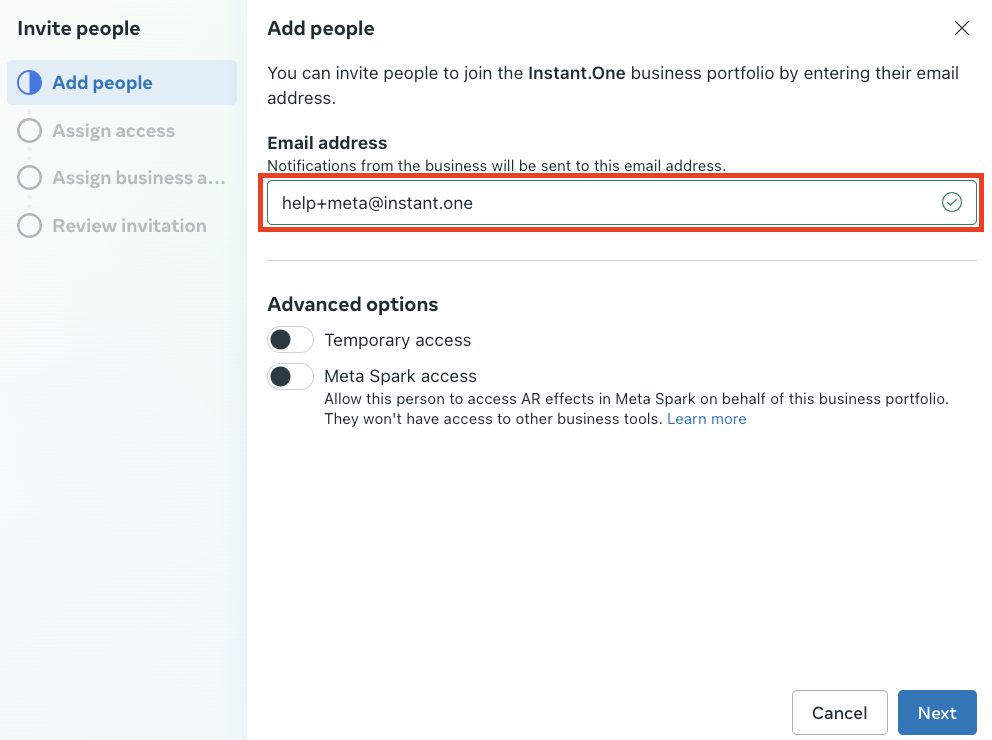
-
You will see an Assign access screen. Please ensure that "Apps and integrations" is ticked. Click Next once this is selected.
-
Please assign your Ad account to the new user, and provide "View Performance" access.
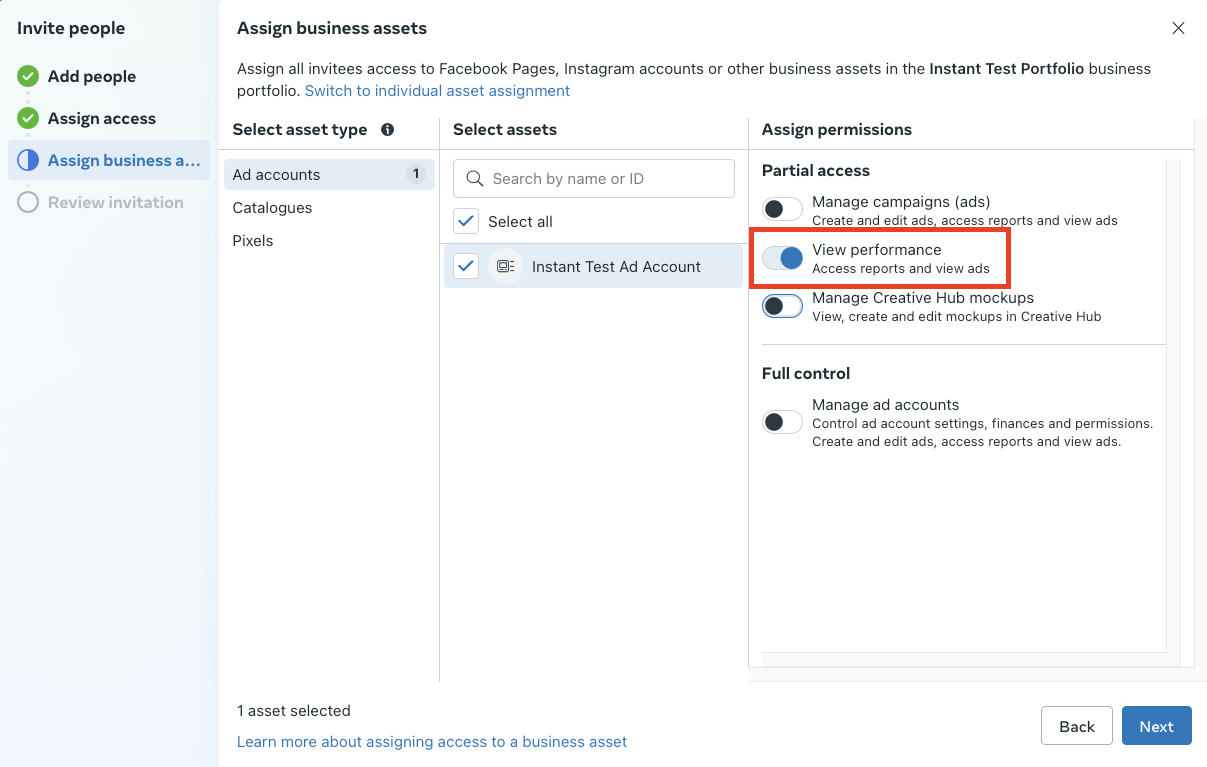
Please assign your Pixel to the new user, and provide "Manage pixels" access and click Next.
-
On the Review invitation step, please click "Send invitation".
Please note that once you are onboarded successfully onto Targeting, Instant doesn't need further access to your Facebook business manager.
Article URL: https://help.instant.one/add-user-to-business-manager
Keywords:
## How does Instant prevent duplicate events in Meta?
To prevent event duplication, we attach a unique de-duplication ID to every event sent to Meta's servers.
This ID ensures that if an event happens multiple times, Meta recognizes it as the same event and does not count it twice.
Using de-duplication IDs is a common and recommended practice in event tracking to ensure that data is accurate and without redundancy.
We ensure this is achieved, by including a unique de-duplication ID with each event sent to Facebook’s Conversion API (CAPI). You may notice more events in Facebook's Event Manager when the Meta integration is enabled, but these are guaranteed to be de-duplicated.
How We Prevent Duplicate Events
To prevent duplication, we attach a unique de-duplication ID to every event sent to Meta's servers. This ID ensures that if an event happens multiple times, Meta recognizes it as the same event and does not count it twice.
-
De-duplication ID: Each event sent from our platform to Meta includes a de-duplication ID. This ID ensures that duplicate events are prevented by linking events with the same ID together. If an event with the same de-duplication ID is received by Meta again, Meta recognizes it as the same event and prevents any duplication.
-
Event Enrichment: By using de-duplication IDs, we can send enriched event data to Meta. This allows Facebook to match and process events with the most complete or relevant data, without causing duplicates.
-
Consistency with Facebook Pixel: We make sure to use the same de-duplication ID that Facebook Pixel generates for events. This ensures that no duplicate events are sent, regardless of whether the event is triggered by the Pixel or the Conversion API.
De-duplication ensures that Meta receives accurate, enriched data, preventing inflated event counts.As a result, you'll be able to achieve more reliable reporting and enhanced optimisation for your campaigns.
Article URL: https://help.instant.one/meta-event-de-duplication
Keywords:
## How do I schedule opt-in forms for Instant Predictive Opt-In?
At times, you may choose to create a new form for your welcome flows. This is often done for specific sales periods or promotions, such as:
- Introducing a limited-time incentive for users to share their contact information.
- Updating colors, styles, or messaging to align with seasonal campaigns or special events.
Your new form may be a temporary adjustment for a sale, holiday campaign, or promotional event. Once the promotion ends, you can easily revert to your standard form.
For instructions on setting a new default form, follow the steps here.
Adding / Removing Scheduled Form Changes
Scheduled form changes are currently only available for Klaviyo forms. If you're using a different form provider with Predictive Opt-In, this feature isn’t supported at this time.
Use scheduled form changes to manage temporary updates without needing to manually modify your default form. This is ideal for:
- Black Friday and Cyber Monday sales
- Holiday promotions
- Limited-time offers
By scheduling your form changes in advance, you can ensure a seamless transition before and after key sales periods.
- Proceed to your Instant dashboard and click on Predictive Opt-In in the sidebar.
- Click on Configuration in the top right.
- In the Configuration, click on Add new scheduled form.
This will create a new scheduled form, where you can provide the start and end dates of the schedule, as well as what Desktop form ID and Mobile form ID you would like to use during this period.
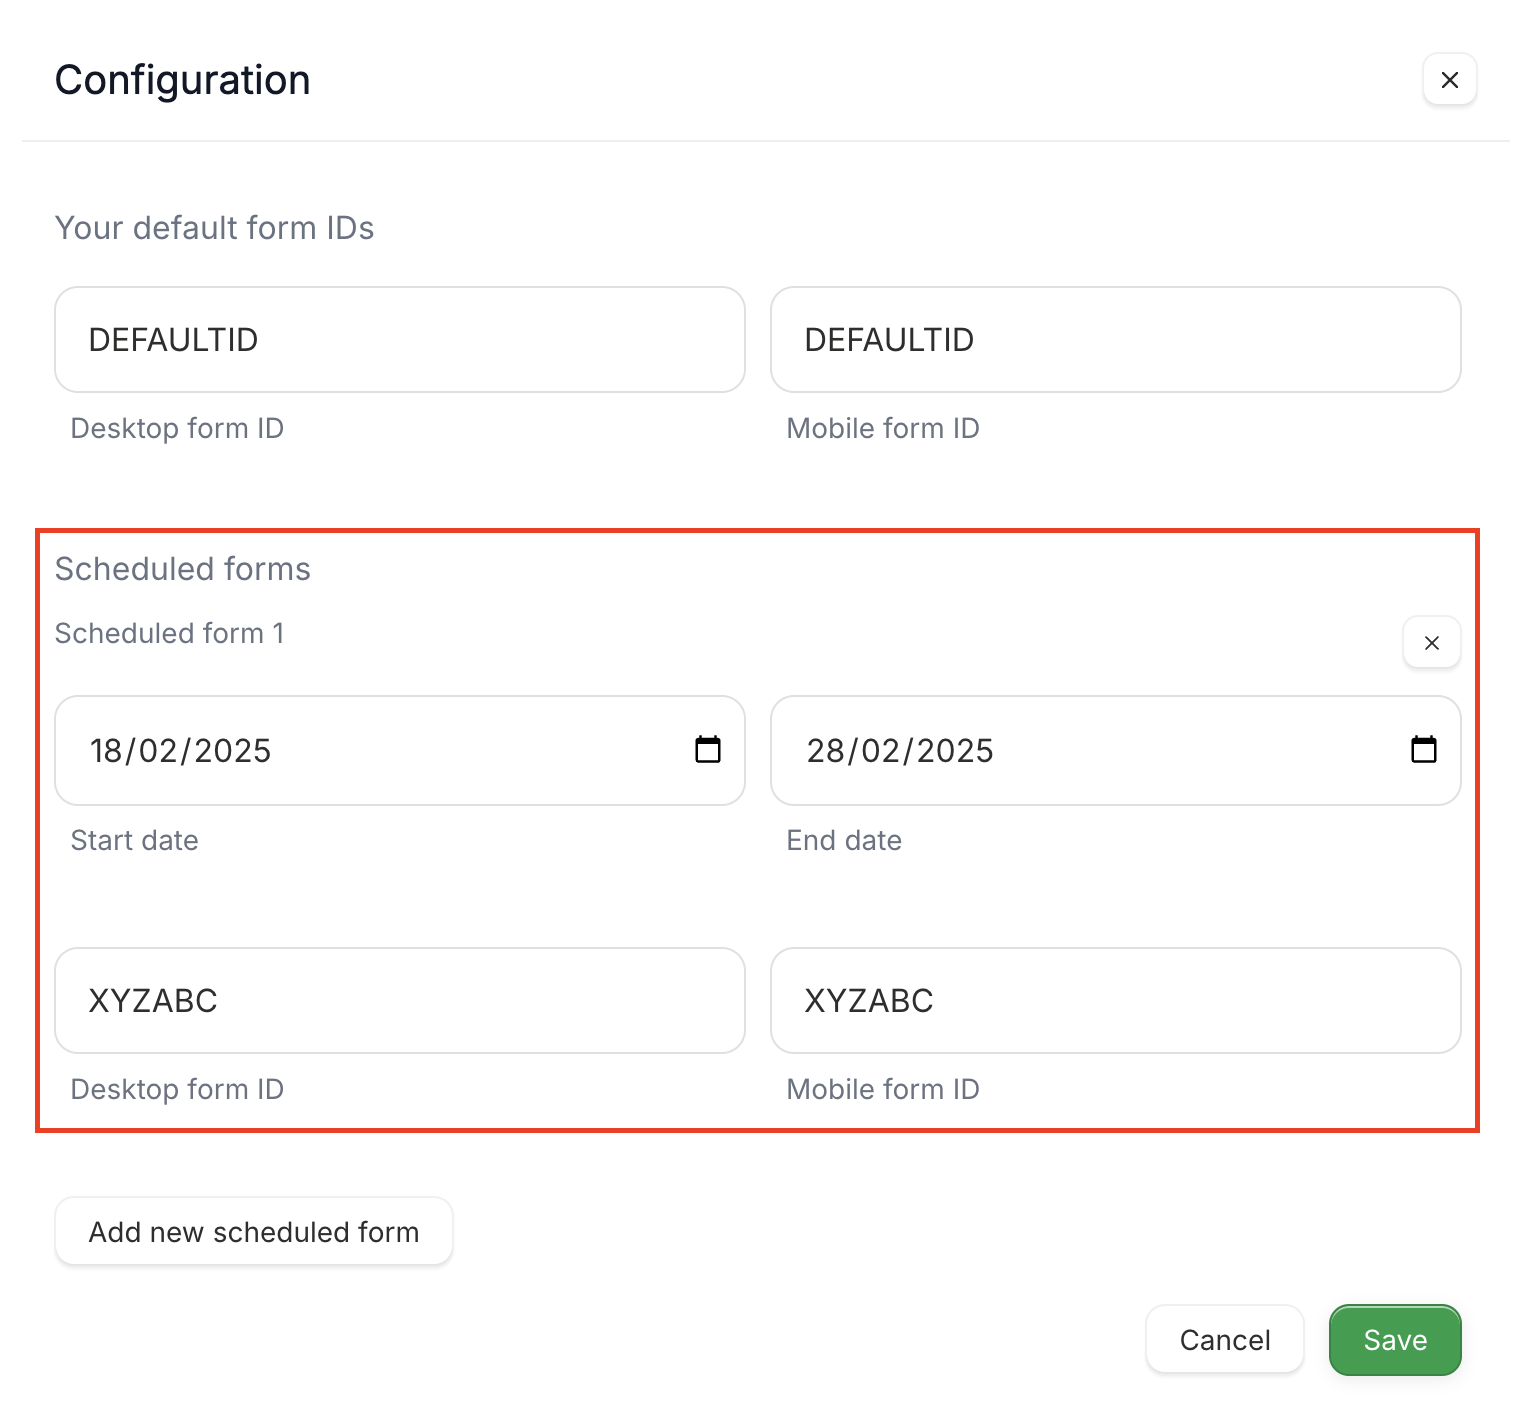
- Click on Save. Your scheduled form is now be used during the period between the start and end dates.
Article URL: https://help.instant.one/how-do-i-schedule-opt-in-forms-for-instant-predictive-opt-in
Keywords:
## Transactions Itemised Report
Instant offers a variety of reports for users to download and access. These reports provide valuable insights and data on transactions, payouts, and reconciliation.
The Transactions Itemised Report downloads the full list of individual transactions from the specified time range. This report contains:
- Balance Transaction Id
- Date Created
- Available On
- Currency
- Gross
- Fee
- Net
- Reporting Category
- Description
- Connected Account
Example

Other Reports
- Transactions Summary
- Payouts Itemised
- Payouts Summary
- Payouts Reconciliation Itemised
- Payouts Reconciliation Summary
Article URL: https://help.instant.one/transactions-itemised-report
Keywords:
## Integrating Instant Checkout into analytics providers - event tracking
This guide describes how to you can integrate Instant Checkout into analytics providers to ensure they are notified when an order is placed through Instant.
You may be familiar with injecting code into your order confirmation screen to send events to analytics platforms. Instant Checkout does not use your standard order confirmation screen, so this guide can assist with making sure that the events are sent through to the same analytics providers too.
This guide will describe how you can subscribe to an Instant order being placed and run custom javascript when an order is placed.
1. Start by placing this block of code in the header of your website to subscribe to the “instantOrderPlaced’ event.
The callback passed as the second parameter to the .on function will be run when an order has been placed.
(function waitForInstantJS() {
    if (window.InstantJS) {
        window.InstantJS.on('instantOrderPlaced', (data) => {
            // run your custom code here
        });
    } else {
        setTimeout(waitForInstantJS, 100); // Check for InstantJS every 100 ms
    }
})();
2. The code running where the “run your custom code” comment is, will now run when an order is placed.
The contents of the data parameter from the callback will be in the structure below.
InstantOrderPlacedItem schema:

{
  "price": number, // e.g. 10000 (smallest unit of currency)
  "name": string, // e.g. My Product
  "id": string, // e.g. ProductID
  "quantity": number // e.g. 5
}

InstantOrderPlaced schema:

{
    "email": string, // e.g. test@instant.one
    "first_name": string, // e.g. Bob
    "last_name": string, // e.g. Jane
    "phone": string, // e.g. +10000000000
    "street": string, // e.g. 1 Park Avenue
    "store_name": string, // e.g. My Store
    "city": string, // e.g. New York
    "region": string, // e.g. New York
    "postal_code": string, // e.g. 12345
    "country": string, // e.g. US
    "id": string, // e.g. 123456
    "grand_total": number, // e.g. 10000 (smallest unit of currency)
    "shipping_total": number, // e.g. 500 (smallest unit of currency)
    "tax_total": number, // e.g. 100 (smallest unit of currency)
    "discounts_total": number, // e.g. 1000 (smallest unit of currency)
    "subtotal": number, // e.g. 1000 (smallest unit of currency)
    "currency": string, // e.g. USD
    "coupon_code": string, // e.g. VIP10
    "merchant_id": string, // e.g. myid
    "store_code": string, // e.g. us
    "items": Array of InstantOrderPlacedItem items
}
An example of what InstantOrderPlaced can look like is below.
{
    "email": "test@instant.one",
    "first_name": "Instant",
    "last_name": "Demo",
    "phone": "+10000000000",
    "street": "1 Park Ave",
    "store_name": "My Store",
    "city": "New York",
    "region": "New York",
    "postal_code": "12345",
    "country": "US",
    "id": "000001450",
    "grand_total": 29668,
    "shipping_total": 0,
    "tax_total": 100,
    "discounts_total": 1000,
    "subtotal": 29668,
    "currency": "USD",
    "coupon_code": "VIP10",
    "merchant_id": "myId",
    "store_code": "us",
    "items": [
        {
            "price": 15674,
            "name": "Test Item 2",
            "id": "My Item ID",
            "quantity": 1
        },
        {
            "price": 13994,
            "name": "Test Item 2",
            "id": "My Item ID",
            "quantity": 1
        }
    ]
}
Example Use Cases
1. Sending data to Google Adwords
You may be using Google Adwords to track orders for SEO purposes, which can aid with attribution and analysis into performance marketing efforts. See below for an example of how you can utilise this custom integration method to send data via gtag to adwords.
(function waitForInstantJS() {
  if (window.InstantJS) {
      window.InstantJS.on('instantOrderPlaced', (data) => {
          gtag('event', 'conversion', {
             'send_to': 'AW-{conversion_id}/{conversion_label}',
             'value': parseFloat(data.grand_total).toFixed(2),
             'currency': data.currency,
             'transaction_id': data.id
          });
      });
   } else {
      setTimeout(waitForInstantJS, 100); // Check for InstantJS every 100 ms
  }
})();
2. Sending data to a custom analytics platform
You may wish to send data to a custom analytics platform that you use on your site, such as Hotjar, Fullstory, Heap Analytics or any other analytics platforms which Instant does not natively support.
To do this, you can utilise this custom integration method. See below as an example.
(function waitForInstantJS() {
  if (window.InstantJS) {
      window.InstantJS.on('instantOrderPlaced', (data) => {
          window.hj('event', 'Purchase Completed')
      });
   } else {
      setTimeout(waitForInstantJS, 100); // Check for InstantJS every 100 ms
  }
})();
3. Sending data in a custom format to Google Analytics 4
Instant already sends data to GA4 in a recommended structure. Please see here: https://help.instant.one/how-do-i-track-instant-purchase-events-with-ga4
However, you may wish to modify this structure for your needs.
To do this, you can utilise this custom integration method. See below as an example.
(function waitForInstantJS() {
  if (window.InstantJS) {
    window.InstantJS.on("instantOrderPlaced", (data) => {
      var event = {
        event: "purchase",
        ecommerce: {
          transaction_id: data.id,
          value: +(parseFloat(data.grand_total) / 100).toFixed(2),
          tax: +(parseFloat(data.tax_total) / 100).toFixed(2),
          shipping: +(parseFloat(data.shipping_total) / 100).toFixed(2),
          currency: data.currency,
          coupon: data.coupon_code,
          website_country: data.country,
          shipping_country: data.country,
          shipping_state: data.region,
          shipping_city: data.city,
          customer_type: "General",
          items: data.items.map(function (item) {
            return {
              item_id: item.id,
              item_name: item.name,
              price: +(parseFloat(item.price) / 100).toFixed(2),
              quantity: item.quantity,
            };
          }),
        },
      };
      window.dataLayer.push({
        ecommerce: null,
      });
      window.dataLayer.push(event);
    });
  } else {
    setTimeout(waitForInstantJS, 100); // Check for InstantJS every 100 ms
  }
})();
Article URL: https://help.instant.one/subscribe-to-order-placed-event
Keywords:
## Why might some attribution tools be missing cart & checkout flow conversions?
If you use UTM-based reporting, you may notice that Abandoned Cart and Abandoned Checkout flows don't always show full click attribution in tools like Google Analytics, Triple Whale or Shopify. This is caused by how Shopify handles checkout URLs.
## Why UTMs Can Drop on Checkout Links
Instant AI includes UTM parameters on every email link. However, Shopify can strip UTMs from URLs that point directly to the checkout. When this happens, external analytics tools can't track the click event and may under-report revenue or clicks for these flows. This only affects checkout links. Storefront links such as to your home-page keep UTMs intact. Instant AI's in-app reporting is not affected because we use first-party click and open tracking rather than relying solely on UTMs.
The flows most impacted are Abandoned Cart and Abandoned Checkout. These flows are designed to maximise conversions by taking shoppers straight to the purchase page and auto-applying any configured coupon. The trade-off is that checkout links are more likely to lose UTM data in external tools. If you aren't using external tools for measuring attribution and relying on these UTM parameters, we recommend continuing to link to the checkout (default behaviour) to optimise conversions.
## How to Ensure Accurate UTM Tracking
If your reporting depends heavily on UTMs, our team can switch your flows to use storefront links instead of checkout links. This preserves UTMs and restores consistent attribution across third-party tracking tools.
To request this change, contact **help@instant.one** or your CSM. Once updated, UTM tracking should appear normally in your external reporting within around seven days.
If you're unsure whether this affects your store, look out for signs such as Abandoned Cart or Checkout appearing under-reported in third-party tools, while Abandoned Browse appears disproportionately higher. Your CSM can help review your account and confirm whether storefront-linking is the right approach for your reporting setup.
---
## Why Are Shoppers Being Redirected to the Homepage from Instant AI Checkout Links?
This may be because a shopper's cart has automatically expired due to security features related to payment gateways. Additionally, if a shopper creates a new checkout session and then clicks on an older checkout link, they may be redirected to the homepage. This affects every platform and there is no easy way to see how often it occurs.
Article URL: https://help.instant.one/why-utms-for-links-to-checkout-dont-always-appear-in-third-party-tracking-tools
Keywords:
## How can I load Instant's pixels via Google Tag Manager for a Custom Store?
Instant supports integration with custom or headless storefronts — including sites built using frameworks like React, Next.js, or PWAs, and eCommerce platforms such as WooCommerce, Salesforce Commerce Cloud, or custom APIs.
If you’re using Google Tag Manager (GTM) to manage your tracking scripts, you can install Instant’s Pixels entirely through GTM, eliminating the need to directly modify your site’s source code.
Please note that incorrect GTM configuration may prevent Instant from identifying visitors or tracking key events.
Overview
Instant’s tracking for a Custom Store consists of two parts:
| Part |
Purpose |
GTM Implementation |
| Theme Pixel |
Identifies visitors and tracks on-site behaviour (page views, product views, cart adds). |
|
| Customer Events Tracking |
Sends customer events (e.g. add to cart, checkout started) to Instant, which are then forwarded to your connected marketing platform (e.g. Klaviyo). |
Configured via GTM event triggers. |
Add the Theme Pixel via GTM
The Theme Pixel loads the Instant library (instant.js) onto your website, allowing Instant to identify anonymous shoppers.
Step 1: Inject the Theme Pixel via GTM (Custom HTML Tag)
- Go to your Google Tag Manager Dashboard.
- Click on Tags > New > Tag Configuration > Custom HTML.
- Paste the following script and click Save.
{% raw %}<script>
!function(i,n,s,t,a,u,d){
    i.InstantConfig = i.InstantConfig || {};
    d = i.InstantJS = i.InstantJS || {};
    d.trackQueue = [];
    d.track = function() { d.trackQueue.push(arguments) };
    u = n.createElement(s);
    u.async = true;
    u.src = t;
    a = n.getElementsByTagName(s)[0];
    a.parentNode.insertBefore(u, a);
}(window, document, 'script', 'https://cdn.instant.one/instant.js?siteId={{SITE_ID}}');
</script>{% endraw %}
💡 This ensures InstantJS loads globally and initialises as soon as possible in the page load sequence.
Step 2: Create Data Layer Variables for Custom Events
To send events from your site through GTM to Instant, GTM needs to receive event payloads via the dataLayer.
If your site already pushes data to the dataLayer, you can reuse those. Otherwise, you’ll need to add new pushes for key eCommerce events.
Example: Pushing Events to the Data Layer
When a customer performs an action (e.g., adds an item to their cart), push an event into the dataLayer with its payload:
window.dataLayer = window.dataLayer || [];
window.dataLayer.push({
  event: "ITEM_ADDED_TO_CART",
  event_payload: {
    provider: "KLAVIYO",
    event: {
      CheckoutURL: "/checkout",
      Items: [
        {
          ProductName: "Wireless Blender",
          Quantity: "1",
          ItemPrice: "59.99",
          ImageURL: "https://example.com/blender.jpg"
        }
      ]
    }
  }
});
The event_payload object here corresponds to the same structure you would normally pass directly to Klaviyo. Please ensure this is the same as the data structure you provide to Klaviyo directly.
Repeat this for all the events you want to track. At a minimum, Instant requires:
-
PAGE_VIEWED
-
COLLECTION_VIEWED
-
PRODUCT_VIEWED
-
ITEM_ADDED_TO_CART
-
CART_VIEWED
-
CHECKOUT_STARTED
Step 3: Create Data Layer Variable in GTM
In GTM:
-
Go to Variables → New → Variable Configuration → Data Layer Variable.
-
Set Variable Name to event_payload.
-
Click Save.
Step 4: Create Custom Event Triggers in GTM
Now, create one trigger per event type you plan to send to Instant.
For example:
-
Go to Triggers → New → Trigger Configuration → Custom Event.
-
Set the Event Name to match your dataLayer event (e.g., ITEM_ADDED_TO_CART).
-
Select All Custom Events.
-
Click Save.
Repeat for:
-
PAGE_VIEWED
-
COLLECTION_VIEWED
-
PRODUCT_VIEWED
-
ITEM_ADDED_TO_CART
-
CART_VIEWED
-
CHECKOUT_STARTED
Step 5: Create Instant Event Tags in GTM
For each event type, create a new tag that sends the dataLayer payload to Instant.
-
Go to Tags → New → Tag Configuration → Custom HTML.
-
Paste the following code:
{% raw %}<script>
InstantJS.track('SHOPIFY_EVENT', {{raw_event}});
</script>{% endraw %}
Replace:
-
{{EventName}} → The event type, e.g. ITEM_ADDED_TO_CART
-
{{event_payload}} → The GTM variable you created earlier (event_payload)
Assign the corresponding trigger (e.g. trigger for ITEM_ADDED_TO_CART). And click Save.
Repeat this for each of your tracked events.
We understand that there are many different ways to set up GTM, so our support team are always happy to help.
Please reach out to Instant support at help@instant.one, or your dedicated customer success manager for further assistance if needed.
Article URL: https://help.instant.one/how-can-i-add-instant-pixels-via-gtm-for-custom-stores
Keywords:
## Send campaigns in your recipients' local timezone
If you have shoppers spread across multiple timezones, a single send time means some recipients get your email at 9am and others get it at 3am. Sending in your recipients' local timezone fixes that with one campaign.
Why use it:
- Every shopper receives your email at a sensible local hour, which lifts open rates in regions that would otherwise get the email overnight.
- You only build one campaign. No cloning per region, no separate sends to manage.
- Engagement stays consistent across your audience, so reporting reflects content performance rather than a timezone lottery.
Choosing a timezone
When you schedule a campaign, the timezone dropdown has two options:
- My timezone (default). Everyone receives the campaign at the same absolute time, based on your store's timezone in Shopify. You can check your store timezone by hovering the globe icon at the bottom of the dashboard.
- Recipient's timezone. Each shopper receives the campaign at the chosen time in their own local timezone.
How sending works in recipient's timezone
If you schedule a campaign for 5pm in recipient's timezone, sending begins as soon as the clock hits 5pm somewhere in your customer base. The campaign moves to Sending at that point.
Each shopper then receives the email when 5pm arrives in their local timezone. Depending on the spread of your audience, the campaign can stay in Sending for up to 24 hours. Once every shopper has been dispatched, it moves to Sent.
How we work out a shopper's timezone
We use each shopper's location, based on their address and any information enriched from your Shopify and Klaviyo integrations. If we can't determine a shopper's location, we fall back to your store's timezone.
What happens if the time has already passed
If a shopper's local 5pm has already passed by the time you schedule, they receive the campaign at your store's 5pm instead.
Things to know
- You can't cancel a campaign once it's in Sending. Sending starts the moment the scheduled time hits the earliest timezone in your audience.
- This option isn't available for A/B test campaigns.
- This applies to email only. SMS campaigns send at your store's timezone.
Article URL: https://help.instant.one/send-campaigns-in-your-recipients-local-timezone
Keywords:
## How to use Custom Event Mapping
By default, Instant AI uses Shopify's standard product fields (price, image, name, description) in every email. For most stores, that's exactly right and you don't need to do anything.
Custom Event Mapping is for stores where Shopify's defaults don't tell the full story. You tell Instant which custom data to use for a given piece of product info, and from then on every email shows that custom data instead of the Shopify default. For example, if you map your member pricing, every email shows the member price instead of the public catalog price. Set it up once and it applies everywhere.
Should you use it?
Use Custom Event Mapping if:
- You sell personalised or custom products (mugs, prints, canvases, jewellery) where the standard product image is a generic mockup and the real product image lives somewhere else
- You run member, club, or wholesale pricing that differs from the public Shopify price
- You have email-specific creative, like a lifestyle shot stored in a metafield rather than the catalog primary image
- You have alternative product names or descriptions stored in metafields that you'd rather use in emails
- You store rich product data in JSON metafields (e.g. pricing objects from an external system) and want to pull a specific value from it
You don't need it if your standard Shopify product fields already show what you want shoppers to see in emails. There's nothing to set up and Instant will work as it always has.
Where to find it
Go to Configuration > Email Settings > Event Mapping.
Create a mapping
There are four steps in the setup wizard.
1. Choose field
Select the standard Shopify field you want to replace. The available fields are:
- Price
{price}
- Compare at price
{compareAtPrice}
- Primary image
{primaryImage}
- Name
{name}
- Description
{description}
2. Pick your source
Choose where Instant should pull the replacement data from. Today the only source is Product metafield.
You'll need to enter:
- Property Namespace: the namespace of your Shopify metafield (e.g.
Club Price)
- Property Key: the key of the metafield (e.g.
price_something)
- Type: select Single value for plain values, or JSON if your metafield stores structured JSON data
If you select JSON, a JSON path field appears. Use dot notation to point to the value you want. For example, use amount for {"amount":"89.0"}, or price.amount for {"price":{"amount":"89.0"}}.
3. Set the fallback rule
Choose what should happen if a product doesn't have the metafield, or the metafield is empty:
- Use the default Shopify value: Instant will render the standard Shopify field as normal, exactly as if no mapping existed.
- Suppress the field: Instant will leave the field blank with no default or placeholder.
4. Confirm
Give the mapping a name (e.g. "Club Price") and review the summary. You'll see the field you're replacing, the data source, the fallback behaviour, and which flows it applies to.
Click Confirm to save.
Manage your mappings
Saved mappings appear in the Mappings table on the Event Mapping tab.
- Status: use the toggle to turn a mapping on or off without deleting it. New mappings start in the off state, so flip the toggle on when you're ready for the mapping to apply to live emails.
- Edit: click the actions menu (⋯) and select Edit mapping to update any step.
- Delete: click the actions menu (⋯) and select Delete to remove the mapping permanently.
Changes apply as soon as a mapping is live. There's no need to republish flows or campaigns.
FAQ
Where does the metafield data come from? Instant pulls metafields directly from Shopify. Make sure your metafield is exposed to the Storefront API and has values populated on the products you want the mapping to apply to.
Which emails does a mapping apply to? All flows. Once a mapping is turned on, the replaced field uses your custom data everywhere it appears in flow emails.
What happens if a single product is missing the metafield? The fallback rule you set in step 3 takes over for that product only. Other products with the metafield populated will continue to use the mapped value.
Can I have multiple mappings on the same field? No. Each Shopify field (e.g. {price}) can only have one active mapping at a time. If you want to change the mapping on a field, edit the existing one or delete it and create a new one.
What happens if I delete a mapping? The standard Shopify field returns to being used in emails immediately. Deleting can't be undone, so if you only want to pause a mapping use the status toggle instead.
Article URL: https://help.instant.one/how-to-use-custom-event-mapping
Keywords:
## What is Instant Audiences?
Instant Audiences helps brands to re-market to shoppers who abandon their website.
Instant Audiences remembers your opted-in shoppers for longer, keeping Klaviyo informed along the way, allowing you to re-target them.
This turns abandoned carts into your biggest revenue driver.
When an opted-in subscriber visits a website and fails to make a purchase, Instant Audiences identifies this shopper and notifies a merchant’s email marketing platform, allowing the merchant to trigger an automated email to bring that shopper back to the website to complete their purchase.
Why use Instant Audiences?
- Increased revenue/sales.
- Better ROI on all types of marketing campaigns.
- Increased return-on-ad-spend (ROAS).
- 2-3x more abandoned browse, add to cart and checkout started events sent to your email marketing software.
- Consistent >50-100% more abandoned flow revenue through your email marketing software.
Article URL: https://help.instant.one/instant-audiences
Keywords:
## How to Keep Your Campaigns Compliant with Subscriber Consent
Email regulations (and your sender reputation) require that marketing campaigns are only sent to people who’ve explicitly opted in. Instant AI is designed to protect you by making All Marketing Subscribers the default and recommended option for all promotional campaigns.
There are two available lists to send Campaigns with Instant AI
-
All Marketing Subscribers → Only people who have explicitly subscribed to receive marketing. Best practice and legally safe. Always use this for promotions, launches, and seasonal campaigns.
-
All Emails → Everyone in your contacts who has not unsubscribed. This can include people who gave their email during checkout but never opted into marketing. Use this only for operational, non-marketing communications.
How this compares to Klaviyo
In Klaviyo, you normally build campaign audiences using filters. The key difference is whether you include both consent and subscription status:
Instant AI → All Marketing Subscribers
= Klaviyo segment: Marketing consent exists AND is Subscribed
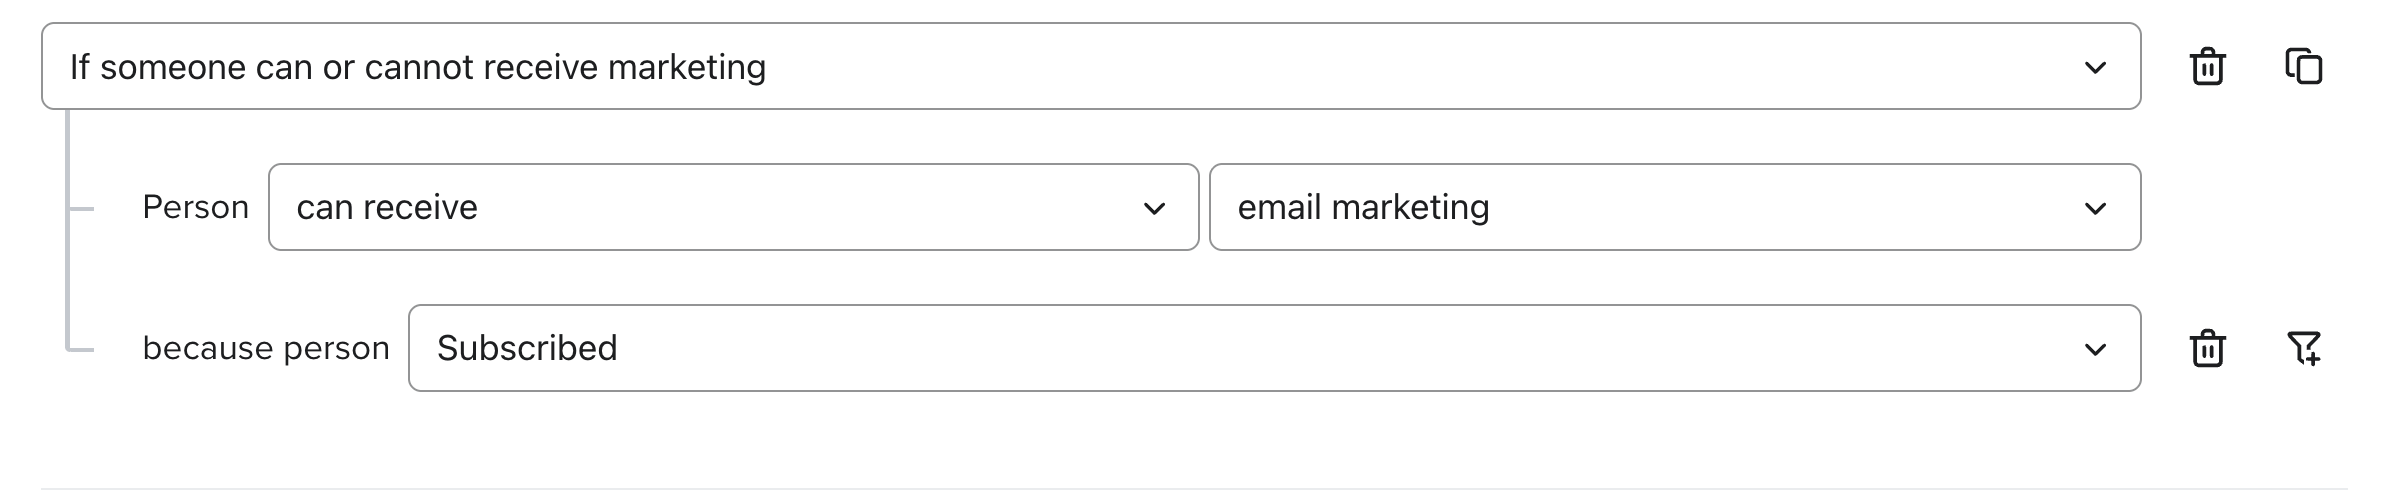
Instant AI → All Emails
= Klaviyo segment: Marketing consent exists (without “is Subscribed”)

Common mistake in Klaviyo:
Merchants often build a segment with “Marketing consent exists” but forget to add “is Subscribed.” This means they’re accidentally sending to contacts who haven’t given marketing permission. If you’ve been doing this in Klaviyo, Instant AI will look stricter — by design.
How to check your Klaviyo setup
-
Go to Lists & Segments in Klaviyo.
-
Open the segment you use for campaigns.
-
Look for these conditions:
-
If it shows only “Marketing consent exists”, this matches All Emails in Instant AI.
-
If it shows “Marketing consent exists AND is Subscribed”, this matches All Marketing Subscribers in Instant AI.
-
Update your filters if needed to ensure you’re only emailing true marketing subscribers.
FAQ's
Which audience should I use for my campaigns?
Always use All Marketing Subscribers for promotional or marketing campaigns. This ensures you only contact people who have explicitly opted in, which is required for compliance and best for engagement.
When would I ever use All Emails?
Only for operational or service-based messages (e.g. account updates, invoices, company updates, or important notices). It should not be used for promotions or marketing.
Why is my audience smaller in Instant AI compared to Klaviyo?
Instant AI enforces compliance by default. If you previously used a Klaviyo segment with only “Marketing consent exists”, that list likely included people who never subscribed. Instant AI excludes those contacts, so your audience may appear smaller — but it is cleaner, safer, and more effective.
What’s the difference between “Marketing consent exists” and “is Subscribed” in Klaviyo?
Marketing consent exists means the contact has given their email, often at checkout. It does not guarantee they opted into marketing. Is Subscribed means they actively confirmed subscription. To match All Marketing Subscribers in Instant AI, both conditions must be used together.
Article URL: https://help.instant.one/how-to-keep-your-campaigns-compliant-with-subscriber-consent
Keywords:
## How does Instant AI keep customer subscriber status up to date and compliant?
Instant AI only sends emails to people who’ve entered their email address on your site and are currently subscribed to email marketing across every platform that you have. This ensures complete compliance between all of your channels that are actively synced in real time.
Before sending any email, we check in real time to validate if they’re still subscribed in every platform, including:
- Instant AI
- Shopify
- Klaviyo (if connected)
For every profile, we gather the latest subscription status and prioritise the most recent update and use this to validate we are still compliant to send. If they’re unsubscribed in any of those places, we don’t send the email and will subsequently update all systems.
This advanced integration ensures that every channel is in sync and compliant to be sending emails together. For more information about how we automatically import shoppers from all systems read our article here.
What if I use an ESP other than Klaviyo?
If you’re using another platform as your ESP that isn't Klaviyo, it's critical to ensure that the platform is actively syncing all subscriber events back to Shopify. We have a robust integration with Shopify to ensure that the marketing email subscription is in sync. As long as your ESP is updating Shopify, we will continue to respect all subscription updates in Shopify, and equally this will ensure your alternative ESP is updating their subscription status if there are updates from Instant AI. To avoid mismatched data, make sure your email platform keeps Shopify in sync and all subscriber status' will remain compliant.
FAQ’s
- What if someone unsubscribes from a Klaviyo or another email provider I'm not integrated with? If you use Klaviyo, we automatically detect that unsubscribe and stop sending. If you use another platform (like Omnisend), we’ll only know about the unsubscribe if it’s synced to Shopify. That’s why it’s essential your ESP updates subscriber status in Shopify. Once you ensure that your ESP is updating Shopify, you can trust that Instant will keep the data compliant and in sync
- Can someone be re-identified if they unsubscribed? We may still recognise who they are on-site using past behaviour, but we won’t send them any emails if they are unsubscribed in any system we check. We will identify them to check if they are their subscription status and won't email. If they explicitly re-subscribe in the future we can update their subscription in all platforms .
- How does Instant manage suppressed profiles in Klaviyo?
By default, if a profile is suppressed in Klaviyo Instant won't email them. Suppressed contacts are managed like unsubscribed contacts and won't be contacted, however we won't sync this data to Shopify. In the instance you've bulk suppressed profiles to manage billing concerns in Klaviyo and want to unsuppress them in Instant please contact your Customer Success Manager or help@instant.one for support to unsuppress profiles in bulk
Article URL: https://help.instant.one/how-does-instant-ai-manage-subscriber-status
Keywords:
## Seasonality and ROI
Learn how seasonality impacts ROI and how you can get the most out of Instant.
An investment into your long term eCommerce success
Seasonality of sales is a foundation of eCommerce driven by changes in customer behaviour across the year. Given the strong influence of seasonality, brands should understand that the revenue uplift delivered by Instant (ie return on investment or ‘ROI’) will also vary across the year — it’s therefore critical to take a ‘lifetime’ view of ROI across extended time periods rather than focusing on short term changes.
Our newly released ‘Projected Future Revenue’ feature shows the forecasted revenue uplift from using Instant in future months, helping you get a sense of the ROI you can expect across the year.
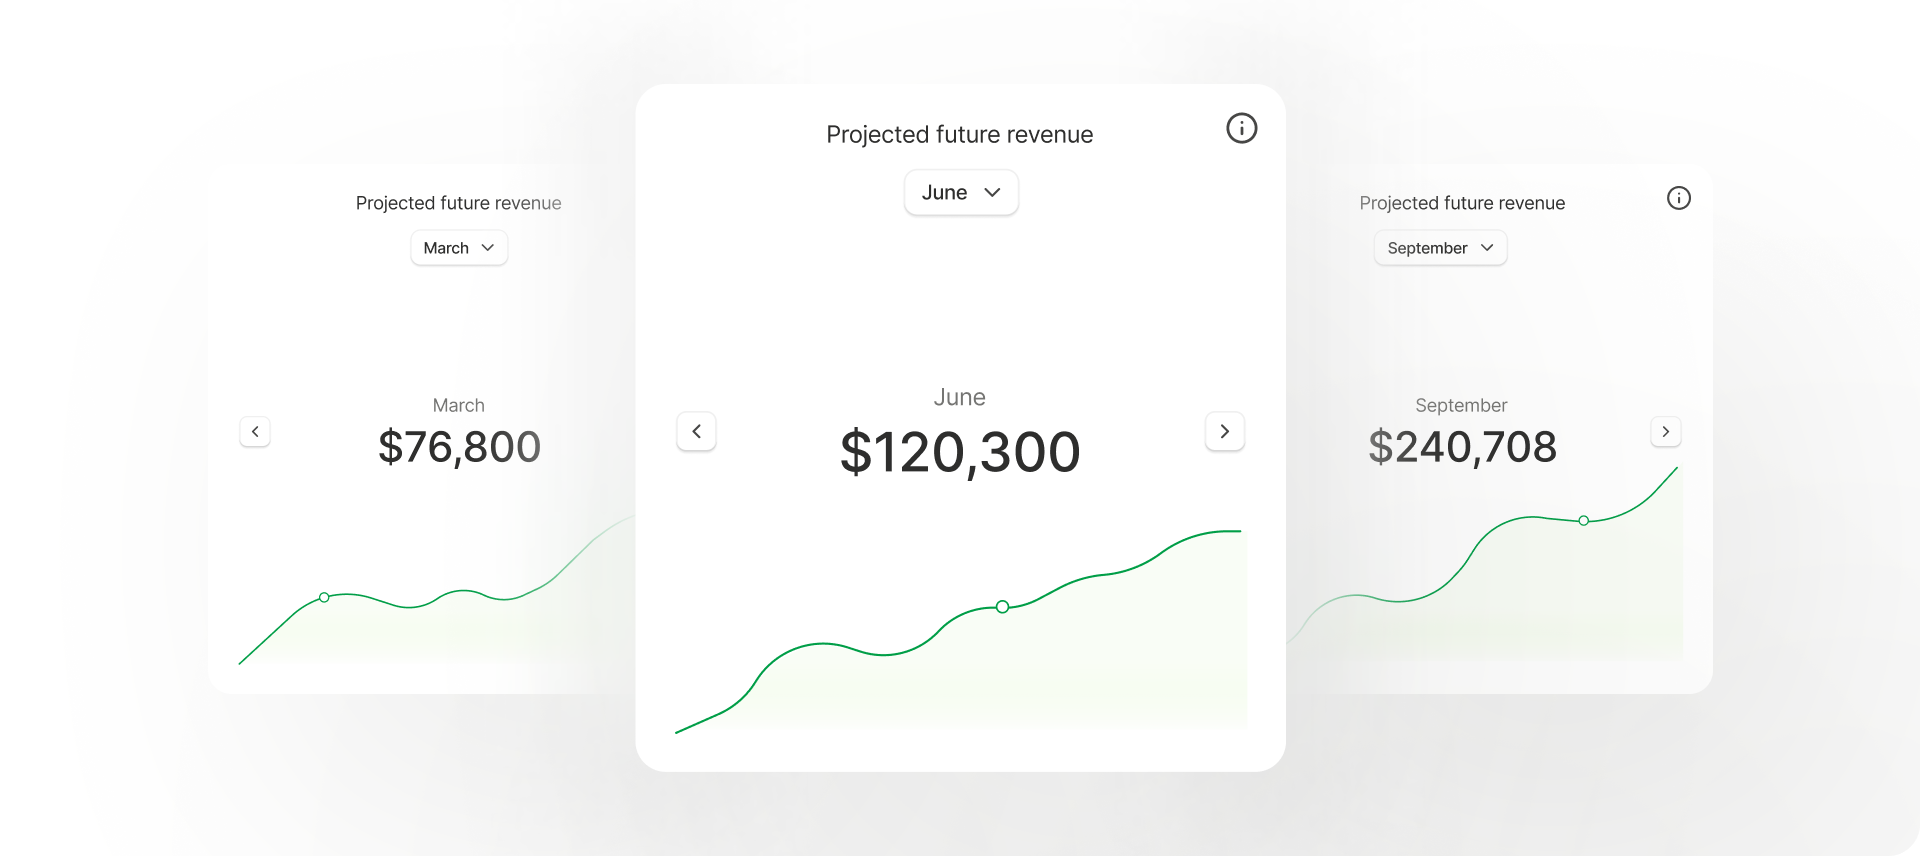 Using Instant to maximise sales is crucial — even during quiet periods!
Instant’s core value is being able to identify return shoppers that would otherwise be anonymous. During a busy sales period, there are of course significantly more shoppers so identifying as many of them as possible is critical to maximise sales.
That’s why it’s so important to use Instant to identify loyal shoppers even during quiet periods — whenever these shoppers return to your website, Instant’s unique/proprietary technology will be able to pick up where they left off so you can re-target them, maximising revenue.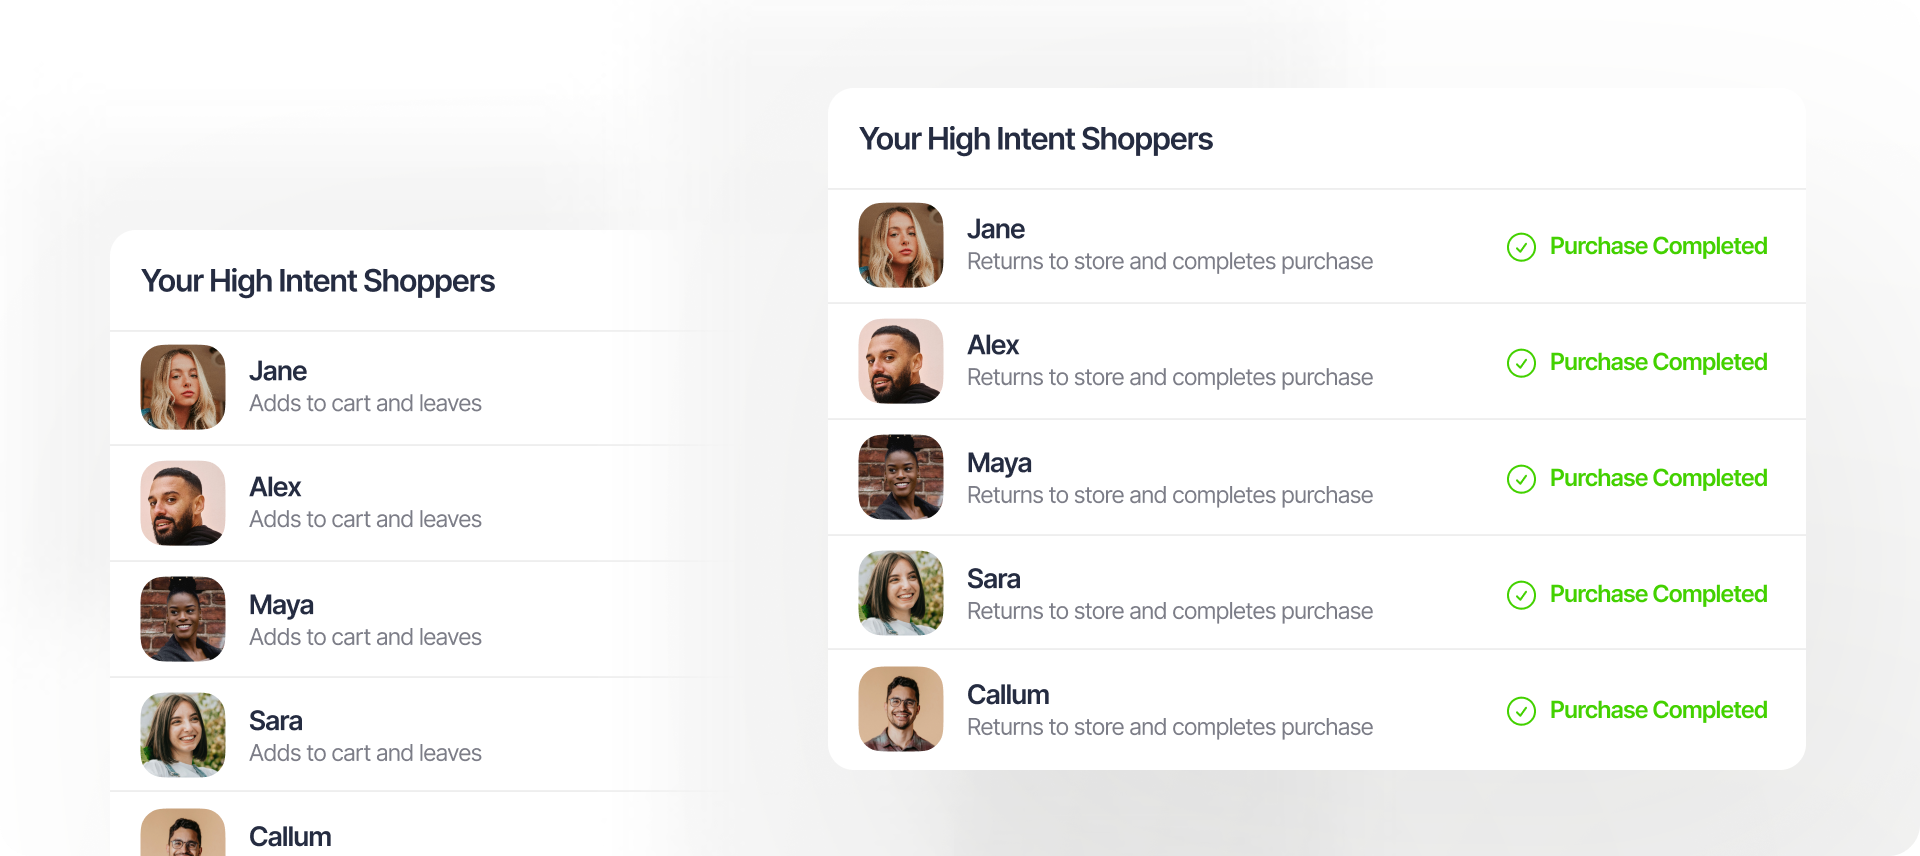
Key seasonal trends and illustrations of how they impact sales
Seasonal sales trends vary across retail sectors but typically occur around:
- Holiday peaks – major shopping holidays like Black Friday, Cyber Monday, and Christmas drive massive spikes in consumer spending across October and November.
- Summer/winter seasons – seasonal shifts around the start and end of summer and winter drive sales, eg swimwear sales fall off as winter begins.
- Industry specific trends — some sectors experience unique seasonality, such as fitness and wellness booming in January (New Year's resolutions!) or outdoor gear in spring.
Below are real examples of revenue uplift projections from brands using Instant over the next 12 months (Feb ‘25 to Jan ‘26), illustrating the impact of seasonality:

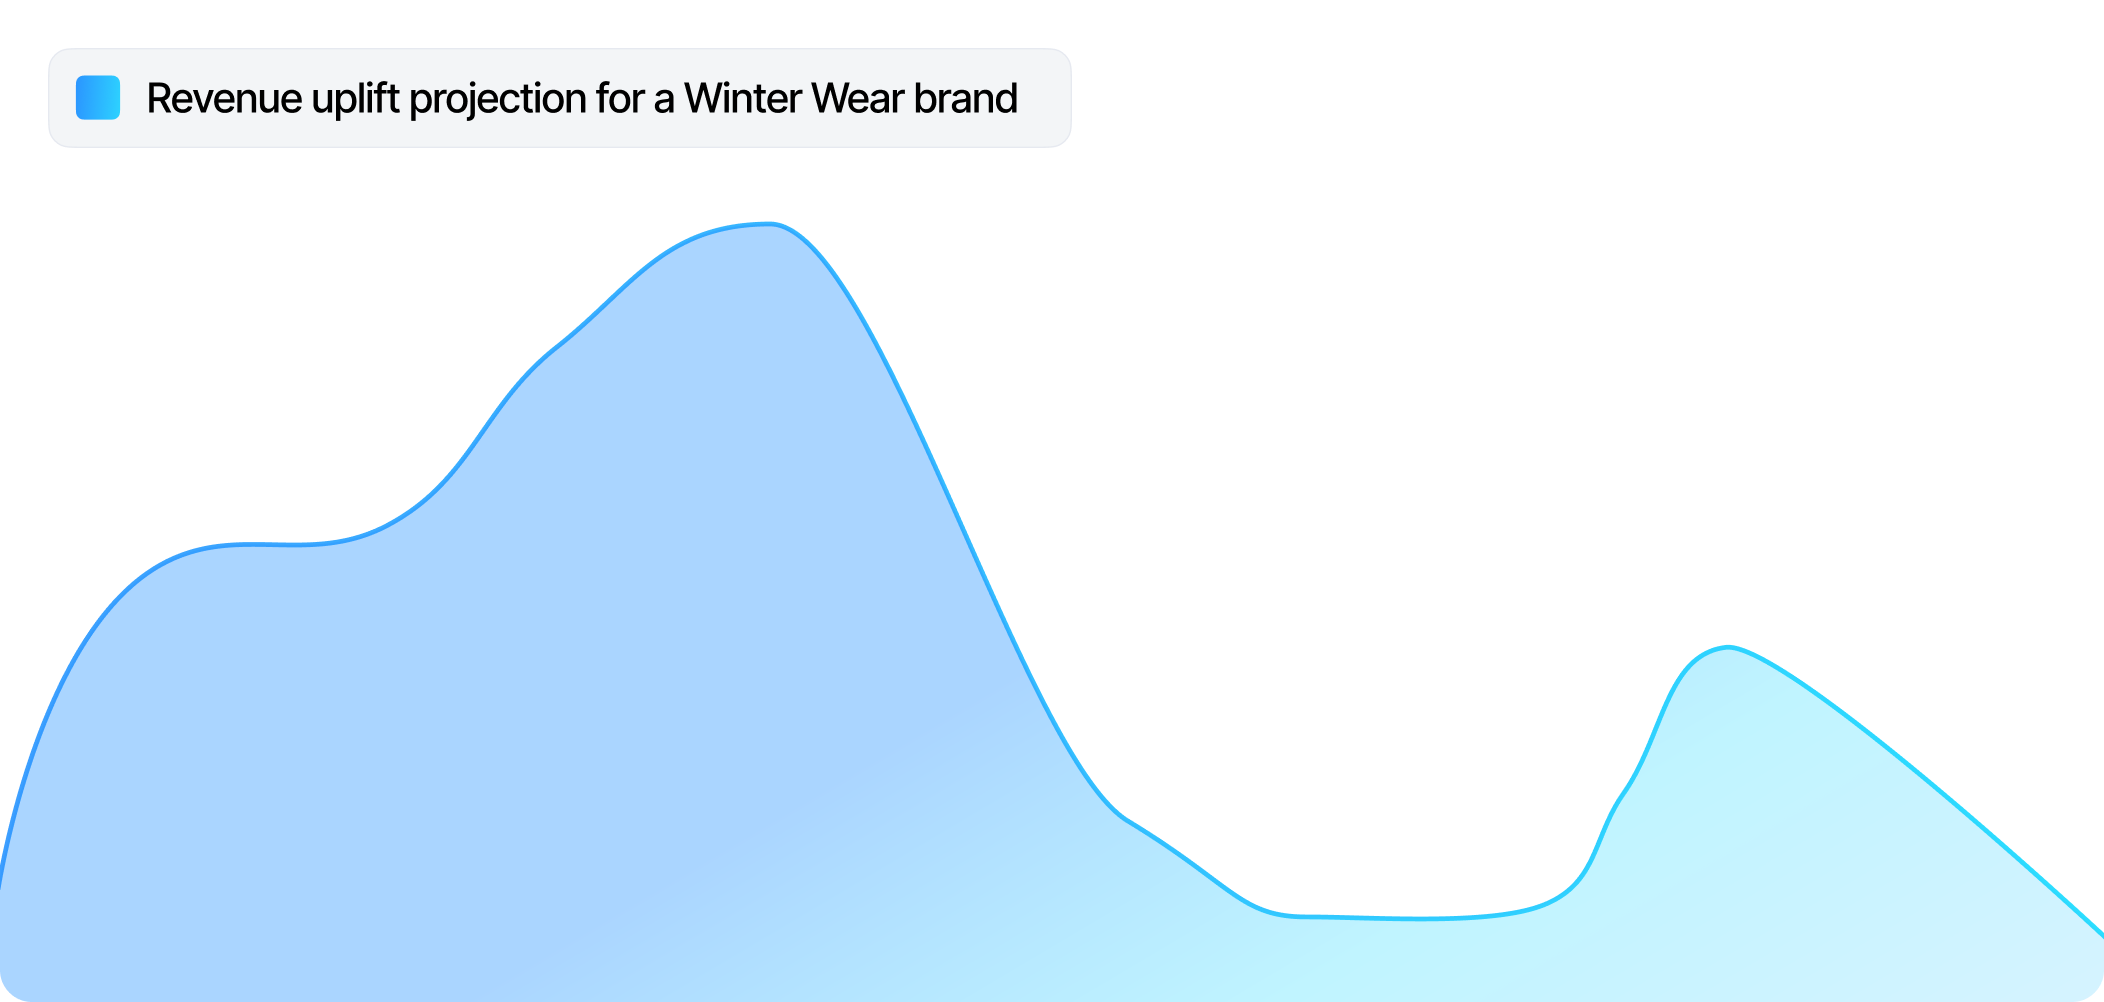
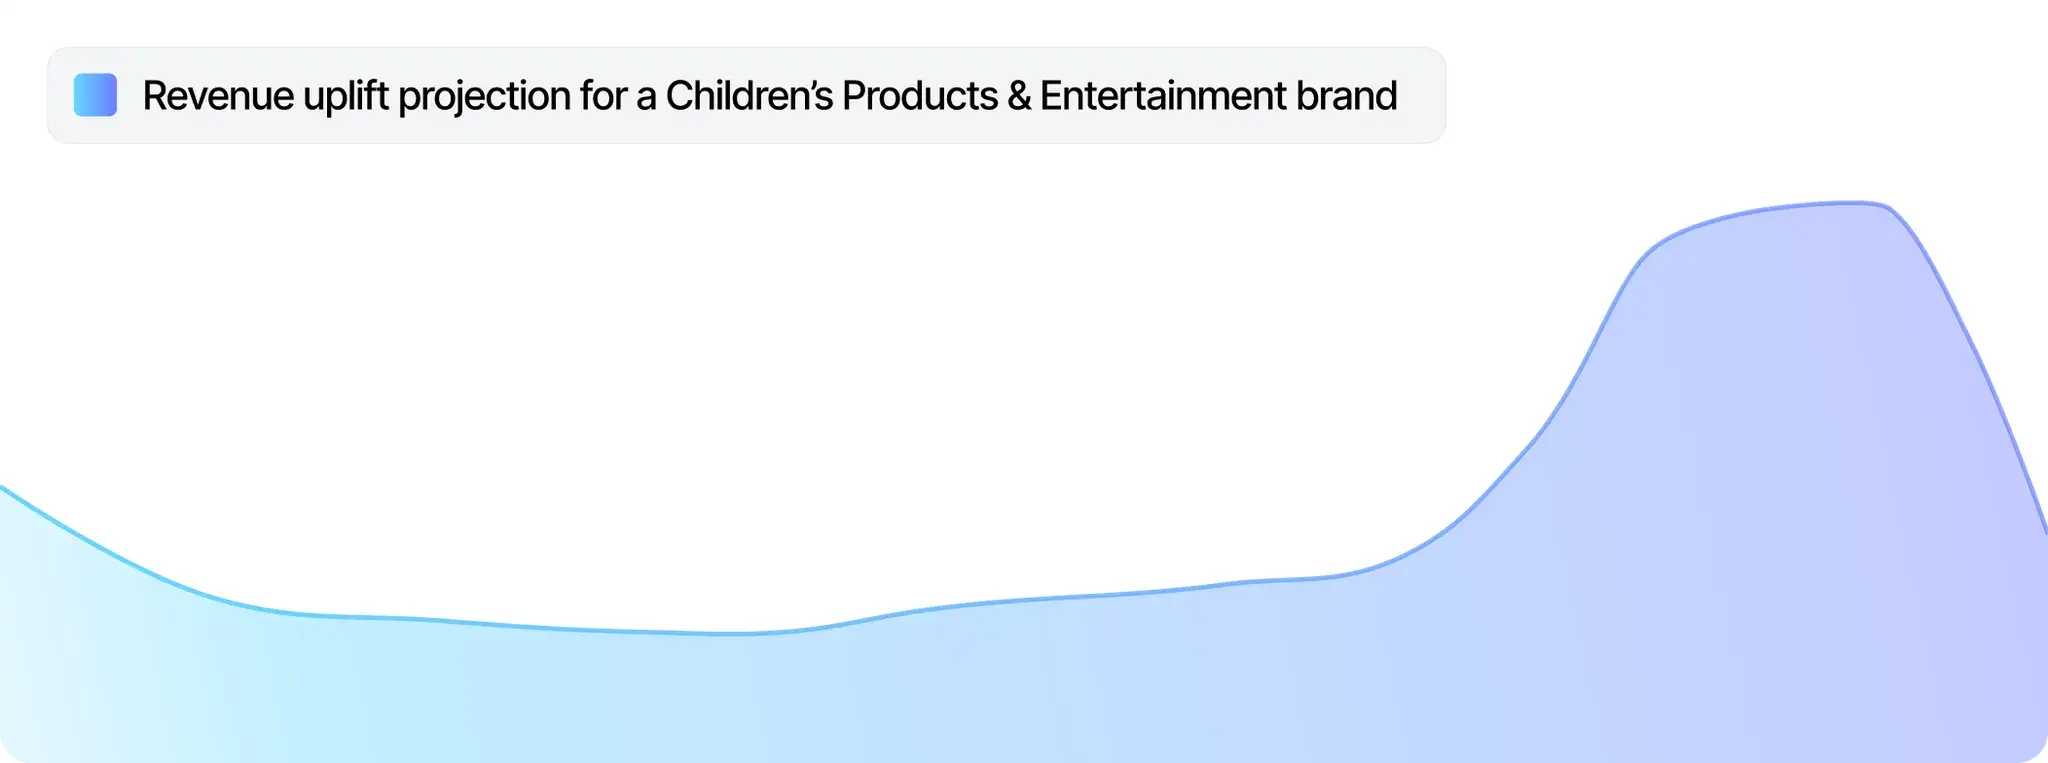
Are you a new customer wanting to learn more? Book a demo here!
Already a customer and wanting to maximise your email marketing conversion during quieter months? Book a meeting with your Customer Success manager!
Article URL: https://help.instant.one/seasonality-and-roi
Keywords:
## Using Instant Audiences with a Custom Store
Instant has native integrations into platforms like Shopify and BigCommerce. However some sites may be headless sites such as a PWA / React app - where the frontend is hosted separately to the back office platform. Or, you may be running an eCommerce store on an alternative platform like Salesforce, WooCommerce etc.
For these websites, Audiences will need to be integrated through a custom integration. There are detailed instructions for:
- Using Instant Audiences with a WooCommerce Store
- Using Instant Audiences with a Neto Store
- Using Instant Audiences with a Shopify Headless Store
If your custom build is not covered by these guides, please keep reading below!
Please contact your customer success manager if you run into any issues - we are happy to guide you or your developers through this implementation if needed.
Step 1: Installing Instant's Pixel
The first step of the integration process requires adding Instant's pixel to your site. This allows Instant to identify anonymous shoppers who visit your website.
- If you're currently onboarding onto the product, your pixel can be found in the Connect Custom Store step.
- If you have already onboarded onto the product, proceed to the Instant dashboard and go to Configuration > Select Custom . You will see a pixel underneath the Custom section.
- Add this pixel to the <head> tag of your website's HTML.
Step 2: Tracking Customer Events
The code snippets below are example track events.
They are intended as a reference — copying and pasting them directly may not work as-is.
After implementing these events in the correct places, make sure you're passing all the necessary data used in your email templates.
Step 3 walks you through this process.
Event triggers determine when Instant interaction events are sent and contain the payload data for Klaviyo.
- Throughout your website, where you would be sending events to Klaviyo, also send them to Instant Audiences by copy pasting the following snippet just below. See examples below.
window.InstantJS.track("EVENT_TYPE", [{
    provider: "KLAVIYO",
    event: EVENT_DATA
}]);
- Replace EVENT_TYPE with the type of event you wish to send.
- Replace EVENT_DATA with the data you'd like to send to Audiences. Audiences will then send this data through to your marketing integrations such as Klaviyo. Please note that the structure of this event data payload does not matter. Audiences will simply forward this payload through to Klaviyo.
Note that the available events are as follows:
- PAGE_VIEWED
- COLLECTION_VIEWED
- PRODUCT_VIEWED
- ITEM_ADDED_TO_CART
- CART_VIEWED
- CHECKOUT_STARTED
We recommend adding adding the following three events at a minimum:
- PRODUCT_VIEWED — this will trigger a Browse Abandonment flow
- ITEM_ADDED_TO_CART — this will trigger a Cart Abandonment flow
- CHECKOUT_STARTED — this will trigger a Checkout Abandonment flow
Example code snippets for these events are shown below.
Example: Checkout started events
To track when a customer starts the checkout flow, you'll need to execute the following JavaScript code as soon as someone visits the checkout page. The payload data serves as a placeholder to demonstrate the required data structure for Instant Audiences.
window.InstantJS.track("CHECKOUT_STARTED", [
  {
    provider: "KLAVIYO",
    event: {
      CheckoutURL: "",
      Items: [
        {
          ProductName: "",
          Quantity: "1",
          ItemPrice: "19.95",
          ImageURL:
            ""
        },
        {
          ProductName: "",
          Quantity: "1",
          ItemPrice: "221.95",
          ImageURL:
            ""
        },
      ],
    },
  },
]);
Example: Add to cart events
To track when a customer adds an item to their cart, you'll need to execute the following JavaScript code when the “Add to Cart” button is clicked.
One implementation method is to add an event listener to the "Add to Cart" button on relevant pages. When clicked, this will trigger the code shown below. The payload data serves as a placeholder to demonstrate the required data structure for Instant Audiences.
window.InstantJS.track("ITEM_ADDED_TO_CART", [
  {
    provider: "KLAVIYO",
    event: {
      CheckoutURL: "",
      Items: [
        {
          ProductName: "",
          Quantity: "1",
          ItemPrice: "19.95",
          ImageURL: "",
        },
        {
          ProductName: "",
          Quantity: "1",
          ItemPrice: "221.95",
          ImageURL: "",
        },
      ],
    },
  },
]);
Example: Product viewed events
To track product views, you'll need to execute the following JavaScript code whenever a customer lands on a product page.
One implementation method is to add the following code snippet to the source code of your product page template. This code will trigger when a customer visits the page. The payload data serves as a placeholder to demonstrate the required data structure for Instant Audiences.
window.InstantJS.track("PRODUCT_VIEWED", [
  {
    provider: "KLAVIYO",
    event: {
      ProductName: "",
      ItemPrice: "370.00",
      ImageURL: ""
    },
  },
]);
Step 3: Update Event Properties
In the code snippet above, the PRODUCT_VIEWED event has a structured event payload:
event: {
  ProductName: "",
  ItemPrice: "370.00",
  ImageURL: ""
}
The properties in this payload will need to match the properties used in your email templates. For example, if you use the property 'event.item_price' in your templates, you will need to change the 'ItemPrice' property to 'item_price'. Similarly, this must be done for any properties your email templates require that are not included in our payload.
Please ensure you are passing through all the necessary data required in your email templates.
If you make updates to your email templates without updating your integration, Klaviyo may receive incomplete data.
Once this is finalised, your integration with Instant Audiences is complete.
Please reach out to your customer success manager if you require any assistance.
Article URL: https://help.instant.one/integrate-instant-with-a-custom-store
Keywords:
## How Email Navigation Links work with Instant AI
Instant AI automatically adds navigation links to the top or bottom of your emails, depending on the template you choose. These links help shoppers easily click back into your store and explore key sections, improving engagement and conversion.
Where do these links come from?
By default, Instant AI pulls your store’s main navigation links from your Shopify site map. This approach ensures your emails reflect the same links Google indexes for SEO, and that shoppers see consistent, familiar navigation.
For example:
If your Shopify site map shows HOME, SALE, NEW ARRIVALS, your Instant AI emails will automatically match this.
Why use your Shopify site map?
We use your site map because:
-
It reflects the primary structure of your store.
-
It helps maintain consistency across channels.
-
It ensures any navigation updates you publish are reflected automatically.
-
Google also relies on your site map for SEO, so keeping it accurate helps your store’s discoverability.
Learn more about Shopify's site map on their website here
or why it's critical to have accurate for SEO purposes on the internet here
Can I change these links?
Yes — you can fully customise the navigation links displayed in your Instant AI emails.
To edit them:
-
Go to the Brand section in your Instant AI dashboard.
-
Scroll to the Navigation links section.
-
Update the Title or URL for any link.
-
Add or delete links if needed.
-
Click Save to apply your changes.
Once saved, these updates will appear the next time your emails are sent.
💡 Tip: Different email templates display navigation links differently. If you want the links to appear more or less prominently, you can try switching templates under Brand → Change Template.
Best practice recommendation
If any links are outdated or incorrect in your emails, we suggest updating your Shopify site map first. This keeps your store structure clean for both Google and Instant AI.
But if you prefer, you can simply override the links directly in Instant AI’s Brand settings without making changes to your store.
Article URL: https://help.instant.one/how-do-email-navigation-links-work-with-instant-ai
Keywords:
## How to use Rules in your Flows
Rules let you conditionally show or replace content in your Instant AI emails — without changing how your flows work. Instead of rebuilding flow logic, you control which parts of your email design appear based on filters like shopper location, purchase history, Shopify tags, or a scheduled date range.
Your flows continue to send automatically as normal. Rules only affect what the recipient sees inside the email.
What can you do with Rules?
Rules are useful any time you want different shoppers to see different email content. Common examples:
- Sales banners: Show a promotional banner during a sale and have it automatically disappear when the sale ends
- Shipping thresholds: Display different free shipping offers based on the shopper's country
- First-time vs. repeat shoppers: Show a different hero image depending on whether someone has purchased before
- B2B and wholesale customers: Add a banner exclusively for shoppers with a specific Shopify tag from your wholesale customers
How Rules work
There are two ways to use Rules in an email:
1. Add a new Rule block
This inserts a new block into your email that only appears when a condition is met. If no condition is met, nothing shows in that spot. Because you add it at the touchpoint level, you can insert different conditional content at different points in a flow.
2. Add a Rule to an existing block
This replaces an existing block with a conditional version. The original block remains as the default and shows to anyone who doesn't meet the condition. When a condition is met, the rule overrides the default with a different block.
Because the replacement applies to that block everywhere it is used, any changes will apply across all touchpoints and flows automatically. This makes it a powerful way to update content in bulk. If you want fine-grained control per touchpoint, use a new Rule block instead.
What filters are available in Rules
When you create a Rule, you set the condition using a filter. The available filters are:
1. Date
Show content during a named scheduled date range (e.g. Black Friday, Spring Sale). Date rules are managed centrally and can be reused across multiple emails. See Scheduled date rules below.
2. Location
Target shoppers based on their country. You can set the condition to In or Not In and select one or more countries from the list.
3. Purchased
Filter based on purchase history. Options include any product or selected products, total spend amount, and a date range (e.g. purchased in the last 60 days).
4. Email Activity
Target shoppers who have opened or clicked an email. You can filter by any email or a specific email, within a defined date range.
5. Shopify Tag
Match shoppers based on their Shopify customer tags. You can filter by Has All, Has Any, or Has None of the selected tags, and search from a live list pulled from your store.
Else conditions
You can chain multiple conditions onto a single rule using else logic. Conditions are evaluated in order: if the first condition is met, that block shows. If not, the next condition is evaluated, and so on. If no conditions are met, the default block shows (for a replace rule) or nothing shows (for an add rule).
How to use scheduled Date Rules
Date rules let you schedule content to appear and disappear automatically across your emails. You give the date range a name (e.g. Spring Sale), set a start and end date and time, and any blocks using that rule will automatically activate and deactivate on schedule.
Because date rules are centralised, one rule can be attached to multiple blocks across multiple emails. If you need to update the dates, for example, to extend a sale, you only need to edit the rule once and it updates everywhere it is used.
Creating a date rule
- Go to Template Designer and click Manage Rules
- Click Create New Rule
- Give the rule a name, set the start and end date and time, and save
- The rule is now available to select as a filter when adding or editing a Rule block
Editing a date rule
- Click Manage Rules from the Template Designer
- Select the rule you want to edit
- Update the name, start date, or end date and click Update Rule
Changes apply everywhere the rule is in use. Once the end date passes, the rule deactivates automatically and emails return to their default.
Pausing Instant Coupons during a date rule
When creating or editing a date rule, you can optionally check Pause Sending Instant Coupons in Emails during this time. When enabled, any Instant-managed coupons will not be included in emails for the duration of the rule. This is useful during a sitewide sale when you may not want to send additional discounts on top of your existing promotion.
Adding a Rule block to your email
- Go to Template Designer, select a flow from the left, and click Edit Template
- In the Add blocks panel on the left, find the Rule block — it has a green outline to distinguish it from standard blocks
- Drag or click to place it in your email
- Click Select filter in the left panel and choose your filter type
- Configure the filter conditions and click Apply
- Select a block type to show when the condition is met
- To add additional else conditions, click + Add condition
- Click Save Changes when done
Adding a Rule to an existing block
-
In the email editor, click the block you want to add a rule to — a Rule button will appear in the left panel
- Click Rule
- Click Select filter, choose your filter type, configure the conditions, and click Apply
- Select the block type to show when the condition is met — this will replace the default block for shoppers who match
- To add additional else conditions, click + Add condition
- Click Save Changes when done
Shoppers who don't meet any condition will see the original default block.
Note: Because this block is used across your emails, any rule you add here will apply everywhere that block appears.
Deleting rules
There are three levels of deletion when editing a rule on an existing block:
- To remove a single block from within a condition, click on the block you wish to remove and click the track icon on the top of the menu
- To remove a single condition from the chain, click the trash icon next to that condition
- To remove all rules from the block entirely, click the trash icon in the top right of the Rules panel
Previewing Rules
While editing, you can check how your rules will look using Preview mode.
- Toggle Preview on in the top right of the editor
- The email switches to a compiled read-only view — a green banner appears at the top showing Previewing [name] by default
- Click the dropdown on the banner to switch to a specific rule variation — the banner updates to Previewing rule [rule name] and the email updates to show that rule's content
- Toggle Preview off to return to editing
You can also preview rules from the Template Designer without entering edit mode. If you have rules configured, a Preview email as dropdown appears above the flow list. Select a flow, then use the dropdown to preview the email as a specific rule variation.
Managing Rules from the Template Designer
Click Manage Rules in the top right of the Template Designer at any time to view, edit, create, or delete your scheduled date rules. Each rule shows its name, date range, number of blocks it is applied to, and whether it is currently live or scheduled.
If you have no rules configured yet, the Preview email as dropdown will not appear — only Manage Rules is shown.
Article URL: https://help.instant.one/how-to-manage-rules-in-your-emails
Keywords:
## How do I know that shoppers converting through emails triggered by Instant wouldn't have converted regardless?
Can I A/B test Instant to validate the results?
When a shopper purchases after engaging with an abandonment email triggered by Instant, we attribute that revenue to Instant. This attribution model mirrors how platforms like Klaviyo attribute revenue generated to individual email marketing flows.
Our research has found that the majority of revenue attributed to Instant is associated with merchants who would not have placed an order had they not received an abandonment email. However, given the seasonality of retail sales, it can be difficult to see exactly how Instant's incremental revenue increase has impacted a merchants' top-line revenue, especially when a merchant adopts Instant during a quieter sales month.
Case Study
For this merchant, we conducted an A/B test to determine exactly how much additional revenue Instant's superior abandonment email marketing could generate for them.
We assigned all shoppers identified by Instant, and not identified by Klaviyo or Shopify, to two cohorts:
- Control — for this segment of shoppers, despite our ability to identify them, we suppressed sending any events to Klaviyo. Therefore, shoppers in this group would not receive abandonment emails triggered by Instant, and if they were to purchase, this would have been purely of their own volition.
- Treatment — for this segment of shoppers, we sent the usual events to Klaviyo, triggering abandonment emails.
Over two weeks, we found:
- The control segment, who did not receive any Instant-triggered abandonment emails, generated $69.8K in revenue.
- The treatment segment, who did receive Instant-triggered abandonment emails, generated $84.2K in revenue.
This is a revenue uplift of $14.4K over two weeks. Had the A/B test not been running the merchant would've generated $28.8K, or $57.6K over a one-month period.
While we did find that Klaviyo attributed slightly more revenue than this to Instant Audience's flows, this revenue uplift is impressive and inline with the results published in our case studies, achieving a massive 23x return-on-investment for the customer.
A/B testing Instant
We're happy to conduct A/B tests for individual merchants who wish to better quantify the ROI they receive from Instant.
Similar to the case study above, in these tests, we assign all shoppers identified by Instant, and not identified by Klaviyo or Shopify, to two cohorts:
- Control — for this segment of shoppers, despite our ability to identify them, we suppress sending any events to Klaviyo. Therefore, shoppers in this group would not receive abandonment emails triggered by Instant, and if they were to purchase, this would have been purely of their own volition.
- Treatment — for this segment of shoppers, we sent the usual events to Klaviyo, triggering abandonment emails.
Over two weeks, we typically see the control segment, who did not receive any Instant-triggered abandonment emails, generate much less revenue.
We can estimate a total monthly increase by multiplying this number by two, to account for the test only running for two weeks, and again by two, to account for the control group that did not receive our events.
To qualify for an A/B test of Instant, merchants must have at least $500,000 in monthly website revenue and relatively high traffic. Smaller websites, unfortunately, do not have enough traffic to produce a statistically significant result from an A/B test of this nature.
Comparing results to Google Analytics
Instant Audiences and Instant AI both conform to Klaviyo's attribution model, because this is the standard for email marketing tools. Because this attribution model varies significantly from Google Analytics, many merchants using Google Analytics notice attribution variances.
Ensure all paid and organic channels can receive credit for conversions
By default, Google Analytics only attributes revenue to Google paid channels. This massively biases Google Analytics attribution towards Google channels.
For more fair attribution across non-Google channels, ensure all paid and organic channels can receive credit for conversions.
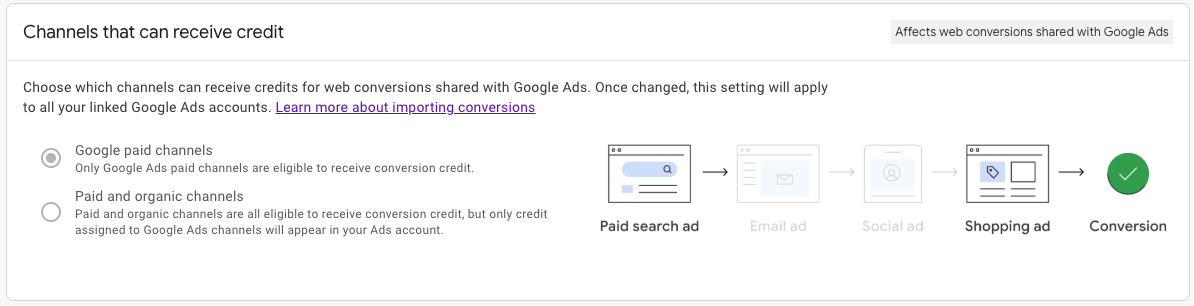
Changing this setting will not impact historic data, may take a few days to take effect, and may impact the conversions you create in Google Ads for bidding and reporting.
Tighten your attribution windows in Google Analytics
By default, Google Analytics has extremely broad attribution windows. This means top-of-funnel channels like Google Ads will get credit for conversions even if their only touchpoint event was months ago. This excessively dilutes attribution across channels, giving old and irrelevant events credit for recent conversions.
We recommend tightening your attribution windows in Google Analytics as follows:
- Acquisition key events (i.e., first_open, first_visit): 7 days (30 days is the default).
- Other key events: 30 days (90 days is the default).
- Engaged-view key events: 3 days.
Understand data-driven attribution
Google's default model is called data-driven attribution. This model is powered by AI. It is analyzing your web traffic, and, where necessary, guessing whether a conversion happened and why. This is necessary because Google Analytics isn't always are of the identity of a shopper (unlike Instant Attribution, thanks to our excellent identity resolution technology) and therefore their history.
This type of attribution works great across very large datasets, but can be extremely unreliable for smaller datasets. Any merchant turning over under $500,000 in monthly website revenue is unlikely to see accurate results from any AI-driven attribution model. These merchants should double check their results by switching to Google's paid and organic last click attribution model, which admittedly favors bottom-of-funnel channels like Instant AI, Instant Audiences, and Klaviyo.
Article URL: https://help.instant.one/testing-instant-revenue-uplift
Keywords:
## How do Price Drop Flows work?
The Price Drop Flow automatically emails shoppers when a product they interacted with drops in price.
It’s designed to recover interest from shoppers who viewed or carted a product but didn’t purchase, encouraging them back when the price becomes more attractive.
We check the current price against the price at the time the shopper last interacted with the product, regardless of when you enable the flow. If the current price is lower and meets our threshold, we send a tailored, high-converting email.
Key behaviours:
-
Targets individual shopper history, not general promotions
-
Only triggers if the price has dropped by at least 10%
-
Prioritises the most compelling message (either $ off or % off, whichever looks stronger)
-
Automatically suppresses emails where no meaningful discount applies
FAQs
How does Instant AI decide when to send a Price Drop email?
We compare the price of a product at the time the shopper last viewed or added it to cart, with the current price.
If the price has dropped by at least 10% and the shopper hasn’t purchased or removed it from their cart, the flow triggers.
Does it matter when I enable the Price Drop flow?
No. We look back at shopper behaviour up to 60 days.
Even if a price reduction occurred before you enabled the flow, we’ll identify shoppers who last saw the product at a higher price.
What discount message appears in the email?
Our AI automatically determines which discount format is most appealing:
-
If the dollar saving looks stronger (e.g. “$20 off”), we highlight that
-
If the percentage saving looks stronger (e.g. “20% off”), we use that instead
Example: If the saving is $2 and that equals 10%, we’ll prioritise “10% off” as more compelling.
If a shopper viewed multiple products and they all go on sale, will they get emails for all of them?
No. We only enrol a shopper in one Price Drop Flow at a time.
If they viewed multiple products that later drop in price, we automatically select the most recent product they interacted with as the focus of the email.
This keeps the message relevant and avoids sending multiple emails at once.
What if there’s an error with pricing?
We have safeguards in place:
-
If the price difference equals $0, or the product’s current price is $0, we suppress the email
-
If a “compare at price” is incorrectly set and doesn’t represent a real saving, we also suppress the email
Will shoppers receive Price Drop emails for every item on sale?
No. The flow focuses on individual shopper history — we don’t send blanket emails for general site-wide sales.
We’ll only send when a product they personally viewed or carted is now significantly cheaper.
Does this work for every product type?
Price Drop works for standard products with clear price history.
It excludes products where historical price comparison isn’t reliable (e.g. dynamic pricing, pre-orders, backorders).
Article URL: https://help.instant.one/faqs-for-price-drop-flows
Keywords:
## How does Instant Audiences impact email deliverability?
Instant Audiences targets opted-in shoppers, meaning deliverability for emails triggered by Instant Audiences should match that of your existing email marketing campaigns.
Article URL: https://help.instant.one/deliverability
Keywords:
## Integrate Instant with Shopify's tracking consent (cookie) banner
Instant integrates with Shopify's cookie banner feature, which makes it easy to request shopper consent for tracking.
In some markets, it is necessary request consent from shoppers for tracking. Shopify's cookie banner functionality makes this easy, and can be use for both cookie-based and cookie-less tracking.
Shopify's cookie banner functionality will detect whether the shopper is in a region that requires consent from shoppers for tracking, and if so, display a simple consent pop-up on your website (Shopify also allows you to override their standard configuration, showing cookie banners in any specific region you like). If a shopper consents, Shopify will then load your tracking scripts that are configured to require permission.
Using Instant with Shopify's cookie banner
If you wish to require shopper consent for Instant's analytics functionality, you can easily configure Instant to work with Shopify's cookie banner.
- In your Shopify dashboard, under Settings → Customer events, find and edit the custom pixel for Instant Audiences.
- Set Permission to Required and Data sale to Data collected does not qualify as data sale.
In regions where this is required, Instant's tracking will now only load for shoppers who consent to tracking.
Article URL: https://help.instant.one/shopify-tracking-consent
Keywords:
## How do I manually add Audiences Product Viewed tracking for Shopify?
If you have installed the Instant pixel for Shopify and are not receiving product viewed events from Audiences, please manually add tracking directly to your website.
Please note that this only works if you are also use the Klaviyo app for Shopify.
- Proceed to the Shopify dashboard, and click on Online Store.
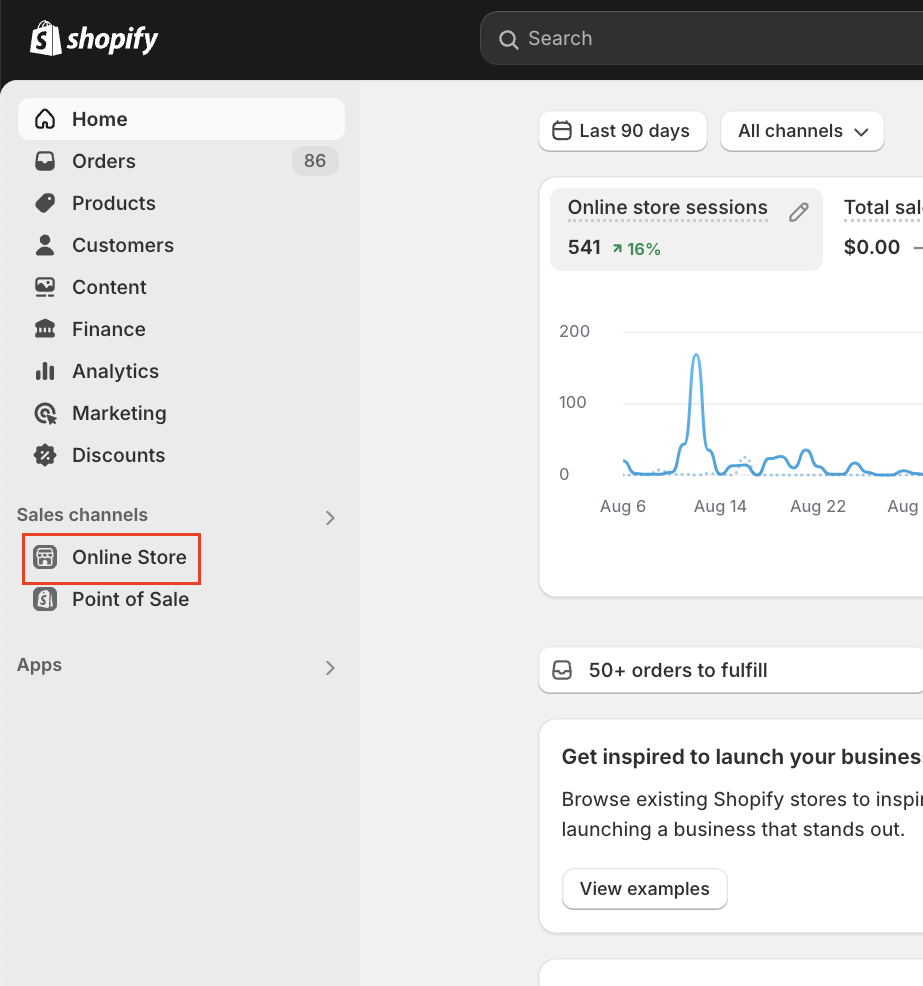
- Click on Edit code
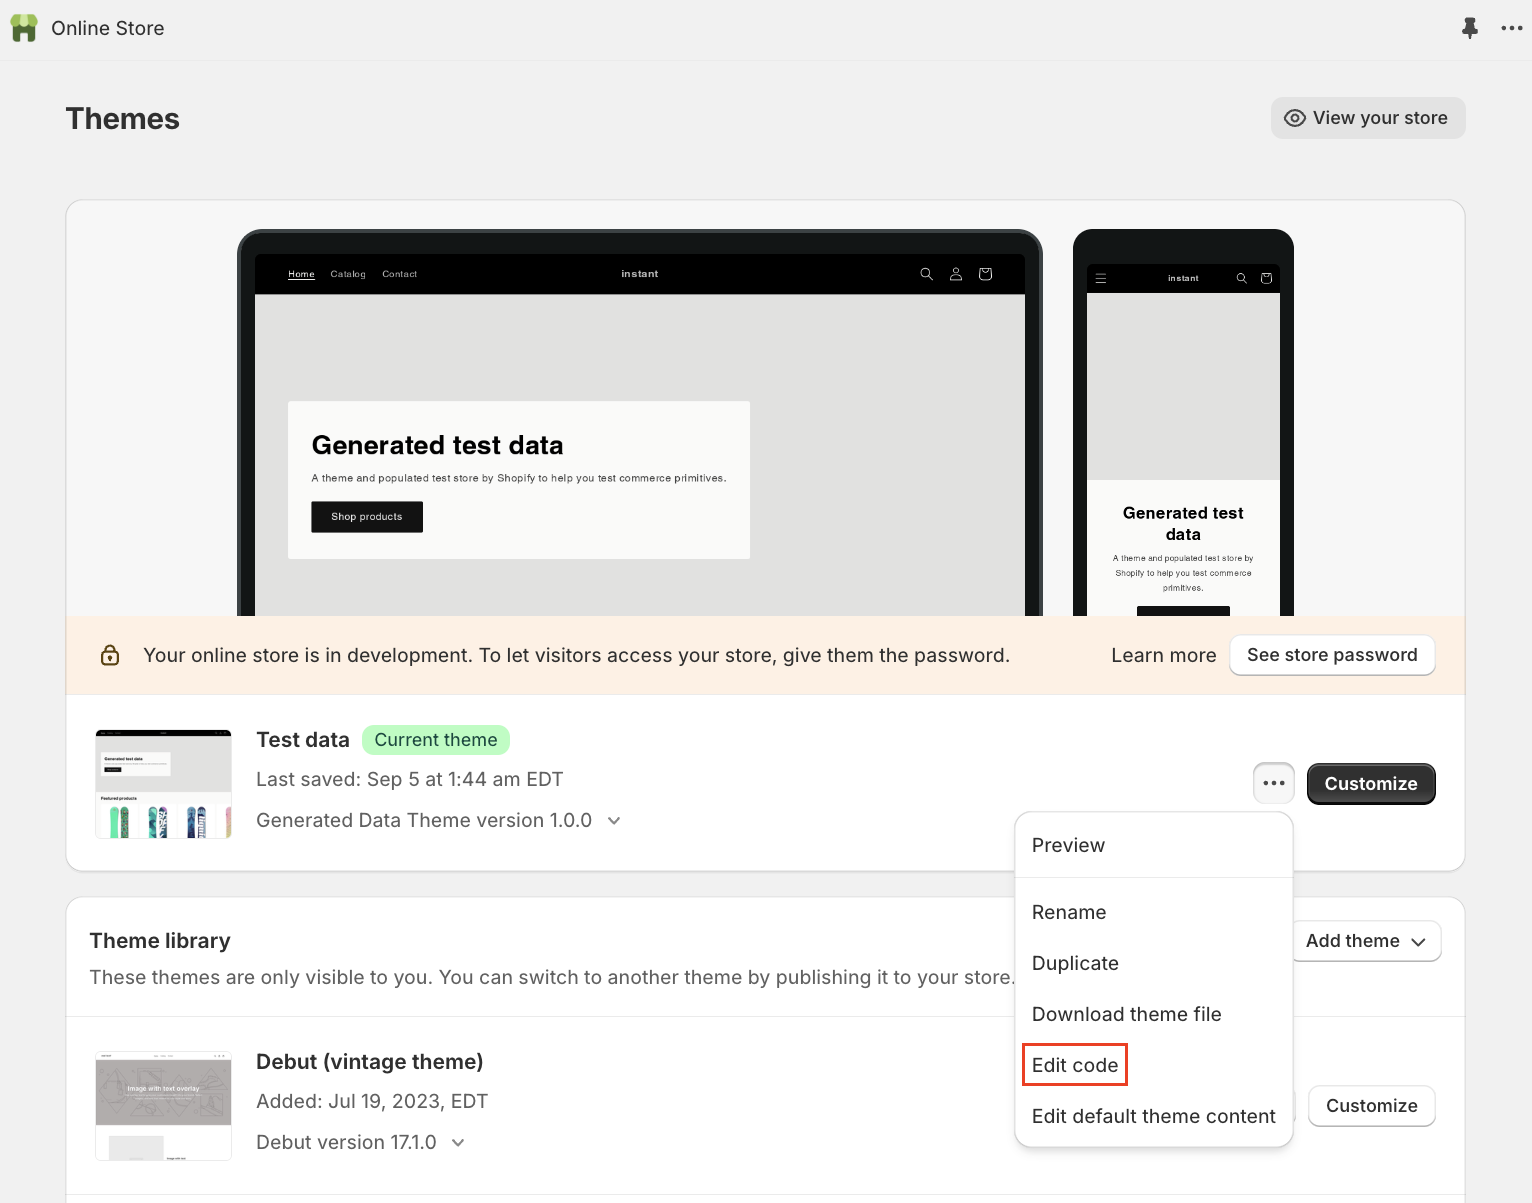
- Proceed to your theme.liquid file

- Inside theme.liquid, locate the </title> line. Below this line, insert the following snippet of code
<script>
const manualInstantProduct = setInterval(() => {
if (window.item) {
window.InstantJS.track('PRODUCT_VIEWED', [
{
provider: 'KLAVIYO',
event: window.item,
},
]);
clearInterval(manualInstantProduct);
}
}, 500);
</script>
- Your theme.liquid should look like this:
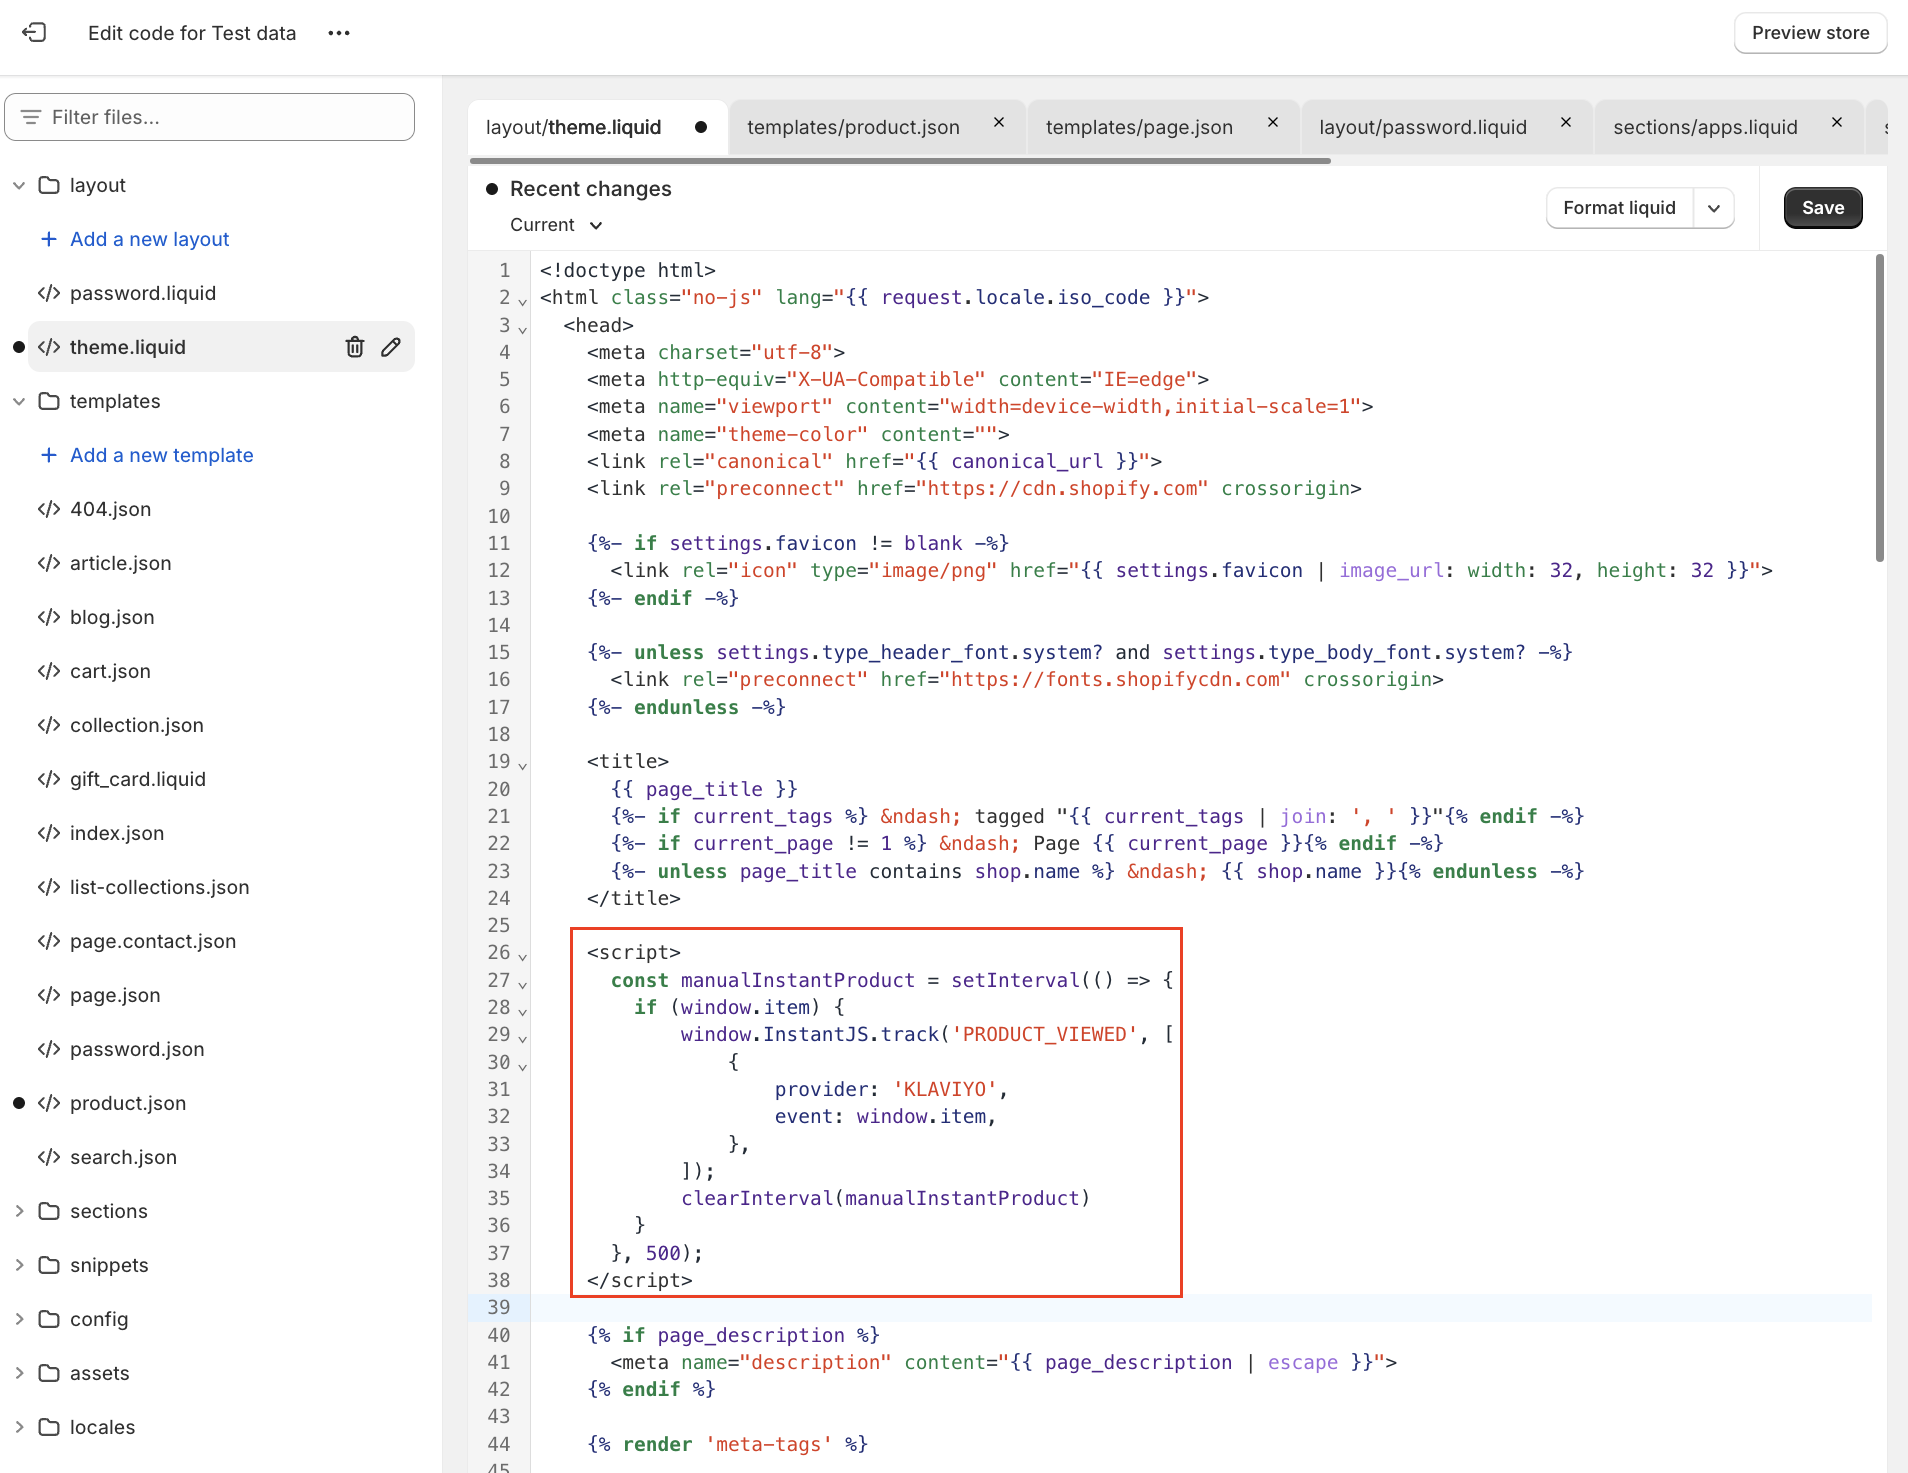
- Click Save.
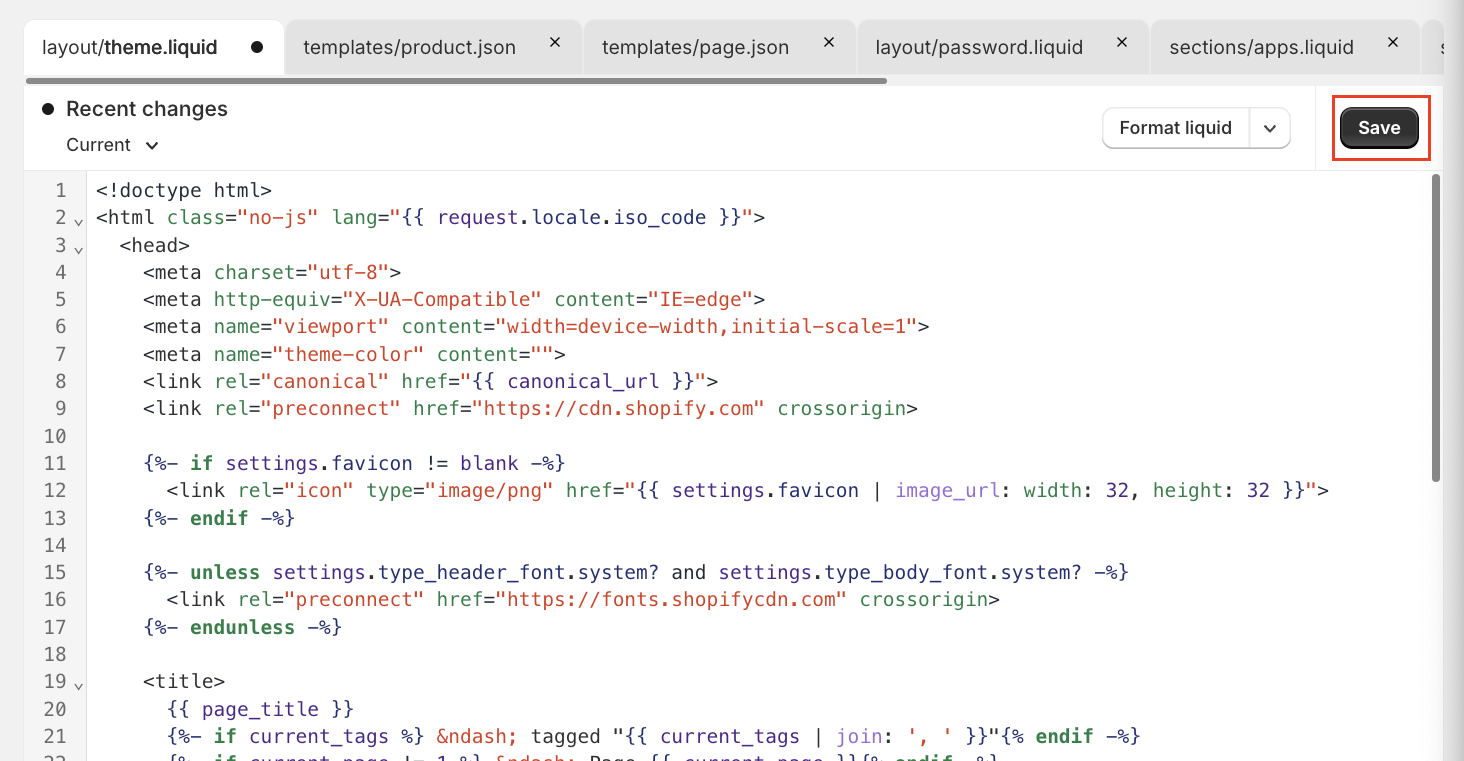
- Product Viewed events will now start manually firing to the Instant pixel. You will see Product Viewed start showing in integrations soon, such as Klaviyo.
Article URL: https://help.instant.one/add-product-viewed-tracking-shopify
Keywords:
## How to send an SMS Campaign with Instant AI
Instant supports SMS as a step type inside multi-step campaigns, alongside email. This article covers why SMS in campaigns matters, how to add and write an SMS step, and what to expect after you send.
If you haven't enabled SMS for your account yet, start with the SMS setup guide first.
- Why send SMS campaigns
- Before you start
- Creating from scratch
- Adding to an existing campaign
- Writing your SMS
- Scheduling your SMS
- What your customer receives
- How we know who to send to
- Analytics for sent campaigns
- FAQ's
Why send SMS campaigns
SMS reaches shoppers in a way email can't. Most texts are read within minutes of delivery, and open rates sit far above what's achievable on email. That makes SMS the right channel for moments that need attention right away: sale launches, last-chance reminders, restocks, exclusive drops, anything where timing matters.
It's also the channel shoppers are most protective of. They expect SMS to be short, useful, and infrequent. Used well, that gives every send a much higher chance of converting than the equivalent email.
The best SMS campaigns sit alongside email, not instead of it
It's rare to send a campaign as SMS only. The strongest results come from pairing channels: an email that does the storytelling, the visuals, and the detail, plus an SMS that delivers the urgency or reminder. Common patterns include:
- Email first, SMS follow-up. Lead with a launch email, then send an SMS reminder on the last day of the sale to anyone who hasn't converted.
- SMS teaser, email reveal. Tease a drop with a short SMS, then send the full announcement by email. Many brands see success with an early access SMS teaser for just the most eager subscribers, then a follow up email
- Multi-touch over a few days. Two emails plus one well-placed SMS often outperforms three emails alone.
This is why SMS in Instant only lives inside multi-step campaigns. You can send a one-step SMS-only campaign if you need to, but the structure is built for sequencing channels together.
Why send SMS through Instant
Adding SMS through Instant means you're not running a parallel program in another tool. You get:
- One audience for both channels. Pick a segment once, and Instant routes each step to the contacts who can receive it (more on this below).
- Unified attribution. SMS revenue, clicks, and engagement appear in the same place as your email metrics, on the campaign view and on your main dashboard.
- Compliance handled. Your brand prefix and unsubscribe line are added automatically, character limits are enforced before you hit send, and STOP replies sync across the platform.
- Predictable cost. Every SMS is kept to a single message, so you're charged one credit per send, every time.
Before you start
SMS in Campaigns requires SMS to be configured on your account first. Once that's done, you can write campaigns that include SMS steps in any combination with email.
- Available for Australian phone numbers only. Shoppers with international numbers are skipped automatically. See Enabling Instant AI SMS in Australia for the full setup.
- Set your brand prefix. Every SMS you send through Instant starts with a brand prefix that identifies your business. See Customising your SMS brand prefix for the options.
- Capture SMS subscribers. Make sure you're collecting SMS consent through your sign-up form, pop-up, or an integrated platform. Existing subscribers synced from Klaviyo or Shopify are picked up automatically. Instant only sends SMS to shoppers who have given explicit SMS consent.
Creating an SMS in a multi-campaign from scratch
- Go to Campaigns in your dashboard.

- Click Create Multi-Step Campaign.
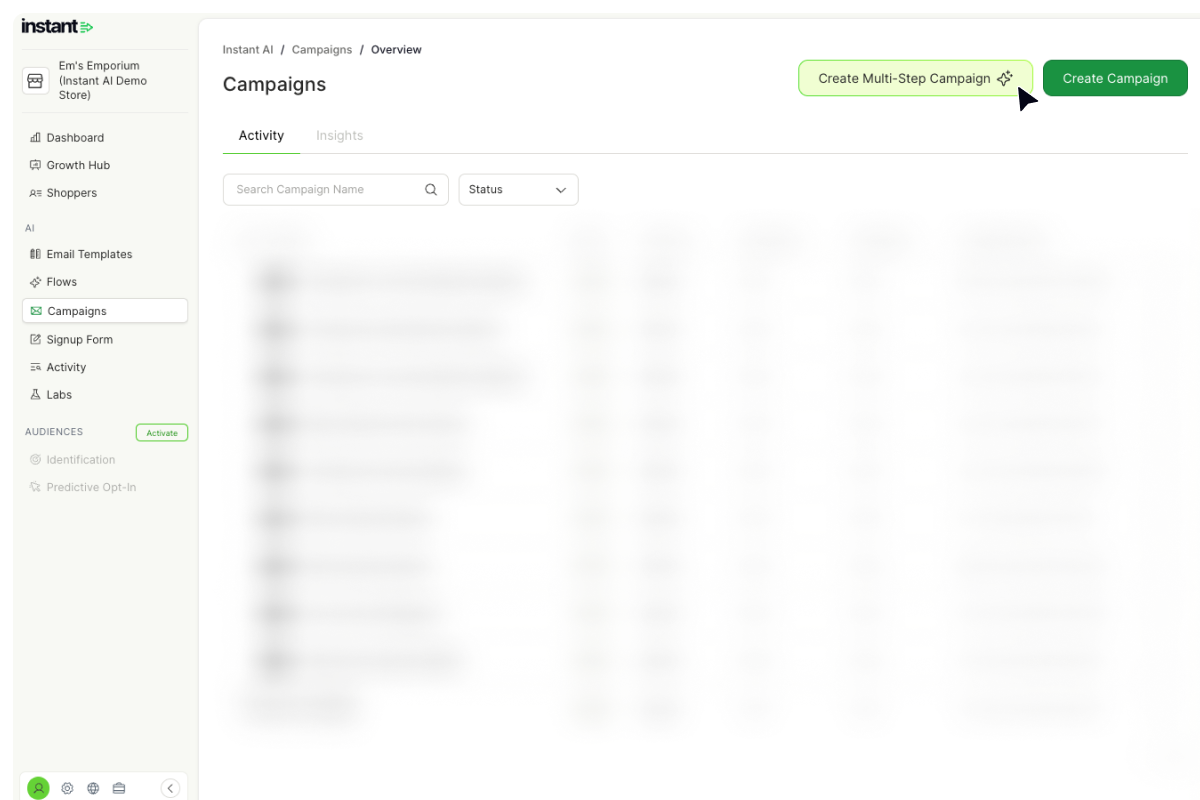
- Choose Create Blank Campaign for an empty multi-step canvas.
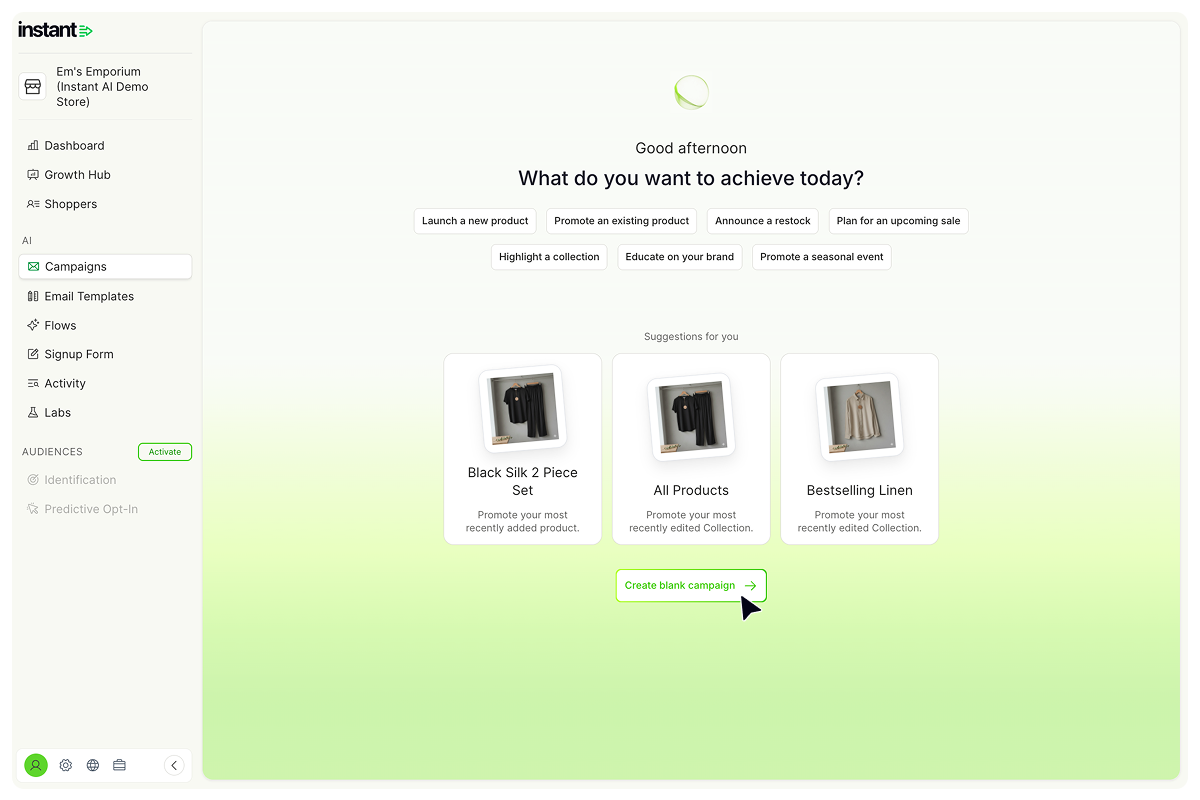
- On the new step, choose Add SMS and draft your message
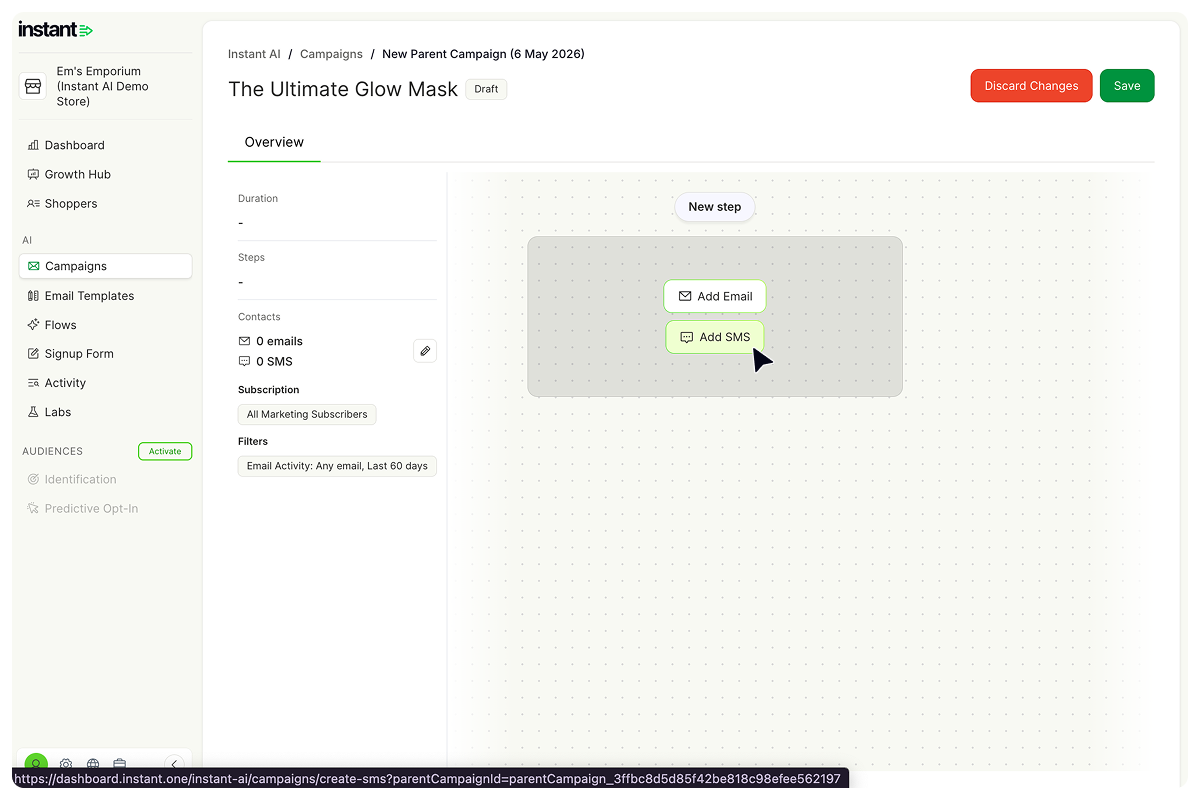
Adding SMS to an existing campaign
You can add an SMS step to any multi-step campaign, even if every other step is an email. For example, if you have three email touchpoints, you can add an SMS as a fourth step, or insert one between two emails.
- Open the multi-step campaign you want to edit.
- Click New step.
- Choose Add SMS.
- Draft your message.
Writing your SMS
When you click Add SMS, the message editor opens with your brand prefix already inserted (for example, EM'S:). The prefix, the unsubscribe line, and your link are all part of the final SMS your customers receive.
The brand prefix
Your prefix is set in SMS Settings, not inside the campaign. Whatever you've configured there will pre-fill at the start of every SMS you draft. You can delete the prefix from an individual campaign if you want to, but you must include your business name somewhere else in the message body. See Customising your SMS brand prefix for more.
Character limit
You have 120 characters to write your message, which includes your prefix. The remaining space in the SMS is reserved for your link and the auto-appended Reply STOP to unsubscribe line.
The character count updates live as you type. If you add an emoji or special character, the count drops automatically to keep your message to a single SMS. For the full breakdown of how this works, see Understanding SMS character limits.
Adding a link
Every SMS must include a link. SMS attribution is based entirely on click tracking, so a link is the only way Instant can attribute revenue back to the SMS.
By default, your link will be set to your store URL. You can change it to any URL you want by editing the Link field. The link is auto-appended after your message and is not part of your 120-character limit.
Adding a variable
You can personalise your SMS with the shopper's first name.
- Click Add variable.
- Choose First name.
- Set a fallback value. The fallback is used if the shopper's name is unknown, or if including their name would push the SMS over the character limit.
First name is the only variable currently supported in SMS campaigns. See Understanding SMS character limits for how variables affect your character count.
Scheduling your SMS
Each step in your multi-step campaign has its own send date and time, set when you build the step. SMS steps are scheduled the same way as email steps.
Instant sends at the exact time you choose, in your store's local time zone. There are no enforced quiet hours, so it's your responsibility to pick a sensible time for your audience. Avoid late nights, very early mornings, and any times that aren't appropriate for marketing messages.
What your customer receives
Every SMS sent through Instant includes:
- Your brand prefix (or your business name if you've removed the prefix)
- The message body you wrote
- Your link
- The
Reply STOP to unsubscribe line, automatically appended
Here's an example:
EM'S: New arrivals just dropped. First look here: https://insst.io/tYynpi Reply STOP to unsubscribe
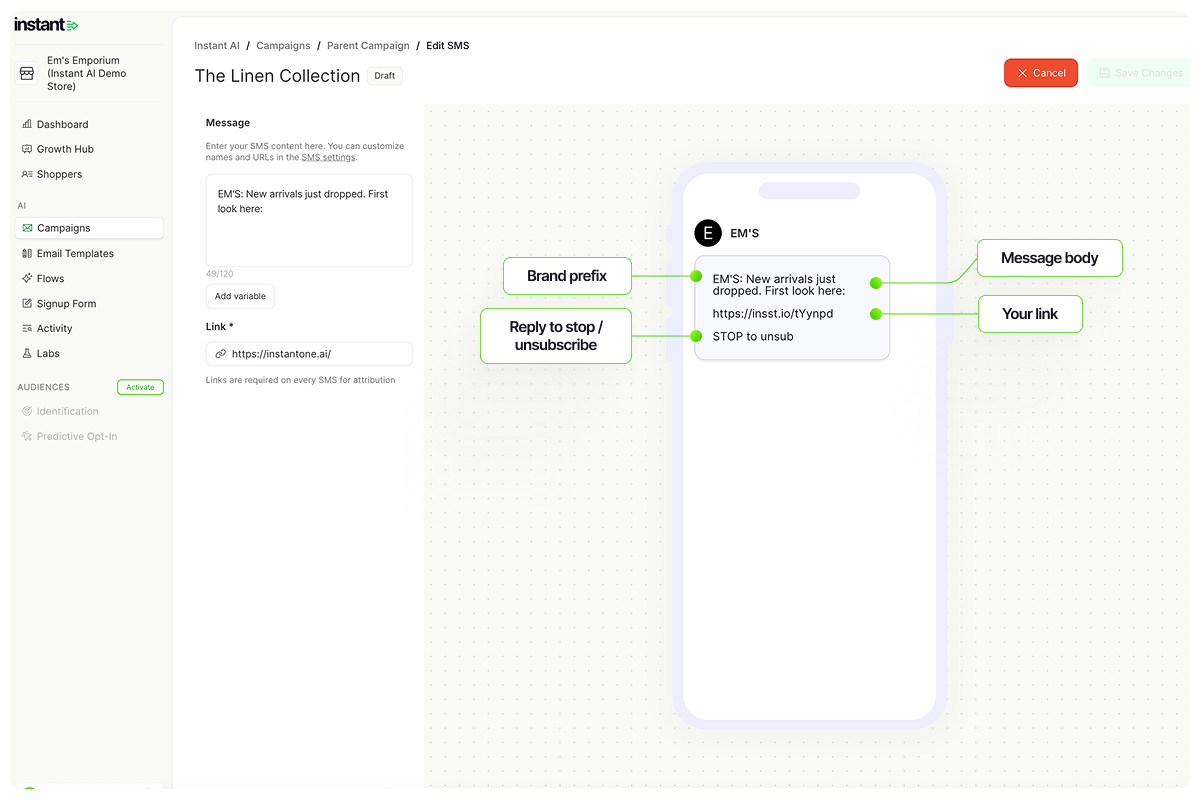
How we know who to send to
You only pick one segment for the entire campaign, not a separate audience per step. From there, Instant automatically works out who in that segment is eligible to receive each step, based on what they're subscribed to.
- Contacts subscribed to both email and SMS receive every step that applies to them.
- Contacts subscribed to email only receive the email steps and skip the SMS steps.
- Contacts subscribed to SMS only receive the SMS steps and skip the email steps.
- Contacts with no phone number on file are automatically skipped on SMS steps.
You don't need to build separate campaigns for each channel. One sequence runs, and every contact only receives the steps they've opted into.
Reading the audience breakdown
When you select your segment, you'll see an estimated breakdown:
- Total contacts in the segment
- How many of those have a subscribed email address
- How many of those have a subscribed phone number
The email and SMS counts will often add up to more than the total contact count, and that's expected. A contact who is subscribed to both email and SMS is counted once in the contact total, but appears in both the email and SMS counts. The email and SMS numbers are forecasts of how many sends each channel will produce, not a unique-person count.
After your campaign sends
Once your campaign is live, SMS appears in your campaign analytics as its own step, alongside any email steps. Send volumes, clicks, attribution, and revenue are all reported in the same place as email, so you can compare both channels directly within the same campaign.
Compliance reminder
Every commercial SMS you send must clearly identify your business. The default brand prefix takes care of this for you. If you ever remove the prefix from a campaign, make sure your business name appears somewhere else in the message body. Sending commercial SMS without proper sender identification can breach the Australian Spam Act.
FAQs
Can I edit or cancel a scheduled SMS campaign?
Yes. Open the scheduled campaign and make your changes. Editing moves the campaign back to draft, where you can reschedule it when you're ready. To cancel a scheduled send, edit the campaign to send it back to draft and leave it there.
Can I send a test SMS to myself before launching?
No. The Send Preview option is email only. You can't send a test SMS to yourself before the campaign goes live, so review your message carefully in the phone preview on the right side of the editor before scheduling.
Can I include more than one link in an SMS?
No. Every SMS sends with exactly one link, set in the Link field of the step. The link is the only way Instant tracks attribution for SMS.
Does Instant support sending images or MMS?
No. SMS in Instant is text only. Images and MMS aren't supported.
If a shopper unsubscribes between steps, do they still receive the rest of the campaign?
No. Once a shopper unsubscribes from SMS, they're removed from any remaining SMS steps in the campaign immediately. They can still receive email steps if they're subscribed to email.
How does this interact with SMS I'm already sending through Klaviyo or another tool?
If you're sending SMS for the same audience through both Instant and Klaviyo, shoppers may receive duplicate messages. Customers tend to be far less forgiving of duplicate texts than duplicate emails, so we recommend sending SMS through one platform at a time. Unsubscribes sync both ways with Klaviyo if you have an integration.
Does Instant respect Australian quiet hours or send-time restrictions?
No. Instant sends at the exact time you schedule. It's your responsibility to choose appropriate sending times for your audience.
Where does SMS revenue show up in my analytics?
SMS revenue is included everywhere campaign revenue appears, including the main dashboard, the campaigns overview, and the individual campaign view. It's reported alongside email so you can see total campaign performance and per-channel performance in the same place.
Related articles
Article URL: https://help.instant.one/how-to-send-an-sms-campaign-with-instant-ai
Keywords:
## Why is my Meta Events Manager showing duplicate events?
What is Instant Targeting?
Instant Targeting solves a critical problem: your Meta ads aren't performing as well as they could because Facebook doesn't have enough information about your customers. When visitors browse your site anonymously or provide limited information, Meta's algorithms struggle to optimise your ad targeting and bidding.
Before Instant Targeting: Meta receives basic, often anonymous event data (someone added to cart, but Meta doesn't know who)
After Instant Targeting: Meta receives enriched events with detailed customer information, enabling smarter ad optimization and better ROAS
Understanding Instant’s Meta integration and deduplication
What You'll See (And Why It's Normal)
Important: When you first enable Instant Targeting, you'll see significantly more events in your Meta Events Manager. This is completely normal and expected.
For example, if Meta records 100 add-to-cart events on the browser, and 100 add-to-cart events on the server, Instant’s integration will send another 100 add-to-cart events server-side — resulting in 300 events being displayed in Meta Events Manager initially.
Why this happens: Meta shows all events received before deduplication. Instant sends enhanced versions of your existing events, so Meta initially displays both the original and enhanced events.
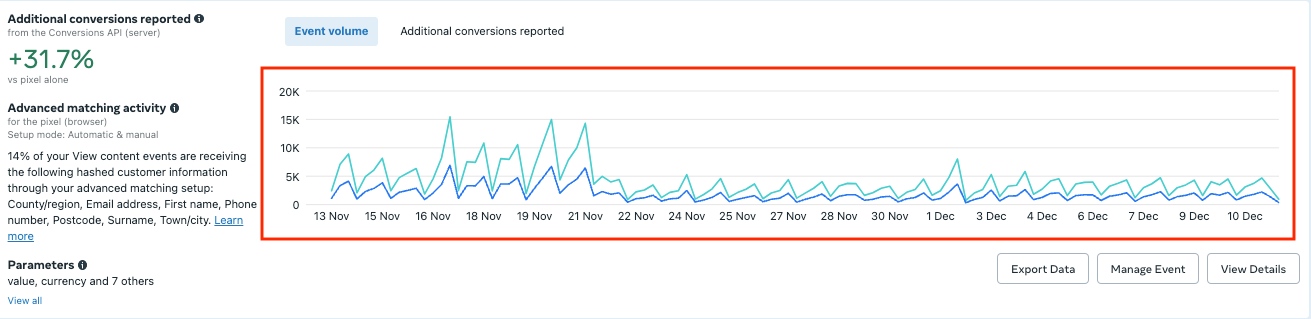
How the Integration Works Behind the Scenes
Whenever one of your customers takes an action, like adding an item to their cart or making a purchase, several systems send records of that event to Meta.
The browser pixel might send a basic record, Shopify’s server-side integration sends another, and Instant Targeting sends an enhanced version, all containing an identical deduplication ID for that specific user action.
If we look at a real example, suppose Jane visits your website and adds a product to her cart.
- The browser pixel records her “Add to Cart” event with limited, often anonymous, customer details.
- Shopify’s server integration might also record Jane’s action but again without much customer information attached.
- Instant Targeting, however, records the same event but supplements it with Jane’s email, prior purchase indicators, and engagement history (if available).
What Happens Next: Automatic Deduplication
The events from Instant's Meta Integration carry the same deduplication ID as events sent from either:
- The browser (via Meta Pixel Integration)
- Other server-side providers (e.g., Shopify's native server-side integration, or another server-side integration provider).
This deduplication ID ensures that Facebook can identify and group duplicate events, preventing double attribution. Within 24-48 hours, Facebook's deduplication system:
-
Groups events with matching deduplication IDs
-
Selects the event with the richest customer data (typically Instant's enhanced event)
-
Uses that enhanced event for ad optimization while discarding duplicates
As a result, after this brief window, the event counts stabilize and return to normal ranges, and Meta starts making smarter optimization decisions thanks to the superior customer data included with each Instant event.
Note that this behaviour is not specific to Instant — we're just following Meta's best practices. Other products that utilise Meta's conversions APIs also send duplicate events, using de-duplication IDs the same way we do.
What Makes an “Enhanced” Event?
Enhanced events from Instant Targeting stand out because they are populated with rich customer attributes.
This context empowers Meta to find more lookalike high-value shoppers, improve audience match quality, and raise overall campaign performance by allocating ad spend more efficiently.
Because Instant Targeting works by adding value, rather than replacing your other integrations, you can safely run it alongside Shopify, Klaviyo, Google Tag Manager, or other Meta API providers.
How to Verify Everything is Working Correctly
The most obvious sign the integration is working is an initial jump in event counts. Over the first week, you may also see Meta’s “Event Match Quality” scores climb and begin to notice upward trends in your ad performance metrics.
If after enabling Instant you see no change in event volume, or if your events suddenly disappear from Events Manager, it could signal a misconfiguration (for instance, a deduplication ID mismatch).
In such cases, our support team is available to help — simply email help@instant.one with your website URL and a detailed description of your issue.
Conclusion
When using Instant’s Meta integration, duplicate events in Meta Events Manager are expected as server-side events mirror those sent from the browser or other providers.
However, thanks to Facebook’s deduplication mechanism, these events are grouped, and the event with the most enriched customer information is used for reporting and optimization. This ensures your marketing data remains accurate and effective.
For further reading, check out Facebook’s documentation on event deduplication: Facebook Deduplication Docs.
Article URL: https://help.instant.one/meta-events-manager-duplicate-events
Keywords:
## How to place test orders on Instant Checkout
Place test orders to confirm that orders are flowing correctly through to your e-commerce backend. Follow these steps to make sure the Instant Checkout is functioning as expected:
Initiate Checkout
- From the Product Page: Directly open the checkout by clicking the Instant "Buy Now" button on the product page.
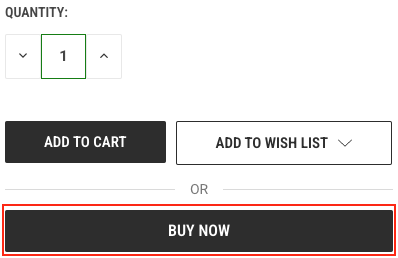
- From the Mini Cart or Cart Page:
- Add an item to the cart.
- Access the mini cart or navigate to the cart page.
- Click the Instant "Buy Now" button to open the checkout window
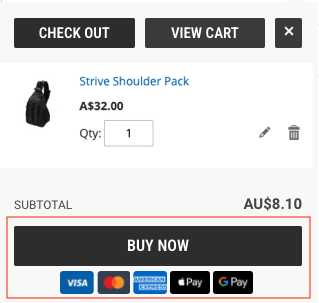
Log In or Sign Up
- Existing Users: Enter your email and log in using the one-time password sent to your email.
- New Users: Enter your email to create a new account; a one-time password will be sent to complete the registration.
- Note for Production Testing: Use "TEST ORDER" in the name field to identify your transaction.
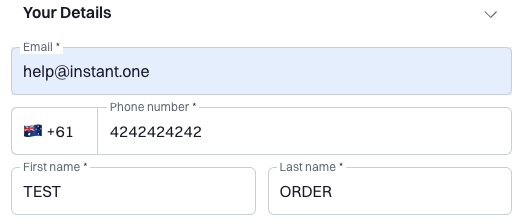
Select Delivery Option
- Choose the most suitable delivery method for your order.
Enter Payment Details
- Complete the payment fields with your information.
Test Coupon Codes
- Apply a Coupon Code: Enter a valid coupon code in the designated field and apply it to your order.
- Verify Discount: Ensure that the discount or promotion associated with the coupon is correctly applied to the total.
- Test Invalid Codes: Enter expired or invalid codes to ensure that appropriate error messages are displayed.
Complete Purchase
- Click "Buy Now" to submit your order.
- A confirmation page will be displayed with your order details, indicating a successful transaction.
Verify Order
- Confirm the order has been processed successfully by checking your E-commerce platform's backend.
- Note: There may be a delay of about 5 minutes for orders to show up on the E-commerce platform. Please allow sufficient time before verifying the transactions.
Test Order Refunds and Cancellations
- Perform tests on processing refunds and cancellations to verify these functions are operating correctly.
By following these structured steps, you can thoroughly test and ensure that the Instant Checkout feature is functional and ready for deployment.
Article URL: https://help.instant.one/test-instant-checkout
Keywords:
## Instant Release Notes | Q1 2026
More ways to conditionally show email content with Rules
Released 10th April 2026
What's new?
- Instant AI now lets you manually create dynamic content within your emails
- Instead of one email for everyone, you can now tailor the design based on who's receiving it. Certain customers can get one image, others might get another.
- Use cases like, Show a sale banner only during your sale, then it auto-disappears, a different hero for repeat buyers, or exclusive content for subscription customers
- Rules are filters you apply to blocks inside your email, so we know which block we should use for which customer, without altering any flows
- There are two ways to use Rules: insert a new block that only appears when a condition is met, or replace an existing block with a different version for specific customers
- You can chain multiple conditions together — if the first isn't met, Instant tries the next, and so on
- Filter by location, purchase history, email activity, Shopify tag, or a scheduled date range
- Date-based Rules activate and expire automatically — set it once and your emails update themselves
- Replacing an existing block updates it everywhere it appears across all your emails at once
Read more about how to manage rules with our documentation here

More design options for buttons and dividers
Released 10th April 2026
What's new?

Improved design for empty blocks & re-using layout blocks
Released 20th March 2026
What's new?
Extra padding settings on images and text blocks
Released 20th March 2026
What's new?
Quick URL sharing for email previews
Released 20th March 2026
What's new?
-
All email previews opened from the flow activity page now have a unique url
-
Copy & Paste from your browser to share an easy link to a specific email
-
Or click the link icon on any email preview to instantly copy & share
Easily re-order blocks with an improved drag & drop experience
Released 13th March 2026
What's new?
-
Re-ordering your email is now even easier, and smoother
-
Simply drag and drop your email blocks where you need them to be
-
All previous manual arrow re-ordering are no longer required
Show/hide compare-at prices on Dynamic Product
Released 13th March 2026
What's new?
- Product blocks that you manually pick a collection or product to show can now show/hide compare-at price
- You can pick if they want to show a "before and after" price in their campaigns or not
Layouts in Email Designs
Released 11th March 2026
What's new?
- You can now add a layout block to your emails
- These work like a custom column design, so you can place blocks within a block
- You can add any image, text or text into your layout blocks, with up to 4 columns
- You can place multiple blocks within each column
- Easy settings to control the template, padding and how the blocks format
- You can still add URL's / other settings to the individual block, within a layout block
- These are available on all flows and campaign designs
Active on Site Filter in Segments
Released 9th March 2026
What's new?
- You can now filter shoppers by when they were last active on your site
- This is available on the Shoppers page and inside Segmentation
- Filter by any time, the last X days, between two dates, on or before, or on or after a specific date
- The date field across all filters now defaults to "Any time", so you only need to set a timeframe if it's relevant to what you're building

Deliverability Dashboard
Released 5th March 2026
What's new?
- A new Deliverability Dashboard is now available under Settings → Deliverability
- Select any date range to analyse performance for a specific period, campaign, or flow
- Use the Recommendations tab for actionable suggestions to strengthen your deliverability
- Track trends over time with performance graphs for delivery rate and bounce rate in the Performance tab
- See a full breakdown by inbox provider (Gmail, Microsoft, Yahoo, Apple, and more) including open rate, click rate, bounce rate, unsubscribes, and spam reports
- Filter activity by specific flow or campaign, and export the data as a CSV
Learn more about the Deliverability Dashboard →
Custom Shopper Segments for Campaigns
Released 3rd March 2026
What’s new?
You can now create and save dynamic Shopper Segments and use them directly in Campaigns. This release introduces advanced audience segmentation across both the Shoppers page and Campaigns, giving you more control over who you target and why.
On the Shoppers page
You can now:
-
Apply multiple filters to your full shopper database
-
Combine behaviour, purchase history, tags, subscription status, location, and more
-
See live audience counts as you build
-
Preview exactly which shoppers match your filters
-
Save filter sets as reusable segments
-
Clone, rename, or delete saved segments anytime
Segments are fully dynamic and automatically update as shopper data changes.Every account includes a default All Shoppers segment, which represents your complete database.
In Campaigns
You can now:
-
Select a saved segment when creating a campaign
-
Start with All Marketing Subscribers and refine with filters
-
Add additional filters on top of a saved segment
-
See total vs eligible recipient counts before sending
-
Preview exactly who will receive your email
For multi-step campaigns, you can review and update the selected segment from the Contacts tab without rebuilding the campaign. Campaign eligibility is evaluated at send time, ensuring emails are only delivered to subscribed shoppers.
Improved Drag & Drop file uploader for Images
Released 25th February 2026
What's new?
- When adding a custom image to your email editor, there's an improved drag and drop
- Drag your images directly into the placeholder image block to replace it
- No longer need an additional modal for uploading images and a simpler experience
Updated Shopify Installation Instructions
Released 25th February 2026
What's new?
Winback flows can be reduced to 1 touchpoint only
Released 24th February 2026
What's new?
Exclude Shoppers with Shopify Tag from Flows
Released 23rd February 2026
What's new?
You can now exclude shoppers from specific flows using Shopify tags, giving you more control over who receives certain emails.
This makes it easier to avoid sending low-intent emails to shoppers who were already likely to convert, such as B2B/Wholesale customers and subscription customers.
- Instant AI now reads and uses existing Shopify tags on shopper profiles
- You can select a Shopify tag and choose which flow that tag should be excluded from
- Any shopper with the selected tag will be skipped during flow enrolment
- Exclusions apply only to the selected flow and do not affect other flows or campaigns
- Excluded shoppers can still receive campaigns and other Instant AI emails
- Shopper profiles now display both Shopify tags and any flows they are excluded from, making it clear why a shopper didn’t enter a flow

Branding is now called Email Settings
Released 19th February 2026
What's new?
- Branding is now called "Email Settings"
- Your existing settings now have 3 tabs to find relevant settings easily
Improved Email Editor UX
Released 18th February 2026
What's new?
- We've improved your email editor with the same tools but an easier settings menu
- When editing an email, all settings now show on a menu bar to the left
- Easily add a block by selecting on the block type, or library to browse more
- To edit the settings of a block, simply select the block and all settings will show on the left
- Once selected, you can edit, delete or clone any block as you usually would.
- All text on the rich text editor can now be edited directly in line, just select and type
Pop-up Analytics
Released 18th February 2026
What's new?
- Instant AI sign-up form now includes analytics of how many new shoppers you have
- See what percentage and count of new email addresses come from your Instant pop-up
- Live activity table of new sign-ups and their source
NEW Multi-step Campaigns
Released 9th February 2026
What's new?
- New Campaigns can now be created as a Multistep Campaign
- Create a series of emails as a sequence tied to a business goal
- Emails will still send as individual, once off campaigns but now grouped together
- Better plan your customer journey and multiple emails for a single outcome
- Gain better insights & analytics for how your emails are performing as a group
- Includes even more AI email assistance to help generate an on-brand draft email
- or skip and manually create your own email with more tools to plan your sequence
Learn how to use it here
Improved Campaigns Analytics
Released 2nd February 2026
What's new?
- The campaigns dashboard has now been split into two tabs: Activity & Insights
- The activity tab has an improved table view to easily see campaigns at a glance
- The insights tab has improved analytics and graphs with more performance over time data
- See the cumulative impact with time graphs of campaign revenue, clicks, opens, sends
- Additional deliverability and insights charts showing your averages across all campaigns

New Deliverability Chart on Flow Analytics
Released 21st January 2026
What's new?
- Updated designs of deliverability charts on each flow
- Easily understand delivered, bounced and skipped events per flow
- Filter different time frames on the report to see the data change over time
More metrics on your Flow Analytics
Released 20th January 2026
What's new?
- Updated designs to better understand unique counts and percentages for each metric
- Applied to metrics such as opens, clicks and conversions
Product Updates feed now in the Growth Hub
Released 16th January 2026
What's new?
- You can easily access a live feed of feature releases within your Growth Hub
- Check it out at any time, to see our latest 4 big feature releases
- Including links to read more or enable the feature
Labs Dashboard now shows analytics on all abandonment flows
Released 16th January 2026
What's new?
- You can now select from a drop down which flow you'd like to see the Labs report for
- The Labs report includes trend analytics from all subject line experiments
- Available on all abandonment flows that have sent 500 or more emails
- Any flows with a complete report will be available to switch between
New Options for Individual Products on Product Blocks
Released 9th January 2026
What's new?
- You can now select a dynamic product block to be individual products or collections
- These settings are conveniently in the same product block for ease of use
- Simply Select which option, then search and select your choice
- When using a Collections, we automatically de-dupe products if using multiple blocks
- When using a specific Product, we don't automatically de-dupe to honour your selection
- Once you pick your product, we'll display all of the product details in the block
- These can be used in any Flow or Campaign emails
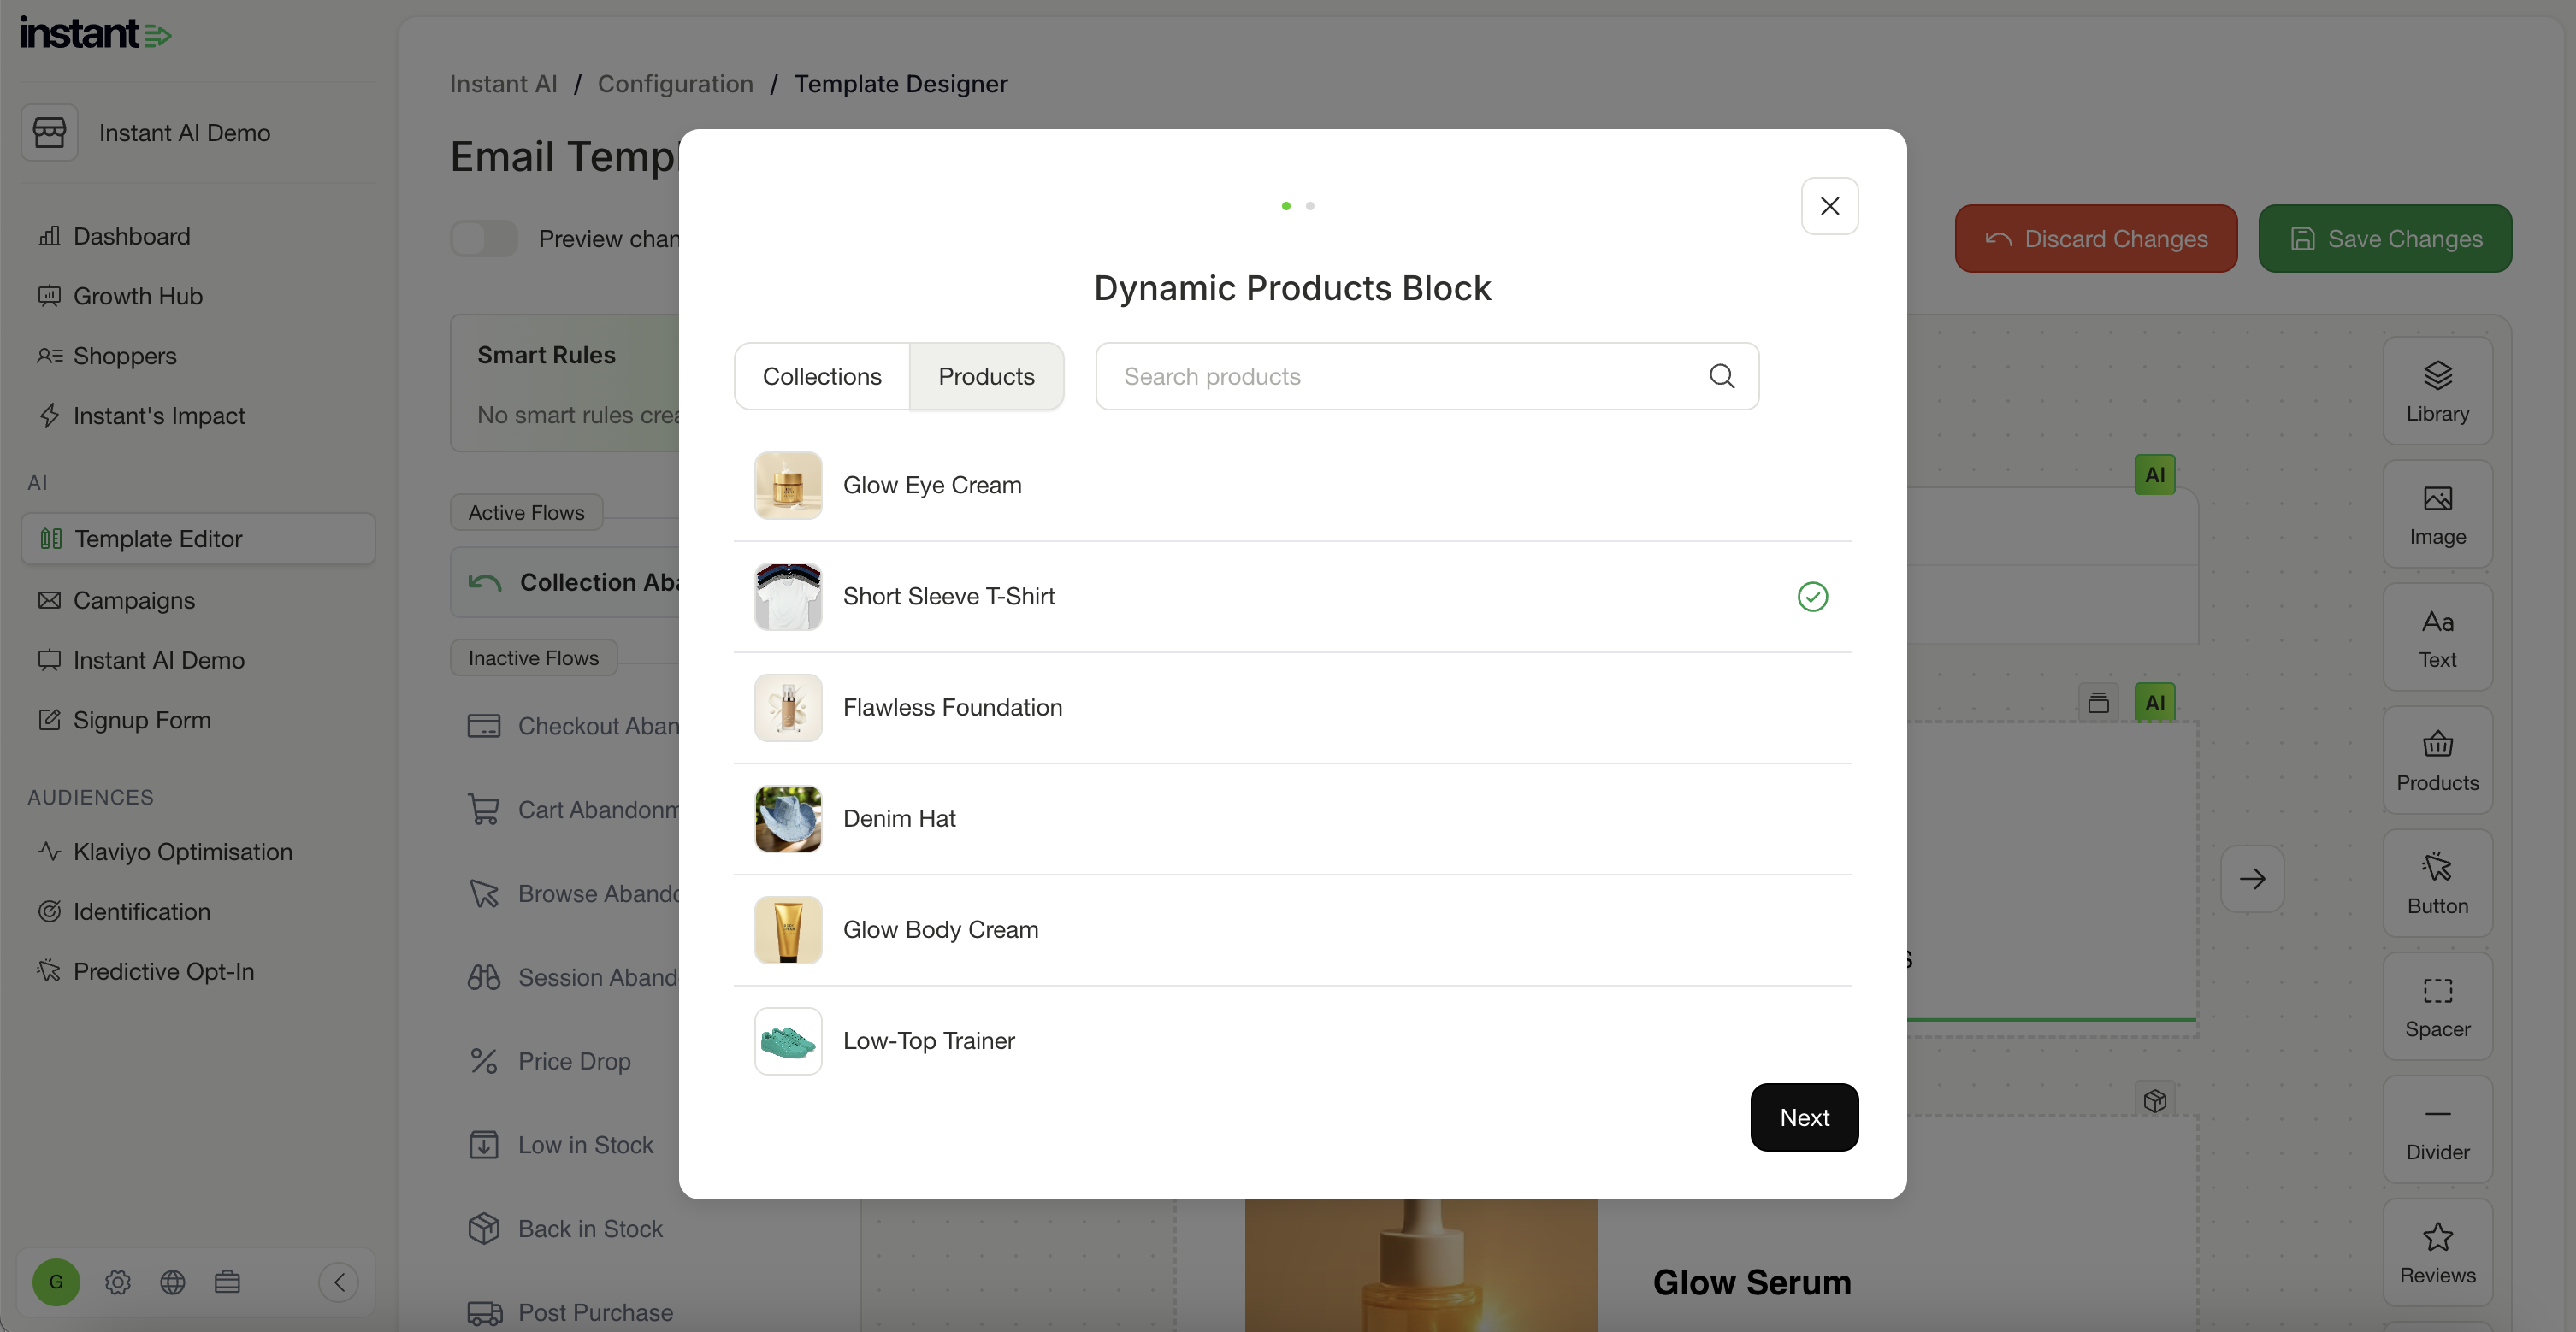
Article URL: https://help.instant.one/instant-release-notes-q1-2026
Keywords:
## How can I update my payout bank account?
We understand you may need to update your bank account details from time to time and this is absolutely something Instant can assist you with.
Currently we don't have the ability for you to adjust this yourself in the merchant dashboard. However, we are more than happy to update this for you on our end.
Please email help@instant.one with the following details:
- Merchant Name
- Bank Account Name
- BSB
- Account Number
We will update this for you within 24 hours and the changes will take affect before the next payout (every business day).
Article URL: https://help.instant.one/update-payout-account
Keywords:
## Net new identifications drive an additional 10-15% uplift in Instant generated revenue
This feature is enabled by default, and enables brands to leverage the Instant network to identify and recognise more of your anonymous, opted-in shoppers.
Over the past year, most brands using Audiences have seen significant revenue growth thanks to Instant's ability to identify anonymous, opted-in shoppers via net new identifications.
Net New Identifications:
-
Across our merchant base, we have seen net new identifications across our network account for 10-15% of the additional revenue we have generated for merchants.
-
Instant's proprietary identification resolution technology works across browsers, devices, and apps. This enables your brand to break free from the limitations of cookies and traditional methods used by platforms like Facebook, Klaviyo, and other providers which significantly assists with identifying anonymous, opted-in shoppers. Net New identifications sets our proprietary ID technology above others in market.
An example:
Imagine this scenario:
- Jane visits Website A and signs up for email marketing.
- Later, Jane visits Website B, where she is also signed up for email marketing.
- She views a product on website B but leaves without making a purchase.
Without Instant:
- Without Instant, Website B cannot recognize that Jane viewed a product unless she had very recently signed up on their site.
-
If Jane is using a different device, browser, or browsing through an app like Instagram, identifying her becomes impossible.
With Instant's Net New Identiifcations:
- Since Jane is recognized on Website A, Website B can also recognize her when she visits.
- This recognition works across any device, browser, or app she's using.
- As Jane is opted into Website B's marketing, they can now re-engage and re-market her effectively, generating additional revenue.
Without Instant, Jane would be anonymous to website B. This means Website B wouldn't have been able to recognise Jane, preventing the ability for Website B to re-market to Jane.
Instant processes billions of website interactions every month, enabling brands like yours to identify and connect with opted-in shoppers across millions of browsers and devices.
This powerful feature is already enabled on all accounts, helping brands reach more shoppers and grow revenue.
Article URL: https://help.instant.one/net-new-identifications
Keywords:
## How to exclude certain shoppers from receiving Instant AI emails
Instant AI gives you multiple ways to exclude shoppers from receiving emails. These exclusions work at different levels, depending on whether you want to stop all emails or only specific flows.
Below is a breakdown of each option, how it works, and when to use it.
Shopify tag Exclusion
Instant AI automatically imports all Shopify tags associated with a shopper profile. You can view these tags by viewing Shoppers > Opening any shopper profile > Reviewing the list of Shopify tags on their profile. Many merchants already use Shopify tags via, subscription tools, Loyalty platforms, B2B workflows, Forms, lists, or automations.
Shopify tag exclusion lets you exclude shoppers from specific flows, based on a tag.
Example
Exclude all shoppers with the tag “B2B” from the Browse Abandonment flow.
In this case:
-
Any shopper with the “B2B” tag will never enrol in that flow
-
They can still receive other flows and campaigns
-
The exclusion always applies as long as the tag remains
Visibility in the shopper profile
When viewing a shopper, you’ll see their Shopify tags and any flows they are excluded from. This makes it easy to understand why a shopper didn’t enter a flow. Shopify tag exclusions are commonly used to avoid attribution issues with subscription customers, Prevent browse or cart emails for shoppers who were already likely to purchase or handle B2B or internal customer groups cleanly.
How to Configure
To configure domain and Shopify tag exclusions:
-
Go to Settings
-
Open Email Settings
-
Select Preferences
-
Scroll down to Shopify Tags
-
Enter a list of Shopify Tags you would like to exclude
-
Select which flows to exclude them from
- Save your changes
You can use the tag instant_exclude if you would like a pre-configured tag to use, otherwise simply enter the name of the tag that you'd like to add. The tag is case sensitive so it's important to check the case and formatting to confirm it's accurately working.
Domain Exclusion
By default, Instant AI automatically excludes your own business domain and any Instant team member email domains from triggering your flows. This prevents you or your team from accidentally triggering abandonment flows and paying for emails sent to yourselves. You may also wish to manually add additional domains if you operate multiple businesses, or share domains across brands or want to exclude internal, test, or partner email addresses.
It’s important to note:
-
Shoppers with excluded domains will not enrol in flows
-
These shoppers can still receive campaigns if they explicitly subscribe
-
Domain exclusion applies automatically once configured
This is useful for avoiding unwanted flow enrolment without fully suppressing shoppers.
Manually Suppress a Profile
Suppressing a profile is the strongest form of exclusion in Instant AI. A suppressed shopper will never receive any Instant AI emails, regardless of their subscription status. This includes all flows, campaigns and any future Instant AI emails.
It’s important to note:
-
A shopper can still be marked as subscribed and suppressed at the same time
-
Suppression skips checking subscription status entirely and won't email them
-
By default, no shoppers are suppressed
How to suppress a profile
-
Go to Shoppers
-
Search for the shopper and open their profile
-
Click the three-dot menu on the right-hand side
-
Select Suppress
Once suppressed, the shopper’s profile will display a “Suppressed” badge, shown alongside their subscribed or unsubscribed status. Use suppression when you need a guaranteed, permanent exclusion for a specific shopper.
FAQs
What’s the difference between suppressing a shopper and excluding them via tags or domains?
Suppressing a shopper is a complete, permanent exclusion — they will never receive any Instant AI emails. Shopify tag and domain exclusions are more targeted and only prevent enrolment in specific flows (or flows in general), while still allowing other communications where applicable.
If a shopper is suppressed, can they still receive campaigns?
No. Suppressed shoppers will not receive any flows, campaigns, or future Instant AI emails under any circumstances.
If a shopper has an excluded domain, can they still receive emails?
Shoppers with excluded domains will not enrol in flows. They can still receive campaigns if they explicitly subscribe.
What happens if a shopper matches multiple exclusions?
The strongest rule always applies. Suppression overrides all other settings. If a shopper is not suppressed, Shopify tag and domain exclusions are evaluated next.
If I remove a Shopify tag, will the shopper be able to enter the flow again?
Yes. Shopify tag exclusions only apply while the tag is present. If the tag is removed, the shopper becomes eligible for the flow again (based on the flow’s normal entry rules).
Can I see why a shopper didn’t enter a flow?
Yes. When viewing a shopper profile, you’ll see their Shopify tags and any flows they are excluded from, making it easy to understand why they were skipped.
Article URL: https://help.instant.one/how-to-exclude-certain-shoppers-from-receiving-instant-ai-emails
Keywords:
## Managing multiple languages and currencies with Instant AI
Instant AI automatically adjusts the currency and language of your emails to be most relevant to your site and your shoppers.
Currency
The default currency for all emails will default to your default store currency from Shopify. This default is used for all test emails, and any emails where the shoppers currency isn't known (e.g. a campaign for the first time).
For Abandonment emails that are triggered from website browsing, we'll dynamically change the email content to match the currency that the user selected. If this is different to your default currency, we'll personalise it automatically to match the shoppers behaviour.
For example:
If your default store is in USD however you have a shopper located in Canada, and they change their currency to CAD while browsing your site, all of the abandonment emails sent during this time will be sent in CAD.
If this same customer is sent an email that isn't triggered from their own behaviour, such as a Campaign email, they will receive your stores default currency. This is to ensure consistent messaging and branding when the customer isn't receiving an email regarding their own transactions.
Language
The default language for all emails generated by Instant AI is English.
We use different localisations of English (e.g. US or British English) based on your Shopify default location. For example, if your Shopify timezone is set to an United States timezone, we will default all copy to US English. Or if your Shopify timezone is set to an Australian timezone, we will default all copy to British English.
There is an advanced option for Global brands to have their AI copy generated in the language unique to every shopper. This is available for brands who want to have multiple languages running at once and use AI to manage the translation. This is not available by default to help you remain on brand to a global audience. If you would like the language to be personalised to your individual shoppers, please contact our support team or your Customer Success Manager to discuss setting this up.
FAQ's
Why did my shopper see a different currency to my default store currency?
If you notice a live shopper email showing a different currency, it usually reflects their own browsing settings. If a shopper changed their currency to one that's different to your default then we'll dynamically change it to match their cart currency. For example, if your store is default to USD, and someone changes their currency to CAD, we'll continue to email the shopper in CAD so that the pricing is relevant to them.
To confirm, open the Email Preview. Each email preview shows a Shopper Timeline with what triggered the send and which settings were applied, so you can see exactly why a particular currency appeared.
Why do my test emails always show one currency?
Test emails always default to your store’s currency, even if you support others. If you're stores currency is USD, the test emails will always send in USD or if your stores currency is AUD, the test emails will always send in AUD. This behaviour occurs for test emails only and will dynamically change depending on the user settings.
Can I force all emails to only use my store’s default currency?
Instant AI will always honour the currency that the user selected so that it matches their cart. If your settings in Shopify support a customer to change their currency in their cart, we'll match that currency so that their emails and their shopping behaviour are in sync.
Article URL: https://help.instant.one/how-instant-ai-manages-different-languages-and-currency
Keywords:
## How to Manage Exclusions with Instant AI Coupons
Sometimes you need more control over how coupons are applied. For example, you may want to:
-
Limit discounts to certain products or collections
-
Control how discounts combine with other offers
-
Set custom rules for free shipping or maximum discount amounts
In these cases, you’ll need to create and manage your coupons in Shopify, then connect them to Instant AI.
How to Create a Discount with Exclusions in Shopify
-
In your Shopify admin, go to Discounts → Create Discount.
-
Select the type of discount you want (e.g. Amount off products, Percentage off, or Free shipping).
-
Add your discount details (value, code name, usage limits, start/end date).
-
Under Applies to, select whether the discount applies to specific collections or products, and exclude any items you don’t want discounted.
-
Under Minimum requirements, set any spend or quantity rules.
-
Under Combinations, decide whether this coupon can be used with other discounts.
-
Save the discount.
Once this is set up, you can connect it to Instant AI.
Connecting Your Shopify Coupon to Instant AI
-
In Instant AI, go to ⚙️ Settings → Coupons.
-
Select Shopify Coupons and choose your existing Shopify discount.
-
Instant AI will generate unique, single-use codes, per shopper, from this parent discount, automatically respecting all of your Shopify rules.
How Instant AI Applies Coupons
-
If at least one product in the email is eligible, the coupon will be included.
-
If no products are eligible, the coupon will be skipped.
-
The expiry date and minimum spend from your Shopify settings will automatically display on the coupon.
-
At checkout, Shopify will always validate the discount, ensuring excluded products never receive a discount.
Adjusting Coupon Settings in Instant AI
Click the ⚙️ Settings on the Coupons page, to refine how coupons work:
-
Choose which flows the coupon will apply to (e.g. Browse, Cart, Checkout, Welcome). The same coupon applies across all selected flows.
-
Decide when the coupon should appear in the flow (Beginning, Middle, End). By default, coupons are placed in the Middle of all flows except Welcome.
-
Optionally allow coupons to stack with shipping discounts.
FAQs
Can I use exclusions with Smart Coupons?
No. Smart Coupons are automatically generated by Instant AI and apply to all products. If you need exclusions or custom rules, use Shopify Coupons.
What happens if an excluded product is featured in an email?
Instant AI checks eligibility before sending. If no products are eligible, the coupon will be skipped.
Do Shopify rules still apply at checkout?
Yes. Shopify always enforces exclusions and rules at checkout, even if a coupon was shown in an email.
Can I apply different coupons to different flows?
The one coupon amount you select will apply across all flows you enable it for.
Article URL: https://help.instant.one/how-to-manage-exclusions-with-instant-ai-coupons
Keywords:
## How do I setup Audiences flows alongside another provider?
If you’re using Instant Audiences alongside another provider with Klaviyo abandonment flows, it’s important to set things up correctly.
This guide will help you prioritize Instant Audiences in your email flows, ensuring you get the best results without overlapping with other providers.
1. Setup your flow delays:
For each flow (like Browse Abandonment, Add to Cart Abandonment, etc.), ensure that Instant Audiences comes first in your email delivery order:
- Step 1: Your original Klaviyo flow should trigger first.
- Step 2: The Instant Audiences flow should trigger 15 minutes after your original Klaviyo flow.
- Step 3: If you’re using another provider’s flow, set it to trigger 15 minutes after Instant Audiences.
Example:
- If your original Browse Abandonment flow triggers after 1 hour,
- Set Instant Audiences to trigger at 1 hour and 15 minutes, and
- Your other provider’s flow to trigger at 1 hour and 30 minutes.
How do you setup the Audiences flows?
Even when setting up Audiences in parallel to another identity resolution provider, continue to set-up the Audiences flows as usual. If you are unsure how to setup the Audiences flows, we have help guides available here.
Apply filters to prevent duplicate emails
To avoid the other provider's flows from sending emails to the same customers that either Klaviyo or Instant has already identified, you need to filter out people who have already been identified by Klaviyo or Instant from each of the flows.
Please apply the following filters to each flow on the other provider.
Browse Abandonment Flow
For the other provider’s Browse Abandonment flow, add these filters:
-
Product Viewed - Instant Audiences: zero times since starting this flow
-
Product Viewed - Instant Audiences: zero times in the last 1 day
-
Viewed Product: zero times since starting this flow
-
Viewed Product: zero times in the last 1 day
-
Added to Cart: zero times since starting this flow
- Item Added to Cart - Instant Audiences: zero times since starting this flow
-
Checkout Started: zero times since starting this flow
- Cart Viewed / Checkout Started - Instant Audiences: zero times since starting this flow
-
Received Email: zero times in the last 7 days for Instant Audiences’ Browse Abandonment flow
-
Received Email: zero times in the last 7 days for the original Browse Abandonment flow
Add to Cart Abandonment Flow
For the other provider’s Add to Cart flow, add these filters:
-
Item Added to Cart - Instant Audiences: zero times since starting this flow
-
Item Added to Cart - Instant Audiences: zero times in the last 1 day
-
Added to Cart: zero times since starting this flow
-
Added to Cart: zero times in the last 1 day
-
Checkout Started: zero times since starting this flow
- Cart Viewed /Checkout Started - Instant Audiences: zero times since starting this flow
-
Received Email: zero times in the last 7 days for Instant Audiences’ Added to Cart Abandonment flow
-
Received Email: zero times in the last 7 days for the original Added to Cart Abandonment flow
Checkout Started Flow
For the other provider’s Checkout Started flow, add these filters:
-
Cart Viewed / Checkout Started - Instant Audiences: zero times since starting this flow
-
Cart Viewed / Checkout Started - Instant Audiences: zero times in the last 1 day
-
Checkout Started: zero times since starting this flow
-
Checkout Started: zero times in the last 1 day
-
Received Email: zero times in the last 7 days for Instant Audiences’ Checkout Abandonment flow
-
Received Email: zero times in the last 7 days for the original Checkout Abandonment flow
Conclusion
Setting up flows correctly is important to ensure that the maximum amount of abandoned customers are being abandoned, whilst not sending out duplicate emails.
By following our setup guides, you will ensure that your Klaviyo flows are set-up correctly and operating without issues.
If you need help at anytime with your Klaviyo flow setup, please reach out to your customer success manager, or email help@instant.one at anytime.
Article URL: https://help.instant.one/audiences-setup-alongside-provider
Keywords:
## How does Instant AI handle bot activity?
Bots are automated programs that simulate human behaviour online. In the context of ecommerce, bots can create fake transactions, run fraudulent credit card activity, inflate customer lists, and trigger automated email flows with invalid or fabricated contact details.
No single tool or platform can eliminate bot activity entirely. Effective bot management is a shared responsibility across your ecommerce stack, your store platform, your email tools, and you as the merchant all play a role. This article explains how Instant AI fits into that picture: what we do automatically, what you can configure, and where the limits of our control are.
How It Happens
Bot activity originates at the store level. When a bot completes a checkout or abandons a cart on your Shopify store, it creates a customer record and triggers downstream tools like Instant AI to respond. By the time Instant AI sees that shopper, the bot has already entered your system.
Sophisticated bots are particularly difficult to catch because they are designed to look like real customers. They rotate IP addresses to avoid being blocked by location, mask their geographic origin to appear as legitimate shoppers, and often use realistic-looking names and email addresses that pass standard validation checks. Some are even capable of completing real transactions with stolen payment details, which makes them indistinguishable from a genuine customer at the point of checkout.
Shopify is the first line of defence. It is where transactions originate and customer records are created. Shopify provides native fraud scoring on orders and flags high-risk transactions, but it does not automatically block all bot activity, particularly from sophisticated bots that pass checkout validation. Merchants can extend Shopify's capabilities with third-party fraud detection apps available in the Shopify App Store, and this is often the most impactful place to intervene.
What You Can Do About It with Instant AI
The following protections are applied to all Instant AI customers without any configuration required.
Email Address Validation Before any email is sent, Instant AI runs every address through two industry-standard authentication services — NeverBounce and ZeroBounce. These services check whether an address is real and deliverable, likely to bounce, or associated with known bot or spam activity. If an address fails validation, Instant AI will not send to it and will stop processing that contact's details. This catches a large proportion of bot-generated addresses, which are often randomised, invalid, or tied to known spam infrastructure.
Bounce & Retry Logic Instant AI uses SendGrid for email delivery. If an email is sent and bounces, Instant AI applies delayed retry logic — skipping the next send attempt for that address. This protects your sender reputation if a bot is cycling through the same invalid address repeatedly.
What You Can Configure
Domain Exclusions If you have identified specific domains that are consistently associated with bot activity, you can add them to Instant AI's domain exclusion settings. Any shopper whose email matches an excluded domain will be skipped from flow enrollment entirely. This list can be updated at any time as new patterns emerge.
Examples of domains you might exclude:
- A domain appearing repeatedly in fraudulent orders (e.g.
nyvexis.com)
- A foreign institutional domain being exploited (e.g.
edu.tr)
- A known test or placeholder domain (e.g.
example.com)
See: How to Exclude Certain Shoppers from Receiving Instant AI Emails
What Is Outside of Our Control
Some bot behaviours fall outside of what Instant AI — or any email tool — can reliably detect or prevent.
Order name or customer name patterns — Instant AI does not filter flow enrollment based on customer names. Name-based detection is unreliable and risks excluding legitimate customers.
Low-value order amounts — Instant AI does not filter based on order or product value. This is better handled upstream at the Shopify or checkout level using fraud scoring.
IP address and location masking — Sophisticated bots rotate IP addresses and spoof their location. Instant AI does not have access to IP-level data and cannot use this as a filtering signal.
Bots using valid email addresses — If a bot uses a real, deliverable address that passes NeverBounce and ZeroBounce validation, Instant AI has no way to automatically identify it as a bot. In these cases, manual identification and domain exclusion is the only available option.
Article URL: https://help.instant.one/how-does-instant-ai-handle-bot-activity
Keywords:
## What to do if you're not receiving your Instant Pin Code to Login (OTP)
Some customers have reported that they don’t receive their login pin code emails, especially when using an email address from an organisation that’s hosted on Outlook. Occasionally, this happens because certain email providers (like Outlook) may block or delay emails from our system. If you experience this, simply retrying the login process can sometimes fix the issue. The system will send another pin code, and this second attempt often gets through.
Step 1: Check your spam and junk folders
Search for an email from Instant in your spam, junk, or promotions folder. Sometimes security filters quietly redirect our emails before you see them.
Step 2: Try requesting the code again
Go back to the login page and request a new code. Our system will send a fresh one. This second attempt often gets through.
⚠️ Important: Only use the most recent code you receive. If you've requested the code multiple times, earlier codes will no longer be valid — only the latest one will work.
Step 3: Try a different browser or device
If you're receiving the code but it's saying "verification failed", try:
- Switching to Chrome or Firefox (if you're using Safari or Edge)
- Logging in from your phone instead of your work computer
- Clearing your browser cache and cookies, then trying again
Step 4: Try a personal email address
If you're using a work email (especially one hosted on Outlook, or a company domain with corporate IT management), your organisation's email security may be filtering our codes. Try asking your account admin to add a personal email address to your account instead.
Step 5: Ask your IT team to whitelist Instant
If you have access to an IT team, ask them to whitelist the Instant email sending domain so that our login codes are marked as safe and always delivered. This is the most permanent fix for corporate email environments.
Still stuck?
If none of the above has worked, please contact our support team. We have an alternative login method available — instead of receiving a code by email each time, we can switch your account to use a password instead.
To request this, remail Instant Support and let us know:
- Your email address
- The name of your store/account
- That you'd like to switch to password-based login
We may require verification from you to confirm your identify, and we'll get you set up as quickly as possible.
Article URL: https://help.instant.one/how-to-fix-pin-code-login-problems
Keywords:
## Email compliance best practices in Australia
Like any email marketing software, it's important that you use Instant in a way that protects your brand reputation and is compliant with Australian spam regulations.
1. Only send compliant emails
Australia's Spam Act 2003 and the Spam Regulations outline your responsibilities as an email sender in Australia.
When sending an email, ensure that it clearly identifies you as the sender and contains your contact information.
- Don’t use false or misleading header information: Your “From,” “To,” “Reply-To,” and routing information – including the originating domain name and email address – must be accurate and identify the person or business who initiated the message.
- Don’t use deceptive subject lines: The subject line must accurately reflect the content of the message.
- Tell recipients where you’re located: Your message must include your valid physical postal address. This should be your company's registered address.
- Tell recipients how to opt out of receiving future email from you: Your email must include a clear and conspicuous explanation of how the recipient can opt out of getting email from you in the future. Give a return email address or another easy Internet-based way to allow people to communicate their choice to you. You may create a menu to allow a recipient to opt out of certain types of messages, but you must include the option to stop all commercial messages from you.
- Honour opt-out requests promptly: Any opt-out mechanism you offer must be able to process opt-out requests for at least 30 days after you send your message. You must honour a recipient’s opt-out request within 5 business days. You can’t charge a fee, require the recipient to give you any personally identifying information beyond an email address, or make the recipient take any step other than sending a reply email or visiting a single page on an Internet website as a condition for honouring an opt-out request. Once people have told you they don’t want to receive more messages from you, you can’t sell or transfer their email addresses, even in the form of a mailing list.
2. Only send emails to engaged shoppers
In Australia, you may only send marketing emails to consumers who've engaged with your brand in some way.
This means that you cannot email someone who has never visited your website, purchased from you, subscribed to a newsletter, or similarly engaged with your business.
Instant Audiences will never provide you with the email address of someone who has not previously engaged with your brand.
3. Keep your privacy policy and terms up to date
When implementing any new website analytics product, businesses should update their privacy policies to keep their customers informed.
When implementing Instant merchants must update their privacy policies. The following clause is our standard recommendation:
We use Instant to help us understand how our customers use our site, and use this information to retarget for marketing purposes. You can read more about how Instant uses your Personal Information here: https://www.instant.one/privacy-policy. You can opt-out by contacting help@instant.one
Merchants should also obtain legal advice specific to their businesses.
4. Consider brand reputation when sending emails
From product pricing and visual identity to product manufacturing quality and marketing strategies, everything you do as a business impacts your brand.
Australians react relatively well to email marketing tactics. In 2020, Australia had the second highest click-to-open rate in the world for marketing emails.
Shopper engagement marketing is incredibly common in online retail. Even the most premium brands utilise cart abandonment marketing, discounts for returning shoppers, and other strategies to maximise customer lifetime value.
Merchants can use insights from Instant Audiences to trigger a variety of email marketing campaigns from their email marketing software. While most choose to configure each of our recommended marketing flows, some innovate and create additional flows, while others only implement a subset of our recommended flows. We encourage brands to find what is right for them, balancing business growth and brand reputation.
Article URL: https://help.instant.one/audiences-best-practices-au
Keywords:
## How to reset your API key
If you have lost access to your API key, navigate to your Apps and Sales channels to reset your API key.
Step 1 : Go to Settings and In the Overview tab, select Uninstall app from the top-right corner.
-3-2.png)
Step 2: Click Uninstall.
-2-1.png)
Step 3: To generate a new API key, click Install App.
-1-1.png)
Step 4: Click Install.
-4-1.png)
Step 5: Click Reveal token once.
-3-1.png)
Step 6: Copy the access token.
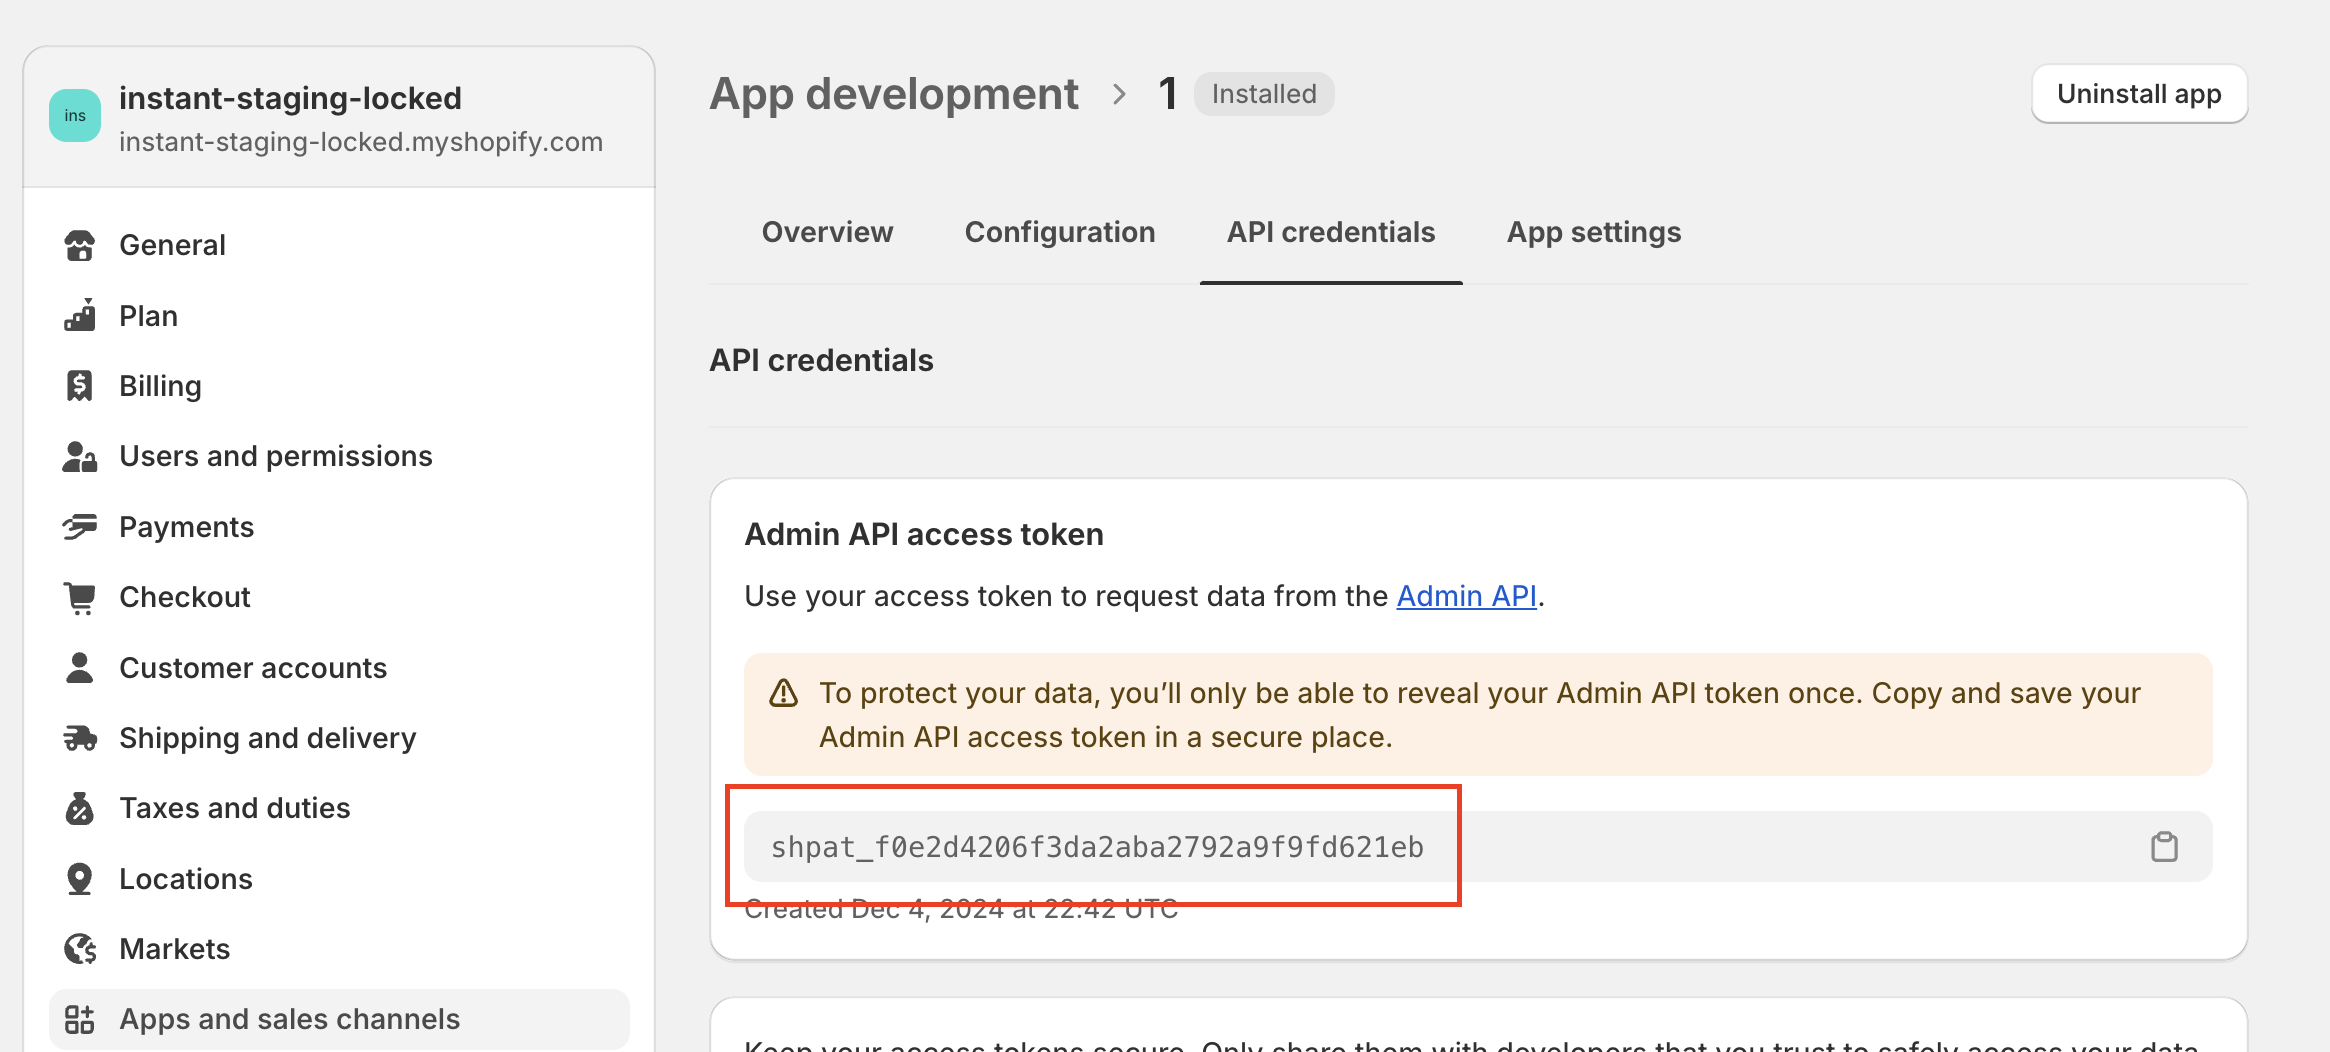
Step 7: Log into your Instant Dashboard and select Configuration in the left hand panel.
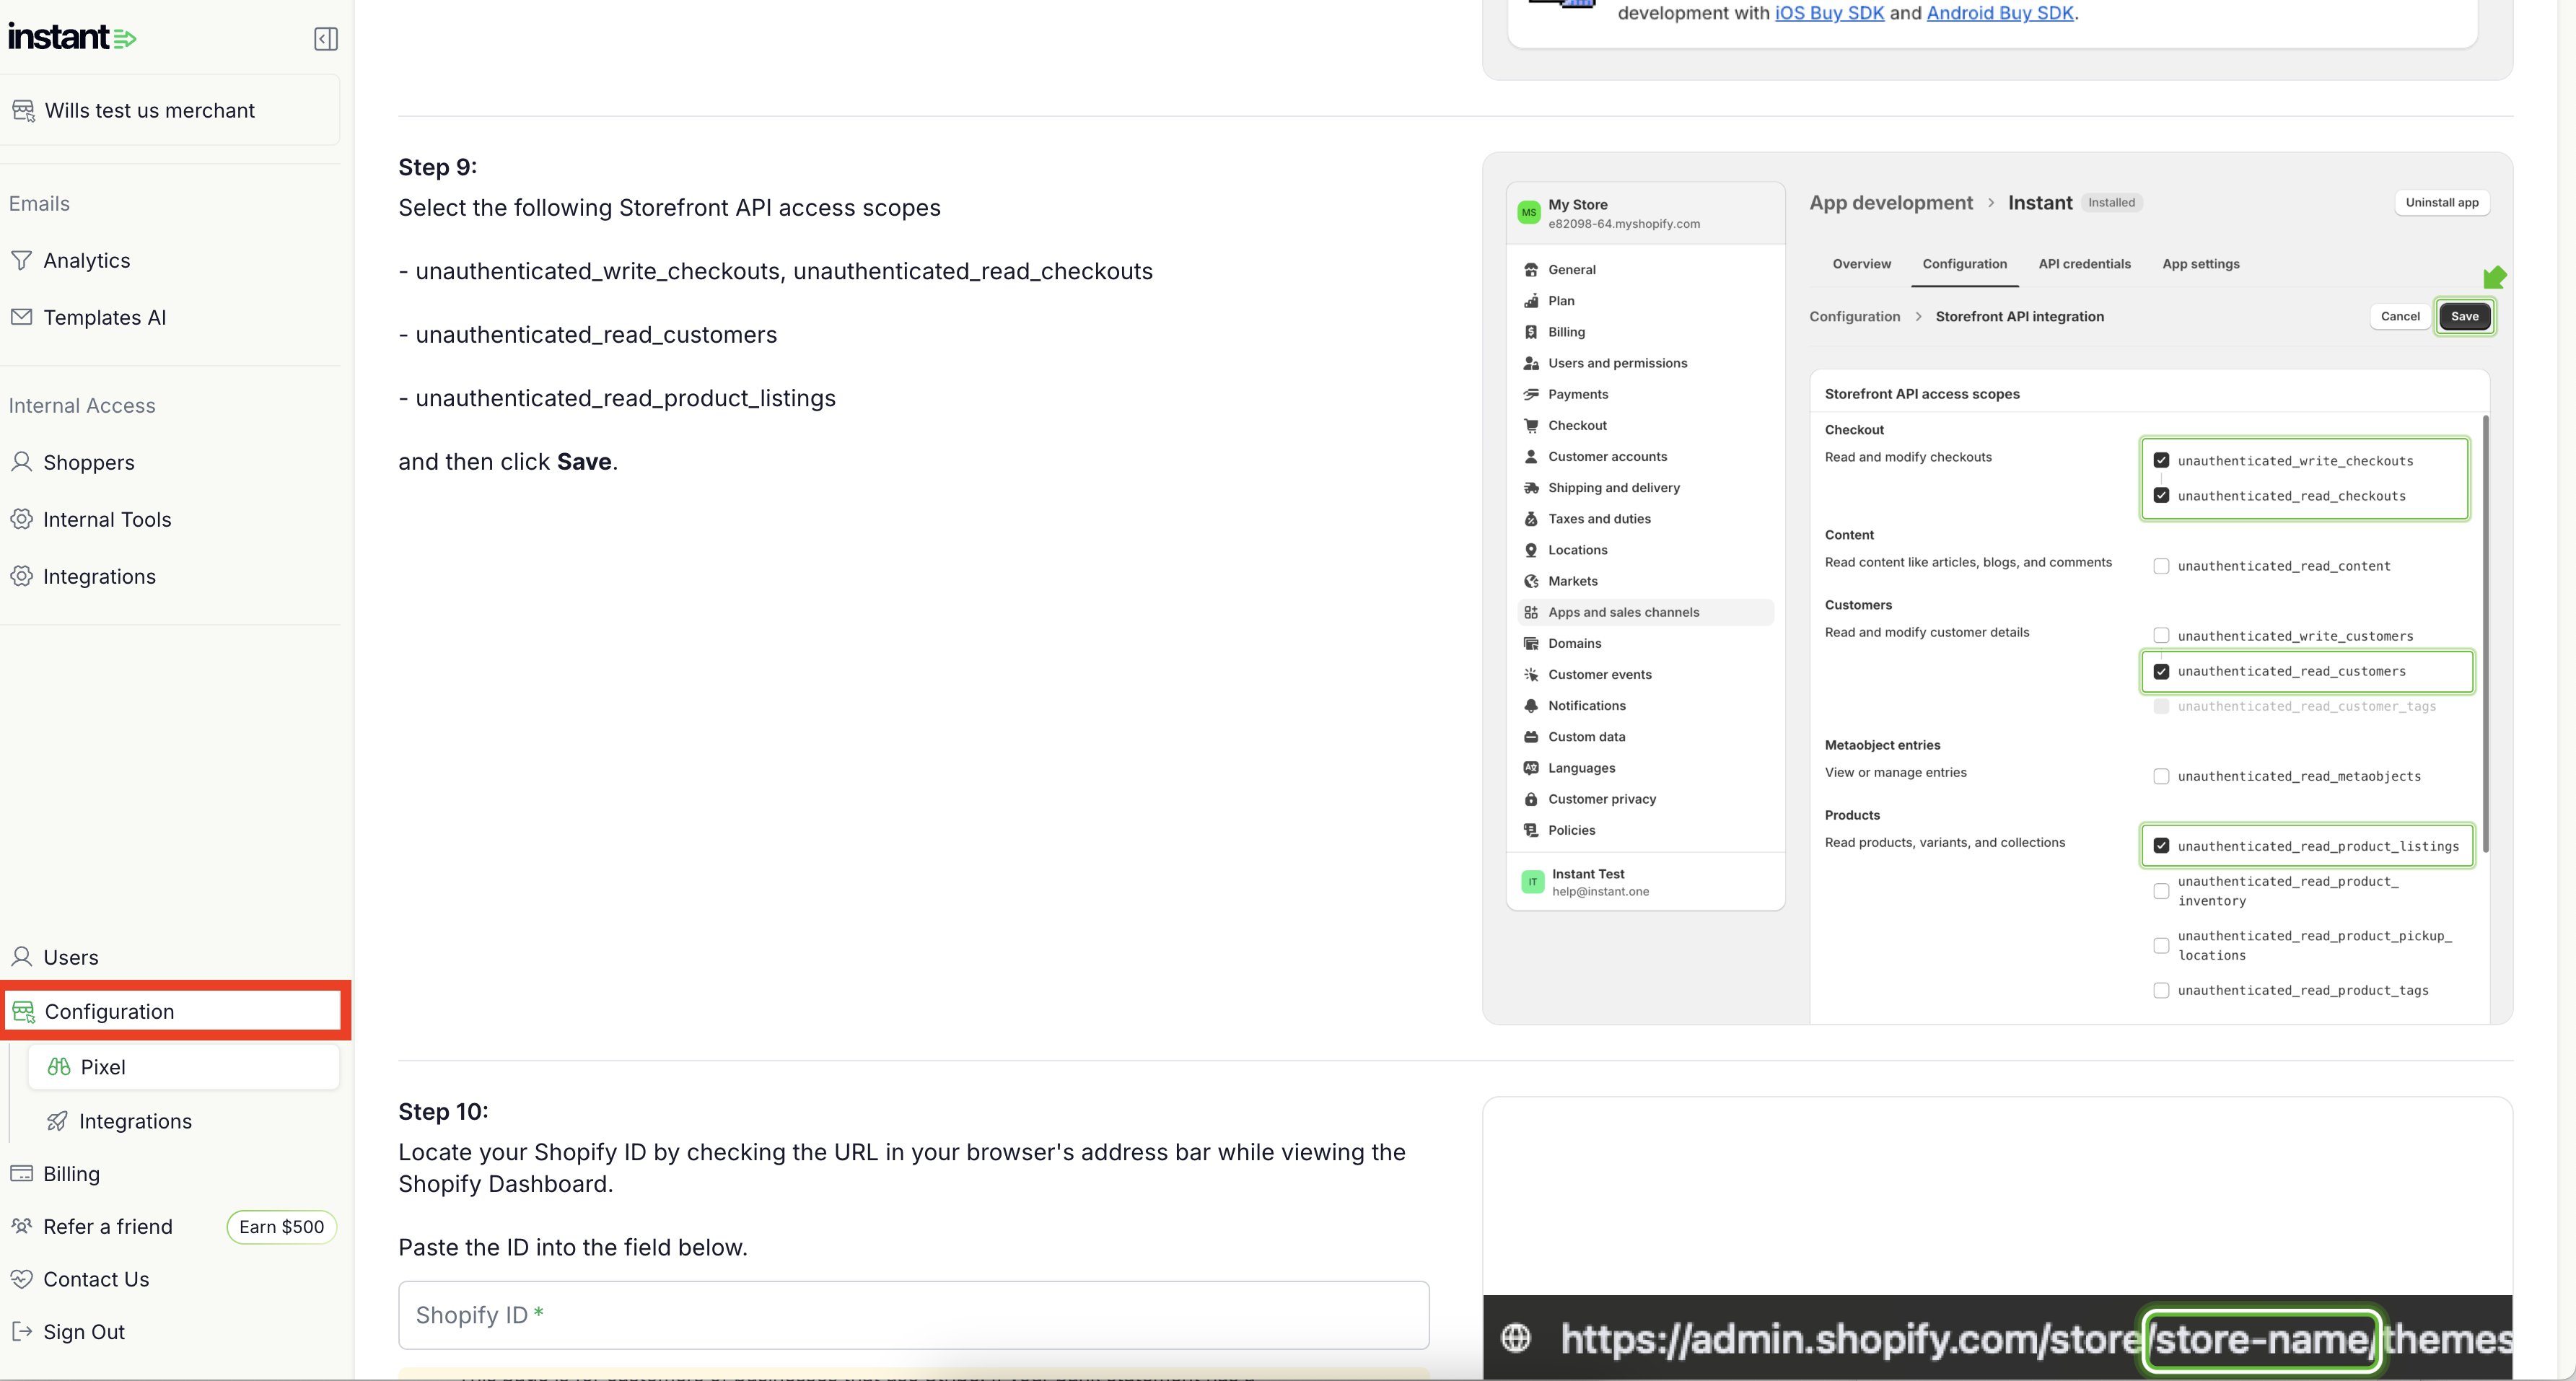
Step 8: Click on the 'Step 2: API Setup' tab and scroll down to Step 11. Next, paste the access token into the Access Token field and click Verify.
-4-1.png)
Article URL: https://help.instant.one/reset-api-key
Keywords:
## How to Manage Coupons with Instant AI
Instant AI supports adding coupons to your flows, to create further incentives to convert customers. These coupons are created as new offers that are automatically added to every email, if they are configured to particular flows.
This strategy is common if you wish to further incentivise high-intent actions to a conversion like in an Abandoned Checkout email, or offer a thankyou gift for subscribing such as giving 10% off in a Welcome Flow email. Coupons are created in addition to any sales or external offers on your site and are offered exclusively within Instant AI emails.
How it works
There are multiple options available when configuring a Coupon with Instant AI.
When creating a coupon you can customise settings such as:
- Coupon Type
- Coupon Amount
- Minimum order requirement
- If eligible to combine with other offers (if it can be stacked with other coupons)
- Which flows it can be offered on
When a customer enrols into a flow, and you have coupons configured, we'll automatically generate and include the coupon in your emails. This coupon is generated directly through our Shopify integration so that a customer can take your coupon and use it at checkout to complete their purchase.
How to find the code
The coupon will show as a part of the AI Body Copy block in your emails for all flows you've configured it to be included. We'll automatically switch the body copy to include the coupon when it meets your coupon configuration.
You don't need to update any templates or flows, simply enable the coupon and we'll take care of the rest. If you want to alter the design of the coupon you can try a different design of the body copy block. If you need to see the codes that have already been sent, you can see these in the email preview of every past sent email
Any coupons configured to apply to your Welcome Flow will automatically show on your pop-up and send immediately on the first touchpoint.
How to set up or change your coupon method
- Go to Settings → Coupons in your Instant dashboard
- Select Add Coupons on the right
- Select the type of coupon you would like to create
- Smart Coupon
- % off the Total Order Value
- $ off the Total Order Value
- Free Shipping
- Existing Shopify Discount
(Select this if you don't want Instant to make a new coupon, and you want to configure all of the requirements yourself in Shopify then map an existing code)
- Depending on which option you pick, you'll be prompted to pick the amount you would like to offer as a part of this code. The settings you input will be created as a new code
- Lastly, we'll show you a preview of the coupon code settings about to apply
- We'll default to the most common flows in your coupon configuration, however if you want to edit this simply click Edit and override any details
- Once you're happy that all of the coupon settings are accurate, just click save
- If you want to configure multiple coupons, such as different coupons per flow, simply repeat the above process for the remaining flows
TIP: You can only have one coupon per flow at a time. If you want to replace a coupon please remove the existing coupon first.
FAQ's
What code is sent to the customer?
By default, Instant AI will always generate a unique coupon per interaction. This means that every customer will get a unique code, every time they quality for a coupon. This is a key strategy to drive urgency and ensure the coupon code isn't misused by personalising the expiry date and use of the code direct to that individual person, on that individual action.
If you wish to use a single code for all customers, you can configure this option during the coupon set up. However it is recommended to continue using a unique code to help more accurately track expiry dates and keep your offer exclusive so it can't be shared.
What flows will the coupon apply to?
Coupons can be configured to apply to a single flow, or multiple flows. If a coupon has been applied to multiple flows then those business rules will apply everywhere.
For example, if you create a 10% off code and apply it to Abandoned Checkout and Abandoned Cart, the same coupon rules will apply to both flows however every customer will continue to get a unique code, specific to their interaction. They will receive their very own code that they must use while their cart is active. If they don't use their code it will expire so that it can't be used with any other future offer
How do customers redeem their coupon?
If an Instant AI coupon is being offered in an email, any customers can click on their CTA buttons or anywhere in the email and have the coupon automatically applied to their checkout. A customer can also choose to copy and paste or manually input the coupon code for it to apply at checkout.
Customers will only be eligible to redeem their coupon if they meet all the conditions that you have configured (e.g. a minimum spend). This is all managed at the Shopify level once the coupon has been created.
How long does a coupon last when it's sent to a customer?
Each of our coupons show an expiry date which is 48 hours, after the last email touchpoint. For example, if you have a flow with 3 emails and the last email is set to send 72 hours after the first interaction, then the coupon will expire +48 hours from that last date. This is to give sufficient timing so that the coupon can be used for the duration of the entire flow.
How is the expiry date format determined on my coupon?
The date format used on Instant AI emails is determined by the location of the recipient. We use the IP address of the recipient to determine the locale.
For example, if interacting with a website while in the US, I will receive my email with the expiry date formatted in US format (MM/DD). However if interacting with a website while in AUS, I will receive my email with the expiry date formatted in AU (DD/MM).
If we cannot determine the location of the recipient for any reason, we will default to the date format of your site. For example, if your site is predominately in the US then we'll prioritise US formatting in the instance we can't verify their location
How do I find a coupon in Shopify that Instant has created?
The email previews on the Instant Dashboard can easily show you what code has been sent to a customer.
If you need to find a coupon that's been generated, you can either search for the coupon in Shopify, by searching INSTANT_COUPON_<insert coupon number> or you can use the Coupons tab on the Instant dashboard to also search and save having to log back into Shopify. Simply copy and paste the coupon from a customers email and find it through one of the above methods.
If you are using Smart coupons, you can follow the same methods but use SMART_COUPON_<insert coupon number>.
Article URL: https://help.instant.one/how-to-manage-coupons-with-instant-ai
Keywords:
## How do I exclude traffic from specific countries?
We automatically filter out traffic from EU countries, but you can also restrict visitors from other countries through your dashboard.
Steps to Exclude Traffic:
1. Log into your dashboard
2. In the left-hand panel, select Integrations.
3. Under Integrations, click the Klaviyo icon.
4. In the pop up window, click Add Country Restriction
5. From the drop-down menu, select the countries you would to include in your traffic. By default, any country not selected will be excluded.
6. Click Update.
8. Your changes will take effect immediately, and traffic will be adjusted accordingly.
If you have any questions regarding this or need additional assistance, please feel free to contact help@instant.one
Article URL: https://help.instant.one/exclude-countries
Keywords:
## Enabling Instant AI SMS in Australia
Before we can activate SMS for your account, Australian regulations require us to verify your business name, registration number, and business address.
This process helps ensure your messages are compliant with carrier and government rules for business communications.
What you’ll need to upload
To complete SMS verification, you’ll need to provide one document for each of the following:
-
Proof of Business Registration — verifies your business name and registration number.
-
Proof of Business Address — verifies your business’s registered or operating address.
You can upload these directly from your dashboard under Enable SMS → Upload Documents, as shown below.
Proof of Business Registration
How to find it
You can download this from the Australian Business Register (ABR) or your government portal.
Search your business name or ABN, then click Download Business Summary or View ABN Details.
What it looks like
What it needs to show
To be accepted, your document must:
Why we need it
This verifies that the SMS messages you send originate from a legitimate, registered business — a legal requirement for SMS compliance in Australia.
Proof of Business Address
How to find it
You can use any official document that shows your business name and address.
Common examples include:
-
Utility bill (electricity, internet, water)
-
Lease agreement or rental contract
-
Recent tax notice or rates bill
-
Bank statement or title deed
What it looks like
A document or scanned copy that includes:
What it needs to show
To be accepted, your document must:
-
Be issued within the last 6 months
-
Show your business name and full address
-
Match the details you entered in your SMS setup form
Why we need it
This confirms your business is physically located in Australia — required by local carriers to prevent spam and misuse of sender numbers.
Why your address must match exactly
The single biggest reason SMS applications get rejected is a mismatched address. Carriers compare the address on your business registration, the address on your proof of address document, and the address you entered in your SMS setup form. If any of them don't match, your application is rejected and you'll need to resubmit.
To avoid rejection:
- Copy your address directly from your business registration document into the setup form. Don't retype it from memory.
- Use the same format across every field. If your registration says "Street," don't shorten it to "St" elsewhere.
- Include your unit or suite number if your registration has one. Leaving it off counts as a mismatch.
- Avoid PO Boxes. Carriers typically require a physical street address.
- Check your registration is current. If you've moved, update your address with the ABR before applying.
If you're not sure whether your details match, the safest approach is to download a fresh copy of your business summary from the ABR right before you apply, and copy directly from that.
Upload tips
-
Upload one clear document per section.
-
Accepted formats: PDF, JPG, DOCX, or PNG.
-
Make sure all information is visible — cropped or blurry images may be rejected.
What happens next
Once you’ve uploaded both documents and clicked Submit, we will verify them and ensure you're set up to send SMS from all mobile carriers in Australia.
You’ll receive a confirmation email once SMS is active — typically within 1–3 business days.
Article URL: https://help.instant.one/enabling-instant-ai-sms-in-australia
Keywords:
## What metrics does Instant Audiences send to Klaviyo?
Instant Audiences sends numerous metrics to Klaviyo. This article describes what those metrics are, and when those metrics are fired.
Below is a table explaining what the Instant Audiences metrics are, and when each Instant Audiences metric is fired in Klaviyo.
| Metric Type |
When is this Metric fired? |
| Page Viewed |
Fired when someone views a page.
This event will also trigger when someone views a product or cart. For example, if someone views a product, both the Page Viewed and Product Viewed will fire.
|
| Product Viewed |
Fired when someone views any product page. This metric will fire multiple times if someone views a product multiple times.
|
| Item Added to Cart |
Fired when someone adds an item to cart, or increases the quantity of any item in their cart.
This metric will fire multiple times if multiple items are being added to the cart in one go.
For example, if you add a bundled product that has 5 products, 5 separate Item Added to Cart metrics will be fired for each item.
|
| Cart Viewed |
Fired when someone views a cart page. This metric will fire multiple times if someone views a cart page multiple times. |
| Checkout Started |
Fired when someone views a checkout page. This metric will fire multiple times if someone views the checkout page multiple times.
This metric will also fire when a customer progresses through parts of the checkout stage, e.g. completing personal or address information will trigger this metric.
|
| Cart Viewed / Checkout Started |
Fired when either the "Cart Viewed" and "Checkout Started" events are fired.
This metric is used to enable simple flow creation, as a single flow can be used for both Cart Viewed and Checkout Started, instead of creating two separate flows.
|
Article URL: https://help.instant.one/metrics-sent-to-klaviyo
Keywords:
## How can I get support?
The Instant team is here to help
Instant is customer first, proactive and dedicated to providing accessible, conversational service.
Instant Help is available via Chat & Email through the following channels:
- Emailing help@instant.one
- Logging a ticket through the form on the knowledge hub
- Speaking to the chatbot on the knowledge hub
- Speaking to the chatbot on the seller dashboard
Our team is available during business hours and committed to responding to any queries by end of day. For urgent enquires we will respond within one hour.
Article URL: https://help.instant.one/support-inquiry
Keywords: contact,support email,contact instant,contact us
## Manual Payment Reviews
While Instant's automated systems work to prevent fraud on your account, if required we can support manual reviews to provide an extra layer of fraud protection allowing you to give certain payments a manual inspection.
For example, you might want to review transactions that:
- Have an elevated risk of fraud according to Instant’s fraud protection system
- Were made from outside your country
- Are greater than a certain amount
- Use an email address from an unusual domain
If you would like to enable manual review or know more about the rules applied to payments or make changes please contact help@instant.one
Manual Payment Review Process
To access your dashboard, navigate to: https://checkout.instant.one/seller
A OTP will be sent to your email, contact us if you cannot log in.
Once you are logged in, navigate to Payments > Reviews. Here you will see a list of transactions that have been flagged for review.
Click View to access more information about the transaction or to approve or decline it.
Clicking "Decline" the transaction will be cancelled and the payment will be refunded to the card holder.
Clicking "Approve" will confirm the order and the transaction will be removed from the Transaction Reviews list.
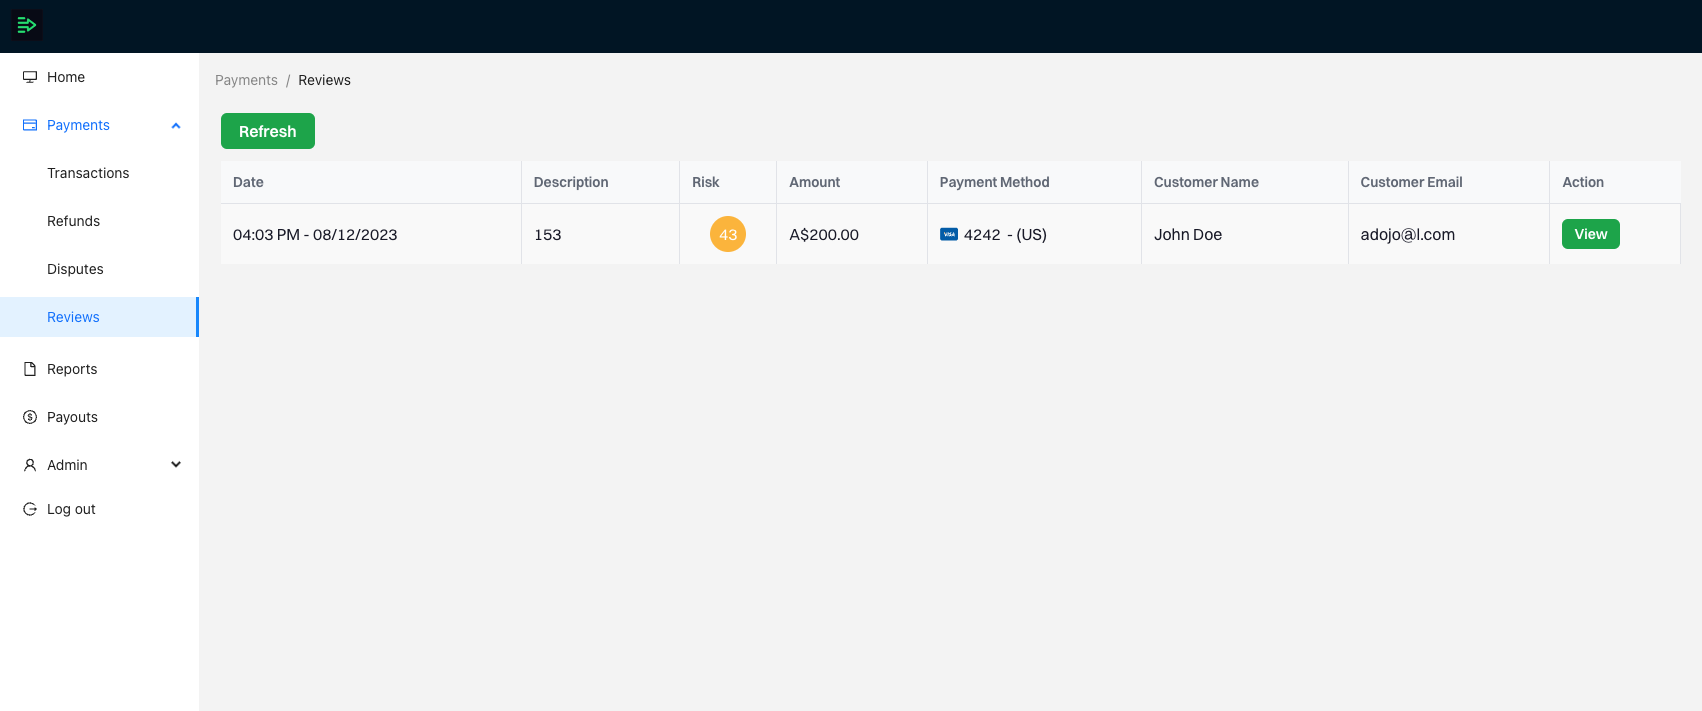
.png)
Article URL: https://help.instant.one/manual-reviews
Keywords:
## Understanding Email Intensity with Instant AI
Learn how you can control the frequency of sending emails and how aggressive you would like your email sending strategy to be
Email Intensity controls the overall aggressiveness of your email sending strategy in Instant AI.
Instead of setting exact send delays or cooldown times for individual flows, you choose an intensity level. Instant AI then automatically manages how quickly emails send and how soon shoppers can re-enter flows, based on context and shopper intent. This approach keeps your email strategy simple to manage while ensuring emails are sent at the right moments.
TIP: To see your settings, visiting Settings > Brand > Scroll down to Email Intensity
What Email Intensity Controls
Your selected Email Intensity affects two key behaviours across all abandonment flows:
- How quickly emails send after a shopper abandons an action
- How long shoppers must wait before re-entering a flow
Higher intensity levels send emails sooner and allow faster re-enrolment. Lower intensity levels space emails out more conservatively.
How Intent Influences Timing
Not all abandonment events indicate the same level of purchase intent. Instant AI takes this into account automatically.
High-intent flows, such as Cart Abandonment and Checkout Abandonment, use shorter cooldowns so shoppers are contacted sooner. Lower-intent flows, like Browse Abandonment, Session Abandonment, and other non-checkout flows, wait longer between sends.
Your chosen intensity level determines how aggressive or conservative this behaviour is overall, while Instant AI handles the details for each flow.
Email Intensity Levels
Email Intensity ranges from Very Low to Very High. Instant AI automatically applies different timing for high- and low-intent flows within each level.
- Very High prioritises fast follow-ups and quicker re-enrolment, especially for high-intent flows.
- High balances speed with restraint for lower-intent behaviour.
- Medium offers a balanced approach between engagement and frequency.
- Low spaces emails out further to reduce overall volume.
- Very Low is the most conservative option, designed to minimise email frequency and shopper fatigue.
Example Timing Behaviour
The table below shows how Email Intensity currently applies cooldowns. These values are managed centrally and may evolve as Instant AI expands its optimisation logic. At every intensity level, high-intent flows always send sooner than lower-intent flows.
| Intensity |
High-Intent Flows |
Lower-Intent Flows |
| Very High |
~1 day |
~2 days |
| High |
~3 days |
~6 days |
| Medium |
~7 days |
~10 days |
| Low |
~10 days |
~14 days |
| Very Low |
~14 days |
~18 days |
Why Email Intensity Replaces Manual Timing
Email Intensity removes the need to manage individual send delays or cooldown rules. By choosing an overall intensity, you define how your email strategy should feel. Instant AI then applies the most appropriate timing across flows, adapts to shopper intent, and allows future improvements without requiring additional configuration.
You can update your Email Intensity at any time, and changes apply automatically across all flows.
Article URL: https://help.instant.one/understanding-email-intensity-with-instant-ai
Keywords:
## How AI subject lines work in Campaigns
 Instant AI can now generate a unique subject line and preview text for every shopper who receives your campaign. Instead of writing one subject line that has to work for everyone, every shopper gets one written specifically for them.
There's no winning variant, because every shopper gets the variant written for them. A first-time subscriber sees something different than a loyal customer. Someone who just abandoned a cart sees something different than someone who hasn't visited in a month. All from the same campaign, all generated automatically.
---
### **How it works**
When AI Subject Lines is enabled on a campaign, Instant AI does two things:
1. **Reads your campaign in full:** the text, images, and everything in between to understand the message you're sending.
2. **Looks at what we know about each individual shopper:** whether they've bought before, visited your website recently, or abandoned a cart.
It then generates a unique subject line and preview text for every shopper, tailored to your campaign content and where that shopper is in their buying cycle.
This replaces the traditional approach of A/B testing to find a single subject line that performs best across your whole list. With AI Subject Lines, every shopper effectively gets their own version.
---
### **How to enable AI Subject Lines on a campaign**
1. Open the campaign you want to edit (or start a new one)
2. Hover over an email in your sequence and hit the ‘Edit’ button
3. On Subject and Preview line inputs, you’ll notice a toggle for **AI Subject Lines. Turn that** on.
4. Save and schedule your campaign as normal
To see the subject lines that go out, go to **Campaigns > Activity** for a live log of every subject line and preview text sent.
---
### **FAQ**
**Can I still write my own subject line?**
Yes. If you'd prefer to use your own copy, leave AI Subject Lines off and write the subject line and preview text manually in the campaign editor.
**Where can I see what subject line each shopper received?**
Go to **Campaigns > Activity** for a live log of every subject line and preview text as emails send.
**Is this the same as the AI subject lines already used in flows?**
Yes, it's the same personalisation logic, now available for campaigns. For flows like Welcome and abandonment, Instant AI has always generated personalised subject lines and preview text per shopper. This release brings that capability to campaigns too.
Article URL: https://help.instant.one/how-ai-subject-lines-work-in-campaigns
Keywords:
## How Does the Brand Kit Work?
**How does the Brand Kit work?**
Your Brand Kit is the central branding for your whole store. It is the single source of styling that Instant AI applies to every email and signup form, so everything stays on brand without you setting it up by hand. Any change you make to your Brand Kit applies everywhere.
**How your Brand Kit is created**
When you connect your store, Instant scrapes your site and builds your Brand Kit automatically. We pull in your logo, colours, type hierarchy, button styling, and image styling so your emails match your site from the start. Everything is populated for you, and you can edit any of it at any time.
**To view and edit your Brand Kit:**
1. Go to **Instant AI > Brand Kit**
2. Review the snapshot of your logo, colours, and typography
3. Click **Edit branding** in the top-right corner
4. Select the **edit pencil** next to the section you want to change
5. Make your changes and watch the preview update on the right
6. Click **Save changes**
**What your Brand Kit includes**
Each section controls a different part of your email styling:
- **Logo.** The logo used across your emails and forms.
- **Colours.** Your core brand palette.
- **Typography.** The font and size for each text level. Heading 1 (headings in Hero or Body blocks), Heading 2 (subheadings in Campaigns), Heading 3 (product names), Body (paragraph copy and product pricing), Caption (links in headers and footers), and Button (text labels in buttons).
- **Spacing.** The default spacing rhythm used across your blocks.
- **Button.** The styling of your primary button, including shape, border, fill and text colour, and button typography.
- **Images.** The preferred styling of image blocks, including shape, border radius, and border.
**Previewing your changes**
As you edit, the canvas on the right shows what your emails will look like with your new styling. Use the **Blocks**, **Flows**, and **Review** tabs to switch views, scroll around the canvas to see different emails and blocks, and use the zoom controls in the top-right of the canvas to look closer.
> **Tip:** Your Brand Kit sets the default for everything. If you want a different look on a single email, you can override the styling manually on that individual email in the editor, without changing your Brand Kit.
> **Note:** The Brand Kit only styles Instant AI blocks. If a block uses custom HTML, or the content is baked into an image (for example a call to action that is part of the image itself), the Brand Kit cannot restyle it.
**FAQ**
**Do my changes apply to existing emails, or only new ones?**
They apply everywhere. Your Brand Kit is the central styling for your whole store, so any change you save carries across all your emails and signup forms.
**I edited my Brand Kit but an email did not update. Why?**
The Brand Kit only drives Instant AI powered blocks. If part of an email is not changing, check that block's formatting. Content built with custom HTML, or a call to action that sits inside an image rather than as a button, is not something the Brand Kit can restyle. In those cases you will need to edit the block directly.
**Can I style one email differently from the rest?**
Yes. Set your default in the Brand Kit, then override the styling on any individual email in the email editor. The override applies only to that email.
**Where does the styling come from in the first place?**
We build your Brand Kit by scraping your live site when you connect your store, so it reflects your existing branding automatically. You can adjust any section from **Instant AI > Brand Kit > Edit branding** whenever you like.
Article URL: https://help.instant.one/how-does-the-brand-kit-work
Keywords:
## Sharing Your Email Usage Data with Instant
If you're using Klaviyo and need to find out your usage metrics to pass on to a sales rep from Instant, follow the steps below.
**How to find Abandonment flow revenue**
1. Visit [https://www.klaviyo.com/flows](https://www.klaviyo.com/flows)
2. Ensure the following filters are applied: Status is **Live**, Metric Period is **Last 30 days**, Metric is **Shopify - Placed Order**
3. Search for your abandonment flows (e.g. type *abandon* in the search bar)
4. Sum up all the revenue figures and share that total with us
Instant AI can now generate a unique subject line and preview text for every shopper who receives your campaign. Instead of writing one subject line that has to work for everyone, every shopper gets one written specifically for them.
There's no winning variant, because every shopper gets the variant written for them. A first-time subscriber sees something different than a loyal customer. Someone who just abandoned a cart sees something different than someone who hasn't visited in a month. All from the same campaign, all generated automatically.
---
### **How it works**
When AI Subject Lines is enabled on a campaign, Instant AI does two things:
1. **Reads your campaign in full:** the text, images, and everything in between to understand the message you're sending.
2. **Looks at what we know about each individual shopper:** whether they've bought before, visited your website recently, or abandoned a cart.
It then generates a unique subject line and preview text for every shopper, tailored to your campaign content and where that shopper is in their buying cycle.
This replaces the traditional approach of A/B testing to find a single subject line that performs best across your whole list. With AI Subject Lines, every shopper effectively gets their own version.
---
### **How to enable AI Subject Lines on a campaign**
1. Open the campaign you want to edit (or start a new one)
2. Hover over an email in your sequence and hit the ‘Edit’ button
3. On Subject and Preview line inputs, you’ll notice a toggle for **AI Subject Lines. Turn that** on.
4. Save and schedule your campaign as normal
To see the subject lines that go out, go to **Campaigns > Activity** for a live log of every subject line and preview text sent.
---
### **FAQ**
**Can I still write my own subject line?**
Yes. If you'd prefer to use your own copy, leave AI Subject Lines off and write the subject line and preview text manually in the campaign editor.
**Where can I see what subject line each shopper received?**
Go to **Campaigns > Activity** for a live log of every subject line and preview text as emails send.
**Is this the same as the AI subject lines already used in flows?**
Yes, it's the same personalisation logic, now available for campaigns. For flows like Welcome and abandonment, Instant AI has always generated personalised subject lines and preview text per shopper. This release brings that capability to campaigns too.
Article URL: https://help.instant.one/how-ai-subject-lines-work-in-campaigns
Keywords:
## How Does the Brand Kit Work?
**How does the Brand Kit work?**
Your Brand Kit is the central branding for your whole store. It is the single source of styling that Instant AI applies to every email and signup form, so everything stays on brand without you setting it up by hand. Any change you make to your Brand Kit applies everywhere.
**How your Brand Kit is created**
When you connect your store, Instant scrapes your site and builds your Brand Kit automatically. We pull in your logo, colours, type hierarchy, button styling, and image styling so your emails match your site from the start. Everything is populated for you, and you can edit any of it at any time.
**To view and edit your Brand Kit:**
1. Go to **Instant AI > Brand Kit**
2. Review the snapshot of your logo, colours, and typography
3. Click **Edit branding** in the top-right corner
4. Select the **edit pencil** next to the section you want to change
5. Make your changes and watch the preview update on the right
6. Click **Save changes**
**What your Brand Kit includes**
Each section controls a different part of your email styling:
- **Logo.** The logo used across your emails and forms.
- **Colours.** Your core brand palette.
- **Typography.** The font and size for each text level. Heading 1 (headings in Hero or Body blocks), Heading 2 (subheadings in Campaigns), Heading 3 (product names), Body (paragraph copy and product pricing), Caption (links in headers and footers), and Button (text labels in buttons).
- **Spacing.** The default spacing rhythm used across your blocks.
- **Button.** The styling of your primary button, including shape, border, fill and text colour, and button typography.
- **Images.** The preferred styling of image blocks, including shape, border radius, and border.
**Previewing your changes**
As you edit, the canvas on the right shows what your emails will look like with your new styling. Use the **Blocks**, **Flows**, and **Review** tabs to switch views, scroll around the canvas to see different emails and blocks, and use the zoom controls in the top-right of the canvas to look closer.
> **Tip:** Your Brand Kit sets the default for everything. If you want a different look on a single email, you can override the styling manually on that individual email in the editor, without changing your Brand Kit.
> **Note:** The Brand Kit only styles Instant AI blocks. If a block uses custom HTML, or the content is baked into an image (for example a call to action that is part of the image itself), the Brand Kit cannot restyle it.
**FAQ**
**Do my changes apply to existing emails, or only new ones?**
They apply everywhere. Your Brand Kit is the central styling for your whole store, so any change you save carries across all your emails and signup forms.
**I edited my Brand Kit but an email did not update. Why?**
The Brand Kit only drives Instant AI powered blocks. If part of an email is not changing, check that block's formatting. Content built with custom HTML, or a call to action that sits inside an image rather than as a button, is not something the Brand Kit can restyle. In those cases you will need to edit the block directly.
**Can I style one email differently from the rest?**
Yes. Set your default in the Brand Kit, then override the styling on any individual email in the email editor. The override applies only to that email.
**Where does the styling come from in the first place?**
We build your Brand Kit by scraping your live site when you connect your store, so it reflects your existing branding automatically. You can adjust any section from **Instant AI > Brand Kit > Edit branding** whenever you like.
Article URL: https://help.instant.one/how-does-the-brand-kit-work
Keywords:
## Sharing Your Email Usage Data with Instant
If you're using Klaviyo and need to find out your usage metrics to pass on to a sales rep from Instant, follow the steps below.
**How to find Abandonment flow revenue**
1. Visit [https://www.klaviyo.com/flows](https://www.klaviyo.com/flows)
2. Ensure the following filters are applied: Status is **Live**, Metric Period is **Last 30 days**, Metric is **Shopify - Placed Order**
3. Search for your abandonment flows (e.g. type *abandon* in the search bar)
4. Sum up all the revenue figures and share that total with us
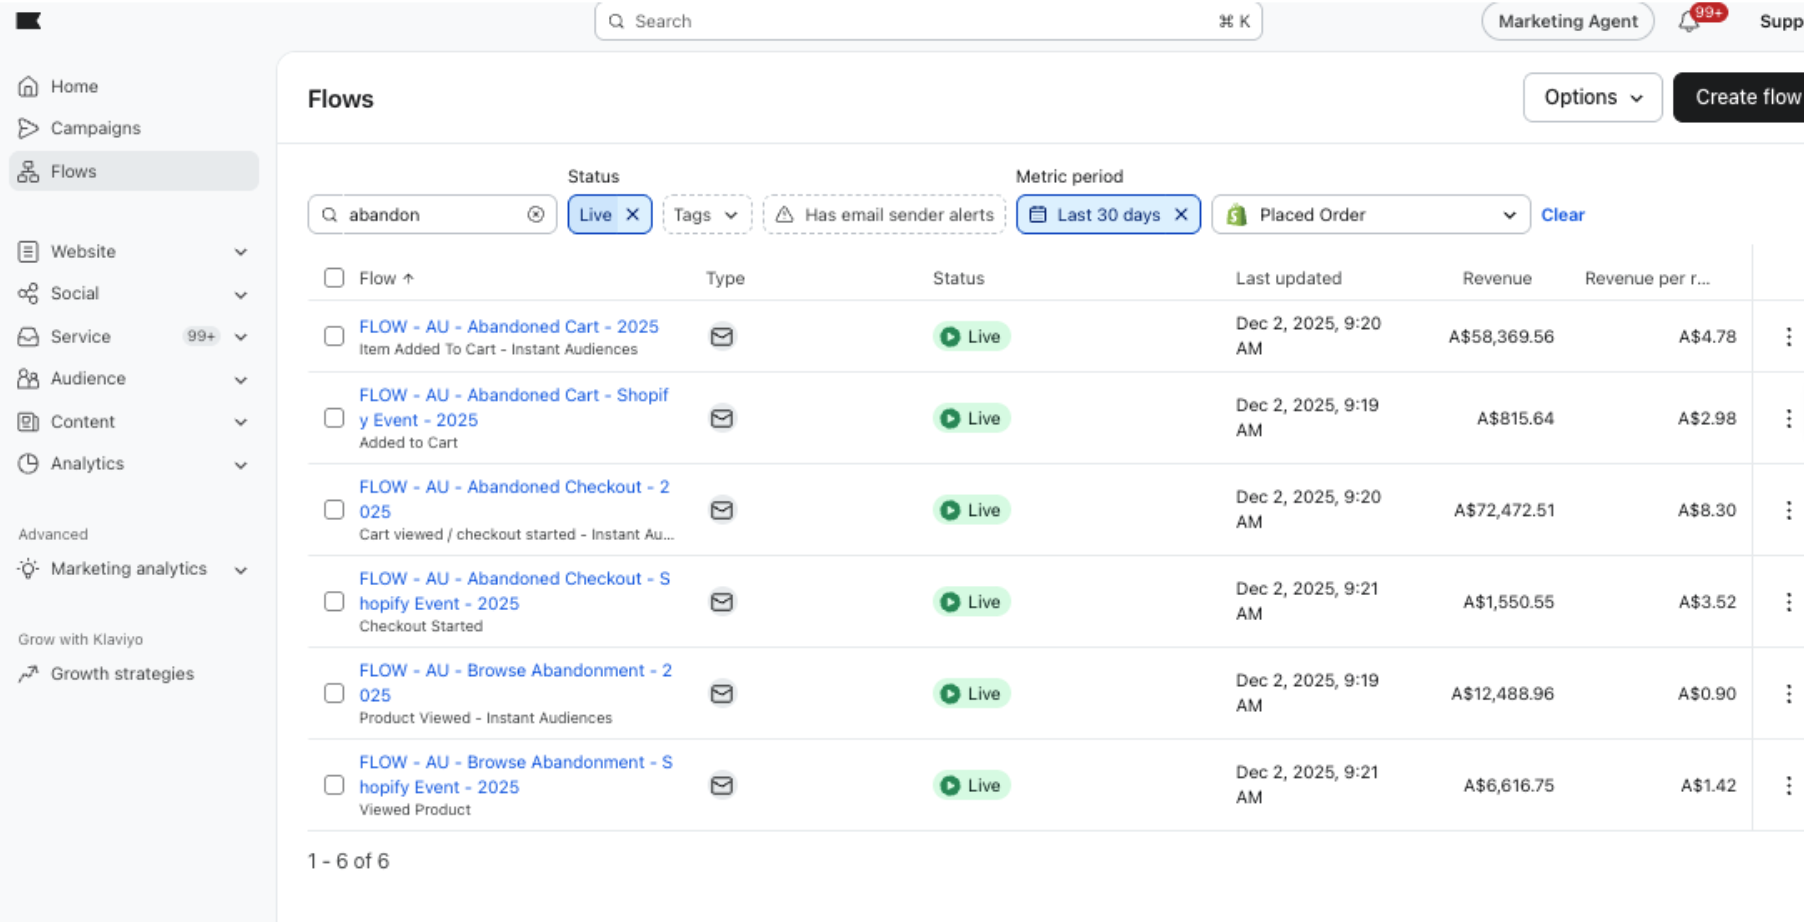 ---
**How to find Flow Email sends and Campaign Email sends**
1. Visit [https://www.klaviyo.com/settings/billing/account-usage](https://www.klaviyo.com/settings/billing/account-usage)
2. Scroll down to **Email Usage**
3. Change **Timeframe** to Last 6 months
4. Change **View** to Message Types
5. Hover over an average month
6. Share with us the **Flow Sends** number and **Campaign Sends** number
---
**How to find Flow Email sends and Campaign Email sends**
1. Visit [https://www.klaviyo.com/settings/billing/account-usage](https://www.klaviyo.com/settings/billing/account-usage)
2. Scroll down to **Email Usage**
3. Change **Timeframe** to Last 6 months
4. Change **View** to Message Types
5. Hover over an average month
6. Share with us the **Flow Sends** number and **Campaign Sends** number
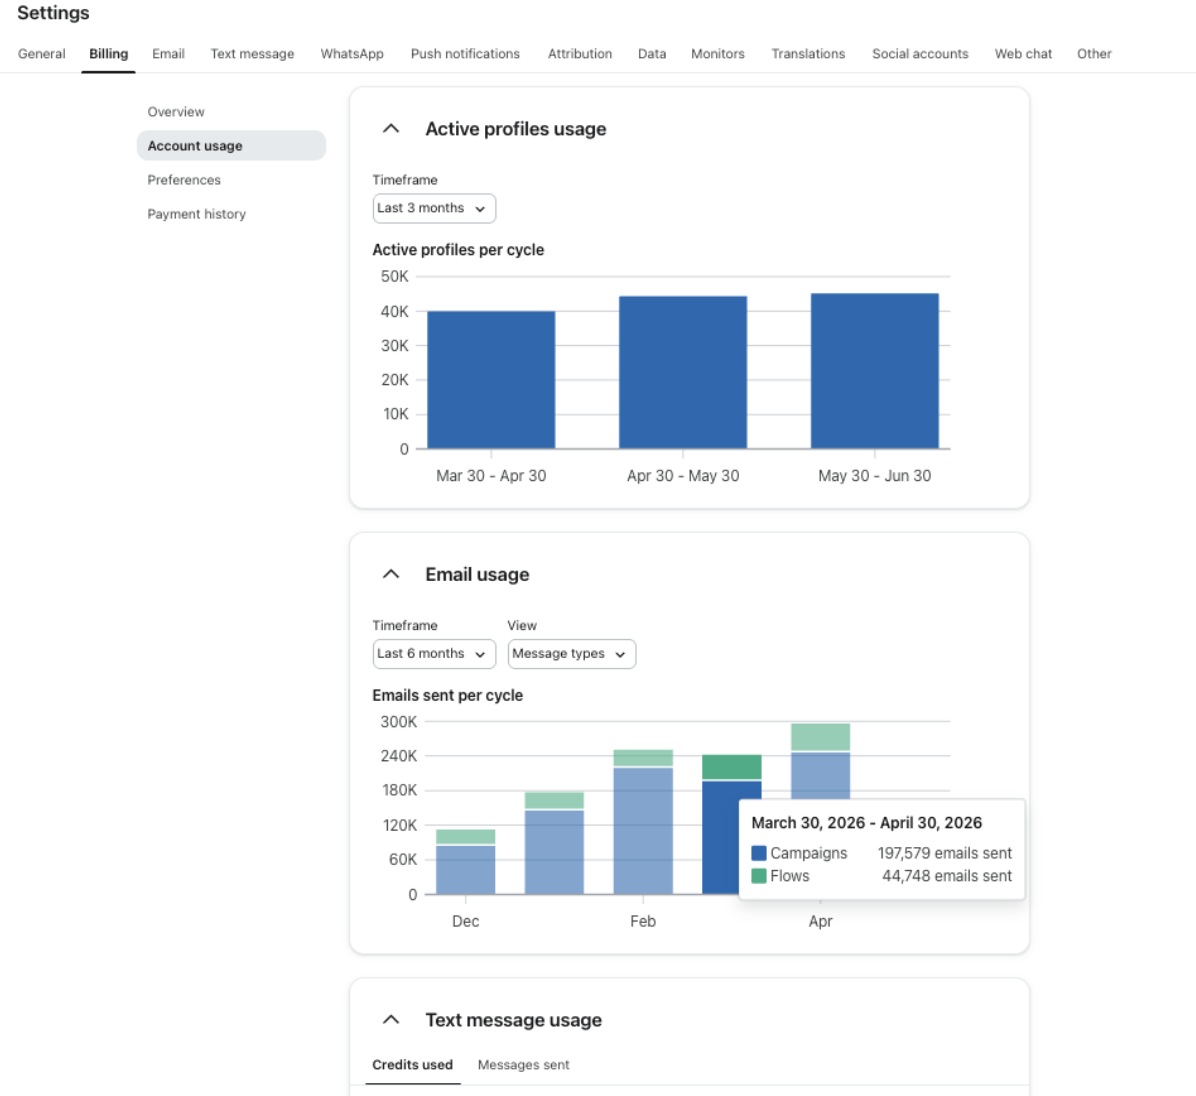 ---
**How to find Welcome Flow sends**
1. Visit [https://www.klaviyo.com/flows](https://www.klaviyo.com/flows)
2. Search for your live Welcome flow and click into it
---
**How to find Welcome Flow sends**
1. Visit [https://www.klaviyo.com/flows](https://www.klaviyo.com/flows)
2. Search for your live Welcome flow and click into it
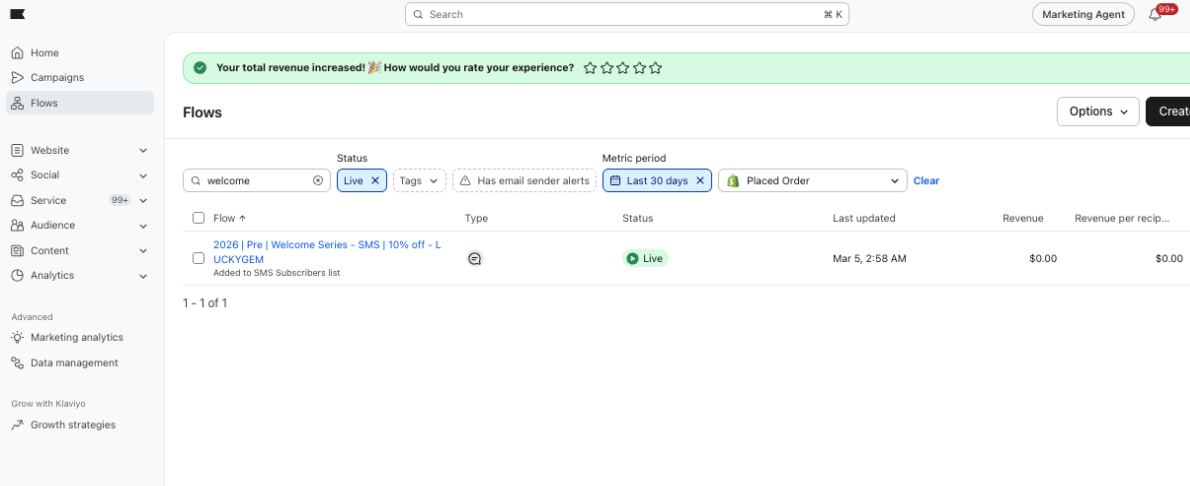 3. Change the time scale to **Last 30 days** at the top right
4. Click the **Analytics** button at the top right (graph icon)
5. Sum up all the **Delivered** numbers across your various emails in that flow
6. Share that number with us
3. Change the time scale to **Last 30 days** at the top right
4. Click the **Analytics** button at the top right (graph icon)
5. Sum up all the **Delivered** numbers across your various emails in that flow
6. Share that number with us
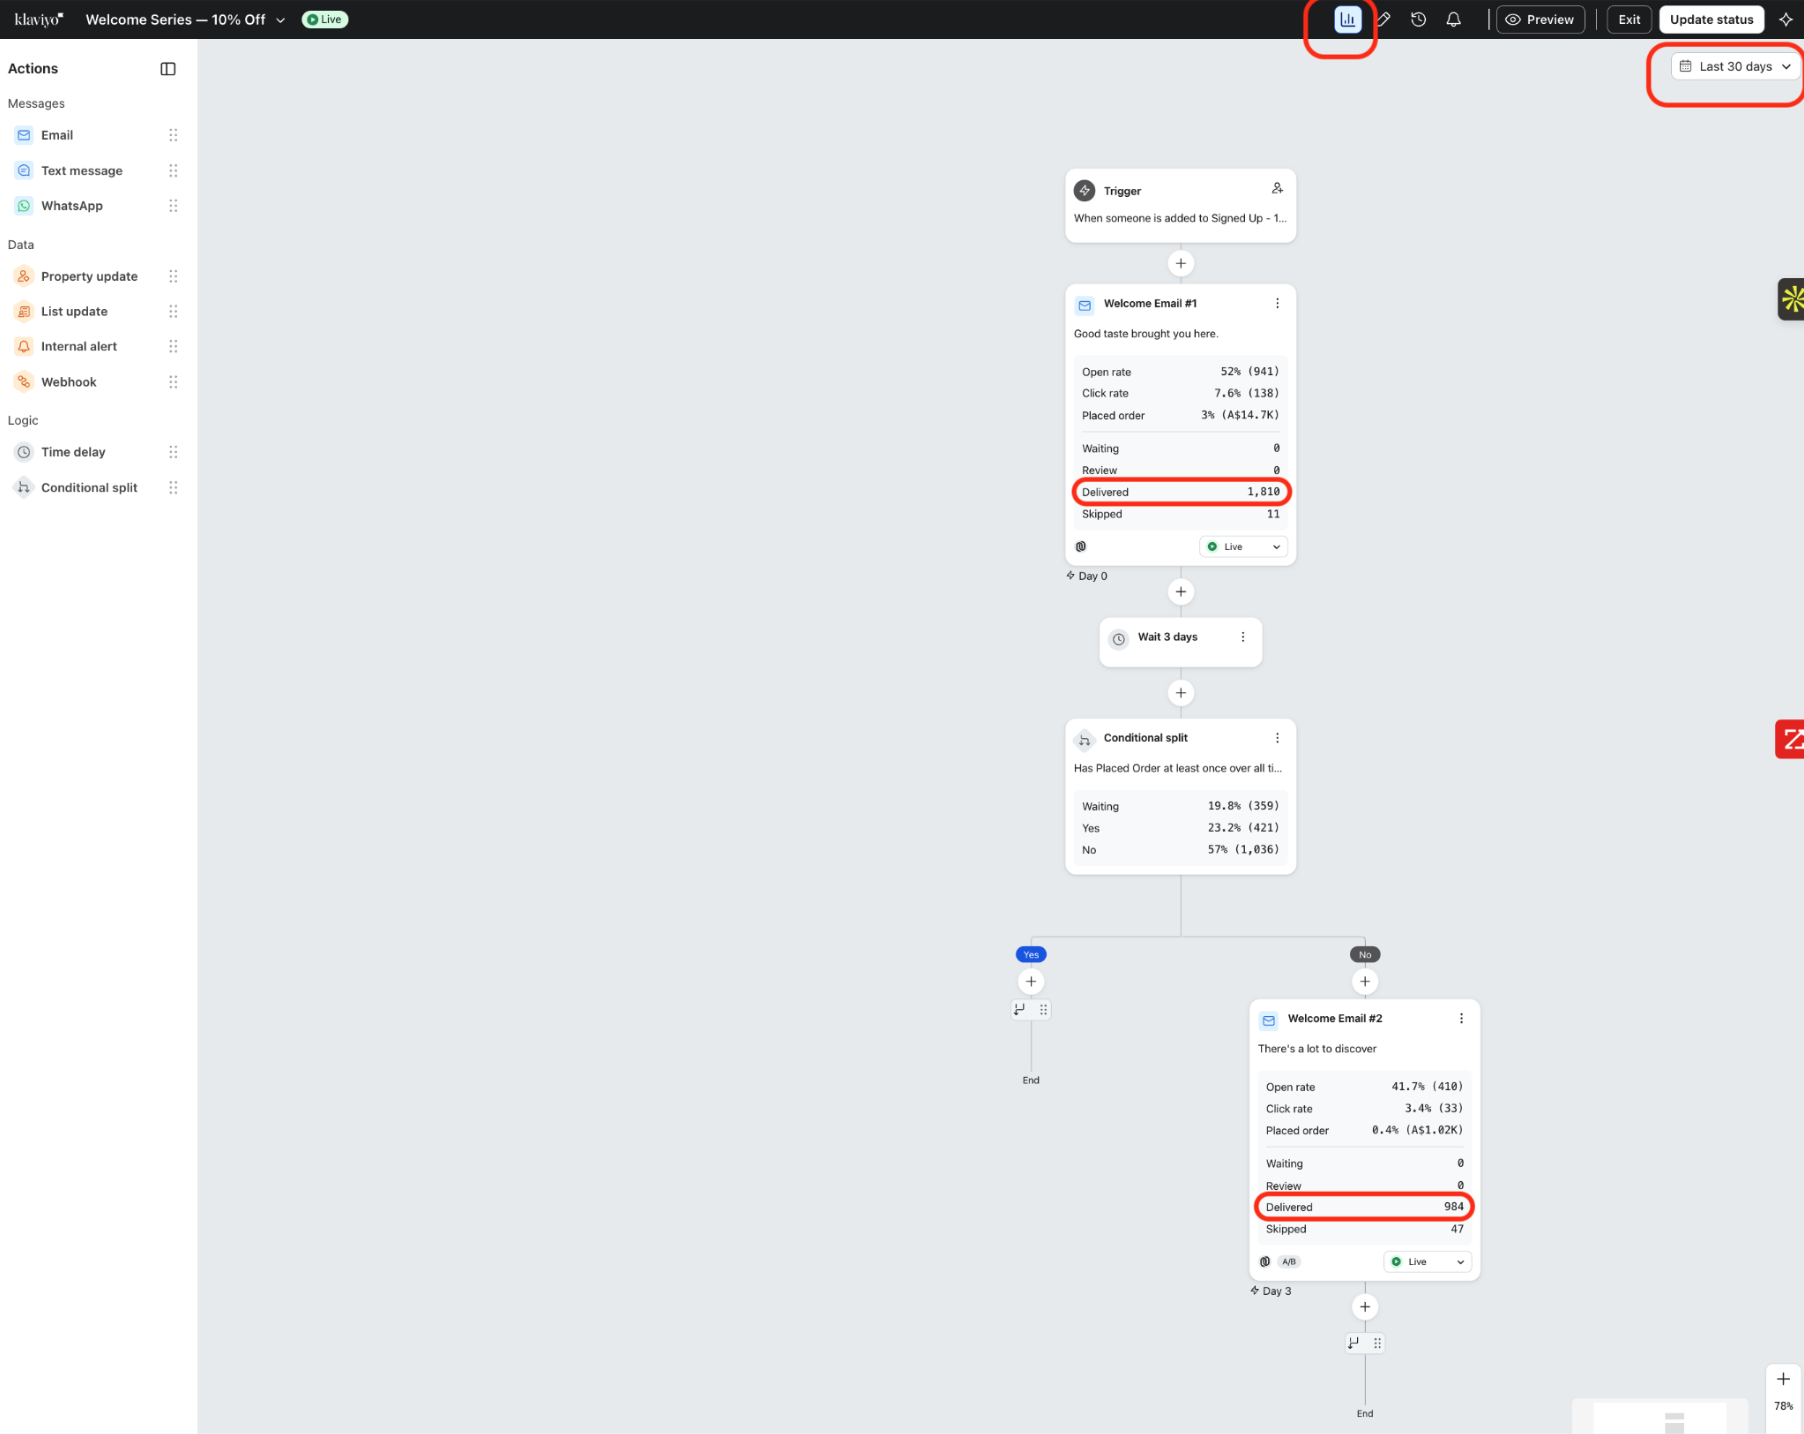 Article URL: https://help.instant.one/sharing-your-email-usage-data-with-instant
Keywords:
## How to manage fallback fonts in your Brand Kit
**How to manage fallback fonts in your Brand Kit**
A fallback font is the web safe font Instant uses when a recipient's email client or browser can't load your custom web font. Every custom font you add needs a fallback so your emails always render in a sensible typeface, no matter where they're opened.
**To add a custom font and set its fallback:**
1. Go to **Brand Kit** and open the **Typography** section
2. Click the typography style you want to update (for example **Heading 1**) to expand it
3. Open the font dropdown showing the current font name
4. Click **Add font**
5. Choose how to add your font using the tabs on the left:
- **Import font** to upload your own file. Enter the **Font Name**, choose the weight and style, then upload your file (WOFF2 format). Use **Add weight** to upload additional weights.
- **Google fonts** to pick from Google's library. Choose your font under **Font name**.
6. Under **Fallback font**, click **Select web safe font** and choose a fallback (Arial, Times New Roman, Helvetica, Georgia, or Verdana)
7. Click **Add font**
Your new font now appears under **Your fonts** in the font dropdown and can be applied to any typography style.
**To change the fallback font for an existing custom font:**
1. Go to **Brand Kit** and open the **Typography** section
2. Open the font dropdown on any typography style
3. Under **Your fonts**, click the **pencil (edit) icon** next to the custom font
4. In the **Edit** window, open the **Fallback font** dropdown and choose a new fallback
5. Use the **Preview** to check how the fallback renders
6. Click **Save changes**
> **Tip:** Web safe fonts are pre-installed on almost every device and email client, which is what makes them reliable fallbacks. Pick the closest match to your custom font's style, for example a serif fallback (Georgia or Times New Roman) for a serif font, or a sans-serif fallback (Arial or Helvetica) for a sans-serif font.
> **Note:** The **Edit** window only lets you change the fallback font. To rename a font, change its weights, or replace the file, remove the font using the **X** next to it in **Your fonts**, then add it again.
> **Note:** After adding or editing a font, click **Save changes** in the top right of your Brand Kit to apply your updates.
**FAQ**
**What is a fallback font?**
It's a web safe font Instant uses when your custom web font can't load in a recipient's email client or browser. It keeps your emails readable everywhere, even where custom fonts aren't supported.
**Why do I need one?**
Some email clients and browsers don't support custom web fonts. Without a fallback, those recipients would see a default system font you haven't chosen. Setting a fallback gives you control over what they see instead.
**Which fonts can I use as a fallback?**
Any of the web safe fonts: Arial, Times New Roman, Helvetica, Georgia, and Verdana. These are the safest choice because they're available on almost every device.
**Can I change a fallback without re-uploading my font?**
Yes. Open the font dropdown, click the **pencil (edit) icon** next to the font under **Your fonts**, and change the fallback there. You don't need to re-upload anything.
**Can I edit anything other than the fallback when editing a font?**
No. The **Edit** window only changes the fallback. To change the font name, weights, or file, remove the font and add it again.
**Do web safe fonts need a fallback?**
No. Web safe fonts are already supported everywhere, so they don't use a fallback. Only custom imported fonts and Google fonts have one.
Article URL: https://help.instant.one/fallback-fonts
Keywords:
## Other resources
If you couldn't find your answer in this document, here are some other things you could try:
- Our privacy policy lives here: https://www.instant.one/legal/privacy-policy
- Our terms and conditions live here: https://www.instant.one/legal/terms-of-service
- We have customer case studies here: https://www.instant.one/case-studies
- Customers can submit support tickets to our team here: https://help.instant.one/kb-tickets/new (ALWAYS look for an answer here before submitting a ticket, though. This is the fastest way to get a resolution to your problem. Encourage your user to look for an answer).
Article URL: https://help.instant.one/sharing-your-email-usage-data-with-instant
Keywords:
## How to manage fallback fonts in your Brand Kit
**How to manage fallback fonts in your Brand Kit**
A fallback font is the web safe font Instant uses when a recipient's email client or browser can't load your custom web font. Every custom font you add needs a fallback so your emails always render in a sensible typeface, no matter where they're opened.
**To add a custom font and set its fallback:**
1. Go to **Brand Kit** and open the **Typography** section
2. Click the typography style you want to update (for example **Heading 1**) to expand it
3. Open the font dropdown showing the current font name
4. Click **Add font**
5. Choose how to add your font using the tabs on the left:
- **Import font** to upload your own file. Enter the **Font Name**, choose the weight and style, then upload your file (WOFF2 format). Use **Add weight** to upload additional weights.
- **Google fonts** to pick from Google's library. Choose your font under **Font name**.
6. Under **Fallback font**, click **Select web safe font** and choose a fallback (Arial, Times New Roman, Helvetica, Georgia, or Verdana)
7. Click **Add font**
Your new font now appears under **Your fonts** in the font dropdown and can be applied to any typography style.
**To change the fallback font for an existing custom font:**
1. Go to **Brand Kit** and open the **Typography** section
2. Open the font dropdown on any typography style
3. Under **Your fonts**, click the **pencil (edit) icon** next to the custom font
4. In the **Edit** window, open the **Fallback font** dropdown and choose a new fallback
5. Use the **Preview** to check how the fallback renders
6. Click **Save changes**
> **Tip:** Web safe fonts are pre-installed on almost every device and email client, which is what makes them reliable fallbacks. Pick the closest match to your custom font's style, for example a serif fallback (Georgia or Times New Roman) for a serif font, or a sans-serif fallback (Arial or Helvetica) for a sans-serif font.
> **Note:** The **Edit** window only lets you change the fallback font. To rename a font, change its weights, or replace the file, remove the font using the **X** next to it in **Your fonts**, then add it again.
> **Note:** After adding or editing a font, click **Save changes** in the top right of your Brand Kit to apply your updates.
**FAQ**
**What is a fallback font?**
It's a web safe font Instant uses when your custom web font can't load in a recipient's email client or browser. It keeps your emails readable everywhere, even where custom fonts aren't supported.
**Why do I need one?**
Some email clients and browsers don't support custom web fonts. Without a fallback, those recipients would see a default system font you haven't chosen. Setting a fallback gives you control over what they see instead.
**Which fonts can I use as a fallback?**
Any of the web safe fonts: Arial, Times New Roman, Helvetica, Georgia, and Verdana. These are the safest choice because they're available on almost every device.
**Can I change a fallback without re-uploading my font?**
Yes. Open the font dropdown, click the **pencil (edit) icon** next to the font under **Your fonts**, and change the fallback there. You don't need to re-upload anything.
**Can I edit anything other than the fallback when editing a font?**
No. The **Edit** window only changes the fallback. To change the font name, weights, or file, remove the font and add it again.
**Do web safe fonts need a fallback?**
No. Web safe fonts are already supported everywhere, so they don't use a fallback. Only custom imported fonts and Google fonts have one.
Article URL: https://help.instant.one/fallback-fonts
Keywords:
## Other resources
If you couldn't find your answer in this document, here are some other things you could try:
- Our privacy policy lives here: https://www.instant.one/legal/privacy-policy
- Our terms and conditions live here: https://www.instant.one/legal/terms-of-service
- We have customer case studies here: https://www.instant.one/case-studies
- Customers can submit support tickets to our team here: https://help.instant.one/kb-tickets/new (ALWAYS look for an answer here before submitting a ticket, though. This is the fastest way to get a resolution to your problem. Encourage your user to look for an answer).
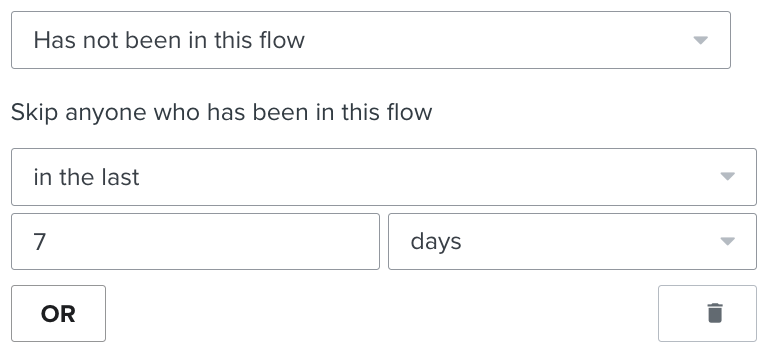
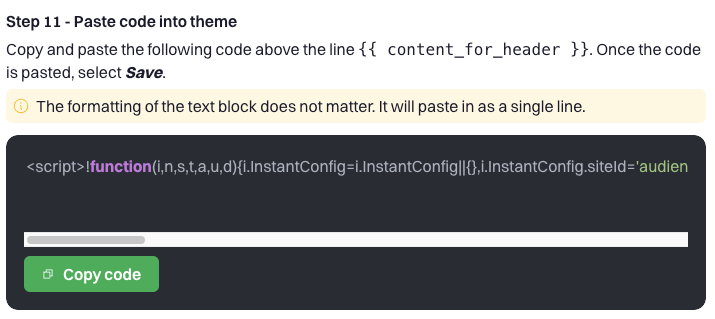
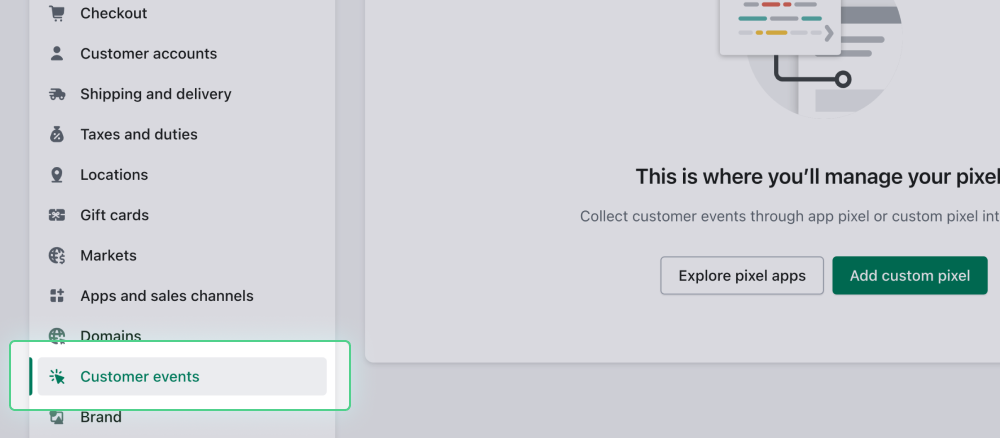
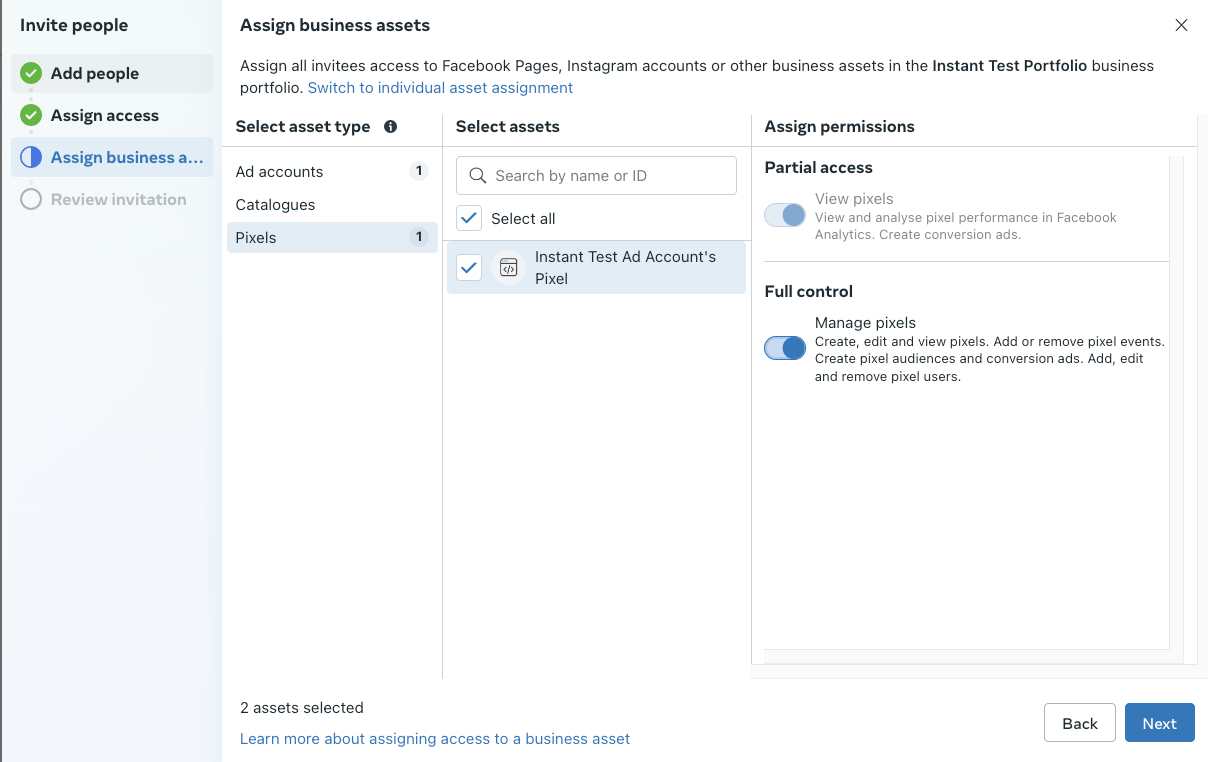
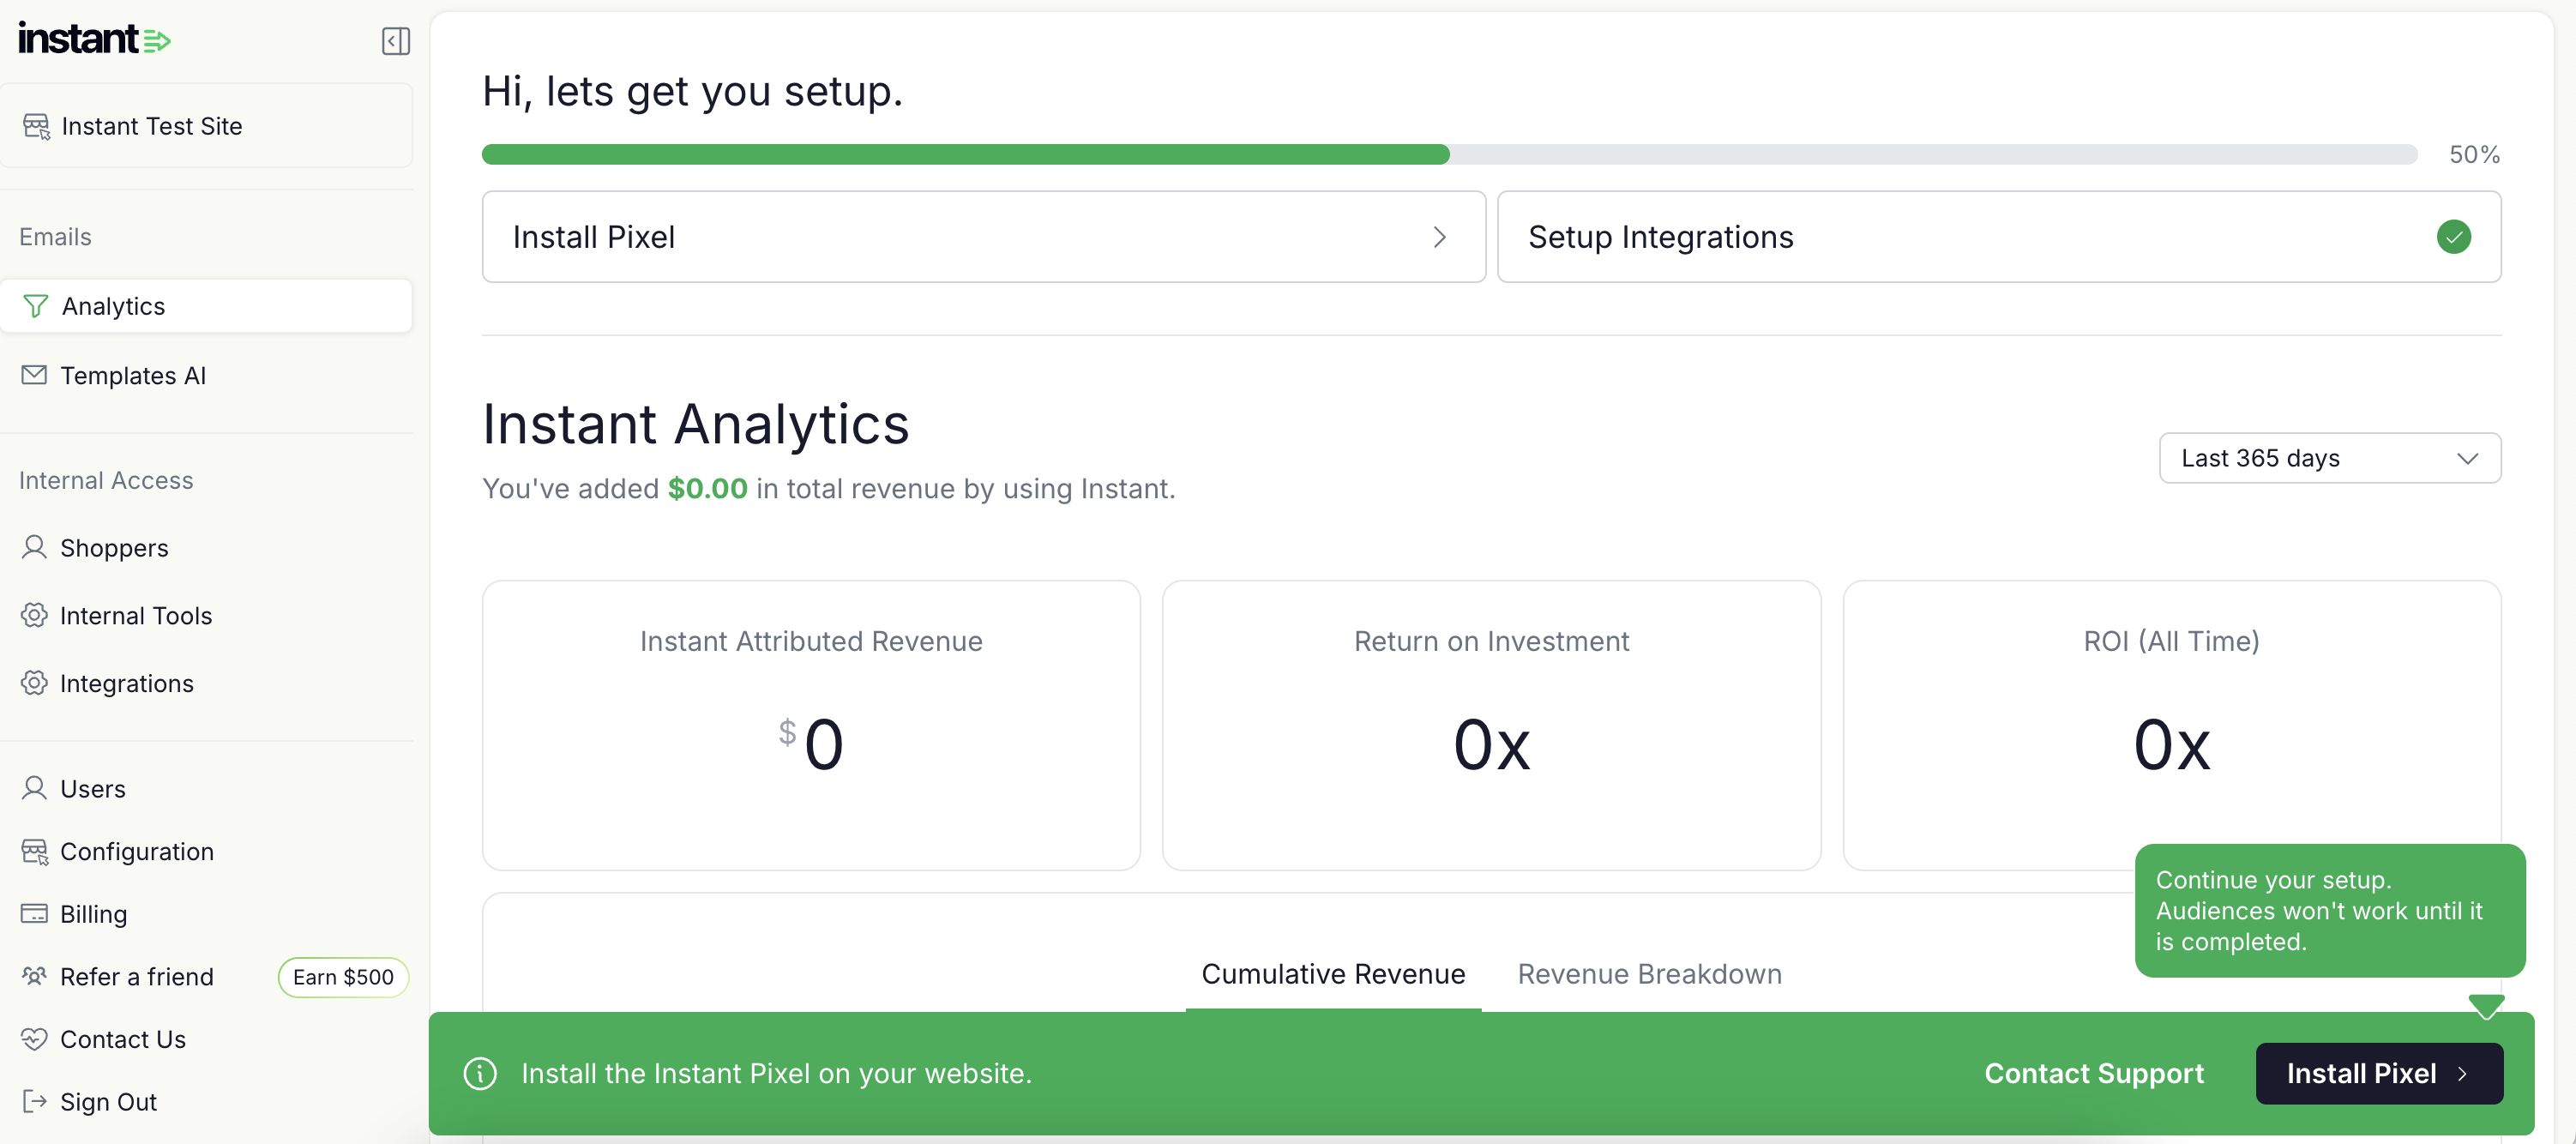
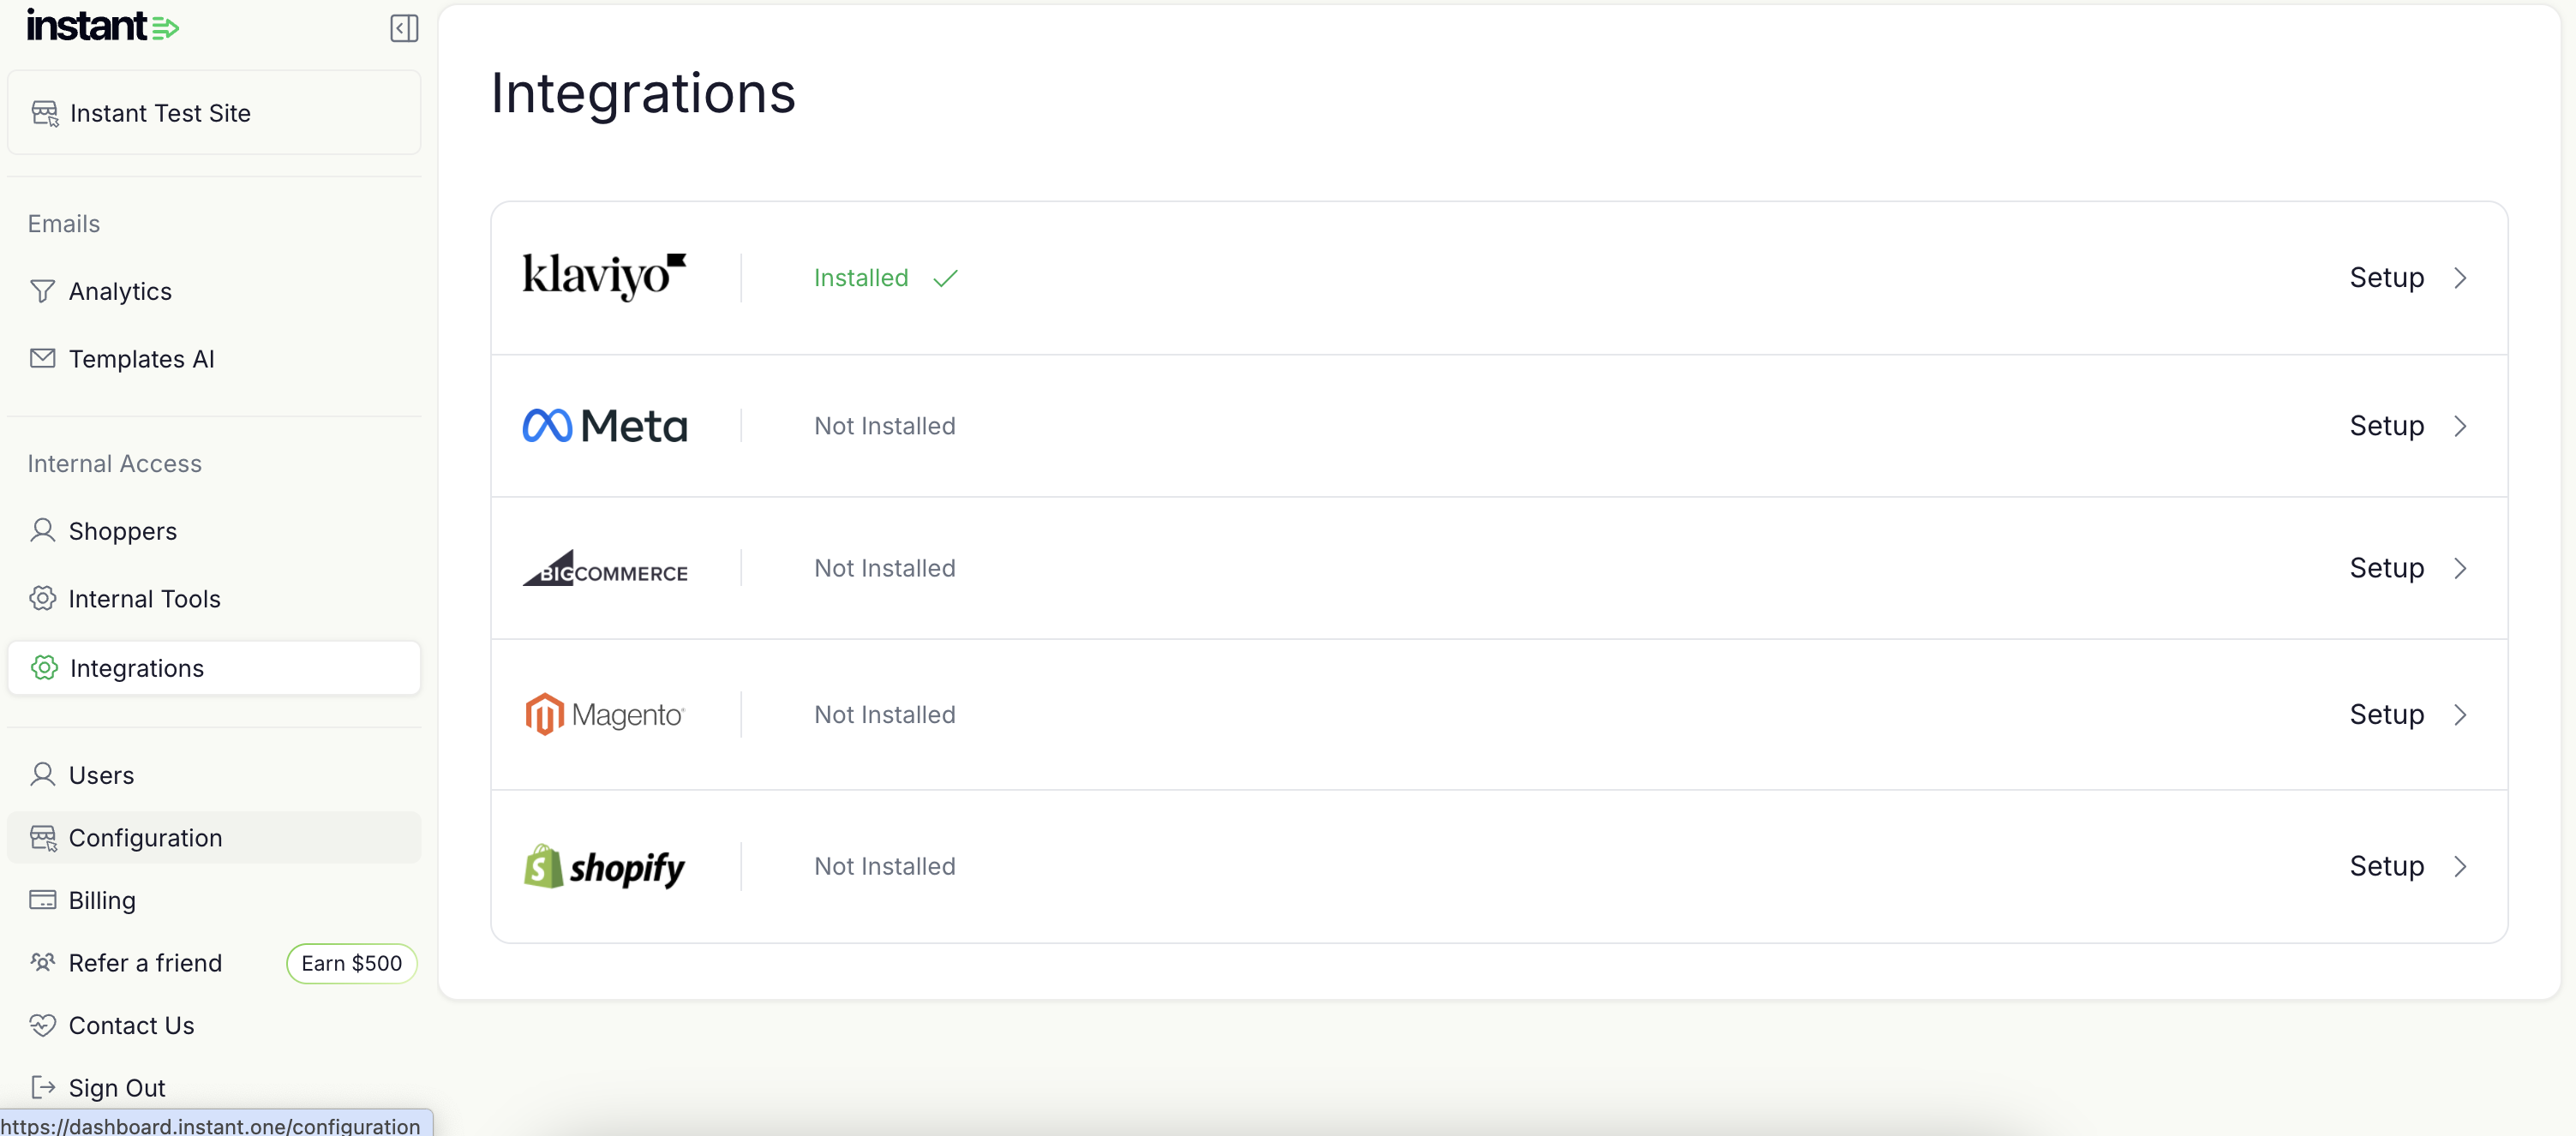
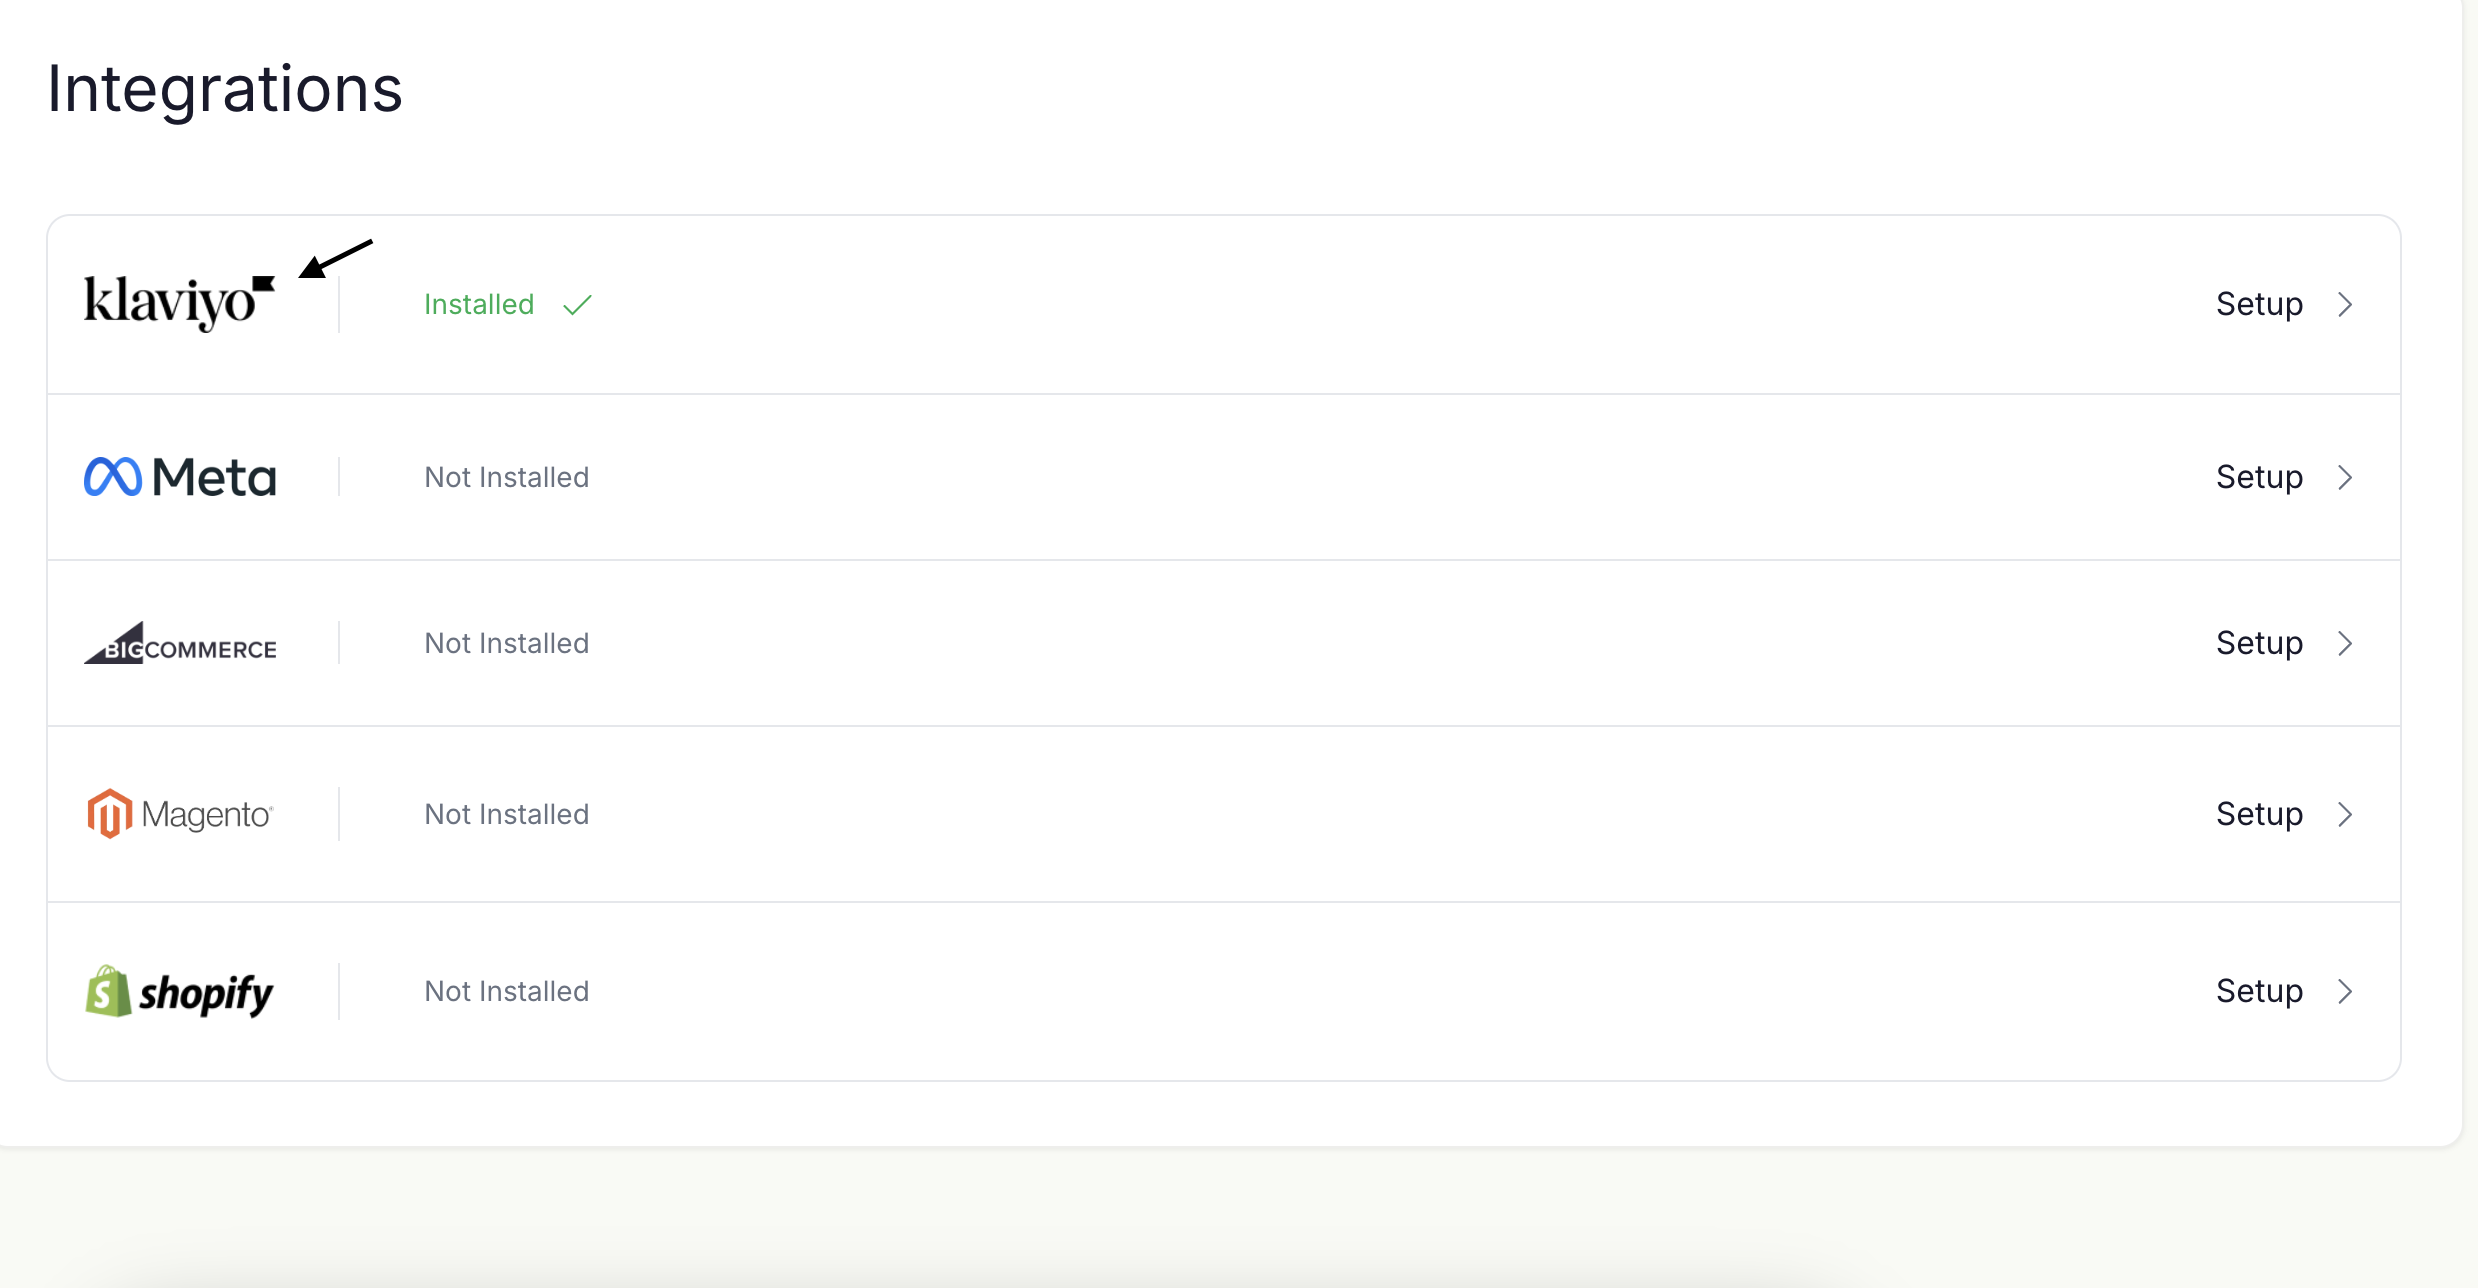
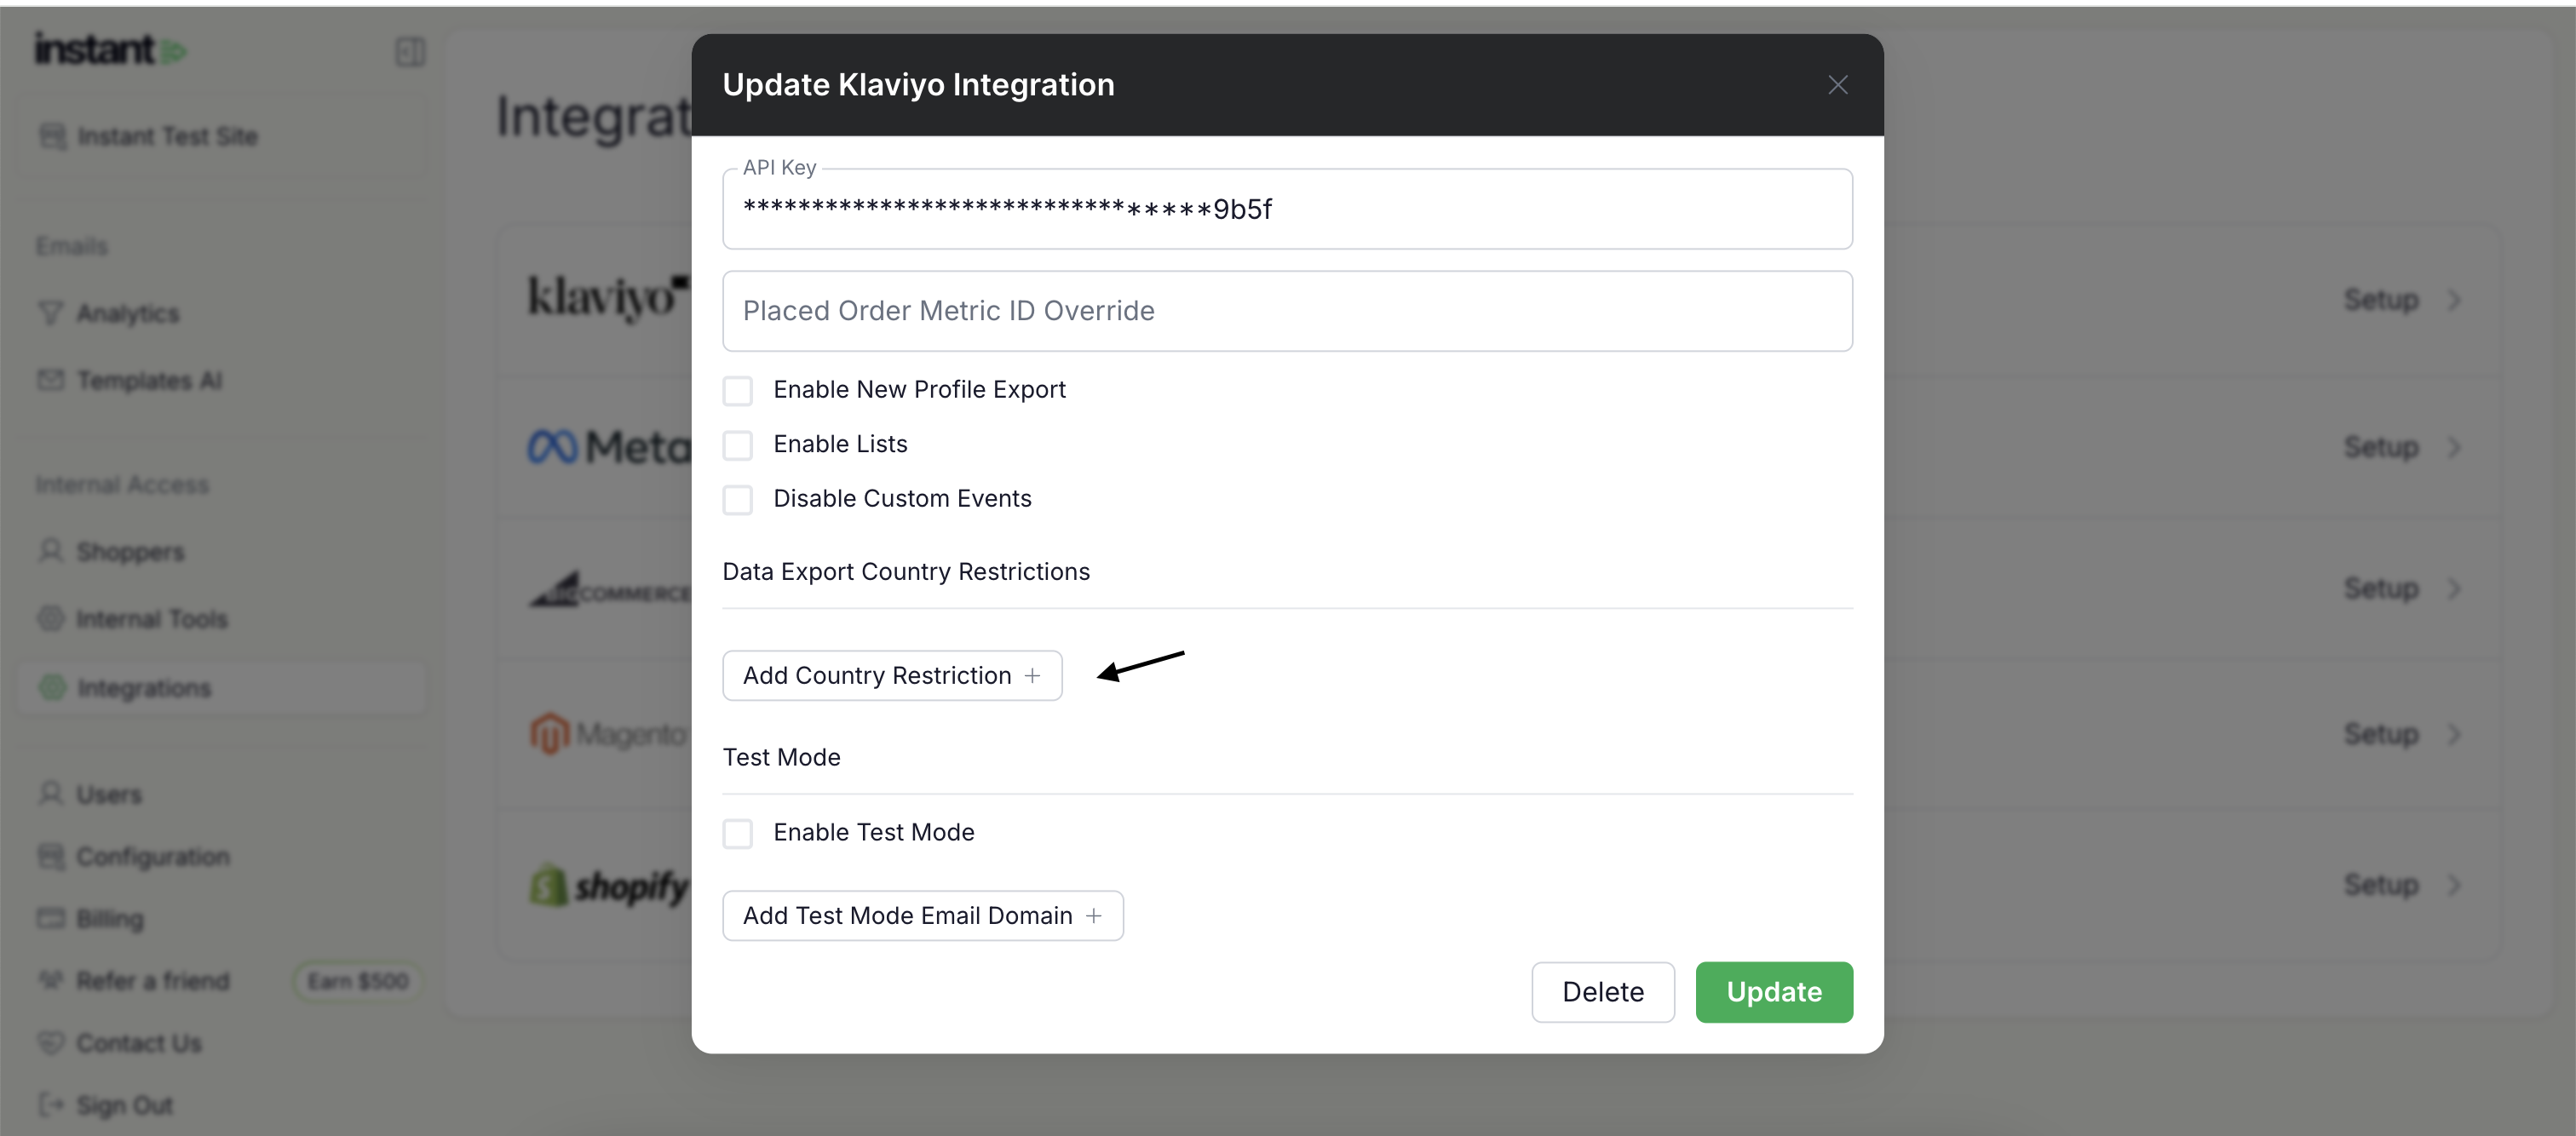
.png)
.png)